
Let's start with a question. How many steps does it take for a new machine to run a regular spring boot project?
1. Download and configure java environment, mysql environment and redis environment (step 6)
2. Initialize mysql database and import sql files (step 2)
3. Download the jar package and start (step 2)
As like as two peas Ling Wancheng's more than 10 steps, which are roughly divided into 00 fragments, and each one is complicated, and changing a machine is exactly the same way to waste time. So today, we introduce the use of docker-compose to complete [docker win (linux)) and one instruction completion.
What is docker?
Based on the problem, simply explain that the environment is a very painful thing in the win10 system. All kinds of software and all kinds of environments, online blogs, how to configure the environment, of course, is to find the big guy around you to drink a cup of milk tea and let him who is proficient in configuring and installing all kinds of software to help you. At the same time, there are many such ideas on the Internet. Let professional people do professional things to save some repetitive and troublesome things, such as knowledge payment, agent looking for resources, Taobao computer remote assistance service and so on.
The idea of docker is based on the above and integrated with the idea of container image (virtual machine). Since someone has configured and gone through the process, I directly encapsulate his process, configured environment and required dependencies (image), and then others can use it and run it directly (similar to script, you can execute it once (image) It can produce the same operation effect as the image publisher), which is stored in the container, and the container can be created multiple times based on the image. This is docker.
This article will build its own docker compose from scratch [containing many big pits]
github repository link [example project]
Docker compose one click operation [example project]
- How to build your own image, and warehouse?
-
- The springboot project is packaged to create an image based on jdk8
- tag the image and upload it to the dockerhub warehouse
- Docker compose construction and solution of various environmental problems.
-
- Create docker compose file
- Pull jar package image - pull mysql image - pull redis image
-
- Container initialization sequence problem solving
- jar package failed to access the database across containers
1. Create a jar package image
1.1 idea packages the springboot project into Jar package
java development foundation. Jar package is the encapsulated spring boot program, which is started with java jar command
The jar can be packaged by maven package
The jar package of this article is: face-0.0.1-SNAPSHOT.jar
1.2 creating images
Create the following files in the same directory as the jar package
Name it Dockerfile. After reading and writing, remember to delete the following txt
# Docker image for springboot file run
# VERSION 1.0.0
# Author: 404name
# The basic image uses java
FROM java:8
# author
MAINTAINER 404name<name404@163.com>
# Mapping file
VOLUME /tmp
# Change your jar package to app.jar
ADD face-0.0.1-SNAPSHOT.jar app.jar
# This refers to the port filled in the jar package, which can be mapped and exposed
EXPOSE 8080
# Startup script
ENTRYPOINT ["java","-Djava.security.egd=file:/dev/./urandom","-jar","/app.jar"]
1.3 building images
First, there must be a docker environment [link]
Run under current directory
docker build -t your_image_name .
for example
docker build -t 404name/sign-in-system:1.0.0 .
Here, 404name corresponds to the user name of my dockerhub, followed by the warehouse Name: version. The dot indicates the current directory
2. Submit image
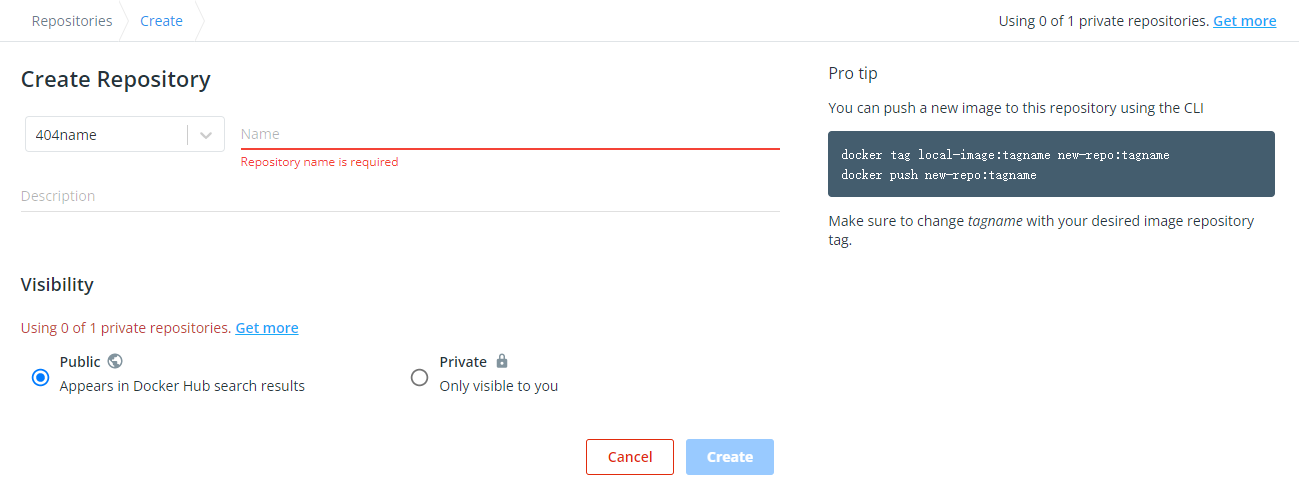
2.1 create warehouse
Docker Hub Log in and register ~ create a warehouse, similar to github
2.2 labeling images
docker tag [REPOSITORY]:[TAG] [repo]/[REPOSITORY]:[TAG]
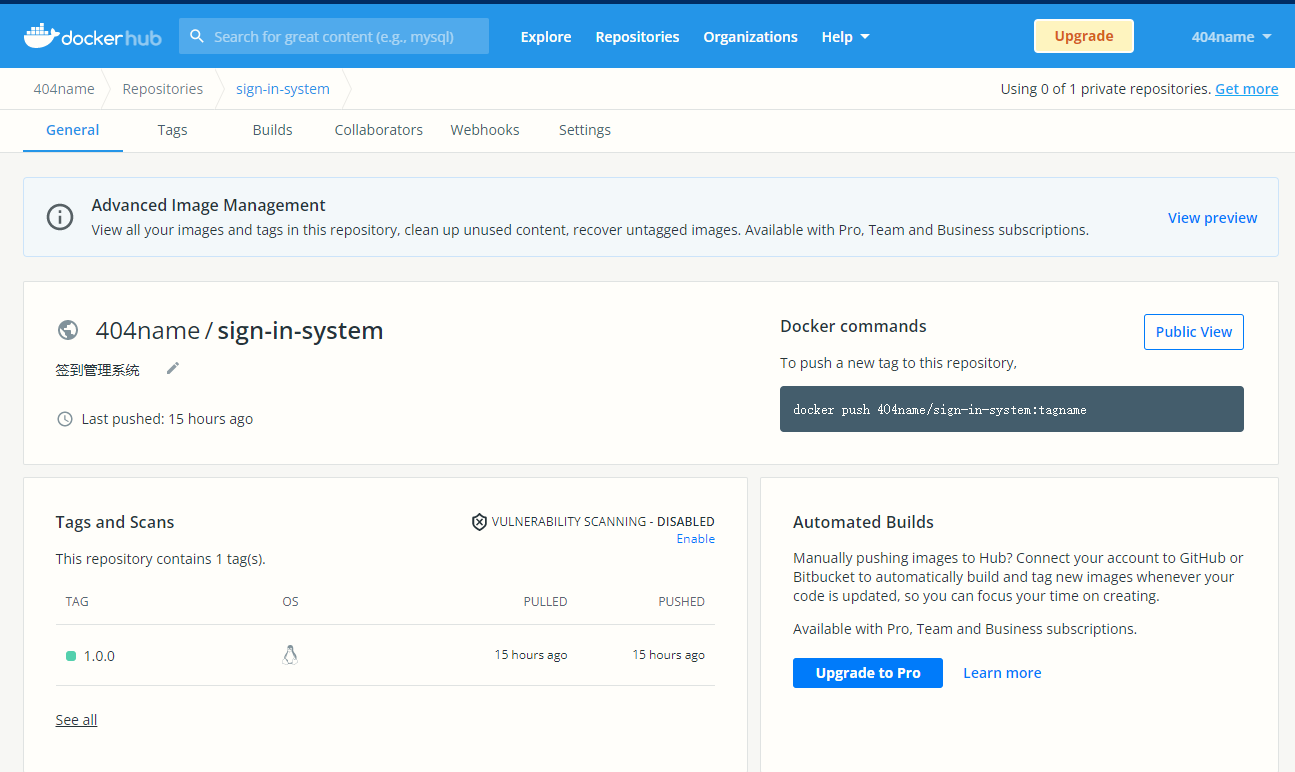
For example, your docker id is 404name, and you created a REPOSITORY called sign in system to submit version 1.0.0
Then: docker tag 404name / sign in system: 1.0.0 404name / sign in system: 1.0.0
2.3 submit after docker login
docker push 404name/sign-in-system:1.0.0
(then you can download it like github)
docker pull helloQMX/test:3
Seeing the above push and pull, have you thought of git? Docker uses similar warehouse management to manage images. Leaders around the world send their encapsulated environment. If others want to use it, docker pull xxx can pull a complex image to run on their own machine.
3. Writing docker compose script
There are many pits, and each step should be understood, illuminated or optimized
Based on the previous java:8 jar package image, it is publicly available for download. Here, write a script to add the mysql + redis environment in the warehouse
- Create docker-compose.yml to write content
- Create a peer folder docker compose
- The subordinate creates / mysql/initdb/xxx.sql. Put the initialization SQL file
- The subordinate creates / redis/redis.conf, and the write configuration is as follows
3.1 configuration content
File directory
├─docker-compose (Map container file)
│  ├─mysql
│  │  ├─conf
│  │  │      my.cnf
│  │  │
│  │  └─initdb
│  │          face_sign_in.sql
│  │
│  └─redis
│          redis.conf
│  docker-compose.yml(Main script)
│  wait-for-it.sh(Listen for other service startup)
wait-for-it.sh (online open source monitoring script)
#!/usr/bin/env bash
# Use this script to test if a given TCP host/port are available

WAITFORIT_cmdname=${0##*/}

echoerr() { if [[ $WAITFORIT_QUIET -ne 1 ]]; then echo "$@" 1>&2; fi }

usage()
{
    cat << USAGE >&2
Usage:
    $WAITFORIT_cmdname host:port [-s] [-t timeout] [-- command args]
    -h HOST | --host=HOST       Host or IP under test
    -p PORT | --port=PORT       TCP port under test
                                Alternatively, you specify the host and port as host:port
    -s | --strict               Only execute subcommand if the test succeeds
    -q | --quiet                Don't output any status messages
    -t TIMEOUT | --timeout=TIMEOUT
                                Timeout in seconds, zero for no timeout
    -- COMMAND ARGS             Execute command with args after the test finishes
USAGE
    exit 1
}

wait_for()
{
    if [[ $WAITFORIT_TIMEOUT -gt 0 ]]; then
        echoerr "$WAITFORIT_cmdname: waiting $WAITFORIT_TIMEOUT seconds for $WAITFORIT_HOST:$WAITFORIT_PORT"
    else
        echoerr "$WAITFORIT_cmdname: waiting for $WAITFORIT_HOST:$WAITFORIT_PORT without a timeout"
    fi
    WAITFORIT_start_ts=$(date +%s)
    while :
    do
        if [[ $WAITFORIT_ISBUSY -eq 1 ]]; then
            nc -z $WAITFORIT_HOST $WAITFORIT_PORT
            WAITFORIT_result=$?
        else
            (echo -n > /dev/tcp/$WAITFORIT_HOST/$WAITFORIT_PORT) >/dev/null 2>&1
            WAITFORIT_result=$?
        fi
        if [[ $WAITFORIT_result -eq 0 ]]; then
            WAITFORIT_end_ts=$(date +%s)
            echoerr "$WAITFORIT_cmdname: $WAITFORIT_HOST:$WAITFORIT_PORT is available after $((WAITFORIT_end_ts - WAITFORIT_start_ts)) seconds"
            break
        fi
        sleep 1
    done
    return $WAITFORIT_result
}

wait_for_wrapper()
{
    # In order to support SIGINT during timeout: http://unix.stackexchange.com/a/57692
    if [[ $WAITFORIT_QUIET -eq 1 ]]; then
        timeout $WAITFORIT_BUSYTIMEFLAG $WAITFORIT_TIMEOUT $0 --quiet --child --host=$WAITFORIT_HOST --port=$WAITFORIT_PORT --timeout=$WAITFORIT_TIMEOUT &
    else
        timeout $WAITFORIT_BUSYTIMEFLAG $WAITFORIT_TIMEOUT $0 --child --host=$WAITFORIT_HOST --port=$WAITFORIT_PORT --timeout=$WAITFORIT_TIMEOUT &
    fi
    WAITFORIT_PID=$!
    trap "kill -INT -$WAITFORIT_PID" INT
    wait $WAITFORIT_PID
    WAITFORIT_RESULT=$?
    if [[ $WAITFORIT_RESULT -ne 0 ]]; then
        echoerr "$WAITFORIT_cmdname: timeout occurred after waiting $WAITFORIT_TIMEOUT seconds for $WAITFORIT_HOST:$WAITFORIT_PORT"
    fi
    return $WAITFORIT_RESULT
}

# process arguments
while [[ $# -gt 0 ]]
do
    case "$1" in
        *:* )
        WAITFORIT_hostport=(${1//:/ })
        WAITFORIT_HOST=${WAITFORIT_hostport[0]}
        WAITFORIT_PORT=${WAITFORIT_hostport[1]}
        shift 1
        ;;
        --child)
        WAITFORIT_CHILD=1
        shift 1
        ;;
        -q | --quiet)
        WAITFORIT_QUIET=1
        shift 1
        ;;
        -s | --strict)
        WAITFORIT_STRICT=1
        shift 1
        ;;
        -h)
        WAITFORIT_HOST="$2"
        if [[ $WAITFORIT_HOST == "" ]]; then break; fi
        shift 2
        ;;
        --host=*)
        WAITFORIT_HOST="${1#*=}"
        shift 1
        ;;
        -p)
        WAITFORIT_PORT="$2"
        if [[ $WAITFORIT_PORT == "" ]]; then break; fi
        shift 2
        ;;
        --port=*)
        WAITFORIT_PORT="${1#*=}"
        shift 1
        ;;
        -t)
        WAITFORIT_TIMEOUT="$2"
        if [[ $WAITFORIT_TIMEOUT == "" ]]; then break; fi
        shift 2
        ;;
        --timeout=*)
        WAITFORIT_TIMEOUT="${1#*=}"
        shift 1
        ;;
        --)
        shift
        WAITFORIT_CLI=("$@")
        break
        ;;
        --help)
        usage
        ;;
        *)
        echoerr "Unknown argument: $1"
        usage
        ;;
    esac
done

if [[ "$WAITFORIT_HOST" == "" || "$WAITFORIT_PORT" == "" ]]; then
    echoerr "Error: you need to provide a host and port to test."
    usage
fi

WAITFORIT_TIMEOUT=${WAITFORIT_TIMEOUT:-15}
WAITFORIT_STRICT=${WAITFORIT_STRICT:-0}
WAITFORIT_CHILD=${WAITFORIT_CHILD:-0}
WAITFORIT_QUIET=${WAITFORIT_QUIET:-0}

# Check to see if timeout is from busybox?
WAITFORIT_TIMEOUT_PATH=$(type -p timeout)
WAITFORIT_TIMEOUT_PATH=$(realpath $WAITFORIT_TIMEOUT_PATH 2>/dev/null || readlink -f $WAITFORIT_TIMEOUT_PATH)

WAITFORIT_BUSYTIMEFLAG=""
if [[ $WAITFORIT_TIMEOUT_PATH =~ "busybox" ]]; then
    WAITFORIT_ISBUSY=1
    # Check if busybox timeout uses -t flag
    # (recent Alpine versions don't support -t anymore)
    if timeout &>/dev/stdout | grep -q -e '-t '; then
        WAITFORIT_BUSYTIMEFLAG="-t"
    fi
else
    WAITFORIT_ISBUSY=0
fi

if [[ $WAITFORIT_CHILD -gt 0 ]]; then
    wait_for
    WAITFORIT_RESULT=$?
    exit $WAITFORIT_RESULT
else
    if [[ $WAITFORIT_TIMEOUT -gt 0 ]]; then
        wait_for_wrapper
        WAITFORIT_RESULT=$?
    else
        wait_for
        WAITFORIT_RESULT=$?
    fi
fi

if [[ $WAITFORIT_CLI != "" ]]; then
    if [[ $WAITFORIT_RESULT -ne 0 && $WAITFORIT_STRICT -eq 1 ]]; then
        echoerr "$WAITFORIT_cmdname: strict mode, refusing to execute subprocess"
        exit $WAITFORIT_RESULT
    fi
    exec "${WAITFORIT_CLI[@]}"
else
    exit $WAITFORIT_RESULT
fi
docker-compose.yml (note below)
version: "3"
# Build service
services:
  # The first service pulls the jar package
  webapp:
    # Just packaged image
    image: 404name/sign-in-system:1.0.0
    ports:
      - "8080:8080"
    volumes:
      # Local files: mapping container files
      - "./wait-for-it.sh:/wait-for-it.sh"
      - "/data"
    links:
      # Create a channel link service so that there is no need to find ip across containers. The jar environment directly uses mysql:3306 link
      - mysql:mysql
      - redis:redis
    # The following two are executed after they are created, but they will not be executed until the following two are created. It is easy to cause the problem that the database has not been initialized
    depends_on:
      - redis
      - mysql
    # Wait for mysql to execute the jar package. If it fails with a small probability, just run it again
    command: ./wait-for-it.sh mysql:3306 --timeout=60

  redis:
    image: redis:latest
    restart: always
    ports:
      - "6379:6379"
    volumes:
      - ./docker-compose/redis/redis.conf:/etc/redis/redis.conf
    command: redis-server /etc/redis/redis.conf

  mysql:
    image: mysql:5.7
    environment:
      MYSQL_DATABASE: face_sign_in
      MYSQL_USER: face_sign_in
      MYSQL_PASSWORD: 123456
      MYSQL_ROOT_PASSWORD: 123456
    expose:
      - 3306
    ports:
      - 3306:3306
    # In order to prevent Chinese garbled code, the following startup parameters are added
    volumes:
      # Start initialization sql file
      - ./docker-compose/mysql/initdb:/docker-entrypoint-initdb.d/
      # db persistence
      - mysql_db:/var/lib/mysql
      # To prevent exceptions in importing sql files, specify the format
      - ./docker-compose/mysql/conf/my.cnf:/etc/my.cnf

volumes:
  mysql_db:
    driver: local
my.cnf
[mysqld]
user=mysql
default-storage-engine=INNODB
character-set-server=utf8mb4
[client]
default-character-set=utf8mb4
[mysql]
default-character-set=utf8mb4
redis.conf
bind 0.0.0.0
protected-mode yes
port 6379
tcp-backlog 511
daemonize no
supervised no
pidfile /var/run/redis_6379.pid
loglevel notice
logfile ""
databases 16
always-show-logo yes
save 900 1
save 300 10
save 60 10000
stop-writes-on-bgsave-error yes
rdbcompression yes
rdbchecksum yes
dbfilename dump.rdb
replica-serve-stale-data yes
repl-diskless-sync no
repl-diskless-sync-delay 5
repl-diskless-load disabled
repl-disable-tcp-nodelay no
replica-priority 100
acllog-max-len 128
lazyfree-lazy-eviction no
lazyfree-lazy-expire no
lazyfree-lazy-server-del no
replica-lazy-flush no
lazyfree-lazy-user-del no
oom-score-adj no
oom-score-adj-values 0 200 800
appendonly no
appendfilename "appendonly.aof"
appendfsync everysec
no-appendfsync-on-rewrite no
auto-aof-rewrite-percentage 100
auto-aof-rewrite-min-size 64mb
aof-load-truncated yes
aof-use-rdb-preamble yes
lua-time-limit 5000
slowlog-log-slower-than 10000
slowlog-max-len 128
latency-monitor-threshold 0
notify-keyspace-events ""
hash-max-ziplist-entries 512
hash-max-ziplist-value 64
list-max-ziplist-size -2
list-compress-depth 0
set-max-intset-entries 512
zset-max-ziplist-entries 128
zset-max-ziplist-value 64
hll-sparse-max-bytes 3000
stream-node-max-bytes 4096
stream-node-max-entries 100
activerehashing yes
client-output-buffer-limit normal 0 0 0
client-output-buffer-limit replica 256mb 64mb 60
client-output-buffer-limit pubsub 32mb 8mb 60
hz 10
dynamic-hz yes
aof-rewrite-incremental-fsync yes
rdb-save-incremental-fsync yes
jemalloc-bg-thread yes
3.2 pit stepping point [attention!]
3.2.1 the mysql database cannot be found after the jar package is started
The database link address cannot be filled in either localhost:3306 or 127.0.0.1. Because containers have their own ip addresses, the external exposure is 127.0.0.1:3306, but local links cannot be used for cross container access
Method 1: find the msql container ip and modify the jar package database link
Method 2: fill in the host ip address for the database link (suitable for servers with public ip)
[the ip address of the above two methods should be determined in advance, so it is not suitable to change the machine, so the third method is troublesome]
Method 3: automatically query mysql
- Set link append first? useSSL=fasle
- For the configuration reference, set the link link to mysql above, and then fill in myqsl:3306 for the database link, so that mysql automatically maps the container ip without filling in it yourself.
3.2.2 incomplete database initialization
You need to specify the character set, utf8mb4 and refer to the above my.cnf folder and warehouse mapping for configuration
3.2.3 the jar package has been started before the database initialization. It is linked to the database, but the table cannot be found
Set the startup sequence, use the wait-for-it.sh script, specify the mysql:3306 response such as jar package, and restart (but if it fails with a small probability, you can start it again)
3.3 operation effect
So far, it has been completed.
The current folder can be completed with one click by running docker compose up (it can also be encapsulated into bat and click Run).

Alicloud hosted image
github is slow and dockerhub is slow. If you want to use gitee, you can try alicloud image hosting~
Alicloud login - welcome to alicloud, a secure and stable cloud computing service platform
1. Log in to alicloud Docker Registry
$ docker login --username=404**** registry.cn-hangzhou.aliyuncs.com
The user name used for login is the full name of the alicloud account, and the password is the password set when the service is opened.
You can modify the credential password on the access credentials page.
2. Pull the image from the Registry
$docker pull registry.cn-hangzhou.aliyuncs.com/404name/test: [image version number]
3. Push the image to Registry
$docker login -- username = 404 * * * * registry.cn-hangzhou.aliyuncs.com ` ` $docker tag [ImageID] registry.cn-hangzhou.aliyuncs.com/404name/test: [image version number] ` ` $docker push registry.cn-hangzhou.aliyuncs.com/404name/test: [image version number]
Please replace the [ImageId] and [image version number] parameters in the example according to the actual image information.
4. Select the appropriate mirror warehouse address
When pushing images from ECS, you can choose to use the intranet address of the image warehouse. The push speed will be improved and your public network traffic will not be lost.
If the machine you are using is located on the classic network, please log in with registry-internal.cn-hangzhou.aliyuncs.com as the domain name of the Registry.
If the machine you are using is located on the VPC network, please log in with registry-vpc.cn-hangzhou.aliyuncs.com as the domain name of the Registry.
5. Examples
Use the "docker tag" command to rename the image and push it to the Registry through the VPC address.
$ docker images``REPOSITORY TAG IMAGE ID CREATED VIRTUAL SIZE``registry.aliyuncs.com/acs/agent 0.7-dfb6816 37bb9c63c8b2 7 days ago 37.89 MB``$ docker tag 37bb9c63c8b2 registry-vpc.cn-hangzhou.aliyuncs.com/acs/agent:0.7-dfb6816
Use the "docker push" command to push the image to the remote.
$ docker push registry-vpc.cn-hangzhou.aliyuncs.com/acs/agent:0.7-dfb6816