Discof Full Text Link under Docker
- Docker Builds a disconf Environment, One of the Trilogy: Building a disconf at a Fast Speed;
- Docker Builds a disconf Environment, Trilogy Two: Local Fast Building a disconf Mirror;
- Docker Builds a disconf Environment, Trilogy 3: Detailed Construction Process;
- Using disconf under Docker: Quick Experience;
- Using disconf under Docker: Detailed demo Development;
Detailed description of the construction process
In the first two chapters, we use remote or local mirrors to quickly experience the process of starting disconf locally. In this chapter, we analyze and comb the entire customization and build process together. After understanding these, we can customize the local disconf environment according to our own needs.
Note the following two points
- The local environment has maven installed, and the bin directory of Maven is configured under the environment variable PATH.
- When compiling and compiling disconf source code, we need to use official shell script, so the operating system of this practice suggests using linux or mac. If using windows, there are three ways: one is to change the shell into bat script, the other is to use linux of virtual machine, and the other is to build a maven container on docker to put the disconf source code on. Compile under this container;
First analyze and then practice
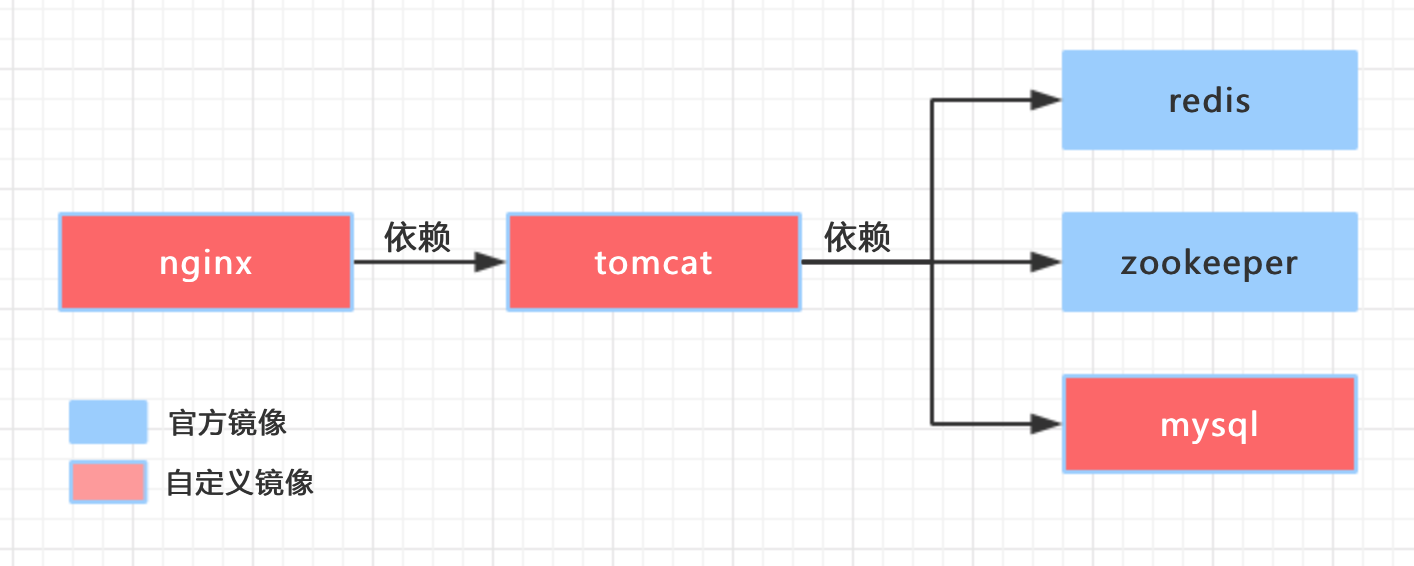
First, list all server s that the disconf environment depends on:
- Redis < no customization, official mirror >
- Zookeeper < no customization, official mirror >
- MySQL < customize, create libraries, tables, import initialization data >
- Tomcat < customization, including business war package, path configuration >
- Nginx < customization, configuration dynamic and static separation, including static web resources >
The next step is to clarify the dependencies between server s (e.g. the business on tomcat needs to connect to mysql database). The dependencies are as follows. If you understand this, you will know how to write the link parameter.
The relationship between server s has been sorted out. Next, we need to customize mysql, tomcat and nginx images. First, we need to prepare materials. disconf is an open source application. We can download the latest source code from git and execute commands:
git clone git@github.com:knightliao/disconf.git
After downloading, open the folder. The contents are as follows:
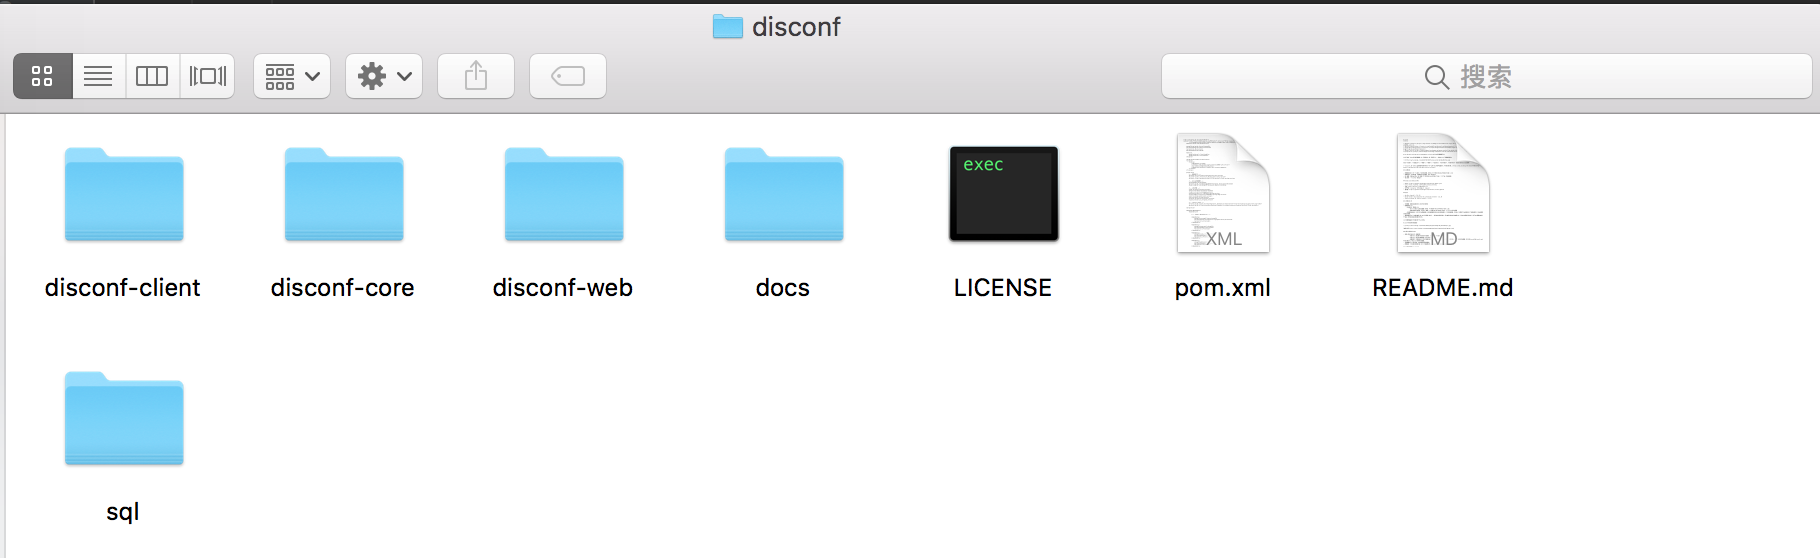
Next, let's start the actual battle. There are five steps in the actual battle: customizing mysql image - > customizing tomcat image - > customizing nginx image - > writing docker-compose script - > docker-compose startup.
Customize mysql image
mysql customization: the purpose is to enable the container to execute sql scripts automatically when creating, create libraries and tables, import initialization data, and implement the method of automatic execution of database scripts on docker. Let mysql in docker automatically execute sql at startup In this article, I will briefly describe the steps:
- Open the disconf source folder and find the following four files in the disconf/disconf-web/sql directory:
0-init_table.sql
1-init_data.sql
201512/20151225.sql
20160701/20160701.sql
- Create a new directory mysql, copy the four sql files mentioned above into this directory, and create a new script named install_data.sh, which reads as follows:
#!/bin/bash
mysql -uroot -p$MYSQL_ROOT_PASSWORD <<EOF
source $WORK_PATH/$FILE_0;
source $WORK_PATH/$FILE_1;
source $WORK_PATH/$FILE_2;
source $WORK_PATH/$FILE_3;
The content is very simple, that is, automatically log in to mysql, password is the environment variable passed in when docker starts, and then execute four sql script files.
- Create a new Dockerfile file in the mysql directory, which reads as follows:
# Docker image of disconf mysql
# VERSION 0.0.1
# Author: bolingcavalry

#The basic image uses daocloud.io/library/mysql:8
FROM daocloud.io/library/mysql:8

#author
MAINTAINER BolingCavalry <zq2599@gmail.com>

#Define working directories
ENV WORK_PATH /usr/local/work

#Define directories that will be automatically executed by containers
ENV AUTO_RUN_DIR /docker-entrypoint-initdb.d

#Define sql file name
ENV FILE_0 0-init_table.sql
ENV FILE_1 1-init_data.sql
ENV FILE_2 20151225.sql
ENV FILE_3 20160701.sql

#Define shell file name
ENV INSTALL_DATA_SHELL install_data.sh

#create folder
RUN mkdir -p $WORK_PATH

#Copy the files of database initialization data to the working directory
COPY ./$FILE_0 $WORK_PATH/
COPY ./$FILE_1 $WORK_PATH/
COPY ./$FILE_2 $WORK_PATH/
COPY ./$FILE_3 $WORK_PATH/

#Put the shell file to be executed in the / docker-entrypoint-initdb.d/ directory, and the container will execute the shell automatically.
COPY ./$INSTALL_DATA_SHELL $AUTO_RUN_DIR/

#Added Executable Permissions to Execution Files
RUN chmod a+x $AUTO_RUN_DIR/$INSTALL_DATA_SHELL
- Open the terminal and execute the following commands in the mysql directory to build the msql image:
docker build -t conf_mysql:0.0.1 .
Successful construction of msql image
Custom tomcat image
When building tomcat image, the most important thing is to generate war package. The steps are as follows:
- Create two folders and set them to ONLINE_CONFIG_PATH and WAR_ROOT_PATH respectively. The settings of environment variables are different under different operating systems. I use mac. The configuration is to add the following contents into ~/.bash_profile file (remember to execute source ~/.bash_profile to make environment after writing). Variables take effect in the current command line window:
ONLINE_CONFIG_PATH=/Users/zq2599/temp/201705/03/005/online-resources
WAR_ROOT_PATH=/Users/zq2599/temp/201705/03/005/war
export ONLINE_CONFIG_PATH
export WAR_ROOT_PATH
/ Users/zq2599/temp/201705/03/005/online-resources and/Users/zq2599/temp/201705/03/005/war are newly created folders.
- Open the subdirectory disconf-web/profile/rd of the source file of disconf. The files in the subdirectory are as follows:
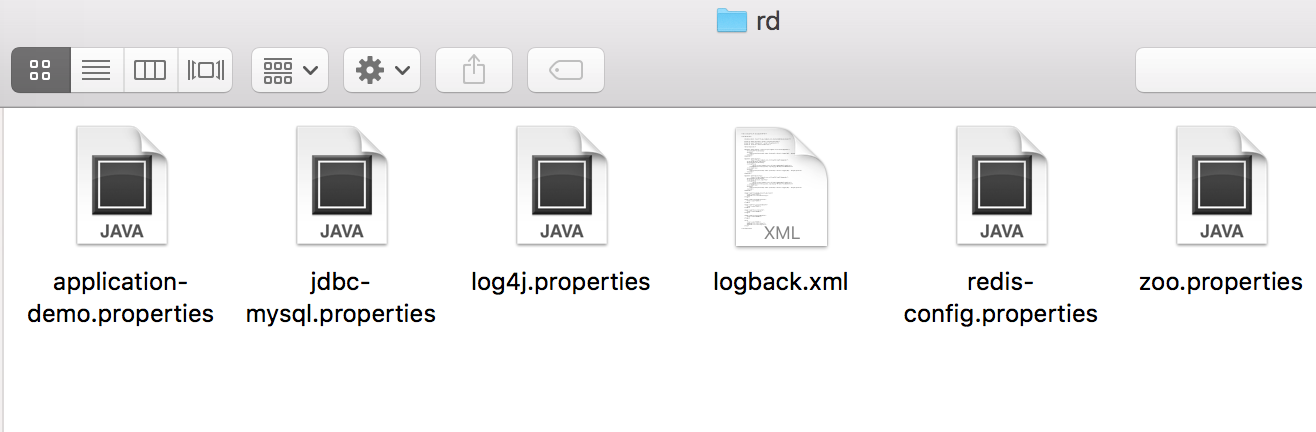
Copy all these files to the directory corresponding to ONLINE_CONFIG_PATH variable, and modify the three files in turn: jdbc-mysql.properties, redis-config.properties, zoo.properties:
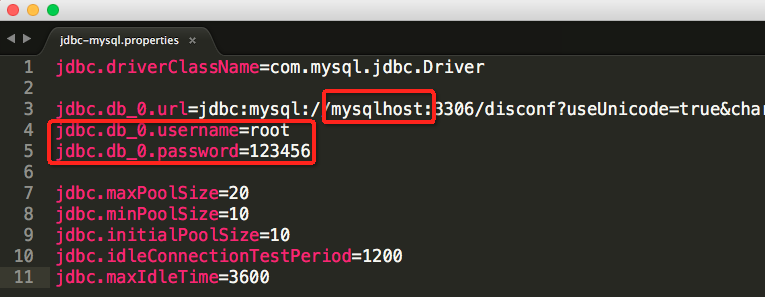
The changes of jdbc-mysql.properties are as follows: the data url is changed to a fixed name mysqlhost, which is the same as the alias in the link parameter in the docker run, and the user name password of the database.
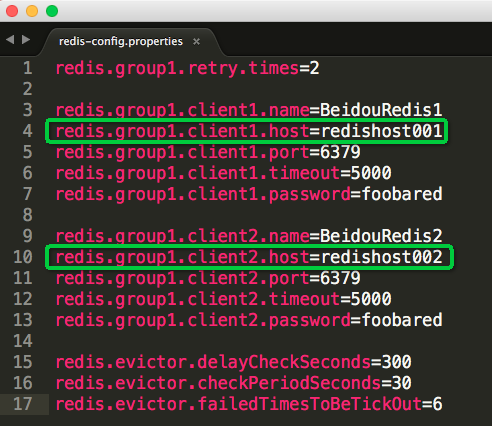
The changes to redis-config.properties are shown below, mainly the host parameter, aligned with the alias of the link parameter at docker run. Note that two redis are configured here.
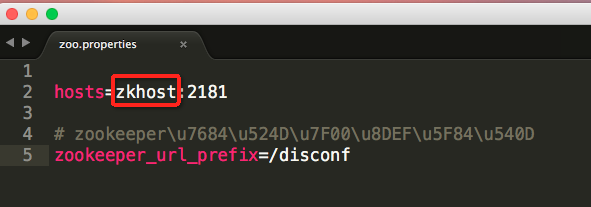
The configuration of zoo.properties is shown below, mainly the host parameter, aligned with the alias of the link parameter at docker run:
Rename the application-demo.properties file to application.properties
Okay, once you've done the parameter modification, tomcat will be able to connect to the corresponding container at run time with these host configurations that are consistent with the link parameters.
Now we use maven to compile and package the disconf source code, and use the terminal to enter the disconf-web subdirectory of the disconf source code, and execute the following commands to start compiling and packaging:
sh deploy/deploy.sh
After execution, you can see the results of compilation and packaging in the directory corresponding to the environment variable WAR_ROOT_PATH, as follows:
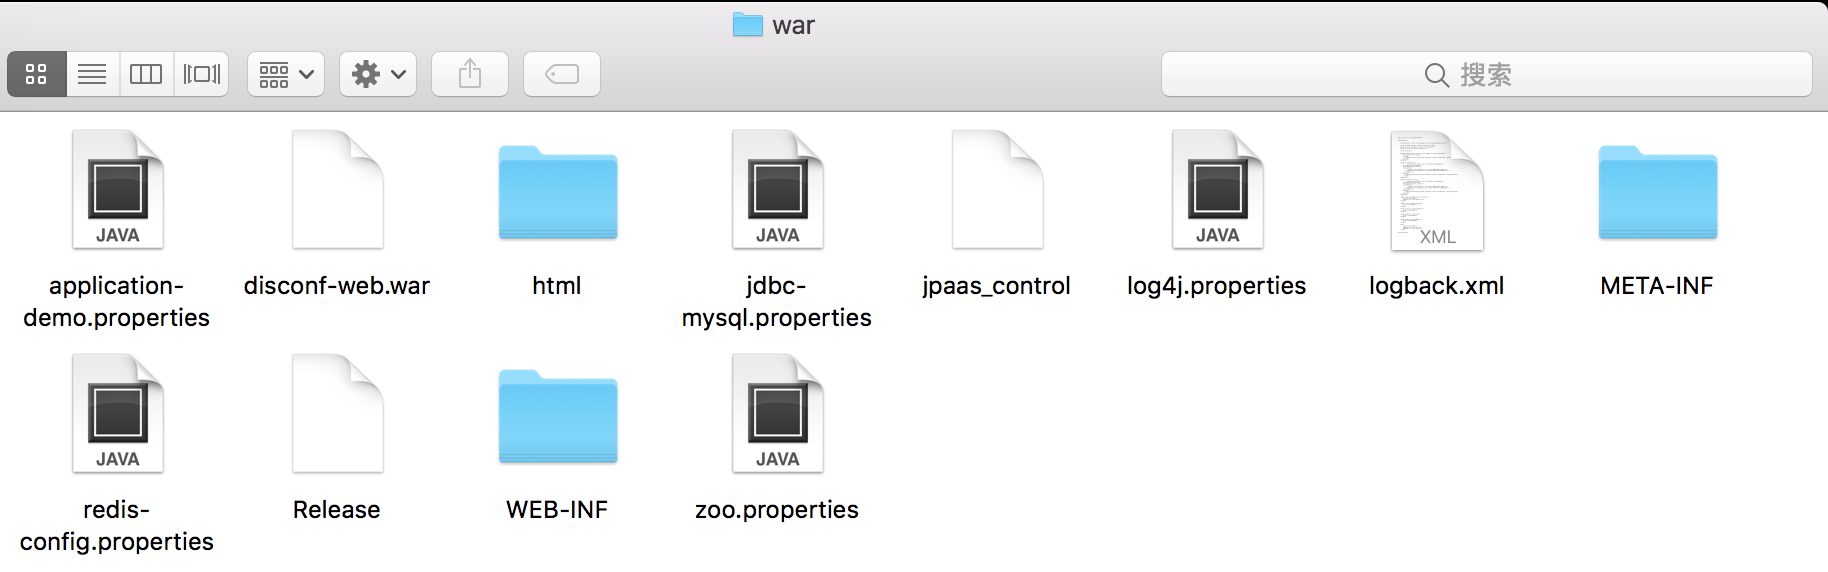
Create a new folder named tomcat, copy the disconf-web.war in the picture above to this folder, and add a new server.xml file here, which is as follows, to specify the application corresponding to the root path of Tomcat service:
<?xml version='1.0' encoding='utf-8'?>
<Server port="8005" shutdown="SHUTDOWN">
<Listener className="org.apache.catalina.startup.VersionLoggerListener" />
<Listener className="org.apache.catalina.core.AprLifecycleListener" SSLEngine="on" />
<Listener className="org.apache.catalina.core.JasperListener" />
<Listener className="org.apache.catalina.core.JreMemoryLeakPreventionListener" />
<Listener className="org.apache.catalina.mbeans.GlobalResourcesLifecycleListener" />
<Listener className="org.apache.catalina.core.ThreadLocalLeakPreventionListener" />
<GlobalNamingResources>
<Resource name="UserDatabase" auth="Container"
type="org.apache.catalina.UserDatabase"
description="User database that can be updated and saved"
factory="org.apache.catalina.users.MemoryUserDatabaseFactory"
pathname="conf/tomcat-users.xml" />
</GlobalNamingResources>
<Service name="Catalina">
<Connector port="8080" protocol="HTTP/1.1"
connectionTimeout="20000"
redirectPort="8443" />
<Connector port="8009" protocol="AJP/1.3" redirectPort="8443" />
<Engine name="Catalina" defaultHost="localhost">
<Realm className="org.apache.catalina.realm.LockOutRealm">
<Realm className="org.apache.catalina.realm.UserDatabaseRealm"
resourceName="UserDatabase"/>
</Realm>
<Host name="localhost" appBase="webapps"
unpackWARs="true" autoDeploy="true">
<Valve className="org.apache.catalina.valves.AccessLogValve" directory="logs"
prefix="localhost_access_log." suffix=".txt"
pattern="%h %l %u %t "%r" %s %b" />
<Context path="" docBase="/usr/local/tomcat/webapps/disconf-web" debug="0" reloadable="true" crossContext="true"/>
</Host>
</Engine>
</Service>
</Server>Compared with the server.xml file in the official tomcat, this configuration information only adds the following node:
<Context path="" docBase="/usr/local/tomcat/webapps/disconf-web" debug="0" reloadable="true" crossContext="true"/>
Add a new Dockerfile file under the tomcat folder, which reads as follows:
# Docker image of disconf tomcat
# VERSION 0.0.1
# Author: bolingcavalry

#Basic mirror using tomcat:7.0.77-jre8
FROM tomcat:7.0.77-jre8

#author
MAINTAINER BolingCavalry <zq2599@gmail.com>

#Define working directories
ENV TOMCAT_BASE /usr/local/tomcat


#Copy configuration files
COPY ./server.xml $TOMCAT_BASE/conf/

#Copy war package
COPY ./disconf-web.war $TOMCAT_BASE/webapps/

#Add read permissions to configuration files
RUN chmod a+xr $TOMCAT_BASE/conf/server.xml

#Delete the default ROOT file
RUN rm -rf $TOMCAT_BASE/webapps/ROOT
You can see that Dockerfile does not do many things, such as copying the war package, copying server.xml, deleting the default ROOT application folder and so on.
Now open the terminal and execute the following commands in the tomcat directory to build the tomcat image:
docker build -t conf_tomcat:0.0.1 .
tomcat image construction is successful!
Constructing nginx Mirror
- Create a new nginx directory and add a new nginx.conf file to it. The contents are as follows:
user  nginx;
worker_processes  1;

error_log  /var/log/nginx/error.log warn;
pid        /var/run/nginx.pid;


events {
    worker_connections  1024;
}


http {
    include       /etc/nginx/mime.types;
    default_type  application/octet-stream;

    log_format  main  '$remote_addr - $remote_user [$time_local] "$request" '
                      '$status $body_bytes_sent "$http_referer" '
                      '"$http_user_agent" "$http_x_forwarded_for"';

    access_log  /var/log/nginx/access.log  main;

    sendfile        on;
    #tcp_nopush     on;

    keepalive_timeout  65;

    #gzip  on;

    #include /etc/nginx/conf.d/*.conf;


    upstream disconf {
        server tomcathost:8080;
    }

    server {
        listen   80;
        server_name localhost;
        access_log logs/disconf_access.log;
        error_log logs/disconf_error.log;

        location / {
            root /usr/local/work/html;
            if ($query_string) {
                expires max;
            }
        }

        location ~ ^/(api|export) {
            proxy_pass_header Server;
            proxy_set_header Host $http_host;
            proxy_redirect off;
            proxy_set_header X-Real-IP $remote_addr;
            proxy_set_header X-Scheme $scheme;
            proxy_pass http://disconf;
        }
    }

}
There are three main configurations:
Annotate the default / etc/nginx/conf.d/*.conf configuration;
Adding the host information of tomcat, the alias of "tomcathost" is consistent with the link parameter of docker run.
In the configuration of dynamic and static separation, if there are api and export in the request url, nginx forwards the request to tomcathost:8080, and other requests directly access the / usr/local/work/html folder of the nginx server.
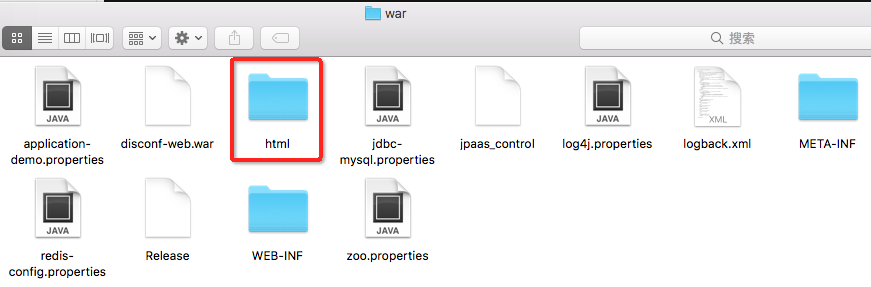
- In the directory corresponding to the environment variable WAR_ROOT_PATH, there is an html folder located in the red box as shown below. This is all static files of the web project. Copy this folder to the newly created nginx directory:
- Add a new Dockerfile file under the nginx folder, which reads as follows:
# Docker image of disconf nginx
# VERSION 0.0.1
# Author: bolingcavalry

#The basic image uses nginx:stable:
FROM nginx:stable

#author
MAINTAINER BolingCavalry <zq2599@gmail.com>

#Define working directories
ENV WORK_PATH /usr/local/work/html

#Define the directory where the nginx configuration file is located
ENV NGINX_CONF_DIR /etc/nginx

#Define nginx configuration file name
ENV NGINX_CONF_FILE_NAME nginx.conf

#Create working folders
RUN mkdir -p $WORK_PATH

#Create nginx Log Folder
RUN mkdir -p /etc/nginx/logs/

#Copy nginx configuration file
COPY ./$NGINX_CONF_FILE_NAME $NGINX_CONF_DIR/

#Copy static resource files of web pages
COPY ./html $WORK_PATH/

#Add read permissions to configuration files
RUN chmod a+xr $NGINX_CONF_DIR/$NGINX_CONF_FILE_NAME
- Now open the terminal and execute the following commands in the nginx directory to build the nginx image:
docker build -t conf_nginx:0.0.1 .
nginx mirror construction is successful!
Write docker-compose script
Add a new docker-compose.yml file (location does not matter), which reads as follows:
version: '2'
services:
  disconf_redis_1:
    image: daocloud.io/library/redis
    restart: always
  disconf_redis_2:
    image: daocloud.io/library/redis
    restart: always
  disconf_zookeeper:
    image: zookeeper:3.3.6
    restart: always
  disconf_mysql:
    image: conf_mysql:0.0.1
    environment:
      MYSQL_ROOT_PASSWORD: 123456
    restart: always
  disconf_tomcat:
    image: conf_tomcat:0.0.1
    links:
      - disconf_redis_1:redishost001
      - disconf_redis_2:redishost002
      - disconf_zookeeper:zkhost
      - disconf_mysql:mysqlhost
    restart: always
  disconf_nginx:
    image: conf_nginx:0.0.1
    links:
      - disconf_tomcat:tomcathost
    ports:
      - "80:80"
    restart: always
According to the dependencies we initially sorted out, start two redis official images, one zookeeper official image, and then start the customized msyql image. Then Tomcat starts and associates redis, zookeeper, mysql and other containers through link. Finally, customized nginx starts, link associates tomcat, and port 80 of nginx container maps to The current computer's 80 ports;
Start all containers
In the directory where the docker-compose.yml file is located, execute the command:
docker-compose up -d
The terminal will show that the containers are starting. As shown below, the name of each container is prefixed and suffixed by docker-compose:

Tomcat application startup takes a little time. We can view the Tomcat startup log through the docker logs-f disconf_disconf_tomcat_1 command. disconf_disconf_tomcat_1 is the container name, as shown in the red box in the figure above.
After startup, enter localhost on browser, you can see familiar disconf login page, username admin, password admin. Log in and try it.
So far, the construction of the disconf environment trilogy has come to an end, from experience to personal configuration step by step, we can customize a disconf environment for ourselves according to our own requirements.
In the following article, let's take a practical look at the use of disconf system and experience the convenience of dynamic configuration for business.
Welcome to my public number