Content of this paper
- Problems solved by Docker
- Docker discussion
- Docker common commands
- Brief description of Docker image, network and data volume
- DockerFile
- DockerCompose
- Container orchestration Swarm and k8s
Note: the content of this article comes from the Docker video summary of crazy God talking java in station B.
1, Why did Docker appear
of course, it was to make money, so several dockers set up dotcloud company, but because they didn't have popularity and couldn't make money, they opened the project for the company's future. Soon, more and more people released the advantages of docker and became popular.
what are the advantages of Docker, or what problems it solves?
- It solves the problem of inconsistent running environment (avoiding the embarrassment that the program can run on my computer but can't run on your computer), which also makes Devops (development, operation and maintenance) easier.
- Docker uses virtualization technology at the operating system level to directly isolate the running containers from each other, and all have their own file systems, but they all use the server kernel to make the best use of server resources;
2, Docker common commands
2.1. Docker installation
See details linux basic operation 2.10.3 install docker using Yum or up2date , or view Official website document.
2.2 operation principle of Docker
the Docker engine runs directly on the host operating system. It does not need to virtualize hardware resources like the virtual machine and load the operating system kernel. It can make full use of hardware resources and start very fast.
Docker structure:
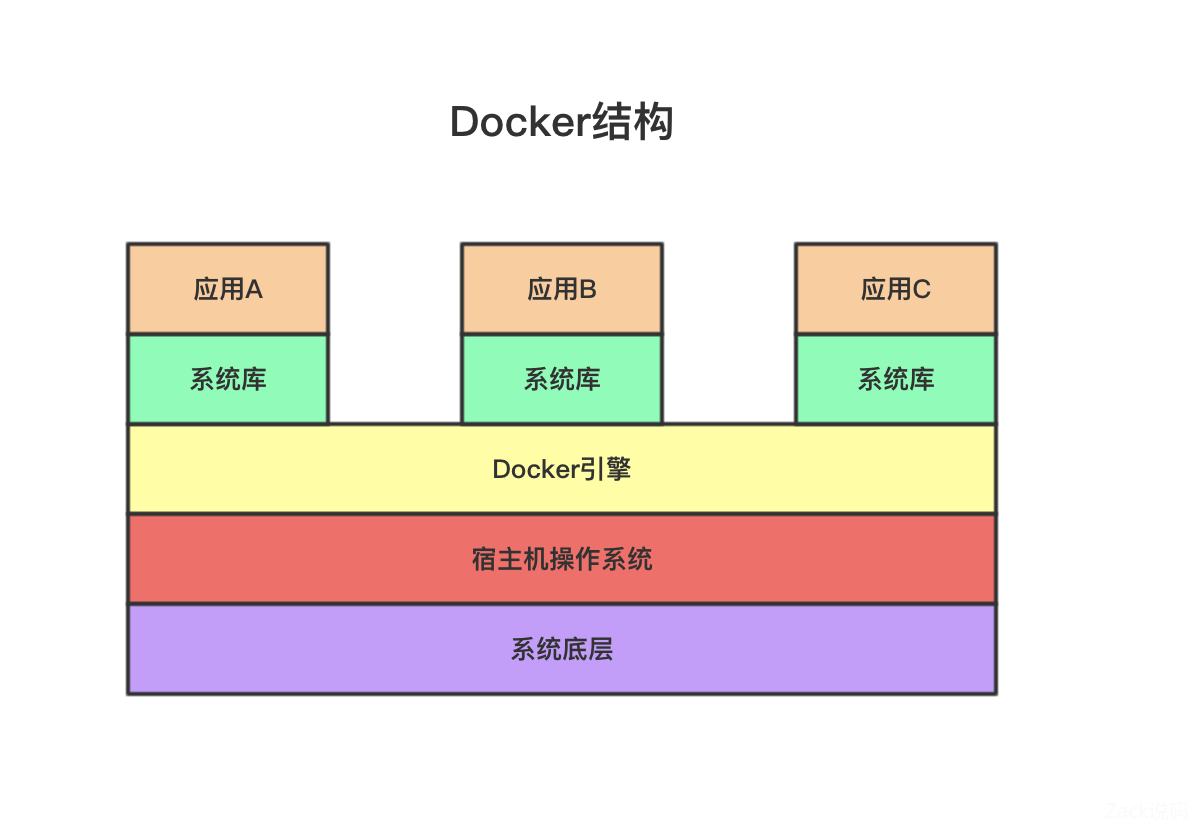
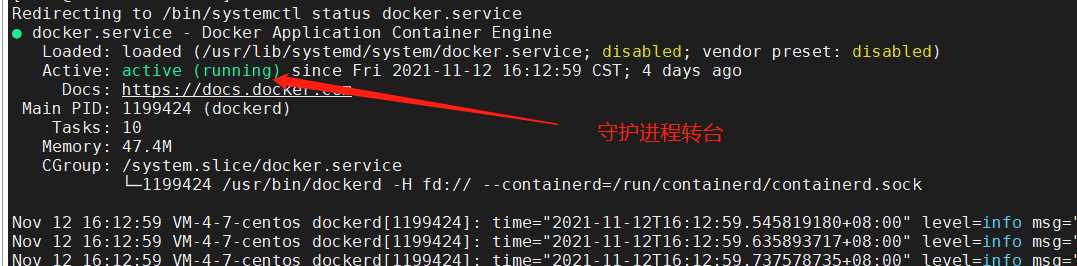
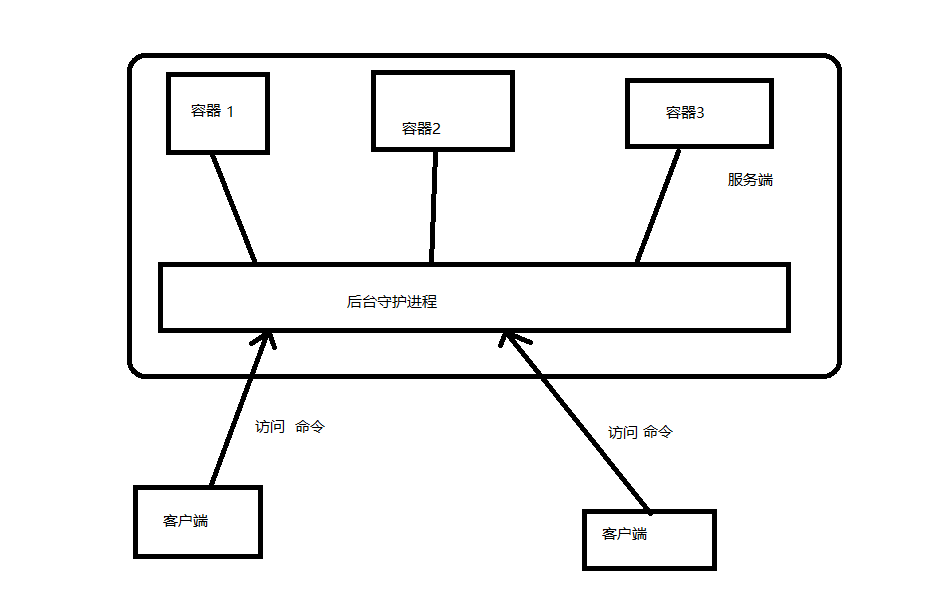
Docker is a system with client server structure. The Dcoker daemon runs on the host. The client accesses the daemon through socket. The daemon accepts client commands and manages the running container.
2.3. Docker help command
docker version #Display docker version information
docker info # Displays the docker system information, including the number of images and containers
docker  command --help #Help command. You can use this command to view the specific usage of docker command
2.4. Docker image command
docker search keyword # Search for related images
docker pull Image name  #Pull image to local
docker rmi Image name or id #delete mirror
docker images #View all local mirrors
2.5. Docker container command
docker run Parameter image name or id #Create container and start
docker ps #View a running mirror
docker start container id #Start container
docker stop container id #Stop container
docker restart container id #Restart container
docker kill container id #Force stop container
Description of docker run parameter:
  --name='name'  #Container name
  -d  #Run in background mode
  -e #Container parameters
  -it #Run in interactive mode and enter the container after startup
  -p [ip Optional]Host port: container port #Port mapping
docker ps Parameter Description:
 -a #View all containers
 -n=? #Displays recently created containers
 -q #Displays only the number of the container
Enter container
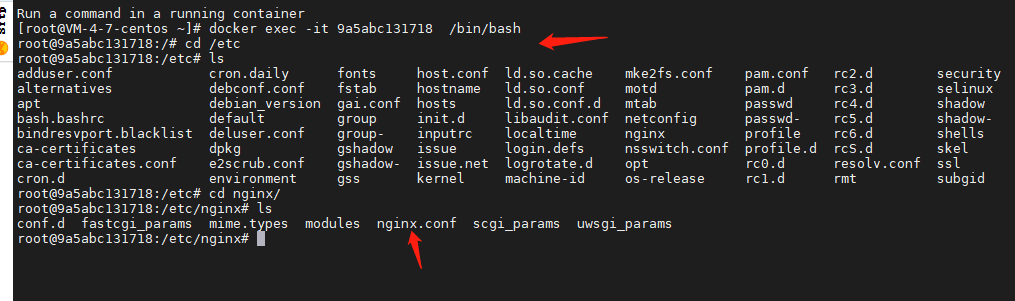
docker exec -it container id bashShell #Enter the container (bashShell generally uses / bin/bash) and you can operate
docker attach container id #If you enter the current container, no new process will be created
difference:
exec, a new terminal will be started and can be operated; attach does not start a new terminal, but enters a running process. Generally, the first one can be used.
Other commonly used related container commands
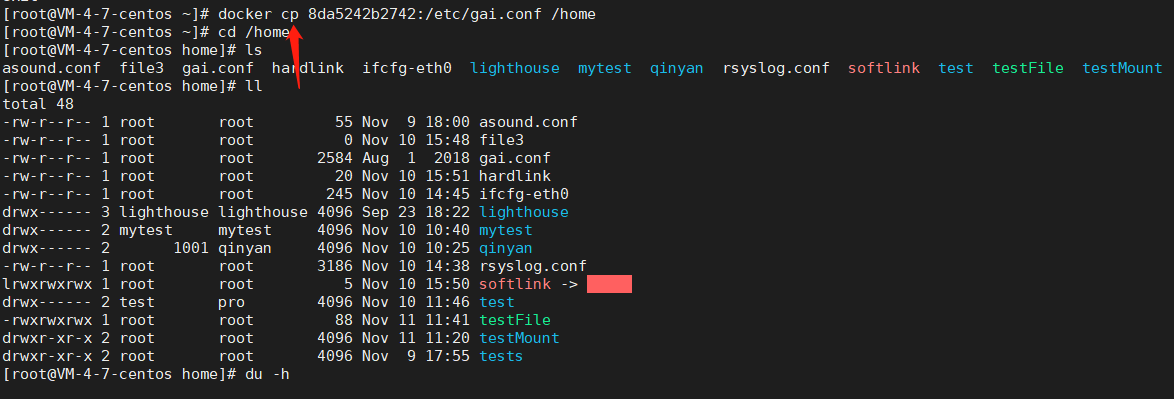
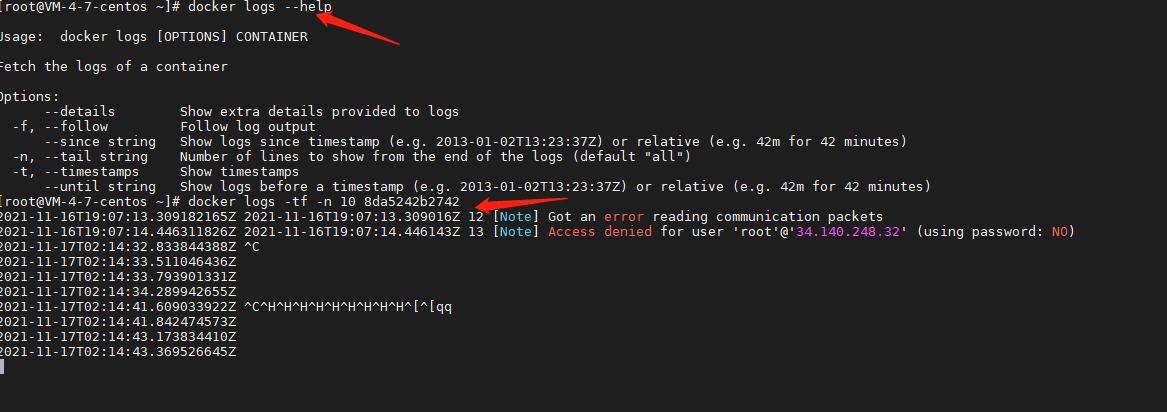
docker inspect container id #View new container metadata
docker top container id #Viewing container process information
docker cp container id: In container host path #Copy the files in the container to the host
docker cp File or directory container id:In container path #Copy the host file to the container
docker logs Parameter container id #Viewing container log information
docker stats #View the docker container cpu and memory usage in real time

2.6. docker command summary
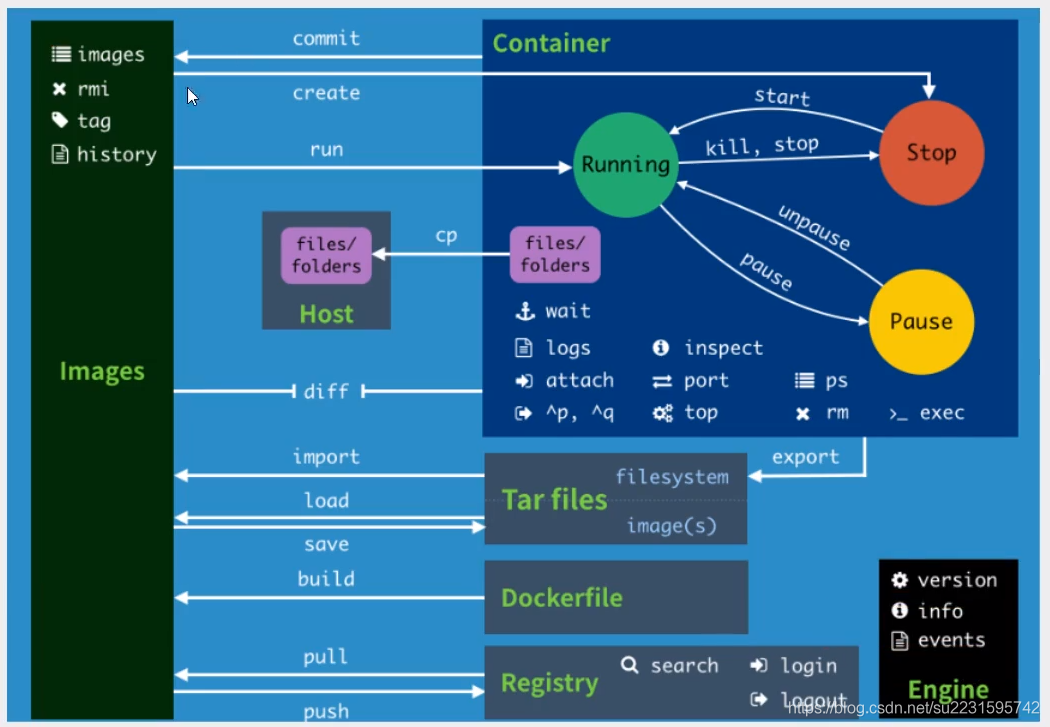
images #Lists the current image of the system
rmi #delete mirror
history #Show a mirror formation history
commit #Commit the current container as a new image
create #Create a new container
run #Create (does not exist) and execute the container
cp #Copy file
diff # View container changes
import #Create a new file system image from the contents of the tar package (corresponding to export)
export #The content stream of the export container is a tar archive file
load #Load an image from a tar package (corresponding to save)
save #Save the image as a tar package
build #Customized image through DockerFile
pull #Pull image
push #Push image library to docker server
start #Start container
kill #kill specifies the container
stop #Stop container
unpause #Unsuspend container
pause #Pause container
wait # Intercepts the exit status value when the container stops
logs # Output log information of the current container
inspect #Viewing container metadata information
attach #The current shell enters the container
port #View port mapping
ps #List containers
top #Viewing container process information
rm #delete mirror
exec #Specifies that the shell enters the container
search #Search image
login #Log in or register with the docker source server
logout #Exit docker source server
version #Display docker version information
info #Display system related information
events #Get container real-time events from docker server
2.7. Command usage: install ngnix, tomcat, es+kibana, mysql and gitLab;
Installing nginx
docker search nginx #View the relevant nginx images on the dockerhub,
#You can also view it on the official website( https://hub.docker.com/_/nginx )
docker pull nginx
docker images
docker run --name="nginx" -d -p 80:80 nginx
After installation, enter the container and you can see the configuration file of nginx
Browser access port 80:

It is very troublesome to enter the container every time you modify nginx. We can provide a mapping path in the host through the data volume. When you modify the file in the host, the file in the container will be automatically modified;
However, the container has been started. There are three ways to modify the startup parameters. Refer to the blog: Docker modifying container parameters
Install tomcat
Install es+kibana
es initialization memory is at least 2G, which allows the server to compare cards. You can add parameters at startup
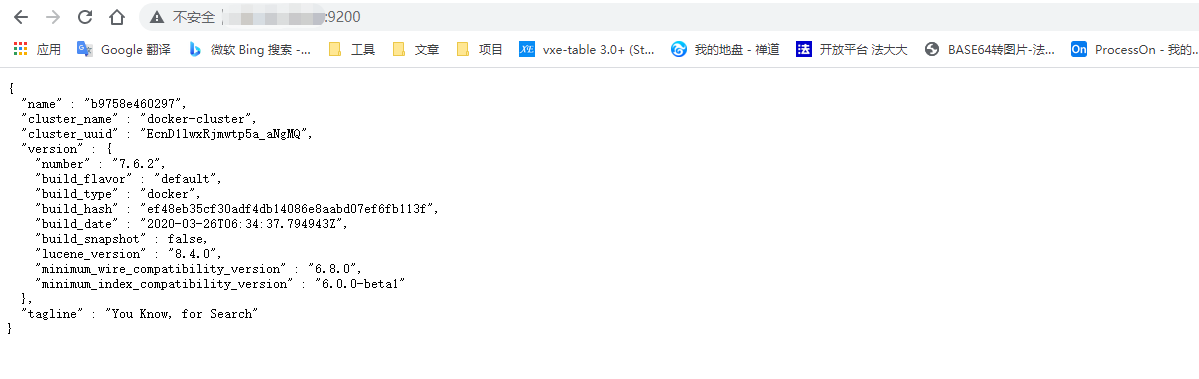
docker pull elasticsearch:7.6.2
docker run --name="elasticsearch7.6.2" -d -p 9200:9200 -p 9300:9300 -e "discovery.type=single-node" -e ES_JAVA_OPTS="-Xms64M -Xmx512m" elasticsearch:7.6.2
visit:
Install mysql
See 3.2 data volume for details
Installing gitLab
Reference: install the Chinese version of gitlab
docker run -d --name="gitlab" -p 8443:443 -p 8080:80 -p 2202:22 -v /root/gitlab/config:/etc/gitlab -v /root/gitlab/logs:/var/log/gitlab -v /root/gitlab/data:/var/opt/gilab Image name
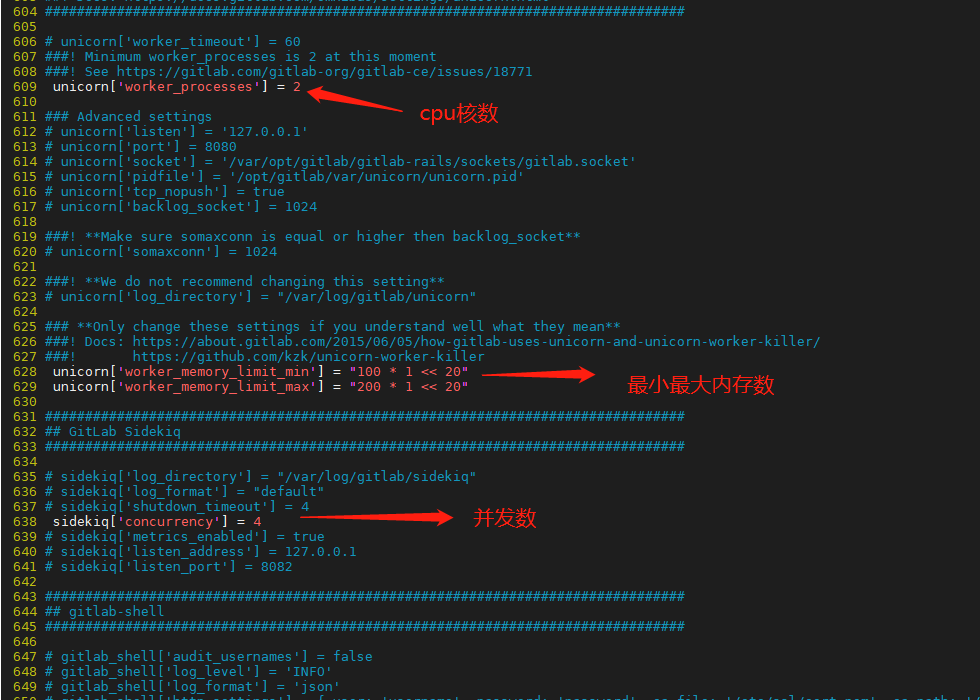
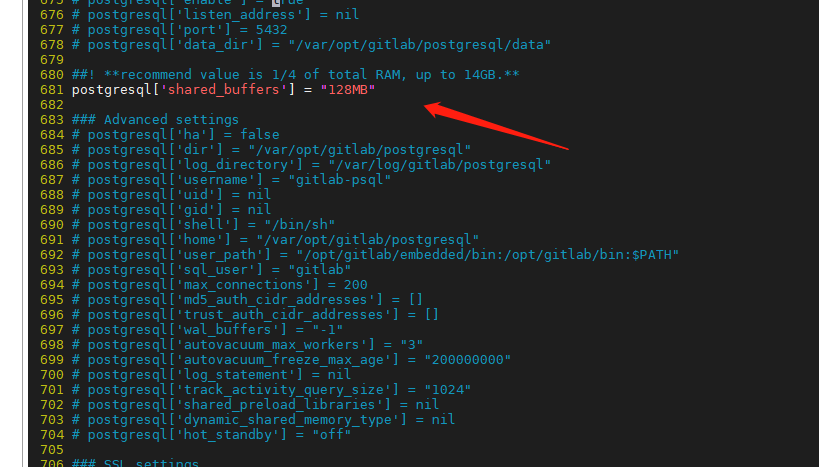
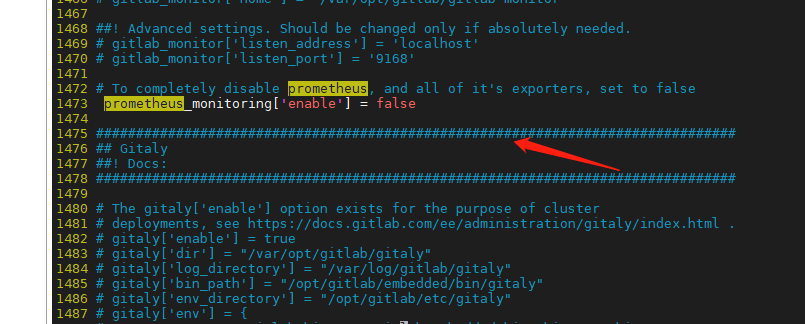
Modify the configuration file to reduce the memory use of gitlab, enter the container / etc/gitlab or modify the gitlab.rb file in the config directory;
unicorn['worker_processes'] = 2 #Modify the number of cpu cores
#Modify maximum memory size
unicorn['worker_memory_limit_min'] = "100 * 1 << 20"
unicorn['worker_memory_limit_max'] = "200 * 1 << 20"

sidekiq['concurrency'] = 4   #Number of concurrent modifications

postgresql['shared_buffers'] = "128MB" #Modify database cache size
postgresql['max_worker_processes'] = 1 #Modify database concurrency

prometheus_monitoring['enable'] = false  #Turn off monitoring
After modification, the configuration file will take effect again in the container:
gitlab-ctl reconfigure
gitlab-ctl restart
If a large amount of memory is occupied, you can set the virtual memory:
Reference virtual memory settings
free -m #1. First check the current state of memory
mkdir swap #2. Create virtual memory state
cd swap
dd if=/dev/zero of=swapfile bs=100M count=50
mkswap /usr/swap/swapfile #Pay attention to your file path and location
swapon /usr/swap/swapfile #Activate swap with the command to immediately enable swap partition files
vim /etc/fstab    #3. Write directly in / etc/fatab
/usr/swap/swapfile      swap                    swap    defaults        0 0
The following passage comes from : in Linux system, you can determine the system's usage principle of SWAP partition by viewing the value of / proc / sys / VM / SWAP. When the value of the swappiness content is 0, it means that the physical memory is used to the maximum extent. The SWAP partition will not be used until the physical memory is used. When the value of the SWAP content is 100, it indicates that the SWAP partition is actively used and the data in memory is replaced to the SWAP partition in time.
It was 0 before modification, and the SWAP partition will not be used until the physical memory is used:
- Temporary modification
echo 10 >/proc/sys/vm/swappiness
- Permanent modification
vim /etc/sysctl.conf  #Setting, add the following configuration
vm.swappiness=10
Make configuration effective
sysctl -p
3, Docker image, container volume and network interpretation
3.1 image
image is a lightweight and executable independent software package used to package software running environment and environment-based software, including all contents of the software, including code, runtime, library, environment variables and configuration files.
Docker image is based on the UnionFS file system (layered, lightweight and high-performance file system, file modifications are superimposed layer by layer, and different directories can be mounted to the same virtual file system). Therefore, Docker image can be inherited through layers, and various specific application images can be made based on the basic image. The Docker image file is shown below:
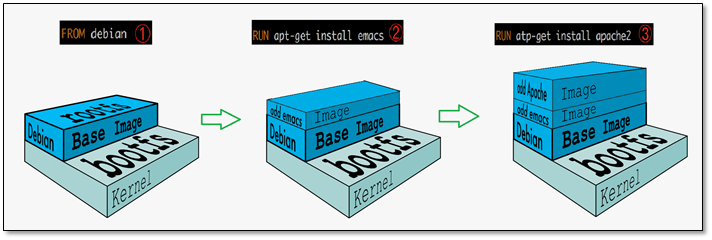
bootfs(boot file system) mainly includes bootloader and kernel. When linux starts, bootloader boots and loads the kernel. When the bootfs file system is loaded, the kernel is loaded into memory. At this time, the right to use the memory is transferred from bootfs to the kernel. At this time, the system will unload bootfs.
rootfs (root file system) is above bootfs, including standard directories and files such as / dec, / proc, / bin, / etc. rootfs is the distribution version of various linux operating systems, such as ubuntu, centos, etc.
docker basic image is a small linux OS, which only contains the most basic commands, tools and program libraries. As for bootfs, all linux OS are basically the same. Docker directly uses the bootfs of the host.
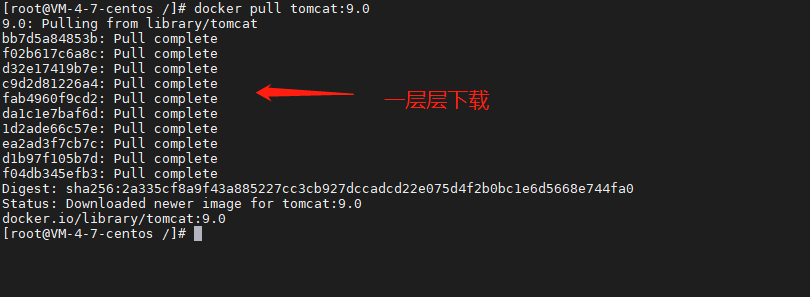
the Docker image is inherited hierarchically, and the downloaded hierarchy will not be downloaded (hierarchy sharing).
all levels of Docker image are read-only and cannot be modified. When the container starts, a writable level will be added at the top of the image, which is the container layer. When we submit the container as an image, we will save the status of the current container as a new layer.
tomcat installation demonstration:
Layered image file download:
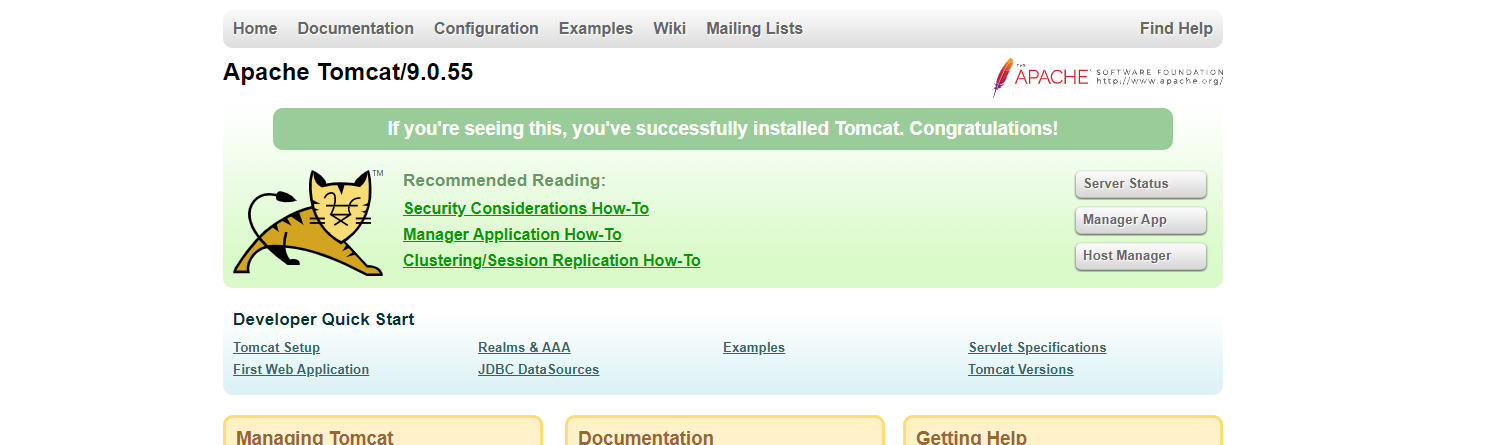
Start the container and add a writable layer:

Access view at this time:

docker's official tomcat image, visit 404. It needs to be modified in the container. Delete the empty webapps and change the file name of webapps.dist to webapps. Visit again at this time to see the tomcat welcome interface.
Package the tomcat container status at this time into a new image, and then start the image to access it normally:

3.1.1 image push
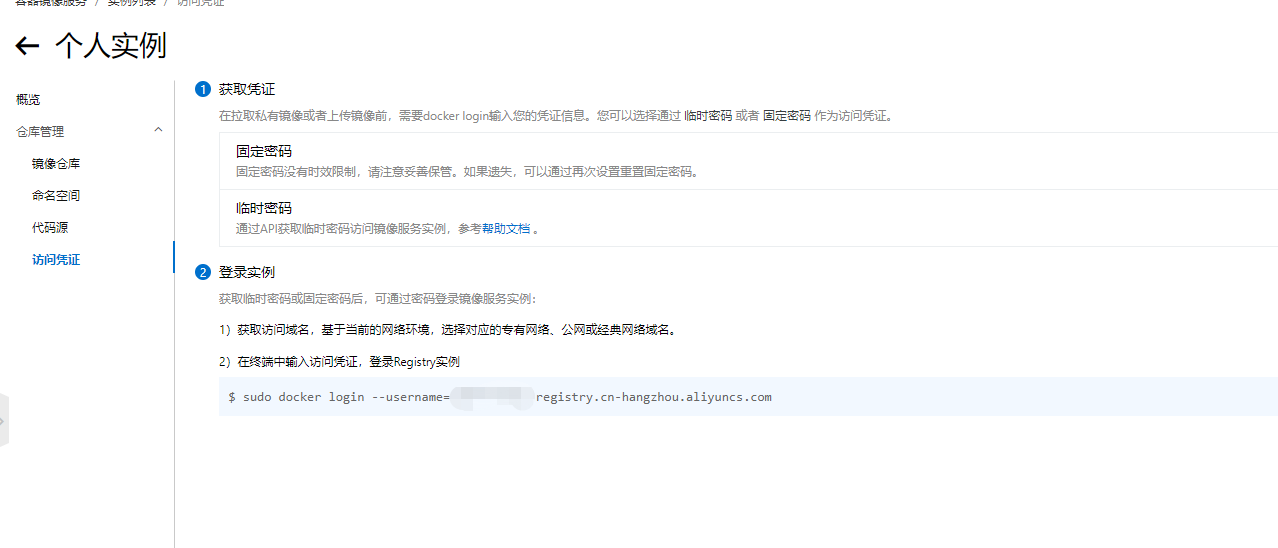
We can also push the image to the Alibaba cloud image warehouse (dockerhub), and then directly pull the image:
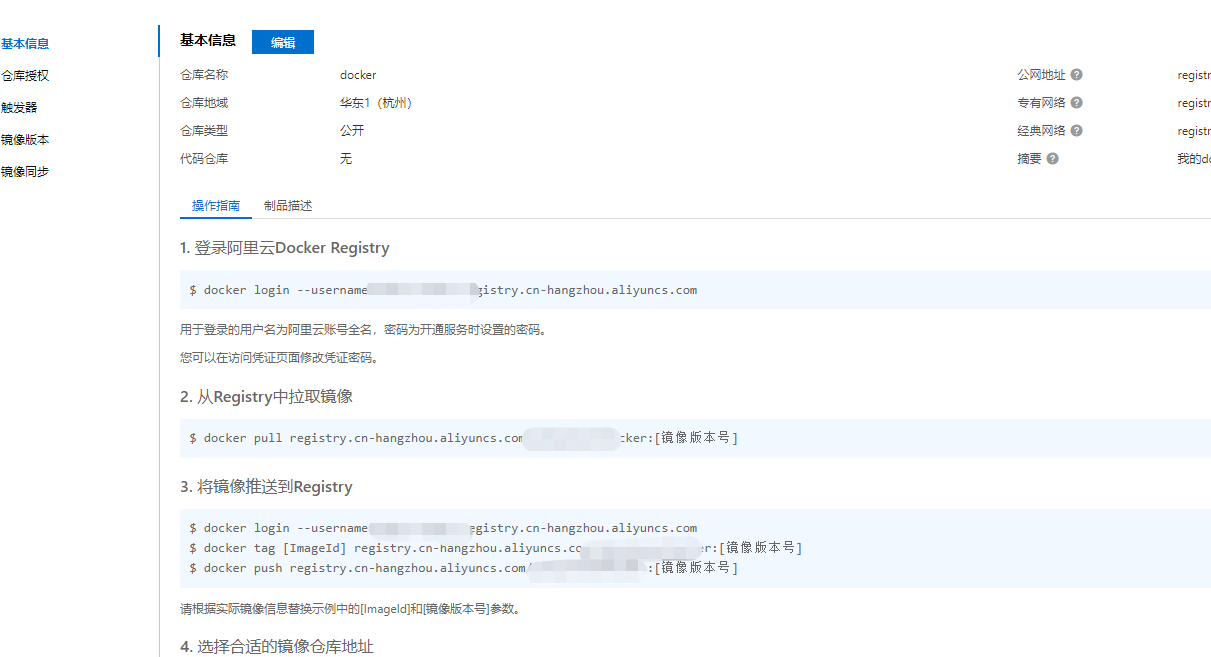
Push step
<1> Login: sudo docker login --username = user name server address (you can view your address in alicloud container image)
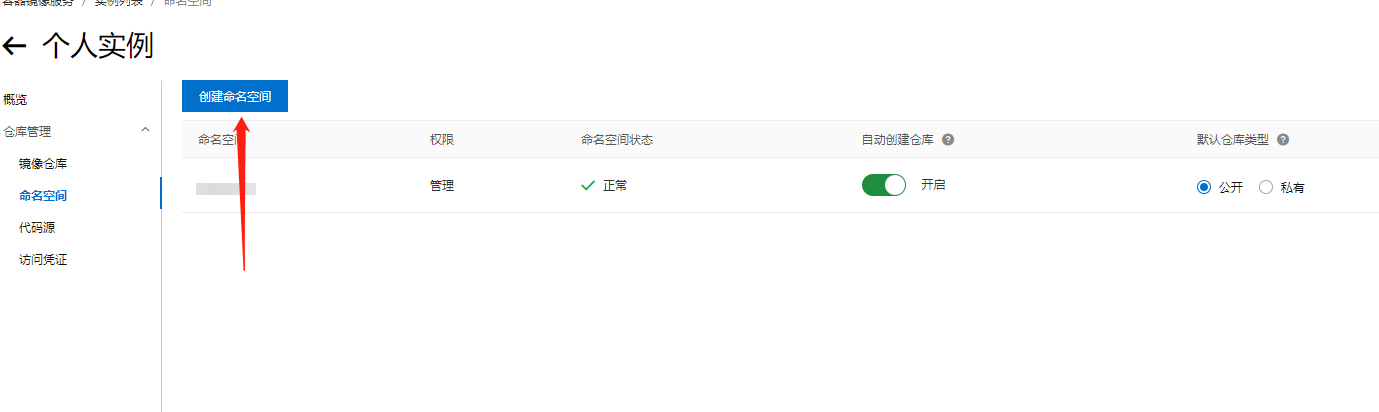
<2> Alibaba cloud creates a namespace
<3> Create local mirror warehouse
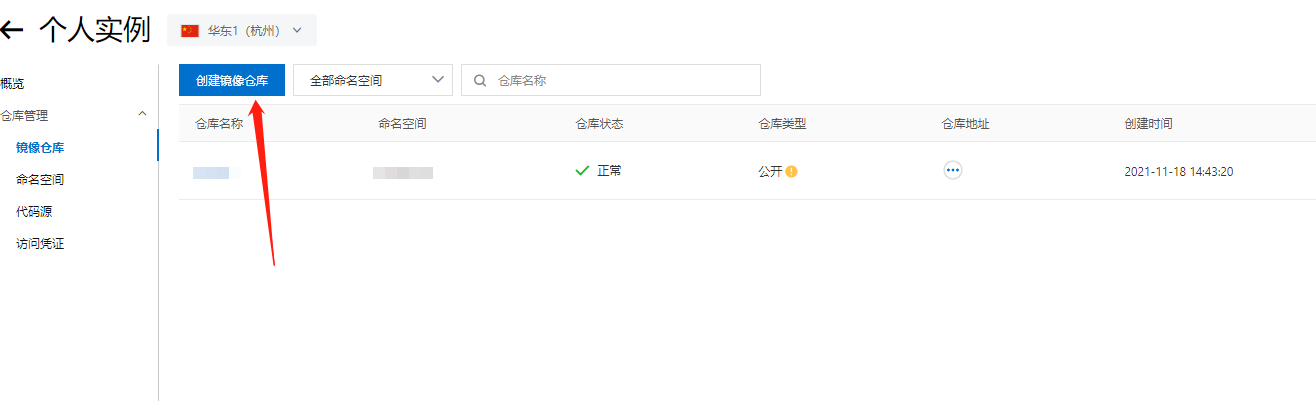
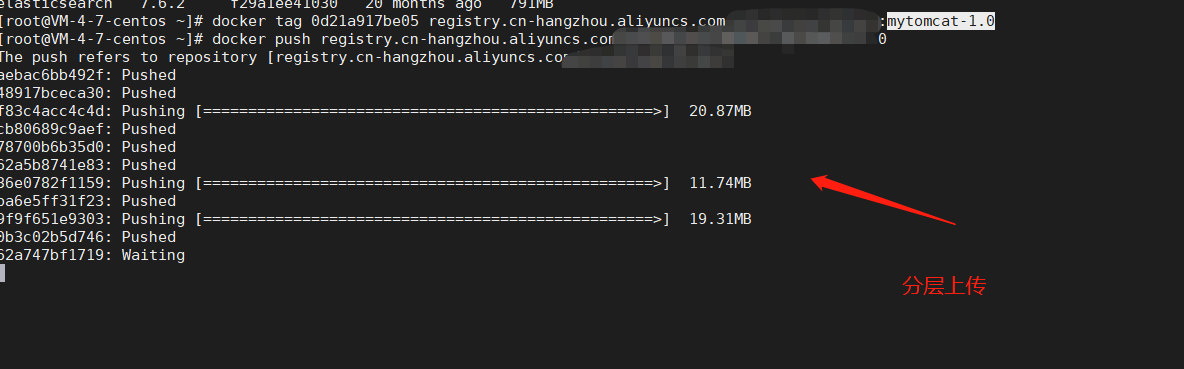
<4> Upload the image according to the operation guide
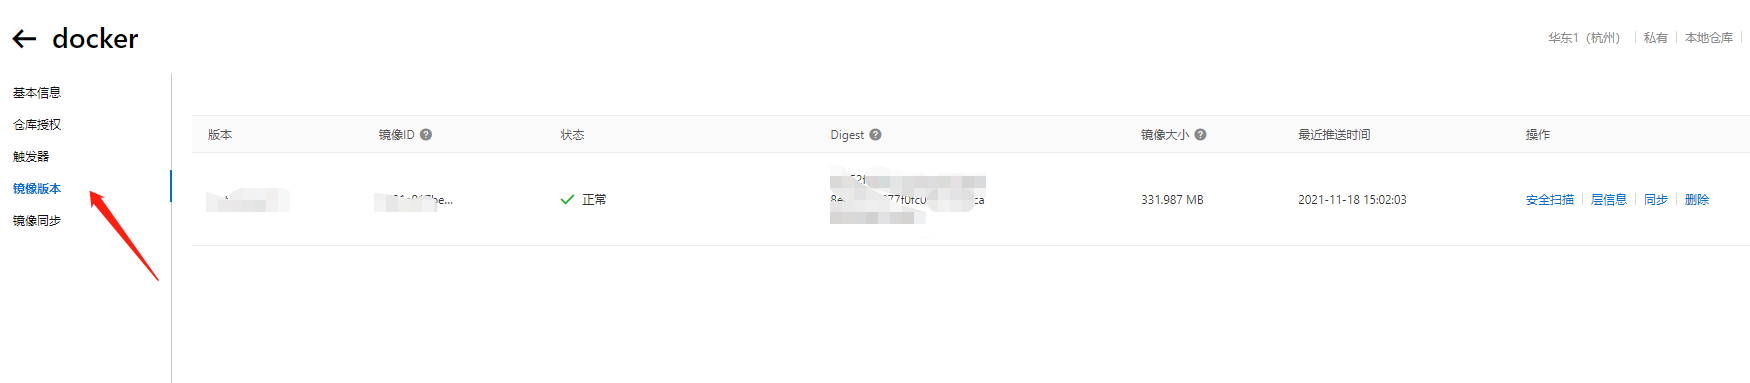
<5> After uploading successfully, we can see the image version uploaded by ourselves
3.2 container roll
docker image packages the application and environment, and our operations are recorded in the container. If the container is deleted, all the data we operate will be deleted, which is very dangerous. In order to avoid the problem that the data disappears when the container is deleted, a data backup is needed to synchronize the data to the host computer. This is container volume technology, which mounts the directory in the container to the host computer.
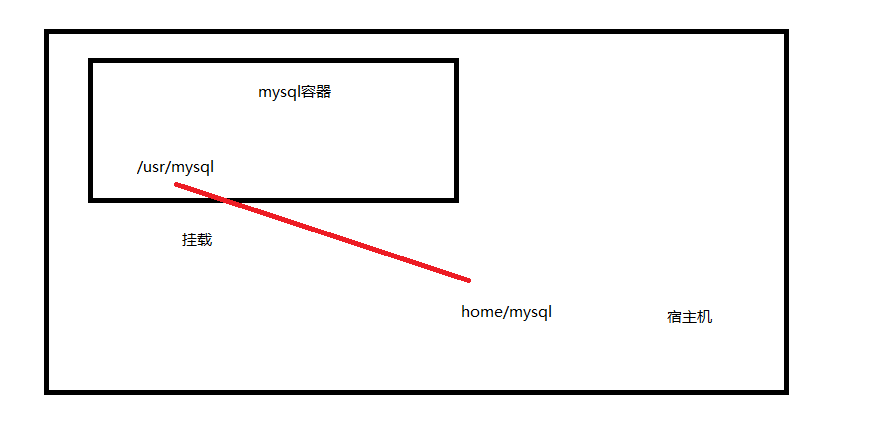
through the container volume technology, whether the data in the container changes or the host data changes, the data will be synchronized and consistent. Mount can be realized through the - v command (- v Host Directory: directory in the container [: ro/rw (read / write permission)]. Mount is divided into named mount and anonymous mount (do not write to the host directory).
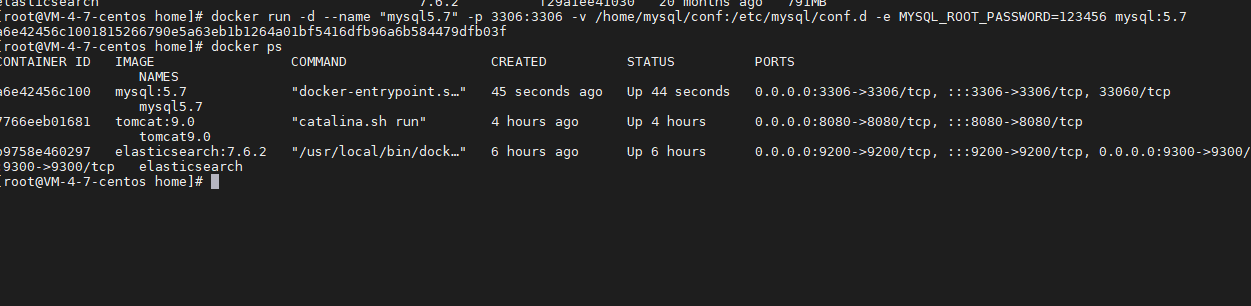
mysql installation:
docker run -d --name "mysql5.7" -p 3306:3306 -v /home/mysql/conf:etc/mysql/conf.d -e MYSQL_ROOT_PASSWORD=123456 mysql:5.7
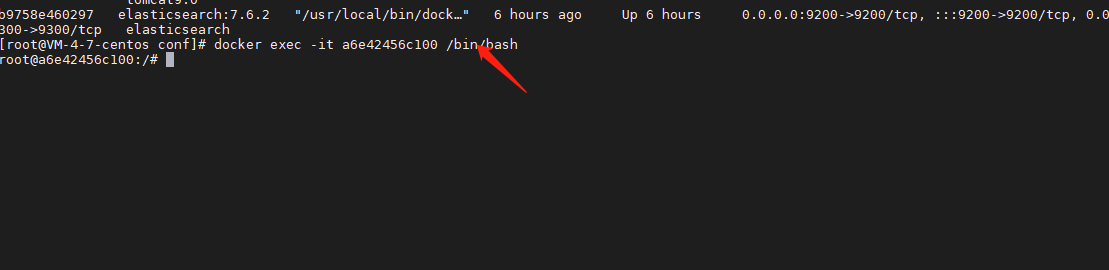
Enter the container and authorize mysql remotely:
docker exec -it container id /bin/bash
<1> MySQL login
mysql -u root -p password #Note that there is no space between the password and - p
<2> Authorization
GRANT ALL PRIVILEGES ON *.* TO 'root'@'%' IDENTIFIED BY 'password' ;
flush privileges;
show grants for root;#View authorization

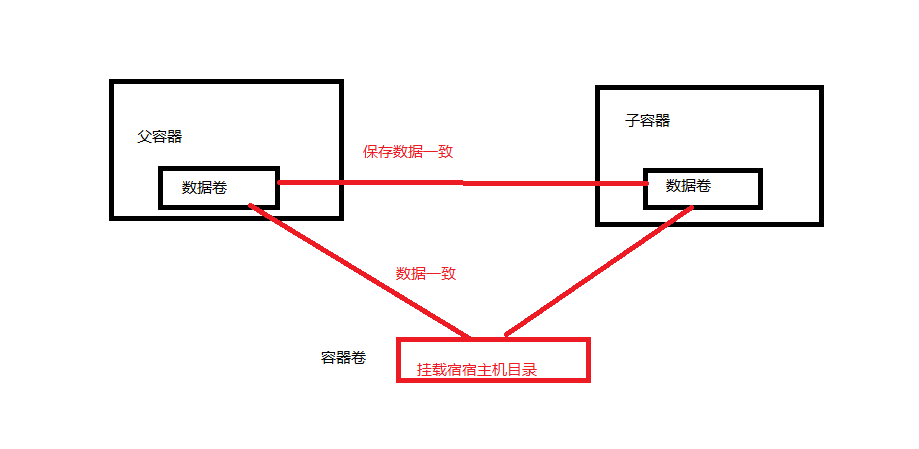
Data volume (data sharing between multiple containers)
when the container is started, the data synchronization before the two containers is realized through the parameter (– volume from parent container name). These synchronized data are the copy concept, and the child container data will not lose data due to the deletion of the parent container data. In addition, the data can also be mounted on the host. At this time, all containers are deleted and the local data still exists.
command:
docker run -d -p 3307:3306 -e MYSQL_ROOT_PASSWORD=123456 --name mysql02 --volumes-from Parent container name mysql:5.7
3.3 network
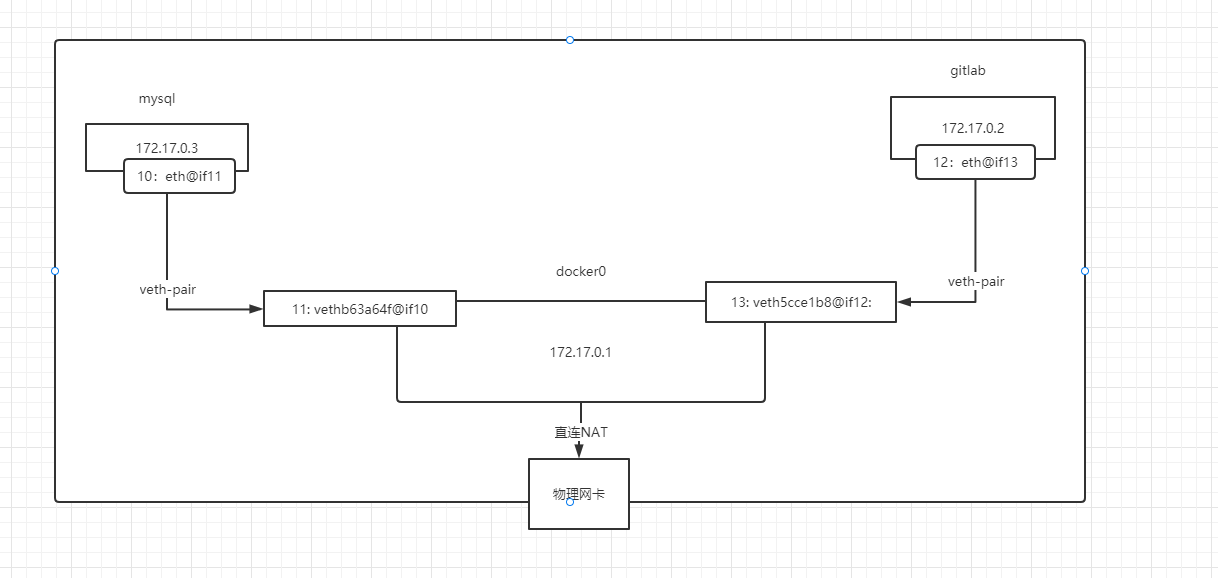
View server ip address (ip addr):
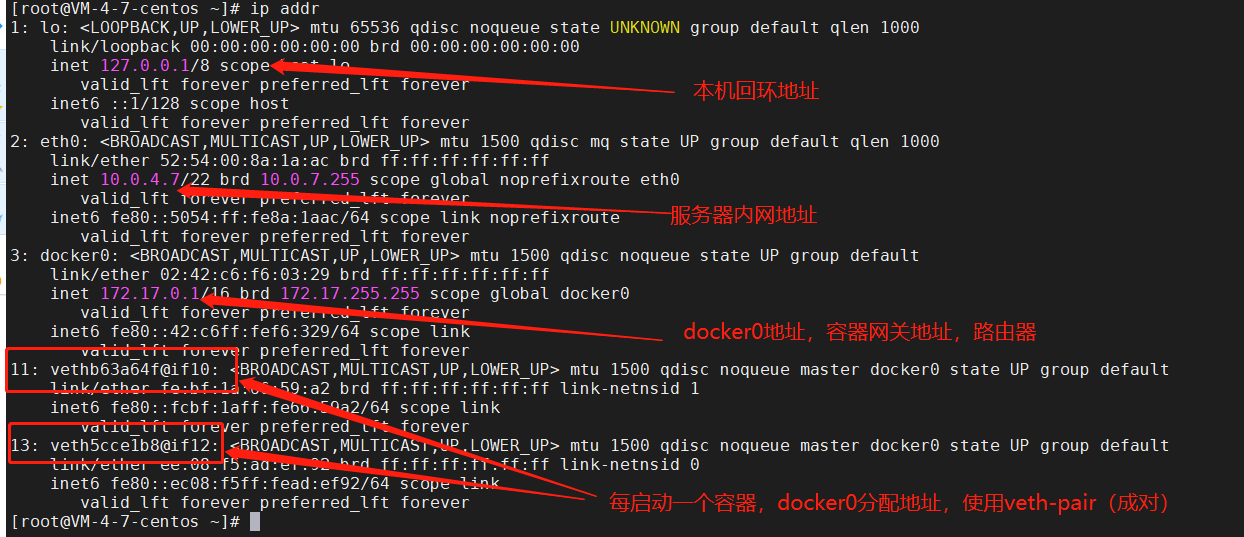
You can see a docker0 address, and the following 33, 35 and 37 addresses are the container address. When the container is started, docker0 will assign an address to the container and use the Veth pair (virtual device interface). One end is connected to the protocol, the other end is connected to each other, and the Veth pair acts as a bridge. Reference articles )Bridging. docker0 is directly connected to the physical network card, and the host is the docker container.
Therefore, the container and the host, and the container and the container can ping each other. However, you can only Ping through the ip address. If you want to Ping with the container name, you can use the - link container when the container is started, and then you can ping with the container name. However, this method is to directly modify the / etc/hosts file in the container and add a mapping address (not recommended).
docker run -d --name="Container name" --link want ping Container name for -p Host port:Container port image name
Custom network
View all docker network types: docker network ls
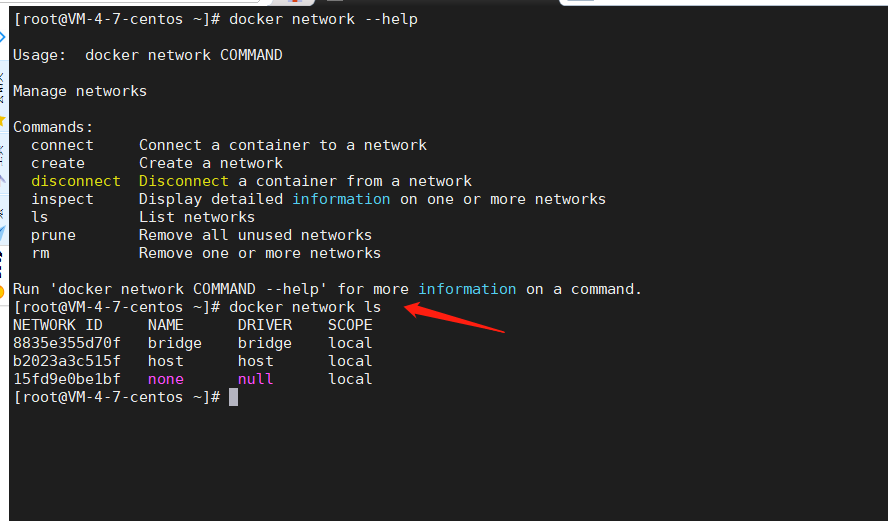
Bridge: bridge mode. By default, this mode is also used for creation;
none: do not create a network;
Host: share the network with the host;
Container: container network connection (limited, generally not used)
When starting the container, add -- net bridge or do not write, which means docker0 (only ip access, container name cannot be accessed)
docker run -d --name tomcat --net bridge tomcat <=> docker run -d --name tomcat tomcat
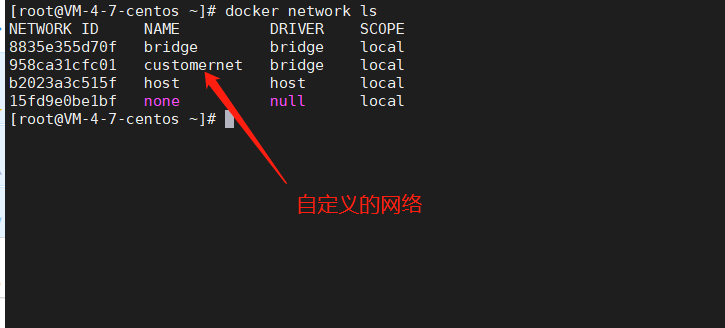
Therefore, customize a network so that it can be accessed through the container name:
docker network create -d bridge --subnet 192.168.0.0/16 --gateway 192.168.0.1 customernet
Specify a custom network launch container:
docker run -d -p 8080:8080 --name tomcat01 --net customernet tomcat:9.0
If an error is reported
WARNING: IPv4 forwarding is disabled. Networking will not work.
The network bridge is required to enable forwarding, otherwise there will be no network after the container is started( solve);
vim /etc/sysctl.conf
net.ipv4.ip_forward=1    #Add this row configuration
systemctl restart NetworkManager && systemctl restart docker #Restart the network (CentOS 8 version of NetworkManager) and docker services
sysctl net.ipv4.ip_forward #If "net.ipv4.ip_forward = 1" is returned, the modification is successful
After solving the problem, start another container:
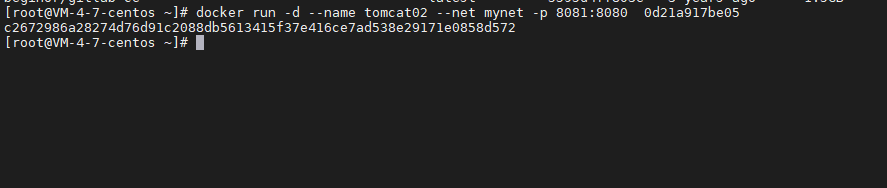
docker run -d -p 8080:8080 --name tomcat02 --net customernet tomcat:9.0
At this point, you can ping directly through the container name.
summary
under a custom network, services can ping not only through ip, but also through container names. Therefore, through a custom docker network, different clusters can use different networks to ensure cluster safety and health.
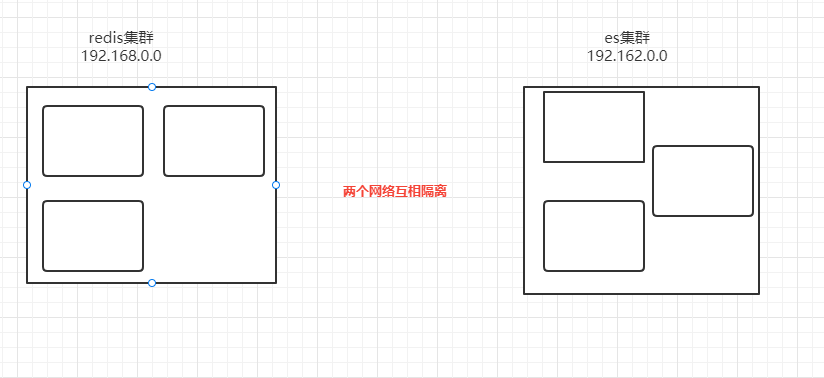
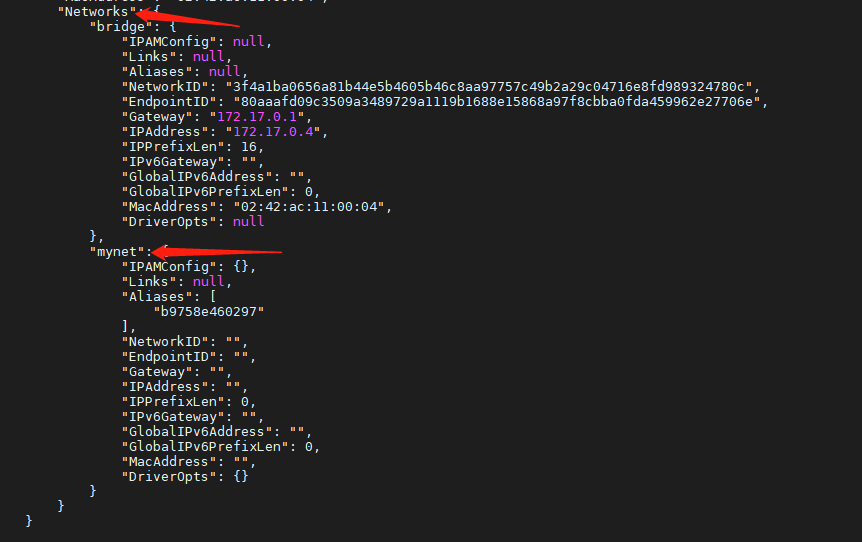
If you want to connect containers between two networks, you need to use the docker network connect command to add a container to another network so that the container has two networks.
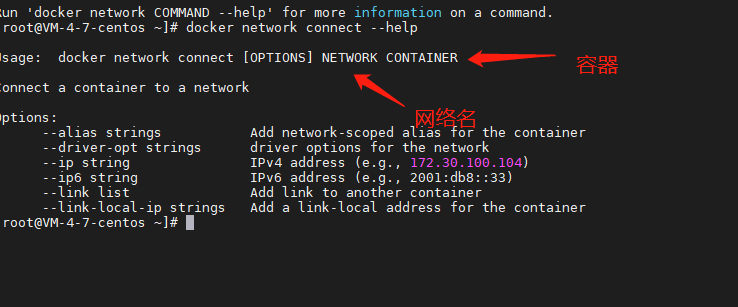
docker network connect mynet b9758e460297
When we want to operate others across the network, we need to use docker network connect to connect.
4, DockerFile
dockerfile is a command parameter script used to build docker images;
Build steps
<1> Write a dockerfile file;
<2> Docker build is built as an image;
<3> Docker run runs the image;
<4> Docker push publishing images (dockerhub, alicloud image warehouse)
4.1 DockerFile Foundation
- The instructions of DockerFile must be all uppercase letters;
- The execution sequence is the same as the writing sequence, from top to bottom;
- #Indicates a comment
- Each instruction will create and submit a new image layer;

4.2. DockerFile common commands
Common commands for image construction
FROM  #Define the basic image;
MAINTAINER #Define image author information, name + email
RUN #Commands to run when building a mirror
ADD #step
WORKDIR #Mirror working directory
VOLUME #Mounted directory
EXPOSE #Expose the listening port of the container to the outside. If you want to have a mapping relationship between the container and the host port, you must add the - P parameter when the container is started
CMD #Specify the command to run when the container starts. Only the last one takes effect and can be replaced.
ENTRYPOINT #Specify the command to run when the container starts. You can append the command
ONBUILD #Add a trigger to the image. Its parameters are any Dockerfile instruction
COPY #Copy files to image
ENV #Setting environment variables
bulid mirror command
docker build -t Image name: label (image name must be all lowercase) .
Dockerfile is the default file name. You do not need to specify the file name with - f. if it is not this file name, you need to specify Represents the current directory;
Test build your own image
FROM java:8
COPY *.jar /jrebelserver.jar
EXPOSE 8888
ENTRYPOINT ["java","-jar","jrebelserver.jar","-p","8888"]
docker build t jerbel:1.0 .
5, Docker Compose container management
dockercompose is mainly used to arrange and manage containers. The docker-compose.yml file (dockerfile file) is written to manage (define and run) containers.
5.1. compose installation:
## Official website installation
sudo curl -L "https://github.com/docker/compose/releases/download/1.3.1/docker-compose-$(uname -s)-$(uname -m)" -o /usr/local/bin/docker-compose

# Domestic image installation
curl -L https://get.daocloud.io/docker/compose/releases/download/1.3.0/docker-compose-`uname -s`-`uname -m` > /usr/local/bin/docker-compose
to grant authorization
chmod 777 /usr/local/bin/docker-compose
5.2. Rules for writing docker-compose.yaml
Official configuration document:
#Three layer configuration
version:"3.9" #Layer 1, compose version
service:   #Second floor, service
	web: #Custom service name Start sequence 3
		image:
		build:
		depends_on:
			- redis #Dependent service name
			- db
		ports:
		network:
		...
	redis: # Custom service name Start sequence 2
		image:
	db: 	  # >Start sequence 1
		image:
	...
# Three layer network, data volume and global configuration
network:
	frontend:
	bakend
5.3. Deploy springboot project with compose
Write Dockerfile file
FROM java:8
COPY *.jar /app.jar
CMD ["--server.port=8002"]
EXPOSE 8002
ENTRYPOIT ["java","-jar","app.jar"]
Write docker-compose.yml (define the entire service, including the required environment, port, Mount directory, network, etc.):
version: '3.9'
services:
	demo:
		build: .
		image: demo
		ports: 8002:8002
		depends_on:
			- redis
	redis:
		image: redis
Start project:
docker-compose up --bu
Package if the project needs to be redeployed
docker-compose up - -build
Note:
- Default service name: file name_ Service name;
- All containers under the project are under one network;
Stop project:
docker-compose down #The container started by the project and the automatically created network will be deleted
Some other commands
docker-compose up -d
docker-compose ps
docker-compose stop #Delete container completely
6, Cluster management Docker Swarm
6.1. Basic concepts of swarm
swarm mainly arranges and manages the cluster container of the host, and can realize dynamic expansion, dynamic update and dynamic capacity expansion. Swarm is an extension in the docker environment. By initializing swarm, other service docker nodes can join the swarm cluster, and then the node nodes can be managed and the service services can be managed. Docker swarm official website address.
docker engine introduces swarm mode, which enables us to create a cluster composed of one or more docker engines, called swarm. Swarm consists of one or more nodes (two types of nodes: manager and workers), which run docker engine or higher physical or virtual machine in swarm mode.
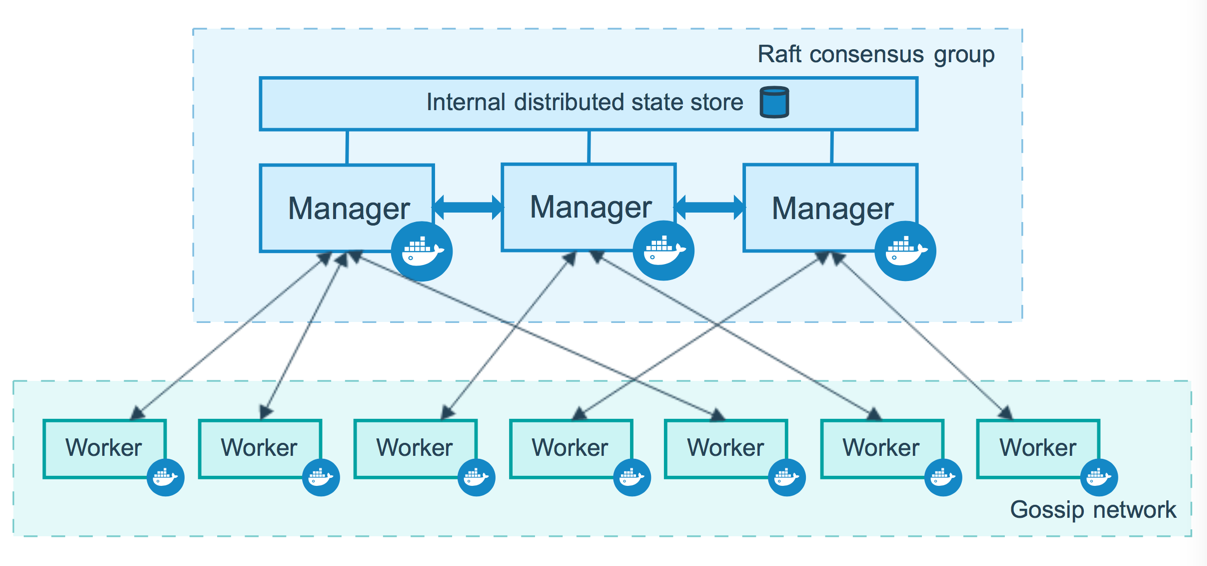
Management node
the management node is used to handle cluster management tasks, including:
-
Maintain cluster status
-
Dispatching service
-
Provides services for the HTTP API of cluster endpoints
manage and maintain the consistent internal state of the whole swarm and all services running on it through the Raft protocol. In order to the fault-tolerant characteristics of swarm mode, an odd number of management nodes are implemented according to the high availability requirements of the organization, which is convenient to recover from the failure of the manager node without downtime.- A cluster with three managers can tolerate the loss of one manager at most;
- A cluster with five managers can tolerate the loss of two management nodes at the same time;
- A cluster with N manager can tolerate the loss of (N-1) / 2 nodes at most.
adding more managers does not mean scalability or higher performance. Generally speaking, the opposite is true. Docker suggests a cluster with up to seven management nodes.
Work node
a work node is a real column of the Docker engine. Its only purpose is to execute containers. Woker nodes do not participate in the Raft distribution status, make scheduling decisions, or provide services for HTTP API s.
you can create a cluster composed of one management node (at least one management node). In a single manager node cluster, run docker service create, and the scheduler places all tasks on the local engine.
Raft consistency protocol: ensure that most nodes are available only when they are alive (that is, the living nodes need more than the dead nodes, so at least 3 nodes are required, and the surviving nodes > 1). Therefore, in order to ensure high availability, docker clusters need at least three primary nodes. When one primary node is down, there are two surviving nodes to ensure that most of them are available.
6.2. Simple swarm setup
command
I'm poorer than I deserve to learn technology 😂, If you can't afford at least four servers, just look at the command.
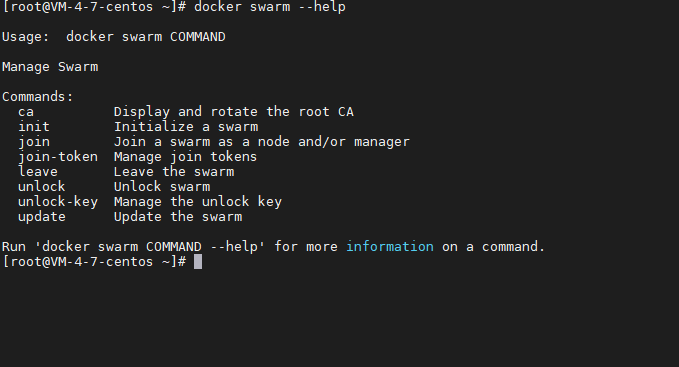
docker swarm --help
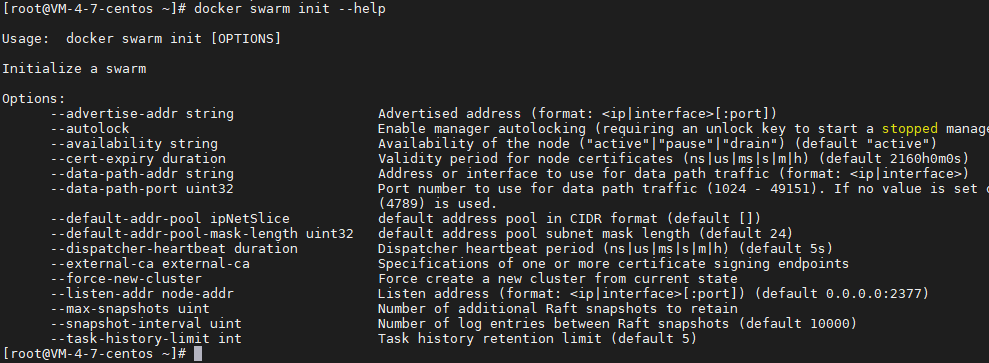
docker swarm init --help #Initialize a management node
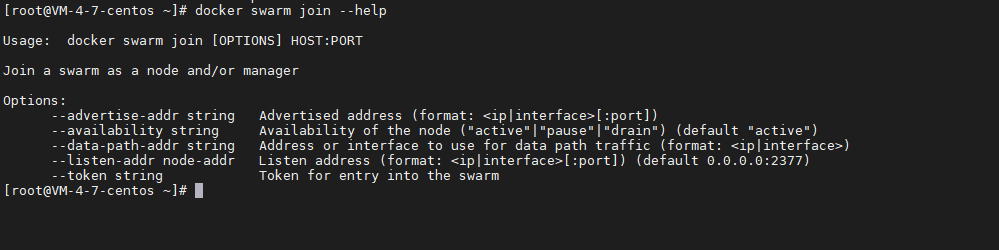
docker swarm join --help #Join a node
There are two steps to build swarm:
- init initialize swarm
- join the nodes that need to be added to the cluster to the corresponding roles (management node and work node)
test
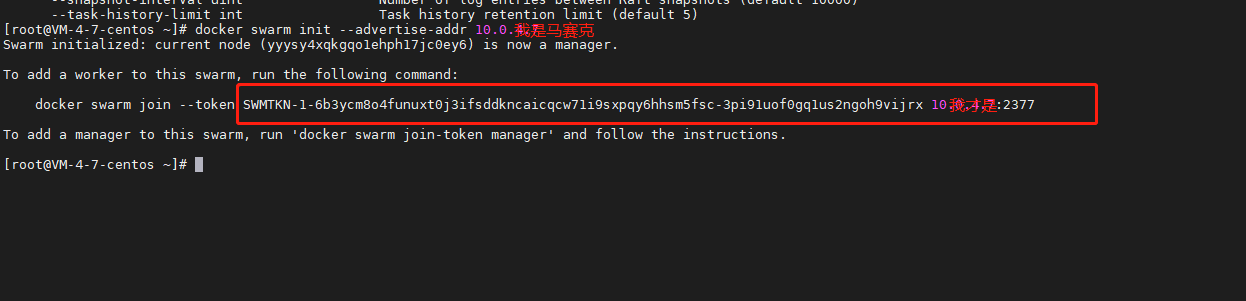
1. Initialize swarm and generate a management node.
Note: intranet ip is used by default. If you want to use external ip, you need to specify external ip; (default port: 2377)
docker swarm init --advertise-addr 10.0.1.5(ip Address. The servers in the best cluster are all in the same network (accessed through the intranet address)
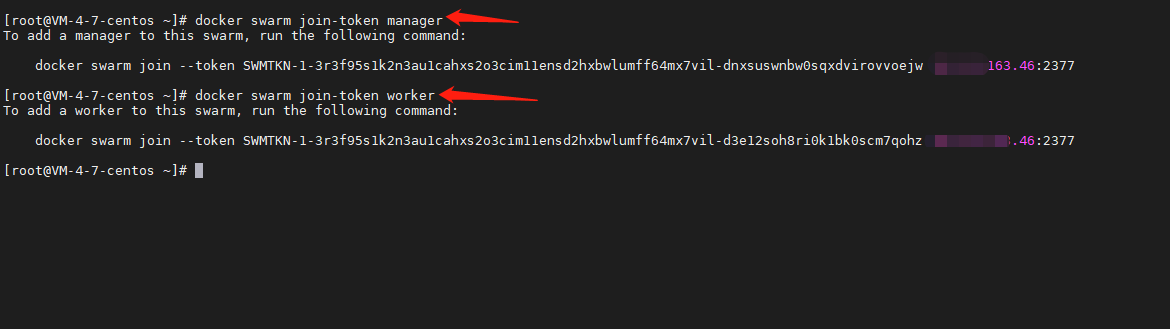
2. docker swarm join
docker swarm join-token worker #View how to join as a work node
docker swarm join-token manager #View how to join as a management node
If there is an error in joining, configure the firewall and open port 2377

3. View node information
docker node ls

4. Leave cluster
docker swarm leave --force

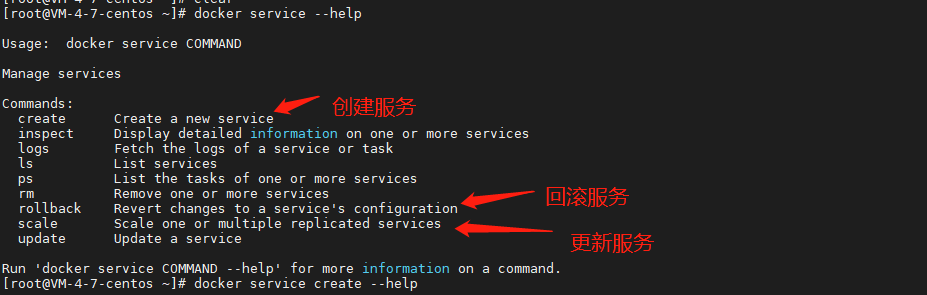
6.3,docker service
service can achieve elastic capacity expansion and contraction in cluster state. Compared with docker run:
- docker run starts a stand-alone project and cannot expand or shrink capacity;
- docker service, with expansion and contraction capacity and rolling update;
Through service, swarm can easily realize gray Publishing: Canary publishing (generally speaking, with the continuous rapid iterative development and launch of a product, on the one hand, it is necessary to ensure the stability of the online version, on the other hand, it is also necessary to ensure the demand for the launch of the new version. Try and make mistakes at a small cost. Even if there are serious errors, the overall impact on the business is affordable or very small, which is Canary release).
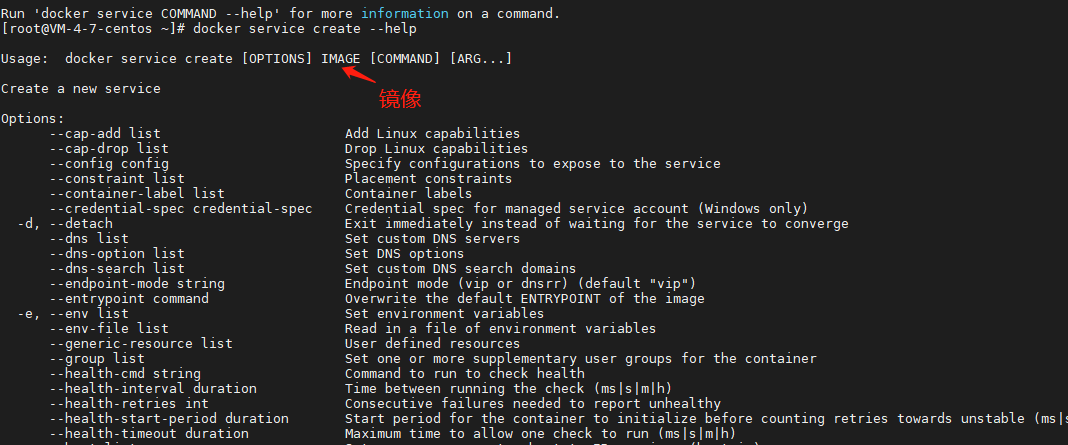
Create service:
docker service create -p 8088:80 --name mynginx nginx
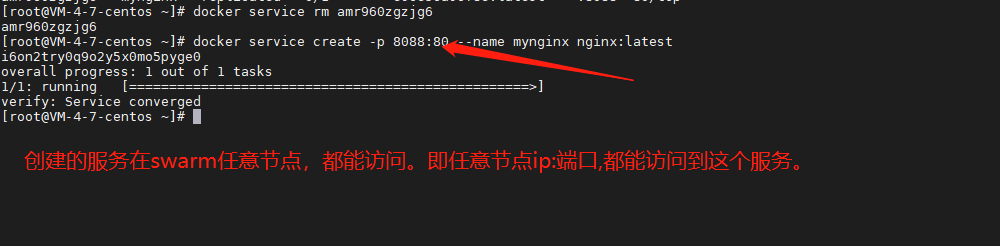
The created service can be accessed through the ip: port of any node.
Dynamic capacity expansion (create three replicas):
docker service update --replicas 3 mynginx
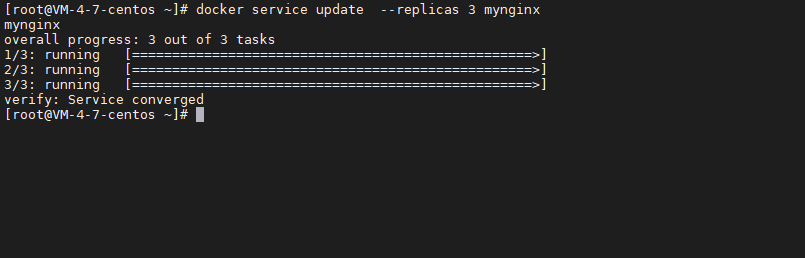
Depending on the traffic, the number of copies created;
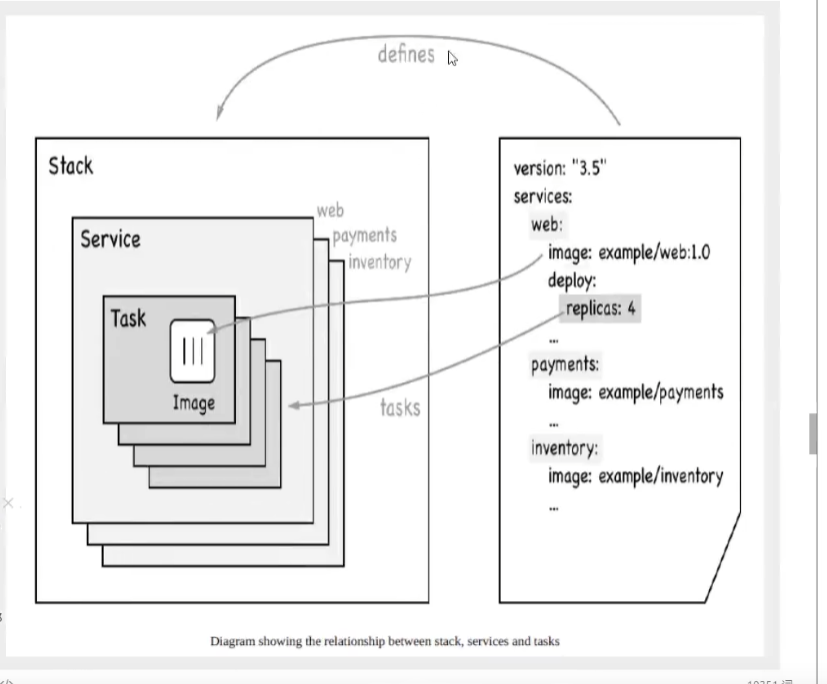
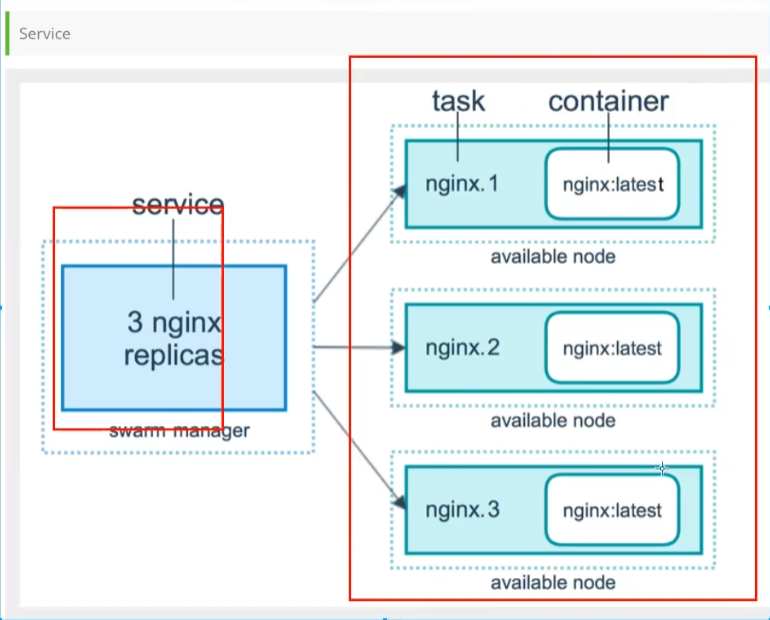
6.4. swarm summary
- Swarm manages the cluster. docker initializes a swarm cluster, and other nodes can join (managers and workers);
- service, which can be run in the management node or work node (core). The content accessed by users is services;
- Task, task, command in the container, refine the task;
swarm Operation Mechanism and principle:

7, Docker Stack
Docker compose is used to deploy stand-alone projects;
#stand-alone
docker-compose up -d work.yaml
docker stack deployment is a cluster deployment;
#colony
docker statck deploy work.ymal
8, Docker Secret
Configure password and security certificate