This article is included in github https://github.com/Michael-lz...
MutationObserver
MutationObserver is an interface that can listen for DOM structure changes. The MutationObserver is notified of any changes to the DOM object tree.
API
MutationObserver is a constructor that accepts a callback parameter and is used to handle node changes. It returns two parameters:
- Changes: list of node change records (sequence < mutationrecord >)
- observer: construct the MutationObserver object.
The MutationObserver object has three methods, as follows:
- observe: set the observation target and accept two parameters. Target: observation target and options: set the observation options through object members
- disconnect: prevents the observer from observing any changes
- Take records: clear the record queue and return the contents
//Select a node to observe
var targetNode = document.getElementById('root')

// Set the configuration options for observer
var config = { attributes: true, childList: true, subtree: true }

// The function to be executed when the node changes
var callback = function (mutationsList, observer) {
  for (var mutation of mutationsList) {
    if (mutation.type == 'childList') {
      console.log('A child node has been added or removed.')
    } else if (mutation.type == 'attributes') {
      console.log('The ' + mutation.attributeName + ' attribute was modified.')
    }
  }
}

// Create an observer example associated with the callback function
var observer = new MutationObserver(callback)

//Use the configuration file to observe the target node
observer.observe(targetNode, config)

// Stop observation
observer.disconnect()
The options parameter in the observe method has the following options:
- childList: set true to observe the changes of target child nodes, such as adding or deleting target child nodes, excluding the changes of modifying child nodes and descendants of child nodes
- Attributes: set true to observe the change of target attributes
- characterData: set true to observe the change of target data
- subtree: if set to true, the target and its descendants will be observed
- attributeOldValue: if the attribute is true or omitted, it is equivalent to setting it to true, indicating that the target attribute value before the change needs to be recorded. If attributeOldValue is set, the attributes setting can be omitted
- characterDataOldValue: if characterData is true or omitted, it is equivalent to setting it to true, indicating that the target data before the change needs to be recorded. If characterDataOldValue is set, the setting of characterData can be omitted
- attributeFilter: if not all attribute changes need to be observed, and attributes is set to true or ignored, set a list of local names (no namespace) of attributes to be observed
characteristic
MutationObserver has the following features:
- It will not run until all script tasks are completed, that is, it will run asynchronously
- It encapsulates DOM change records into an array for processing, rather than processing DOM changes individually one by one.
- It can observe all changes that occur in the DOM node, and it can also observe a certain kind of changes
When the DOM changes, the MutationObserver event will be triggered. However, it is essentially different from events: events are triggered synchronously, that is, changes in DOM will trigger corresponding events immediately; MutationObserver is triggered asynchronously. After DOM changes, it will not be triggered immediately, but will not be triggered until all current DOM operations are completed.
For example, if 1000 paragraphs (p elements) are continuously inserted into a document, 1000 insertion events will be triggered continuously, and the callback function of each event will be executed, which is likely to cause the browser to jam; The MutationObserver is completely different. It is triggered only after 1000 paragraphs are inserted, and it is triggered only once, which reduces the frequent changes of DOM and is greatly conducive to performance.
IntersectionObserver
When developing web pages, we often need to know whether an element enters the "viewport", that is, whether users can see it.
The traditional implementation method is to monitor the scroll event and then call the getBoundingClientRect() method of the target element to get the coordinates corresponding to the upper left corner of the viewport, and then judge whether it is in the viewport. The disadvantage of this method is that due to the intensive occurrence of scroll events and large amount of calculation, it is easy to cause performance problems.
At present, there is a new IntersectionObserver API that can automatically "observe" whether elements are visible. Chrome 51 + already supports it. Because the essence of visible is that the target element and the viewport produce a cross area, this API is called "cross viewer".
API
IntersectionObserver is a browser native constructor that accepts two parameters: callback is the callback function when visibility changes, and option is the configuration object (this parameter is optional).
var io = new IntersectionObserver(callback, option)

// Start observing
io.observe(document.getElementById('example'))

// Stop observing
io.unobserve(element)

// Close the viewer
io.disconnect()
If you want to observe multiple nodes, you need to call this method multiple times.
io.observe(elementA)
io.observe(elementB)
When the visibility of the target element changes, the callback function of the observer is called. Callback is usually triggered twice. One is when the target element just enters the viewport (becomes visible), and the other is when it leaves the viewport completely (becomes invisible).
var io = new IntersectionObserver((entries) => {
  console.log(entries)
})
The parameters (entries) of the callback function are an array, and each member is an IntersectionObserverEntry object. For example, if the visibility of two observed objects changes at the same time, the entries array will have two members.
- Time: the time when visibility changes. It is a high-precision timestamp, in milliseconds
- Target: the observed target element, which is a DOM node object
- isIntersecting: is the target visible
- Rootboundaries: information about the rectangular area of the root element. The return value of the getBoundingClientRect() method. If there is no root element (i.e. scrolling directly relative to the viewport), null is returned
- boundingClientRect: information about the rectangular area of the target element
- intersectionRect: information about the intersection area between the target element and the viewport (or root element)
- intersectionRatio: the visible proportion of the target element, that is, the proportion of intersectionRect to boundingClientRect. It is 1 when it is completely visible and less than or equal to 0 when it is completely invisible
for instance
<html lang="en">
<head>
<meta charset="UTF-8" />
<title>Document</title>
<style>
#div1 {
position: sticky;
top: 0;
height: 50px;
line-height: 50px;
text-align: center;
background: black;
color: #ffffff;
font-size: 18px;
}
</style>
</head>
<body>
<div id="div1">home page</div>
<div style="height: 1000px;"></div>
<div id="div2" style="height: 100px; background: red;"></div>
<script>
var div2 = document.getElementById('div2')
let observer = new IntersectionObserver(
function (entries) {
entries.forEach(function (element, index) {
console.log(element)
if (element.isIntersecting) {
div1.innerText = 'I'm out'
} else {
div1.innerText = 'home page'
}
})
},
{
root: null,
threshold: [0, 1]
}
)
observer.observe(div2)
</script>
</body>
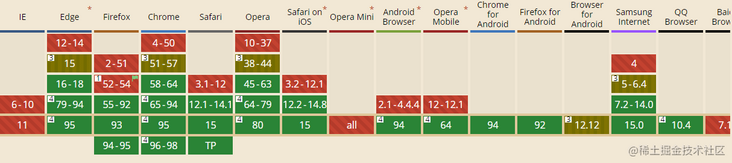
</html>Compared with getBoundingClientRect, its advantage is that it does not cause redrawing backflow. Compatibility is as follows
Lazy loading of pictures
The principle of image lazy loading is mainly realized by the core logic of judging whether the current image has reached the visual area. This can save bandwidth and improve web page performance. The traditional lazy loading is realized by listening to the scroll event, but the scroll event will be triggered many times in a very short time, which will seriously affect the page performance. To improve page performance, we can use IntersectionObserver to load images lazily.
const imgs = document.querySelectorAll('img[data-src]')
const config = {
  rootMargin: '0px',
  threshold: 0
}
let observer = new IntersectionObserver((entries, self) => {
  entries.forEach((entry) => {
    if (entry.isIntersecting) {
      let img = entry.target
      let src = img.dataset.src
      if (src) {
        img.src = src
        img.removeAttribute('data-src')
      }
      // Release observation
      self.unobserve(entry.target)
    }
  })
}, config)

imgs.forEach((image) => {
  observer.observe(image)
})
Infinite scroll
The implementation of infinite scroll is also very simple.
var intersectionObserver = new IntersectionObserver(function (entries) {
  // If not, return
  if (entries[0].intersectionRatio <= 0) return
  loadItems(10)
  console.log('Loaded new items')
})

// Start observing
intersectionObserver.observe(document.querySelector('.scrollerFooter'))
getComputedStyle()
DOM2 Style adds a getComputedStyle() method on document.defaultView, which returns a CSSStyleDeclaration
Object (the same type as the style attribute) that contains the calculation style of the element.
API
document.defaultView.getComputedStyle(element[,pseudo-element])
// or
window.getComputedStyle(element[,pseudo-element])
This method takes two parameters: the element to get the calculation style and the pseudo element string (such as ": after"). If you do not need to query pseudo elements, the second parameter can be passed null.
<!DOCTYPE html>
<html>
  <head>
    <style type="text/css">
      #myDiv {
        background-color: blue;
        width: 100px;
        height: 200px;
      }
    </style>
  </head>
  <body>
    <div id="myDiv" style="background-color: red; border: 1px solid black"></div>
  </body>
  <script>
    function getStyleByAttr(obj, name) {
      return window.getComputedStyle ? window.getComputedStyle(obj, null)[name] : obj.currentStyle[name]
    }
    let node = document.getElementById('myDiv')
    console.log(getStyleByAttr(node, 'backgroundColor'))
    console.log(getStyleByAttr(node, 'width'))
    console.log(getStyleByAttr(node, 'height'))
    console.log(getStyleByAttr(node, 'border'))
  </script>
</html>
Similarities and differences between and style
The same thing between getComputedStyle and element.style is that both return CSSStyleDeclaration objects. The difference is:
- element.style reads only the inline style of the element, that is, the style written on the style attribute of the element; The style read by getComputedStyle is the final style, including inline style, embedded style and external style.
- Element.style supports both reading and writing. We can rewrite the style of elements through element.style. getComputedStyle only supports reading and does not support writing. We can read the style by using getComputedStyle and modify the style through element.style
getBoundingClientRect
The getBoundingClientRect() method returns the size of the element and its position relative to the viewport.
API
let DOMRect = object.getBoundingClientRect()
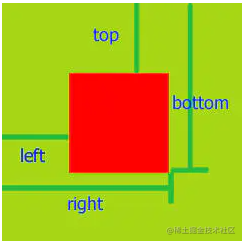
Its return value is a DOMRect object, which is a collection of rectangles returned by the element's getClientRects() method, that is, the CSS border size of the element. The returned result is the smallest rectangle containing the complete element, and has several read-only attributes in pixels: left, top, right, bottom, x, y, width, and height, which are used to describe the whole border. Properties other than width and height are calculated relative to the upper left corner of the view window.
Application scenario
1. Gets the distance the dom element is positioned relative to the upper left corner of the web page
The previous writing method is to find the element through offsetParent and locate the parent element until it recurses to the top-level element body or html.
// Gets the distance the dom element is positioned relative to the upper left corner of the web page
function offset(el) {
  var top = 0
  var left = 0
  do {
    top += el.offsetTop
    left += el.offsetLeft
  } while ((el = el.offsetParent)) // There is a compatibility problem and compatibility is required
  return {
    top: top,
    left: left
  }
}

var odiv = document.getElementsByClassName('markdown-body')
offset(a[0]) // {top: 271, left: 136}
Now, according to the api getBoundingClientRect, it can be written as follows:
var positionX = this.getBoundingClientRect().left + document.documentElement.scrollLeft
var positionY = this.getBoundingClientRect().top + document.documentElement.scrollTop
2. Determine whether the element is in the visible area
function isElView(el) {
  var top = el.getBoundingClientRect().top // The distance from the top of the element to the top of the visible area
  var bottom = el.getBoundingClientRect().bottom // The distance from the bottom of the element to the top of the visible area
  var se = document.documentElement.clientHeight // The height of the visible area of the browser.
  if (top < se && bottom > 0) {
    return true
  } else if (top >= se || bottom <= 0) {
    // invisible
  }
  return false
}
requestAnimationFrame
window.requestAnimationFrame() tells the browser that you want to execute an animation and ask the browser to update the animation before calling the specified callback function before next redraw.
API
This method needs to pass in a callback function as a parameter, which will be executed before the next redrawing of the browser.
window.requestAnimationFrame(callback)
Compatibility processing
window._requestAnimationFrame = (function () {
  return (
    window.requestAnimationFrame ||
    window.webkitRequestAnimationFrame ||
    window.mozRequestAnimationFrame ||
    function (callback) {
      window.setTimeout(callback, 1000 / 60)
    }
  )
})()
End animation
var globalID
function animate() {
  // done();  Always running
  globalID = requestAnimationFrame(animate) // Do something animate
}
globalID = requestAnimationFrame(animate) //start
cancelAnimationFrame(globalID) //end
Compared with setTimeout, the biggest advantage of requestAnimationFrame is that the system determines the execution time of the callback function. Specifically, if the screen refresh rate is 60Hz, the callback function is executed every 16.7ms. If the refresh rate is 75Hz, the time interval becomes 1000/75=13.3ms. In other words, the pace of requestAnimationFrame follows the pace of system refresh. It can ensure that the callback function is executed only once in each refresh interval of the screen, so it will not cause frame loss and jam in the animation. The API call is simple, as shown below:
var progress = 0
//Callback function
function render() {
  progress += 1 //Modify the position of the image
  if (progress < 100) {
    //Render recursively before the animation ends
    window.requestAnimationFrame(render)
  }
}
//First frame rendering
window.requestAnimationFrame(render)
advantage:
- CPU energy saving: for the animation implemented by setTimeout, when the page is hidden or minimized, setTimeout still performs the animation task in the background. Because the page is invisible or unavailable at this time, refreshing the animation is meaningless and a complete waste of CPU resources. The requestAnimationFrame is completely different. When the page processing is not activated, the screen refresh task of the page will also be suspended by the system. Therefore, the requestAnimationFrame following the pace of the system will also stop rendering. When the page is activated, the animation will continue to execute from the last place, effectively saving CPU overhead.
- Function throttling: in high-frequency events (resize,scroll, etc.), in order to prevent multiple function executions within a refresh interval, use requestAnimationFrame to ensure that the function is executed only once within each refresh interval, which can not only ensure fluency, but also better save the cost of function execution. It is meaningless to execute the function multiple times within a refresh interval, because the display refreshes every 16.7ms, and multiple drawings will not be reflected on the screen.
Application scenario
1. Monitor scroll function
The listener function of page scroll event is very suitable for using this api and delaying it until the next re rendering.
$(window).on('scroll', function () {
  window.requestAnimationFrame(scrollHandler)
})
Scroll smoothly to the top of the page
const scrollToTop = () => {
  const c = document.documentElement.scrollTop || document.body.scrollTop
  if (c > 0) {
    window.requestAnimationFrame(scrollToTop)
    window.scrollTo(0, c - c / 8)
  }
}

scrollToTop()
2. Massive data rendering
For example, rendering 100000 pieces of data mainly consists of the following methods:
(1) Use timer
//Container to insert
let ul = document.getElementById('container')
// Insert 100000 pieces of data
let total = 100000
// Insert 20 at a time
let once = 20
//PageCount
let page = total / once
//Index of each record
let index = 0
//Cyclic loading data
function loop(curTotal, curIndex) {
  if (curTotal <= 0) {
    return false
  }
  //How many entries per page
  let pageCount = Math.min(curTotal, once)
  setTimeout(() => {
    for (let i = 0; i < pageCount; i++) {
      let li = document.createElement('li')
      li.innerText = curIndex + i + ' : ' + ~~(Math.random() * total)
      ul.appendChild(li)
    }
    loop(curTotal - pageCount, curIndex + pageCount)
  }, 0)
}
loop(total, index)
(2) Using requestAnimationFrame
//Container to insert
let ul = document.getElementById('container')
// Insert 100000 pieces of data
let total = 100000
// Insert 20 at a time
let once = 20
//PageCount
let page = total / once
//Index of each record
let index = 0
//Cyclic loading data
function loop(curTotal, curIndex) {
  if (curTotal <= 0) {
    return false
  }
  //How many entries per page
  let pageCount = Math.min(curTotal, once)
  window.requestAnimationFrame(function () {
    for (let i = 0; i < pageCount; i++) {
      let li = document.createElement('li')
      li.innerText = curIndex + i + ' : ' + ~~(Math.random() * total)
      ul.appendChild(li)
    }
    loop(curTotal - pageCount, curIndex + pageCount)
  })
}
loop(total, index)
Monitoring Caton method
The FPS of the web page is calculated once per second, a column of data is obtained, and then analyzed. The popular explanation is that some JS code is executed regularly through the requestAnimationFrame API. If the browser is stuck, the rendering frequency cannot be well guaranteed, and the frame cannot reach 60 frames in 1s, it can indirectly reflect the rendering frame rate of the browser.
var lastTime = performance.now()
var frame = 0
var lastFameTime = performance.now()
var loop = function (time) {
  var now = performance.now()
  var fs = now - lastFameTime
  lastFameTime = now
  var fps = Math.round(1000 / fs)
  frame++
  if (now > 1000 + lastTime) {
    var fps = Math.round((frame * 1000) / (now - lastTime))
    frame = 0
    lastTime = now
  }
  window.requestAnimationFrame(loop)
}
We can define some boundary values. For example, if there are three FPS S lower than 20 in a row, it can be considered that there is a jam on the web page.
Recommended articles
You must know the principle analysis of webpack plug-in
Asynchronous loading principle and subcontracting strategy of Web pack
Summarize 18 webpack plug-ins, there will always be what you want!
Build a vue-cli4+webpack mobile terminal framework (out of the box)
From zero construction to optimization of a Vue cli like scaffold
Encapsulate a toast and dialog component and publish it to npm
Build a webpack project from scratch
Summarize several methods of Web pack packaging optimization
Advanced application of summarizing vue knowledge system
Summarize the practical skills of vue knowledge system
Introduction to summarizing vue knowledge system
Summarize the common skills of H5 development of mobile terminal (full of dry goods!)