Copyright Statement: This article is the original article of blogger Gane_Cheng. You are welcome to reprint and disseminate knowledge. Please leave a message to inform and indicate the source so that the original text can be found after the article has been corrected. Personal remarks, please take a skeptical attitude for reference!

For reprinting, please indicate the source:
http://blog.csdn.net/gane_cheng/article/details/52819118
http://www.ganecheng.tech/blog/52819118.html (Browse better)
On October 29, 2014, the W3C announced that after nearly eight years of hard work, HTML5 Standards and specifications have finally been formulated.
Html5 It will replace the HTML 4.01 and XHTML 1.0 standards formulated in 1999, in order to make the network standards meet the needs of the contemporary network and bring rich content of seamless convergence for desktop and mobile platforms at the time of rapid development of Internet applications.
As a programmer of IT in 2010, it can be said that HTML5 has witnessed the development step by step. Over the years, many new features of HTML5 have been abandoned in order to be compatible with IE6. But nowadays, unlike in the past, mobile devices are popular, HTML5 is naturally supported, and IE on the desktop is eventually rejected by users and Microsoft. More HTML5 browsers are popular. I want to re-examine these new features brought about by HTML5.
New features of HTML5
(1) Semantic
HTML5 gives web pages better meaning and structure.
(2) Local Storage Characteristics (OFFLINE & STORAGE)
Web app based on HTML5 has shorter startup time and faster networking speed, all thanks to HTML5 APP Cache and local storage capabilities.
(3) Device Access Characteristics (DEVICE ACCESS)
Since the publication of API documents for Geolocation functions, HTML5 has provided web application developers with more functional optimization options, bringing more advantages of experience functions. HTML5 provides an unprecedented open interface for data and application access. External applications can be directly linked to the data inside the browser, such as video and audio can be directly linked to microphones and cameras.
(4) Connection Characteristics (CONNECTIVITY)
More effective connection efficiency makes real-time chat based on pages, faster experience of web games, and more optimized online communication realized. HTML5 has more effective server push technology, Server-Sent Event and WebSockets are two of these features, these two features can help us achieve the server to "push" data to the client function.
(5) Multimedia Features of Web Pages (MULTIMEDIA)
Support Audio, Video and other multimedia functions on the web side, and complement each other with the website's own APPS, camera, video and audio functions.
3-D, Graphics & Effects
Based on SVG, Canvas, WebGL and CSS3 With the 3D function, users will be amazed at the amazing visual effect presented in the browser.
Performance & Integration
No user will ever wait for your Loading - HTML5 will solve previous cross-domain problems through technologies such as XMLHttpRequest2 to help your Web applications and websites work faster in a diversified environment.
The following seven new features are studied separately.
(1) Semantic

HTML5 adds new content tags with certain semantics to make Search Engines It's more efficient to crawl information from your website.

Content tags in HTML4 are at the same level, so it is impossible to distinguish different parts of content. The content tags in HTML5 are independent of each other and have different levels. Search engines and statistical software can quickly identify each part of the content.
These tags are useful for news websites and blog websites.
The biggest problem is how unsupported browsers handle these new semantic elements when they are used.
The most common solution I've ever seen is this.
<section class="section">

    <!-- content -->

</section>
- 1
- 2
- 3
- 4
- 5
- 1
- 2
- 3
- 4
- 5
.section
{
     color: blue;
}
- 1
- 2
- 3
- 4
- 1
- 2
- 3
- 4
If you want to know more about semantic tag compatibility, you can refer to this article. http://html5.group.iteye.com/group/wiki/3293-html5
(2) Local Storage Characteristics (OFFLINE & STORAGE)
HTML5 provides an API for web storage to facilitate offline use of Web applications. In addition, compared with cookie s, the new API has the advantages of high security, high efficiency and larger space.
Let's first look at W3C's introduction to offline storage.
Web Apps can start faster and work even if there is no internet connection, thanks to the HTML5 App Cache, as well as the Local Storage, Indexed DB, and the File API specifications.
HTML5 offline storage includes application caching, local storage, indexing data base File interface.
Following is an introduction.
(1) Application Cache
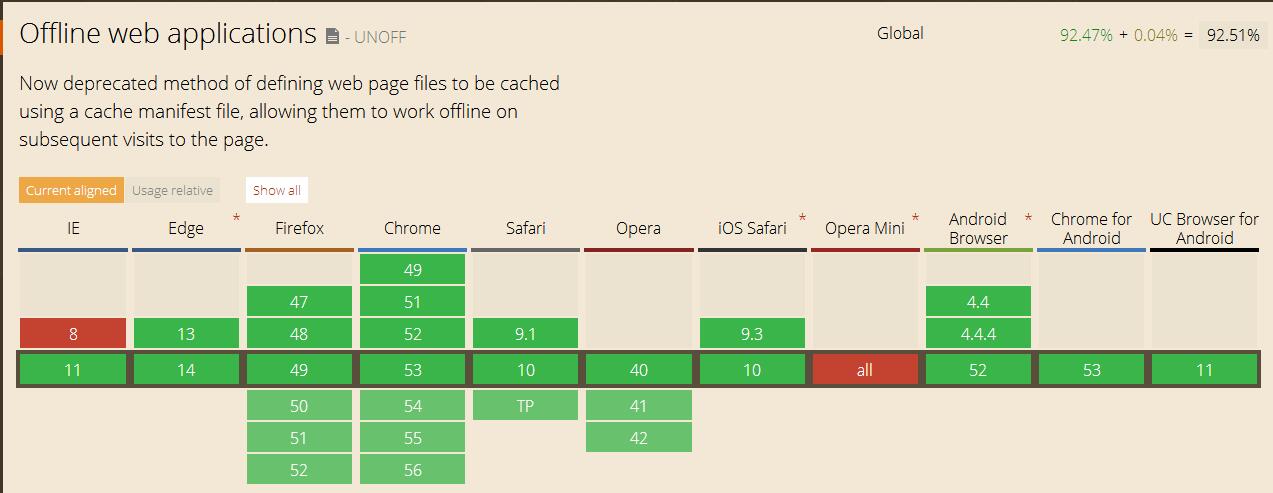
With HTML5, it is easy to create offline versions of web applications by creating cache manifest files.
HTML5 introduces application caching, which means that web applications can be cached and accessed without an Internet connection.
Application caching brings three advantages to applications:
- Offline browsing - Users can use them when applying offline
- Speed - Cached resources load faster
- Reduce server load - Browsers will only download updated or changed resources from servers.
Let's not talk nonsense. Let's first feel the charm of Application Cache. Shut up, show me the demo!
Demo link: http://www.ganecheng.tech/welcome_offline.html
1. Open this page and wait for loading for the first time. There is no difference between the page and the normal page.
2. Click the refresh button, or force the refresh button, to see the speed of the second opening. Is it going to explode soon? (Speed)
3. Now I ask you to unplug the cable, disconnect WiFi, click the refresh button again, or force the refresh button to see the speed of the third opening. Is it going to explode soon? Note that there is no Internet connection, and the server lost connection, still open the page seconds, but also the normal operation of the page. (Offline browsing to reduce server load)
After seeing the effect, take a look at the principle of App Cache.
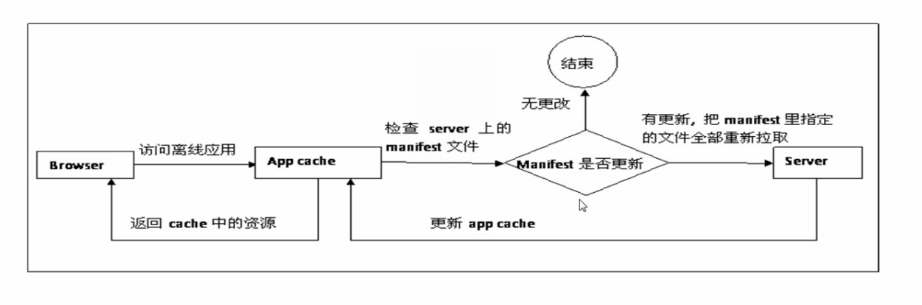
When we first configure cache manifest correctly, the browser caches the resources in the manifest file. When we visit the application again, the browser will directly return the resources in the cache, and then check whether the manifest file has changed. If there are changes, the corresponding changes will be updated, and the app cache in the browser will be changed.
Usage method
Page declaration using App Cache
 <!DOCTYPE HTML>
 <html manifest="index.manifest">
- 1
- 2
- 1
- 2
Resources are specified in the manifest file.
CACHE MANIFEST
theme.css
logo.gif
main.js

NETWORK:
login.asp

FALLBACK:
/html5/ /404.html
- 1
- 2
- 3
- 4
- 5
- 6
- 7
- 8
- 9
- 10
- 1
- 2
- 3
- 4
- 5
- 6
- 7
- 8
- 9
- 10
The manifest file can be divided into three parts:
CACHE MANIFEST - The files listed under this heading will be cached after the first download.
NETWORK - The files listed under this heading need to be connected to the server and will not be cached.
FALLBACK - The files listed under this heading specify the return pages (such as 404 pages) when pages cannot be accessed.
CACHE MANIFEST is necessary.
NETWORK stipulates that the file "login.asp" will never be cached and is not available offline.
FALLBACK stipulates that if an Internet connection cannot be established, "404.html" is used instead of all files in the / html5 / directory.
Once the application is cached, it keeps the cache until the following happens:
- Users empty the browser cache, users how to do, the page can not be left and right, said is not said.
- The manifest file has been modified. Please note that updating a file listed in the list does not mean that the browser will re-cache the resource. List file itself must be changed, usually with a comment, the content of the comment is the date, want to update, change the date.
- The application cache is updated by the program, which is a little more reliable.
It should be noted that the updated resources need to open the page next time to take effect. This open page has been loaded from the cache before updating the resources.
To update by the program, you need to rely on the manifest file to be modified, because it calls the interface provided by the browser to detect the value of window.applicationCache.status. If it is UPDATEREADY, it means that the browser can update the cache after comparing the manifest file. window.applicationCache.swapCache(). Update finished, will not take effect immediately, window.location.reload(); reload the page.
There are so many states in the cache.
var appCache = window.applicationCache;
switch (appCache.status)
{
    case appCache.UNCACHED: // UNCACHED == 0
        return 'UNCACHED';
        break;
    case appCache.IDLE: // IDLE == 1
        return 'IDLE';
        break;
    case appCache.CHECKING: // CHECKING == 2
        return 'CHECKING';
        break;
    case appCache.DOWNLOADING: // DOWNLOADING == 3
        return 'DOWNLOADING';
        break;
    case appCache.UPDATEREADY: // UPDATEREADY == 4
        return 'UPDATEREADY';
        break;
    case appCache.OBSOLETE: // OBSOLETE == 5
        return 'OBSOLETE';
        break;
    default:
        return 'UKNOWN CACHE STATUS';
        break;
};
- 1
- 2
- 3
- 4
- 5
- 6
Program update cache method.
// Check if a new cache is available on page load.
window.addEventListener('load', function(e)
{
    window.applicationCache.addEventListener('updateready', function(e)
    {
        if (window.applicationCache.status == window.applicationCache.UPDATEREADY)
        {
            // Browser downloaded a new app cache.
            // Swap it in and reload the page to get the new hotness.
            window.applicationCache.swapCache();
            if (confirm('A new version of this site is available. Load it?'))
            {
                window.location.reload();
            }
        }
        else
        {
            // Manifest didn't changed. Nothing new to server.
        }
    }, false);
}, false);
- 1
- 2
- 3
- 4
- 5
- 6
- 7
- 8
- 9
- 10
- 11
- 12
- 13
- 14
- 15
- 16
- 17
- 18
- 19
- 20
- 21
- 1
- 2
- 3
- 4
- 5
- 6
- 7
- 8
- 9
- 10
- 11
- 12
- 13
- 14
- 15
- 16
- 17
- 18
- 19
- 20
- 21
For more ways to update caching, refer to this article: http://www.jb51.net/html5/67850.html
Overall, the three advantages of App Cache are obvious. But with a few pits, no one is willing to use this new feature.
1. Pages using App Cache update the page resources after the list file is updated, but only the next time the page is opened, which means that we need to use code to determine whether the latest version is the latest version, if not, refresh the page. It's a bad experience.
2. Pages that use App Cache will also be cached, which is almost a nightmare for pages that need dynamic updates. The pages accessed by users are not up-to-date and can cause a lot of problems.
3. The mix of App cache and browser cache will make the update mechanism more complex, mainly due to the following factors:
1) App cache differs in the implementation of browser platforms;
2) Each browser also provides different page refresh mechanisms;
3) app cache is also inextricably linked with traditional browser cache; for how they work together, the relevant specifications of HTML5 do not provide very clear details of app cache; browser official documents do not give very clear instructions.
4) The update mechanism of browser cache itself is very complex.
5) If the manifest file itself has cache time or is set to be always available, then your web page will never be updated.
App Cache has more pits, you can refer to this article: http://dreclo.blog.163.com/blog/static/528789512014111675023409/ Then decide whether or not to use this new feature.
From amazing at the power of App Cache to filling the pit, it took W3C so long to come up with such a thing, which is really disappointing. It took less than an hour to learn how to use App Cache, filling the pit for an afternoon. Every page should have manifest, every page should add code to judge to update the cache, can I curse people?
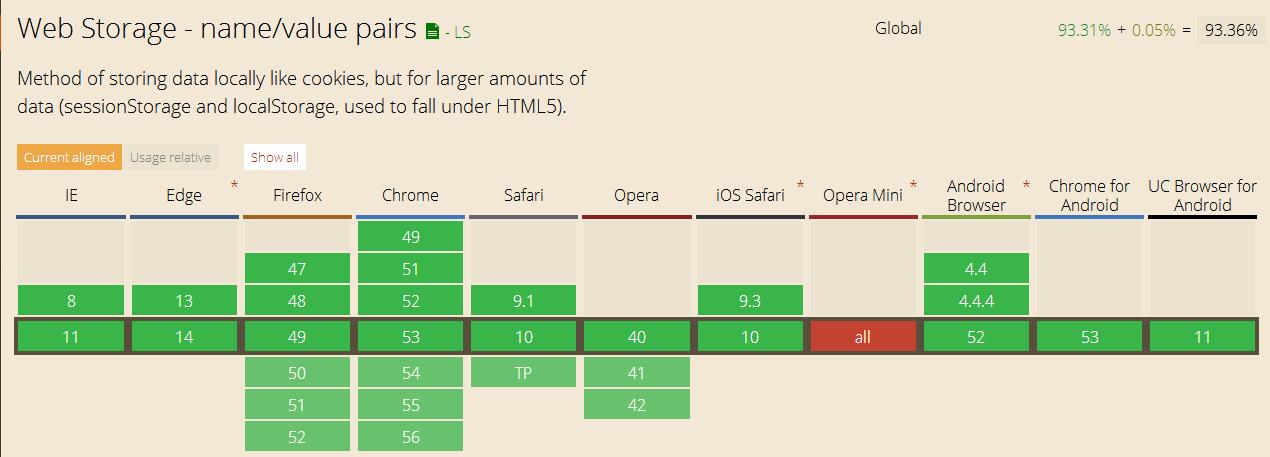
(2) Local Storage
History of local storage development.
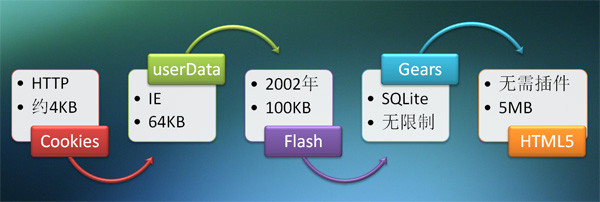
The earliest Cookies is naturally known to all, the main problem is that they are too small, about 4KB, and IE6 only supports 20 cookies per domain name, too few. The advantage is that everyone is supportive and well supported. Users who banned cookies long ago also slowly disappeared, as if they had banned cookies before. JavaScript Users do not exist the same.
userData is IE stuff, garbage. Flash is now the most used bar, the space is 25 times Cookie, basically enough. Later, Google launched Gears, although there are no restrictions, but the upset point is to install additional plug-ins (not specifically studied). By HTML5, all of these have been unified. The official recommendation is 5MB for each website. It's very big. Just save some strings. That's enough. The odd thing is that all supported browsers currently use 5MB. Although some browsers can be set up by users, it is appropriate for web page makers to consider the current situation with 5MB.
The first is naturally to detect whether the browser supports local storage. In HTML5, local storage is a window property, including local storage and session storage. The difference between them should be clearly identified by name. The former is always local, while the latter is only accompanied by session. Once the window is closed, it will disappear. The usage of the two is exactly the same. Take the local Storage as an example.
if(window.localStorage)
{
     alert('This browser supports localStorage');
}
else
{
     alert('This browser does NOT support localStorage');
}
- 1
- 2
- 3
- 4
- 5
- 6
- 7
- 8
- 1
- 2
- 3
- 4
- 5
- 6
- 7
- 8
The way to store data is to add an attribute directly to window.localStorage, such as window.localStorage.a or window.localStorage ["a"]. Its operation method of reading, writing and deleting is very simple. It exists in the form of key-value pairs as follows:
localStorage.a = 3;//Set a to "3"
localStorage["a"] = "sfsf";//Set a to "sfsf sf" to override the above values
localStorage.setItem("b","isaac");//Set b to "isaac"
var a1 = localStorage["a"];//Get the value of a
var a2 = localStorage.a;//Get the value of a
var b = localStorage.getItem("b");//Get the value of b
localStorage.removeItem("c");//Clear the value of c
- 1
- 2
- 3
- 4
- 5
- 6
- 7
- 1
- 2
- 3
- 4
- 5
- 6
- 7
The most recommended ones here are getItem() and setItem(), and removeItem() is used for clearing key-value pairs. If you want to clear all key-value pairs at once, you can use clear(). In addition, HTML5 also provides a key() method that can be used when you don't know which keys are there, as follows:
var storage = window.localStorage;
function showStorage()
{
     for(var i=0;i<storage.length;i++)
     {
          //key(i) gets the corresponding key, and then gets the corresponding value by getItem().
          document.write(storage.key(i)+ " : " + storage.getItem(storage.key(i)) + "<br>");
     }
}
- 1
- 2
- 3
- 4
- 5
- 6
- 7
- 8
- 9
- 1
- 2
- 3
- 4
- 5
- 6
- 7
- 8
- 9
Write a simple counter that uses local storage:
    var storage = window.localStorage;
    if (!storage.getItem("pageLoadCount"))
    {
        storage.setItem("pageLoadCount",0);
    }
    storage.pageLoadCount = parseInt(storage.getItem("pageLoadCount")) + 1;//Must Format Conversion
    document.getElementById("count").innerHTML = storage.pageLoadCount;
    showStorage();
- 1
- 2
- 3
- 4
- 5
- 6
- 7
- 8
- 1
- 2
- 3
- 4
- 5
- 6
- 7
- 8
Continuous refresh can see the number rising at a little bit, as shown in the following figure:

It should be noted that HTML5 local storage can only store strings, any format storage will be automatically converted to strings, so when reading, you need to type conversion. That's why parseInt had to be used in the previous code.
For more information about localStorage, please refer to this article: http://www.cnblogs.com/xiaowei0705/archive/2011/04/19/2021372.html
(3) Indexed DB
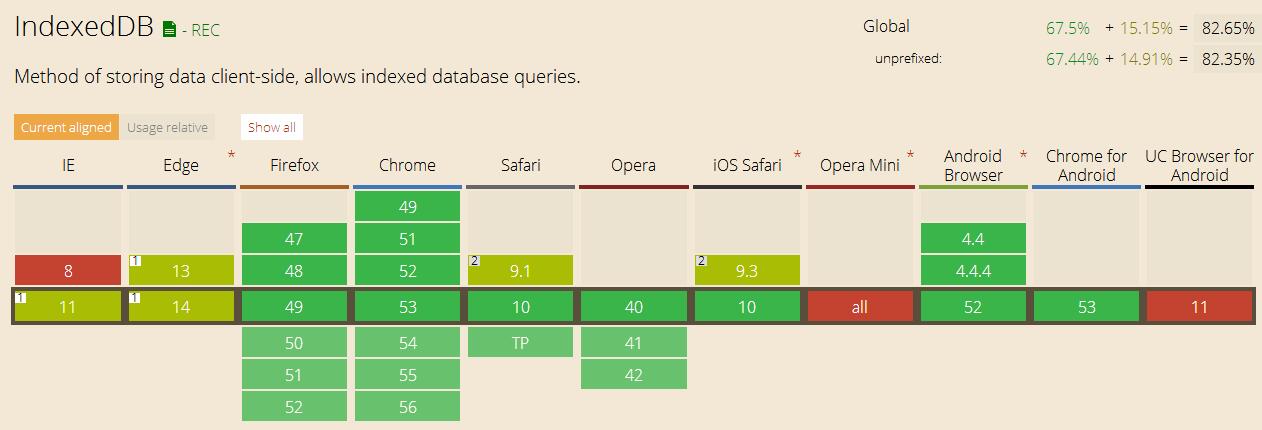
IndexedDB essentially allows users to store large amounts of data in browsers. Any application that needs to send a large amount of data can benefit from this feature, and the data can be stored in the user's browser. Currently, this is only one of the functions of IndexedDB, which also provides a powerful index-based Search api to get the data users need.
Users may ask: What is the difference between IndexedDB and other previous storage mechanisms (such as cookies, sessions)?
Cookies is the most commonly used mechanism for browser-side data preservation, but it has limited data size and privacy problems. Cookies also send data back and forth in each request, which is totally unable to take advantage of client data storage.
Let's look at the characteristics of the Local Storage local storage mechanism. Local Storage has good support in HTML 5, but it is still limited in terms of total storage. Local Storage does not provide a real "retrieval API", and locally stored data is accessed only through key-value pairs. Local Storage is suitable for certain scenarios where data needs to be stored, such as user preferences and habits, while IndexedDB is more suitable for storing data such as advertising (it is more like a real database).
Generally speaking, there are two different types of databases: relational and document databases (also known as NoSQL or objects). Relational databases such as SQL Server, MySQL,Oracle Data is stored in tables. Document databases such as MongoDB,CouchDB,Redis Data sets are stored as individual objects. IndexedDB is a document database that is completely built into a sandbox environment in the browser (mandatory according to the (browser) homology policy).
Each operation of the database is described as opening the database through a request, accessing an object store, and then continuing.
Request life cycle for opening database

Is IndexedDB suitable for my application?
Now the key question is, "Is IndexedDB suitable for my application?" As usual, the answer is yes: "It depends. "First, when you try to save data on the client side, you will consider HTML5 local storage. Local storage is supported by a wide range of browsers and has a very easy-to-use API. Simplicity has its advantages, but its disadvantage is that it can not support complex search strategies, store large amounts of data and provide transaction support.
IndexedDB is a database. So when you want to make a decision for the client, consider how you choose a database of persistent media on the server. You may ask yourself some questions to help you decide whether the client database is suitable for your application, including:
- Does your user support the IndexedDB API by accessing your application through a browser?
- Do you need to store a lot of data on the client?
- Do you need to quickly locate individual data points in a large data set?
-
Your Framework Do you need transaction support on the client?
If you answer "yes" to any of these questions, it's likely that IndexedDB is a good candidate for your application.
IndexedDB usage
Now that you have the opportunity to familiarize yourself with some of the overall concepts, the next step is to start implementing IndexedDB-based applications. The first step is to unify the implementation of IndexedDB in different browsers. You can easily add checks for various vendor-specific options and set them to the same name as the official object on the window object. The following listing shows how the final results of window.indexedDB, window.IDBTransaction, window.IDBKeyRange are updated and set to the specific implementation of the corresponding browser.
        window.indexedDB = window.indexedDB ||
                           window.mozIndexedDB ||
                           window.webkitIndexedDB ||
                           window.msIndexedDB;

        window.IDBTransaction = window.IDBTransaction ||
                           window.webkitIDBTransaction ||
                           window.msIDBTransaction;

        window.IDBKeyRange = window.IDBKeyRange ||
                           window.webkitIDBKeyRange ||
                           window.msIDBKeyRange;
- 1
- 2
- 3
- 4
- 5
- 6
- 7
- 8
- 9
- 10
- 11
- 12
- 1
- 2
- 3
- 4
- 5
- 6
- 7
- 8
- 9
- 10
- 11
- 12
Now that each database-related global object holds the correct version, the application can be ready to start working with IndexedDB.
Open the database
// Open our database, database name, version number
var request = indexedDB.open("MyTestDatabase", 3);
- 1
- 2
- 1
- 2
Three events in indexedDB
//Database Open Successfully Executed
request.onsuccess = function (event)
{
      // Better use "this" than "req" to get the result to avoid problems with
      // garbage collection.
      // db = request.result;
      db = this.result;
      console.debug("initDb DONE");
};
//Failed database open execution
request.onerror = function (event)
{
      console.error("initDb:", evt.target.errorCode);
};
//When the database is opened for the first time or when the specified version number is higher than the version number of the currently persistent database, triggering this event can create object storage space structure, update structure, add index, etc. in this place.
request.onupgradeneeded = function (event)
{
      console.debug("initDb.onupgradeneeded");
      var store = event.currentTarget.result.createObjectStore(
        DB_STORE_NAME, { keyPath: 'id', autoIncrement: true });
};
- 1
- 2
- 3
- 4
- 5
- 6
- 7
- 8
- 9
- 10
- 11
- 12
- 13
- 14
- 15
- 16
- 17
- 18
- 19
- 20
- 21
- 1
- 2
- 3
- 4
- 5
- 6
- 7
- 8
- 9
- 10
- 11
- 12
- 13
- 14
- 15
- 16
- 17
- 18
- 19
- 20
- 21
Add or update data
// Our customer data looks like this.
const customerData = [
  { ssn: "444-44-4444", name: "Bill", age: 35, email: "bill@company.com" },
  { ssn: "555-55-5555", name: "Donna", age: 32, email: "donna@home.org" }
];

var transaction = db.transaction(["customers"], "readwrite");

// Perform some operations when all data is added to the database
transaction.oncomplete = function(event) {
  alert("All done!");
};

transaction.onerror = function(event) {
  // Don't forget to do error handling!
};

var objectStore = transaction.objectStore("customers");
for (var i in customerData)
{
  var request = objectStore.add(customerData[i]);
  request.onsuccess = function(event)
  {
    // event.target.result == customerData[i].ssn
  };
}
- 1
- 2
- 3
- 4
- 5
- 6
- 7
- 8
- 9
- 10
- 11
- 12
- 13
- 14
- 15
- 16
- 17
- 18
- 19
- 20
- 21
- 22
- 23
- 24
- 25
- 26
- 1
- 2
- 3
- 4
- 5
- 6
- 7
- 8
- 9
- 10
- 11
- 12
- 13
- 14
- 15
- 16
- 17
- 18
- 19
- 20
- 21
- 22
- 23
- 24
- 25
- 26
Delete data
var request = db.transaction(["customers"], "readwrite")
                .objectStore("customers")
                .delete("444-44-4444");
request.onsuccess = function(event) {
  // Delete data successfully!
};
- 1
- 2
- 3
- 4
- 5
- 6
- 1
- 2
- 3
- 4
- 5
- 6
get data
var transaction = db.transaction(["customers"]);
var objectStore = transaction.objectStore("customers");
var request = objectStore.get("444-44-4444");
request.onerror = function(event)
{
  // Error handling!
};
request.onsuccess = function(event)
{
  // Do something about request.result!
  alert("Name for SSN 444-44-4444 is " + request.result.name);
};
- 1
- 2
- 3
- 4
- 5
- 6
- 7
- 8
- 9
- 10
- 11
- 12
- 1
- 2
- 3
- 4
- 5
- 6
- 7
- 8
- 9
- 10
- 11
- 12
For a "simple" extraction, the code here is a bit too much. Let's see how we can shorten it a little bit, assuming that you're dealing with errors at the database level:
db.transaction("customers").objectStore("customers").get("444-44-4444").onsuccess = function(event)
{
  alert("Name for SSN 444-44-4444 is " + event.target.result.name);
};
- 1
- 2
- 3
- 4
- 1
- 2
- 3
- 4
Data acquisition using cursors
Using get() requires you to know which key you want to retrieve. If you want to traverse all the values in the object storage space, you can use cursors. It looks like the following:
var customers = [];

var objectStore = db.transaction("customers").objectStore("customers");

objectStore.openCursor().onsuccess = function(event)
{
  var cursor = event.target.result;
  if (cursor)
  {
    customers.push(cursor.value);
    cursor.continue();
  }
  else
  {
    alert("Got all customers: " + customers);
  }
};
- 1
- 2
- 3
- 4
- 5
- 6
- 7
- 8
- 9
- 10
- 11
- 12
- 13
- 14
- 15
- 16
- 17
- 1
- 2
- 3
- 4
- 5
- 6
- 7
- 8
- 9
- 10
- 11
- 12
- 13
- 14
- 15
- 16
- 17
Here is a fully encapsulated example that simplifies these operations.
<script type="text/javascript">

        window.indexedDB = window.indexedDB ||
                           window.mozIndexedDB ||
                           window.webkitIndexedDB ||
                           window.msIndexedDB;

        window.IDBTransaction = window.IDBTransaction ||
                           window.webkitIDBTransaction ||
                           window.msIDBTransaction;

        window.IDBKeyRange = window.IDBKeyRange ||
                           window.webkitIDBKeyRange ||
                           window.msIDBKeyRange;

        (function(window){

            'use strict';

            var db = {

                version: 1, // important: only use whole numbers!

                objectStoreName: 'tasks',

                instance: {},

                upgrade: function (e) {

                    var
                        _db = e.target.result,
                        names = _db.objectStoreNames,
                        name = db.objectStoreName;

                    if (!names.contains(name)) {

                        _db.createObjectStore(
                            name,
                            {
                                keyPath: 'id',
                                autoIncrement: true
                            });
                    }
                },

                errorHandler: function (error) {
                    window.alert('error: ' + error.target.code);
                    debugger;
                },

                open: function (callback) {

                    var request = window.indexedDB.open(
                        db.objectStoreName, db.version);

                    request.onerror = db.errorHandler;

                    request.onupgradeneeded = db.upgrade;

                    request.onsuccess = function (e) {

                        db.instance = request.result;

                        db.instance.onerror =
                            db.errorHandler;

                        callback();
                    };
                },

                getObjectStore: function (mode) {

                    var txn, store;

                    mode = mode || 'readonly';

                    txn = db.instance.transaction(
                        [db.objectStoreName], mode);

                    store = txn.objectStore(
                        db.objectStoreName);

                    return store;
                },

                save: function (data, callback) {

                    db.open(function () {

                        var store, request,
                            mode = 'readwrite';

                        store = db.getObjectStore(mode),

                        request = data.id ?
                            store.put(data) :
                            store.add(data);

                        request.onsuccess = callback;
                    });
                },

                getAll: function (callback) {

                    db.open(function () {

                        var
                            store = db.getObjectStore(),
                            cursor = store.openCursor(),
                            data = [];

                        cursor.onsuccess = function (e) {

                            var result = e.target.result;

                            if (result &&
                                result !== null) {

                                data.push(result.value);
                                result.continue();

                            } else {

                                callback(data);
                            }
                        };

                    });
                },

                get: function (id, callback) {

                    id = parseInt(id);

                    db.open(function () {

                        var
                            store = db.getObjectStore(),
                            request = store.get(id);

                        request.onsuccess = function (e){
                            callback(e.target.result);
                        };
                    });
                },

                'delete': function (id, callback) {

                    id = parseInt(id);

                    db.open(function () {

                        var
                            mode = 'readwrite',
                            store, request;

                        store = db.getObjectStore(mode);

                        request = store.delete(id);

                        request.onsuccess = callback;
                    });
                },

                deleteAll: function (callback) {

                    db.open(function () {

                        var mode, store, request;

                        mode = 'readwrite';
                        store = db.getObjectStore(mode);
                        request = store.clear();

                        request.onsuccess = callback;
                    });

                }
            };

            window.app = window.app || {};
            window.app.db = db;

        }(window));


        //Method of displaying data on a page
        var bindData = function (data) {

            $("#IndexedDB").html('');

            if(data.length === 0){
                $("#IndexedDB").html(" No data ");
                return;
            }

            data.forEach(function (note) {
                $("#IndexedDB").append(note.id+","+note.title+","+note.text);
            });
        };

        //A New Data
        var note =
        {
                id:1,
                title: "Data 1",
                text: "Another field of data 1"
        };
        //Another new data
        var note2 =
        {
                id:2,
                title: "Data 2",
                text: "Another field of data 2"
        };
        //Insert or update data
        window.app.db.save(note,function()
        {
            //window.app.db.getAll(bindData);
        });
        window.app.db.save(note2);

        //get data
        window.app.db.get(1,function(item)
        {
            //alert("window.app.db.get:"+item.id+","+item.title+","+item.text);
        });

        //Delete data
        window.app.db.delete(1,function()
        {
            //alert("window.app.db.get:"+item.id+","+item.title+","+item.text);
        });

        //Delete all
        window.app.db.deleteAll(function()
        {
            //alert("window.app.db.get:"+item.id+","+item.title+","+item.text);
        });

</script>
- 1
- 2
- 3
- 4
- 5
- 6
- 7
- 8
- 9
- 10
- 11
- 12
- 13
- 14
- 15
- 16
- 17
- 18
- 19
- 20
- 21
- 22
- 23
- 24
- 25
- 26
- 27
- 28
- 29
- 30
- 31
- 32
- 33
- 34
- 35
- 36
- 37
- 38
- 39
- 40
- 41
- 42
- 43
- 44
- 45
- 46
- 47
- 48
- 49
- 50
- 51
- 52
- 53
- 54
- 55
- 56
- 57
- 58
- 59
- 60
- 61
- 62
- 63
- 64
- 65
- 66
- 67
- 68
- 69
- 70
- 71
- 72
- 73
- 74
- 75
- 76
- 77
- 78
- 79
- 80
- 81
- 82
- 83
- 84
- 85
- 86
- 87
- 88
- 89
- 90
- 91
- 92
- 93
- 94
- 95
- 96
- 97
- 98
- 99
- 100
- 101
- 102
- 103
- 104
- 105
- 106
- 107
- 108
- 109
- 110
- 111
- 112
- 113
- 114
- 115
- 116
- 117
- 118
- 119
- 120
- 121
- 122
- 123
- 124
- 125
- 126
- 127
- 128
- 129
- 130
- 131
- 132
- 133
- 134
- 135
- 136
- 137
- 138
- 139
- 140
- 141
- 142
- 143
- 144
- 145
- 146
- 147
- 148
- 149
- 150
- 151
- 152
- 153
- 154
- 155
- 156
- 157
- 158
- 159
- 160
- 161
- 162
- 163
- 164
- 165
- 166
- 167
- 168
- 169
- 170
- 171
- 172
- 173
- 174
- 175
- 176
- 177
- 178
- 179
- 180
- 181
- 182
- 183
- 184
- 185
- 186
- 187
- 188
- 189
- 190
- 191
- 192
- 193
- 194
- 195
- 196
- 197
- 198
- 199
- 200
- 201
- 202
- 203
- 204
- 205
- 206
- 207
- 208
- 209
- 210
- 211
- 212
- 213
- 214
- 215
- 216
- 217
- 218
- 219
- 220
- 221
- 222
- 223
- 224
- 225
- 226
- 227
- 228
- 229
- 230
- 231
- 232
- 233
- 234
- 235
- 236
- 237
- 238
- 239
- 240
- 241
To learn more about IndexedDB usage, you can refer to these two articles.
https://developer.mozilla.org/zh-CN/docs/Web/API/IndexedDB_API/Using_IndexedDB
In addition to IndexedDB, there is also a Web SQL that has been abandoned by W3C.
Browser support for local database is not only implemented from IndexedDB, but also a new method after the implementation of Web SQL. Similar to IndexedDB,Web SQL is a client database, but it is implemented as a relational database and communicates with the database using Structured Query Language (SQL). The history of Web SQL is full of twists and turns, but the bottom line is that no mainstream browser vendors continue to support Web SQL.
If Web SQL is actually an obsolete technology, why mention it? Interestingly, Web SQL is firmly supported in browsers. Chrome, Safari, iOS Safari, and Android All browsers support it. In addition, it is not the latest version of these browsers that provides support. Many of the latest and best previous versions of these browsers can also support it. Interestingly, if you add support for Web SQL to support IndexedDB, you suddenly find that many browser vendors and versions become some kind of incarnation to support browser built-in databases.
Therefore, if your application really needs a client database, the highest level of adoption you want to achieve is possible. When IndexedDB is unavailable, it may seem that your application needs to choose to use Web SQL to support client data architecture. Although there are distinct differences between document databases and relational databases in managing data, as long as you have the right abstraction, you can use local databases to build an application.
The use of Web SQL is similar to the operation of the SQLite database, which is not covered here.
To learn more about Web SQL, you can refer to this article: http://www.ibm.com/developerworks/cn/web/1210_jiangjj_html5db/
(4) File API
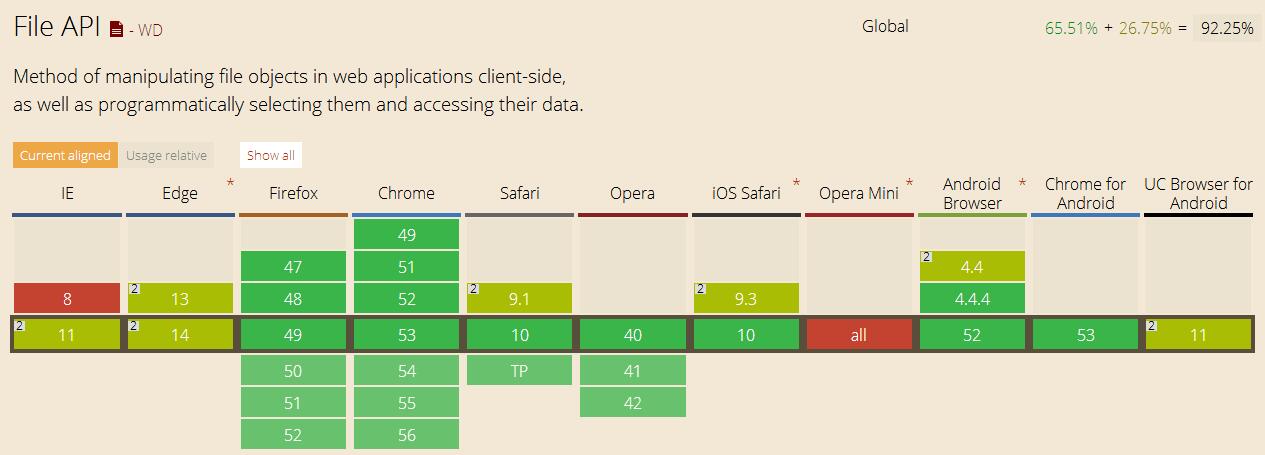
In the past, we used flash, silverlight or third-party activeX plug-ins to operate local files. Because using these technologies, it is difficult to achieve uniform performance across platforms, browsers and devices. Another point of view is that our web applications rely on third-party plug-ins, rather than being very independent and not universal enough. . In the HTML5 standard, APIs for operating files are provided by default to standardize all of this directly. With the API of operating files, our Web application can easily control a series of operations such as reading, writing, folders, files and so on through JS.
Look at a demo first. Before we operated on a picture file, we uploaded the picture to the server, then pointed to the url address of the server with an img tag, and then processed the picture with a third-party plug-in. Now all of this does not need the server, because the methods of reading the file provided by the FileReader object are very simple, and all of them are The operation of client js.
http://html5demos.com/file-api/
Now let's use these API s ourselves.
Write our HTML page first.
    <input type="file" multiple="multiple" name="fileDemo" id="fileDemo" />
    <br />
    <input type="button" value="Get the name of the file" id="btnGetFile" />
    <input type="button" value="readAsDataURL" id="readAsDataURL" onclick="showDataByURL();" />
    <input type="button" value="readAsBinaryString" id="readAsBinaryString" onclick="showDataByBinaryString();" />
    <input type="button" value="readAsText" id="readAsText" onclick="showDataByText();" />
    <div id="result"></div>
- 1
- 2
- 3
- 4
- 5
- 6
- 7
- 1
- 2
- 3
- 4
- 5
- 6
- 7
Get the filename
            $("#btnGetFile").click(function(e)
            {
                var fileList = document.getElementById("fileDemo").files;
                for (var i = 0; i < fileList.length; i++)
                {
                    if (!(/image\/\w+/.test(fileList[i].type)))
                    {
                        $("#Appnd ("<span>type:"+fileList[i].type+"--********** non-picture type*****-name:" +fileList[i].name+"- - size:" +fileList[i].size+"</span><br/>";
                    }
                    else
                    {
                        $("#result").append("<span>type:" + fileList[i].type + "--name:" + fileList[i].name + "--size:" + fileList[i].size + "</span><br />");
                    }
                }
            });
- 1
- 2
- 3
- 4
- 5
- 6
- 7
- 8
- 9
- 10
- 11
- 12
- 13
- 14
- 15
- 1
- 2
- 3
- 4
- 5
- 6
- 7
- 8
- 9
- 10
- 11
- 12
- 13
- 14
- 15
readAsDataURL()
Start reading the contents of the specified Blob object or File object. When the reading operation is completed, the value of the readyState property becomes DONE, which is called if the onloadend event handler is set. At the same time, the result property will contain a string in data: URL format to represent the contents of the read file.
This method is very useful, for example, to achieve a local preview of the picture.
        function showDataByURL()
        {
            var resultFile = document.getElementById("fileDemo").files[0];
            if (resultFile)
            {
                var reader = new FileReader();

                reader.readAsDataURL(resultFile);
                reader.onload = function(e)
                {
                    var urlData = this.result;
                    document.getElementById("result").innerHTML += "<img src='" + urlData + "' alt='" + resultFile.name + "' />";
                };

            }

        }
- 1
- 2
- 3
- 4
- 5
- 6
- 7
- 8
- 9
- 10
- 11
- 12
- 13
- 14
- 15
- 16
- 17
- 1
- 2
- 3
- 4
- 5
- 6
- 7
- 8
- 9
- 10
- 11
- 12
- 13
- 14
- 15
- 16
- 17
readAsBinaryString()
Start reading the contents of the specified Blob object or File object. When the reading operation is completed, the value of the readyState property becomes DONE, which is called if the onloadend event handler is set. At the same time, the result property will contain the original binary data of the read file.
        function showDataByBinaryString()
        {
            var resultFile = document.getElementById("fileDemo").files[0];
            if (resultFile)
            {
                var reader = new FileReader();
                //Asynchronous mode, does not affect the main thread
                reader.readAsBinaryString(resultFile);

                reader.onload = function(e)
                {
                    var urlData = this.result;
                    document.getElementById("result").innerHTML += urlData;
                };
            }
        }
- 1
- 2
- 3
- 4
- 5
- 6
- 7
- 8
- 9
- 10
- 11
- 12
- 13
- 14
- 15
- 16
- 17
- 18
- 1
- 2
- 3
- 4
- 5
- 6
- 7
- 8
- 9
- 10
- 11
- 12
- 13
- 14
- 15
- 16
- 17
- 18
readAsText()
Start reading the contents of the specified Blob object or File object. When the reading operation is completed, the value of the readyState property becomes DONE, which is called if the onloadend event handler is set. At the same time, the result property will contain a string to represent the contents of the read file.
        function showDataByText()
        {
            var resultFile = document.getElementById("fileDemo").files[0];
            if (resultFile)
            {
                var reader = new FileReader();

                reader.readAsText(resultFile, 'gb2312');
                reader.onload = function(e)
                {
                    var urlData = this.result;
                    document.getElementById("result").innerHTML += urlData;
                };
            }
        }
- 1
- 2
- 3
- 4
- 5
- 6
- 7
- 8
- 9
- 10
- 11
- 12
- 13
- 14
- 15
- 16
- 1
- 2
- 3
- 4
- 5
- 6
- 7
- 8
- 9
- 10
- 11
- 12
- 13
- 14
- 15
- 16
Event Handler
onabort
Called when the read operation is aborted.
onerror
Called when an error occurs in the read operation.
onload
Called when the read operation completes successfully.
onloadend
Called when the read operation is complete, whether successful or unsuccessful. This handler is called after onload or onerror.
onloadstart
Called before the read operation is about to begin.
onprogress
Called periodically during data reading.
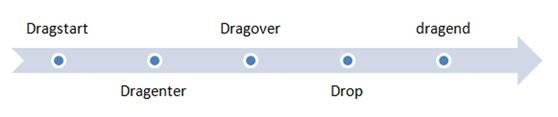
HTML5 also supports drag and drop when uploading files.
<div id="holder"></div>

var holder = document.getElementById('holder');

holder.ondrop = function (e)
{
  e.preventDefault();

  var file = e.dataTransfer.files[0],
      reader = new FileReader();

  reader.onload = function (event)
  {
    console.log(event.target);
    holder.style.background = 'url(' + event.target.result + ') no-repeat center';
  };

  console.log(file);
  reader.readAsDataURL(file);

  return false;
};
- 1
- 2
- 3
- 4
- 5
- 6
- 7
- 8
- 9
- 10
- 11
- 12
- 13
- 14
- 15
- 16
- 17
- 18
- 19
- 20
- 21
- 22
- 1
- 2
- 3
- 4
- 5
- 6
- 7
- 8
- 9
- 10
- 11
- 12
- 13
- 14
- 15
- 16
- 17
- 18
- 19
- 20
- 21
- 22
For more information about HTML5 file interface operation files, please refer to the following article:
https://developer.mozilla.org/zh-CN/docs/Using_files_from_web_applications
https://developer.mozilla.org/zh-CN/docs/Web/API/FileReader
http://blog.csdn.net/testcs_dn/article/details/8695532
http://www.cnblogs.com/fly_dragon/archive/2012/06/02/2532035.html
(3) Device Access Characteristics (DEVICE ACCESS)

Here's a W3C introduction to this feature.
Beginning with the Geolocation API, Web Applications can present rich, device-aware features and experiences. Incredible device access innovations are being developed and implemented, from audio/video input access to microphones and cameras, to local data such as contacts & events, and even tilt orientation.
It includes geographic location API, media access API, contacts and events, and device orientation.
The following studies are carried out separately.
(1) Geolocation API
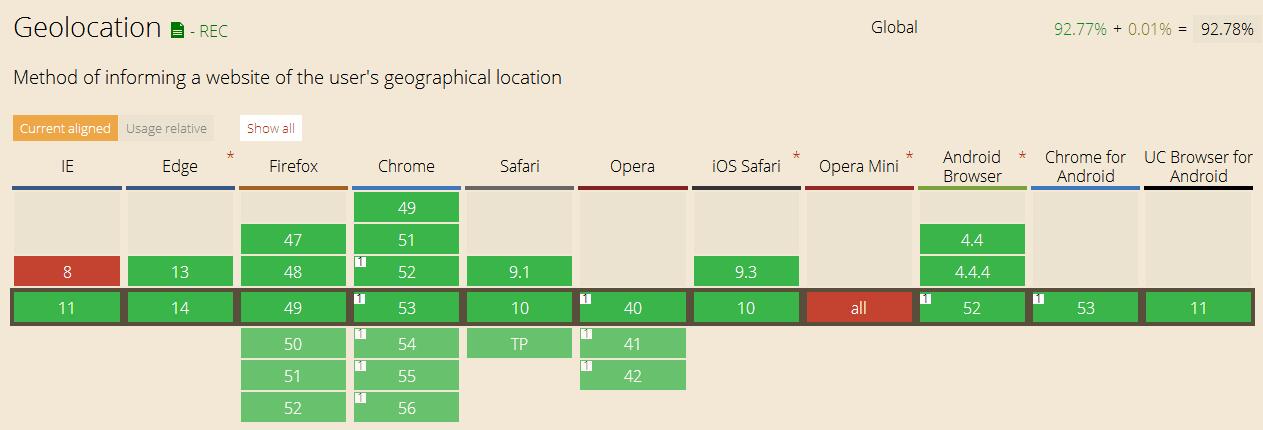
The HTML5 Geolocation API is used to get the user's geographic location.
Since this feature may violate user privacy, user location information is not available unless the user agrees. Generally, when this information is invoked on a web page, a permission application window will pop up.
First Demo: http://www.w3school.com.cn/tiy/t.asp?f=html5_geolocation_error
If the computer can't get the location information, try it on the mobile phone.
getCurrentPosition()
The getCurrentPosition() method obtains the user's location.
The standard usage is as follows:
<script>
    var x=document.getElementById("demo");
    function getLocation()
    {
      if (navigator.geolocation)
      {
          navigator.geolocation.getCurrentPosition(showPosition);
      }
      else
      {
          x.innerHTML="Geolocation is not supported by this browser.";
      }
    }
    function showPosition(position)
    {
        x.innerHTML="Latitude: " + position.coords.latitude + "<br />Longitude: " + position.coords.longitude;
    }
</script>
- 1
- 2
- 3
- 4
- 5
- 6
- 7
- 8
- 9
- 10
- 11
- 12
- 13
- 14
- 15
- 16
- 17
- 18
- 1
- 2
- 3
- 4
- 5
- 6
- 7
- 8
- 9
- 10
- 11
- 12
- 13
- 14
- 15
- 16
- 17
- 18
- Detecting whether geolocation is supported
- If supported, run the getCurrentPosition() method. If not, a message is displayed to the user.
- If getCurrentPosition() runs successfully, a coordinates object is returned to the function specified in the parameter showPosition
- showPosition() function obtains and displays longitude and latitude
The above example is a very basic geolocation script without error handling.
The whole process should be like this.
    <script>
        var x = document.getElementById("demo");
        function getLocation()
        {
            if (navigator.geolocation)
            {
                navigator.geolocation.getCurrentPosition(showPosition, showError);
            }
            else
            {
                x.innerHTML = "Geolocation is not supported by this browser.";
            }
        }
        function showPosition(position)
        {
            x.innerHTML = "Latitude: " + position.coords.latitude + "<br />Longitude: " + position.coords.longitude;
        }
        function showError(error)
        {
            switch (error.code)
            {
                case error.PERMISSION_DENIED:
                    x.innerHTML = "User denied the request for Geolocation."
                    break;
                case error.POSITION_UNAVAILABLE:
                    x.innerHTML = "Location information is unavailable."
                    break;
                case error.TIMEOUT:
                    x.innerHTML = "The request to get user location timed out."
                    break;
                case error.UNKNOWN_ERROR:
                    x.innerHTML = "An unknown error occurred."
                    break;
            }
        }
    </script>
- 1
- 2
- 3
- 4
- 5
- 6
- 7
- 8
- 9
- 10
- 11
- 12
- 13
- 14
- 15
- 16
- 17
- 18
- 19
- 20
- 21
- 22
- 23
- 24
- 25
- 26
- 27
- 28
- 29
- 30
- 31
- 32
- 33
- 34
- 35
- 36
- 1
- 2
- 3
- 4
- 5
- 6
- 7
- 8
- 9
- 10
- 11
- 12
- 13
- 14
- 15
- 16
- 17
- 18
- 19
- 20
- 21
- 22
- 23
- 24
- 25
- 26
- 27
- 28
- 29
- 30
- 31
- 32
- 33
- 34
- 35
- 36
Error code:
- Permission denied - Users are not allowed to locate geographically
- Position unavailable - unable to get the current location
- Timeout - Operation timeout
- Unknown error - Unknown error
If you want to know more about the geographic location API, you can refer to this website. http://www.w3school.com.cn/html5/html_5_geolocation.asp
(2) Media Access API (media API)
First demo. Microphones and cameras also involve user privacy, so browsers will apply to users for access rights.
https://www.ganecheng.tech/html5/media.html
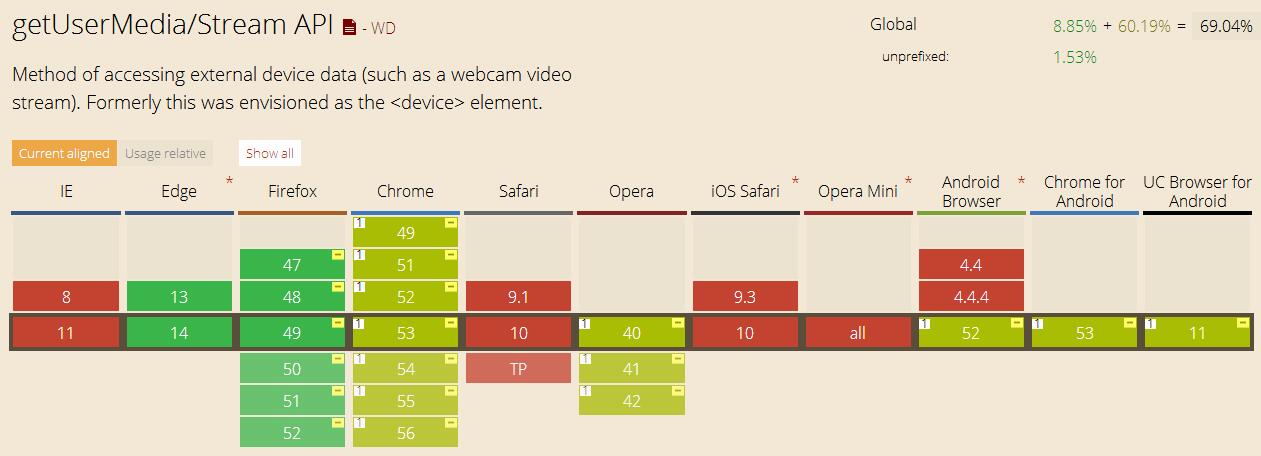
getUserMedia()
All the above effects are achieved through the getUserMedia() method.
    <video id="video" autoplay="autoplay" style='width: 640px; height: 480px'></video>
    <button id='picture'>PICTURE</button>
    <canvas id="canvas" width="640" height="480"></canvas>
- 1
- 2
- 3
- 1
- 2
- 3
        var video = document.getElementById("video");
        var context = canvas.getContext("2d");
        var errocb = function(code)
        {
            console.log(code);
        };
        if (navigator.getUserMedia)
        { // Standard API
            navigator.getUserMedia(
            {
                "video" : true
            }, function(stream)
            {
                video.src = stream;
                video.play();
            }, errocb);
        }
        else if (navigator.webkitGetUserMedia)
        { // API of WebKit Core

            console.log(navigator.webkitGetUserMedia);
            navigator.webkitGetUserMedia(
            {
                "video" : true
            }, function(stream)
            {

                video.src = window.webkitURL.createObjectURL(stream);
                video.play();
            }, errocb);

        }
        //    Display the photographs on the canvas
        document.getElementById("picture").addEventListener("click", function()
        {
            context.drawImage(video, 0, 0, 640, 480);
        });
- 1
- 2
- 3
- 4
- 5
- 6
- 7
- 8
- 9
- 10
- 11
- 12
- 13
- 14
- 15
- 16
- 17
- 18
- 19
- 20
- 21
- 22
- 23
- 24
- 25
- 26
- 27
- 28
- 29
- 30
- 31
- 32
- 33
- 34
- 35
- 36
- 37
- 1
- 2
- 3
- 4
- 5
- 6
- 7
- 8
- 9
- 10
- 11
- 12
- 13
- 14
- 15
- 16
- 17
- 18
- 19
- 20
- 21
- 22
- 23
- 24
- 25
- 26
- 27
- 28
- 29
- 30
- 31
- 32
- 33
- 34
- 35
- 36
- 37
Video acquisition is like this. Audio acquisition can be done by adding "audio": true.
For more information about media API, refer to the article: http://blog.csdn.net/u010359143/article/details/50326981
http://blog.csdn.net/renfufei/article/details/21168239
http://www.jb51.net/html5/81028.html
(3) Contacts Manager API
This is a good idea that belongs to W3C and has not been formally incorporated into the standard. At present, no reliable information has been found.
The original proposal can be referred to here. http://contacts-manager-api.sysapps.org/
But there are two similar alternatives.
Firefox OS (Ended Life) sample code.
var request = window.navigator.contacts.getAll();
var count = 0;
request.onsuccess = function ()
{
  if(this.result)
  {
    count++;
    // Display the name of the contact
    console.log(this.result.givenName + ' ' + this.result.familyName);
    // Move to the next contact which will call the request.onsuccess with a new result
    this.continue();
  } else
  {
    console.log(count + 'contacts found.');
  }
}
request.onerror = function () {}
- 1
- 2
- 3
- 4
- 5
- 6
- 7
- 8
- 9
- 10
- 11
- 12
- 13
- 14
- 15
- 16
- 17
- 1
- 2
- 3
- 4
- 5
- 6
- 7
- 8
- 9
- 10
- 11
- 12
- 13
- 14
- 15
- 16
- 17
Want to live on this dead web operating system Learn more about it here. https://developer.mozilla.org/en-US/docs/Mozilla/B2G_OS/API/ContactManager
Cordova (Hybrid App) implementations are referenced here https://cordova.apache.org/docs/en/3.0.0/cordova/contacts/contacts.html
(4) Device Orientation & Device Motion API

Device Orientation is often used to detect the direction of gravity induction, and Device Motion is often used to shake a shake function.
① DeviceOrientation
Gravity sensing is also a common function in native APP. The application of gravity sensing in Web App is mostly used to judge the rotation direction of the screen, as well as scene applications based on it, such as controlling the left and right movement of objects on the page, acceleration and deceleration, etc.
To achieve the above functions in Web App, it is necessary to obtain real-time parameters of the rotation direction of the screen, which can be obtained from the browser's Device Orientation API using HTML5.
When the browser's Orientation changes, the DeviceOrientation event is triggered and a DeviceOrientation Event object is returned with the following list of attributes:
| attribute | Interpretation |
|---|---|
| alpha | The direction indicated by the equipment depends on the setting of the compass. |
| beta | Angle of rotation of equipment around x-axis |
| gamma | Angle of rotation of equipment around y axis |
Note: Different versions of mobile operating systems and browsers, as well as the built-in browsers in different applications, have different support for device orientation events. Especially on Android platforms, there may be situations where some devices are working properly and others are unresponsive.
Working principle
The rotation angle of the device is determined according to the parameters of the event object in three directions. Among them, alpha value range is 0-360, which needs to be determined according to the device's compass settings. Generally speaking, the value of 0.beta is the angle of rotation of the device around the x-axis when the device points to the North direction, and the value range is -180-180. gamma ranges from - 90 to 90.
In this case, alpha value is of little significance, mainly referring to beta and gamma values.
When the screen tilts left along the y axis horizontally, the gamma value becomes negative and the right tilt becomes positive.
The beta value becomes positive when the screen tilts forward along the x-axis horizontally and negative when it tilts backward.
So, if we set a threshold, when the absolute values of beta and gamma are greater than that threshold, we think that the device rotates. In addition, according to beta and gamma values to determine whether to tilt left or right, and the degree of tilt.
Implementation and examples
The first is to bind device orientation events and handlers for browsers.
//add deviceorientation event listener
if(window.DeviceOrientationEvent)
{
    window.addEventListener('deviceorientation',DeviceOrientationHandler,false);
}else
{
    alert("Your browser does not support it DeviceOrientation");
}

function DeviceOrientationHandler(event)
{
        var alpha = event.alpha,
            beta = event.beta,
            gamma = event.gamma;

        if(alpha != null || beta != null || gamma != null)
        {
            dataContainerOrientation.innerHTML = "alpha:" + alpha + "<br />beta:" + beta + "<br />gamma:" + gamma;
            //Judging Screen Direction
            var html = "";
            if( Math.abs(gamma) < GAMMA_MIN && Math.abs(beta) > BETA_MAX ){
                html = "Screen direction: Portrait";
            }

            if( Math.abs(beta) < BETA_MIN && Math.abs(gamma) > GAMMA_MAX ){
                html = "Screen direction: Landscape";
            }

            var gamma_html = "";
            if( gamma > 0 ){
                gamma_html = "Tilt to the right";
            }else{
                gamma_html = "Leaning to the left";
            }
            html += "<br />"+gamma_html
            stage.innerHTML = html;
        }else
        {
            dataContainerOrientation.innerHTML = "Current browsers do not support DeviceOrientation";
        }
}
- 1
- 2
- 3
- 4
- 5
- 6
- 7
- 8
- 9
- 10
- 11
- 12
- 13
- 14
- 15
- 16
- 17
- 18
- 19
- 20
- 21
- 22
- 23
- 24
- 25
- 26
- 27
- 28
- 29
- 30
- 31
- 32
- 33
- 34
- 35
- 36
- 37
- 38
- 39
- 40
- 41
- 1
- 2
- 3
- 4
- 5
- 6
- 7
- 8
- 9
- 10
- 11
- 12
- 13
- 14
- 15
- 16
- 17
- 18
- 19
- 20
- 21
- 22
- 23
- 24
- 25
- 26
- 27
- 28
- 29
- 30
- 31
- 32
- 33
- 34
- 35
- 36
- 37
- 38
- 39
- 40
- 41
This example shows how to use beta and gamma values to show the rotation and rollover directions of the screen. To achieve more accurate object judgment, it also needs complex algorithm To calculate.
Extended application
The device Orientation API interface can be used to obtain the parameters of screen rotation direction of mobile devices on the web, and improve on the basis of examples. It can be extended to control the movement of page elements on the screen and realize the purpose of animation or game. For example, by adjusting the direction of the screen to control the small ball on the page to go maze, control the movement of the car to avoid obstacles and so on.
② DeviceMotion
Shake-and-shake function is a function that many native APP s can achieve, such as WeChat Shake a shake in QQ music to find friends, shake a shake in QQ music to change songs, etc. They all use the API provided by the acceleration sensor of the mobile phone to perform different actions according to the acceleration value acquired when monitoring the acceleration change of the mobile phone.
HTML5 also provides a similar interface in Web APP, DeviceMotion Event. DeviceMotion encapsulates events of motion sensor data, and can obtain data such as motion acceleration of mobile phone in motion state.
DeviceMotionEvent Object Properties List:
| attribute | Interpretation |
|---|---|
| event.accelaration | x(y,z): the acceleration value of the device in the x(y,z) direction |
| event.accelarationIncludingGravity | x(y,z): The moving acceleration of the device in the x(y,z) direction after considering the gravitational acceleration |
| event.rotationRate | alpha,beta,gamma: The angle at which the device rotates around the x,y,z axes |
The difference between event.accelaration Including Gravity and event.accelaration is that the former adds gravitational acceleration, that is, 9.8 in the z axis direction, and the values in the X and Y directions are the same.
Rotation Rate: The concepts of alpha, beta and gamma are consistent with Device Orientation Event.
The difference is that:
The value of Device Orientation Event is the difference from the initial state. As long as the direction of the device remains unchanged, any movement will not affect the value.
DeviceMotion Event is the difference time ratio relative to a previous instantaneous value, that is, the speed of change, once the device is stationary, it will be restored to 0.
Realize a shake
        function Shake(threshold, callback)
        {
            //Define thresholds
            this.SHAKE_THRESHOLD = threshold ? threshold : 2000;
            this.last_update = 0;
            this.x = this.y = this.z = this.last_x = this.last_y = this.last_z = 0;
            this.init = function()
            {
                if (window.DeviceMotionEvent)
                {
                    window.addEventListener('devicemotion', this.deviceMotionHandler, false);
                }
                else
                {
                    alert('Your browser does not support it DeviceMotion');
                }
            };
            var that = this;
            this.deviceMotionHandler = function(eventData)
            {
                var acceleration = eventData.accelerationIncludingGravity;
                var curTime = new Date().getTime();
                if ((curTime - that.last_update) > 100)
                {
                    var diffTime = curTime - that.last_update;
                    that.last_update = curTime;
                    that.x = acceleration.x;
                    that.y = acceleration.y;
                    that.z = acceleration.z;
                    var speed = Math.abs(that.x + that.y + that.z - that.last_x - that.last_y - that.last_z) / diffTime * 10000;
                    if (speed > that.SHAKE_THRESHOLD)
                    {
                        if (window.console && console.log)
                        {
                            console.log("shaked");
                        }
                        if (callback != undefined)
                        {
                            callback(that);
                        }
                    }
                    that.last_x = that.x;
                    that.last_y = that.y;
                    that.last_z = that.z;
                }
            }
        };

        window.onload = function()
        {
            var shake1 = new Shake(2000, function(obj)
            {
                alert("shaked");
                var r = document.getElementById("result");
                r.innerHTML = "x:" + obj.x + "";
                r.innerHTML += "y:" + obj.y + "";
                r.innerHTML += "z:" + obj.z + "";
            });
            shake1.init();
        };
- 1
- 2
- 3
- 4
- 5
- 6
- 7
- 8
- 9
- 10
- 11
- 12
- 13
- 14
- 15
- 16
- 17
- 18
- 19
- 20
- 21
- 22
- 23
- 24
- 25
- 26
- 27
- 28
- 29
- 30
- 31
- 32
- 33
- 34
- 35
- 36
- 37
- 38
- 39
- 40
- 41
- 42
- 43
- 44
- 45
- 46
- 47
- 48
- 49
- 50
- 51
- 52
- 53
- 54
- 55
- 56
- 57
- 58
- 59
- 60
- 1
- 2
- 3
- 4
- 5
- 6
- 7
- 8
- 9
- 10
- 11
- 12
- 13
- 14
- 15
- 16
- 17
- 18
- 19
- 20
- 21
- 22
- 23
- 24
- 25
- 26
- 27
- 28
- 29
- 30
- 31
- 32
- 33
- 34
- 35
- 36
- 37
- 38
- 39
- 40
- 41
- 42
- 43
- 44
- 45
- 46
- 47
- 48
- 49
- 50
- 51
- 52
- 53
- 54
- 55
- 56
- 57
- 58
- 59
- 60
Equipment orientation and motion API involve some mathematical knowledge. To learn more about this API, you can refer to the following two articles.
http://www.jianshu.com/p/5769075e9885
http://w3c.github.io/deviceorientation/spec-source-orientation.html
(4) Connection Characteristics (CONNECTIVITY)

First look at the definition of W3C.
More efficient connectivity means more real-time chats, faster games, and better communication. Web Sockets and Server-Sent Events are pushing (pun intended) data between client and server more efficiently than ever before.
HTTP is connectionless, one request, one response. In order to realize the function of Wechat's web browsing and chatting, it is necessary to use polling to achieve the effect of long connection. Most of the time of polling is spent in idle work, wasting network and resources. Now HTML5 brings us more efficient connection schemes, Web Sockets and Server-Sent Events.
Next, the two connection modes are studied separately.
(1) Web Sockets

Operating Principle

Browser-side examples
var wsServer = 'ws://localhost:8888/Demo'; //Server address
var websocket = new WebSocket(wsServer); //Creating WebSocket Objects
websocket.send("hello");//Send a message to the server
alert(websocket.readyState);//View the current status of websocket
websocket.onopen = function (evt)
{
//Connections have been established
};
websocket.onclose = function (evt)
{
//Connection closed
};
websocket.onmessage = function (evt)
{
//Receive the server message and extract it using evt.data
};
websocket.onerror = function (evt)
{
//raise an exception
};
- 1
- 2
- 3
- 4
- 5
- 6
- 7
- 8
- 9
- 10
- 11
- 12
- 13
- 14
- 15
- 16
- 17
- 18
- 19
- 20
- 1
- 2
- 3
- 4
- 5
- 6
- 7
- 8
- 9
- 10
- 11
- 12
- 13
- 14
- 15
- 16
- 17
- 18
- 19
- 20
Server side
The client data of handshake protocol has been replaced by browser, and the server needs to be implemented by ourselves. At present, there are many open source implementations in the market, such as:
Kaazing WebSocket Gateway (a Java-implemented WebSocket Server);
Mod_pywebsocket (a Python-implemented WebSocket Server);
Netty (a Java-implemented network framework that includes support for WebSocket);
Node.js (a JavaScript framework on the Server side provides support for WebSocket);
WebSocket4Net (a. net server-side implementation);
In fact, WebSocket has been implemented in the current framework of. net 4.5. Instead of official implementation, we will write a simple one ourselves. The server needs to shake hands, receive and send according to the protocol.
Handshake
/// <summary>
/// Generating Sec-WebSocket-Accept
/// </summary>
/// <param name="handShakeText">client handshake information </param>
/// <returns>Sec-WebSocket-Accept</returns>
private static string GetSecKeyAccetp(byte[] handShakeBytes,int bytesLength)
{
    string handShakeText = Encoding.UTF8.GetString(handShakeBytes, 0, bytesLength);
    string key = string.Empty;
    Regex r = new Regex(@"Sec-WebSocket-Key:(.*?)rn");
    Match m = r.Match(handShakeText);
    if (m.Groups.Count != 0)
    {
        key = Regex.Replace(m.Value, @"Sec-WebSocket-Key:(.*?)rn", "$1").Trim();
    }
    byte[] encryptionString = SHA1.Create().ComputeHash(Encoding.ASCII.GetBytes(key + "258EAFA5-E914-47DA-95CA-C5AB0DC85B11"));
    return Convert.ToBase64String(encryptionString);
}
- 1
- 2
- 3
- 4
- 5
- 6
- 7
- 8
- 9
- 10
- 11
- 12
- 13
- 14
- 15
- 16
- 17
- 18
- 1
- 2
- 3
- 4
- 5
- 6
- 7
- 8
- 9
- 10
- 11
- 12
- 13
- 14
- 15
- 16
- 17
- 18
If the handshake is successful, the client's onopen event will be triggered.
Parsing received client information
/// <summary>
/// Parsing Client Packet
/// </summary>
/// <param name="recBytes">Packets received by the server </param>
/// <param name="recByteLength">valid data length </param>
/// <returns></returns>
private static string AnalyticData(byte[] recBytes, int recByteLength)
{
    if (recByteLength < 2) { return string.Empty; }

    bool fin = (recBytes[0] & 0x80) == 0x80; // 1 bit, 1 represents the last frame
    if (!fin){
    return string.Empty;// No processing for more than one frame
    }

    bool mask_flag = (recBytes[1] & 0x80) == 0x80; // Does it contain a mask?
    if (!mask_flag){
    return string.Empty;// Temporary non-processing without mask
    }

    int payload_len = recBytes[1] & 0x7F; // Data Length

    byte[] masks = new byte[4];
    byte[] payload_data;

    if (payload_len == 126)
    {
        Array.Copy(recBytes, 4, masks, 0, 4);
        payload_len = (UInt16)(recBytes[2] << 8 | recBytes[3]);
        payload_data = new byte[payload_len];
        Array.Copy(recBytes, 8, payload_data, 0, payload_len);

    }
    else if (payload_len == 127)
    {
        Array.Copy(recBytes, 10, masks, 0, 4);
        byte[] uInt64Bytes = new byte[8];
        for (int i = 0; i < 8; i++)
        {
        uInt64Bytes[i] = recBytes[9 - i];
        }
        UInt64 len = BitConverter.ToUInt64(uInt64Bytes, 0);

        payload_data = new byte[len];
        for (UInt64 i = 0; i < len; i++)
        {
        payload_data[i] = recBytes[i + 14];
        }
    }else
    {
        Array.Copy(recBytes, 2, masks, 0, 4);
        payload_data = new byte[payload_len];
        Array.Copy(recBytes, 6, payload_data, 0, payload_len);

    }

    for (var i = 0; i < payload_len; i++)
    {
    payload_data[i] = (byte)(payload_data[i] ^ masks[i % 4]);
    }
    return Encoding.UTF8.GetString(payload_data);
}
- 1
- 2
- 3
- 4
- 5
- 6
- 7
- 8
- 9
- 10
- 11
- 12
- 13
- 14
- 15
- 16
- 17
- 18
- 19
- 20
- 21
- 22
- 23
- 24
- 25
- 26
- 27
- 28
- 29
- 30
- 31
- 32
- 33
- 34
- 35
- 36
- 37
- 38
- 39
- 40
- 41
- 42
- 43
- 44
- 45
- 46
- 47
- 48
- 49
- 50
- 51
- 52
- 53
- 54
- 55
- 56
- 57
- 58
- 59
- 60
- 61
- 62
Send data to client
/// <summary>
/// Packing server data
/// </summary>
/// <param name="message">data </param>
/// < returns > packet </returns >
private static byte[] PackData(string message)
{
    byte[] contentBytes = null;
    byte[] temp = Encoding.UTF8.GetBytes(message);

    if (temp.Length < 126)
    {
        contentBytes = new byte[temp.Length + 2];
        contentBytes[0] = 0x81;
        contentBytes[1] = (byte)temp.Length;
        Array.Copy(temp, 0, contentBytes, 2, temp.Length);
    }else if (temp.Length < 0xFFFF)
    {
        contentBytes = new byte[temp.Length + 4];
        contentBytes[0] = 0x81;
        contentBytes[1] = 126;
        contentBytes[2] = (byte)(temp.Length & 0xFF);
        contentBytes[3] = (byte)(temp.Length >> 8 & 0xFF);
        Array.Copy(temp, 0, contentBytes, 4, temp.Length);
    }else
    {
    // Don't deal with super-long content for the time being
    }

    return contentBytes;
}
- 1
- 2
- 3
- 4
- 5
- 6
- 7
- 8
- 9
- 10
- 11
- 12
- 13
- 14
- 15
- 16
- 17
- 18
- 19
- 20
- 21
- 22
- 23
- 24
- 25
- 26
- 27
- 28
- 29
- 30
- 31
- 1
- 2
- 3
- 4
- 5
- 6
- 7
- 8
- 9
- 10
- 11
- 12
- 13
- 14
- 15
- 16
- 17
- 18
- 19
- 20
- 21
- 22
- 23
- 24
- 25
- 26
- 27
- 28
- 29
- 30
- 31
Web Sockets is a great design. For more information, see here.
https://my.oschina.net/u/1266171/blog/357488
(2) Server-Sent Events
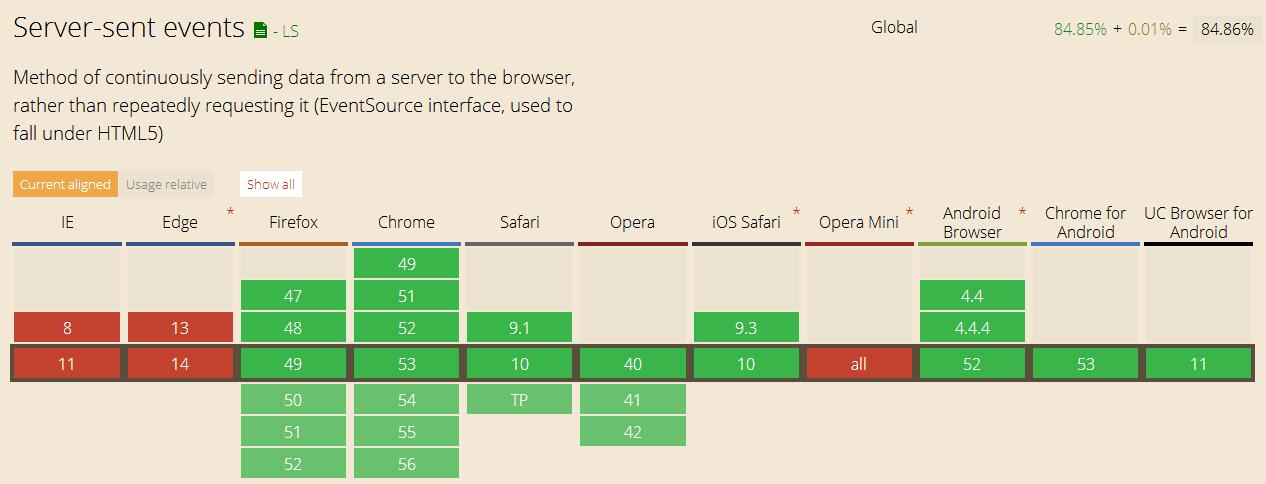
Operating Principle

The browser sends the request to the server through HTTP. The server takes out the latest information in the database and returns it to the client immediately. The client waits for three seconds to send the next request again.
Client example
<script>
if(typeof(EventSource)!=="undefined")
{
  var source=new EventSource("/example/html5/demo_sse.php");
  source.onmessage=function(event)
    {
    document.getElementById("result").innerHTML+=event.data + "<br />";
    };
}
else
{
  document.getElementById("result").innerHTML="Sorry, your browser does not support server-sent events...";
}
</script>
- 1
- 2
- 3
- 4
- 5
- 6
- 7
- 8
- 9
- 10
- 11
- 12
- 13
- 14
- 1
- 2
- 3
- 4
- 5
- 6
- 7
- 8
- 9
- 10
- 11
- 12
- 13
- 14
Server-side examples
<?php
header('Content-Type: text/event-stream');
header('Cache-Control: no-cache');

$time = date('r');
echo "data: The server time is: {$time}\n\n";
flush();
?>
- 1
- 2
- 3
- 4
- 5
- 6
- 7
- 8
- 1
- 2
- 3
- 4
- 5
- 6
- 7
- 8
To learn more about Server-Sent Events, you can refer to these two articles.
http://www.w3school.com.cn/html5/html_5_serversentevents.asp
http://www.ibm.com/developerworks/cn/web/1307_chengfu_serversentevent/
Server load
- Long-polling accounts for a small portion of CPU resources, but creating empty processes wastes system memory.
- Server-Sent Events work in many ways, unless Server-Sent Events do not have to close the connection after each response is sent.
- WebSockets, the server only needs a process to process all requests, no loops, no need to allocate cpu and memory for each client.
Client Load
- Long-polling depends on how it is implemented, but it is ultimately an asynchronous approach.
- Server-Sent Events uses the browser's built-in implementation, which costs only a small part of the resources.
- Like Server-Sent Events, WebSockets uses the built-in implementation of browsers, which costs only a small portion of resources.
Time line
- Long-polling is close to real-time, but there is a certain delay in sending new requests and sending them.
- Server-Sent Events defaults to a delay of 3 seconds, but can be adjusted.
- Real-time WebSockets
Implementation complexity
- Long-polling is very simple to implement.
- Server-Sent Events is even simpler than Long-polling.
- You need a WebSockets server to handle events and open a port
For a better understanding of the differences between polling, Web Sockets and Server-Sent Events, you can refer to this article.
https://www.oschina.net/question/82993_63312
(5) Multimedia Features of Web Pages (MULTIMEDIA)

Look at the definition of W3C.
Audio and video are first class citizens in the HTML5 web, living in harmony with your apps and sites. Lights, camera, action!
It can be seen that HTML5 native support for audio and video makes W3C very excited. It is also the expectation of developers for many years. Finally, we can kick Flash into the pit.
Audio and Video Tags
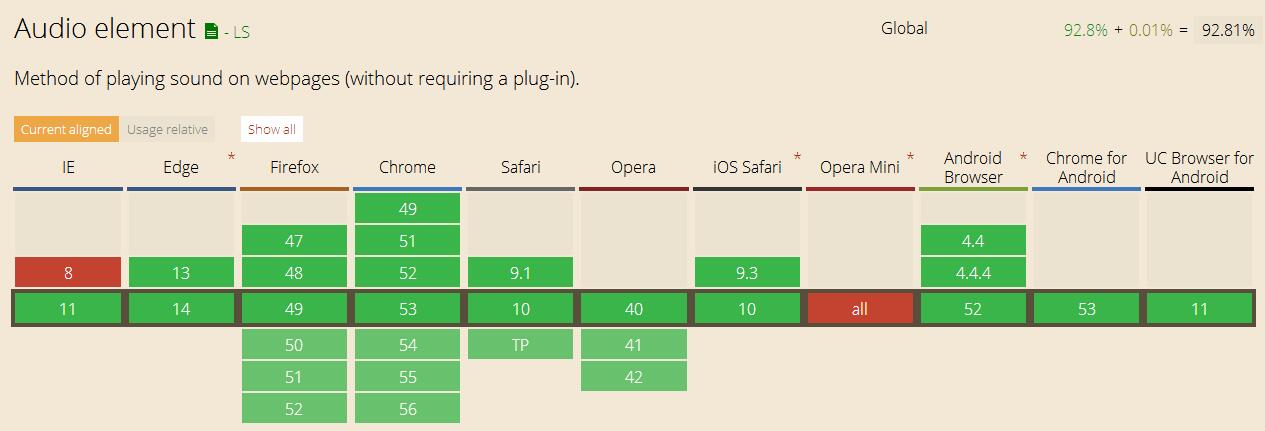

Although support for audio and video is very powerful, but there is really nothing to say, is the two tags.
<audio controls="controls">
  <source src="song.ogg" type="audio/ogg">
  <source src="song.mp3" type="audio/mpeg">
  Your browser does not support the audio tag.
</audio>
- 1
- 2
- 3
- 4
- 5
- 1
- 2
- 3
- 4
- 5
<video width="320" height="240" controls="controls">
  <source src="movie.ogg" type="video/ogg">
  <source src="movie.mp4" type="video/mp4">
  Your browser does not support the video tag.
</video>
- 1
- 2
- 3
- 4
- 5
- 1
- 2
- 3
- 4
- 5
But because audio and video will be used more than other new features, the compatibility of browsers should be paid attention by developers. It is worthwhile to use ckplayer to unify all platforms for reference. You can refer to this page. http://www.ckplayer.com/.
Audio API

HTML5 audio processing interface is different from Audio tag. The Audio tag on the page is only a more semantic representation of HTML5, while the Audio API provided by HTML5 for JavaScript programming enables us to manipulate the original audio stream data directly in the code and reproduce it arbitrarily.
First demo, http://wayou.github.io/HTML5_Audio_Visualizer/ After opening the page, open a local song. Then the visualization effect can be displayed.
principle
Before a piece of audio reaches the speaker for playback, we intercept it halfway, and then we get the audio data. This interception is done by window.AudioContext. All our operations on audio are based on this object. AudioContext can create different kinds of AudioNode, i.e. audio nodes. Different nodes have different functions. Some add filters to the audio, such as improving the timbre (such as Biquad FilterNode), changing the monotony, and some segment the audio, such as dividing the channels in the sound source to get the left and right channel sound (Channel Splitter Node), and some analyze the frequency spectrum of the audio data. .
All operations are based on the AudioContext object.
Get the AudioContext object.
window.AudioContext = window.AudioContext || window.webkitAudioContext || window.mozAudioContext || window.msAudioContext;

try {
    var audioContext = new window.AudioContext();
} catch (e) {
    Console.log('!Your browser does not support AudioContext');
}
- 1
- 2
- 3
- 4
- 5
- 6
- 7
- 1
- 2
- 3
- 4
- 5
- 6
- 7
Subsequent operations are all related to audio decoding. Want to know more about HTML5 Audio API. You can refer to the following article.
http://www.cnblogs.com/Wayou/p/3543577.html
https://developer.mozilla.org/zh-CN/docs/Web/API/AudioContext
After a search, no Video API at the same level of functionality as the Audio API was found.
3-D, Graphics & Effects

Look at the introduction of W3C.
Between SVG, Canvas, WebGL, and CSS3 3D features, you're sure to amaze your users with stunning visuals natively rendered in the browser.
It includes SVG, Canvas, WebGL, and CSS3 3D, respectively.
(1) Scalable Vector Graphics (SVG)

SVG is a graphical format for describing two-dimensional vector graphics.
First demo, http://www.ganecheng.tech/html5/svg.html
Compared with other image formats, the advantages of using SVG are:
- SVG can be read and modified by many tools (such as notepad)
- Compared with JPEG and GIF images, SVG is smaller in size and more compressible.
- SVG is scalable.
- SVG images can be printed with high quality at any resolution.
- SVG can be enlarged without degradation of image quality.
- Text in SVG images is optional and searchable (suitable for making maps)
- SVG can work with Java Technology works together
- SVG is an open standard.
- SVG files are pure XML
SVG has three uses.
(1) Put SVG directly on the web page as a picture
<img style="width: 250px;" alt="kiwi" src="./kiwi.svg">
- 1
- 1
(2) SVG animation
Draw a Pentagon
<svg xmlns="http://www.w3.org/2000/svg" version="1.1" height="190">
   <polygon points="100,10 40,180 190,60 10,60 160,180"
   style="fill:red;stroke:blue;stroke-width:3;fill-rule:evenodd;" />
</svg>
- 1
- 2
- 3
- 4
- 1
- 2
- 3
- 4
(3) Interaction of SVG pictures and filter effect
<svg version="1.1" id="Layer_1" xmlns="http://www.w3.org/2000/svg" xmlns:xlink="http://www.w3.org/1999/xlink" x="0px" y="0px" width="612px" height="502.174px" viewBox="0 65.326 612 502.174"
        enable-background="new 0 65.326 612 502.174" xml:space="preserve" class="logo99">
    <style>
    .kiwi {
        fill: #94d31b; //
        stroke: #909; //
        stroke-width: 10; // not sure which of these is correct //
        stroke-linejoin : butt | round | square; //
        stroke-linecap: butt| round| square; //
        stroke-dasharray: 5, 5, 10; //
        filter: url(#pictureFilter); //
        mask: url(#f1); //
        clip-path: url();
    }

    .kiwi:hover {
        fill: #ace63c;
    }

    .ground {
        fill: #787f6a;
    }

    .ground:hover {
        filter: url(#pictureFilter);
        fill: #896d3d;
    }
    </style>
    <ellipse class="ground" cx="283.5" cy="487.5" rx="259" ry="80"></ellipse>
    <path class="kiwi"
                d="M210.333,65.331C104.367,66.105-12.349,150.637,1.056,276.449c4.303,40.393,18.533,63.704,52.171,79.03
      c36.307,16.544,57.022,54.556,50.406,112.954c-9.935,4.88-17.405,11.031-19.132,20.015c7.531-0.17,14.943-0.312,22.59,4.341
      c20.333,12.375,31.296,27.363,42.979,51.72c1.714,3.572,8.192,2.849,8.312-3.078c0.17-8.467-1.856-17.454-5.226-26.933
      c-2.955-8.313,3.059-7.985,6.917-6.106c6.399,3.115,16.334,9.43,30.39,13.098c5.392,1.407,5.995-3.877,5.224-6.991
      c-1.864-7.522-11.009-10.862-24.519-19.229c-4.82-2.984-0.927-9.736,5.168-8.351l20.234,2.415c3.359,0.763,4.555-6.114,0.882-7.875
      c-14.198-6.804-28.897-10.098-53.864-7.799c-11.617-29.265-29.811-61.617-15.674-81.681c12.639-17.938,31.216-20.74,39.147,43.489
      c-5.002,3.107-11.215,5.031-11.332,13.024c7.201-2.845,11.207-1.399,14.791,0c17.912,6.998,35.462,21.826,52.982,37.309
      c3.739,3.303,8.413-1.718,6.991-6.034c-2.138-6.494-8.053-10.659-14.791-20.016c-3.239-4.495,5.03-7.045,10.886-6.876
      c13.849,0.396,22.886,8.268,35.177,11.218c4.483,1.076,9.741-1.964,6.917-6.917c-3.472-6.085-13.015-9.124-19.18-13.413
      c-4.357-3.029-3.025-7.132,2.697-6.602c3.905,0.361,8.478,2.271,13.908,1.767c9.946-0.925,7.717-7.169-0.883-9.566
      c-19.036-5.304-39.891-6.311-61.665-5.225c-43.837-8.358-31.554-84.887,0-90.363c29.571-5.132,62.966-13.339,99.928-32.156
      c32.668-5.429,64.835-12.446,92.939-33.85c48.106-14.469,111.903,16.113,204.241,149.695c3.926,5.681,15.819,9.94,9.524-6.351
      c-15.893-41.125-68.176-93.328-92.13-132.085c-24.581-39.774-14.34-61.243-39.957-91.247
      c-21.326-24.978-47.502-25.803-77.339-17.365c-23.461,6.634-39.234-7.117-52.98-31.273C318.42,87.525,265.838,64.927,210.333,65.331
      z M445.731,203.01c6.12,0,11.112,4.919,11.112,11.038c0,6.119-4.994,11.111-11.112,11.111s-11.038-4.994-11.038-11.111
      C434.693,207.929,439.613,203.01,445.731,203.01z">
    </path>
    <filter id="pictureFilter">
      <feGaussianBlur stdDeviation="15"></feGaussianBlur>
    </filter>
</svg>
- 1
- 2
- 3
- 4
- 5
- 6
- 7
- 8
- 9
- 10
- 11
- 12
- 13
- 14
- 15
- 16
- 17
- 18
- 19
- 20
- 21
- 22
- 23
- 24
- 25
- 26
- 27
- 28
- 29
- 30
- 31
- 32
- 33
- 34
- 35
- 36
- 37
- 38
- 39
- 40
- 41
- 42
- 43
- 44
- 45
- 46
- 47
- 48
- 49
- 50
- 51
- 1
- 2
- 3
- 4
- 5
- 6
- 7
- 8
- 9
- 10
- 11
- 12
- 13
- 14
- 15
- 16
- 17
- 18
- 19
- 20
- 21
- 22
- 23
- 24
- 25
- 26
- 27
- 28
- 29
- 30
- 31
- 32
- 33
- 34
- 35
- 36
- 37
- 38
- 39
- 40
- 41
- 42
- 43
- 44
- 45
- 46
- 47
- 48
- 49
- 50
- 51
How to draw a moving line with SVG
Look at demo first. http://www.ganecheng.tech/html5/svg_animate_line.html
<path fill="none" stroke="deeppink" stroke-width="14" stroke-miterlimit="0"

d="M11.6 269s-19.7-42.4 6.06-68.2 48.5-6.06 59.1 12.1l-3.03 28.8 209-227s45.5-21.2 60.6 1.52c15.2 22.7-3.03 47-3.03 47l-225 229s33.1-12 48.5 7.58c50 63.6-50 97-62.1 37.9"

stroke-dasharray="988.0 988.0"

stroke-dashoffset="988.0"

/>
- 1
- 2
- 3
- 4
- 5
- 6
- 7
- 8
- 9
- 1
- 2
- 3
- 4
- 5
- 6
- 7
- 8
- 9
var path = document.querySelector('.squiggle-animated path');
var length = path.getTotalLength();
// Action before removal
path.style.transition = path.style.WebkitTransition =
  'none';
// Setting the Starting Point
path.style.strokeDasharray = length + ' ' + length;
path.style.strokeDashoffset = length;
// Get an area, get relevant styles, and let the browser find a starting point.
path.getBoundingClientRect();
// Define actions
path.style.transition = path.style.WebkitTransition =
  'stroke-dashoffset 2s ease-in-out';
// Go!
path.style.strokeDashoffset = '0';
- 1
- 2
- 3
- 4
- 5
- 6
- 7
- 8
- 9
- 10
- 11
- 12
- 13
- 14
- 15
- 1
- 2
- 3
- 4
- 5
- 6
- 7
- 8
- 9
- 10
- 11
- 12
- 13
- 14
- 15
Principle: Use d attribute to get a Bessel curve, so that the distance between each line segment is 1 times the length of the line segment, slowly reduce the offset value, and get a positive movement effect.
The stroke-dasharray attribute allows you to specify the length of each segment of the drawn line, and the second value is the length of the gap between the segments.
The stroke-dashoffset property lets you specify the initial offset for each segment.
To learn more about SVG, you can refer to the following website.
http://www.w3school.com.cn/svg/svg_examples.asp
http://www.w3school.com.cn/svg/svg_reference.asp
http://www.webhek.com/animated-line-drawing-in-svg/
http://www.webhek.com/demo/svg/
(2) Canvas
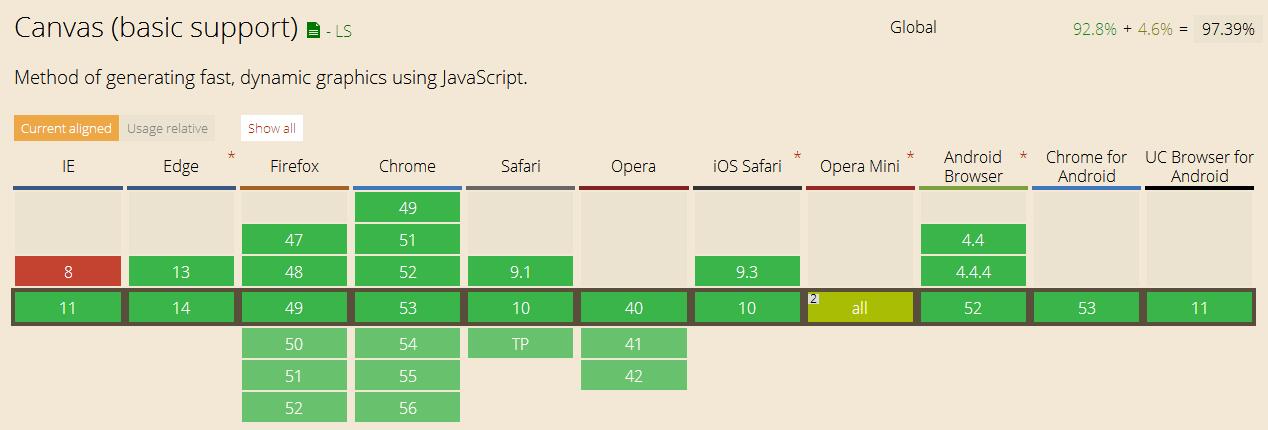
Canvas is also the hottest position for front-end engineers to show off their skills. There are many demo s.
http://www.17sucai.com/pins/demoshow/9386
http://www.17sucai.com/pins/demoshow/12676
http://www.17sucai.com/pins/demoshow/5937
http://www.html5tricks.com/demo/html5-canvas-waterful/index.html
http://www.html5tricks.com/demo/html5-canvas-loader/index.html
http://www.html5tricks.com/demo/html5-canvas-particle-effect/index.html
http://www.html5tricks.com/demo/html5-cool-fire-effect/index.html
The canvas element of HTML5 uses JavaScript to draw images on a Web page.
The canvas is a rectangular area where you can control each pixel.
canvas has many ways to draw paths, rectangles, circles, characters and add images.
Create Canvas elements
<canvas id="myCanvas" width="200" height="100"></canvas>
- 1
- 1
Drawing through JavaScript
The canvas element itself is not capable of drawing. All drawing must be done within JavaScript:
<script type="text/javascript">
    var c=document.getElementById("myCanvas");
    var cxt=c.getContext("2d");
    cxt.fillStyle="#FF0000";
    cxt.fillRect(0,0,150,75);
</script>
- 1
- 2
- 3
- 4
- 5
- 6
- 1
- 2
- 3
- 4
- 5
- 6
Comparison of Canvas and SVG
Both Canvas and SVG allow you to create graphics in browsers, but they are fundamentally different.
SVG
SVG is a language that uses XML to describe 2D graphics.
SVG is based on XML, which means that every element in the SVG DOM is available. You can attach a JavaScript event handler to an element.
In SVG, each drawn graph is treated as an object. If the attributes of SVG objects change, the browser can automatically reproduce the graphics.
Canvas
Canvas draws 2D graphics through JavaScript.
Canvas is rendered pixel by pixel.
In canvas, once the graph is drawn, it will not continue to get browser attention. If its position changes, the whole scene also needs to be redrawn, including any objects that may have been covered by graphics.
Comparison between Canvas and SVG
Canvas
- Resolution-dependent
- Event handlers are not supported
- Weak text rendering ability
- Ability to save result images in. png or. jpg format
- Most suitable for image-intensive games, many of which are frequently redrawn
SVG
- Resolution independent
- Supporting event handlers
- Best suited for applications with large rendering areas (such as Google Maps)
- High complexity slows down rendering (any application that overuses DOM is not fast)
- Not suitable for game application
To learn more about Canvas, you can refer to the link below.
http://www.w3school.com.cn/html/html5_canvas.asp
http://www.w3school.com.cn/tags/html_ref_canvas.asp
https://developer.mozilla.org/zh-CN/docs/Web/API/Canvas_API
http://blog.csdn.net/clh604/article/details/8536059
(3) Web Graphics Library (WebGL)
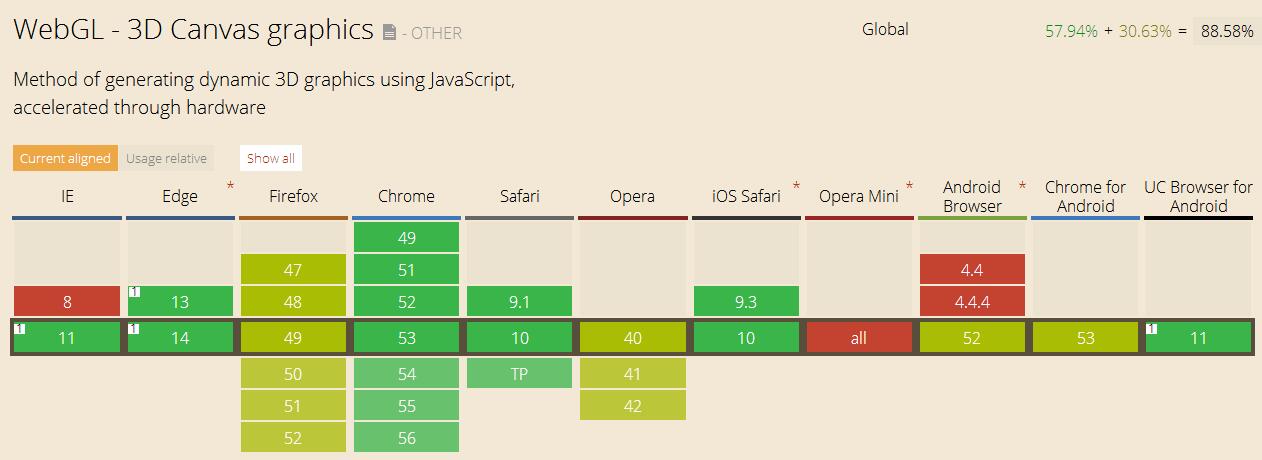
First demo.
https://www.cubeslam.com/ncokau
http://labs.gooengine.com/pearl-boy/indexBelow.html
http://www.cnblogs.com/lhb25/p/9-mind-blowing-webgl-demos.html
http://www.open-open.com/news/view/9d8136/
http://www.oschina.net/news/26547/webgl-chrome/
WebGL (full-written Web Graphics Library) is a 3D drawing standard, which allows JavaScript to be combined with OpenGL ES 2.0. By adding a JavaScript binding to OpenGLES 2.0, WebGL can provide hardware 3D accelerated rendering for HTML5 Canvas, so that Web developers can use system graphics cards to display 3D scenes and models more smoothly in browsers. It also creates complex navigation and data visualization. Obviously, WebGL technology standard avoids the trouble of developing special rendering plug-ins for web pages. It can be used to create web pages with complex 3D structure, even to design 3D web games and so on.
Basic Principles of WebGL
The emergence of WebGL makes it possible to display 3D images on browsers in real time. WebGL is essentially based on rasterized API, not on 3D API.
WebGL Object Acquisition
WebGL is also based on Canvas canvas. Let's look at the WebGL acquisition method.
// Get A WebGL context
var canvas = document.getElementById("canvas");
var gl = canvas.getContext("experimental-webgl");
- 1
- 2
- 3
- 1
- 2
- 3
WebGL only focuses on two aspects: the coordinates of projection matrix and the color of projection matrix. The task of using WebGL program is to realize WebGL objects with projection matrix coordinates and colors. You can use the "shader" to accomplish the above tasks. The vertex shader can provide the coordinates of the projection matrix, and the fragment shader can provide the color of the projection matrix.
Regardless of the size of the image to be realized, the coordinate range of the projection matrix is always from - 1 to 1. Here is a simple example of implementing WebGL objects.
// Get A WebGL context
var canvas = document.getElementById("canvas");
var gl = canvas.getContext("experimental-webgl");

// setup a GLSL program
var program = createProgramFromScripts(gl, ["2d-vertex-shader", "2d-fragment-shader"]);
gl.useProgram(program);

// look up where the vertex data needs to go.
var positionLocation = gl.getAttribLocation(program, "a_position");

// Create a buffer and put a single clipspace rectangle in
// it (2 triangles)
var buffer = gl.createBuffer();
gl.bindBuffer(gl.ARRAY_BUFFER, buffer);
gl.bufferData(
gl.ARRAY_BUFFER,
new Float32Array([
-1.0, -1.0,
 1.0, -1.0,
-1.0,  1.0,
-1.0,  1.0,
 1.0, -1.0,
 1.0,  1.0]),
gl.STATIC_DRAW);
gl.enableVertexAttribArray(positionLocation);
gl.vertexAttribPointer(positionLocation, 2, gl.FLOAT, false, 0, 0);

// draw
gl.drawArrays(gl.TRIANGLES, 0, 6);
- 1
- 2
- 3
- 4
- 5
- 6
- 7
- 8
- 9
- 10
- 11
- 12
- 13
- 14
- 15
- 16
- 17
- 18
- 19
- 20
- 21
- 22
- 23
- 24
- 25
- 26
- 27
- 28
- 29
- 30
- 1
- 2
- 3
- 4
- 5
- 6
- 7
- 8
- 9
- 10
- 11
- 12
- 13
- 14
- 15
- 16
- 17
- 18
- 19
- 20
- 21
- 22
- 23
- 24
- 25
- 26
- 27
- 28
- 29
- 30
Here are two shaders.
<script id="2d-vertex-shader" type="x-shader/x-vertex">
attribute vec2 a_position;

void main() {
  gl_Position = vec4(a_position, 0, 1);
}
</script>

<script id="2d-fragment-shader" type="x-shader/x-fragment">
void main() {
  gl_FragColor = vec4(0, 1, 0, 1);  // green
}
</script>
- 1
- 2
- 3
- 4
- 5
- 6
- 7
- 8
- 9
- 10
- 11
- 12
- 13
- 1
- 2
- 3
- 4
- 5
- 6
- 7
- 8
- 9
- 10
- 11
- 12
- 13
It will draw a green rectangle to fill the whole drawing board.

Further back is too professional, need to master the knowledge of graphics and graphics, demo can really see very strong, but need more professional talent to do.
For more information on WebGL, see here.
https://developer.mozilla.org/zh-CN/docs/Web/API/WebGL_API
http://blog.csdn.net/column/details/webgl.html
http://www.w3cschool.cn/webgl/i4gf1oh1.html
http://blog.163.com/hongshaoguoguo@126/blog/static/18046981201311310510380/
(4)CSS3 3D(CSS3 3D)
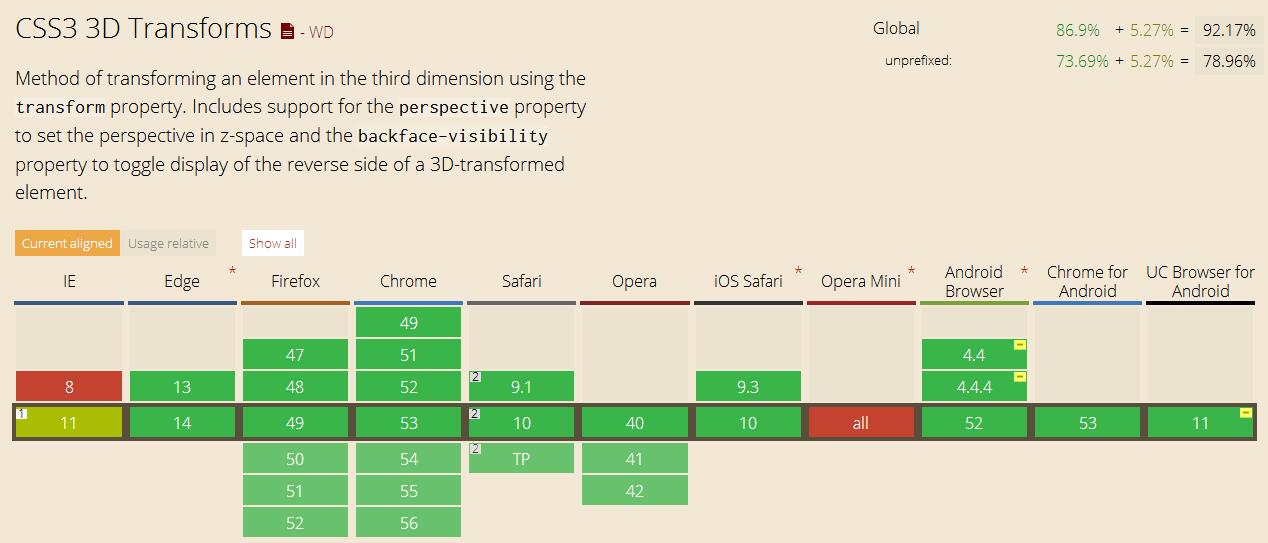
First demo.
http://www.ganecheng.tech/html5/css33d.html
CSS3 allows elements to be displayed in 3D.
Here's how this demo is displayed.
<!DOCTYPE html>
<html lang="zh-cn">
<head>
<meta charset="utf-8">
<meta http-equiv="X-UA-Compatible" content="IE=edge">
<meta name="viewport" content="width=device-width, initial-scale=1">

<style type="text/css">
*{margin: 0;padding: 0;}
html,body{height: 80%;background: black;}
.wrap
{
      height: 100%;position: relative;
      -webkit-transform-style:preserve-3d;
      -webkit-perspective:0px;

      -moz-transform-style:preserve-3d;
      -moz-perspective:0px;

      -webkit-animation:mydhua 5s ease infinite;
      -moz-animation:mydhua 5s ease infinite;
}
.box
{
    width: 200px;
    height: 200px;
    position: absolute;
    top: 50%;
    left: 50%;
    margin:-100px 0 0 -100px;
    line-height: 200px;
    text-align: center;
    font-size: 48px;
    color: white;
}
.box1{
    -webkit-transform:rotatey(90deg) translatez(-100px);
    -moz-transform:rotatey(90deg) translatez(-100px);
    background: rgba(128,0,128,.5);
}
.box2{
    -webkit-transform:rotatey(90deg) translatez(100px);
    -moz-transform:rotatey(90deg) translatez(100px);
    background: rgba(255,0,255,.5);
}
.box3{
    -webkit-transform:rotatex(90deg) translatez(100px);
    -moz-transform:rotatex(90deg) translatez(100px);
    background: rgba(255,153,204,.5);
}
.box4{
    -webkit-transform:rotatex(90deg) translatez(-100px);
    -moz-transform:rotatex(90deg) translatez(-100px);
    background: rgba(0,204,255,.5);
}
.box5{
    -webkit-transform: translatez(-100px);
    -moz-transform:translatez(-100px);
    background: rgba(153,204,255,.5);
}
.box6{
    -webkit-transform: translatez(100px);
    -moz-transform:translatez(100px);
    background: rgba(0,255,255,.5);
}

@-webkit-keyframes mydhua{

    0%{-webkit-transform:rotateX(0deg) rotateY(0deg) rotateZ(0deg);-webkit-transform-origin: center center;}
    100%{-webkit-transform:rotateX(180deg) rotateY(180deg) rotateZ(180deg);-webkit-transform-origin: center center; }
}
@-moz-keyframes mydhua{

    0%{-moz-transform:rotateX(0deg) rotateY(0deg) rotateZ(0deg);-webkit-transform-origin: center center;}
    100%{-moz-transform:rotateX(180deg) rotateY(180deg) rotateZ(180deg); -webkit-transform-origin: center center;}
}
</style>
</head>
<body style="width:960px;margin:0px auto;">

<div class="wrap">
    <div class="box1 box">1</div>
    <div class="box2 box">2</div>
    <div class="box3 box">3</div>
    <div class="box4 box">4</div>
    <div class="box5 box">5</div>
    <div class="box6 box">6</div>
</div>

<script type="text/javascript">

</script>
</body>
</html>
- 1
- 2
- 3
- 4
- 5
- 6
- 7
- 8
- 9
- 10
- 11
- 12
- 13
- 14
- 15
- 16
- 17
- 18
- 19
- 20
- 21
- 22
- 23
- 24
- 25
- 26
- 27
- 28
- 29
- 30
- 31
- 32
- 33
- 34
- 35
- 36
- 37
- 38
- 39
- 40
- 41
- 42
- 43
- 44
- 45
- 46
- 47
- 48
- 49
- 50
- 51
- 52
- 53
- 54
- 55
- 56
- 57
- 58
- 59
- 60
- 61
- 62
- 63
- 64
- 65
- 66
- 67
- 68
- 69
- 70
- 71
- 72
- 73
- 74
- 75
- 76
- 77
- 78
- 79
- 80
- 81
- 82
- 83
- 84
- 85
- 86
- 87
- 88
- 89
- 90
- 91
- 92
- 93
- 94
First of all, the sub-elements can be displayed in 3D effect.
.wrap
{
      height: 100%;position: relative;
      -webkit-transform-style:preserve-3d;
      -webkit-perspective:0px;

      -moz-transform-style:preserve-3d;
      -moz-perspective:0px;
}
- 1
- 2
- 3
- 4
- 5
- 6
- 7
- 8
- 9
- 1
- 2
- 3
- 4
- 5
- 6
- 7
- 8
- 9
Next, we specify the initial position of six div s.
rotateX() represents the angle of rotation along the X axis.
rotateY() represents the angle of rotation along the Y axis in 3D.
translateZ() represents a 3D transformation, using only values for the Z axis. Represents the moving position on Z axis. The larger the value, the closer it is to the screen, the smaller the value, and the farther it is from the screen. Feel the effect of translateZ() on this website. http://www.zhangxinxu.com/study/201209/transform-perspective-translateZ.html
    <div class="box1 box">1</div>
    <div class="box2 box">2</div>
    <div class="box3 box">3</div>
    <div class="box4 box">4</div>
    <div class="box5 box">5</div>
    <div class="box6 box">6</div>

.box
{
    width: 200px;
    height: 200px;
    position: absolute;
    top: 50%;
    left: 50%;
    margin:-100px 0 0 -100px;
    line-height: 200px;
    text-align: center;
    font-size: 48px;
    color: white;
}
.box1{
    -webkit-transform:rotatey(90deg) translatez(-100px);
    -moz-transform:rotatey(90deg) translatez(-100px);
    background: rgba(128,0,128,.5);
}
.box2{
    -webkit-transform:rotatey(90deg) translatez(100px);
    -moz-transform:rotatey(90deg) translatez(100px);
    background: rgba(255,0,255,.5);
}
.box3{
    -webkit-transform:rotatex(90deg) translatez(100px);
    -moz-transform:rotatex(90deg) translatez(100px);
    background: rgba(255,153,204,.5);
}
.box4{
    -webkit-transform:rotatex(90deg) translatez(-100px);
    -moz-transform:rotatex(90deg) translatez(-100px);
    background: rgba(0,204,255,.5);
}
.box5{
    -webkit-transform: translatez(-100px);
    -moz-transform:translatez(-100px);
    background: rgba(153,204,255,.5);
}
.box6{
    -webkit-transform: translatez(100px);
    -moz-transform:translatez(100px);
    background: rgba(0,255,255,.5);
}
- 1
- 2
- 3
- 4
- 5
- 6
- 7
- 8
- 9
- 10
- 11
- 12
- 13
- 14
- 15
- 16
- 17
- 18
- 19
- 20
- 21
- 22
- 23
- 24
- 25
- 26
- 27
- 28
- 29
- 30
- 31
- 32
- 33
- 34
- 35
- 36
- 37
- 38
- 39
- 40
- 41
- 42
- 43
- 44
- 45
- 46
- 47
- 48
- 49
- 50
- 1
- 2
- 3
- 4
- 5
- 6
- 7
- 8
- 9
- 10
- 11
- 12
- 13
- 14
- 15
- 16
- 17
- 18
- 19
- 20
- 21
- 22
- 23
- 24
- 25
- 26
- 27
- 28
- 29
- 30
- 31
- 32
- 33
- 34
- 35
- 36
- 37
- 38
- 39
- 40
- 41
- 42
- 43
- 44
- 45
- 46
- 47
- 48
- 49
- 50
Now define the keyframe animation.
Define a key frame animation with @keyframes, 0% for the start state, 100% for the end state, 50% for the need, and so on. The name of the animation is mydhua.
@-webkit-keyframes mydhua{

    0%{-webkit-transform:rotateX(0deg) rotateY(0deg) rotateZ(0deg);-webkit-transform-origin: center center;}
    100%{-webkit-transform:rotateX(180deg) rotateY(180deg) rotateZ(180deg);-webkit-transform-origin: center center; }
}
@-moz-keyframes mydhua{

    0%{-moz-transform:rotateX(0deg) rotateY(0deg) rotateZ(0deg);-webkit-transform-origin: center center;}
    100%{-moz-transform:rotateX(180deg) rotateY(180deg) rotateZ(180deg); -webkit-transform-origin: center center;}
}
- 1
- 2
- 3
- 4
- 5
- 6
- 7
- 8
- 9
- 10
- 1
- 2
- 3
- 4
- 5
- 6
- 7
- 8
- 9
- 10
Next comes animation.
.wrap
{
      -webkit-animation:mydhua 5s ease infinite;
      -moz-animation:mydhua 5s ease infinite;
}
- 1
- 2
- 3
- 4
- 5
- 1
- 2
- 3
- 4
- 5
So we get a CSS3 3D rotation effect.
Whenever 3D is involved, it is related to spatial solid geometry. If you want to further develop in this area, you should always keep books of this kind at your desk.
To learn more about CSS3 3D, you can refer to the following website.
https://segmentfault.com/a/1190000003843764
http://www.w3school.com.cn/css3/css3_3dtransform.asp
http://www.cnblogs.com/duanhuajian/archive/2012/08/30/2664026.html
Performance & Integration

Look at the introduction of W3C.
Make your Web Apps and dynamic web content faster with a variety of techniques and technologies such as Web Workers and XMLHttpRequest 2. No user should ever wait on your watch.
Performance and integration features mainly include two things, Web Workers and XMLHttpRequest 2.
The following is an introduction in turn.
(1) Web Workers
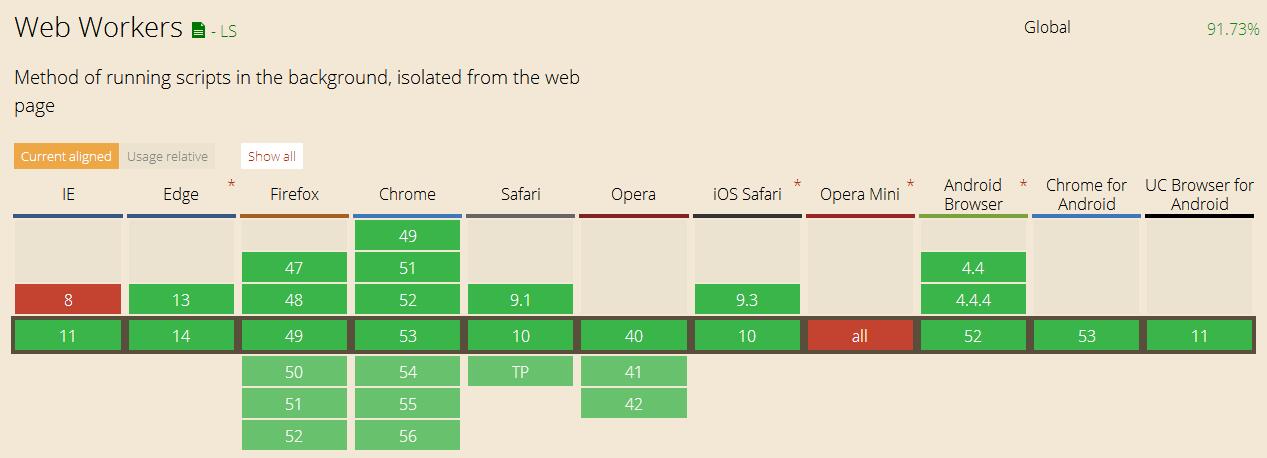
First demo, http://www.w3school.com.cn/tiy/t.asp?f=html5_webworker.
When a script is executed in an HTML page, the state of the page is unresponsive until the script is complete.
Ajax sends requests to the server and receives responses asynchronously. Otherwise, the page will get stuck.
Web Workers is JavaScript running in the browser background, independent of other scripts, and will not affect the performance of the page. You can continue to do whatever you want: click, select content, and so on, while Web Workers are running in the background.
setInterval and setTimeout are executed in a single thread.
Although there are setInterval and setTimeout functions in JavaScript that make javaScript look like multi-threaded execution, JavaScript alone is actually single-threaded and can only do one thing at a time.
Look at an example.
<!DOCTYPE html>
<html>
<head>
    <title>Web Workers</title>
</head>
<body>
    <h1>Web Workers</h1>

    <script type="text/javascript">
    setTimeout(function(){
        console.log('timeout function');
    },1000);
    alert('do not close');
    </script>
</body>
</html>
- 1
- 2
- 3
- 4
- 5
- 6
- 7
- 8
- 9
- 10
- 11
- 12
- 13
- 14
- 15
- 16
- 1
- 2
- 3
- 4
- 5
- 6
- 7
- 8
- 9
- 10
- 11
- 12
- 13
- 14
- 15
- 16
When the page runs, a dialog box pops up. If setTimeout runs on another thread, the console prints "timeout function" in a second. The fact is that the console will never output text as long as the dialog box is not closed. These two sentences really run in one thread.
This design makes JavaScript simple, but sometimes annoying, because the single-threaded design means that JavaScript code must run quickly. The common problem is that a complex JavaScript script will interrupt the execution of other scripts on the page, and even cause the page to lose response. This is why the API of Ajax is designed asynchronously.
Use of Web Workers
In the HTML 5 specification, the concept of web workers is introduced to solve the problem that client JavaScript can not be multi-threaded. The definition of worker refers to parallel threads of code. However, web worker is in a self-contained environment, unable to access window s objects and document objects of main threads, and can only communicate with main threads through asynchronous messaging mechanism.
We need to place the javascript code that we want to execute separately in a separate js file, and then call the Worker constructor on the page to create a thread. The parameter is the file path. If the parameter is stored in a relative address, then we need to refer to the script that contains the statement calling the Worker constructor. If it is an absolute path, we need to ensure homology (protocol + host).+ Port). This file does not require us to display references on the page using script tags
w=new Worker("/example/html5/demo_workers.js");
- 1
- 1
The worker object has only two attributes, which are actually two callback function handles.
onerror: When the worker runs incorrectly and is not captured in the worker, it is captured here.
onmessage: When the worker sends a message to the main thread, it is called.
There are two important methods in its prototype
PosMessage: Familiar catch-up. We have introduced the postMessage() method of window object before. woker's postMessage method is similar to that of window, but the parameters are slightly different. It only needs to pass the message content, and supports all JavaScript native data types. Of course, if you are not sure, it can also be serialized into string delivery.
Terminate: Terminate worker execution. Some worker execution is slow, and the main thread can terminate its execution on its own initiative.
demo_workers.js
var i=0;

function timedCount()
{
    i=i+1;
    postMessage(i);
    setTimeout("timedCount()",500);
}

timedCount();
- 1
- 2
- 3
- 4
- 5
- 6
- 7
- 8
- 9
- 10
- 1
- 2
- 3
- 4
- 5
- 6
- 7
- 8
- 9
- 10
demo.html
<!DOCTYPE html>
<html>
<body>

<p>count: <output id="result"></output></p>
<button onclick="startWorker()">start Worker</button>
<button onclick="stopWorker()">Stop it Worker</button>
<br /><br />

<script>
var w;

function startWorker()
{
    if(typeof(Worker)!=="undefined")
    {
          if(typeof(w)=="undefined")
          {
              w=new Worker("/example/html5/demo_workers.js");
          }
          w.onmessage = function (event)
          {
            document.getElementById("result").innerHTML=event.data;
          };
    }
    else
    {
      document.getElementById("result").innerHTML="Sorry, your browser does not support Web Workers...";
    }
}

function stopWorker()
{
    w.terminate();
}
</script>

</body>
</html>
- 1
- 2
- 3
- 4
- 5
- 6
- 7
- 8
- 9
- 10
- 11
- 12
- 13
- 14
- 15
- 16
- 17
- 18
- 19
- 20
- 21
- 22
- 23
- 24
- 25
- 26
- 27
- 28
- 29
- 30
- 31
- 32
- 33
- 34
- 35
- 36
- 37
- 38
- 39
- 40
- 1
- 2
- 3
- 4
- 5
- 6
- 7
- 8
- 9
- 10
- 11
- 12
- 13
- 14
- 15
- 16
- 17
- 18
- 19
- 20
- 21
- 22
- 23
- 24
- 25
- 26
- 27
- 28
- 29
- 30
- 31
- 32
- 33
- 34
- 35
- 36
- 37
- 38
- 39
- 40
To learn more about Web Workers, refer to the link below.
http://www.w3school.com.cn/html5/html_5_webworkers.asp
http://www.cnblogs.com/dolphinX/p/3452684.html
https://developer.mozilla.org/zh-CN/docs/Web/API/Web_Workers_API/Using_web_workers
(2) New Ajax (XMLHttpRequest 2)

XMLHttpRequest is a browser interface that enables Javascript to communicate with HTTP(S). That's Ajax.
The previous generation of Ajax had the following drawbacks.
- Only support text data transmission, can not be used to read and upload binary files.
- When transmitting and receiving data, there is no progress information, only prompt whether it has been completed.
- Subject to Same Origin Policy, data can only be requested from servers with the same domain name, not across domains.
XMLHttpRequest 2 is also the new Ajax. In view of the shortcomings of the old version, a great improvement has been made, which has the following characteristics.
- You can set the time limit for HTTP requests.
- FormData objects can be used to manage form data.
- You can upload files.
- Data can be requested under different domain names (cross-domain requests).
- The server-side binary data can be obtained.
- Data transmission progress information can be obtained.
XMLHttpRequest 2 example
Front-end code.
<!DOCTYPE html>
<html>
    <head>
        <meta http-equiv="Content-Type" content="text/html; charset=UTF-8">
        <title>Second Generation XmlHttpRequest Asynchronous upload</title>
        <script type="text/javascript">
            function upload(){
                if (!window.FormData){
                    alert('Your browser does not support the second generation XmlHttpRequest');
                    return;
                }
                // New Objects in HTML5
                var formData = new FormData(document.getElementById('uploadForm'));
                //Adding other form fields
                formData.append('user', 'haolin');
                formData.append('pass', '111111');

                var xhr = new XMLHttpRequest();
                xhr.open('POST', 'upload'); //Request url

                //Upload completion callback function
                xhr.onload = function(event) {
                    if (xhr.status === 200) {
                        alert("Upload Success");
                    } else {
                        alert('Error');
                    }
                };
                xhr.send(formData);
            }
        </script>
    </head>
    <body>
        <h1>Second Generation XmlHttpRequest Object implementation asynchronous upload</h1>
        <form id="uploadForm" action="" method="post" enctype="multipart/form-data">
            <input id="upfile" type="file" name="upfile"/>
            <input type="button" value="upload" onclick="upload()"/>
        </form>
    </body>
</html>
- 1
- 2
- 3
- 4
- 5
- 6
- 7
- 8
- 9
- 10
- 11
- 12
- 13
- 14
- 15
- 16
- 17
- 18
- 19
- 20
- 21
- 22
- 23
- 24
- 25
- 26
- 27
- 28
- 29
- 30
- 31
- 32
- 33
- 34
- 35
- 36
- 37
- 38
- 39
- 40
- 1
- 2
- 3
- 4
- 5
- 6
- 7
- 8
- 9
- 10
- 11
- 12
- 13
- 14
- 15
- 16
- 17
- 18
- 19
- 20
- 21
- 22
- 23
- 24
- 25
- 26
- 27
- 28
- 29
- 30
- 31
- 32
- 33
- 34
- 35
- 36
- 37
- 38
- 39
- 40
Background code
PrintWriter out = new PrintWriter(response.getOutputStream());
FileItemFactory factory = new DiskFileItemFactory();// Create a DiskFileItemFactory object for the request and parse the request through it. After parsing, all form items are saved in a List.
ServletFileUpload upload = new ServletFileUpload(factory);
List<FileItem> items;
try {
    items = upload.parseRequest(request);
    Iterator<FileItem> itr = items.iterator();
    while (itr.hasNext()) {
    FileItem item = (FileItem) itr.next();
    System.out.println("Is it? FormField: " + item.isFormField());
    System.out.println("Received Domain: " + item.getFieldName());
    System.out.println("Received value: " + item.getString("utf-8"));
    // Check whether the current item is a regular form item or upload a file.
    if (item.isFormField()) {// If it is a regular form item, display the form content.
        String fieldName = item.getFieldName();
        out.println("the field name is " + fieldName);// Displays the form domain name.
       } else {// If you upload a file, display the file name.
        out.println("the upload file name is " + item.getName());
    }
    }
    out.flush();
    out.close();
} catch (FileUploadException e) {
    e.printStackTrace();
}
- 1
- 2
- 3
- 4
- 5
- 6
- 7
- 8
- 9
- 10
- 11
- 12
- 13
- 14
- 15
- 16
- 17
- 18
- 19
- 20
- 21
- 22
- 23
- 24
- 25
- 1
- 2
- 3
- 4
- 5
- 6
- 7
- 8
- 9
- 10
- 11
- 12
- 13
- 14
- 15
- 16
- 17
- 18
- 19
- 20
- 21
- 22
- 23
- 24
- 25
XMLHttpRequest 2 is encapsulated.
var AjaxForm = function(cfg){
    if (!window.FormData){
        alert("Sorry, your browser doesn't supoort FormData!");
    }

    /**
     * null or undefined Return true, otherwise false
     */
    this.isNullOrUndefined = function(v, errMsg){
        if (!v){
            alert(errMsg);
            return true;
        }
        return false;
    };

    var cfg = cfg || {};
    if (this.isNullOrUndefined(cfg.id, "id can't be empty")) return;
    if (this.isNullOrUndefined(cfg.url, "url can't be empty")) return;

    this.id = cfg.id; // Form id
    this.method = cfg.method || "POST"; //Default POST method
    this.url = cfg.url;
    this.async = !cfg.sync; //Synchronization or not
    this.resultType = cfg.resultType || "text"; //Returns the result type json object or text
    this.formData = new FormData(document.getElementById(this.id)); //form data
    this.xhr = new XMLHttpRequest(); //Current Request Object

    /**
     * Timeout event
     * Configuration format:
     *   timeout : xxx,
     *   onTimeout: function(event){}
     */
    if (cfg.timeout){
        this.xhr.timeout = cfg.timeout;
        this.xhr.ontimeout = cfg.onTimeout;
    }

    /**
     * Send process events
     * Configuration format:
     * onProgress: function(loaded, total){}
     */
    if (cfg.onProgress){ //Data transmission process
        this.xhr.upload.onprogress = function(e){
            if (e.lengthComputable) {
                cfg.onProgress(e.loaded, e.total);
            }
        };
    }

    /**
     * Upload Completion Event
     */
    if (cfg.onComplete){
        this.xhr.onload = function(event){
            var res = event.target.responseText;
            if (this.resultType === 'json'){
                if ((typeof JSON) === 'undefine'){
                    res = eval("("+res+")");
                } else{
                    res = JSON.parse(res);
                }
            }
            cfg.onComplete(res);
        };
    }

    /**
     * Make a request
     */
    this.request = function(){
        this.xhr.open(this.method, this.url, this.async);
        this.xhr.send(this.formData);
    };
};
- 1
- 2
- 3
- 4
- 5
- 6
- 7
- 8
- 9
- 10
- 11
- 12
- 13
- 14
- 15
- 16
- 17
- 18
- 19
- 20
- 21
- 22
- 23
- 24
- 25
- 26
- 27
- 28
- 29
- 30
- 31
- 32
- 33
- 34
- 35
- 36
- 37
- 38
- 39
- 40
- 41
- 42
- 43
- 44
- 45
- 46
- 47
- 48
- 49
- 50
- 51
- 52
- 53
- 54
- 55
- 56
- 57
- 58
- 59
- 60
- 61
- 62
- 63
- 64
- 65
- 66
- 67
- 68
- 69
- 70
- 71
- 72
- 73
- 74
- 75
- 76
- 77
- 78
call
var af = new AjaxForm({
    id: "uploadForm",
    url: 'upload',
    method: 'POST',
    timeout: 5000,
    onTimeout: function(event){
        alert('It is timeout.');
    },
    onProgress: function(loaded, total){
        var complete = (loaded / total * 100 | 0);
        var progress = document.getElementById('uploadProgress');
        progress.value = complete;
        progress.innerHTML = complete;
    },
    onComplete: function(result){
        alert(result);
    }
});
af.request();
- 1
- 2
- 3
- 4
- 5
- 6
- 7
- 8
- 9
- 10
- 11
- 12
- 13
- 14
- 15
- 16
- 17
- 18
- 19
- 1
- 2
- 3
- 4
- 5
- 6
- 7
- 8
- 9
- 10
- 11
- 12
- 13
- 14
- 15
- 16
- 17
- 18
- 19
As you can see, although it's XMLHttpRequest 2, it's still an XMLHttpRequest object. To use the new features, you need to first determine whether window.FormData is supported.
If you want to know more about XMLHttpRequest 2, you can refer to the following article.
https://www.w3.org/TR/XMLHttpRequest2
https://my.oschina.net/indestiny/blog/215472
http://www.ruanyifeng.com/blog/2012/09/xmlhttprequest_level_2.html
http://blog.csdn.net/hills/article/details/41246939
Epilogue
I've been doing web development before. But I have never studied HTML5 carefully. It took four days to write this article. From marveling at the power of HTML5 to witnessing so many pits, the browser's performance could not keep up with it.
But we shouldn't be pessimistic. Solutions are always more difficult. Chrome and Firefox have been driving browser performance. The front end is no longer the time to cut a picture, adjust the color, change the font size, and put Flash on it. HTML5 will give us a better future. Front-end development Others also have an opportunity to upgrade their technology content and meet various opportunities.
Best wishes to the front end.