Summary
kubeadm has been supported by cluster deployment, and in version 1.13, GA, master and etcd are clustered deployments. It is also the most recommended deployment mode for government officials. kubeadm is promoted by its sig group. kubeadm has many features of kubernetes. Next, we will practice and understand its charm.
Bid mark
1. Build kubernetes cluster through kubeadm and build new management households
2. For the follow-up demonstration of version upgrade, here we upgrade version 1.13.1 to v1.14.
3. Principle Interpretation of Kubeadm
This article mainly introduces the deployment of kubeadm to hacker cluster
kubeadm deploys k8s v1.13 "cocoa cluster"
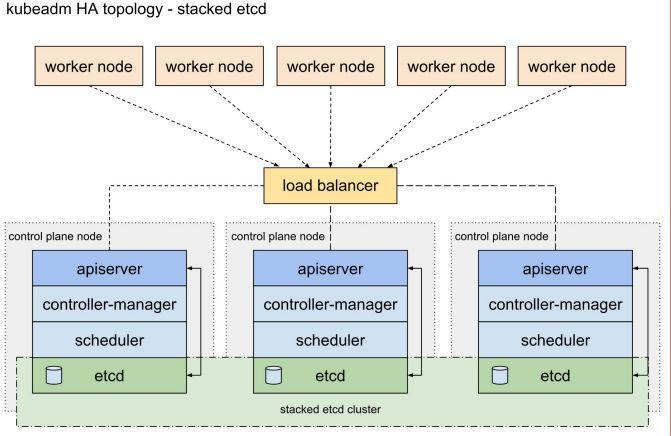
There are two types of _____________
- Stacked etcd topology
-
That is to say, each etcd is deployed on three master s separately. They do not communicate with each other. The advantage is simple, but the disadvantage is the lack of etcd availability.
-
Less than 4 machines (3master and etcd,1node)
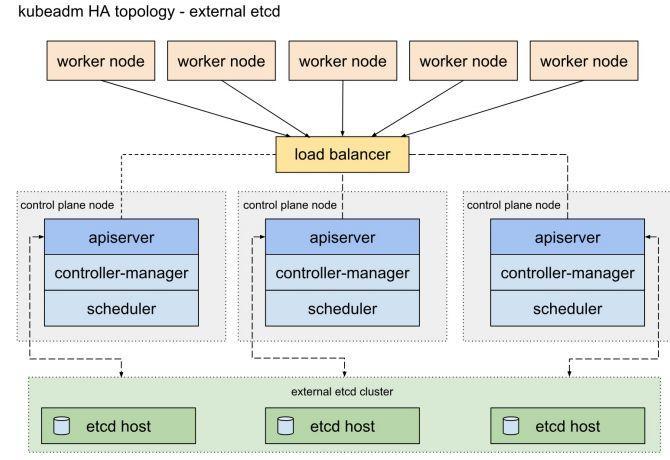
- External etcd topology
-
That is to say, the etcd topology outside the cluster is adopted, which has better redundancy, but requires less than 7 machines (3master,3etcd,1node)
-
Production environment recommendation
- Ben also adopts this topology.
step
-
Environmental preparation
-
Installation components: docker,kubelet,kubeadm (all nodes)
-
Make the above components deploy etcd cluster
-
Deploy master
-
Add node
-
Installation of collaterals
-
Verification
- summary
Machine environment preparation
- System environment
#Operating System Version ("Must, just for this case)
$cat /etc/redhat-release
CentOS Linux release 7.2.1511 (Core)
#Kernel version ("must, only here case)
$uname -r
4.17.8-1.el7.elrepo.x86_64

#Open ftype on the data disk (hold) on each node
umount /data
mkfs.xfs -n ftype=1 -f /dev/vdb
#Ban swap
swapoff -a
sed -i "s#^/swapfile#\#/swapfile#g" /etc/fstab
mount -a
Installation of docker,kubelet,kubeadm (all nodes)
-
docker installation
-
k8s1.13 version according to the official recommendation, do not adopt the latest 18.09, which we adopt 18.06, installation needs to specify the version.
-
Source: kubeadm now properly recognizes Docker 18.09.0 and newer, but still treats 18.06 as the default supported version.
- The installation script is as follows (persist on each node):
-
yum install -y yum-utils device-mapper-persistent-data lvm2
yum-config-manager \
        --add-repo \
        https://download.docker.com/linux/centos/docker-ce.repo

yum makecache fast

yum install -y --setopt=obsoletes=0 \
      docker-ce-18.06.1.ce-3.el7

systemctl start docker
systemctl enable docker
-
Install kubeadm,kubelet,kubectl
- Official's Google yum Source Law is downloaded directly from domestic servers, so it can be downloaded from other channels and uploaded to servers first.
cat <<EOF > /etc/yum.repos.d/kubernetes.repo
-
- Local installation
# Prohibition of selinux
- File repair, centos7 is known to route traffic errors because iptables are bypassed, so make sure that net.bridge.bridgenf-call-iptables in sysctl configuration is set to 1
cat <<EOF > /etc/sysctl.d/k8s.conf
Make the above components deploy etcd cluster
1. On the etcd node, set the etcd service to be started and managed by kubelet
cat << EOF > /etc/systemd/system/kubelet.service.d/20-etcd-service-manager.conf
2. Configure each etcd host with kubeadm to ensure that each host carries 12 etcd instances: on etcd1 (i.e. hosts0 above)
Command, you can see the directory of host name on / tmp
# Update HOST0, HOST1, and HOST2 with the IPs or resolvable names of your hosts
export HOST0=10.10.184.226
export HOST1=10.10.213.222
export HOST2=10.10.239.108

# Create temp directories to store files that will end up on other hosts.
mkdir -p /tmp/${HOST0}/ /tmp/${HOST1}/ /tmp/${HOST2}/

ETCDHOSTS=(${HOST0} ${HOST1} ${HOST2})
NAMES=("infra0" "infra1" "infra2")

for i in "${!ETCDHOSTS[@]}"; do
HOST=${ETCDHOSTS[$i]}
NAME=${NAMES[$i]}
cat << EOF > /tmp/${HOST}/kubeadmcfg.yaml
apiVersion: "kubeadm.k8s.io/v1beta1"
kind: ClusterConfiguration
etcd:
      local:
            serverCertSANs:
            - "${HOST}"
            peerCertSANs:
            - "${HOST}"
            extraArgs:
                  initial-cluster:
${NAMES[0]}=https://${ETCDHOSTS[0]}:2380,${NAMES[1]}=https://${ETCDHOSTS[1]}:2380,${N
AMES[2]}=https://${ETCDHOSTS[2]}:2380
                  initial-cluster-state: new
                  name: ${NAME}
                  listen-peer-urls: https://${HOST}:2380
                  listen-client-urls: https://${HOST}:2379
                  advertise-client-urls: https://${HOST}:2379
                  initial-advertise-peer-urls: https://${HOST}:2380
EOF
done
3. Making CA: Implementing the command to be certified on host0, it will create two pieces: / etc/kubernetes/pki/etcd/ca.crt/etc/kubernetes/pki/etcd/ca.key (this step requires *)
[root@10-10-184-226 ~]# kubeadm init phase certs etcd-ca
[certs] Generating "etcd/ca" certificate and key
4. Certificate each etcd node on host0:
export HOST0=10.10.184.226
export HOST1=10.10.213.222
export HOST2=10.10.239.108
kubeadm init phase certs etcd-server --config=/tmp/${HOST2}/kubeadmcfg.yaml
kubeadm init phase certs etcd-peer --config=/tmp/${HOST2}/kubeadmcfg.yaml
kubeadm init phase certs etcd-healthcheck-client --
config=/tmp/${HOST2}/kubeadmcfg.yaml
kubeadm init phase certs apiserver-etcd-client --config=/tmp/${HOST2}/kubeadmcfg.yaml
cp -R /etc/kubernetes/pki /tmp/${HOST2}/
# cleanup non-reusable certificates
find /etc/kubernetes/pki -not -name ca.crt -not -name ca.key -type f -delete

kubeadm init phase certs etcd-server --config=/tmp/${HOST1}/kubeadmcfg.yaml
kubeadm init phase certs etcd-peer --config=/tmp/${HOST1}/kubeadmcfg.yaml
kubeadm init phase certs etcd-healthcheck-client --
config=/tmp/${HOST1}/kubeadmcfg.yaml
kubeadm init phase certs apiserver-etcd-client --config=/tmp/${HOST1}/kubeadmcfg.yaml
cp -R /etc/kubernetes/pki /tmp/${HOST1}/
find /etc/kubernetes/pki -not -name ca.crt -not -name ca.key -type f -delete

kubeadm init phase certs etcd-server --config=/tmp/${HOST0}/kubeadmcfg.yaml
kubeadm init phase certs etcd-peer --config=/tmp/${HOST0}/kubeadmcfg.yaml
kubeadm init phase certs etcd-healthcheck-client --
config=/tmp/${HOST0}/kubeadmcfg.yaml
kubeadm init phase certs apiserver-etcd-client --config=/tmp/${HOST0}/kubeadmcfg.yaml
# No need to move the certs because they are for HOST0

# clean up certs that should not be copied off this host
find /tmp/${HOST2} -name ca.key -type f -delete
find /tmp/${HOST1} -name ca.key -type f -delete
- The effect of sending certificates and kubeadmcfg.yaml to each etcd node is as follows
/root/
└── kubeadmcfg.yaml
---
/etc/kubernetes/pki
├── apiserver-etcd-client.crt
├── apiserver-etcd-client.key
└── etcd
        ├── ca.crt
        ├── ca.key
        ├── healthcheck-client.crt
        ├── healthcheck-client.key
        ├── peer.crt
        ├── peer.key
        ├── server.crt
        └── server.key
5. To be static pod manifest, hold on the 3 etcd nodes respectively: (need x)
$ kubeadm init phase etcd local --config=/root/kubeadmcfg.yaml
[etcd] Creating static Pod manifest for local etcd in "/etc/kubernetes/manifests"
6. Check the status of etcd cluster. This etcd cluster is completed.
docker run --rm -it --net host -v /etc/kubernetes:/etc/kubernetes
k8s.gcr.io/etcd:3.2.24 etcdctl --cert-file /etc/kubernetes/pki/etcd/peer.crt --keyfile /etc/kubernetes/pki/etcd/peer.key --ca-file /etc/kubernetes/pki/etcd/ca.crt --
endpoints https://${HOST0}:2379 cluster-health
member 9969ee7ea515cbd2 is healthy: got healthy result from
https://10.10.213.222:2379
member cad4b939d8dfb250 is healthy: got healthy result from
https://10.10.239.108:2379
member e6e86b3b5b495dfb is healthy: got healthy result from
https://10.10.184.226:2379
cluster is healthy
Make kubeadm deploy master
- Copy certificates from any etcd to master 1 node
export CONTROL_PLANE="ubuntu@10.0.0.7"
+scp /etc/kubernetes/pki/etcd/ca.crt "${CONTROL_PLANE}":
+scp /etc/kubernetes/pki/apiserver-etcd-client.crt "${CONTROL_PLANE}":
+scp /etc/kubernetes/pki/apiserver-etcd-client.key "${CONTROL_PLANE}":
- Write and initialize the configuration kubeadm-config.yaml on the master of the platform
apiVersion: kubeadm.k8s.io/v1beta1
kind: ClusterConfiguration
kubernetesVersion: stable
#kubernetesVersion: 1.13.1
#Note that we want to install 1.13.1 first and then upgrade 1.13.4 later, so we declare the version number directly.
apiServer:
   certSANs:
   - "k8s.paas.test"
controlPlaneEndpoint: "k8s.paas.test:6443"
etcd:
       external:
              endpoints:
              - https://10.10.184.226:2379
              - https://10.10.213.222:2379
              - https://10.10.239.108:2379
              caFile: /etc/kubernetes/pki/etcd/ca.crt
              certFile: /etc/kubernetes/pki/apiserver-etcd-client.crt
              keyFile: /etc/kubernetes/pki/apiserver-etcd-client.key
networking:
    podSubnet: "10.244.0.0/16"
Note: This k8s.paas.test:6443 is a LB, if there is no virtual IP to do it.
-
Make Private Warehouse (Define Mirror Function) kubeadm hold flexibly customize cluster init ialization by modifying the parameters in the configuration file. For example, image Repository can set mirror prefix. We can edit the parameters in kubeadm-config.yaml after passing the mirror to internal private service.
- On master 1: kubeadm init -- config. kubeadm-config.yaml
Your Kubernetes master has initialized successfully!

To start using your cluster, you need to run the following as a regular user:

    mkdir -p $HOME/.kube
    sudo cp -i /etc/kubernetes/admin.conf $HOME/.kube/config
    sudo chown $(id -u):$(id -g) $HOME/.kube/config

You should now deploy a pod network to the cluster.
Run "kubectl apply -f [podnetwork].yaml" with one of the options listed at:
    https://kubernetes.io/docs/concepts/cluster-administration/addons/

You can now join any number of machines by running the following on each node
as root:

  kubeadm join k8s.paas.test:6443 --token f1oygc.3zlc31yjcut46prf --discoverytoken-ca-cert-hash xx

  [root@k8s-m1 ~]
  $kubectl get node
  NAME STATUS ROLES AGE VERSION
  k8s-m1 NotReady master 4m54s v1.13.1
Install two other Masters
- Configuration of admin.conf on master 1 and copies of pki-related certificates to two other masters are also recorded as follows:
/etc/kubernetes/pki/ca.crt
/etc/kubernetes/pki/ca.key
/etc/kubernetes/pki/sa.key
/etc/kubernetes/pki/sa.pub
/etc/kubernetes/pki/front-proxy-ca.crt
/etc/kubernetes/pki/front-proxy-ca.key
/etc/kubernetes/pki/etcd/ca.crt
/etc/kubernetes/pki/etcd/ca.key (Copies are needed here in official files, but they are not needed in practice.)
/etc/kubernetes/admin.conf
Note: Official files are two fewer pieces/etc/kubernetes/pki/apiserver-etcd-client.crt/etc/kubernetes/pki/apiserver-etcdclient.key. Without apiserver, it will fail to start and report errors:
Unable to create storage backend: config (&{ /registry []
/etc/kubernetes/pki/apiserver-etcd-client.key /etc/kubernetes/pki/apiserver-etcdclient.crt /etc/kubernetes/pki/etcd/ca.crt true 0xc000133c20 <nil> 5m0s 1m0s}),
err (open /etc/kubernetes/pki/apiserver-etcd-client.crt: no such file or
directory)
- In 2 and 3 master s, insist on adding:
  kubeadm join k8s.paas.test:6443 --token f1oygc.3zlc31yjcut46prf --discovery-tokenca-cert-hash sha256:078b63e29378fb6dcbedd80dd830b83e37521f294b4e3416cd77e854041d912f
--experimental-control-plane
Adding node Node
[root@k8s-n1 ~]
$ kubeadm join k8s.paas.test:6443 --token f1oygc.3zlc31yjcut46prf --discovery-tokenca-cert-hash sha256:078b63e29378fb6dcbedd80dd830b83e37521f294b4e3416cd77e854041d912f
[preflight] Running pre-flight checks
[discovery] Trying to connect to API Server "k8s.paas.test:6443"
[discovery] Created cluster-info discovery client, requesting info from
"https://k8s.paas.test:6443"
[discovery] Requesting info from "https://k8s.paas.test:6443" again to validate TLS
against the pinned public key
[discovery] Cluster info signature and contents are valid and TLS certificate
validates against pinned roots, will use API Server "k8s.paas.test:6443"
[discovery] Successfully established connection with API Server "k8s.paas.test:6443"
[join] Reading configuration from the cluster...
[join] FYI: You can look at this config file with 'kubectl -n kube-system get cm
kubeadm-config -oyaml'
[kubelet] Downloading configuration for the kubelet from the "kubelet-config-1.13"
ConfigMap in the kube-system namespace
[kubelet-start] Writing kubelet configuration to file "/var/lib/kubelet/config.yaml"
[kubelet-start] Writing kubelet environment file with flags to file
"/var/lib/kubelet/kubeadm-flags.env"
[kubelet-start] Activating the kubelet service
[tlsbootstrap] Waiting for the kubelet to perform the TLS Bootstrap...
[patchnode] Uploading the CRI Socket information "/var/run/dockershim.sock" to the
Node API object "k8s-n1" as an annotation

This node has joined the cluster:
* Certificate signing request was sent to apiserver and a response was received.
* The Kubelet was informed of the new secure connection details.

Run 'kubectl get nodes' on the master to see this node join the cluster.
network install
kubectl apply -f
https://raw.githubusercontent.com/coreos/flannel/a70459be0084506e4ec919aa1c114638878d
b11b/Documentation/kube-flannel.yml
kubectl get pod --all-namespaces -o wide
NAMESPACE NAME READY STATUS RESTARTS AGE
IP NODE NOMINATED NODE READINESS GATES
kube-system coredns-86c58d9df4-dc4t2 1/1 Running 0 14m
172.17.0.3 k8s-m1 <none> <none>
kube-system coredns-86c58d9df4-jxv6v 1/1 Running 0 14m
172.17.0.2 k8s-m1 <none> <none>
kube-system kube-apiserver-k8s-m1 1/1 Running 0 13m
10.10.119.128 k8s-m1 <none> <none>
kube-system kube-apiserver-k8s-m2 1/1 Running 0 5m
10.10.76.80 k8s-m2 <none> <none>
kube-system kube-apiserver-k8s-m3 1/1 Running 0 4m58s
10.10.56.27 k8s-m3 <none> <none>
kube-system kube-controller-manager-k8s-m1 1/1 Running 0 13m
10.10.119.128 k8s-m1 <none> <none>
kube-system kube-controller-manager-k8s-m2 1/1 Running 0 5m
10.10.76.80 k8s-m2 <none> <none>
kube-system kube-controller-manager-k8s-m3 1/1 Running 0 4m58s
10.10.56.27 k8s-m3 <none> <none>
kube-system kube-flannel-ds-amd64-nvmtk 1/1 Running 0 44s
10.10.56.27 k8s-m3 <none> <none>
kube-system kube-flannel-ds-amd64-pct2g 1/1 Running 0 44s
10.10.76.80 k8s-m2 <none> <none>
kube-system kube-flannel-ds-amd64-ptv9z 1/1 Running 0 44s
10.10.119.128 k8s-m1 <none> <none>
kube-system kube-flannel-ds-amd64-zcv49 1/1 Running 0 44s
10.10.175.146 k8s-n1 <none> <none>
kube-system kube-proxy-9cmg2 1/1 Running 0 2m34s
10.10.175.146 k8s-n1 <none> <none>
kube-system kube-proxy-krlkf 1/1 Running 0 4m58s
10.10.56.27 k8s-m3 <none> <none>
kube-system kube-proxy-p9v66 1/1 Running 0 14m
10.10.119.128 k8s-m1 <none> <none>
kube-system kube-proxy-wcgg6 1/1 Running 0 5m
10.10.76.80 k8s-m2 <none> <none>
kube-system kube-scheduler-k8s-m1 1/1 Running 0 13m
10.10.119.128 k8s-m1 <none> <none>
kube-system kube-scheduler-k8s-m2 1/1 Running 0 5m
10.10.76.80 k8s-m2 <none> <none>
kube-system kube-scheduler-k8s-m3 1/1 Running 0 4m58s
10.10.56.27 k8s-m3 <none> <none>
installation is complete
Verification
- First verify that kube-apiserver, kube-controller-manager, kube-scheduler, pod network are normal:
$kubectl create deployment nginx --image=nginx:alpine
$kubectl get pods -l app=nginx -o wide
NAME READY STATUS RESTARTS AGE IP NODE
NOMINATED NODE READINESS GATES
nginx-54458cd494-r6hqm 1/1 Running 0 5m24s 10.244.4.2 k8s-n1
<none> <none>
- kube-proxy verification
$kubectl expose deployment nginx --port=80 --type=NodePort
service/nginx exposed

[root@k8s-m1 ~]
$kubectl get svc
NAME TYPE CLUSTER-IP EXTERNAL-IP PORT(S) AGE
kubernetes ClusterIP 10.96.0.1 <none> 443/TCP 122m
nginx NodePort 10.108.192.221 <none> 80:30992/TCP 4s
[root@k8s-m1 ~]
$kubectl get pods -l app=nginx -o wide
NAME READY STATUS RESTARTS AGE IP NODE
NOMINATED NODE READINESS GATES
nginx-54458cd494-r6hqm 1/1 Running 0 6m53s 10.244.4.2 k8s-n1
<none> <none>

$curl -I k8s-n1:30992
HTTP/1.1 200 OK
- Verify the status of dns,pod files
kubectl run --generator=run-pod/v1 -it curl --image=radial/busyboxplus:curl
If you don't see a command prompt, try pressing enter.
[ root@curl:/ ]$ nslookup nginx
Server: 10.96.0.10
Address 1: 10.96.0.10 kube-dns.kube-system.svc.cluster.local

Name: nginx
Address 1: 10.108.192.221 nginx.default.svc.cluster.local
- Ke Ke
Shut down master 1, access Nginx shutdown master 1 in 120 random pods, access Nginx in 120 random pods
while true;do curl -I nginx && sleep 1 ;done
summary
-
About version
-
Kernel version 4.19 is more stable. No recommendation 4.17 (5 is new)
- The latest stable version of docker is 1.17.12, and here it is 1.18.06. Although k8s official has confirmed compatibility with 1.18.09, it is still recommended that 1.17.12 be produced.
-
-
About the file network, each choice is different. flannel is more common in Zhongguo company, but before deployment, we should select the file network plug-in and set it up in advance in the configuration file (kubeadm configuration was not written in the beginning of the official blog, and then the requirement must be added in the file network configuration).
-
Error handling
-
To reset the environment, kubeadm reset is a good tool, but it will not reset completely. Some data in etcd (such as configmap security, etc.) is not empty, so if it is necessary to reset the real environment, remember to reset etcd after reset.
- The method of resetting etcd is to empty etcd node / var/lib/etcd and restart docker service.
-
-
×××
-
Mirror: kubeadm has defined the mirror prefix, and image repository can be set in kubeadm-config.yaml
-
yum, you can download the guide in advance, you can also set http_proxy to access
- init, you need to connect to google when issuing certificates and inits, or you can set http_proxy to access them.
-
-
More
- Certificates and upgrades will continue in the next chapter.