1, Pre knowledge points
1.1 two ways to deploy Kubernetes cluster in production environment
At present, there are two ways to deploy Kubernetes cluster in production:
-
kubeadm
Kubeadm is a K8s deployment tool that provides kubeadm init and kubeadm join for rapid deployment of Kubernetes clusters.
Official address: https://kubernetes.io/docs/reference/setup-tools/kubeadm/kubeadm/
-
Binary package
Download the binary package of the distribution from github, manually deploy each component to form the Kubernetes cluster.
Kubeadm lowered the deployment threshold, but blocked many details, and it was difficult to troubleshoot problems. If you want to be more controllable, it is recommended to use binary package to deploy Kubernetes cluster. Although manual deployment is troublesome, you can learn a lot of working principles during this period, which is also conducive to later maintenance.
1.2 installation requirements
Before you start to deploy the Kubernetes cluster machine, you need to meet the following conditions:
-
One or more machines, operating system CentOS7.x-86_x64
-
Hardware configuration: 2GB or more RAM, 2 CPU s or more, 30GB or more hard disk
-
Network interworking among all machines in the cluster
-
You can access the Internet and need to pull the image. If the server cannot access the Internet, you need to download the image in advance and import the node
-
Disable swap partition
1.3 preparation environment
Software environment:
| Software | edition |
|---|---|
| operating system | CentOS7.8_x64 (mini) |
| Docker | 19-ce |
| Kubernetes | 1.18 |
Overall server planning:
| role | IP | assembly |
|---|---|---|
| k8s-master1 | 192.168.31.71 | kube-apiserver,kube-controller-manager,kube-scheduler,etcd |
| k8s-master2 | 192.168.31.74 | kube-apiserver,kube-controller-manager,kube-scheduler |
| k8s-node1 | 192.168.31.72 | kubelet,kube-proxy,docker etcd |
| k8s-node2 | 192.168.31.73 | kubelet,kube-proxy,docker,etcd |
| Load Balancer(Master) | 192.168.31.81 ,192.168.31.88 (VIP) | Nginx L4 |
| Load Balancer(Backup) | 192.168.31. 82 | Nginx L4 |
Note: in view of the low configuration of some friends' computers, so many virtual machines can't run, so this set of high availability cluster is implemented in two parts. First, deploy a single Master architecture (192.168.31.71/72/73), and then expand to a multi Master architecture (the above planning). By the way, get familiar with the Master expansion process.
Single Master architecture:
Single Master server planning:
| role | IP | assembly |
|---|---|---|
| k8s-master | 192.168.31.71 | kube-apiserver,kube-controller-manager,kube-scheduler,etcd |
| k8s-node1 | 192.168.31.72 | kubelet,kube-proxy,docker etcd |
| k8s-node2 | 192.168.31.73 | kubelet,kube-proxy,docker,etcd |
1.4 operating system initialization configuration
#Turn off firewall
systemctl stop firewalld
systemctl disable firewalld

#Turn off selinux
Sed - I's / enforcing / disabled / '/ etc / SELinux / config ා permanent
setenforce 0 ා temporary

#Turn off swap
swapoff -a (temporary)
Sed - RI's /. * swap. * / # & / '/ etc / fstabාpermanent

#Set the host name according to the plan
hostnamectl set-hostname <hostname>

#Add hosts in master
cat >> /etc/hosts << EOF
192.168.31.71 k8s-master
192.168.31.72 k8s-node1
192.168.31.73 k8s-node2
EOF

#Passing bridged IPv4 traffic to iptables' chain
cat > /etc/sysctl.d/k8s.conf << EOF
net.bridge.bridge-nf-call-ip6tables = 1
net.bridge.bridge-nf-call-iptables = 1
EOF
sysctl --system takes effect

#Time synchronization
yum install ntpdate -y
ntpdate time.windows.com
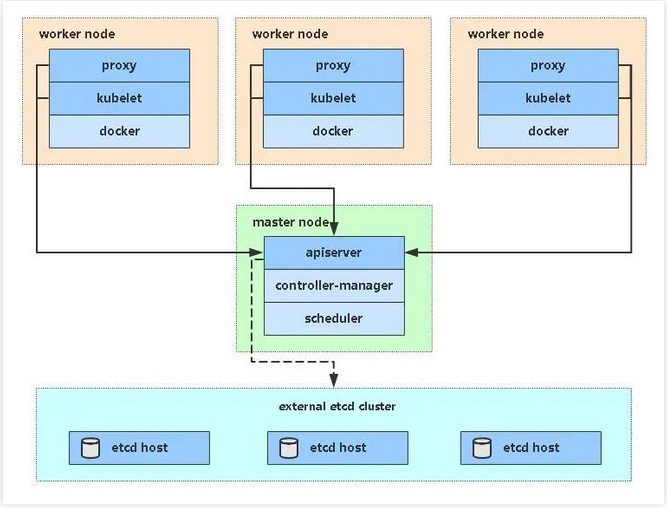
2, Deploy Etcd cluster
Etcd is a distributed key value storage system. Kubernetes uses etcd for data storage, so first prepare an etcd database. To solve the single point failure of etcd, it should be deployed in a cluster mode. Here, three sets of etcd can be used to build a cluster, which can tolerate one machine failure. Of course, you can also use five sets of etcd to build a cluster, which can tolerate two machine failures.
| Node name | IP |
|---|---|
| etcd-1 | 192.168.31.71 |
| etcd-2 | 192.168.31.72 |
| etcd-3 | 192.168.31.73 |
Note: in order to save machines, it is reused with k8s node machines. It can also be deployed independently of the k8s cluster, as long as the apiserver can connect to it.
2.1 prepare cfssl certificate generation tool
cfssl is an open source certificate management tool, which is more convenient to use than openssl.
For any server operation, use the Master node here.
wget https://pkg.cfssl.org/R1.2/cfssl_linux-amd64
wget https://pkg.cfssl.org/R1.2/cfssljson_linux-amd64
wget https://pkg.cfssl.org/R1.2/cfssl-certinfo_linux-amd64
chmod +x cfssl_linux-amd64 cfssljson_linux-amd64 cfssl-certinfo_linux-amd64
mv cfssl_linux-amd64 /usr/local/bin/cfssl
mv cfssljson_linux-amd64 /usr/local/bin/cfssljson
mv cfssl-certinfo_linux-amd64 /usr/bin/cfssl-certinfo
2.2 generate Etcd certificate
1. Self signed certification authority (CA)
Create working directory:
mkdir -p ~/TLS/{etcd,k8s}

cd TLS/etcd
Self signed CA:
cat > ca-config.json << EOF
{
 "signing": {
 "default": {
 "expiry": "87600h"
 },
 "profiles": {
 "www": {
 "expiry": "87600h",
 "usages": [
 "signing",
 "key encipherment",
 "server auth",
 "client auth"
 ]
 }
 }
 }
}
EOF

cat > ca-csr.json << EOF
{
 "CN": "etcd CA",
 "key": {
 "algo": "rsa",
 "size": 2048
 },
 "names": [
 {
 "C": "CN",
 "L": "Beijing",
 "ST": "Beijing"
 }
 ]
}
EOF
Generate certificate:
cfssl gencert -initca ca-csr.json | cfssljson -bare ca -

ls *pem
ca-key.pem  ca.pem
2. Use self signed CA to issue Etcd HTTPS certificate
To create a certificate request file:
cat > server-csr.json << EOF
{
 "CN": "etcd",
 "hosts": [
 "192.168.31.71",
 "192.168.31.72",
 "192.168.31.73"
 ],
 "key": {
 "algo": "rsa",
 "size": 2048
 },
 "names": [
 {
 "C": "CN",
 "L": "BeiJing",
 "ST": "BeiJing"
 }
 ]
}
EOF
Note: the IP in the hosts field of the above file is the cluster internal communication IP of all etcd nodes, and no one can be less! In order to facilitate the later expansion, several more reserved IPS can be written.
Generate certificate:
cfssl gencert -ca=ca.pem -ca-key=ca-key.pem -config=ca-config.json -profile=www server-csr.json | cfssljson -bare server

ls server*pem
server-key.pem server.pem
2.3 download binaries from Github
Download address: https://github.com/etcd-io/etcd/releases/download/v3.4.9/etcd-v3.4.9-linux-amd64.tar.gz
2.4 deploy Etcd cluster
To simplify the operation, all files generated by node 1 will be copied to node 2 and node 3 later
1. Create working directory and extract binary package
mkdir /opt/etcd/{bin,cfg,ssl} -p
tar zxvf etcd-v3.4.9-linux-amd64.tar.gz
mv etcd-v3.4.9-linux-amd64/{etcd,etcdctl} /opt/etcd/bin/
2. Create etcd configuration file
cat > /opt/etcd/cfg/etcd.conf << EOF
#[Member]
ETCD_NAME="etcd-1"
ETCD_DATA_DIR="/var/lib/etcd/default.etcd"
ETCD_LISTEN_PEER_URLS="https://192.168.31.71:2380"
ETCD_LISTEN_CLIENT_URLS="https://192.168.31.71:2379"
#[Clustering]
ETCD_INITIAL_ADVERTISE_PEER_URLS="https://192.168.31.71:2380"
ETCD_ADVERTISE_CLIENT_URLS="https://192.168.31.71:2379"
ETCD_INITIAL_CLUSTER="etcd-1=https://192.168.31.71:2380,etcd-2=https://192.168.31.72:2380,etcd-3=https://192.168.31.73:2380"
ETCD_INITIAL_CLUSTER_TOKEN="etcd-cluster"
ETCD_INITIAL_CLUSTER_STATE="new"
EOF
-
ETCD_NAME: node name, unique in the cluster
-
ETCD_DATA_DIR: Data Directory
-
ETCD_LISTEN_PEER_URLS: cluster communication listening address
-
ETCD_LISTEN_CLIENT_URLS: client access listening address
-
ETCD_INITIAL_ADVERTISE_PEER_URLS: cluster notification address
-
ETCD_ADVERTISE_CLIENT_URLS: client notification address
-
ETCD_INITIAL_CLUSTER: cluster node address
-
ETCD_INITIAL_CLUSTER_TOKEN: cluster token
-
ETCD_INITIAL_CLUSTER_STATE: the current state of joining the cluster. New is the new cluster. Existing means joining the existing cluster
3. System D management etcd
cat > /usr/lib/systemd/system/etcd.service << EOF
[Unit]
Description=Etcd Server
After=network.target
After=network-online.target
Wants=network-online.target
[Service]
Type=notify
EnvironmentFile=/opt/etcd/cfg/etcd.conf
ExecStart=/opt/etcd/bin/etcd \
--cert-file=/opt/etcd/ssl/server.pem \
--key-file=/opt/etcd/ssl/server-key.pem \
--peer-cert-file=/opt/etcd/ssl/server.pem \
--peer-key-file=/opt/etcd/ssl/server-key.pem \
--trusted-ca-file=/opt/etcd/ssl/ca.pem \
--peer-trusted-ca-file=/opt/etcd/ssl/ca.pem \
--logger=zap
Restart=on-failure
LimitNOFILE=65536
[Install]
WantedBy=multi-user.target
EOF
4. Copy the certificate just generated
Copy the generated certificate to the path in the configuration file:
cp ~/TLS/etcd/ca*pem ~/TLS/etcd/server*pem /opt/etcd/ssl/
5. Start and set the startup
systemctl daemon-reload
systemctl start etcd
systemctl enable etcd
6. Copy all the generated files of node 1 to node 2 and node 3
scp -r /opt/etcd/ root@192.168.31.72:/opt/
scp /usr/lib/systemd/system/etcd.service root@192.168.31.72:/usr/lib/systemd/system/
scp -r /opt/etcd/ root@192.168.31.73:/opt/
scp /usr/lib/systemd/system/etcd.service root@192.168.31.73:/usr/lib/systemd/system/
Then modify them in node 2 and node 3 respectively etcd.conf Node name and current server IP in profile:
vi /opt/etcd/cfg/etcd.conf
#[Member]
ETCD_NAME="etcd-1" # Modify here and change node 2 to etcd-2,Change node 3 to etcd-3
ETCD_DATA_DIR="/var/lib/etcd/default.etcd"
ETCD_LISTEN_PEER_URLS="https://192.168.31.71:2380" # Modify here as the current server IP
ETCD_LISTEN_CLIENT_URLS="https://192.168.31.71:2379" # Modify here as the current server IP

#[Clustering]
ETCD_INITIAL_ADVERTISE_PEER_URLS="https://192.168.31.71:2380" # Modify here as the current server IP
ETCD_ADVERTISE_CLIENT_URLS="https://192.168.31.71:2379" # Modify here as the current server IP
ETCD_INITIAL_CLUSTER="etcd-1=https://192.168.31.71:2380,etcd-2=https://192.168.31.72:2380,etcd-3=https://192.168.31.73:2380"
ETCD_INITIAL_CLUSTER_TOKEN="etcd-cluster"
ETCD_INITIAL_CLUSTER_STATE="new"
Finally, start etcd and set it to start, as above.
7. View cluster status
ETCDCTL_API=3 /opt/etcd/bin/etcdctl --cacert=/opt/etcd/ssl/ca.pem --cert=/opt/etcd/ssl/server.pem --key=/opt/etcd/ssl/server-key.pem --endpoints="https://192.168.31.71:2379,https://192.168.31.72:2379,https://192.168.31.73:2379" endpoint health

https://192.168.31.71:2379 is healthy: successfully committed proposal: took = 8.154404ms
https://192.168.31.73:2379 is healthy: successfully committed proposal: took = 9.044117ms
https://192.168.31.72:2379 is healthy: successfully committed proposal: took = 10.000825ms
If the above information is output, the cluster deployment is successful. If there is any problem, the first step is to look at the log first: / var/log/message or journalctl -u etcd
3, Install Docker
Download address: https://download.docker.com/linux/static/stable/x86_64/docker-19.03.9.tgz
The following operations are performed on all nodes. Binary installation is used here, as is yum installation.
3.1 decompress binary package
tar zxvf docker-19.03.9.tgz
mv docker/* /usr/bin
3.2 systemd management docker
cat > /usr/lib/systemd/system/docker.service << EOF
[Unit]
Description=Docker Application Container Engine
Documentation=https://docs.docker.com
After=network-online.target firewalld.service
Wants=network-online.target
[Service]
Type=notify
ExecStart=/usr/bin/dockerd
ExecReload=/bin/kill -s HUP $MAINPID
LimitNOFILE=infinity
LimitNPROC=infinity
LimitCORE=infinity
TimeoutStartSec=0
Delegate=yes
KillMode=process
Restart=on-failure
StartLimitBurst=3
StartLimitInterval=60s
[Install]
WantedBy=multi-user.target
EOF
3.3 create profile
mkdir /etc/docker
cat > /etc/docker/daemon.json << EOF
{
 "registry-mirrors": ["https://b9pmyelo.mirror.aliyuncs.com"]
}
EOF
-
Registration mirrors Alibaba cloud image accelerator
3.4 start and set the startup
systemctl daemon-reload
systemctl start docker
systemctl enable docker
4, Deploy Master Node
If you have any problems in your study or the documents are wrong, you can contact Alain ~ wechat: init1024
4.1 generate Kube API server certificate
1. Self signed certification authority (CA)
cat > ca-config.json << EOF
{
 "signing": {
 "default": {
 "expiry": "87600h"
 },
 "profiles": {
 "kubernetes": {
 "expiry": "87600h",
 "usages": [
 "signing",
 "key encipherment",
 "server auth",
 "client auth"
 ]
 }
 }
 }
}
EOF
cat > ca-csr.json << EOF
{
 "CN": "kubernetes",
 "key": {
 "algo": "rsa",
 "size": 2048
 },
 "names": [
 {
 "C": "CN",
 "L": "Beijing",
 "ST": "Beijing",
 "O": "k8s",
 "OU": "System"
 }
 ]
}
EOF
Generate certificate:
cfssl gencert -initca ca-csr.json | cfssljson -bare ca -

ls *pem
ca-key.pem  ca.pem
2. Issue Kube apiserver HTTPS certificate with self signed CA
To create a certificate request file:
cd TLS/k8s
cat > server-csr.json << EOF
{
 "CN": "kubernetes",
 "hosts": [
 "10.0.0.1",
 "127.0.0.1",
 "192.168.31.71",
 "192.168.31.72",
 "192.168.31.73",
 "192.168.31.74",
 "192.168.31.81",
 "192.168.31.82",
 "192.168.31.88",
 "kubernetes",
 "kubernetes.default",
 "kubernetes.default.svc",
 "kubernetes.default.svc.cluster",
 "kubernetes.default.svc.cluster.local"
 ],
 "key": {
 "algo": "rsa",
 "size": 2048
 },
 "names": [
 {
 "C": "CN",
 "L": "BeiJing",
 "ST": "BeiJing",
 "O": "k8s",
 "OU": "System"
 }
 ]
}
EOF
Note: the IP in the hosts field of the above file is all Master/LB/VIP IP. None of them can be less! In order to facilitate the later expansion, several more reserved IPS can be written.
Generate certificate:
cfssl gencert -ca=ca.pem -ca-key=ca-key.pem -config=ca-config.json -profile=kubernetes server-csr.json | cfssljson -bare server

ls server*pem
server-key.pem server.pem
4.2 download binaries from Github
Download address: https://github.com/kubernetes/kubernetes/blob/master/CHANGELOG/CHANGELOG-1.18.md#v1183
Note: open the link and you will find that there are many packages in it. It is enough to download a server package, including the Master and Worker Node binaries.
4.3 unpacking binary packages
mkdir -p /opt/kubernetes/{bin,cfg,ssl,logs}
tar zxvf kubernetes-server-linux-amd64.tar.gz
cd kubernetes/server/bin
cp kube-apiserver kube-scheduler kube-controller-manager /opt/kubernetes/bin
cp kubectl /usr/bin/
4.4 deploy Kube API server
1. Create profile
cat > /opt/kubernetes/cfg/kube-apiserver.conf << EOF
KUBE_APISERVER_OPTS="--logtostderr=false \\
--v=2 \\
--log-dir=/opt/kubernetes/logs \\
--etcd-servers=https://192.168.31.71:2379,https://192.168.31.72:2379,https://192.168.31.73:2379 \\
--bind-address=192.168.31.71 \\
--secure-port=6443 \\
--advertise-address=192.168.31.71 \\
--allow-privileged=true \\
--service-cluster-ip-range=10.0.0.0/24 \\
--enable-admission-plugins=NamespaceLifecycle,LimitRanger,ServiceAccount,ResourceQuota,NodeRestriction \\
--authorization-mode=RBAC,Node \\
--enable-bootstrap-token-auth=true \\
--token-auth-file=/opt/kubernetes/cfg/token.csv \\
--service-node-port-range=30000-32767 \\
--kubelet-client-certificate=/opt/kubernetes/ssl/server.pem \\
--kubelet-client-key=/opt/kubernetes/ssl/server-key.pem \\
--tls-cert-file=/opt/kubernetes/ssl/server.pem \\
--tls-private-key-file=/opt/kubernetes/ssl/server-key.pem \\
--client-ca-file=/opt/kubernetes/ssl/ca.pem \\
--service-account-key-file=/opt/kubernetes/ssl/ca-key.pem \\
--etcd-cafile=/opt/etcd/ssl/ca.pem \\
--etcd-certfile=/opt/etcd/ssl/server.pem \\
--etcd-keyfile=/opt/etcd/ssl/server-key.pem \\
--audit-log-maxage=30 \\
--audit-log-maxbackup=3 \\
--audit-log-maxsize=100 \\
--audit-log-path=/opt/kubernetes/logs/k8s-audit.log"
EOF
Note: the first is escape character and the second is line break character. Escape character is used to keep line break character with EOF.
-
– logtostderr: enable logging
-
- v: log level
-
– log dir: log directory
-
– etcd servers: etcd cluster address
-
– bind address: listening address
-
– secure port: https secure port
-
– advertisement address: cluster advertisement address
-
– allow privileged: enable authorization
-
– Service cluster IP range: Service virtual IP address segment
-
– enable admission plugins: access control module
-
– authorization mode: authentication authorization, enabling RBAC authorization and node self-management
-
– enable bootstrap token auth: enable TLS bootstrap mechanism
-
– token auth file: bootstrap token file
-
– service node port range: default allocation port range of Service nodeport type
-
– kubelet client XXX: apiserver accesses kubelet client certificate
-
– TLS XXX file: apiserver https certificate
-
– Etcd xxxfile: connect Etcd cluster certificate
-
– audit log XXX: audit log
2. Copy the certificate just generated
Copy the generated certificate to the path in the configuration file:
cp ~/TLS/k8s/ca*pem ~/TLS/k8s/server*pem /opt/kubernetes/ssl/
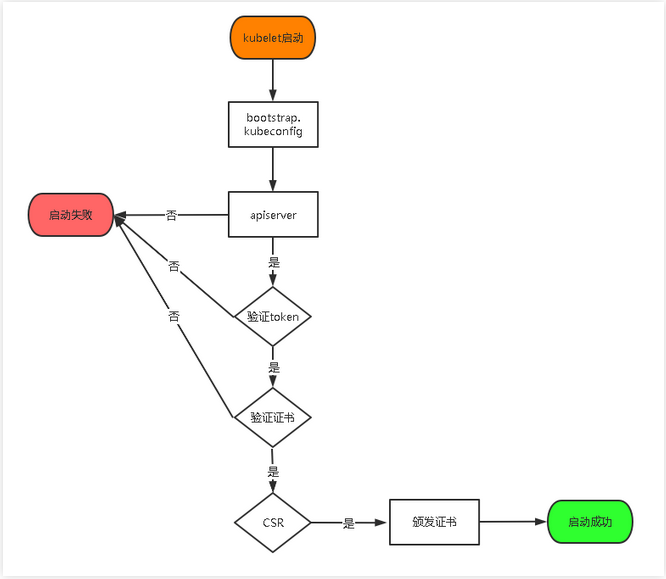
3. Enable TLS Bootstrapping mechanism
TLS bootstrapping: after Master apiserver enables TLS authentication, the Node kubelet and Kube proxy must use the valid certificate issued by CA to communicate with Kube apiserver. When there are many nodes, the client certificate issuance needs a lot of work, which also increases the cluster expansion complexity. In order to simplify the process, Kubernetes introduces TLS bootstrapping mechanism to automatically issue client certificates. Kubelet will automatically apply for certificates from apserver as a low authority user, and kubelet's certificates will be dynamically signed by apserver. Therefore, it is strongly recommended to use this method on Node. At present, it is mainly used for kubelet, and Kube proxy is still issued a certificate by us.
TLS bootstrapping workflow:
Create the token file in the above configuration file:
cat > /opt/kubernetes/cfg/token.csv << EOF
c47ffb939f5ca36231d9e3121a252940,kubelet-bootstrap,10001,"system:node-bootstrapper"
EOF
Format: token, user name, UID, user group
token can also generate replacement by itself:
head -c 16 /dev/urandom | od -An -t x | tr -d ' '
4. System D Management API server
cat > /usr/lib/systemd/system/kube-apiserver.service << EOF
[Unit]
Description=Kubernetes API Server
Documentation=https://github.com/kubernetes/kubernetes
[Service]
EnvironmentFile=/opt/kubernetes/cfg/kube-apiserver.conf
ExecStart=/opt/kubernetes/bin/kube-apiserver \$KUBE_APISERVER_OPTS
Restart=on-failure
[Install]
WantedBy=multi-user.target
EOF
5. Start and set the startup
systemctl daemon-reload
systemctl start kube-apiserver
systemctl enable kube-apiserver
6. Authorize kubelet bootstrap users to request certificates
kubectl create clusterrolebinding kubelet-bootstrap \
--clusterrole=system:node-bootstrapper \
--user=kubelet-bootstrap
4.5 deploy Kube Controller Manager
1. Create profile
cat > /opt/kubernetes/cfg/kube-controller-manager.conf << EOF
KUBE_CONTROLLER_MANAGER_OPTS="--logtostderr=false \\
--v=2 \\
--log-dir=/opt/kubernetes/logs \\
--leader-elect=true \\
--master=127.0.0.1:8080 \\
--bind-address=127.0.0.1 \\
--allocate-node-cidrs=true \\
--cluster-cidr=10.244.0.0/16 \\
--service-cluster-ip-range=10.0.0.0/24 \\
--cluster-signing-cert-file=/opt/kubernetes/ssl/ca.pem \\
--cluster-signing-key-file=/opt/kubernetes/ssl/ca-key.pem \\
--root-ca-file=/opt/kubernetes/ssl/ca.pem \\
--service-account-private-key-file=/opt/kubernetes/ssl/ca-key.pem \\
--experimental-cluster-signing-duration=87600h0m0s"
EOF
-
– master: connect to apserver through local insecure local port 8080.
-
– leader select: automatically select (HA) when the component starts multiple
-
– cluster signing cert file / – cluster signing key file: CA that automatically issues certificates to kubelet, consistent with apiserver
2. systemd Management Controller Manager
cat > /usr/lib/systemd/system/kube-controller-manager.service << EOF
[Unit]
Description=Kubernetes Controller Manager
Documentation=https://github.com/kubernetes/kubernetes
[Service]
EnvironmentFile=/opt/kubernetes/cfg/kube-controller-manager.conf
ExecStart=/opt/kubernetes/bin/kube-controller-manager \$KUBE_CONTROLLER_MANAGER_OPTS
Restart=on-failure
[Install]
WantedBy=multi-user.target
EOF
3. Start and set the startup
systemctl daemon-reload
systemctl start kube-controller-manager
systemctl enable kube-controller-manager
4.6 deploy Kube scheduler
1. Create profile
cat > /opt/kubernetes/cfg/kube-scheduler.conf << EOF
KUBE_SCHEDULER_OPTS="--logtostderr=false \
--v=2 \
--log-dir=/opt/kubernetes/logs \
--leader-elect \
--master=127.0.0.1:8080 \
--bind-address=127.0.0.1"
EOF
-
– master: connect to apserver through local insecure local port 8080.
-
– leader select: automatically select (HA) when the component starts multiple
2. systemd management scheduler
cat > /usr/lib/systemd/system/kube-scheduler.service << EOF
[Unit]
Description=Kubernetes Scheduler
Documentation=https://github.com/kubernetes/kubernetes
[Service]
EnvironmentFile=/opt/kubernetes/cfg/kube-scheduler.conf
ExecStart=/opt/kubernetes/bin/kube-scheduler \$KUBE_SCHEDULER_OPTS
Restart=on-failure
[Install]
WantedBy=multi-user.target
EOF
3. Start and set the startup
systemctl daemon-reload
systemctl start kube-scheduler
systemctl enable kube-scheduler
4. View cluster status
All components have been started successfully. View the current cluster component status through the kubectl tool:
kubectl get cs
NAME                 STATUS    MESSAGE             ERROR
scheduler            Healthy   ok
controller-manager   Healthy   ok
etcd-2               Healthy   {"health":"true"}
etcd-1 Healthy {"health":"true"}
etcd-0 Healthy {"health":"true"}
The above output indicates that the Master node component is running normally.
5, Deploy Worker Node
If you have any problems in your study or the documents are wrong, you can contact Alain ~ wechat: init1024
The next step is to operate on the Master Node, that is, as a Worker Node at the same time
5.1 create working directory and copy binaries
To create a working directory on all worker node s:
mkdir -p /opt/kubernetes/{bin,cfg,ssl,logs}
Copy from master node:
cd kubernetes/server/bin
cp kubelet kube-proxy /opt/kubernetes/bin   # Local copy
5.2 deploy kubelet
1. Create profile
cat > /opt/kubernetes/cfg/kubelet.conf << EOF
KUBELET_OPTS="--logtostderr=false \\
--v=2 \\
--log-dir=/opt/kubernetes/logs \\
--hostname-override=k8s-master \\
--network-plugin=cni \\
--kubeconfig=/opt/kubernetes/cfg/kubelet.kubeconfig \\
--bootstrap-kubeconfig=/opt/kubernetes/cfg/bootstrap.kubeconfig \\
--config=/opt/kubernetes/cfg/kubelet-config.yml \\
--cert-dir=/opt/kubernetes/ssl \\
--pod-infra-container-image=lizhenliang/pause-amd64:3.0"
EOF
-
- hostname override: display name, unique in the cluster
-
– network plugin: enable CNI
-
- kubeconfig: an empty path, which will be generated automatically, and later used to connect to apserver
-
– bootstrap kubeconfig: request certificate from apiserver for the first boot
-
– config: configuration parameter file
-
– cert dir: kubelet certificate generation directory
-
– Pod infra container image: manage the image of Pod network container
2. Configuration parameter file
cat > /opt/kubernetes/cfg/kubelet-config.yml << EOF
kind: KubeletConfiguration
apiVersion: kubelet.config.k8s.io/v1beta1
address: 0.0.0.0
port: 10250
readOnlyPort: 10255
cgroupDriver: cgroupfs
clusterDNS:
- 10.0.0.2
clusterDomain: cluster.local
failSwapOn: false
authentication:
 anonymous:
 enabled: false
 webhook:
 cacheTTL: 2m0s
 enabled: true
 x509:
 clientCAFile: /opt/kubernetes/ssl/ca.pem
authorization:
 mode: Webhook
 webhook:
 cacheAuthorizedTTL: 5m0s
 cacheUnauthorizedTTL: 30s
evictionHard:
 imagefs.available: 15%
 memory.available: 100Mi
 nodefs.available: 10%
 nodefs.inodesFree: 5%
maxOpenFiles: 1000000
maxPods: 110
EOF
3. Generate bootstrap.kubeconfig file
KUBE_APISERVER="https://192.168.31.71:6443" # apiserver IP:PORT
TOKEN="c47ffb939f5ca36231d9e3121a252940" # And token.csv Keep consistent

# generate kubelet bootstrap kubeconfig configuration file
kubectl config set-cluster kubernetes \
 --certificate-authority=/opt/kubernetes/ssl/ca.pem \
 --embed-certs=true \
 --server=${KUBE_APISERVER} \
 --kubeconfig=bootstrap.kubeconfig
kubectl config set-credentials "kubelet-bootstrap" \
 --token=${TOKEN} \
 --kubeconfig=bootstrap.kubeconfig
kubectl config set-context default \
 --cluster=kubernetes \
 --user="kubelet-bootstrap" \
 --kubeconfig=bootstrap.kubeconfig
kubectl config use-context default --kubeconfig=bootstrap.kubeconfig
Copy to profile path:
cp bootstrap.kubeconfig /opt/kubernetes/cfg
4. System D management kubelet
cat > /usr/lib/systemd/system/kubelet.service << EOF
[Unit]
Description=Kubernetes Kubelet
After=docker.service
[Service]
EnvironmentFile=/opt/kubernetes/cfg/kubelet.conf
ExecStart=/opt/kubernetes/bin/kubelet \$KUBELET_OPTS
Restart=on-failure
LimitNOFILE=65536
[Install]
WantedBy=multi-user.target
EOF
5. Start and set the startup
systemctl daemon-reload
systemctl start kubelet
systemctl enable kubelet
5.3 approve kubelet certificate application and join the cluster
# see kubelet Certificate request
kubectl get csr
NAME                                                   AGE    SIGNERNAME                                    REQUESTOR           CONDITION
node-csr-uCEGPOIiDdlLODKts8J658HrFq9CZ--K6M4G7bjhk8A   6m3s   kubernetes.io/kube-apiserver-client-kubelet   kubelet-bootstrap   Pending

# Approve application
kubectl certificate approve node-csr-uCEGPOIiDdlLODKts8J658HrFq9CZ--K6M4G7bjhk8A

# View nodes
kubectl get node
NAME STATUS ROLES AGE VERSION
k8s-master NotReady <none> 7s v1.18.3
Note: because the network plug-in has not been deployed, the node will not be ready
5.4 deploy Kube proxy
1. Create profile
cat > /opt/kubernetes/cfg/kube-proxy.conf << EOF
KUBE_PROXY_OPTS="--logtostderr=false \\
--v=2 \\
--log-dir=/opt/kubernetes/logs \\
--config=/opt/kubernetes/cfg/kube-proxy-config.yml"
EOF
2. Configuration parameter file
cat > /opt/kubernetes/cfg/kube-proxy-config.yml << EOF
kind: KubeProxyConfiguration
apiVersion: kubeproxy.config.k8s.io/v1alpha1
bindAddress: 0.0.0.0
metricsBindAddress: 0.0.0.0:10249
clientConnection:
 kubeconfig: /opt/kubernetes/cfg/kube-proxy.kubeconfig
hostnameOverride: k8s-master
clusterCIDR: 10.0.0.0/24
EOF
3. Generate kube-proxy.kubeconfig file
To generate a Kube proxy certificate:
# Switch working directory
cd TLS/k8s

# Create certificate request file
cat > kube-proxy-csr.json << EOF
{
 "CN": "system:kube-proxy",
 "hosts": [],
 "key": {
 "algo": "rsa",
 "size": 2048
 },
 "names": [
 {
 "C": "CN",
 "L": "BeiJing",
 "ST": "BeiJing",
 "O": "k8s",
 "OU": "System"
 }
 ]
}
EOF

# Generate certificate
cfssl gencert -ca=ca.pem -ca-key=ca-key.pem -config=ca-config.json -profile=kubernetes kube-proxy-csr.json | cfssljson -bare kube-proxy

ls kube-proxy*pem
kube-proxy-key.pem kube-proxy.pem
To generate the kubeconfig file:
KUBE_APISERVER="https://192.168.31.71:6443"

kubectl config set-cluster kubernetes \
 --certificate-authority=/opt/kubernetes/ssl/ca.pem \
 --embed-certs=true \
 --server=${KUBE_APISERVER} \
 --kubeconfig=kube-proxy.kubeconfig
kubectl config set-credentials kube-proxy \
 --client-certificate=./kube-proxy.pem \
 --client-key=./kube-proxy-key.pem \
 --embed-certs=true \
 --kubeconfig=kube-proxy.kubeconfig
kubectl config set-context default \
 --cluster=kubernetes \
 --user=kube-proxy \
 --kubeconfig=kube-proxy.kubeconfig
kubectl config use-context default --kubeconfig=kube-proxy.kubeconfig
Copy to profile specified path:
cp kube-proxy.kubeconfig /opt/kubernetes/cfg/
4. System D management Kube proxy
cat > /usr/lib/systemd/system/kube-proxy.service << EOF
[Unit]
Description=Kubernetes Proxy
After=network.target
[Service]
EnvironmentFile=/opt/kubernetes/cfg/kube-proxy.conf
ExecStart=/opt/kubernetes/bin/kube-proxy \$KUBE_PROXY_OPTS
Restart=on-failure
LimitNOFILE=65536
[Install]
WantedBy=multi-user.target
EOF
5. Start and set the startup
systemctl daemon-reload
systemctl start kube-proxy
systemctl enable kube-proxy
5.5 deploy CNI network
Prepare the CNI binaries first:
Download address: https://github.com/containernetworking/plugins/releases/download/v0.8.6/cni-plugins-linux-amd64-v0.8.6.tgz
Extract the binary package and move to the default working directory:
mkdir /opt/cni/bin
tar zxvf cni-plugins-linux-amd64-v0.8.6.tgz -C /opt/cni/bin
Deploy CNI network:
wget https://raw.githubusercontent.com/coreos/flannel/master/Documentation/kube-flannel.yml
sed -i -r "s#quay.io/coreos/flannel:.*-amd64#lizhenliang/flannel:v0.12.0-amd64#g" kube-flannel.yml
The default image address cannot be accessed. Modify it to docker hub image warehouse.
kubectl apply -f kube-flannel.yml

kubectl get pods -n kube-system
NAME                          READY   STATUS    RESTARTS   AGE
kube-flannel-ds-amd64-2pc95   1/1     Running   0 72s

kubectl get node
NAME STATUS ROLES AGE VERSION
k8s-master Ready <none> 41m v1.18.3
Deploy the network plug-in, and Node is ready.
5.6 authorize apiserver to access kubelet
cat > apiserver-to-kubelet-rbac.yaml << EOF
apiVersion: rbac.authorization.k8s.io/v1
kind: ClusterRole
metadata:
 annotations:
 rbac.authorization.kubernetes.io/autoupdate: "true"
 labels:
 kubernetes.io/bootstrapping: rbac-defaults
 name: system:kube-apiserver-to-kubelet
rules:
 - apiGroups:
 - ""
 resources:
 - nodes/proxy
 - nodes/stats
 - nodes/log
 - nodes/spec
 - nodes/metrics
 - pods/log
 verbs:
 - "*"
---
apiVersion: rbac.authorization.k8s.io/v1
kind: ClusterRoleBinding
metadata:
 name: system:kube-apiserver
 namespace: ""
roleRef:
 apiGroup: rbac.authorization.k8s.io
 kind: ClusterRole
 name: system:kube-apiserver-to-kubelet
subjects:
 - apiGroup: rbac.authorization.k8s.io
 kind: User
 name: kubernetes
EOF

kubectl apply -f apiserver-to-kubelet-rbac.yaml
5.7 add new Worker Node
1. Copy the deployed Node related files to the new Node
In the master node, copy the files involved in the Worker Node to the new node 192.168.31.72/73
scp -r /opt/kubernetes root@192.168.31.72:/opt/

scp -r /usr/lib/systemd/system/{kubelet,kube-proxy}.service root@192.168.31.72:/usr/lib/systemd/system

scp -r /opt/cni/ root@192.168.31.72:/opt/

scp /opt/kubernetes/ssl/ca.pem root@192.168.31.72:/opt/kubernetes/ssl
2. Delete kubelet certificate and kubeconfig file
rm /opt/kubernetes/cfg/kubelet.kubeconfig
rm -f /opt/kubernetes/ssl/kubelet*
Note: these files are generated automatically after the certificate application is approved. Each Node is different and must be deleted and regenerated.
3. Modify the host name
vi /opt/kubernetes/cfg/kubelet.conf
--hostname-override=k8s-node1

vi /opt/kubernetes/cfg/kube-proxy-config.yml
hostnameOverride: k8s-node1
4. Start and set the startup
systemctl daemon-reload
systemctl start kubelet
systemctl enable kubelet
systemctl start kube-proxy
systemctl enable kube-proxy
5. Approve the new Node kubelet Certificate Application on the Master
kubectl get csr
NAME                                                   AGE   SIGNERNAME                                    REQUESTOR           CONDITION
node-csr-4zTjsaVSrhuyhIGqsefxzVoZDCNKei-aE2jyTP81Uro   89s   kubernetes.io/kube-apiserver-client-kubelet   kubelet-bootstrap   Pending

kubectl certificate approve node-csr-4zTjsaVSrhuyhIGqsefxzVoZDCNKei-aE2jyTP81Uro
6. View Node status
kubectl get node
NAME         STATUS     ROLES    AGE   VERSION
k8s-master   Ready      <none>   65m   v1.18.3
k8s-node1    Ready      <none>   12m   v1.18.3
k8s-node2    Ready      <none>   81s   v1.18.3
Node 2 (192.168.31.73) is the same as above. Remember to change the host name!
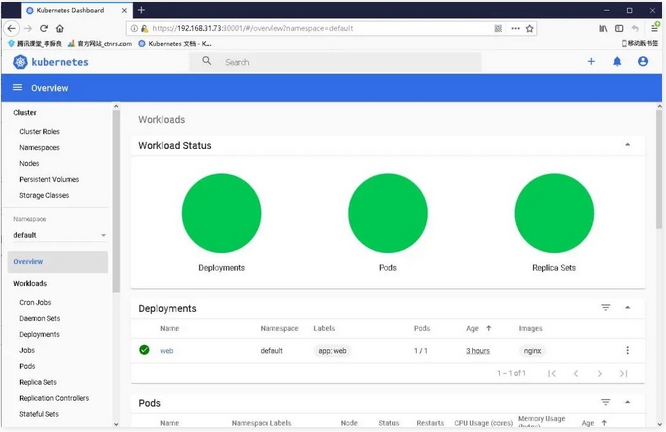
6, Deploy Dashboard and CoreDNS
6.1 deploy Dashboard
$ wget https://raw.githubusercontent.com/kubernetes/dashboard/v2.0.0-beta8/aio/deploy/recommended.yaml
By default, Dashboard can only be accessed inside the cluster. Modify the Service to NodePort type and expose it to the outside:
vi recommended.yaml
kind: Service
apiVersion: v1
metadata:
  labels:
 k8s-app: kubernetes-dashboard
 name: kubernetes-dashboard
 namespace: kubernetes-dashboard
spec:
 ports:
 - port: 443
 targetPort: 8443
 nodePort: 30001
 type: NodePort
 selector:
 k8s-app: kubernetes-dashboard

kubectl apply -f recommended.yaml
kubectl get pods,svc -n kubernetes-dashboard
NAME                                             READY   STATUS              RESTARTS   AGE
pod/dashboard-metrics-scraper-694557449d-z8gfb   1/1     Running             0          2m18s
pod/kubernetes-dashboard-9774cc786-q2gsx         1/1     Running		     0 2m19s

NAME TYPE CLUSTER-IP EXTERNAL-IP PORT(S) AGE
service/dashboard-metrics-scraper ClusterIP 10.0.0.141 <none> 8000/TCP 2m19s
service/kubernetes-dashboard NodePort 10.0.0.239 <none> 443:30001/TCP 2m19s
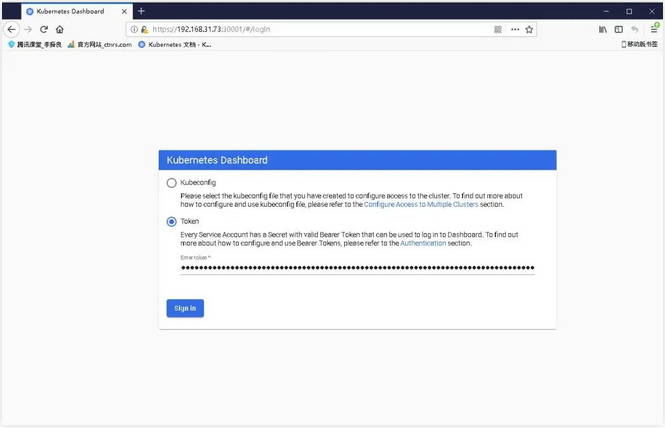
Access address: https://NodeIP:30001
Create a service account and bind the default cluster admin administrator cluster role:
kubectl create serviceaccount dashboard-admin -n kube-system
kubectl create clusterrolebinding dashboard-admin --clusterrole=cluster-admin --serviceaccount=kube-system:dashboard-admin
kubectl describe secrets -n kube-system $(kubectl -n kube-system get secret | awk '/dashboard-admin/{print $1}')
Log in to the Dashboard with the output token.
6.2 deploy CoreDNS
CoreDNS is used for cluster internal Service name resolution.
kubectl apply -f coredns.yaml

kubectl get pods -n kube-system
NAME                          READY   STATUS    RESTARTS   AGE
coredns-5ffbfd976d-j6shb      1/1     Running   0 32s
kube-flannel-ds-amd64-2pc95 1/1 Running 0 38m
kube-flannel-ds-amd64-7qhdx 1/1 Running 0 15m
kube-flannel-ds-amd64-99cr8 1/1 Running 0 26m
DNS resolution test:
kubectl run -it --rm dns-test --image=busybox:1.28.4 sh
If you don't see a command prompt, try pressing enter.

/ # nslookup kubernetes
Server: 10.0.0.2
Address 1: 10.0.0.2 kube-dns.kube-system.svc.cluster.local

Name: kubernetes
Address 1: 10.0.0.1 kubernetes.default.svc.cluster.local
No problem parsing.
So far, the deployment of single Master cluster is completed, and the next chapter will expand to multi Master cluster~
From
Deploy a complete set of Kubernetes high availability cluster (I)
https://mp.weixin.qq.com/s?__biz=MzAwNTM5Njk3Mw==&mid=2247489695&idx=1&sn=bbbada7f44623d29f924edd66af3d0f9&chksm=9b1c181dac6b910bbb0d18e6cdc1c0fee48a93667b44323944c71bda36b69b4078f97ddf077f&mpshare=1&scene=23&srcid=&sharer_sharetime=1591065165448&sharer_shareid=1673ee92644e7d2dbfc74a63f0c33384#rd