Hello, I'm Zhang Jintao.
Kubernetes, as the cornerstone of the cloud, has brought us great convenience. More and more companies have also applied kubernetes to the production environment. However, while enjoying the convenience it brings, we also need to pay attention to some potential safety hazards.
In this article, I will focus on container image security.
Generally, container image security refers to the following two aspects:
- The security of the image's own content;
- Security of image distribution process;
Mirror the security of your own content
To talk about the security of the image's own content, we need to know what the image is and what its content is.
What is mirroring
Take debian image as an example, pull the latest image, save it as a tar file, and then unzip it:
➜  ~ mkdir -p debian-image
➜  ~ docker pull debian
Using default tag: latest
latest: Pulling from library/debian
647acf3d48c2: Pull complete
Digest: sha256:e8c184b56a94db0947a9d51ec68f42ef5584442f20547fa3bd8cbd00203b2e7a
Status: Downloaded newer image for debian:latest
docker.io/library/debian:latest
➜  ~ docker image save -o debian-image/debian.tar debian
➜  ~ ls debian-image
debian.tar
➜  ~ tar -C debian-image -xf debian-image/debian.tar
➜  ~ tree -I debian.tar debian-image
debian-image
├── 827e5611389abf13dad1057e92f163b771febc0bcdb19fa2d634a7eb0641e0cc.json
├── b331057b5d32f835ac4b051f6a08af6e9beedb99ec9aba5c029105abe360bbda
│   ├── json
│   ├── layer.tar
│   └── VERSION
├── manifest.json
└── repositories

1 directory, 6 files
After decompression, we see that it is a combination of a bunch of json files and layer.tar files. We unzip layer.tar again:
➜  ~ tar -C debian-image/b331057b5d32f835ac4b051f6a08af6e9beedb99ec9aba5c029105abe360bbda -xf debian-image/b331057b5d32f835ac4b051f6a08af6e9beedb99ec9aba5c029105abe360bbda/layer.tar
➜  ~ tree -I 'layer.tar|json|VERSION'  -L 1 debian-image/b331057b5d32f835ac4b051f6a08af6e9beedb99ec9aba5c029105abe360bbda
debian-image/b331057b5d32f835ac4b051f6a08af6e9beedb99ec9aba5c029105abe360bbda
├── bin
├── boot
├── dev
├── etc
├── home
├── lib
├── lib64
├── media
├── mnt
├── opt
├── proc
├── root
├── run
├── sbin
├── srv
├── sys
├── tmp
├── usr
└── var

19 directories, 0 files
You must be familiar with the unzipped directory structure. Yes, this is the directory structure of rootfs.
If we use some application images built by ourselves, you will also find the corresponding files of the application after several times of decompression.
How to ensure the security of the image's own content
As we have seen earlier, container image is a combination of rootfs and applications, as well as some configuration files. Therefore, to ensure the security of its own content, it is mainly considered from the following aspects:
rootfs security
According to our actual situation, rootfs is usually provided by the basic (system) image we use, or it can also be considered to be provided by the image configured in the FROM field of Dockerfile when we build the image.
In this regard, to achieve security, we need to:
- Use images from trusted sources, such as those officially maintained by Docker;
- Continuously scan and upgrade the vulnerability of the basic image;
- You can also consider using the destroy image, which can also be protected from attack to a certain extent;
application program
The application is actually provided by ourselves. In order to achieve security in this regard, we need to:
- Continuously scan software vulnerabilities;
- Update the dependent timely;
- Consider transitioning from SDL (Security Development Lifecycle) to DevSecOps;
configuration file
The configuration files contained in the image are provided by the image building tool. Generally, as long as we ensure that the image building tool used has not been tampered with or left any loopholes, there will basically be no major problems here.
On the whole, we can use similar methods directly Trivy perhaps Anchore Engine And other image vulnerability scanning tools to help us ensure the security of image content. In addition, some image warehouses, such as Harbor, have built-in image security scanning tools, or you can use the docker scan command to scan images.
Image distribution security
How are images distributed
Let's first look at how container images are built and deployed into our Kubernetes environment.
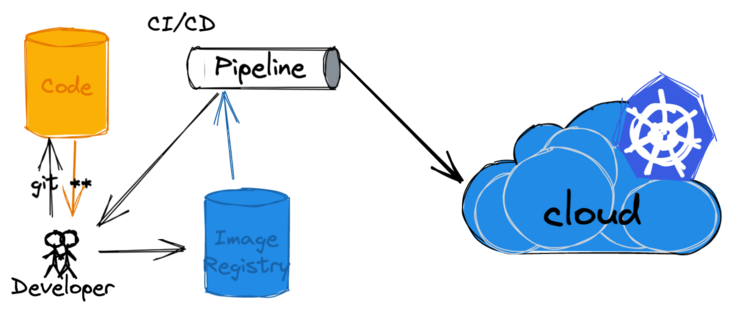
Fig. 1 is a brief process diagram of container image from creation to release deployment
After writing the code, the developer pushes the code to the code warehouse. This triggers the CI to build. In this process, the image will be built and pushed to the image warehouse.
In the CD phase, the images in the image warehouse will be used and deployed to the target Kubernetes cluster.
So how do attackers attack in this process?
Security issues in image distribution
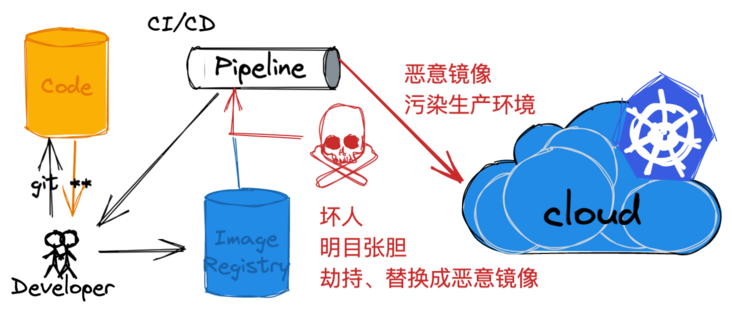
Figure 2, image distribution deployment security example
As shown in the figure, in the phase of image distribution and deployment, the upstream is the image warehouse and the downstream is the Kubernetes cluster. For the image warehouse, even for the self built environment of the intranet, our concept has changed from boundary based security to zero trust security. Therefore, we take the public warehouse as an example.
Attackers can hijack and replace with malicious images by some means, including directly attacking the image warehouse.
To ensure the security source and integrity of the image deployed in the Kubernetes cluster, it needs to be carried out in two main links:
- Sign the image when constructing the image;
- Verify the signature during image distribution and deployment; (continued in the next article)
Let's take a look at them separately.
Mirrored labels and summaries
We usually have two options when using container mirroring:
- Tags, such as alpine:3.14.3
- Summary, e.g alpine@sha256:635f0aa53d99017b38d1a0aa5b2082f7812b03e3cdb299103fe77b5c8a07f1d2
In most scenarios, we will use the tag directly because it is more readable. However, the image content may change over time, because we may use the same label for images of different contents. The most common is the latest label. Each time a new version is released, the image of the new version will continue to use the latest label, but the application version has been upgraded to the latest version.
The main disadvantage of using summary is its poor readability. However, the summary of each image is unique. The summary is the hash value of SHA256 of the image content. Therefore, we can ensure the uniqueness of the image through the summary.
You can see the label and summary information directly through the following example:
➜  ~ docker pull alpine:3.14.3
3.14.3: Pulling from library/alpine
Digest: sha256:635f0aa53d99017b38d1a0aa5b2082f7812b03e3cdb299103fe77b5c8a07f1d2
Status: Image is up to date for alpine:3.14.3
docker.io/library/alpine:3.14.3
➜  ~ docker image inspect alpine:3.14.3 | jq -r '.[] | {RepoTags: .RepoTags, RepoDigests: .RepoDigests}'
{
  "RepoTags": [
    "alpine:3.14.3"
  ],
  "RepoDigests": [
    "alpine@sha256:635f0aa53d99017b38d1a0aa5b2082f7812b03e3cdb299103fe77b5c8a07f1d2"
  ]
}
So how to ensure the correctness / security of the image? This is the main problem solved by image signature.
Mirror signature solution
Digital signature is a well-known method to maintain the integrity of any data transmitted on the network. We have several general schemes for container image signature.
Docker Content Trust (DCT)
When transmitting general files, you may have had similar experiences, such as incomplete downloaded files due to network reasons; Or encounter the attack of middleman, resulting in the tampering and replacement of files.
In fact, images may encounter similar problems during distribution, which is the focus of our discussion here, that is, the main problem solved by Docker Content Trust (DCT).
Docker Content Trust uses digital signatures and allows the client or runtime to verify the integrity and publisher of specific image labels. For use, this is the related functions provided by the docker trust command. Note: Docker CE 17.12 and above is required.
As mentioned earlier, image records can have some labels in the following format:
[REGISTRY_HOST[:REGISTRY_PORT]/]REPOSITORY[:TAG]
Take the label as an example, DCT will be associated with a part of the label. Each image repository has a set of keys that the image publisher uses to sign the image label. (the image publisher can decide which labels to sign) the image warehouse can contain multiple images with signed and unsigned labels at the same time.
It should be noted here that if the image publisher pushes the signed latest image first and then the unsigned latest image, the latter image will not affect the content of the previous image (different from the places covered by the label above).
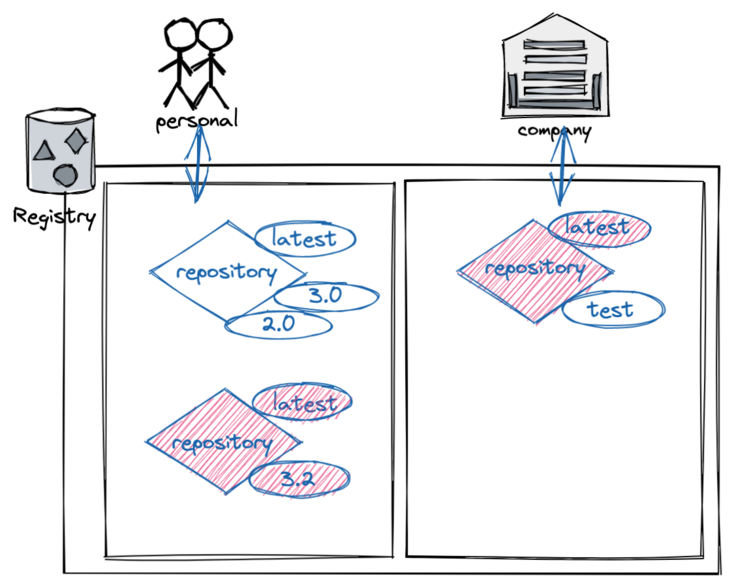
Figure 4. Example of DCT image signature (the figure outlines the authentication process of logging into the image warehouse)
In production, we can enable DCT to ensure that all images used are signed. If DCT is enabled, only trusted images (signed and verifiable images) can be pulled, run, or built.
Enabling DCT is a bit like applying "filter" to the image warehouse, that is, you can only see the signed image label, but not the unsigned image label. If the client does not have DCT enabled, it can see all the images.
Here, let's take a quick look at the working process of DCT
Its trust in the mirror label is managed by using the signature key. When we first turn on DCT and use it, we will create a keyset. A key set consists of the following types of keys:
- An offline key, which is the root of the image label DCT (it is difficult to recover if the root key is lost)
- The repository or tag key that signs the label tag key
- Server managed keys, such as timestamp keys
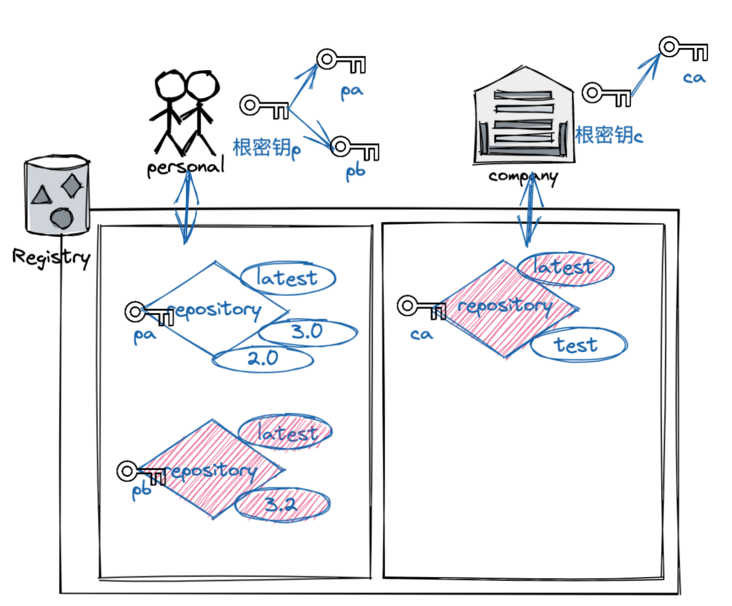
Figure 5, image signature key example
We just mentioned that the client uses DCT, that is, our docker trust command, which is based on Notary v1. By default, DCT is disabled in Docker client. To enable, you need to set DOCKER_CONTENT_TRUST=1 environment variable.
The effects are as follows:
➜  ~ DOCKER_CONTENT_TRUST=1 docker pull alpine:3.12
Pull (1 of 1): alpine:3.12@sha256:c0e9560cda118f9ec63ddefb4a173a2b2a0347082d7dff7dc14272e7841a5b5a
docker.io/library/alpine@sha256:c0e9560cda118f9ec63ddefb4a173a2b2a0347082d7dff7dc14272e7841a5b5a: Pulling from library/alpine
188c0c94c7c5: Already exists
Digest: sha256:c0e9560cda118f9ec63ddefb4a173a2b2a0347082d7dff7dc14272e7841a5b5a
Status: Downloaded newer image for alpine@sha256:c0e9560cda118f9ec63ddefb4a173a2b2a0347082d7dff7dc14272e7841a5b5a
Tagging alpine@sha256:c0e9560cda118f9ec63ddefb4a173a2b2a0347082d7dff7dc14272e7841a5b5a as alpine:3.12
docker.io/library/alpine:3.12
Notary v1
We mentioned earlier that DCT is implemented based on Notary v1, but this is not the focus of this article, so here is only a brief introduction to Notary v1. Notary project address: https://github.com/notaryproj...
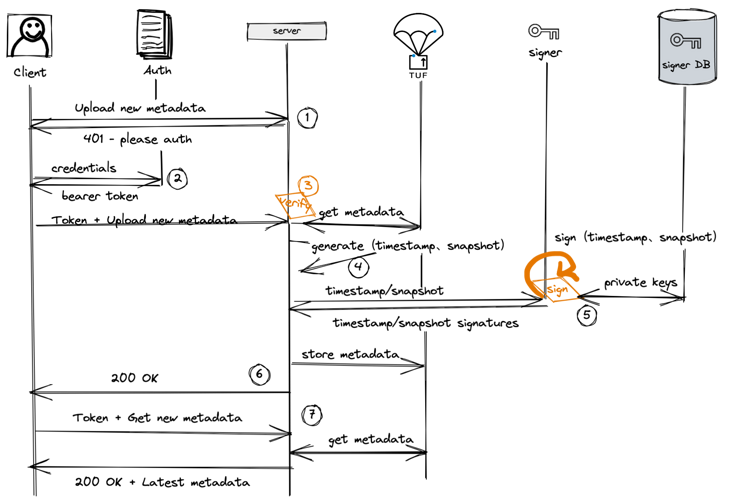
Figure 6. Interaction flow of Notary client, server and signature
Process 1 - identity authentication. Any connection without a token will be redirected to the authorization server (Docker Registry v2 identity authentication);
Process 2 - the client will log in to the authorization server through HTTPS authentication to obtain the token;
Process 3 - when the client uploads a new metadata file, the server will check whether there are conflicts according to the previous version, and verify the signature, verification and validity of the uploaded metadata;
Process 4 - once all uploaded metadata has been verified, the server will generate time stamps (and possibly snapshots), and then send them to sign for signature;
Process 5 - sign retrieves the encrypted private key from its database, decrypts the key, signs with them, and sends it back to the server;
Procedure 6 - the server stores the metadata uploaded by the client and generated by the server in the TUF library. The generated timestamp and snapshot metadata prove that the metadata uploaded by the client is the latest version of the trusted collection. After that, the server will notify the client that the upload is successful;
Procedure 7 - the client can now download the latest metadata from the server immediately. When the timestamp expires, the server will traverse the whole sequence, generate a new timestamp, request a sign signature, and store the newly signed timestamp in the database. Then, it sends the new timestamp together with other stored metadata to the requesting client;
As this project is a security project, although it is of great use, it is not active as a whole. The v2 version is now under development. Interested partners are welcome to join us.
sigstore and Cosign
Here is another project from the Linux foundation, called sigstore, which is mainly to provide some standard libraries / tools for better signature and verification. Of course, sigstore has gathered open source projects including Cosign, Fulcio and Rekor, involving image signature verification and supply chain.

Figure 7. Introduction to sigstore
Cosign is one of the tools of sigstore, which is used to create, store and verify container image signatures in OCI registry. Cosign v1.0 was released in the second half of this year. Whether it can be stably used in the production environment remains to be tested. Up to now, cosign has released v1.3.1. For detailed changes, please refer to its release note: https://github.com/sigstore/c...
Let's take a look at how it performs mirror signature
➜  cosign cosign generate-key-pair
Enter password for private key:
Enter password for private key again:
Private key written to cosign.key
Public key written to cosign.pub
➜  cosign cosign sign --key cosign.key ghcr.io/tao12345666333/argo-cd-demo/argo-cd-demo:fa5714f419b3d11dee6ac795e38356e9c3c439cb
Enter password for private key: %
➜  cosign cosign verify --key cosign.pub  ghcr.io/tao12345666333/argo-cd-demo/argo-cd-demo:fa5714f419b3d11dee6ac795e38356e9c3c439cb

Verification for ghcr.io/tao12345666333/argo-cd-demo/argo-cd-demo:fa5714f419b3d11dee6ac795e38356e9c3c439cb --
The following checks were performed on each of these signatures:
  - The cosign claims were validated
  - The signatures were verified against the specified public key
  - Any certificates were verified against the Fulcio roots.

[{"critical":{"identity":{"docker-reference":"ghcr.io/tao12345666333/argo-cd-demo/argo-cd-demo"},"image":{"docker-manifest-digest":"sha256:768845efa2a32bc5c5d83a6f7ec668b98f5db46585dd1918afc9695a9e653d2d"},"type":"cosign container image signature"},"optional":null}]
It seems relatively simple.
summary
The above is about the content security of the image itself and the image signature verification in the image distribution security.
In the next article, I will introduce how to verify the signature during image distribution and deployment, and how to protect the Kubernetes cluster from attacks from unsigned or untrusted source images. Please look forward to it!
Welcome to subscribe my official account number [MoeLove].