Cluster construction helps us to understand how the cluster works, so that we can better understand the high availability, replica fault tolerance mechanism and high performance of es.
Role assignment in es
- Master node
Parameter: node.master: true
Because the real master node is elected by multiple nodes with master node qualification. Therefore, this attribute only represents whether this node has the primary node election qualification. - Data node
node.data: true data node
This attribute indicates whether the node stores data or not. The primary node can also store data. - Client node
node.master: false
node.data: false point
This combination means that this node will neither be the master node nor store data. The meaning of this node is to be a client node, which can perform load balancing mainly for massive requests.
By default, each node has the qualification to be the master node, stores data, and processes client requests.
docker builds es cluster
We build three ES nodes on the same virtual machine, 1master (also Data-node itself) and 2data-node.
Download Image
docker pull elasticsearch:7.4.1
New configuration
For three new configurations, please note that the cluster name must be consistent
es1.yml
#Cluster name all nodes should be consistent
cluster.name: "test_es"
#Name of this node
node.name: master
#Manually specify the name or ip of all nodes that can be mater s. These configurations will be calculated in the first election
cluster.initial_master_nodes: ["master"]
#As master node
node.master: true
#Store data or not
node.data: true
#head plug-in settings, support cross domain access
http.cors.enabled: true
http.cors.allow-origin: "*"
http.port: 9200
transport.tcp.port: 9300
#Set the local communication address for other nodes to interact with the ip address of the node
network.host: 0.0.0.0
es2.yml
#Cluster name all nodes should be consistent
cluster.name: "test_es"
#Name of this node
node.name: node-1
#Manually specify the name or ip of all nodes that can be mater s. These configurations will be calculated in the first election
cluster.initial_master_nodes: ["master"]
node.master: false
#Store data or not
node.data: true
http.port: 9202
transport.tcp.port: 9302
#master address
discovery.seed_hosts: ["172.17.0.2:9300"]
#Set the local communication address for other nodes to interact with the ip address of the node
network.host: 0.0.0.0
es3.yml
#Cluster name all nodes should be consistent
cluster.name: "test_es"
#Name of this node
node.name: node-2
#Manually specify the name or ip of all nodes that can be mater s. These configurations will be calculated in the first election
cluster.initial_master_nodes: ["master"]
node.master: false
#Store data or not
node.data: true
http.port: 9203
transport.tcp.port: 9303
#master address
discovery.seed_hosts: ["172.17.0.2:9300"]
network.host: 0.0.0.0
Note that the mster address I wrote above is the ip address of the docker container
docker runs es
Let's separate master and datanode
docker run -d --name elasticSearch-master \
-p 9200:9200 -p 9300:9300 \
-v /usr/local/dockerfiles/es-cluster/es1.yml:/usr/share/elasticsearch/config/elasticsearch.yml \
elasticsearch:7.4.1

docker run -d --name elasticSearch-node1 \
-p 9202:9202 -p 9302:9302 \
-v /usr/local/dockerfiles/es-cluster/es2.yml:/usr/share/elasticsearch/config/elasticsearch.yml \
elasticsearch:7.4.1

docker run -d --name elasticSearch-node2 \
-p 9203:9203 -p 9303:9303 \
-v /usr/local/dockerfiles/es-cluster/es3.yml:/usr/share/elasticsearch/config/elasticsearch.yml \
elasticsearch:7.4.1
Cluster status view
- Command view
 curl -XGET 'http://192.168.100.1:9200/_cat/health?v'

#Console output:
epoch      timestamp cluster status node.total node.data shards pri relo init unassign pending_tasks max_task_wait_time active_shards_percent
1587542787 08:06:27  test_es green           3         3      9   3    0    0        0             0                  -                100.0%
We can see that our cluster status is green, 3 nodes, 3 data nodes and other relevant information
- es head view
docker pull mobz/elasticsearch-head:5

docker run -d -p 9100:9100 mobz/elasticsearch-head:5
Develop 9100 port access: http://192.168.100.1:9100/ To view the cluster status
java writes data to ES cluster
es 7.4.1 requires spring boot version 2.2.1. The following is only the key configuration:
pom
  <parent>
    <groupId>org.springframework.boot</groupId>
    <artifactId>spring-boot-starter-parent</artifactId>
    <version>2.2.1.RELEASE</version>
  </parent>

   <dependency>
            <groupId>org.springframework.boot</groupId>
            <artifactId>spring-boot-starter-data-elasticsearch</artifactId>
 </dependency>
application.yml
spring:
  elasticsearch:
    rest:
      uris: http://192.168.100.1:9200
Program code
entity
@Data
@NoArgsConstructor
@AllArgsConstructor
/**
 * index Equivalent to db
 * type Equivalent to table
 */
@Document(indexName = "basic_index",type = "user_info", shards = 3, replicas = 2)
public class UserInfoDTO {

    @Id
    private String userId;

    @Field(type = FieldType.Keyword)
    private String userName;

    @Field(type = FieldType.Keyword)
    private String nikeName;

    @Field(type = FieldType.Text, analyzer = "ik_max_word")
    private String remarks;
}
jpa
public interface UserInfoRepo extends ElasticsearchRepository<UserInfoDTO, String> {
}
sevice
this.userInfoRepo.saveAll(users);
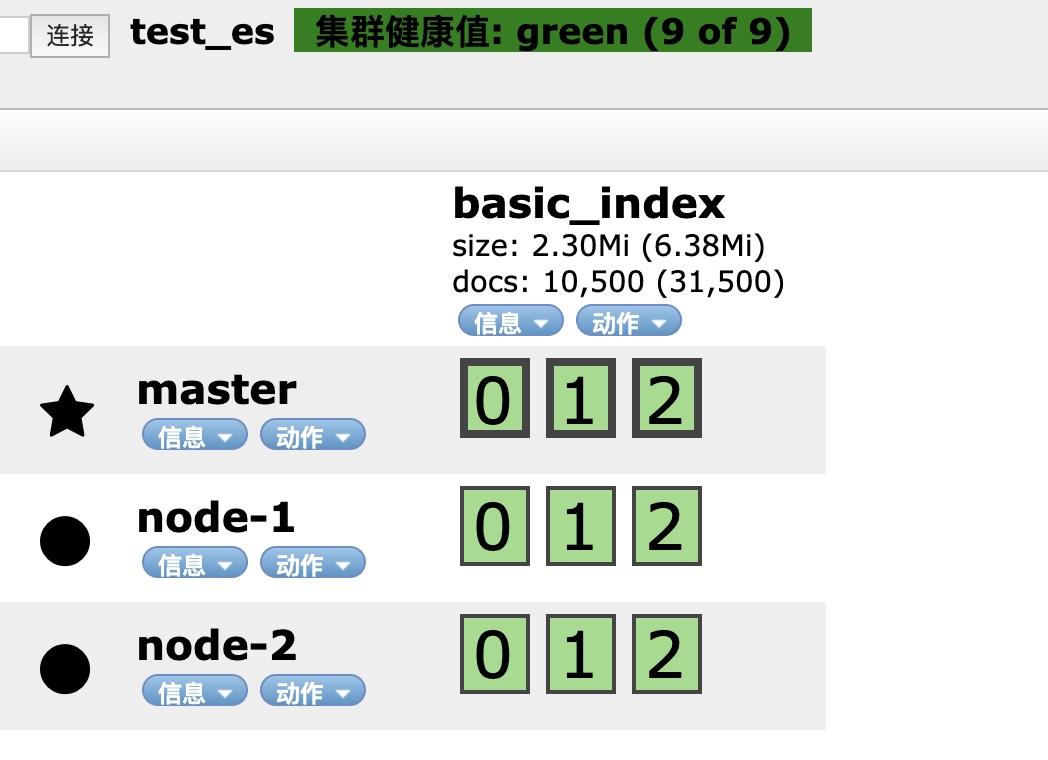
View es head after execution:
You can see that our data 3-piece 2-copy settings take effect.