You need to start docker before you can use it. Here are some possible commands to start docker:
Docker startup, shutdown, pause, etc. (if the startup self startup is set, there is no need to start docker first)
sudo systemctl start docker#Start docker
sudo systemctl enable docker#Set startup
sudo systemctl stop docker#Pause docker
sudo systemctl restart docker#Restart docker
Now we can deploy the container with Docker. We need to download the image first.
Docker image can be regarded as a special file system. In addition to providing the program, library, resource, configuration and other files required by the container runtime, it also includes some configuration parameters prepared for runtime (such as anonymous volume, environment variable, user, etc.).
Image is not a single file: it has multiple layers, which we can use
docker history image name | id
View the content and size of each layer in the image. Each layer corresponds to an instruction in the dockerfile. In other words, this image is actually an analog computer system formed after the dockerfile is executed to provide the configuration required by its own program or project.
Docker images exist in / var/lib/docker / by default.
Where does the image come from?
Firstly, Docker Hub is a public registry maintained by docker company and contains a large number of image files. Docker client tool downloads images from this public image warehouse by default. The remote warehouse address is: https://hub.docker.com/ , these are some common fixed system images.
Secondly, some projects may need to be configured separately and cannot use the fixed system on the Internet. Therefore, you can configure your own image file by writing your own dockerfile file.
1. Mirror related commands
(1) Search image
docker search Image name
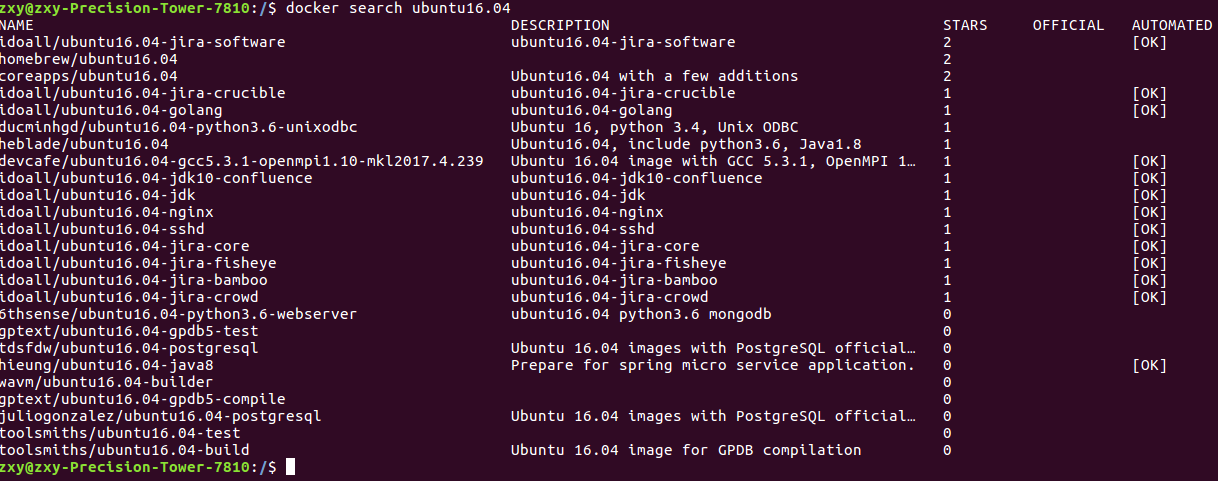 If we need ubuntu system image, as shown in the figure, the search results for Ubuntu 16.04 are as follows:
NAME: image NAME DESCRIPTION: image details
STARS: STARS refer to the degree of use of this image, which is similar to the STARS on github
OFFICIAL: is it an OFFICIAL image
AUTOMATED: indicates whether it was created by the docker hub public automatic build process. I don't know who built it
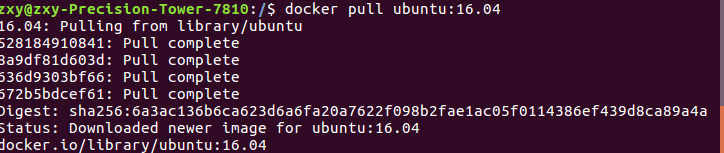
(2) Download (pull) image
docker pull Image name
docker pull ubuntu:16.04#If no version number is added, the latest version will be downloaded by default
 (3) View existing images
docker images#View existing images
zxy@zxy-Precision-Tower-7810:/$ docker images
REPOSITORY    TAG       IMAGE ID       CREATED        SIZE
ubuntu        16.04     38b3fa4640d4   3 weeks ago    135MB
hello-world   latest    d1165f221234   5 months ago   13.3kB
 Image name        Label (version number) mirror ID number      Image release time     size
You can see the Hello world image we pulled when verifying docker and the downloaded Ubuntu 16.04 image.
(4) Delete mirror
docker rmi image ID number
docker rmi d1165f221234
If an error is reported: error response from daemon: Conflict: unable to delete d1165f222234 (must be forced) - image is being used by stopped container 9776ac490567
This is because there are containers under the image, so you need to delete the container first, and then delete the image:
zxy@zxy-Precision-Tower-7810:/$ docker rmi d1165f221234
Error response from daemon: conflict: unable to delete d1165f221234 (must be forced) - image is being used by stopped container 9776ac490567

docker rm container ID(It's the last one to report a mistake ID)
zxy@zxy-Precision-Tower-7810:/$ docker rm 9776ac490567
zxy@zxy-Precision-Tower-7810:/$ docker rmi d1165f221234
Untagged: hello-world:latest
Untagged: hello-world@sha256:0fe98d7debd9049c50b597ef1f85b7c1e8cc81f59c8d623fcb2250e8bec85b38
Deleted: sha256:d1165f2212346b2bab48cb01c1e39ee8ad1be46b87873d9ca7a4e434980a7726
Deleted: sha256:f22b99068db93900abe17f7f5e09ec775c2826ecfe9db961fea68293744144bd
(5) Delete all mirrors
docker rmi 'docker images -q'
2. Container related commands
(1) View running containers
docker ps
 Because only the image has been downloaded and the container has not been created, it is empty.
(2) View all containers
docker ps -a
zxy@zxy-Precision-Tower-7810:/$ docker ps -a
CONTAINER ID   IMAGE          COMMAND       CREATED          STATUS                      PORTS     NAMES
ea8073e531c3   ubuntu:16.04   "/bin/bash"   42 seconds ago   Exited (0) 24 seconds ago             myubuntu1604
ca8ddae10051   hello-world    "/hello"      20 minutes ago   Exited (0) 20 minutes ago             great_mayer
(3) Create container
docker run -it --name=Container name image name: version number /bin/bash
zxy@zxy-Precision-Tower-7810:/$ docker run -it --name=myubuntu1604 ubuntu:16.04 /bin/bash
root@ea8073e531c3:/#
Followed by / bin/bash, which means that after creating the container, enter the container and use the command line under its ID.
Description of common optional parameters:
-i means to run the container in "interactive mode"
-t means that the container will enter its command line after it is started.
After adding these two parameters, the container creation can log in. That is, a pseudo terminal is allocated, which is generally combined to write -it.
-d add the - d parameter after run to create a daemon container to run in the background (in this way, the container will not be logged in automatically after the container is created. If only the - it parameter is added, the container will be automatically entered after creation).
Another difference is that when this container exits, it will still be in the running state and only run in the background. Once it is created, it will change to the closed state. docker ps can't find the running container.
– name = name the created container (two -) followed by a space + the name of the image in which you want to create the container. If there is a version number, take the version number.
-v represents the directory mapping relationship (the former is the host directory, and the latter is the directory mapped to the host, that is, the host Directory: the directory in the container). You can use multiple - v to map multiple directories or files. Note: it's best to do directory mapping, modify it on the host, and then share it on the container.
-p represents port mapping. The former is the host port and the latter is the mapped port in the container. You can use multiple - p for multiple port mapping
-e setting environment variables for containers
Create a daemon container as follows. You can see that after exiting, when viewing the running container, the container is still running:
zxy@zxy-Precision-Tower-7810:/$ docker run -di --name=myubuntu2 ubuntu:16.04
25dc0a5b794e1c4711b571d2a2a8f7a3ee5b6426fa4e622f8ffcfddfdbc4569c

root@25dc0a5b794e:/# exit
exit
zxy@zxy-Precision-Tower-7810:/$ docker ps
CONTAINER ID   IMAGE          COMMAND       CREATED              STATUS              PORTS     NAMES
25dc0a5b794e   ubuntu:16.04   "/bin/bash"   About a minute ago   Up About a minute             myubuntu2
(3) Exit the current container (ctrl+d can also be used)
exit
zxy@zxy-Precision-Tower-7810:/$ docker run -it --name=myubuntu1604 ubuntu:16.04 /bin/bash
root@ea8073e531c3:/# exit
exit
(4) Stop, start, kill, delete a container
Stop a container that is already running
docker stop Container name or container id

Start a container that has stopped
docker start Container name or container id

kill Drop a container that is already running
docker kill Container name or container id

Delete container
docker rm Container name or container id

(5) Enter a running container
docker attach -it container id
3. Migration and backup of docker
(1) Mirrored backup
docker save -o package / path (. tar) container name
docker save -o /media/zxy/zhou/myubuntu1.tar ubuntu
If no path is added here or the path is in the host computer, that is, the system folder of the computer, an error will be reported:
zxy@zxy-Precision-Tower-7810:/$ docker save -o myubuntu1.tar ubuntu
open .docker_temp_474446985: permission denied
There are two ways to view experience:
First: change the saved path to one with permission, insert a USB flash drive, and save it in a USB flash drive. I have an external hard disk, and there is no problem saving it;
Second: turn off selinux temporarily. It seems like a firewall. I think it's better not to turn it off.
It is possible to package the image according to the said path:
 (2) Loading of packaged images
docker load -i myubuntu1.tar
(3) Copy some files in the container to the host
docker cp container id: Absolute path to the container file/Absolute path of the host to copy to
docker cp 59d6b9ecd9ca:/opt/octmps/ClassI_Scatt.out /media/zxy/zhou/
4. dockerfile deployment image
There are generally two ways to obtain an image:
1) Pull to pull the existing image
2) dockerfile deployment image
Pulling an image has been mentioned earlier. The following mainly describes the methods and problems of building an image by Dockerfile.
(1) Before building an image, you need to have a basic image. Generally, novices recommend using some commonly used systems, such as ubuntu and redhat. It may be difficult to use only mysqlz. Here, my program needs nvidia/opengl:1.0-glvnd-devel (this will be written at the beginning of the Dockerfile file, open source directly, and those who write Dockerfile themselves will follow their own), so first pull opengl:
docker pull nvidia/opengl:1.0-glvnd-devel
(2) Select or create a folder to store dockerfile and all related files of your program (do not put it in the root directory, that is, in the / folder, which will slow down the running speed):
sudo mkdir - p /usr/local/oct
(3) Put your program files and dockerfile files in
sudo mv path/Dockerfile /usr/local/oct
Or create a Dockerfile by yourself:
touch Dockerfile
Open and write this file:
vim Dockerfile
(5) View the contents of the Dockerfile created
cat Dockerfile
(6) Enter the directory and start to execute the dockerfile file (key)
cd /usr/local/oct
docker build -t The name of the image generated by the execution file .
The last. Means the location of the dockerfile file to be executed. Because we have entered the directory, the dot indicates the current directory.
(7) If you run the dockerfile file again and don't want to echo the last configured package directly, you can add – no cache at the end:
docker build -t The name of the image generated by the execution file . --no-cache
(8) Create a container from an existing image
docker container run --name Container name -d Image name
zxy@zxy-Precision-Tower-7810:/media/zxy/zhou/zxycode/OCT-MPS-master$ docker container run --name myoctproject -d octtest
e8c1743936bcb227516d2a0ff1dd7076a6e394a5d3c7a24962e1d95a63ad77c5
A container address will be returned, using
docker ps -a
You can see that the container is running.
Or you can use the above:
docker run --gpus all -it --name=myoctproject -d octtest
This method can be directly created and entered into the container.
Here, because I need to use gpu, I add the option to select all gpu.
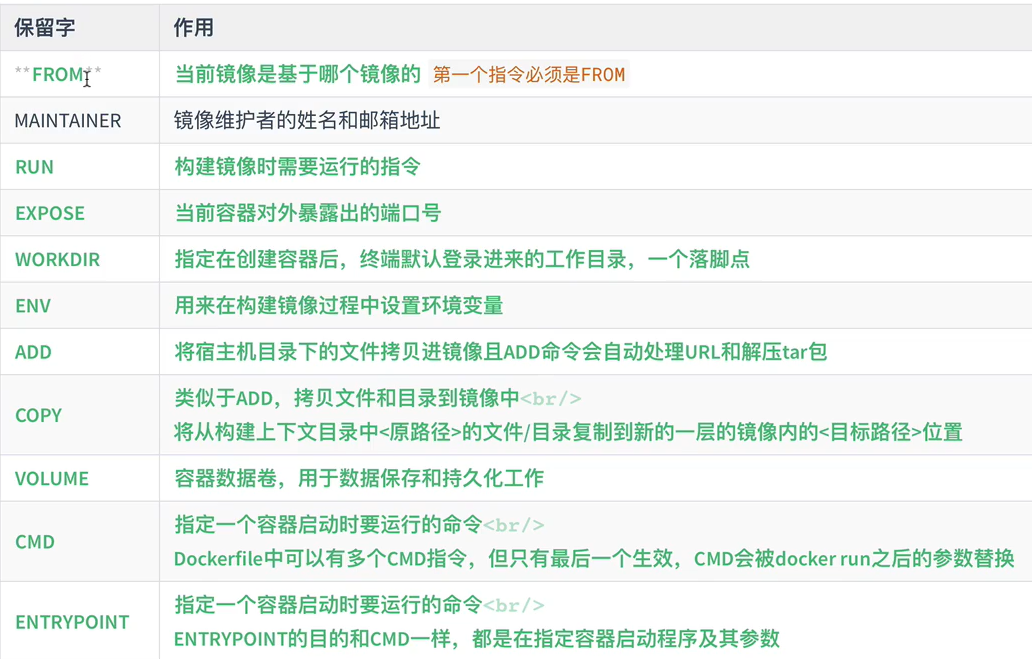
Statement to build Dockerfile file
5. Some operations that can be performed in the container
(1)cat
(2)ls
(3)