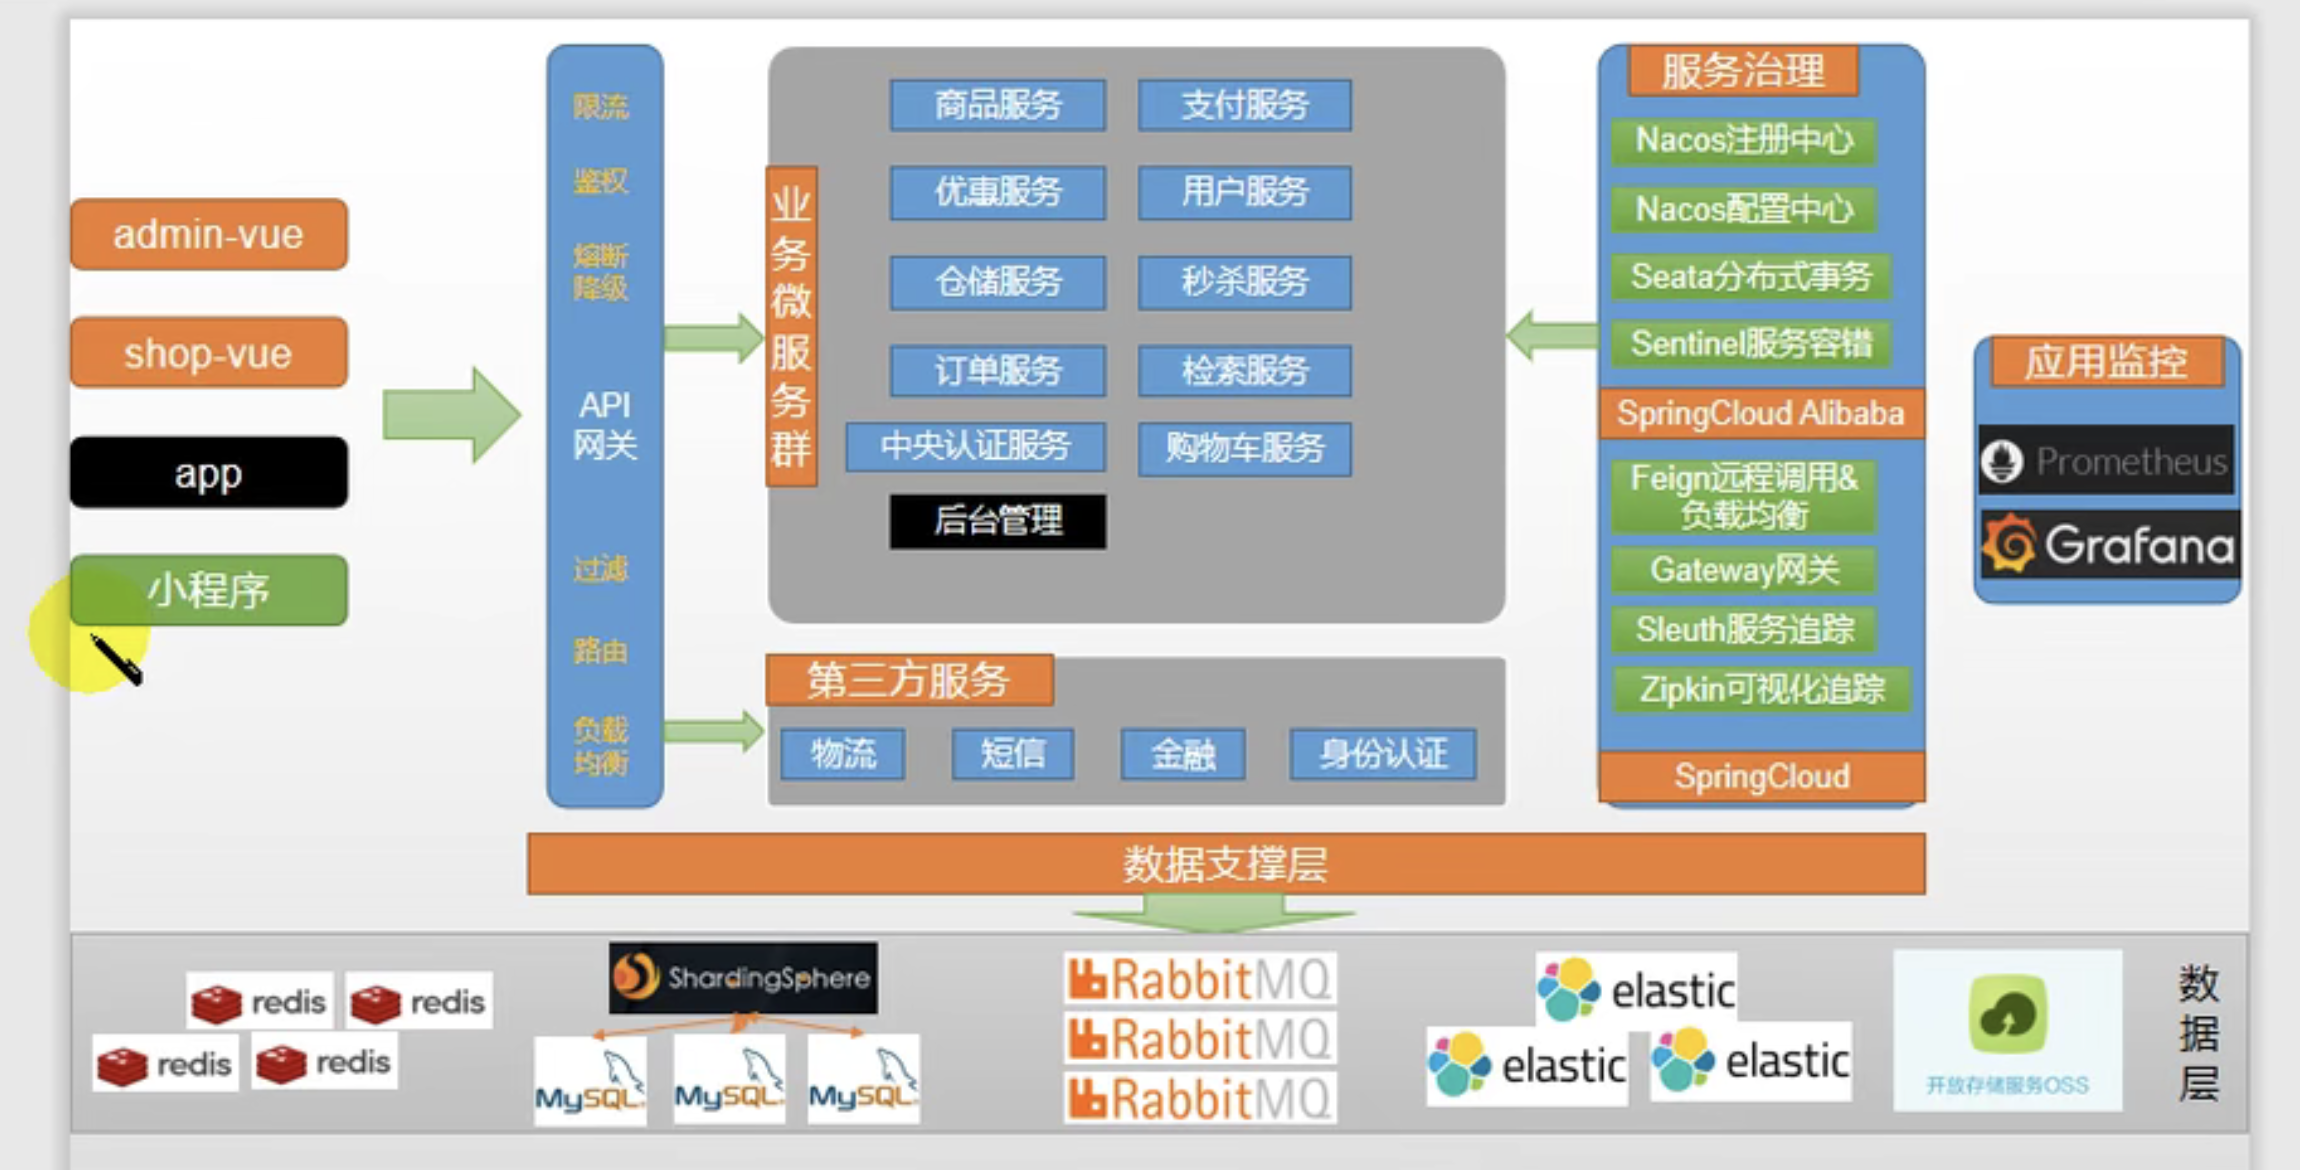
Mall infrastructure diagram:
Preparation of necessary components
docker installation, sql,redis
Each image of docker can be regarded as loading an application on a complete and independent Linux system.
instructions
For more detailed instruction learning, refer to: docker Instruction Learning
docker images: view the installed images
1. Install mysql image:
go docker warehouse Search mysql versions in the image
sudo docker pull mysql:5.7

# --Name specify container name - v directory mount - p specify port mapping - e set mysql parameters - d run in the background
sudo docker run -p 3306:3306 --name mysql \
-v /mydata/mysql/log:/var/log/mysql \ # Mount / mydata/mysql/log under Linux with / var/log/mysql shower gel inside the container
-v /mydata/mysql/data:/var/lib/mysql \
-v /mydata/mysql/conf:/etc/mysql \
-e MYSQL_ROOT_PASSWORD=root \ # -e modify mysql parameters
-d mysql:5.7
docker ps view running images in docker
docker ps
CONTAINER ID   IMAGE       COMMAND                  CREATED         STATUS         PORTS                               NAMES
c496d2553202   mysql:5.7   "docker-entrypoint.s..."   4 minutes ago   Up 4 minutes   0.0.0.0:3306->3306/tcp, 33060/tcp   mysql
From left to right:
- CONTAINER ID: ID
- IMAGE: IMAGE
- COMMAND: start COMMAND
- CREATED: start time
- STATUS: STATUS
- PORTS: port number and mapping relationship with host
- NAMES: container name
At this point, we can verify that an image is a complete Linux operating system:
# Execute / bin/bash of mysql container
[root@VM-16-11-centos /]# docker exec -it mysql /bin/bash
# You can see that you have entered the mysql image (see the ID)
root@c496d2553202:/# ls		# As can be seen from the directory, it is a complete Linux system directory
bin  boot  dev	docker-entrypoint-initdb.d  entrypoint.sh  etc	home  lib  lib64  media  mnt  opt  proc  root  run  sbin  srv  sys  tmp  usr  var
- Modify mysql configuration:
vi /mydata/mysql/conf/my.conf

[client]
default-character-set=utf8

[mysql]
default-character-set=utf8

[mysqld]
init_connect='SET collation_connection = utf8_unicode_ci'
init_connect='SET NAMES utf8'
character-set-server=utf8
collation-server=utf8_unicode_ci
skip-character-set-client-handshake
skip-name-resolve
docker restart mysql: restart the mysql image
2. Install redis
-
Pull image: docker pull redis (the latest image is the default when the version number is not added)
-
Directory mount
Because the redis.conf file does not exist at present, docker will think that the mounted redis.conf is a directory if it is mounted directly, so we create a file first and then mount it.
# In virtual machine
mkdir -p /mydata/redis/conf
touch /mydata/redis/conf/redis.conf

docker run -p 6379:6379 --name redis \
-v /mydata/redis/data:/data \
-v /mydata/redis/conf/redis.conf:/etc/redis/redis.conf \
-d redis redis-server /etc/redis/redis.conf

# Go directly to the redis client.
docker exec -it redis redis-cli
- Modify redis configuration: configure AOF persistence mode
vi /mydata/redis/conf/redis.conf

appendonly true
Make the image self start with the computer restart:
sudo docker update mysql --restart=always
sudo docker update redis --restart=always
VsCode and corresponding plug-ins
Create all microservice directories
- Goods and services: product
- Warehousing service: ware
- Order service: order
- Coupon service: coupon
- User service: member
Common ground: both use SpringWeb+OpenFeign
Create database:
- pms: Commodity System
- sms: marketing system
- oms: order system
- ums: user system
- wms: inventory system
Then import the data
Secondary development by using the existing background management framework
Background management framework of Renren open source (secondary development)
1,renren-fast , background project of background management framework
2,Ren fast Vue (front end) , front end project
Import the Ren fast project into an existing project.
- Download node.js
Download from the official website. After the installation is completed, because it is in the / usr/bin / directory, there is no need to configure environment variables. It can be used out of the box.
Set mirror source:
npm config set registry https://registry.npm.taobao.org
In the Ren fast Vue front-end project, use npm install to install the required components.
code generation
Use the Ren generator project to generate the controller/dao/entity/service code of the basic service.
Only need to modify:
- The spring.datasource.url connection in application.yml is your own database, and the username and password are your own
- Mainpath (path), package (package name), moduleName (module name), tablePrefix (table prefix) in generator.properties
- Because each generated file depends on a common util and entity, we abstract a common package to solve the problem of common dependency.
Configure each service - create a new application.yml under resources, as follows:
spring:
  datasource:
    username: root
    password: root
    url: jdbc:mysql://49.233.35.25:3306/topmall_pms 	#  Change to the corresponding database

mybatis-plus:
  mapper-locations: classpath:/mapper/**/*.xml	# mapper directory
  global-config:
    db-config:
      id-type: auto   # Auto increment primary key

server:
  port: 10000	# Port number
Selection of other components
- Registry (service discovery / registration): SpringCloud Alibaba - Nacos
- Configuration center (dynamic configuration management): SpringCloud Alibaba - Nacos
- Load balancing: spring cloud - Ribbon
- Declarative HTTP client (calling remote service RPC?): SpringCloud - Feign
- Service fault tolerance (current limiting, degradation, fusing): SpringCloud Alibaba - Sentinel
- API gateway (weblux programming mode): spring cloud - gateway
- Call chain monitoring: SpringCloud - sleuth
- Distributed transaction solution: SpringCloud Alibaba - Seata