https://blog.csdn.net/xiaoxsen/article/details/79050842
Note: Close the firewall
Prerequisite:
Prepare three server nodes to install and deploy Zookeeper and ActiveMQ. My three nodes are 192.168.1.130, 192.168.1.163 and 192.168.1.165, respectively.
Install ZK and ActiveMQ:
Download ZK at each node and decompress it.
wget http://mirrors.tuna.tsinghua.edu.cn/apache/zookeeper/zookeeper-3.4.6/zookeeper-3.4.6.tar.gz
tar -zxvf zookeeper-3.4.6.tar.gz
- 1
- 2
- 3
Download ActiveMQ at each node and decompress it.
wget http://apache.fayea.com/activemq/5.11.1/apache-activemq-5.11.1-bin.tar.gz
tar -xf ./apache-activemq-5.11.1-bin.tar.gz
- 1
- 2
This is a normal download and installation operation. I use ansible to automate the deployment of nodes, which is relatively easy and convenient.
#centos_docker ansible_ssh_host=192.168.1.222 ansible_ssh_user=root
centos_svr ansible_ssh_host=192.168.1.130 ansible_ssh_user=root zookeeper_id=1
centos_svr1 ansible_ssh_host=192.168.1.163 ansible_ssh_user=root zookeeper_id=2
centos_svr2 ansible_ssh_host=192.168.1.165 ansible_ssh_user=root zookeeper_id=3
#ubuntu_svr ansible_ssh_host=192.168.1.236 ansible_ssh_user=root zookeeper_id=2
#debian_svr ansible_ssh_host=192.168.1.237 ansible_ssh_user=root zookeeper_id=3
[nginx]
centos_svr
#ubuntu_svr
#debian_svr
[nginx:vars]
[etcd]
centos_svr
#ubuntu_svr
#debian_svr
[etcd:vars]
[redis]
centos_svr
#ubuntu_svr
#debian_svr
[redis:vars]
[zookeeper]
centos_svr
#ubuntu_svr
#debian_svr
centos_svr1
centos_svr2
[activemq]
centos_svr
[zookeeper:vars]
zookeeper_hosts='1:192.168.1.130,2:192.168.1.163,3:192.168.1.165'
[docker-build]
centos_svr
#ubuntu_svr
#debian_svr
[docker-build:vars]
docker_build_force=False
#docker_instance_using_exist_data=True
#docker_instance_sshport='2022'
#zookeeper_hosts='1:192.168.1.130,2:192.168.1.163,3:192.168.1.165'
[all-group:children]
nginx
etcd
redis
zookeeper
docker-build
[all-group:vars]
#NexusRepoHost=192.168.1.249
NexusRepoHost=linux.xxxxx.com.cn
#NexusRepoHost=nexus.clouedu.com
NexusRepoPort=8081
docker_build_host_global_vars={ 'NexusRepoHost': '{{ NexusRepoHost }}', 'NexusRepoPort': '{{ NexusRepoPort }}' }
- 1
- 2
- 3
- 4
- 5
- 6
- 7
- 8
- 9
- 10
- 11
- 12
- 13
- 14
- 15
- 16
- 17
- 18
- 19
- 20
- 21
- 22
- 23
- 24
- 25
- 26
- 27
- 28
- 29
- 30
- 31
- 32
- 33
- 34
- 35
- 36
- 37
- 38
- 39
- 40
- 41
- 42
- 43
- 44
- 45
- 46
- 47
- 48
- 49
- 50
- 51
- 52
- 53
- 54
- 55
- 56
- 57
- 58
- 59
- 60
- 61
- 62
- 63
- 64
- 65
- 66
- 67
- 68
- 69
First configure the ZK cluster:
Configure environment variables:
[root@localhost ~]# vi /etc/profile
- 1
Add the following:
export ZOOKEEPER_HOME=/opt/zookeeper
export PATH=$PATH:$ZOOKEEPER_HOME/bin:$ZOOKEEPER_HOME/conf
- 1
- 2
First configure the first ZK, edit the zoo.cfg file in the conf directory of the ZK installation directory, and if not, copy a zoo.simple.cfg and rename it zoo.cfg to continue configuring.
[root@localhost zookeeper]# vi conf/zoo.cfg
- 1
Then add the following configuration
# the directory where the snapshot is stored.
dataDir=/opt/zookeeper/data
# Place the dataLogDir to a separate physical disc for better performance
dataLogDir=/opt/zookeeper/log
...............
server.1=0.0.0.0:2888:3888
server.2=192.168.1.163:2888:3888
server.3=192.168.1.165:2888:3888
- 1
- 2
- 3
- 4
- 5
- 6
- 7
- 8
Then create the mypid file in the data directory and write the content to 1 to save the exit.
Configure the second ZK, as described above.
# the directory where the snapshot is stored.
dataDir=/opt/zookeeper/data
# Place the dataLogDir to a separate physical disc for better performance
dataLogDir=/opt/zookeeper/log
...............
server.1=192.168.1.130:2888:3888
server.2=0.0.0.0:2888:3888
server.3=192.168.1.165:2888:3888
- 1
- 2
- 3
- 4
- 5
- 6
- 7
- 8
Then create the mypid file in the data directory and write the content to 2 to save the exit.
The third ZK configuration:
# the directory where the snapshot is stored.
dataDir=/opt/zookeeper/data
# Place the dataLogDir to a separate physical disc for better performance
dataLogDir=/opt/zookeeper/log
...............
server.1=192.168.1.130:2888:3888
server.2=192.168.1.163:2888:3888
server.3=0.0.0.0:2888:3888
- 1
- 2
- 3
- 4
- 5
- 6
- 7
- 8
Then create the mypid file in the data directory and write the content to 3 to save the exit.
After ZK is configured, start ZK sequentially
Start zk:
zkServer.sh start
- 1
View status:
zkServer.sh status
- 1
The status of the three ZK s after successful integration is as follows:
[root@localhost ~]# zkServer.sh status
ZooKeeper JMX enabled by default
Using config: /opt/zookeeper/bin/../conf/zoo.cfg
Mode: leader
[root@localhost ~]#
- 1
- 2
- 3
- 4
- 5
[root@localhost ~]# zkServer.sh status
ZooKeeper JMX enabled by default
Using config: /opt/zookeeper/bin/../conf/zoo.cfg
Mode: follower
[root@localhost ~]#
- 1
- 2
- 3
- 4
- 5
[root@localhost ~]# zkServer.sh status
ZooKeeper JMX enabled by default
Using config: /opt/zookeeper/bin/../conf/zoo.cfg
Mode: follower
[root@localhost ~]#
- 1
- 2
- 3
- 4
- 5
If there are any abnormalities, we need to wait for a while, because they need to communicate with each other. When the three ZKs are not fully up, there will be abnormalities. After the three ZKs elect the Leader through the election algorithm, the other two will be normal when they are in the follower.
Seeing the above results indicates that ZK integration has been successful. Let's look at how to integrate ActiveMQ.
ActiveMQ is installed on three nodes, and the installation method is the same as ZK. I won't repeat it here.
The MQ configuration of the three nodes is as follows:
[root@localhost activemq]# vi conf/activemq.xml
- 1
Modify brokerName first, and the three MQ s need to be changed to the same one.
brokerName="activemq-cluster"
- 1
In modifying the persistence adapter, all three machines are changed as follows, but the hostname needs to be changed to the ip of the node. In order to avoid conflicts, the port number of bind is changed to 6262621-6262623 in turn.
<persistenceAdapter>
                <!--kahaDB directory="${activemq.data}/kahadb"/ -->
                <replicatedLevelDB
                directory="${activemq.data}/leveldb"
                replicas="3"
                bind="tcp://0.0.0.0:62621"
                zkAddress="192.168.1.130:2181,
                192.168.1.163:2181,
                192.168.1.165:2181"
                hostname="192.168.1.130"
                zkPath="/activemq/leveldb-stores"
                />
                </persistenceAdapter>
- 1
- 2
- 3
- 4
- 5
- 6
- 7
- 8
- 9
- 10
- 11
- 12
- 13
To avoid port number collision, change the port number of openwire to 5155, 51516, 51517 in turn.
<transportConnectors> <!-- DOS protection, limit concurrent connections to 1000 and frame size to 100MB --> <transportConnector name="openwire" uri="tcp://0.0.0.0:51515?maximumConnections=1000&wireFormat.maxFrameSize=104857600"/>
- 1
- 2
- 3
Modify jetty.xml
[root@localhost activemq]# vi conf/jetty.xml
- 1
In turn, the port numbers of the three MQ control and management interfaces are changed to 8161, 8162 and 8163.
    <bean id="jettyPort" class="org.apache.activemq.web.WebConsolePort" init-method="start">
             <!-- the default port number for the web console -->
        <property name="host" value="0.0.0.0"/>
        <property name="port" value="8161"/>
    </bean>
- 1
- 2
- 3
- 4
- 5
- 6
Finally, start MQ in turn. When you enter the address of the management interface in the browser, you will find that only one MQ management interface can be accessed. Then this machine is Master, the other two are slave, and will not start. When the Master machine goes down, the other two will choose one as Master to start and continue sending messages, which can achieve high reuse. Let's look at the test code:
ActiveMQ Connection Factory Configuration:
    <!-- Activemq Connecting factories -->
    <bean id="activeMQConnectionFactory" class="org.apache.activemq.ActiveMQConnectionFactory">
        <constructor-arg value="system" />
        <constructor-arg value="manager" />
        <constructor-arg value="failover:(tcp://192.168.1.130:51515,tcp://192.168.1.163:51516,tcp://192.168.1.165:51517)?Randomize=false" />
    </bean>
- 1
- 2
- 3
- 4
- 5
- 6
- 7
- 8
Message Sending Client Class:
package com.wind.client;
import javax.jms.Destination;
import org.springframework.context.ApplicationContext;
import org.springframework.context.support.ClassPathXmlApplicationContext;
import org.springframework.jms.core.JmsTemplate;
import com.wind.sender.MessageSender;
public class MessageClient {
public static void main(String[] args) {
ApplicationContext applicationContext = new ClassPathXmlApplicationContext("applicationContext.xml");
JmsTemplate jmsTemplate = (JmsTemplate) applicationContext.getBean("jmsTemplate");
final Destination destination = (Destination) applicationContext.getBean("destination");
System.out.println("connected"+destination.toString());
final MessageSender messageSender = new MessageSender(destination, jmsTemplate);
new Thread(new Runnable() {
	public void run() {
		for (int i = 0; i < 10000; i++) {
			// TODO Auto-generated method stub
			try {
				Thread.sleep(1000);

				messageSender.sendMessageByTxt("ActiveMQ "+i);
				System.out.println("Send a message: ActiveMQ "+i);

			} catch (InterruptedException e) {
				// TODO Auto-generated catch block
				e.printStackTrace();
			}
		}
	}
}).start();
}
}
- 1
- 2
- 3
- 4
- 5
- 6
- 7
- 8
- 9
- 10
- 11
- 12
- 13
- 14
- 15
- 16
- 17
- 18
- 19
- 20
- 21
- 22
- 23
- 24
- 25
- 26
- 27
- 28
- 29
- 30
- 31
- 32
- 33
- 34
- 35
- 36
- 37
- 38
- 39
- 40
- 41
Message Sending Class:
package com.wind.sender;
import javax.jms.Destination;
import javax.jms.JMSException;
import javax.jms.Message;
import javax.jms.Session;
import org.springframework.jms.core.JmsTemplate;
import org.springframework.jms.core.MessageCreator;
public class MessageSender {
private Destination destination;

private JmsTemplate jmsTemplate;

public MessageSender(Destination destination, JmsTemplate jmsTemplate) {
	this.destination = destination;
	this.jmsTemplate = jmsTemplate;
}

public void sendMessage(final String txt)
{

	jmsTemplate.send(destination,new MessageCreator() {

		public Message createMessage(Session session) throws JMSException {
			 Message message = session.createTextMessage(txt);
			 return message;
		}
	});
}
public void sendMessageByTxt(String tx)
{
	jmsTemplate.setDefaultDestination(destination);
	jmsTemplate.convertAndSend(tx);

}
}
- 1
- 2
- 3
- 4
- 5
- 6
- 7
- 8
- 9
- 10
- 11
- 12
- 13
- 14
- 15
- 16
- 17
- 18
- 19
- 20
- 21
- 22
- 23
- 24
- 25
- 26
- 27
- 28
- 29
- 30
- 31
- 32
- 33
- 34
- 35
- 36
- 37
- 38
- 39
- 40
- 41
- 42
- 43
Message Receiving Class:
package com.wind.reciever;
import javax.jms.JMSException;
import javax.jms.Message;
import javax.jms.MessageListener;
import javax.jms.TextMessage;
public class MessageReciever implements MessageListener {
public void onMessage(Message message) {
	// TODO Auto-generated method stub
	 if (message instanceof TextMessage) {
            TextMessage textMessage = (TextMessage) message;
            try {
                String text = textMessage.getText();
                System.out.println("Received the message: " + text);
            } catch (JMSException e) {
                e.printStackTrace();
            }
        }
}
- 1
- 2
- 3
- 4
- 5
- 6
- 7
- 8
- 9
- 10
- 11
- 12
- 13
- 14
- 15
- 16
- 17
- 18
- 19
- 20
- 21
Test results:
Let the program run, send and receive messages normally, and then pass
# ps axu | grep activemq
# kill -9 xxx
- 1
- 2
Stop the master MQ machine (192.168.1.130.51515). The effect is bad: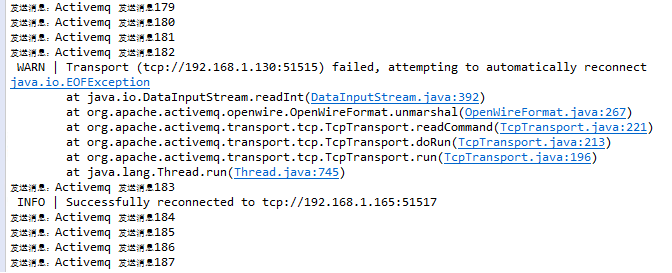
The master MQ machine (192.168.1.163.51516), which was rebuilt, stopped MQ. The effect was poor: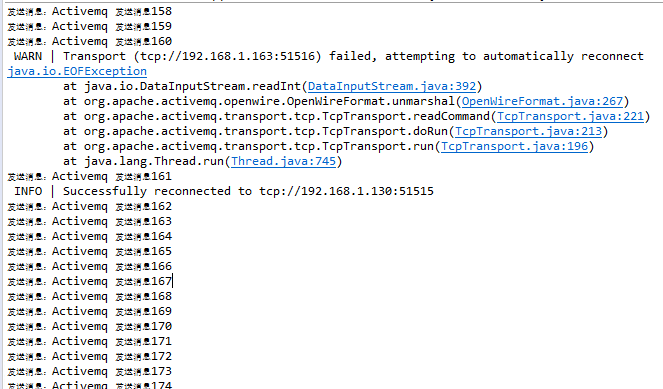
It is found that the message will continue to be sent each time, which makes it highly usable.
                                </div>
            <link href="https://csdnimg.cn/release/phoenix/mdeditor/markdown_views-e44c3c0e64.css" rel="stylesheet">
                </div>