This article introduces how to install dependency on Kepler cloud platform.
What is Kplcloud?
kplcloud is a lightweight PaaS platform based on Kubernetes. It manages the application through a visual interface, reduces the degree of application containerization, and reduces the time cost of application containerization.
Kplcloud has been serving multiple teams such as Yixin Yiren wealth and has been running stably for nearly two years. At present, the platform has run hundreds of applications and nearly thousands of containers in the production environment.
I. Namespace
It is recommended to separate Kepler related services into a proprietary Namespace and create a new space in Kubernetes. You can create the space by executing the following command
$ kubectl create namespace kpaas
Or execute the following command:
$ kubectl apply -f install/kubernetes/namespace.yaml
2. Configure persistent storage
2.1 configuration of persistent storage
Here, NFS is used for persistence. If you have your own persistence scheme, you can not use the modified scheme.
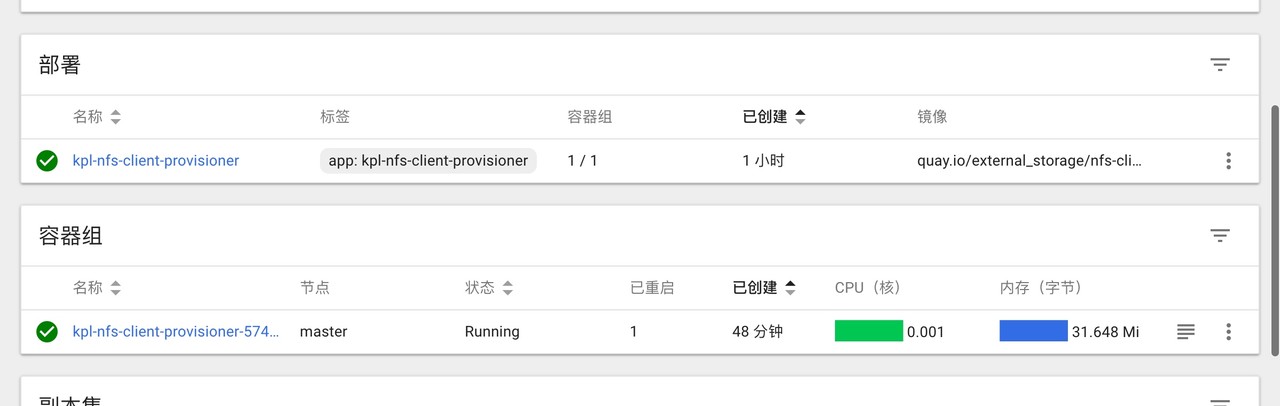
$ kubectl apply -f install/kubernetes/storage/serviceaccount.yaml
$ kubectl apply -f install/kubernetes/storage/rbac.yaml
$ kubectl apply -f install/kubernetes/storage/provisioner.yaml
$ kubectl apply -f install/kubernetes/storage/stroageclass.yaml
2.2 need to adjust the advisor
Call the service address and path according to your own environment.
volumes:
- name: kpl-nfs-client-root
  nfs:
    server: 172.16.0.4
    path: "/home/data"
containers:
- name: kpl-nfs-client-provisioner
  image: quay.io/external_storage/nfs-client-provisioner:latest
  env:
    - name: PROVISIONER_NAME
      value: fuseim.pri/ifs
    - name: NFS_SERVER
      value: 172.16.0.4
    - name: NFS_PATH
      value: "/home/data"
III. installation of Redis
For the convenience of demonstration, the docker version of redis is also deployed on the kubernetes cluster. In the real environment, please use an independent redis server or cluster.
If you haven't initialized persistent storage, please configure the storage class and install Redis service here.
3.1 installation
$ kubectl apply -f install/kubernetes/redis/statefulset.yaml
$ kubectl apply -f install/kubernetes/redis/service.yaml
$ kubectl apply -f install/kubernetes/redis/configmap.yaml
The configuration information of redis is written in configmap statefullset.yaml
The official redis has the / data directory by default, so we need to configure the persistent storage target in the / data directory.
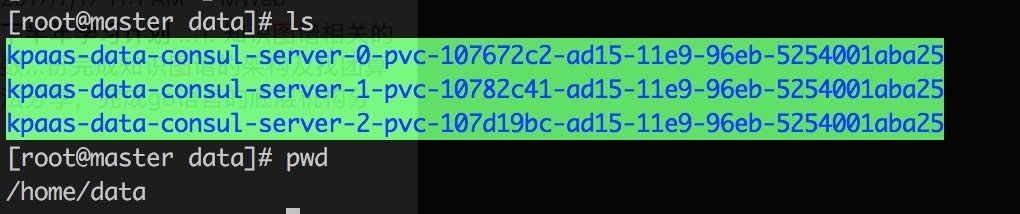
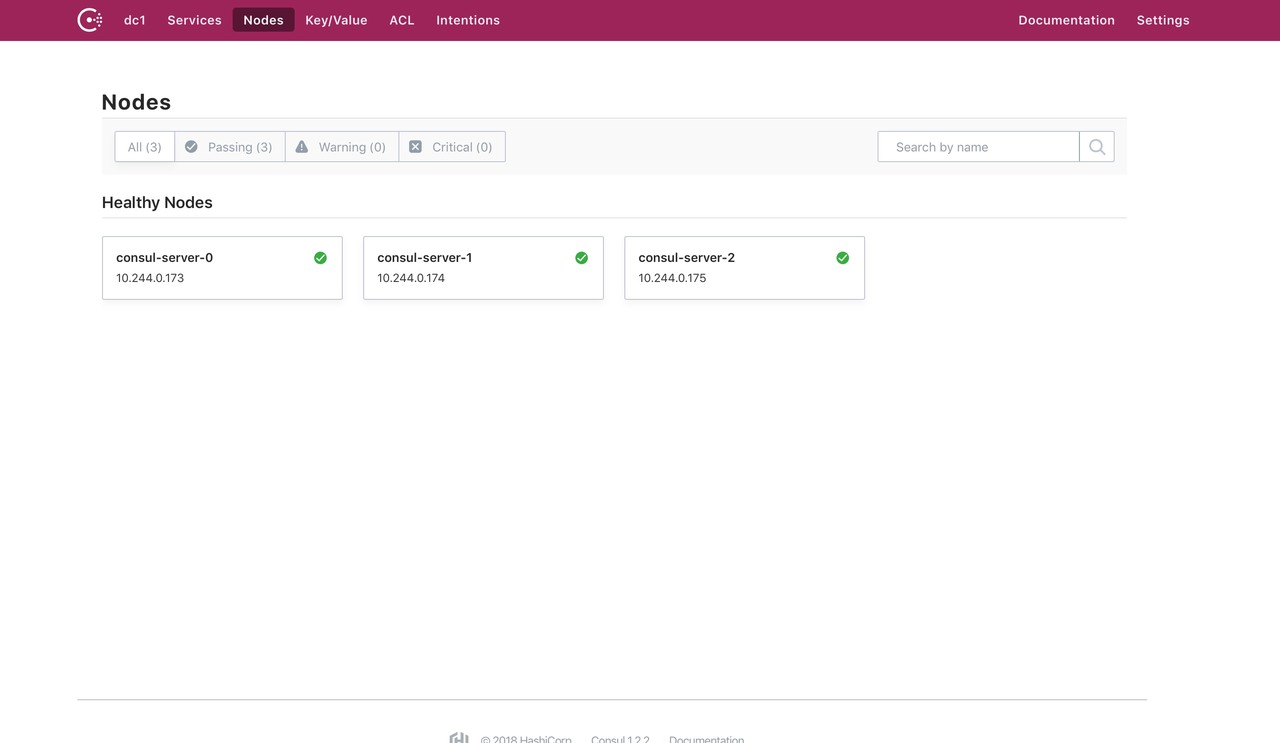
IV. installation of Consul cluster
If you have a separate consul cluster or do not want to use consul, you do not need to execute the following command. The following command is to install the docker version of the consumer cluster on your kubernetes cluster if you have persistent storage.
If you haven't initialized the persistent storage, please configure the storage class and install the consumer cluster here.
4.1 installation
$ kubectl apply -f install/kubernetes/consul/configmap.yaml
$ kubectl apply -f install/kubernetes/consul/service.yaml
$ kubectl apply -f install/kubernetes/consul/statefulset.yaml
$ kubectl apply -f install/kubernetes/consul/ingress.yaml
We use stateful set to deploy clusters. If you already have persistent storage classes, just change the storageClassName to your storage class package.
ingress.yaml provides access to the outside world
Configuration file of configmap.yaml consumer cluster server
4.2 notes
You may need to pay attention to this kubernetes affinity problem. If your kubernetes is a single point, please use the following commented out code. No the service cannot be started by.
      affinity:
        podAntiAffinity:
          requiredDuringSchedulingIgnoredDuringExecution:
            - labelSelector:
                matchLabels:
                  app: consul
                  component: server
              topologyKey: kubernetes.io/hostname
#          # Single node uses this
#          preferredDuringSchedulingIgnoredDuringExecution:
#            - wight: 100
#              podAffinityTerm:
#                topologyKey: kubernetes.io/hostname
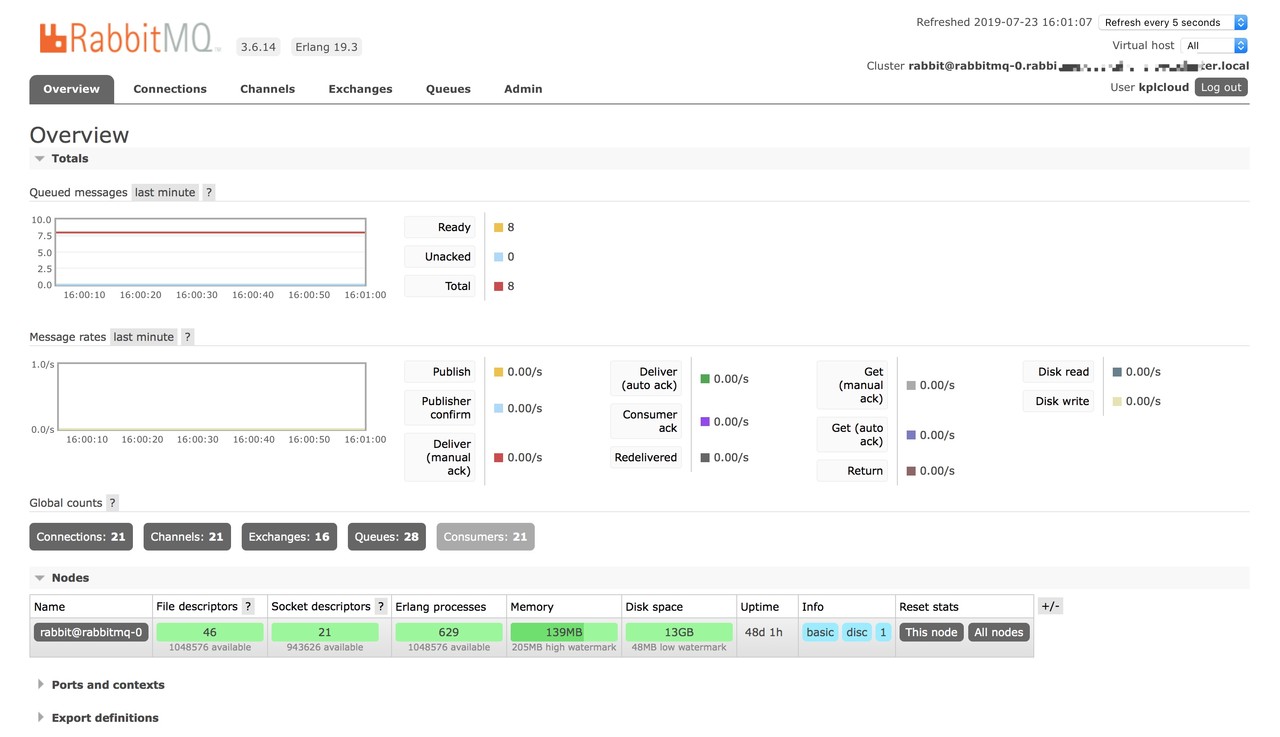
V. installation of RabbitMQ service
For the convenience of demonstration, rabbitmq also uses the docker version deployed on the kubernetes cluster. For the real environment, please use the independent rabbitmq server.
If you haven't initialized the persistent storage, please configure the storage class and install the rabbitMQ service here.
5.1 installation
$ kubectl apply -f install/kubernetes/rabbitmq/statefulset.yaml
$ kubectl apply -f install/kubernetes/rabbitmq/service.yaml
Stateful service: statefullset.yaml entry: ingress.yaml
kpass needs to be created in rabbitmq:
- Vhost: kplcloud
- Exchanges: kplcloud-exchange
- User: kplcloud
- RoutingKey: kplcloud
Vi. install Mysql service
6.1 mysql
For the convenience of demonstration, the docker version of mysql is also deployed on the kubernetes cluster. In the real environment, please use an independent mysql server.
If you haven't initialized the persistent storage, please configure the storage class and install mysql service here.
6.2 installation
$ kubectl apply -f install/kubernetes/mysql/statefulset.yaml
$ kubectl apply -f install/kubernetes/mysql/service.yaml
- MySQL? Root? Password: MySQL user name
- MySQL? Root? Password: MySQL password
This project needs to create a database: kplcloud
VII. Installation of ELK
Logstash and ES have high requirements for machines. It is recommended to use an independent ELK cluster to collect and analyze logs.
If you have to use the Docker version of elk and deploy it in the Kubernetes cluster, if you have not yet started the persistent storage, first initialize the persistent storage. Please configure the storage class in the persistent storage here and then install the relevant services.
ELK mainly includes Elasticsearch, logstash and kibana services. Kibana and logstash can be used in Deployment. All ES needs to be persistent because the log data exists on ES.
$ kubectl apply -f install/kubernetes/elk/elasticsearch.yaml
$ kubectl apply -f install/kubernetes/elk/logstash.yaml
$ kubectl apply -f install/kubernetes/elk/kibana.yaml
$ kubectl apply -f install/kubernetes/elk/ingress.yaml
VIII. Harbor installation
The image warehouse is not running on the kubernetes cluster. It seems that it can't run either. Find a server with large capacity and Docker installation to build it.
For the installation and start-up mode, please refer to the official instructions: https://github.com/goharbor/harbor/blob/master/docs/installation_guide.md
8.1 installation
Download the Harbor installation file. I'm dealing with it offline. If you can't download it, please add an agent.
$ https://storage.googleapis.com/harbor-releases/release-1.8.0/harbor-offline-installer-v1.8.1.tgz
8.2 decompression
$ tar -zxvf harbor-offline-installer-v1.8.1.tgz
8.3 configure the harbor file harbor.conf
## Configuration file of Harbor

# hostname sets the access address. You can use ip or domain name, not 127.0.0.1 or localhost.
hostname = hub.kpaas.nsini.com

# The default access protocol is http. You can also set https. If you set https, nginx ssl needs to set on.
ui_url_protocol = http

# The default password of root user of mysql database is root123, which is modified in actual use.
db_password = root123

max_job_workers = 3
customize_crt = on
ssl_cert = /data/cert/server.crt
ssl_cert_key = /data/cert/server.key
secretkey_path = /data
admiral_url = NA

# Mail settings, used when sending reset password mail
email_identity =
email_server = smtp.mydomain.com
email_server_port = 25
email_username = sample_admin@mydomain.com
email_password = abc
email_from = admin <sample_admin@mydomain.com>
email_ssl = false

# After Harbor is started, the password for the administrator UI to log in is Harbor 12345 by default.
harbor_admin_password = Harbor12345

# Authentication mode: multiple authentication modes are supported here, such as LADP, current storage and database authentication. The default is DB auth, mysql database authentication.
auth_mode = db_auth

# Configuration items during LDAP authentication
#ldap_url = ldaps://ldap.mydomain.com
#ldap_searchdn = uid=searchuser,ou=people,dc=mydomain,dc=com
#ldap_search_pwd = password
#ldap_basedn = ou=people,dc=mydomain,dc=com
#ldap_filter = (objectClass=person)
#ldap_uid = uid
#ldap_scope = 3
#ldap_timeout = 5

# Open self registration or not
self_registration = on

# Token effective time, 30 minutes by default
token_expiration = 30

# The user creates project permission control, which is everyone by default, or adminonly.
project_creation_restriction = everyone

verify_remote_cert = on
8.4 start Harbor and execute. / install.sh or docker composer directly.
$ ./install.sh
$ docker-compose start
IX. Prometheus installation
If there is no initial persistent storage, initialize the persistent storage first. Please configure the storage class in the persistent storage and install the related service.
Prometheus needs to store data locally, so it needs to mount persistent storage.
$ kubectl apply -f install/kubernetes/prometheus/deployment.yaml
$ kubectl apply -f install/kubernetes/prometheus/ingress.yaml
$ kubectl apply -f install/kubernetes/prometheus/configmap.yaml
$ kubectl apply -f install/kubernetes/prometheus/serviceaccount.yaml
$ kubectl apply -f install/kubernetes/prometheus/service.yaml
$ kubectl apply -f install/kubernetes/prometheus/persistentvolumeclaim.yaml
9.1 relevant configuration
The configmap.yaml file has five files:
- etcd3.rules.yml
- kube-state-metrics_rules.yml
- kubelet_rule.yml
- kubernetes_rule.yml
- prometheus.yml
The above four files are referenced in prometheus. If you have new rules, you can add them here.
In prometheus.yml file, it is configured that alerting currently defaults to alertmanager:9093. If you have your own alarm management platform, just modify the address. If you want to use alertmanager, please see Installing alertmanager.
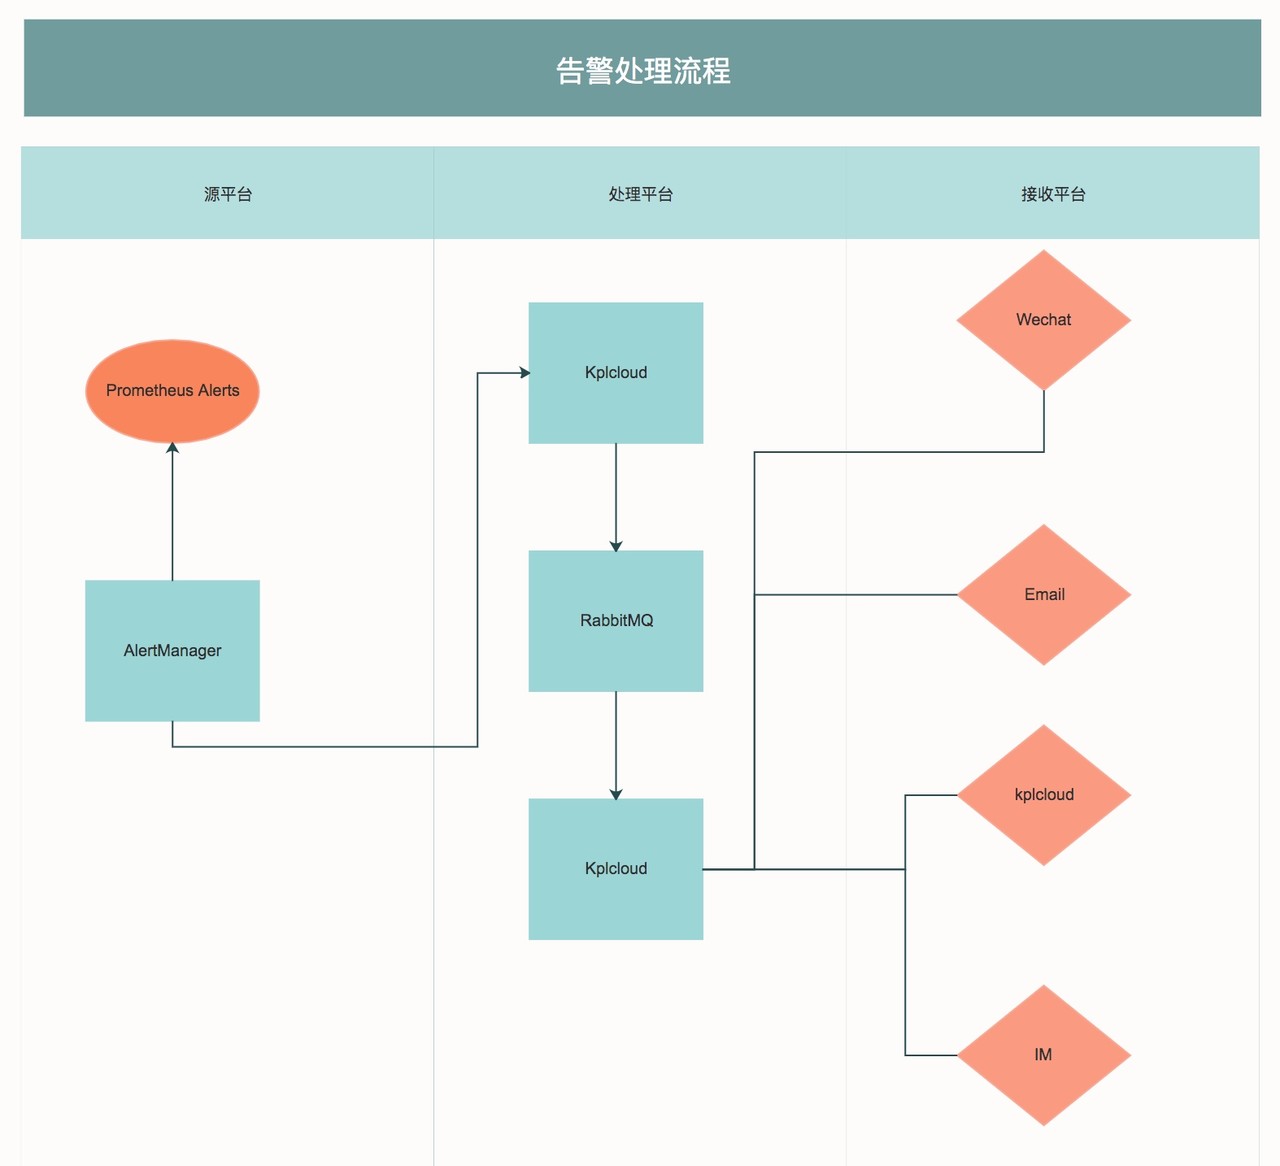
X. install and configure alertmanager
Alertmanager mainly receives alert data from prometheus
10.1 installation
You can install Docker independently without using Docker. The following example is deployed on the kubernetes cluster.
$ kubectl apply -f install/kubernetes/alertmanager/deployment.yaml
$ kubectl apply -f install/kubernetes/alertmanager/ingress.yaml
$ kubectl apply -f install/kubernetes/alertmanager/configmap.yaml
$ kubectl apply -f install/kubernetes/alertmanager/service.yaml
10.2 relevant configuration
Here, the alarm information is sent to kplcloud platform by webhook, and kplcloud receives data processing and merges it into rabbitmq.
apiVersion: v1
data:
  config.yml: |-
    global:

    route:
      group_by: ['alertname', 'cluster', 'service']
      group_wait: 30s
      group_interval: 5m
      repeat_interval: 10m
      receiver: webhook

    receivers:
    - name: 'webhook'
      webhook_configs:
      - url: 'http://kplcloud:8080/public/prometheus/alerts'
kind: ConfigMap
metadata:
  name: alertmanager
The data processed by kplcloud is finally pushed to the corresponding users and platforms according to the corresponding rules.
Xi. Installation of kpaas
$ git clone github.com/kplcloud/kplcloud.git
11.1 Docker
$ docker pull kplcloud/kplcloud:latest
11.2 kubernetes
Basic service installation: install.md
If your other services are ready, you can directly execute the following command to deploy the Kepler cloud platform on kubernetes.
$ kubectl apply -f install/kubernetes/kpaas/configmap.yaml
$ kubectl apply -f install/kubernetes/kpaas/deployment.yaml
$ kubectl apply -f install/kubernetes/kpaas/service.yaml
$ kubectl apply -f install/kubernetes/kpaas/ingress.yaml
If you have a private warehouse, do the following on the master node:
$ kubectl create secret generic regcred --from-file=.dockerconfigjson=/root/.docker/config.json --type=kubernetes.io/dockerconfigjson -n default
Create it under each namespace, so k8s has the right to pull the image of the private warehouse.
Deployment needs to add imagePullSecrets to:
imagePullSecrets:
- name: regcred
Open source address:
- Github: https://github.com/kplcloud/kplcloud
- Document: https://docs.nsini.com
- Demo: https://kplcloud.nsini.com
Author: Yiren Jinke - wealth Technology Department - innovation team
Source: Yixin Institute of Technology