Hello, everyone. I'm a studious junior brother. Today, I will continue to explain the second method I wrote: etree method based on lxml library combined with xpath method - crawling the contents of the ranking list and generating the word cloud map.
The learning experience is mainly divided into three lectures:
1. Crawler based on regular expression - crawling the contents of the ranking list
2. etree method based on lxml library combined with xpath method -- crawling the contents of the list and generating the cloud picture of the list words
3. Call the crawler method of the ranking list based on the interface and save the crawled content to the csv file
etree method based on lxml library combined with xpath method -- crawling the contents of the ranking list and generating the word cloud map of the ranking list
Idea: first print the text content of the web page through the requests library, and then convert the printed text content into html through the etree method in the lxml library. After converting to html, we can use xpath to locate the text content of the tag, that is, the content we want to crawl. Then import wordcloud word cloud Library (generate word cloud), jieba sub word library (divide the generated word cloud into words to show better), matplotlib Library (draw word cloud image module), and finally import the word cloud background image you want to generate to complete this crawling task.
Step 1: print out the web page content through the requests library; Then use etree to transform the text content into html web page format
import requests
#Import etree method function from lxml Library
from lxml import etree

csdn_python_url='https://blog.csdn.net/nav/python'
headers={'User-Agent':'Mozilla/5.0 (Windows NT 10.0; Win64; x64) AppleWebKit/537.36 (KHTML, like Gecko) Chrome/95.0.4638.69 Safari/537.36'}
python_yemian=requests.get(url=csdn_python_url,headers=headers)
python_yemian.encoding="utf-8"
#lxml is introduced here, and the text text crawled down can be used as html again with etree.HTML method
html = etree.HTML(python_yemian.text)

'''
there html Has been transformed by us into html Web page format
 Can proceed xpath Location


'''
Step 2: xpath locates the label text content
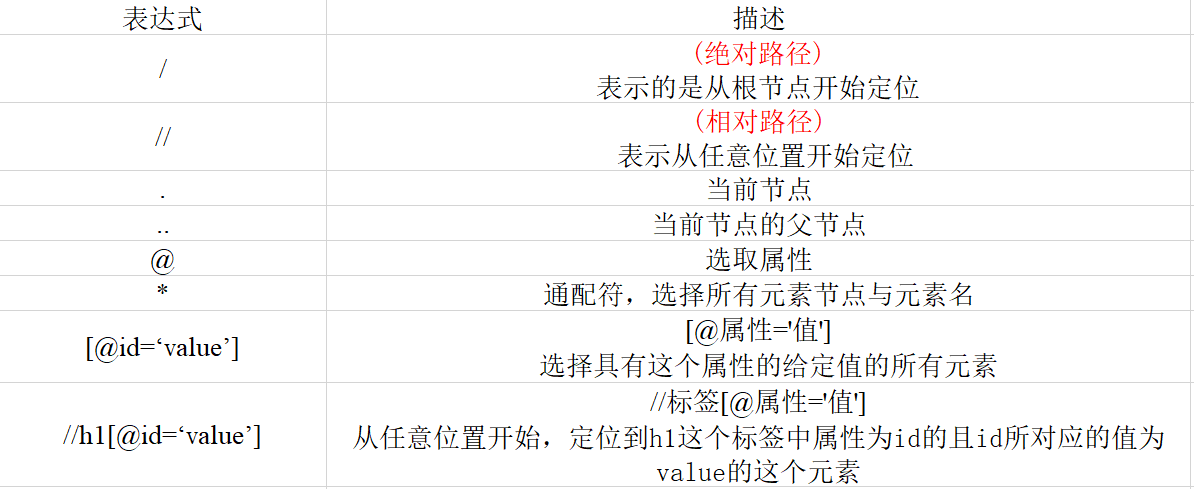
Brief overview of xpath positioning methods:

Crawl the content by positioning
'''
list_rebang Is a list
 Note that what we need here is the text content of the label, so finally locate the position
 We need to add one text()

'''
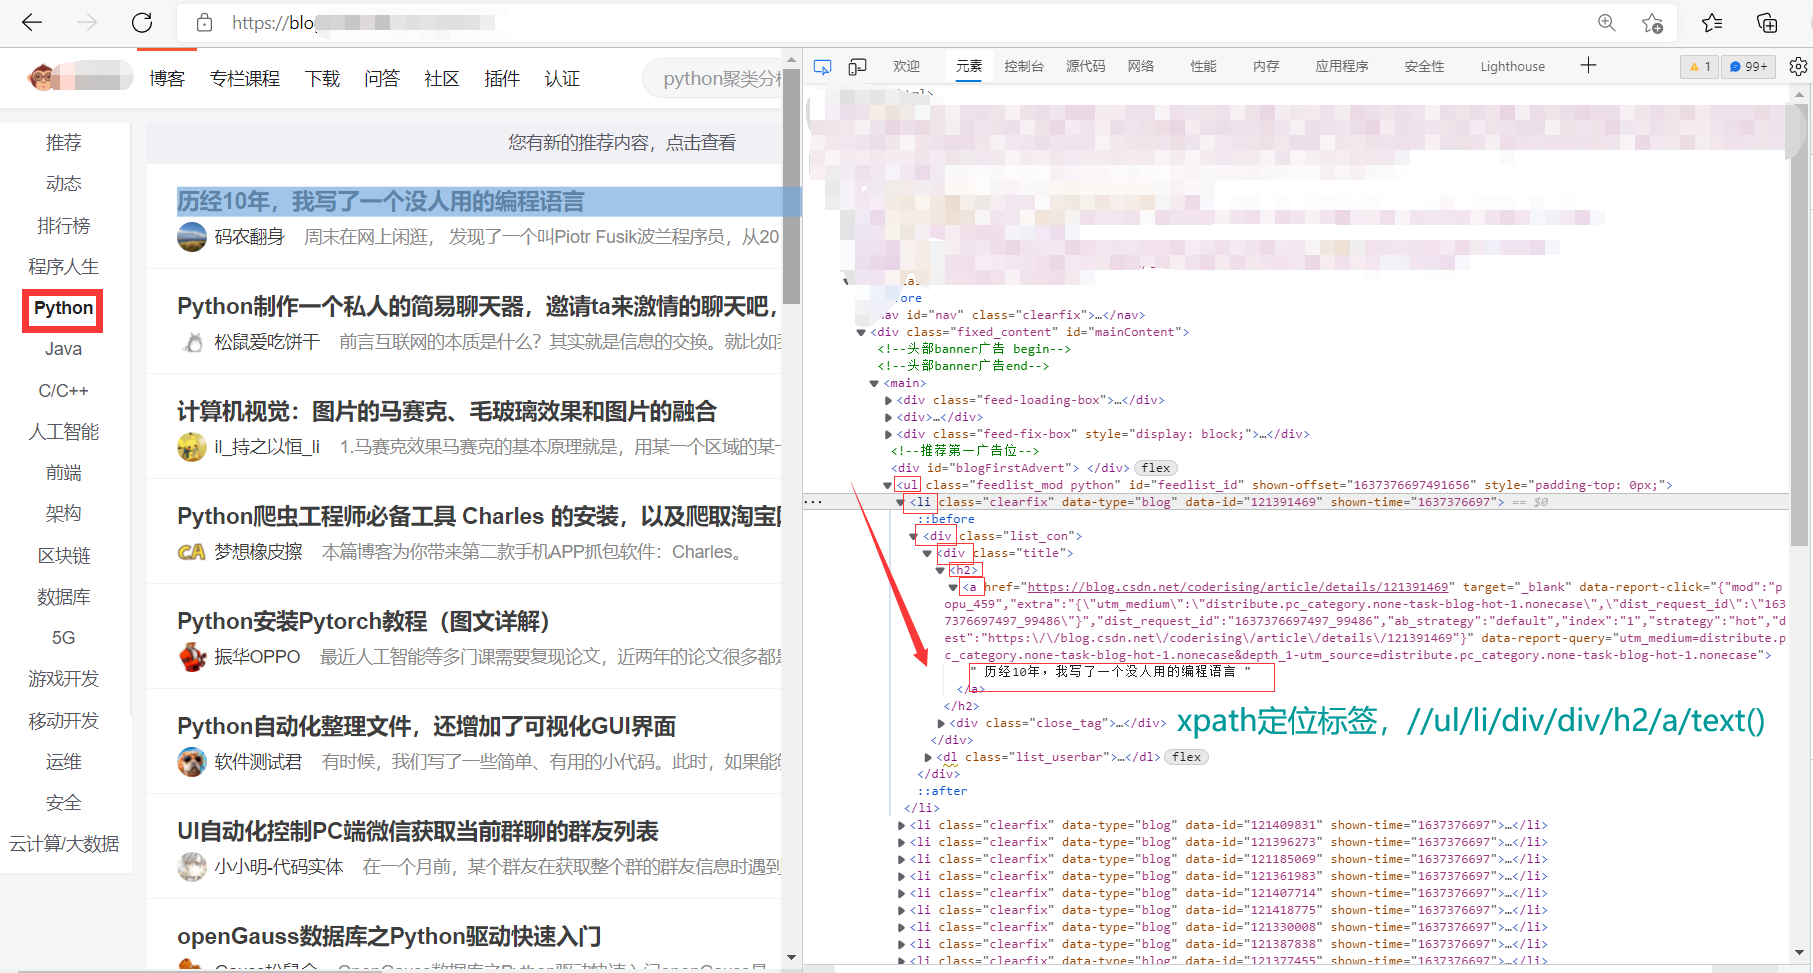
list_rebang=html.xpath('//ul[@id="feedlist_id"]/li/div/div/h2/a/text()')
#Convert list to string
str_rebang=''.join(list_rebang)
#Replace the blanks
str_rebang=str_rebang.replace(' ','')
#print(str_rebang)

Note: I forgot to add attribute to the positioning tag in the above figure
Details: through observation, we find that the first few li tags and div tags in the above label have many repetitions, so how should we locate them?
Answer: if you want to locate the first li tag, li[1]; If you want to locate the first div tag in the li tag, click / li/div[1];
(the positioning here starts from 1, not 0. Note)
Step 3: generate word cloud
#jieba word segmentation divides sentences into words separated by spaces
cut_text = ' '.join(jieba.cut(str_rebang))
print(cut_text)

#Font library location, which font is used when displaying word cloud
font_path = r'D:\fang_zheng_zitiku\FZSSJW.TTF'

#Location of word cloud background map
background_jpg_path = r'D:\python_pachong_csdn_rebang\Word cloud background picture\Word cloud background figure 2.jpg'
#Generate background map
background_image = np.array(Image.open(background_jpg_path))

#To form a word cloud, mask is the parameter size to obtain the background image
wordcloud =WordCloud(font_path,background_color="white",mask=background_image).generate(cut_text)


# Generate color values
image_colors = ImageColorGenerator(background_image)


#Draw word cloud
plt.imshow(wordcloud.recolor(color_func=image_colors), interpolation="bilinear")
#Close axis
plt.axis("off")
#Drawing display
plt.show()
Full code:
import requests
from lxml import etree
#Drawing image module
import matplotlib.pyplot as plt
#jieba plays the role of word segmentation
import jieba
#When you download wordcloud, you automatically download pIL and numpy
from PIL import Image

import numpy as np

from wordcloud import WordCloud, ImageColorGenerator

csdn_python_url='https://blog.csdn.net/nav/python'
headers={'User-Agent':'Mozilla/5.0 (Windows NT 10.0; Win64; x64) AppleWebKit/537.36 (KHTML, like Gecko) Chrome/95.0.4638.69 Safari/537.36'}
python_yemian=requests.get(url=csdn_python_url,headers=headers)
python_yemian.encoding="utf-8"
#lxml is introduced here, and etree can be used as html to crawl down the text text
html = etree.HTML(python_yemian.text)
#name
#list_ Rebang text is followed by a list
list_rebang=html.xpath('//ul[@id="feedlist_id"]/li/div/div/h2/a/text()')
#Convert list to string
str_rebang=''.join(list_rebang)
#Replace spaces with strings
str_rebang=str_rebang.replace(' ','')
#print(str_rebang)

#jieba word segmentation divides sentences into words separated by spaces
cut_text = ' '.join(jieba.cut(str_rebang))
print(cut_text)

#Font library location
font_path = r'D:\fang_zheng_zitiku\FZSSJW.TTF'

#Location of word cloud background map
background_jpg_path = r'D:\python_pachong_csdn_rebang\Word cloud background picture\Word cloud background figure 2.jpg'

background_image = np.array(Image.open(background_jpg_path))

#Constituent word cloud
wordcloud =WordCloud(font_path,background_color="white",mask=background_image).generate(cut_text)
#Draw word cloud
#interpolation="bilinear" I can't understand bilinear interpolation...


# Generate color values
image_colors = ImageColorGenerator(background_image)


plt.imshow(wordcloud.recolor(color_func=image_colors), interpolation="bilinear")
#Close axis
plt.axis("off")
#Drawing display
plt.show()
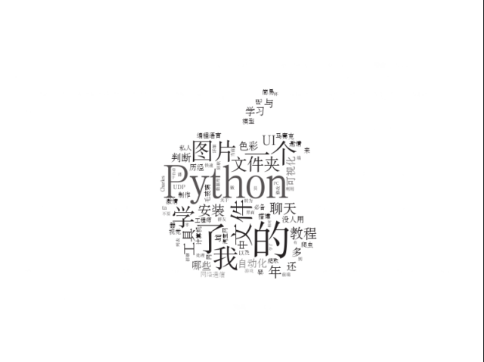
design sketch:

It's not easy for newcomers to create. I think it's good to watch the official. Give me a praise, mmda!!!
Reprint indicate the source!
