Overall scheme of dispatching center
XXL job transformation
target
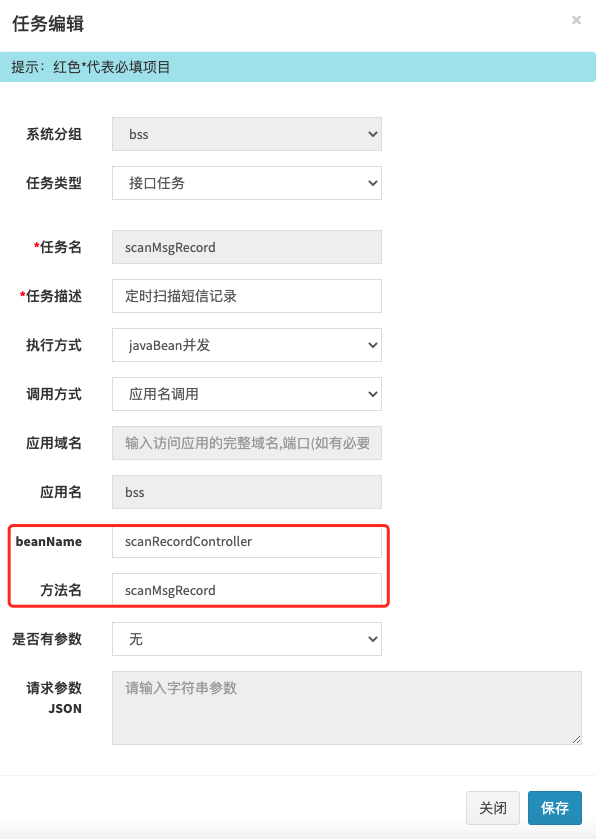
Our dispatching center is generally built in the spring environment. The native support scheme of XXXL job requires @ xxxjob ("xxx") annotation. However, our self-developed scheduling center supports scheduling by configuring beans and bean methods (methods can be parameterized, but can only be String types). The configuration diagram is as follows:
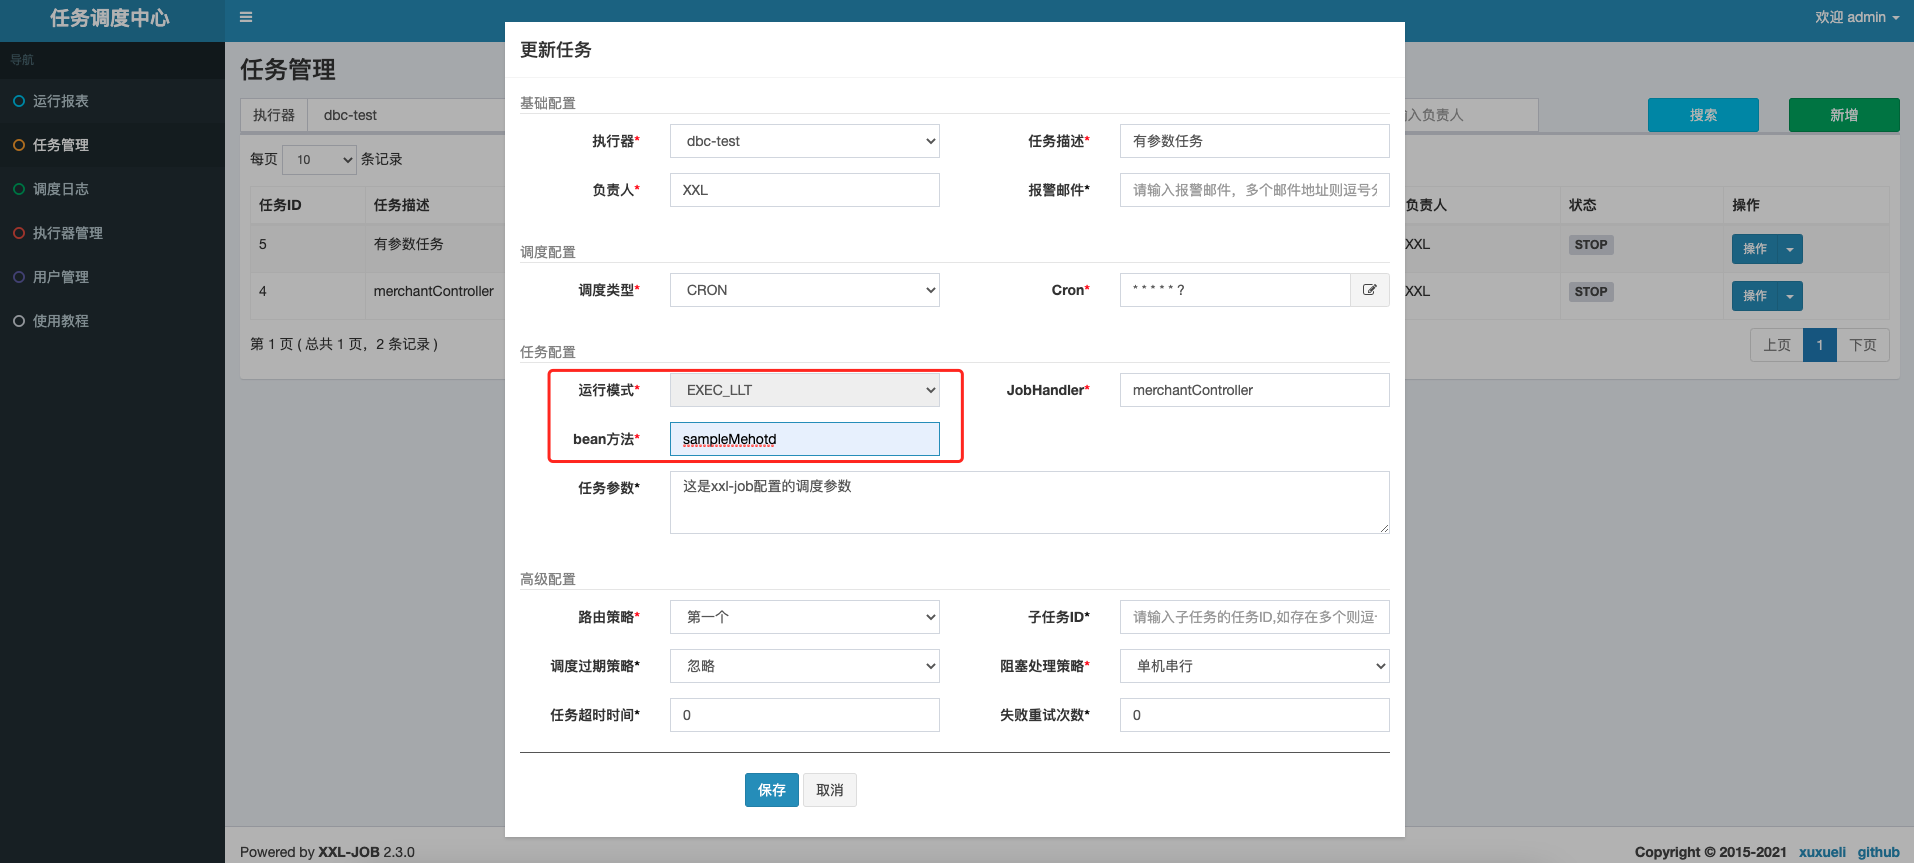
Therefore, we try to transform XXXL job and add a scheduling type so that it can directly schedule the bean method without adding @ xxxjob ("xxx") annotation. The overall effect is shown in the figure below:
admin page &db modification
As shown in the figure above, you need to add
-
XXL of db_ job_ Info, add field: handler_method varchar(255) DEFAULT '' COMMENT 'called bean method'
-
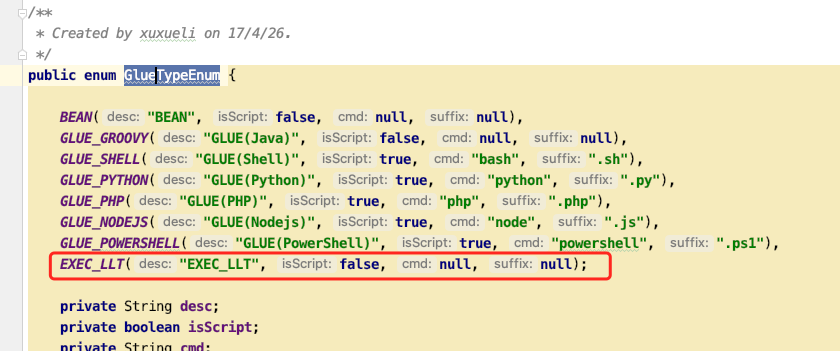
Task configuration - > operation mode, add an "exec"_ LLT "type: com.xxl.job.core.glue.gluetyenum
-
If exec is selected_ LLT "type, to display the" bean method "input box to enter the method
Changes to the above code can be viewed through the clone Code: https://gitee.com/kelvin11/xxl-job
Key modified codes
admin added "exec"_ Scheduling support for type LLT
Here, you can mainly find out where to modify from the scheduling entry. You can click "execute once" on the page to see which interface of the backend admin is triggered (answer: / jobinfo/trigger)
com.xxl.job.admin.controller.JobInfoController#triggerJob
com.xxl.job.admin.core.thread.JobTriggerPoolHelper#trigger
com.xxl.job.admin.core.trigger.XxlJobTrigger#trigger
com.xxl.job.admin.core.trigger.XxlJobTrigger#processTrigger
com.xxl.job.admin.core.trigger.XxlJobTrigger#runExecutor
com.xxl.job.core.biz.client.ExecutorBizClient#run
XxlJobRemotingUtil.postBody(addressUrl + "run", accessToken, timeout, triggerParam, String.class);
Along the way, you can see that in fact, the final admin calls the execution of the executor through an http call. The parameter examples of this call are as follows:
http://localhost:9999/run

{
    "jobId": 1,
    "executorHandler": "sampleLltJob",
    "handlerMethod": "execLltSample",-------This is the newly added parameter in this transformation
    "executorParams": "hello parameters~",
    "executorBlockStrategy": "SERIAL_EXECUTION",
    "executorTimeout": 0,
    "logId": 11,
    "logDateTime": 1637041633591,
    "glueType": "EXEC-LLT",
    "glueSource": "",
    "glueUpdatetime": 1541254891000,
    "broadcastIndex": 0,
    "broadcastTotal": 1
}
The core of the modification should be how to execute the request after the executor receives it.
executor added "exec"_ Scheduling support for type LLT
How does the executor receive requests? Let's look for the keyword / run and find it here: com.xxl.job.core.server.EmbedServer.EmbedHttpServerHandler#channelRead0. It is obvious that this is a server created by netty. By default, it is the port 9999 configured in the configuration file.
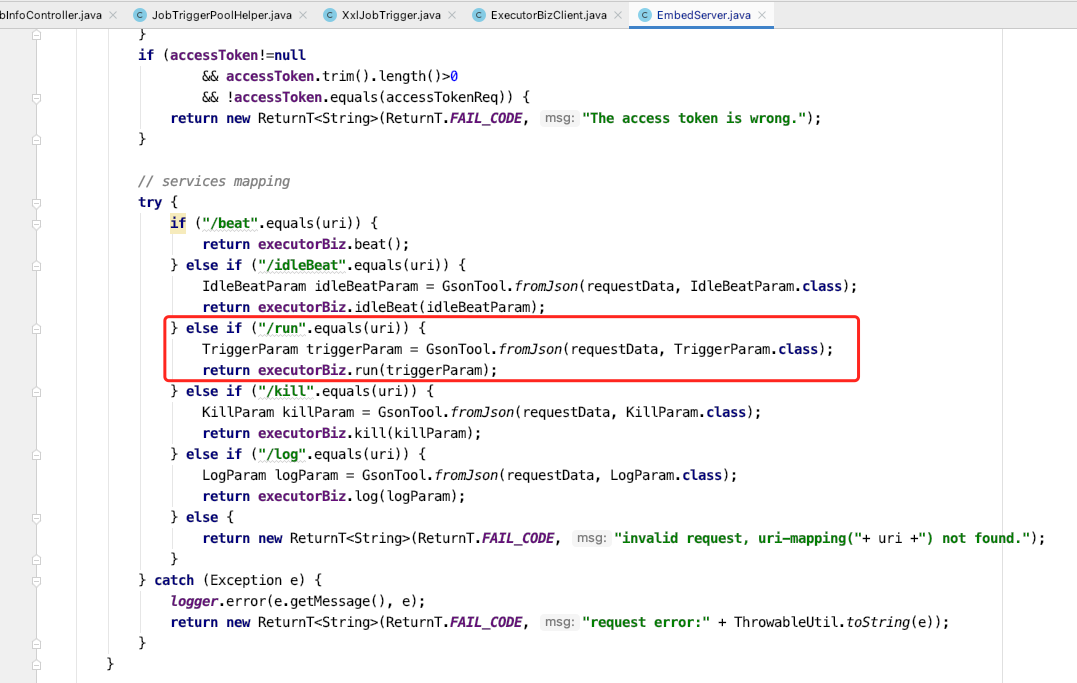
In order to minimize the transformation, we still use the / run method to receive the request and add a new processing method. Here is the focus of the transformation.
com.xxl.job.core.biz.impl.ExecutorBizImpl#run
Originally, we wanted to get an IJobHandler. We can see the implementation class. Originally, there were three. We aimed at "exec"_ LLT "type, a new implementation class is added.

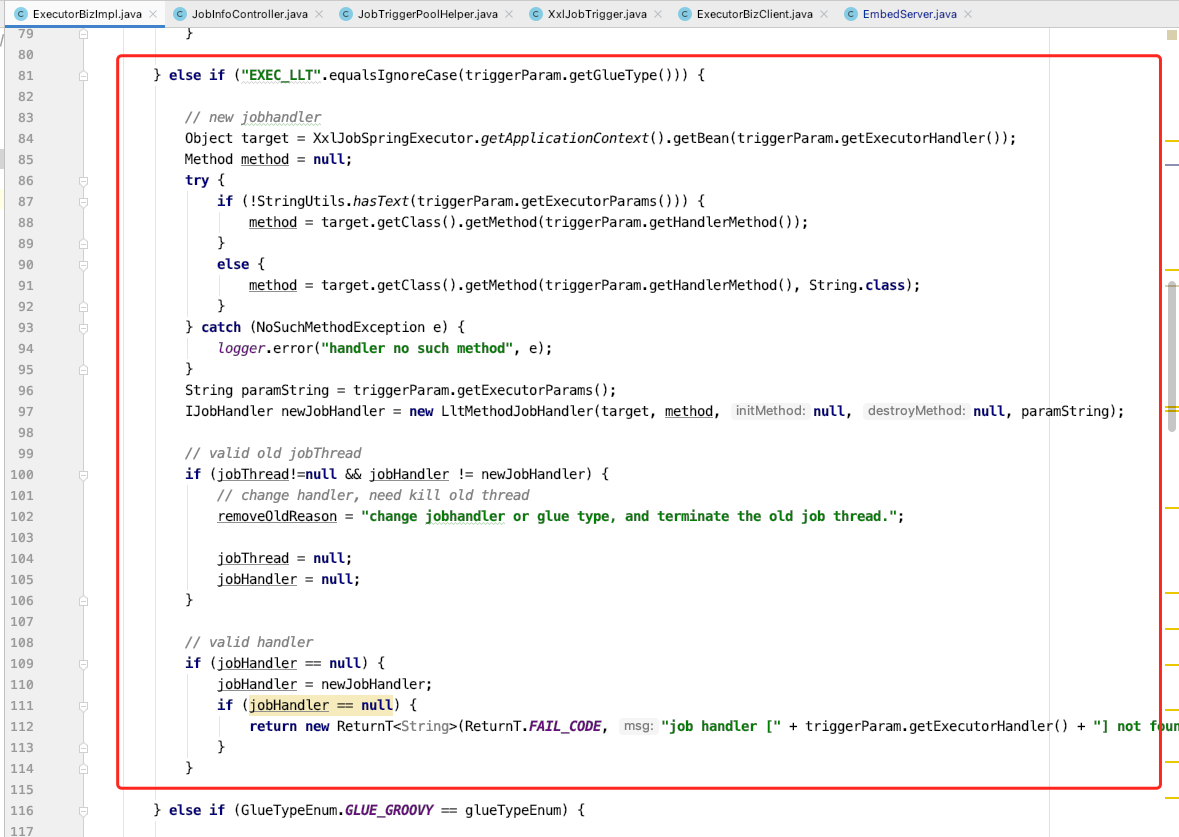
Through reflection, we find the corresponding called class and method according to TriggerParam, and then generate the LltMethodJobHandler object. The core code is as follows:
// new jobhandler
Object target = XxlJobSpringExecutor.getApplicationContext().getBean(triggerParam.getExecutorHandler());
Method method = null;
try {
    if (!StringUtils.hasText(triggerParam.getExecutorParams())) {
        method = target.getClass().getMethod(triggerParam.getHandlerMethod());
    }
    else {
        method = target.getClass().getMethod(triggerParam.getHandlerMethod(), String.class);
    }
} catch (NoSuchMethodException e) {
    logger.error("handler no such method", e);
}
String paramString = triggerParam.getExecutorParams();
IJobHandler newJobHandler = new LltMethodJobHandler(target, method, null, null, paramString);
The newly added com.xxl.job.core.handler.impl.LltMethodJobHandler code is not complex. It is basically the same as the original, that is, it adds reflection calls instead of executing the methods found through the original annotations.
package com.xxl.job.core.handler.impl;

import com.xxl.job.core.handler.IJobHandler;
import org.springframework.util.StringUtils;

import java.lang.reflect.Method;

/**
 * @author liukun
 */
public class LltMethodJobHandler extends IJobHandler {

    private final Object target;
    private final Method method;
    private Method initMethod;
    private Method destroyMethod;
    private String paramString;

    public LltMethodJobHandler(Object target, Method method, Method initMethod, Method destroyMethod, String paramString) {
        this.target = target;
        this.method = method;

        this.initMethod = initMethod;
        this.destroyMethod = destroyMethod;

        this.paramString = paramString;
    }

    @Override
    public void execute() throws Exception {
        if (!StringUtils.hasText(paramString)) {
            method.invoke(target);
        }
        else {
            method.invoke(target, paramString);
        }
        /*Class<?>[] paramTypes = method.getParameterTypes();
        if (paramTypes.length > 0) {
            method.invoke(target, new Object[paramTypes.length]);       // method-param can not be primitive-types
        } else {
            method.invoke(target);
        }*/
    }

    @Override
    public void init() throws Exception {
        if(initMethod != null) {
            initMethod.invoke(target);
        }
    }

    @Override
    public void destroy() throws Exception {
        if(destroyMethod != null) {
            destroyMethod.invoke(target);
        }
    }

    @Override
    public String toString() {
        return super.toString()+"["+ target.getClass() + "#" + method.getName() +"]";
    }
}
So far, the transformation of our admin and executor has been completed. The following is to jar the executor and put it into the project to run.
Because we use the docker environment and the swam overlay network, we have a question here: what is the ip obtained by the executor? Can admin call the executor normally?
deploy
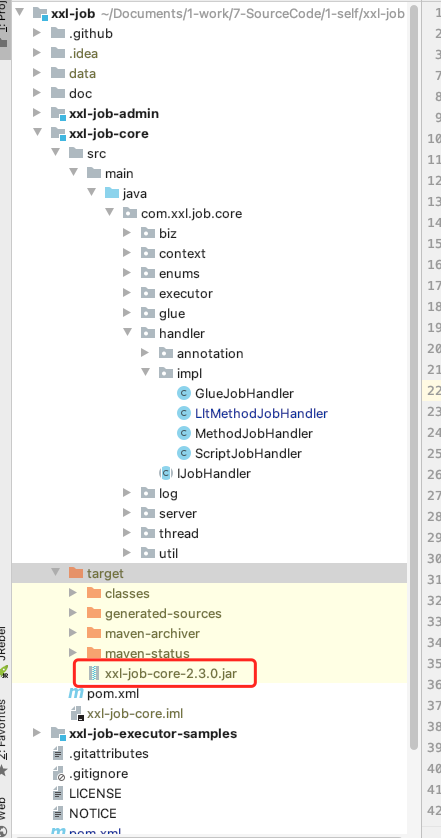
Execute jar package
This is relatively simple. Package XXL job directly, and then find the corresponding jar package under the target directory of XXL job core
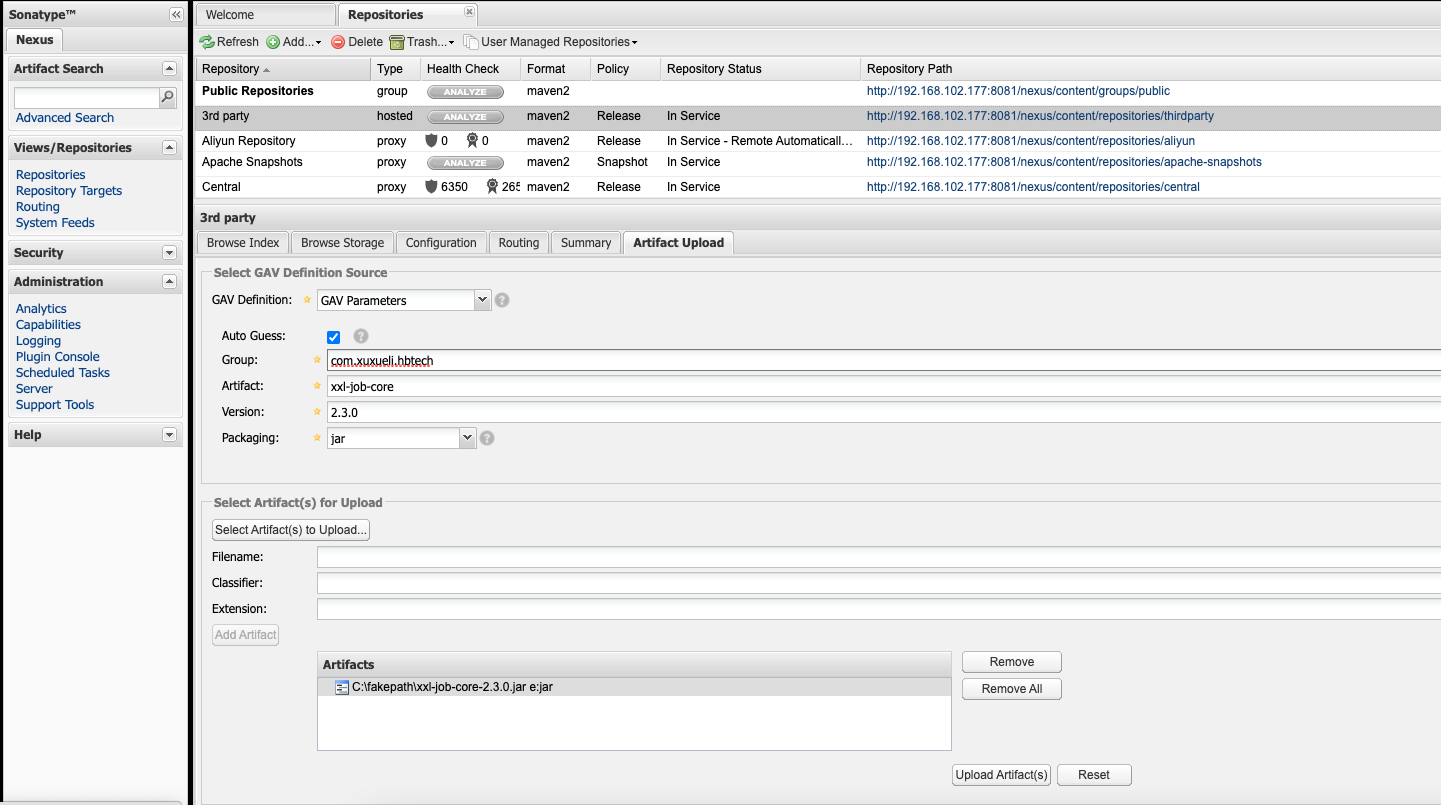
Upload the jar package of the executor to the nexus private server
Introducing in dbc project
Introduction of executor in maven
<dependency>
  <groupId>com.xuxueli.hbtech</groupId>
  <artifactId>xxl-job-core</artifactId>
  <version>2.3.0</version>
</dependency>
Add the properties configuration of XXL job
### xxl-job admin address list, such as "http://address" or "http://address01,http://address02"
xxl.job.admin.addresses=http://172.18.102.116:8080/xxl-job-admin

### xxl-job, access token
xxl.job.accessToken=

### xxl-job executor appname
xxl.job.executor.appname=dbc-test
### xxl-job executor registry-address: default use address to registry , otherwise use ip:port if address is null
xxl.job.executor.address=
### xxl-job executor server-info
xxl.job.executor.ip=
xxl.job.executor.port=9999
### xxl-job executor log-path
xxl.job.executor.logpath=./data/applogs/xxl-job/jobhandler
### xxl-job executor log-retention-days
xxl.job.executor.logretentiondays=30

logging.config=classpath:logback.xml
Add configuration of XXL job
package com.hbtech.dbc.common.config;

import com.xxl.job.core.executor.impl.XxlJobSpringExecutor;
import org.slf4j.Logger;
import org.slf4j.LoggerFactory;
import org.springframework.beans.factory.annotation.Value;
import org.springframework.context.annotation.Bean;
import org.springframework.context.annotation.Configuration;

/**
 * xxl-job config
 *
 * @author liukun 2017-04-28
 */
@Configuration
public class XxlJobConfig {
    private Logger logger = LoggerFactory.getLogger(XxlJobConfig.class);

    @Value("${xxl.job.admin.addresses}")
    private String adminAddresses;

    @Value("${xxl.job.accessToken}")
    private String accessToken;

    @Value("${xxl.job.executor.appname}")
    private String appname;

    @Value("${xxl.job.executor.address}")
    private String address;

    @Value("${xxl.job.executor.ip}")
    private String ip;

    @Value("${xxl.job.executor.port}")
    private int port;

    @Value("${xxl.job.executor.logpath}")
    private String logPath;

    @Value("${xxl.job.executor.logretentiondays}")
    private int logRetentionDays;


    @Bean
    public XxlJobSpringExecutor xxlJobExecutor() {
        logger.info(">>>>>>>>>>> xxl-job config init.");
        XxlJobSpringExecutor xxlJobSpringExecutor = new XxlJobSpringExecutor();
        xxlJobSpringExecutor.setAdminAddresses(adminAddresses);
        xxlJobSpringExecutor.setAppname(appname);
        xxlJobSpringExecutor.setAddress(address);
        xxlJobSpringExecutor.setIp(ip);
        xxlJobSpringExecutor.setPort(port);
        xxlJobSpringExecutor.setAccessToken(accessToken);
        xxlJobSpringExecutor.setLogPath(logPath);
        xxlJobSpringExecutor.setLogRetentionDays(logRetentionDays);

        return xxlJobSpringExecutor;
    }

    /**
     * For multiple network cards and internal deployment of containers, the registered IP can be flexibly customized with the help of the "InetUtils" component provided by "spring cloud commons";
     *
     *      1,Import dependency:
     *          <dependency>
     *             <groupId>org.springframework.cloud</groupId>
     *             <artifactId>spring-cloud-commons</artifactId>
     *             <version>${version}</version>
     *         </dependency>
     *
     *      2,Configuration file, or container startup variable
     *          spring.cloud.inetutils.preferred-networks: 'xxx.xxx.xxx.'
     *
     *      3,Get IP
     *          String ip_ = inetUtils.findFirstNonLoopbackHostInfo().getIpAddress();
     */


}
The dbc project is packaged in jar
<build>
    <plugins>
        <plugin>
            <groupId>org.apache.maven.plugins</groupId>
            <artifactId>maven-compiler-plugin</artifactId>
            <configuration>
                <source>1.8</source>
                <target>1.8</target>
                <encoding>UTF-8</encoding>
            </configuration>
        </plugin>

        <plugin>
            <groupId>org.springframework.boot</groupId>
            <artifactId>spring-boot-maven-plugin</artifactId>
            <configuration>
                <fork>true</fork>
            </configuration>
        </plugin>
    </plugins>
</build>
Create docker swarm overlay environment
We have two virtual machines to test, 172.18.102.116 and 172.18.102.134 respectively.
-
Anti stepping pit
In order to prevent stepping on the pit, first open the firewall and open some necessary ports (both machines need to execute)
systemctl restart firewalld.service
firewall-cmd --zone=public --add-port=7946/tcp --permanent
firewall-cmd --zone=public --add-port=7946/udp --permanent
firewall-cmd --zone=public --add-port=4789/udp --permanent
firewall-cmd --zone=public --add-port=4789/tcp --permanent
firewall-cmd --zone=public --add-port=2375/tcp --permanent
firewall-cmd --zone=public --add-port=2375/udp --permanent
firewall-cmd --zone=public --add-port=2377/udp --permanent
firewall-cmd --zone=public --add-port=2377/tcp --permanent
firewall-cmd --zone=public --add-port=8080/tcp --permanent
firewall-cmd --zone=public --add-port=9999/tcp --permanent
firewall-cmd --reload
If not, you may encounter some strange problems, such as:
-
The overlay network is created. On the work machine, the container application cannot join the network
[root@server3 ~]# docker run -itd --name=busybox2 --network=testnetwork busybox /bin/sh
Unable to find image 'busybox:latest' locally
latest: Pulling from library/busybox
e685c5c858e3: Pull complete
Digest: sha256:e7157b6d7ebbe2cce5eaa8cfe8aa4fa82d173999b9f90a9ec42e57323546c353
Status: Downloaded newer image for busybox:latest
1d2f47a82445a946ea78c44058baf1fe21c5f3204bc484197139b0808842c50d
docker: Error response from daemon: attaching to network failed, make sure your network options are correct and check manager logs: context deadline exceeded.
-
When starting the container application, report firewall related problems
[root@116 xxl]# docker run -itd --name xxladmin -p 8080:8080 --network=testnetwork5 xxladmin1.0
c3d9f1a5a62c50aee388364306ba575aa0b5a59fbc85c5408b2040b7a3250ff5
docker: Error response from daemon: container c3d9f1a5a62c50aee388364306ba575aa0b5a59fbc85c5408b2040b7a3250ff5: endpoint join on GW Network failed: driver failed programming external connectivity on endpoint gateway_79cd50cb1a80 (0f8dc70541f22f02d3e89832e929dfc18ffcac3d15ed563a6f7c2b464bdb9111):  (iptables failed: iptables --wait -t nat -A DOCKER -p tcp -d 0/0 --dport 8080 -j DNAT --to-destination 172.31.0.4:8080 ! -i br-167a79121a6e: iptables: No chain/target/match by that name.
 (exit status 1)).
-
-
Create swarm manager on 116
root@116 xxl]# docker swarm init --advertise-addr 172.18.102.116
Swarm initialized: current node (nvb5j0no5xzsz7kp9hue2by9f) is now a manager.

To add a worker to this swarm, run the following command:

    docker swarm join --token SWMTKN-1-2zv0qv7nkownkvrojs3jhipjg5jnjmsod1i6ihy2l8ppw6cine-bdjj76p0xaavdnjfjha5ek8n8 172.18.102.116:2377

To add a manager to this swarm, run 'docker swarm join-token manager' and follow the instructions.
-
Then execute the docker swarm join command on 134
-
Create overlay network on 116
docker network create -d overlay --attachable my-network5
After execution, this network information will also be available on 134.
Deploy XXL job admin
Upload xxl-job-admin-2.3.0.jar
Create Dockerfile for admin
FROM java:8
MAINTAINER KelvinLiu
ADD xxl-job-admin-2.3.0.jar xxl-job-admin-2.3.0.jar
EXPOSE 8080
ENTRYPOINT ["java","-jar","xxl-job-admin-2.3.0.jar"]
Build the docker image of admin
docker build -t xxladmin1.0 .
Build the docker container of admin
docker run -itd --name xxladmin -p 8080:8080 --network=testnetwork5 xxladmin1.0
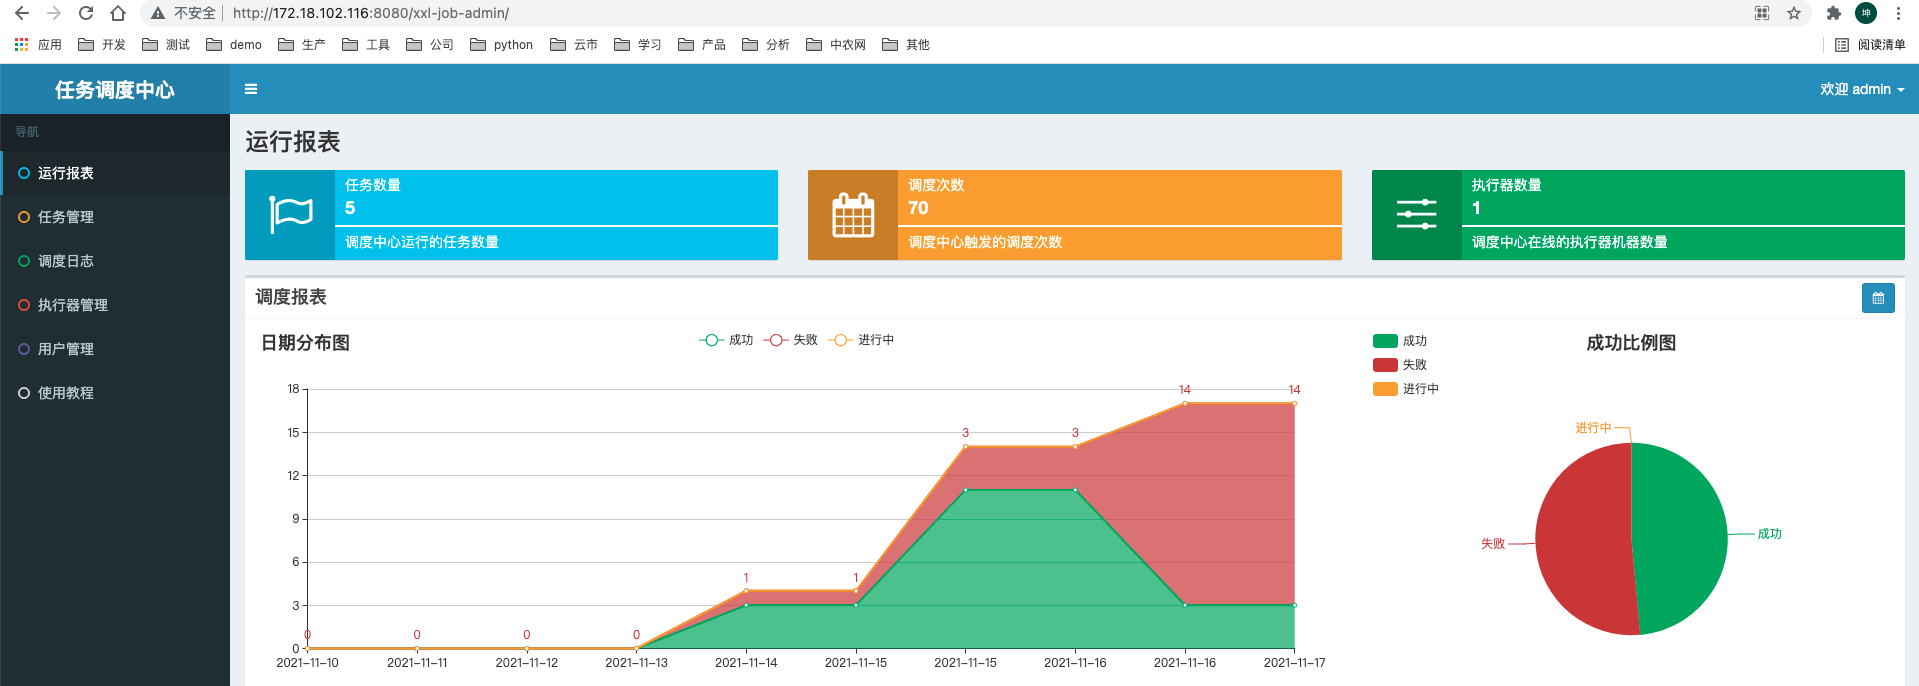
Access admin
http://172.18.102.116:8080/xxl-job-admin/
Deploy dbc with XXL job executor
Upload dbc.jar
Create Dockerfile for dbc
FROM java:8
MAINTAINER KelvinLiu
ADD dbc.jar dbc.jar
EXPOSE 9999
ENTRYPOINT ["java","-jar","dbc.jar"]
Build docker image of dbc
docker build -t dbc1.0 .
Building docker container for dbc
docker run -itd --name dbc -p 9999:9999 --network=testnetwork5 dbc1.0
Check whether the executor on admin is automatically registered
The premise is to build the executor first (don't fill it in blue). Otherwise, even if the dbc is started, the executor will not be automatically created. It is understood here that the executor should be built by itself. If the names are the same, when the dbc is started, admin will update the ip of the dbc executor through the automatically running thread.
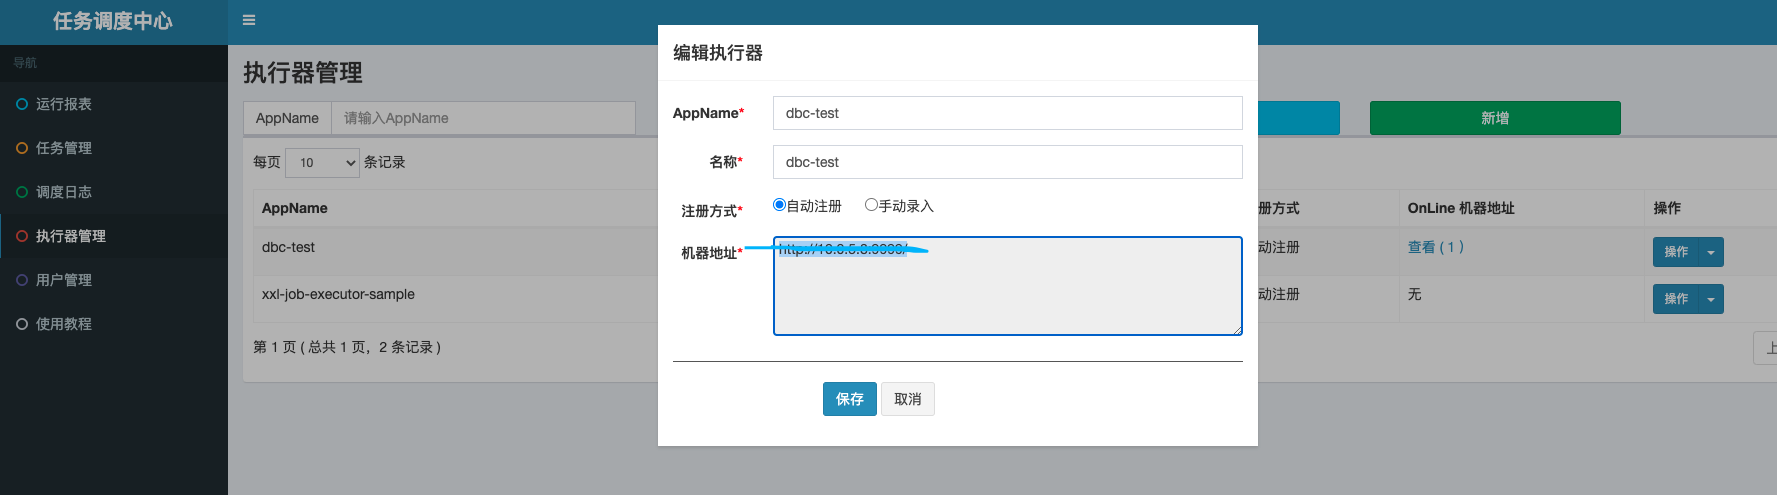
In fact, from the above figure, you can see that the automatically registered actuator machine address is the IP address of the container
Execute once
It will not be explained here. During execution, the admin machine calls the ip:9999 port of the dbc container and overlay s the network to ensure that the two containers can be called through IP.