What is canvas
In web pages, we also call the special area for drawing graphics as "canvas". Web designers can draw their own graphic styles in this area.
How to use canvas
1. Create canvas
Use the canvas tag in HTML5 to create a canvas in a web page.
Basic syntax format:
<canvas id="Canvas name" width="numerical value" height="numerical value">
	Your browser does not support canvas
</canvas>
2. Get canvas
To control the canvas in JavaScript, first get the canvas. Use the getElementById() method to get the canvas object in the web page.
jib syntax format:
var canvas = document.getElementById('cavs');
3. Prepare brush
After you have the canvas, you need to prepare a brush to start drawing. This brush is the context object. The context object, also known as the drawing environment, allows you to draw graphics on the canvas.
Basic syntax format:
canvas.getContext('2d');
In JavaScript, we usually define a variable to save the obtained context object.
var context = canvas.getContext('2d');
4. Determine initial position
When drawing graphics, we first need to determine where to place the "pen", and the position of the "pen" is the initial position. In the plane (2d), the initial position can be represented by the coordinate axis of "x, y". In the canvas, starting from the top left corner "0,0", the X axis increases to the right and the y axis increases downward.
Basic syntax format:
context.moveTo(100,100);
5. Connection endpoint
Line endpoint is used to define an endpoint and draw a line from the endpoint to the initial position. Use the lineTo(x,y) method in the canvas to define the line endpoint.
Basic syntax format:
context.lineTo(100,100);
6. Stroke
A line can be drawn through the initial position and the end of the line, but the line cannot be seen. At this point, we need to add stroke to the line to make it visible. Using the stroke() method in the canvas, you can achieve the visual effect of lines.
Basic syntax format:
context.stroke();
Line style
1. Width
Use the lineWidth attribute in the canvas to define the width of the line. The value of this attribute is a numerical value (without unit), measured in pixels.
Basic syntax format:
context.lineWidth='10';
2. Stroke color
Use the strokeStyle attribute in the canvas to define the stroke color of the line. The value of this attribute is hexadecimal color value or English color value.
Basic syntax format:
context.strokeStyle='red';
3. End shape
By default, the endpoint of the line is square. The shape of the endpoint can be changed through the lineCap attribute in the canvas.
Basic syntax format:
lineCap='Attribute value'
| Attribute value | Display effect |
|---|---|
| But (default) | The default effect, no end points, displays straight lines and square edges. |
| round | Displays the end of the circle. |
| square | Displays the end of the square. |
Path of line
1. Reset path
In the same canvas, no matter how many connection endpoints we add, there can only be one path. If you want to start a new path, you need to use the beginPath() method. When beginPath() appears, it means that the path starts again.
Basic syntax format:
ctx.beginPath();
2. Closed path
Closed path is to close the open path drawn by us. After the multi-point path is closed, it will form a specific shape. In the canvas, use the closePath() method to close the path.
Basic syntax format:
ctx.closePath();
3. Fill path
Generates a solid shape by filling the content area of the path.
Basic syntax format:
ctx.fillStyle = '#ff0'
ctx.fill();
Drawing method of circle
In the canvas, use the arc() method to draw circles or arcs.
Basic syntax format:
arc(x,y,r,Start angle,End angle,direction)
x and y: x and y represent the coordinate position of the center of the circle on the x and y axes.
r: Represents the radius of a circle or arc that determines the size of the drawing.
Start angle: indicates the position of the initial arc point. The arc point is represented by numerical value and "Math.PI" (PI, which can be understood as 180 degrees).
End angle: the position of the end arc point, and the setting method of the initial angle is the same.
Direction: divided into clockwise and counterclockwise.
Smiley face drawing exercise
The effects are as follows:
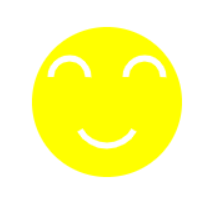
Code implementation:
<!DOCTYPE html>
<html lang="en">
<head>
    <meta charset="UTF-8">
    <meta http-equiv="X-UA-Compatible" content="IE=edge">
    <meta name="viewport" content="width=device-width, initial-scale=1.0">
    <title>Document</title>
</head>
<body>
    <canvas id="cas" width="400" height="400"></canvas>
    <script type="text/javascript">
    var ctx = document.getElementById("cas").getContext('2d');
    ctx.beginPath();
    ctx.arc(100,100,60,0,2*Math.PI,true);
    ctx.closePath();
    ctx.fillStyle = '#ff0';
    ctx.fill();

    ctx.beginPath();
    ctx.strokeStyle = '#fff';
    ctx.lineWidth = 5;
    ctx.arc(100,110,25,Math.PI/6,5*Math.PI/6,false);
    ctx.stroke();

    ctx.beginPath();
    ctx.strokeStyle = '#fff';
    ctx.lineWidth = 5;
    ctx.arc(70,80,15,Math.PI/400,5*Math.PI/1,true);
    ctx.stroke();

    ctx.beginPath();
    ctx.strokeStyle = '#fff';
    ctx.lineWidth = 5;
    ctx.arc(130,80,15,Math.PI/400,5*Math.PI/1,true);
    ctx.stroke();
    </script>
</body>
</html>
Matchmaker drawing exercise
The effects are as follows:
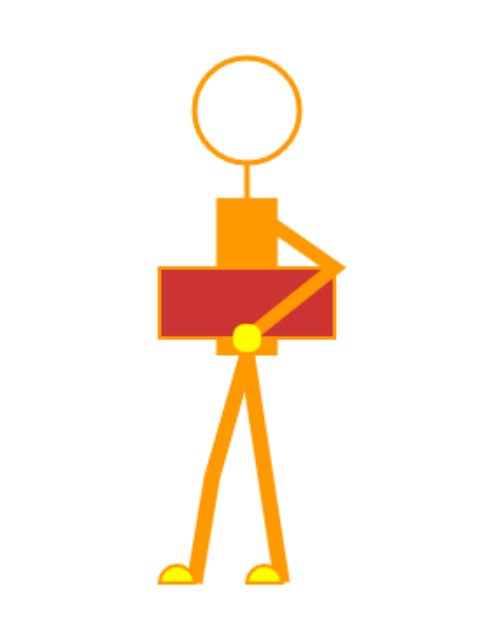
Code implementation:
<!DOCTYPE html>
<html lang="en">
<head>
    <meta charset="UTF-8">
    <meta http-equiv="X-UA-Compatible" content="IE=edge">
    <meta name="viewport" content="width=device-width, initial-scale=1.0">
    <title>Document</title>
</head>
<body>
    <canvas id="cas" width="1000" height="600"></canvas>
    <script type="text/javascript">
    var ctx = document.getElementById('cas').getContext('2d');

    //head

    ctx.beginPath();
    ctx.arc(400,110,30,0,2*Math.PI,true);
    ctx.closePath();
    ctx.strokeStyle = '#ff9900';
    ctx.lineWidth = '3';
    ctx.stroke();
    //neck
    ctx.beginPath();
    ctx.moveTo(400,140);
    ctx.lineTo(400,160);
    ctx.lineWidth = 3;
    ctx.stroke();
    //body
    ctx.beginPath();
    ctx.moveTo(400,160);
    ctx.lineTo(400,250);
    ctx.lineWidth = 35;
    ctx.stroke();
    //folder
    ctx.beginPath();
    ctx.moveTo(350,200);
    ctx.lineTo(350,240);
    ctx.lineTo(450,240);
    ctx.lineTo(450,200);
    ctx.closePath();
    ctx.fillStyle = '#cc3333';
    ctx.fill();
    ctx.lineWidth = 2;
    ctx.stroke();

    //Arms
    ctx.beginPath();
    ctx.moveTo(400,165);
    ctx.lineTo(450,200);
    ctx.lineTo(400,240);
    ctx.lineWidth = 8;
    ctx.stroke();
    //Palm
    ctx.beginPath();
    ctx.arc(400,240,8,0,2*Math.PI,true);
    ctx.fillStyle = '#ff0';
    ctx.fill();
    //Legs
    ctx.beginPath();
    ctx.moveTo(400,250);
    ctx.lineTo(380,320);
    ctx.lineTo(370,380);
    ctx.lineWidth = 9;
    ctx.stroke();

    ctx.beginPath();
    ctx.moveTo(400,250);
    ctx.lineTo(420,380);
    ctx.lineWidth = 9;
    ctx.stroke();
    //foot
    ctx.beginPath();
    ctx.arc(360,380,10,0,1*Math.PI,true);
    ctx.closePath();
    ctx.fillStyle = '#ff0'
    ctx.fill();
    ctx.lineWidth = '2';
    ctx.stroke();

    ctx.beginPath();
    ctx.arc(410,380,10,0,1*Math.PI,true);
    ctx.closePath();
    ctx.fillStyle = '#ff0'
    ctx.fill();
    ctx.lineWidth = '2';
    ctx.stroke();

    </script>
</body>
</html>
Summary:
The use of canvas is divided into five parts:
1. Get canvas
2. Get brush
3. Determine starting point
4. Determine end point
5. Stroke