There is no doubt that you are born worthy of love.
catalogue
2. Analyze interface documents
(1) Freeze and unfreeze interface
3. Reference UI to write front-end pages
(2) List and complex operations
4. Freezing and thawing function
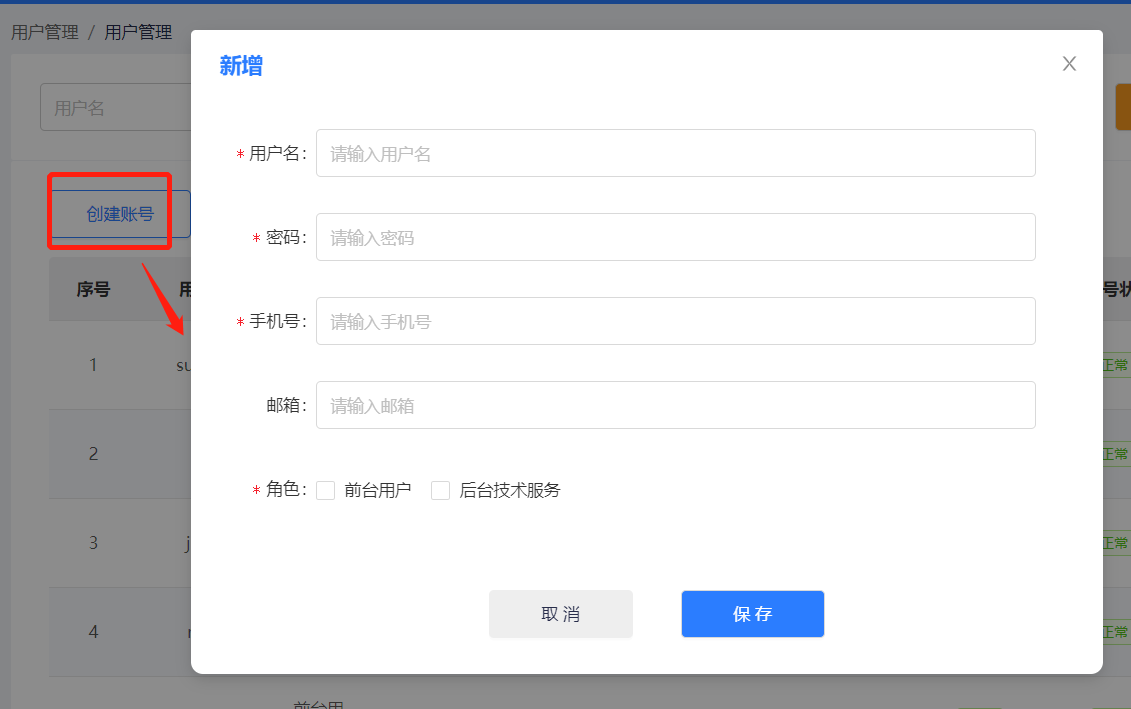
(1) Click "create account" to pop up the pop-up box
(2) Click "add" to call the interface
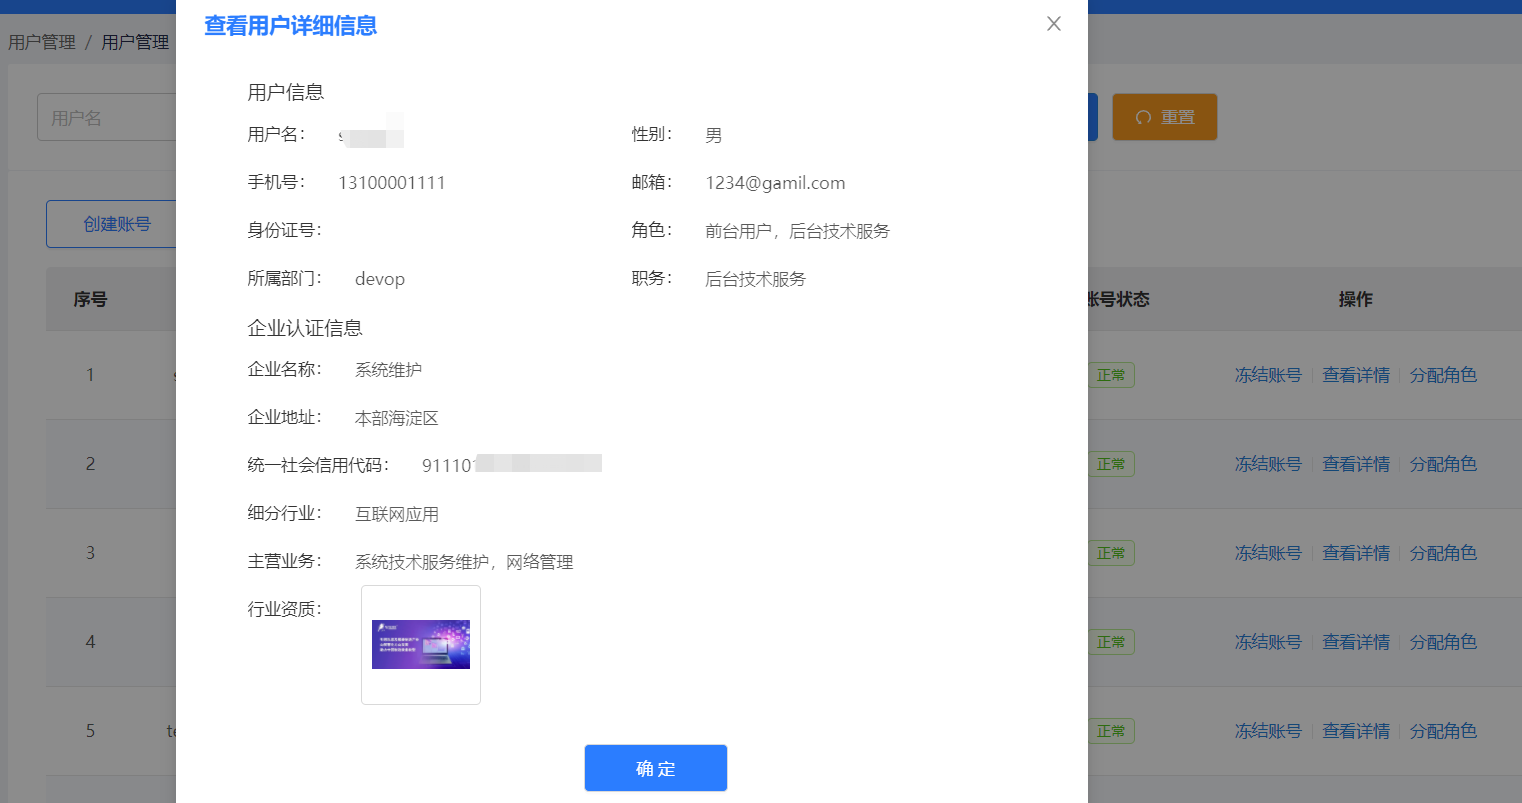
(1) Click to view the details, and a pop-up box will appear
(3) Processing of picture display
1. See the page effect
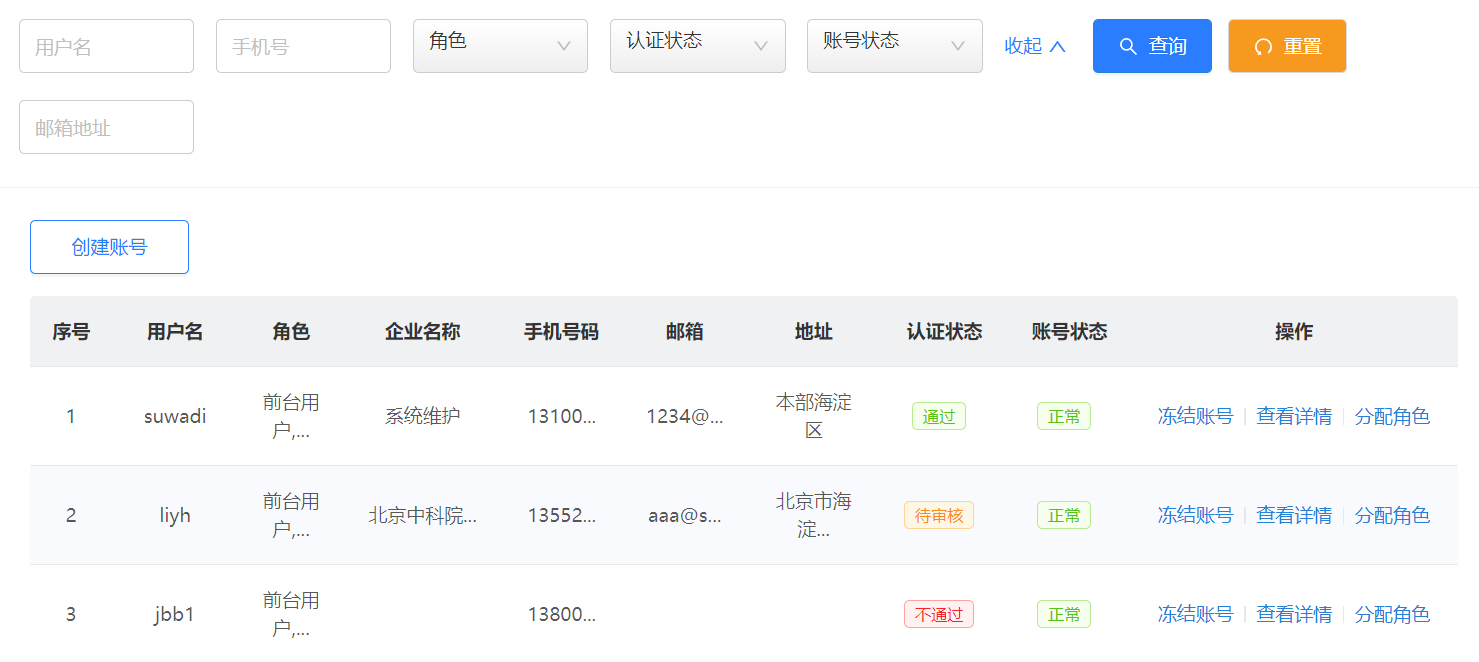


Function summary:
(1) Expansion and collapse of query bar [React introduction practice] expand - collapse function of complex search form_ Sabrina_cc blog - CSDN blog
(2) Page list display data [React introduction practice] combined with ant design, you can develop a simple [user management] page including [list] and [search bar] from 0_ Sabrina_cc blog - CSDN blog
(3) The list corresponds to the display of different labels and the display of operations by situation
(3) View details - you need to click the event transfer parameter to query the display of the user's details
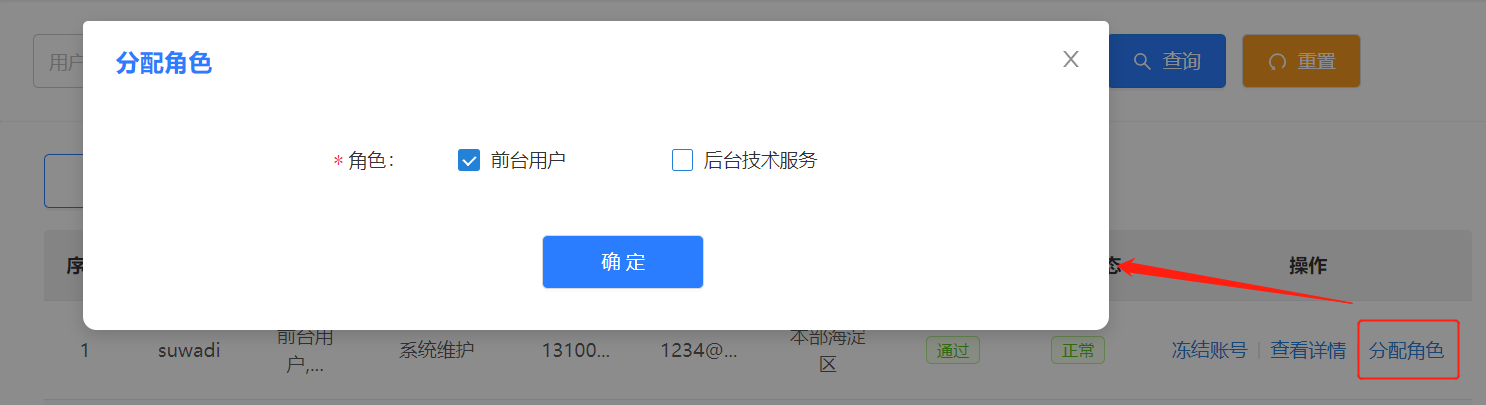
(4) Freeze / unfreeze account number-- Switch operation
(5) Create an account - pop up the box to create a new one and verify it. Refresh the list after creating a new one
2. Analyze interface documents
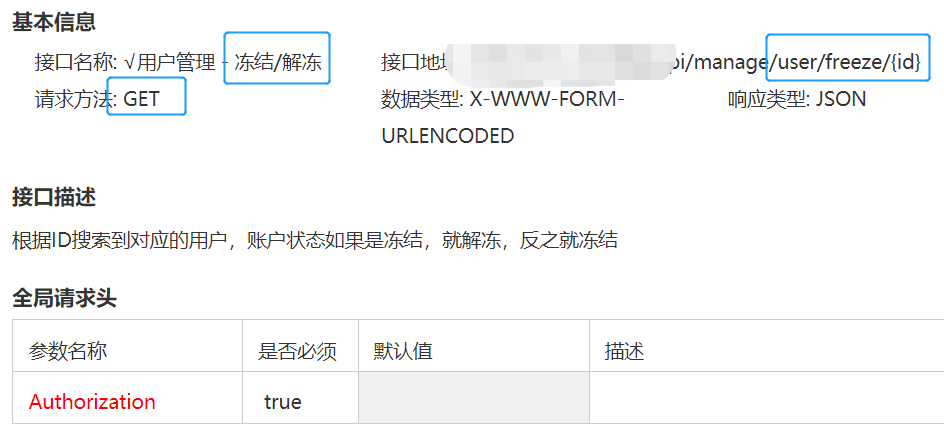
(1) Freeze and unfreeze interface
To change the interface, you only need to pass in the corresponding id of the account, and the back-end implements the reverse operation. The front end only needs to handle the display
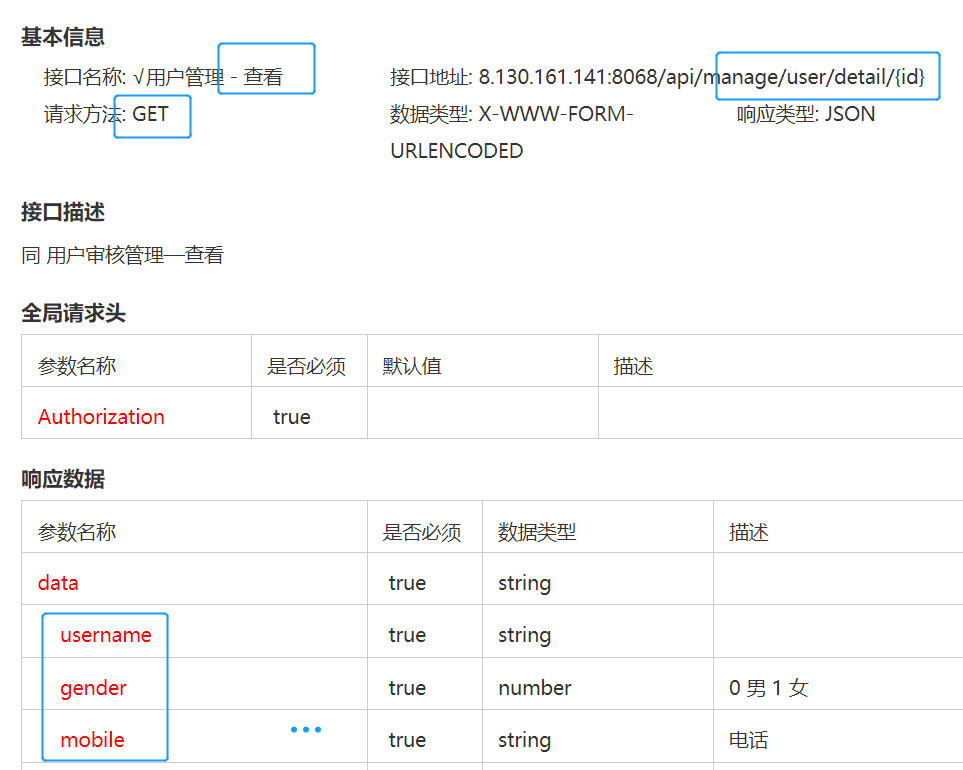
(2) View details interface
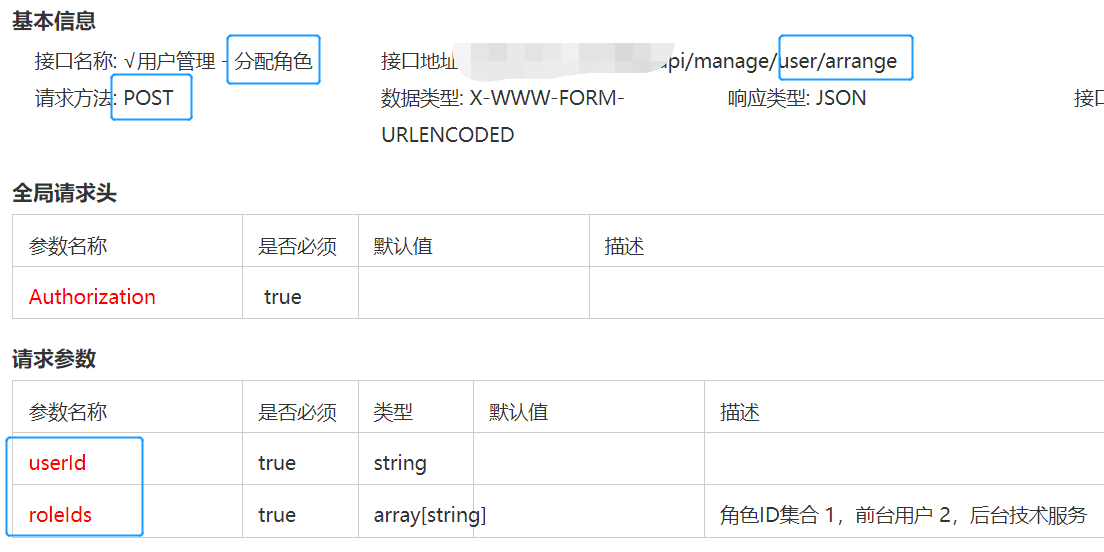
(3) Assign role interface
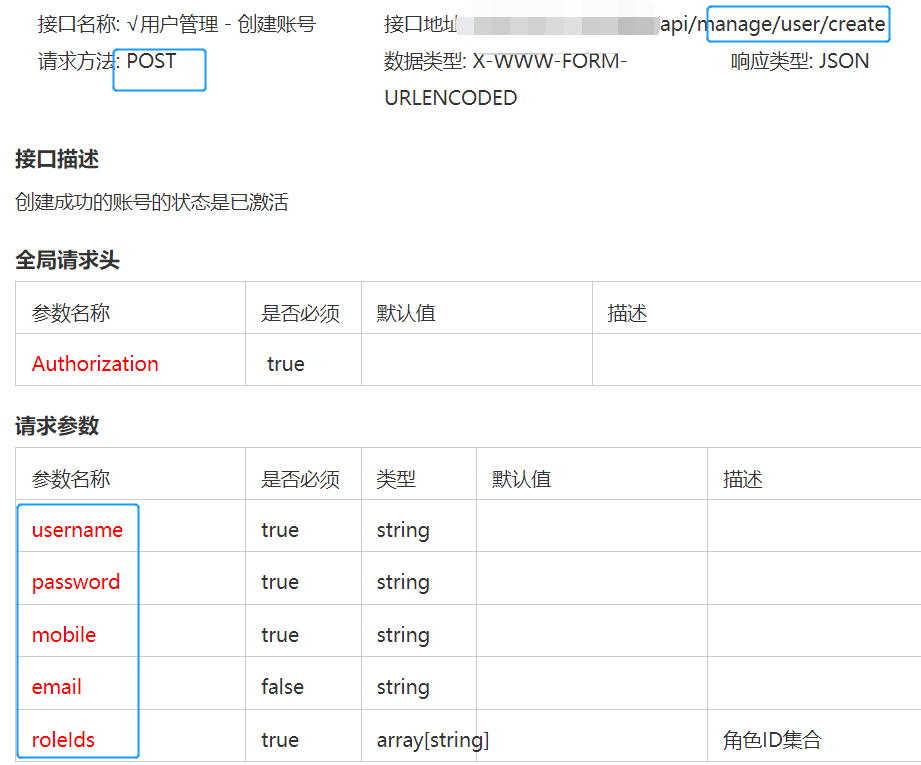
(4) Create user interface
3. Reference UI to write front-end pages
(1) Overall page layout
Search is the query part; CollectionCreateForm is a pop-up box for creating a new part; DetailForm is the detail pop-up box; RoleForm is the pop-up part of role assignment; StandardTable is the list part;
return (
    <PageHeaderLayout title="list" className={'commonList'}>
      <Search init={init} dispatch={dispatch} />
      {visible && (
        <CollectionCreateForm
          setVisible={setVisible}
          visible={visible}
          dispatch={dispatch}
          init={init}
          toggleForm={toggleForm}
        />
      )}
      {detailVisible && (
        <DetailForm
          setDetVisible={setDetVisible}
          detailVisible={detailVisible}
          dispatch={dispatch}
          init={init}
          userId={userId}
          toggleDetail={toggleDetail}
          detailData={detailData}
        />
      )}
      {roleVisible && (
        <RoleForm
          setRoleVisible={setRoleVisible}
          roleVisible={roleVisible}
          dispatch={dispatch}
          init={init}
          userId={userId}
          userRole={userRole}
          toggleRole={toggleRole}
        />
      )}
      <Card
        style={{ marginTop: 1 }}
        bordered={false}
        bodyStyle={{ padding: '8px 32px 32px 32px' }}
      >
        <div className={'commonListOperator'}>
          <Button
            type="primary"
            onClick={() => toggleForm(-1)}
            className={styles.new}
          >
            Create account
          </Button>
        </div>
        <StandardTable
          loading={loading}
          data={listData}
          columns={columns}
          onChange={handleStandardTableChange}
        />
      </Card>
    </PageHeaderLayout>
  )
(2) List and complex operations
Among them, the return value of the role display interface is the roles:[1,2] array, which represents' foreground user 'and' background technical service 'respectively. Here, the front-end string splicing is required, and the maximum display is five characters‘ Mobile phone number 'and' enterprise name 'are the same.
const columns = useMemo(
    () => [
      {
        title: 'Serial number',
        dataIndex: '_id'
      },
      {
        title: 'user name',
        dataIndex: 'username'
      },
      {
        title: 'role',
        width: 80,
        dataIndex: 'roles', //['1','2']  ['1']
        // render: (value: any) => (
        //   <>
        //     {value = = = 1 & & < > foreground user < / >}
        //     {value = = = 2 & & < > background technical service < / >}
        //   </>
        // )
        render: (value: any) => {
          var str = ''
          if (value.length == 1) {
            value.forEach((element: number) => {
              if (element === 1) {
                str = 'Foreground user'
              } else {
                str = 'Background technical services '
              }
            })
          } else {
            value.forEach((element: number) => {
              // console.log(element)
              if (element === 1) {
                str = str + 'Foreground user,'
              } else {
                str = str + 'Background technical services '
              }
            })
          }
          if (str.length <= 5) {
            return str
          } else {
            return <Tooltip title={str}>{str.substring(0, 5) + '...'}</Tooltip>
          }
        }
      },

      {
        title: 'Enterprise name',
        dataIndex: 'firmName',
        render: (record: any) => {
          if (record.length <= 5) {
            return record
          } else {
            return (
              <Tooltip title={record}>{record.substring(0, 5) + '...'}</Tooltip>
            )
          }
        }
      },
      {
        title: 'phone number',
        dataIndex: 'mobile',
        render: (record: any) => {...},
      {
        title: 'mailbox',
        dataIndex: 'email',
        render: (record: any) => {...}
      },
      {
        title: 'address',
        dataIndex: 'address',
        width: 100,
        render: (record: any) => {...}
      },
      {
        title: 'Authentication status',
        dataIndex: 'status',
        render: (value: any) => (
          <>
            {value === 3 && <Tag color="blue">Not submitted</Tag>}
            {value === 0 && <Tag color="orange">To be reviewed</Tag>}
            {value === 1 && <Tag color="red">Fail</Tag>}
            {value === 2 && <Tag color="green">adopt</Tag>}
          </>
        )
      },
      {
        title: 'Account status',
        dataIndex: 'isFreeze',
        render: (value: any) => (
          <>
            {value == 0 && <Tag color="green">normal</Tag>}
            {value == 1 && <Tag color="red">frozen</Tag>}
          </>
        )
      },
      {
        title: 'operation',
        render: (value: any) => (
          <>
            {value.isFreeze == 1 && (
              <Popconfirm
                title="Are you sure to unfreeze the account"
                onConfirm={() => {
                  changeFreeze(value.id)
                }}
                // onConfirm={changeFreeze(value.id)}
                style={{ width: 400 }}
              >
                <a type="primary">Unfreeze account number</a>
              </Popconfirm>
            )}
            {value.isFreeze == 0 && (
              <Popconfirm
                title="Are you sure to freeze the account"
                onConfirm={() => {
                  changeFreeze(value.id)
                }}
              >
                <a type="primary">Frozen account</a>
              </Popconfirm>
            )}
            <Divider type="vertical" />
            <a type="primary" onClick={() => toggleDetail(value.id)}>
              View details
            </a>
            {value.isFreeze == 0 && <Divider type="vertical" />}
            {value.isFreeze == 0 && (
              <a
                type="primary"
                onClick={() => toggleRole(value.id, value.roles)}
              >
                Assign roles
              </a>
            )}
          </>
        )
      }
    ],
    [changeFreeze, toggleDetail, toggleRole]
  )
Display of operation: isFreeze controls whether the display is "frozen" or "unfrozen", and implements work corresponding to the changeFreeze(value.id) function; View details is an operation for each user, and bind the function toggleDetail(value.id); Only non frozen users can be assigned roles, corresponding to onClick = {() => toggleRole(value.id, value.roles)}
4. Freezing and thawing function
// Account unfreezing and freezing
  const changeFreeze = useCallback(
    (index: any) => {
      dispatch({
        type: 'usermanage/changeFreeze',
        params: [{ id: index }]
      }).then((v: any) => {
        if (v.code === 200) {
          message.success(v.message)
          init()
        }
      })
    },
    [dispatch, init]
  )
changeFreeze: async ({ params: [remoteValue] }, { dispatch }) => {
const data = await dispatch({
type: 'usermanage/get',
params: ['/api/manage/user/freeze/' + remoteValue.id]
})
return data
}5. New function
(1) Click "create account" to pop up the pop-up box
Create a new page new.tsx under the same directory of the page, and import on the main page CollectionCreateForm from './ new'
function NewPage({
  visible,setVisible,toggleForm,dispatch,userId,itemData,init,form
}: any) {
  const { getFieldDecorator, validateFields } = form

  return (
    <Modal
      title={'newly added'}
      visible={visible}
      onCancel={toggleForm}
      footer={[
        <Button
          key="back"
          onClick={() => {
            setVisible(false)
          }}
        >
          cancel
        </Button>,
        <Button key="submit" onClick={onSave}>
          preservation
        </Button>
      ]}
      className={styles.modal}
    >
      <Form layout="inline">
        ...
        <Form.Item label="role">...</Form.Item>
      </Form>
    </Modal>
  )
}
export default Form.create()(NewPage) as any
Add a click event toggleForm () for the button
<Button type="primary" onClick={() => toggleForm(-1)}>Create account</Button>toggleForm() is mainly used to control the display and hiding of pop ups- 1 means "new" instead of "modify" (but this page does not involve modification). Each trigger will be displayed with hidden layer passing [visible, setVisible] = useState(false) is reversed
const [visible, setVisible] = useState(false)
const toggleForm = useCallback((v: any) => {
    setVisible(prevState => {
      return !prevState
    })
  }, [])
Finally, set on the main page and control the display through visible. And pass in parameters.
{visible && (
        <CollectionCreateForm
          setVisible={setVisible}
          visible={visible}
          dispatch={dispatch}
          init={init}
          toggleForm={toggleForm}
        />
      )}
(2) Click "add" to call the interface
//New interface
  const onSave = useCallback(() => {
    console.log('preservation')
    validateFields((err: any, fieldsValue: any) => {
      if (err) return
      let res = {
        ...fieldsValue
      }
      if (fieldsValue.email == undefined) {
        fieldsValue.email = ''
      }
      console.log(fieldsValue)
      dispatch({
        type: 'usermanage/post',
        params: ['/api/manage/user/create', res]
      }).then((v: any) => {
        if (v.code === 200) {
          toggleForm()
          message.success(v.message)
          init()
        }
      })
    })
  }, [dispatch, init, toggleForm, validateFields])
6. View details function
(1) Click to view the details, and a pop-up box will appear
All pop-up box implementations here are similar to the [add] function. After writing the component page, you can control its display and hiding through visible and toggle.
{detailVisible && (
        <DetailForm
          setDetVisible={setDetVisible}
          detailVisible={detailVisible}
          dispatch={dispatch}
          init={init}
          userId={userId}
          toggleDetail={toggleDetail}
          detailData={detailData}
        />
      )}
(2) Display details
Because clicking different data shows different details, you need to pass in this line id in the click event
onClick={() => toggleDetail(value.id)}After clicking, control the display of modal through visible, and initialize the page details at the same time.
const editInit = useCallback(
    (index: any) => {
      dispatch({ type: 'usermanage/getDetail', params: [{ userId: index }] })
    },
    [dispatch]
  )
const toggleDetail = useCallback(
    (v: any) => {
      setUserId(v)
      editInit(v)
      console.log('Display details')
      setDetVisible(detailState => {
        return !detailState
      })
    },
    [editInit]
  )
(3) Processing of picture display
Use the custom encapsulation component ImgUpload, where diabled={true} indicates that it is not uploadable, and the display picture is displayed. The return value of qualificationFileIds needs to meet the format url: ''
handle detaildata.qualificationFileIds
  // var contentUrl = [
  //   {url:'http://39.101.69.143:9000/si..'},
  //   {url:'http://39.101.69.143:9000/simulati..'}
  // ]
<Form.Item label="Industry qualification" className={styles.formItem}>
{/* {(detailData && detailData.qualificationFileIds) || ''} */}
{getFieldDecorator('qualificationFileIds', {
initialValue: detailData.qualificationFileIds || []
// initialValue: contentUrl
})(
<ImgUpload
accept={['png', 'jpg']}
remoteValue={{ type: 0 }}
tip="((please upload pictures)"
disabled={true}
/>
)}
</Form.Item>Attached ImgUpload component code: Component source code https://download.csdn.net/download/Sabrina_cc/31857426