Deploy my website into the container - solves the pain point of each website migration
1. Requirements
Ultimately, money is still insufficient, which leads me to often change servers to participate in new user discounts. In the first year, the server price is still very affordable, but this requires me to constantly migrate the website. Because the environment and deployment that the website depends on are very cumbersome, every migration is exhausting, painful and uncomfortable! Fortunately, now I have learned container virtualization technologies such as docker and kubernetes. This plans to container the website to maintain environmental consistency and persistence. The next time you migrate a website, you can directly docker pull my image, and then start the container. Mom doesn't have to worry about me staying up late to write bug s anymore!

2. Framework concept
The best choice is to run in the form of k8s pod, and then expose the service, so as to achieve the purpose of external access. But,money! K8s say less about three 2c4g servers and resolutely give up this scheme.
Now only docker can be used. Fortunately, one server can handle it.
You may need to:
Alibaba cloud server purchase offer
Original docker & k8s - deploy k8s step by step with me (binary installation and deployment)
The original three ECS use kubedm to quickly deploy the latest version K8sv1.21.3
The original Alibaba cloud ECS is used to deploy its own private harbor image warehouse
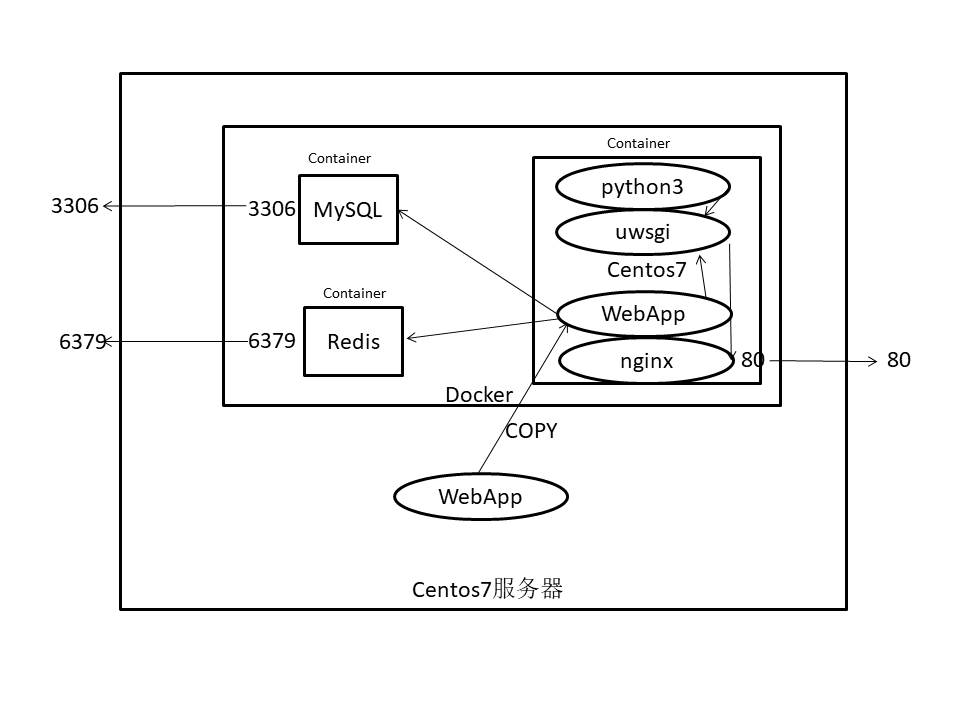
2.1 three container idea
mysql and redis each have a container. This is best done in the k8s cluster, but I use the docker, so I use the second method, as shown below.

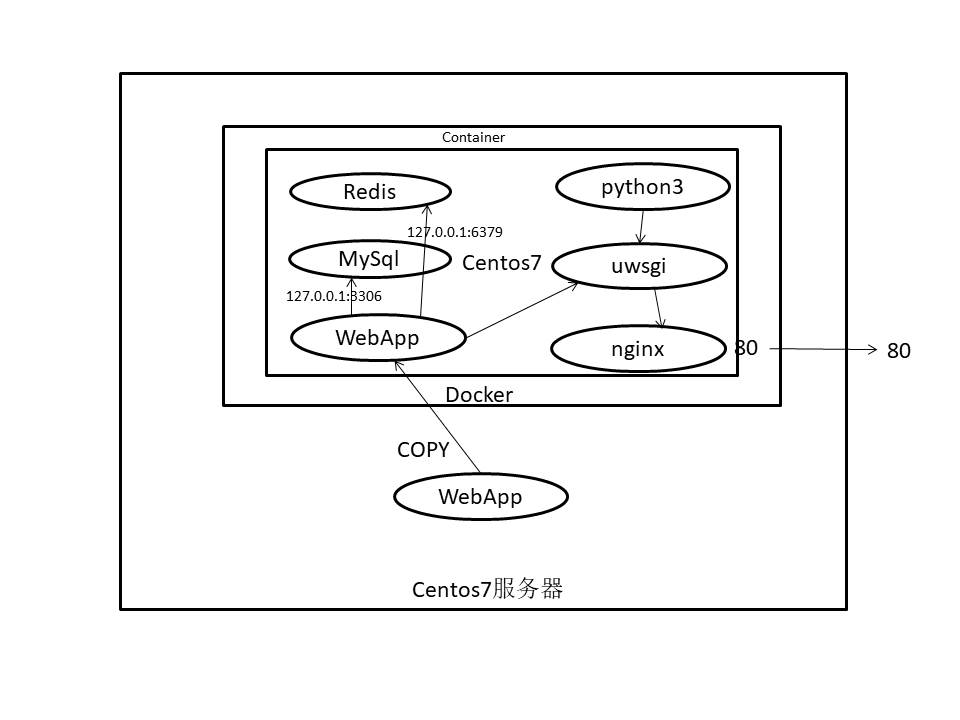
2.2 single container concept
That is, customize a Centos image to meet all dependent environments. This idea is adopted later. Later, I found that the image of everything gathered in one container is too large, more than 3 G.... But,money! Make do with it. First....

3. Vessel fabrication - Environmental preparation
-
Install docker
Refer to my previous article: Original Docker & k8s - installation, deployment, image management, container operation and Dockerfile of Docker
-
docker image
docker pull centos:centos7
After the image is removed, it enters the container:
# Run container privilege port mapping background
docker run -dti --name bt -p80:80 -p8888:8888 --privileged=true dachongming/django-web:bt /usr/sbin/init

# Enter container
docker exec -ti 7c5784e1f1f7 /bin/bash
# Turn off firewall
[root@7c5784e1f1f7 /]# systemctl stop firewalld
-
Installing Python 3
yum install python3 -y
-
Installing uwsgi
Direct pip3 installation will report an error of missing dependencies. Install dependencies first
yum install gcc
yum install python3-devel.x86_64
At this point, pip3 is installed successfully
pip3 install uwsgi
-
Installing nginx
# Install the dependent EPEL release first, otherwise it will report: No package nginx available
yum install epel-release

# nginx is now installed
yum install nginx
-
Install pagoda panel
# In the middle of installing the pagoda, press the prompt and enter yes
[root@7c5784e1f1f7 /]# yum install -y wget && wget -O install.sh http://download.bt.cn/install/install_6.0.sh && sh install.sh
The server must release the port first
At this time, the browser accesses the server public network IP:8888/1dea6e26
-
Install mysql and redis
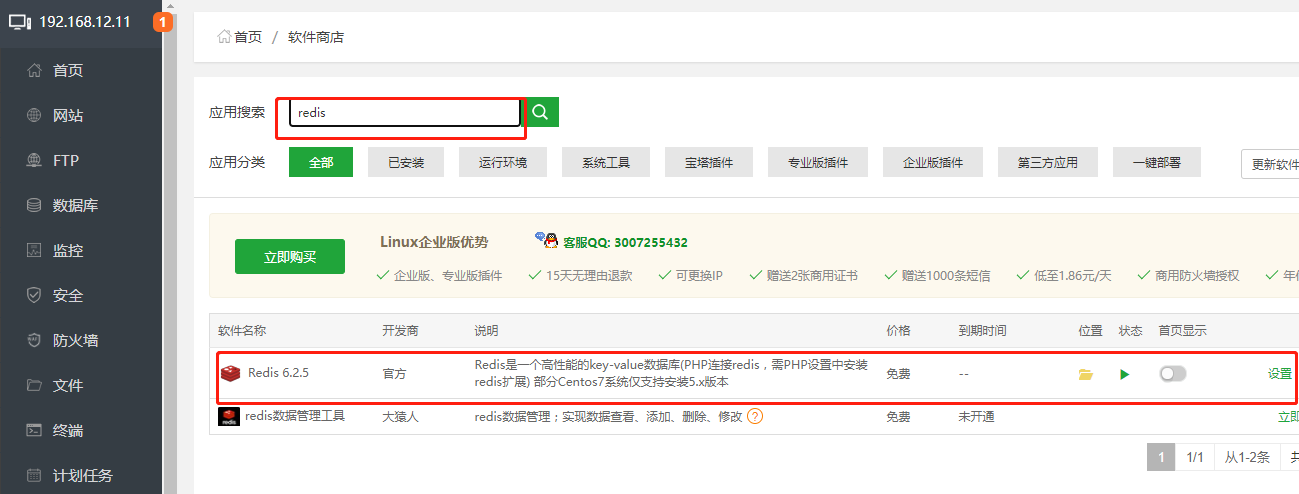
After logging in the pagoda, search and install mysql and redis

4. Package the container as a mirror image
Persistent storage:
docker commit -p CONTAINER ID docker.io/dachongming/alpine:v3.14.0_with_1.txt
docker commit -p 7c5784e1f1f7 docker.io/dachongming/bloglee:v1
docker push docker.io/dachongming/bloglee:v1
It is slow to push the dockerhub. You can push the image to our private warehouse:
docker commit -p 7c5784e1f1f7 harbor.liboer.top/public/bloglee:v1
docker push harbor.liboer.top/public/bloglee:v1
You may need to:
Alibaba cloud server purchase offer
The original Alibaba cloud ECS is used to deploy its own private harbor image warehouse
Organize into DockerFile
FROM dachongming/bloglee:v1

MAINTAINER libo_sober@163.com

COPY BlogLee /app/

WORKDIR /app/BlogLee

RUN source ./bloglee.sql &&\
    pips install ./requirements.txt &&\
    uwsgi --ini ./uwsgi.ini
    nginx


# Finally, start the container
docker run -dti --name bloglee -p80:80 -p8888:8888 -v/mydata/BlogLee:/app/ --privileged=true dachongming/bloglee:v1
Some of them is too laggy, and my server is too stuck. Test it on the virtual machine sometime
appendix
View run container
docker ps

View all containers
docker ps -a

Enter container
 Where string is container ID:

docker exec -it d27bd3008ad9 /bin/bash

Deactivate all active containers:
docker stop $(docker ps -q)

Delete all containers:
docker rm $(docker ps -aq)

One command deactivates and deletes the container:
docker stop $(docker ps -q) & docker rm $(docker ps -aq)