catalogue
Inter cluster communication mode
Electing a master node from a node
5, Spring boot integrates Redis Cluster
1, Redis cluster principle
Redis cluster does not use consistency hash, Instead, the concept of hash slot is introduced. The redis cluster has 16384 hash slots. After each key is verified by CRC16, the module of 16384 is taken to determine which slot to place. Each node of the cluster is responsible for a part of the hash slot. For example, the current cluster has three nodes, then:
Node A contains hash slots 0 to 5500.
Node B contains hash slots 5501 to 11000.
Node C contains hash slots 11001 to 16384.
Note: a key value does not correspond to a hash slot. A hash slot can have many key values. Theoretically, a cluster can store many key values.
CRC16 algorithm
static const uint16_t crc16tab[256]= {
    0x0000,0x1021,0x2042,0x3063,0x4084,0x50a5,0x60c6,0x70e7,
    0x8108,0x9129,0xa14a,0xb16b,0xc18c,0xd1ad,0xe1ce,0xf1ef,
    0x1231,0x0210,0x3273,0x2252,0x52b5,0x4294,0x72f7,0x62d6,
    0x9339,0x8318,0xb37b,0xa35a,0xd3bd,0xc39c,0xf3ff,0xe3de,
    0x2462,0x3443,0x0420,0x1401,0x64e6,0x74c7,0x44a4,0x5485,
    0xa56a,0xb54b,0x8528,0x9509,0xe5ee,0xf5cf,0xc5ac,0xd58d,
    0x3653,0x2672,0x1611,0x0630,0x76d7,0x66f6,0x5695,0x46b4,
    0xb75b,0xa77a,0x9719,0x8738,0xf7df,0xe7fe,0xd79d,0xc7bc,
    0x48c4,0x58e5,0x6886,0x78a7,0x0840,0x1861,0x2802,0x3823,
    0xc9cc,0xd9ed,0xe98e,0xf9af,0x8948,0x9969,0xa90a,0xb92b,
    0x5af5,0x4ad4,0x7ab7,0x6a96,0x1a71,0x0a50,0x3a33,0x2a12,
    0xdbfd,0xcbdc,0xfbbf,0xeb9e,0x9b79,0x8b58,0xbb3b,0xab1a,
    0x6ca6,0x7c87,0x4ce4,0x5cc5,0x2c22,0x3c03,0x0c60,0x1c41,
    0xedae,0xfd8f,0xcdec,0xddcd,0xad2a,0xbd0b,0x8d68,0x9d49,
    0x7e97,0x6eb6,0x5ed5,0x4ef4,0x3e13,0x2e32,0x1e51,0x0e70,
    0xff9f,0xefbe,0xdfdd,0xcffc,0xbf1b,0xaf3a,0x9f59,0x8f78,
    0x9188,0x81a9,0xb1ca,0xa1eb,0xd10c,0xc12d,0xf14e,0xe16f,
    0x1080,0x00a1,0x30c2,0x20e3,0x5004,0x4025,0x7046,0x6067,
    0x83b9,0x9398,0xa3fb,0xb3da,0xc33d,0xd31c,0xe37f,0xf35e,
    0x02b1,0x1290,0x22f3,0x32d2,0x4235,0x5214,0x6277,0x7256,
    0xb5ea,0xa5cb,0x95a8,0x8589,0xf56e,0xe54f,0xd52c,0xc50d,
    0x34e2,0x24c3,0x14a0,0x0481,0x7466,0x6447,0x5424,0x4405,
    0xa7db,0xb7fa,0x8799,0x97b8,0xe75f,0xf77e,0xc71d,0xd73c,
    0x26d3,0x36f2,0x0691,0x16b0,0x6657,0x7676,0x4615,0x5634,
    0xd94c,0xc96d,0xf90e,0xe92f,0x99c8,0x89e9,0xb98a,0xa9ab,
    0x5844,0x4865,0x7806,0x6827,0x18c0,0x08e1,0x3882,0x28a3,
    0xcb7d,0xdb5c,0xeb3f,0xfb1e,0x8bf9,0x9bd8,0xabbb,0xbb9a,
    0x4a75,0x5a54,0x6a37,0x7a16,0x0af1,0x1ad0,0x2ab3,0x3a92,
    0xfd2e,0xed0f,0xdd6c,0xcd4d,0xbdaa,0xad8b,0x9de8,0x8dc9,
    0x7c26,0x6c07,0x5c64,0x4c45,0x3ca2,0x2c83,0x1ce0,0x0cc1,
    0xef1f,0xff3e,0xcf5d,0xdf7c,0xaf9b,0xbfba,0x8fd9,0x9ff8,
    0x6e17,0x7e36,0x4e55,0x5e74,0x2e93,0x3eb2,0x0ed1,0x1ef0
};

uint16_t crc16(const char *buf, int len) {
    int counter;
    uint16_t crc = 0;
    for (counter = 0; counter < len; counter++)
            crc = (crc<<8) ^ crc16tab[((crc>>8) ^ *buf++)&0x00FF];
    return crc;
}
Inter cluster communication mode
All cluster nodes establish communication with a binary protocol (cluster bus) through TCP connection. Each node is connected to each other node on the cluster through cluster bus. A gossip protocol is used between nodes to spread cluster information.
Primary node downtime
There are two states of node failure: PFAIL and FAIL. When an active ping packet (A ping packet waiting for its reply after sending) sent by section A to node B in the cluster has been waiting for more than node_ Time out, then A considers that this node is unreachable and marks it as PFAIL. If other nodes also mark node B as PFAIL (node A collects the status information of node B identified by most primary nodes in the cluster through the mission field as PFAIL), then A will mark B as FAIL and tell other reachable nodes that node B has failed.
Electing a master node from a node
The election and promotion of slave nodes are handled by the slave node. The master node will vote which slave node to promote. The election of a slave node occurs when the master node is marked as FAIL by at least one slave node with the necessary conditions to become the master node.
A slave node can initiate an election when the following conditions are met:
- The master node of the slave node is in the FAIL state.
- The number of hash slots that this master node is responsible for is not zero.
- The disconnection of the replication link between the slave node and the master node shall not exceed a given period of time to ensure that the data of the slave node is reliable.
- If a slave node wants to be elected, the first step should be to increase its currentEpoch (which can be understood as the event version number) count and ask the master nodes to vote.
A failover is broadcast from the node_ AUTH_ The request packet is sent to each master node in the cluster to request votes. Then wait for a reply (up to NODE_TIMEOUT). Once a master node votes for the slave node, it will reply with a FAILOVER_AUTH_ACK, and in NODE_TIMEOUT * 2 can no longer vote for other slave nodes of the same master node during this period.
Once a slave node receives a response from most of the master nodes, it wins the election. Otherwise, if it cannot be in node_ If most primary nodes are accessed within the timeout time, the current election will be interrupted and displayed in node_ After timeout * 4, another slave node attempts to initiate an election.
The slave node does not attempt to initiate an election as soon as the master node enters the FAIL state, but there is a little delay.
The master node receives a request from the slave node to fail_ AUTH_ A request to vote in the form of a request. To grant a vote, the following conditions must be met:
- In a given period (epoch), a master node can only vote once and refuses to vote in the previous period: each master node has a lastVoteEpoch field. Once the currentEpoch in the authentication request packet is less than the lastVoteEpoch, the master node will refuse to vote again. When a master node actively responds to a voting request, lastVoteEpoch will be updated accordingly.
- A master node votes for a slave node if and only if the master node of the slave node is marked as FAIL.
- If the currentEpoch in the authentication request is smaller than the currentEpoch in the master node, the request will be ignored. Therefore, the response of the master node always carries the currentEpoch consistent with the authentication request. If the same slave node requests to vote again after adding currentEpoch, it is guaranteed that an old delayed reply from the master node will not be accepted by the new round of election.
2, RedisCluster installation
Traditional way
1. Create file
[root@localhost local]# mkdir redis-cluster
[root@localhost redis-cluster]# mkdir 7000
[root@localhost redis-cluster]# mkdir 7001
[root@localhost redis-cluster]# mkdir 7002
[root@localhost redis-cluster]# mkdir 7003
[root@localhost redis-cluster]# mkdir 7004
[root@localhost redis-cluster]# mkdir 7005
#Copy the drop configuration file to the corresponding directory
[root@localhost redis-cluster]# cp /usr/local/redis-6.2.4/redis.conf /usr/local/redis-cluster/7000/ -r
[root@localhost redis-cluster]# cp /usr/local/redis-6.2.4/redis.conf /usr/local/redis-cluster/7001/ -r
[root@localhost redis-cluster]# cp /usr/local/redis-6.2.4/redis.conf /usr/local/redis-cluster/7002/ -r
[root@localhost redis-cluster]# cp /usr/local/redis-6.2.4/redis.conf /usr/local/redis-cluster/7003/ -r
[root@localhost redis-cluster]# cp /usr/local/redis-6.2.4/redis.conf /usr/local/redis-cluster/7004/ -r
[root@localhost redis-cluster]# cp /usr/local/redis-6.2.4/redis.conf /usr/local/redis-cluster/7005/ -r
2. Modify profile
#Comment out
bind 127.0.0.1 -::1
#Background start
daemonize yes
# Allow external access
protected-mode no
#Modify the port number from 7000 to 7005
port 7000
#Specify the pid file 7000-7005 for startup
pidfile /var/run/redis_7000.pid
#Do not lose 7000-7005 quotation marks in the log path
logfile  "usr/local/redis-cluster/7000/redis.log"
#Modify the rdb file for later capacity expansion. Because it is the same virtual machine, it is not necessary to change 7000-7005 if it is not in the same virtual machine
dbfilename dump_7000.rdb
#Change Password
requirepass xiaojie
#The password of the cluster. Otherwise, you need to enter the password when switching nodes
masterauth xiaojie
#Start cluster
cluster-enabled yes
#Automatic file generation 7000-7005
cluster-config-file nodes-7000.conf
3. Start cluster
Startup script authorization chmod +x startall.sh
/usr/local/redis/bin/redis-server /usr/local/redis-cluster/7000/redis.conf
/usr/local/redis/bin/redis-server /usr/local/redis-cluster/7001/redis.conf
/usr/local/redis/bin/redis-server /usr/local/redis-cluster/7002/redis.conf
/usr/local/redis/bin/redis-server /usr/local/redis-cluster/7003/redis.conf
/usr/local/redis/bin/redis-server /usr/local/redis-cluster/7004/redis.conf
/usr/local/redis/bin/redis-server /usr/local/redis-cluster/7005/redis.conf
4. Create cluster
#No password cluster replicas 1 master-slave node 1:1 assignment
./redis-cli --cluster create  192.168.139.154:7000  192.168.139.154:7001  192.168.139.154:7002  192.168.139.154:7003  192.168.139.154:7004  192.168.139.154:7005  --cluster-replicas 1

#Have a password
./redis-cli --cluster create  192.168.139.154:7000  192.168.139.154:7001  192.168.139.154:7002  192.168.139.154:7003  192.168.139.154:7004  192.168.139.154:7005  --cluster-replicas 1 -a xiaojie
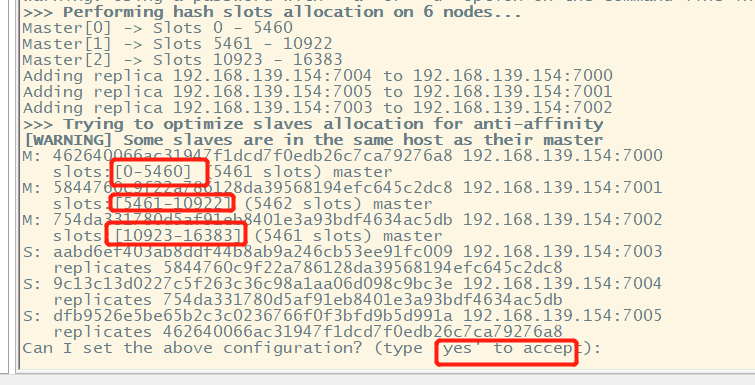
Enter yes to receive the card slot assignment.
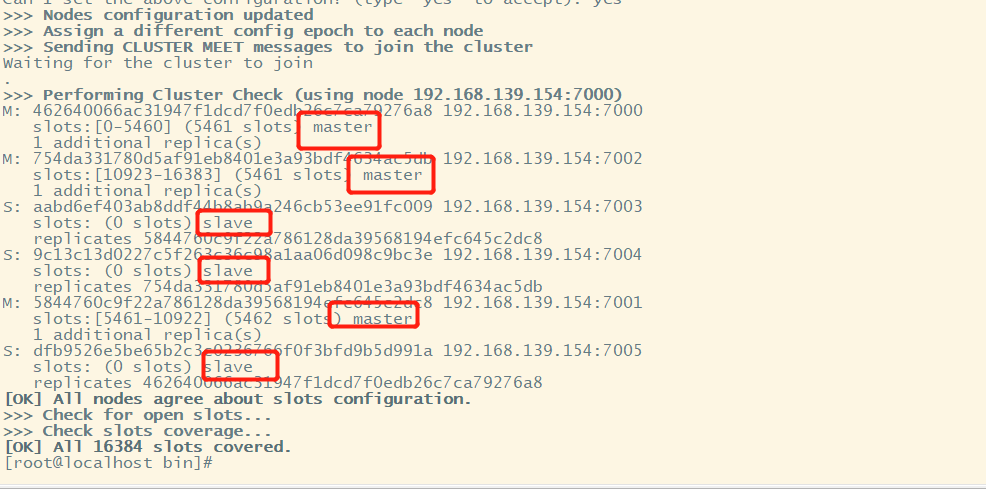
Seeing this figure shows that the cluster installation is successful.
Cluster nodes command to view cluster nodes
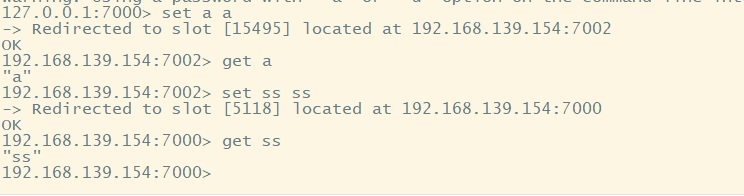
test
[root@localhost bin]# ./redis-cli -p 7000 -c -a 'xiaojie'
OK, the construction is completed.
Docker mode
1. Pull image
[root@localhost bin]# docker pull redis
2. Create file
[root@localhost local]# mkdir docker-redis-cluster
3. Create redis-cluster.tmpl file
#port
port ${PORT}
#Cluster password
masterauth xiaojie
#redis password
requirepass xiaojie
#Start cluster
cluster-enabled yes
#configuration file
cluster-config-file nodes.conf

cluster-node-timeout 5000
#If the ip of the cluster communication is accessed through the external network, the public network ip of the server shall be filled in
cluster-announce-ip 192.168.6.137
##Reporting ports of cluster nodes to prevent nat
cluster-announce-port ${PORT}
#Reporting bus port of cluster nodes to prevent nat
cluster-announce-bus-port 1${PORT}
#Open aof
appendonly yes
4. Create data and conf files
[root@localhost docker-redis-cluster]# for port in `seq 9000 9005`; do mkdir -p ./${port}/conf && PORT=${port} envsubst < ./redis-cluster.tmpl > ./${port}/conf/redis.conf && mkdir -p ./${port}/data; done5. Create Redis container
[root@localhost docker-redis-cluster]# for port in `seq 9000 9005`; do docker run -d --net=host -v /usr/local/docker-redis-cluster/${port}/conf/redis.conf:/etc/redis/redis.conf -v /usr/local/docker-redis-cluster/${port}/data:/data --restart always --name=redis-${port} redis redis-server /etc/redis/redis.conf; done6. Enter any container to create a cluster
#Enter container
[root@localhost docker-redis-cluster]# docker exec -it 9e36f2ab4ae7 bash
#Create cluster
root@localhost:/data# redis-cli --cluster create  192.168.6.137:9000  192.168.6.137:9001  192.168.6.137:9002  192.168.6.137:9003  192.168.6.137:9004  192.168.6.137:9005  --cluster-replicas 1 -a xiaojie
7. Testing
root@localhost:/data# redis-cli -p 9000 -c -a 'xiaojie'
Warning: Using a password with '-a' or '-u' option on the command line interface may not be safe.
192.168.6.137:9002> set docker docker
-> Redirected to slot [9730] located at 192.168.6.137:9001
OK
192.168.6.137:9001> get docker
"docker"
192.168.6.137:9001>
3, Cluster expansion
Cluster expansion is to add cluster nodes on the basis of the original without restarting the server. Simply put, add a new server, and then distribute some card slots and data from other nodes (if there is data in the card slot, it will be distributed to the new node together with the data).
Add two configuration files, which are available at the source address below
Add master node
#Start the new connection node
[root@localhost bin]# ./redis-server /usr/local/redis-cluster/7006/redis.conf
[root@localhost bin]# ./redis-server /usr/local/redis-cluster/7007/redis.conf
#Add master node
[root@localhost bin]# /usr/local/redis/bin/redis-cli --cluster add-node 192.168.139.154:7006   192.168.139.154:7000 -a xiaojie  #- a xiaojie is not required if there is no password

You can see that the new node has no card slot.
Next, we assign a slave node to the new master node
[root@localhost bin]# ./redis-cli --cluster add-node   192.168.139.154:7007  192.168.139.154:7000  --cluster-slave   --cluster-master-id  9493cb0e7ee7b35da0c9078e9a99e5b577de9f1a -a xiaojie
#The master id is the id corresponding to the 7006 node. You can see that we have added a slave node for 7006

Enter cluster nodes to check the cluster status, as shown in the figure above. No card slot has been allocated
Assign card slot below
#This client can connect to any node, not limited to 7000
[root@localhost bin]# ./redis-cli --cluster reshard  192.168.139.154:7000 -a xiaojie
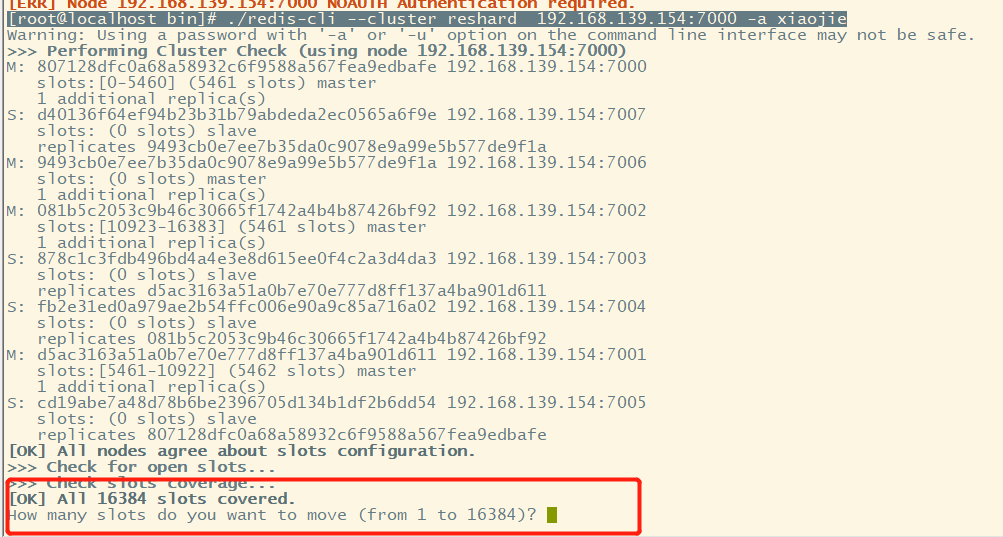
How many slots do you want to move? 16384 / 4 = 4096, so we want to move 4096 card slots to 7006 node, and then distribute them to 7006 from the other three main nodes (there are no card slots on the slave node). So enter 4096
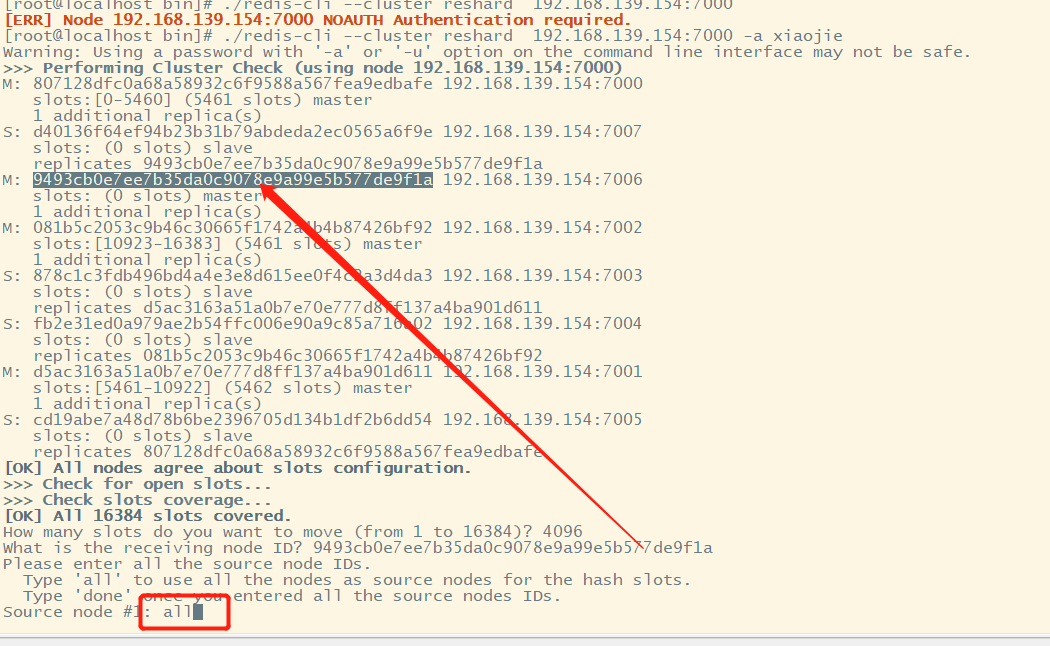
Enter the corresponding id. here, we select all, and then select yes. Just wait until the card slot is allocated.

It can be seen from the above figure on the right that the card slot has been allocated to us.
4, Cluster shrinkage
Cluster capacity reduction is just the opposite of capacity expansion, that is, removing service nodes without restarting the server.

We choose to give all 7006 card slots to 7001. Note: when removing a node, make sure that all card slots have been removed to other primary nodes.
[root@localhost bin]# ./redis-cli --cluster reshard 192.168.139.154:7000 --cluster-from 9493cb0e7ee7b35da0c9078e9a99e5b577de9f1a -a xiaojie --cluster-to d5ac3163a51a0b7e70e777d8ff137a4ba901d611 --cluster-slots -a xiaojie
5, Spring boot integrates Redis Cluster
spring:
  jackson:
    time-zone: GMT+8
    date-format: yyyy-MM-dd HH:mm:ss
  datasource:
    name: my-test
    url: jdbc:mysql://127.0.0.1:3306/my_test?useUnicode=true&characterEncoding=UTF-8&rewriteBatchedStatements=true&allowMultiQueries=true&serverTimezone=Asia/Shanghai
    username: root
    password: root
    type: com.alibaba.druid.pool.DruidDataSource
    driver-class-name: com.mysql.cj.jdbc.Driver
  redis:
    cluster:
      nodes: #I am connected to the cluster installed by Docker
      - 192.168.6.137:9000
      - 192.168.6.137:9001
      - 192.168.6.137:9002
      - 192.168.6.137:9003
      - 192.168.6.137:9004
      - 192.168.6.137:9005
    password: xiaojie
    connect-timeout: 5000
#    password: xiaojie #This password must be added before you can connect to the redis server. If no password is configured, it is not required
#    connect-timeout: 5000
#    database: 0
#    sentinel:
#      master: mymaster
#      nodes: 192.168.6.137:26379,192.168.6.137:26380,192.168.6.137:26381
#      password: xiaojie #This password is the password of sentinel. If requirepass is not configured in sentinel.conf, it is not required
Complete code and cluster configuration file: https://gitee.com/whisperofjune/springboot-redis.git
reference resources:
Redis cluster spec - redis Chinese data station - redis China user group (CRUG)
docker deploys redis Cluster - bridgehead foot washing city - blog Park