Preface
In the previous article, I have described some contents of docker's entry level. This article begins to explain other contents of docker in depth. First, it will talk about the principle and practical operation of the discovery and automatic update part of docker container service.
Talk about the concept and advantages (just look at them)
Introduction to consumer
A service software (open source) developed by HashiCorp in go language to support distributed and highly available service discovery and configuration sharing in multiple data centers.
Main features:
Service discovery and configuration;
Support health check, and run HTTP, GTPC and DNS protocol to call API to store key value pairs;
Adopt Raft algorithm to ensure high availability of services
Support security service communication;
Support multiple data centers;
consul agent
The agent is divided into two types: server and client. Basically, there is no difference between these two types. server agent stores messages of services. Generally speaking, in order to prevent single point of failure, it is recommended to use three to five types to build cluster architecture.
client agent is mainly used to log off service, health check and forward the query of server agent, which is equivalent to an agent, so it must run on each host of the cluster.
The emergence of a service or software tool must have its use scenarios and advantages, otherwise, where can it stand?
Scenarios used by consumer
- Registration and configuration sharing of Docker container
- Registration and configuration sharing of Coreos instances
- Configuration sharing, service discovery and health check of SaaS applications.
- Vites cluster
- Integrate with the confd service to dynamically generate nginx and haproxy configuration files
Consumer advantages (compared with other service tools)
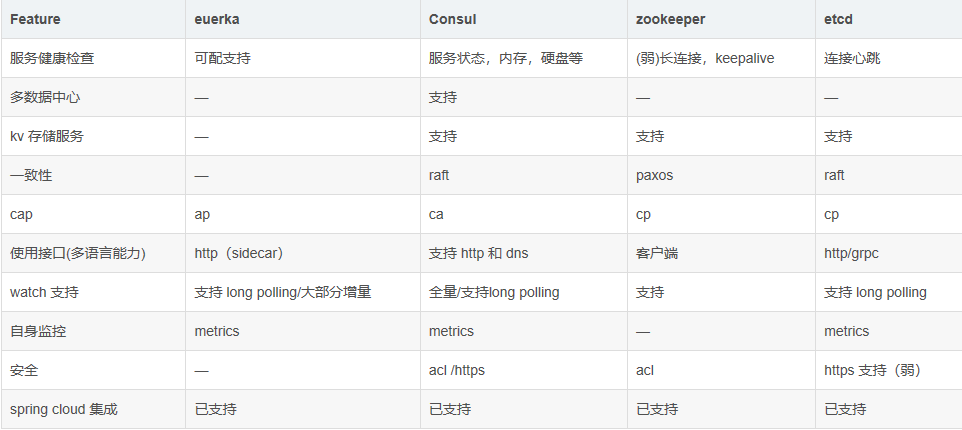
Through comparison, you can find that consumer has its own advantages over other software tools, and the scenario used in this article is built in docker.
Let's look at the principle of the consumer discovery and update mechanism (it can be understood in combination with practical deployment)
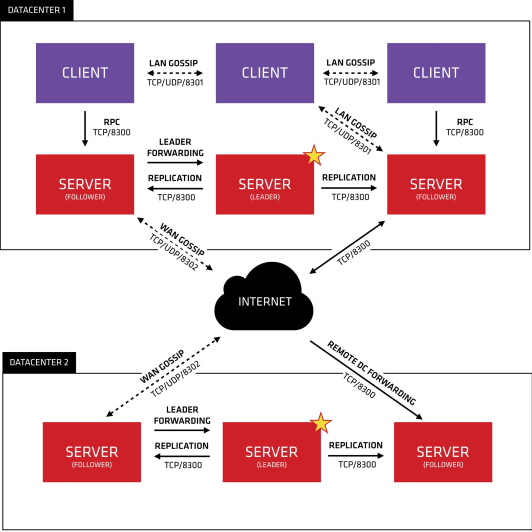
Through one diagram, we can understand the characteristics of consumer and the working mechanism of internal roles, including supporting multiple data centers, port numbers, service discovery, configuration and update functions, etc
Description:
1. Consul Cluster consists of nodes that deploy and run Consul Agent. There are two roles in Cluster: Server and Client.
2. The roles of server and Client have nothing to do with the application services running on Consul Cluster. They are based on the role division of Consul
 3. Consul Server: used to maintain the status information of Consul Cluster, achieve data consistency, and respond to RPC requests. The official recommendation is to run at least three or more consul servers. A leader needs to be elected among multiple servers. This election process is implemented based on Raft protocol. The consul data information on multiple server nodes keeps strong consistency. Communicate with local clients in LAN and other data centers through Wan. Consul Client: only maintain its own state, and forward HTTP and DNS interface requests to the server.
4. Consul supports multiple data centers. Each data center is required to install a group of consul clusters. The communication between multiple data centers is based on the mission protocol protocol, and the Raft algorithm is used to achieve consistency
Let's start the deployment process
Practical demonstration
Two servers
| ip | hostname | tools |
|---|---|---|
| 192.168.10.128/24 | consul-server | Docker Ce (install and start docker service), consumer, consumer template, nginx software |
| 192.168.10.129/24 | docker-service | docker-ce,registrator |
Brief introduction of implementation process
First: deploy the service auto discovery mechanism of operation verification consumer
Second: deploy operation to verify the service configuration update mechanism of consumer
Now start the verification deployment process of the first item
1. Configuring on the consumer server node
#Set the host name, decompress related tools, and optimize the use of tools
[root@localhost ~]# hostnamectl set-hostname consul-server
[root@localhost ~]# su
[root@consul-server ~]# cd /opt/
[root@consul-server opt]# ls
consul_0.9.2_linux_amd64.zip  consul-template_0.19.3_linux_amd64.zip  containerd  docker.sh  rh
[root@consul-server opt]# unzip consul_0.9.2_linux_amd64.zip
Archive:  consul_0.9.2_linux_amd64.zip
  inflating: consul
[root@consul-server opt]# unzip consul-template_0.19.3_linux_amd64.zip
Archive:  consul-template_0.19.3_linux_amd64.zip
  inflating: consul-template
[root@consul-server opt]# ls
consul  consul_0.9.2_linux_amd64.zip  consul-template  consul-template_0.19.3_linux_amd64.zip  containerd  docker.sh  rh
[root@consul-server opt]# mv consul /usr/bin
[root@consul-server opt]# mv consul-template /usr/bin
#Create working directory
[root@consul-server opt]# mkdir /root/consul
[root@consul-server opt]# cd /root/consul/
[root@consul-server consul]# ls
2. Deploy consumer on the consumer server node
[root@consul-server consul]#  consul agent \
> -server \
> -bootstrap \
> -ui \
> -data-dir=/var/lib/consul-data \
> -bind=192.168.10.128 \
> -client=0.0.0.0 \
> -node=consul-server01 &> /var/log/consul.log &
[1] 6489
[root@consul-server consul]# jobs
[1]+  In operation               consul agent -server -bootstrap -ui -data-dir=/var/lib/consul-data -bind=192.168.10.128 -client=0.0.0.0 -node=consul-server01 &>/var/log/consul.log &
3. View the log of running agent:
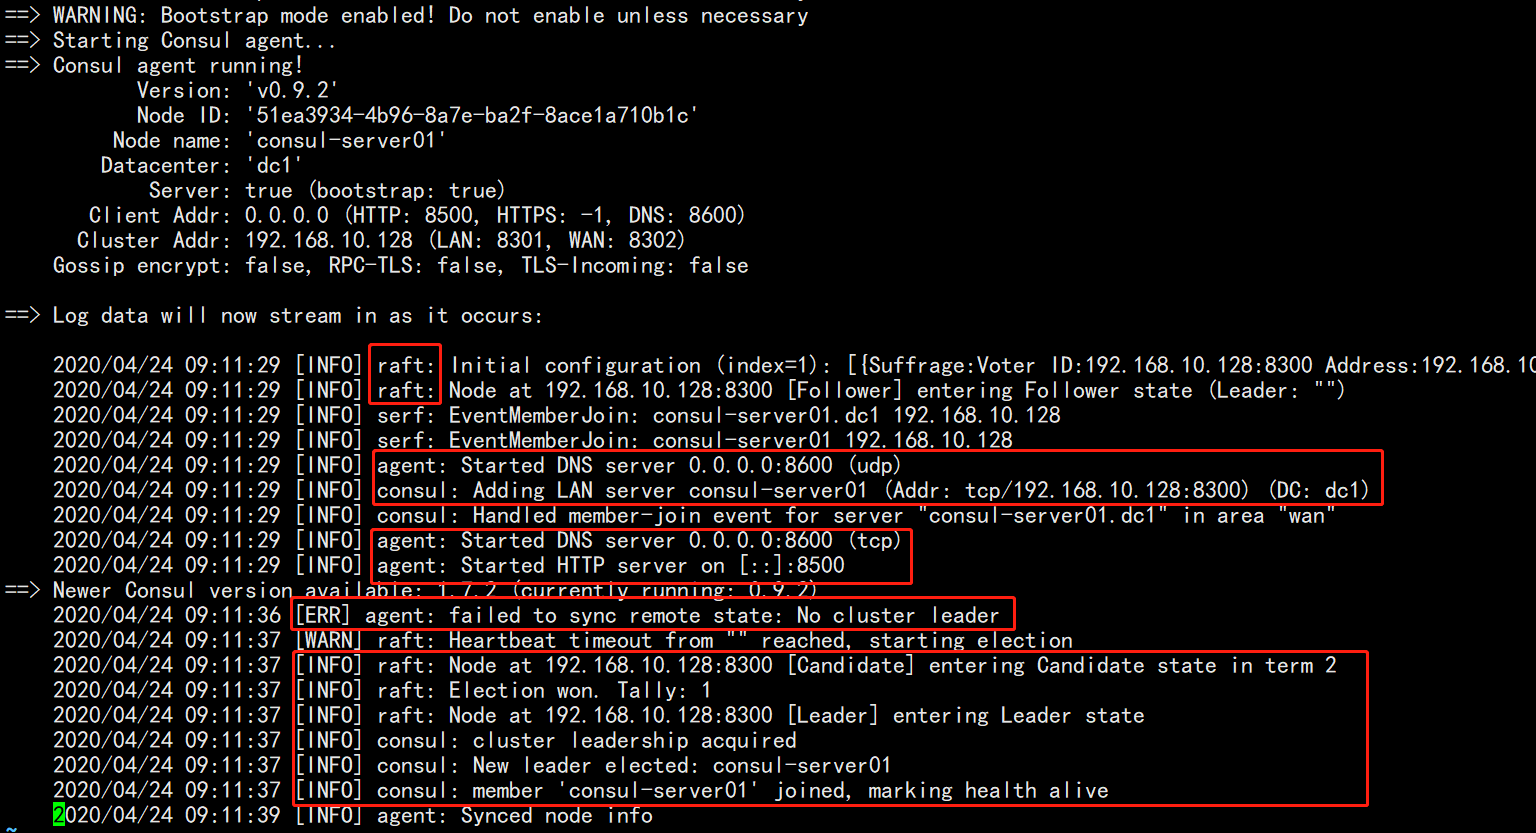
Pay attention to the red part, which reflects the characteristics and information of algorithm, agent function opening, relevant port protocol, etc. in the log. There is an ERR, which is ignored here temporarily (in fact, the information after the problem has been solved can be found, and it will automatically become a leader, because this is a single node. 3 or 5 are recommended in the production environment)
4. Configuring on the docker service node
[root@localhost ~]# hostnamectl set-hostname docker-service
[root@localhost ~]# su
#Install and configure gliderlabs / Registrar
[root@docker-service ~]# docker run -d \
> --name=registrator \
> --net=host \
> -v /var/run/docker.sock:/tmp/docker.sock \
> --restart=always \
> gliderlabs/registrator:latest \
> -ip=192.168.10.129 \
> consul://192.168.10.128:8500
Unable to find image 'gliderlabs/registrator:latest' locally
latest: Pulling from gliderlabs/registrator
Image docker.io/gliderlabs/registrator:latest uses outdated schema1 manifest format. Please upgrade to a schema2 image for better future compatibility. More information at https://docs.docker.com/registry/spec/deprecated-schema-v1/
c87f684ee1c2: Pull complete
a0559c0b3676: Pull complete
a28552c49839: Pull complete
Digest: sha256:6e708681dd52e28f4f39d048ac75376c9a762c44b3d75b2824173f8364e52c10
Status: Downloaded newer image for gliderlabs/registrator:latest
befb4e5e2b4239a48bb85cedbdd061ef27996b31e3f323a4ba35d66b68286691
5. View the downloaded images and running containers on the current server node

Run two nginx container services on the current server node to test the discovery mechanism of the consumer service
[root@docker-service ~]# docker run -itd -p 88:80 --name nginx01 -h nginx-01 nginx:latest
Unable to find image 'nginx:latest' locally
latest: Pulling from library/nginx
54fec2fa59d0: Pull complete
4ede6f09aefe: Pull complete
f9dc69acb465: Pull complete
Digest: sha256:86ae264c3f4acb99b2dee4d0098c40cb8c46dcf9e1148f05d3a51c4df6758c12
Status: Downloaded newer image for nginx:latest
441d11db3bcf4bb47d758967661e27df2e9d5855ab540e01766236e8587fd1ae2
[root@docker-service ~]# docker run -itd -p 89:80 --name nginx02 -h nginx-02 nginx:latest
18508414acc2327d0df9aa570575a2369a239dd408a075eaa23fdfccfd14660f
[root@docker-service ~]# docker ps -a
CONTAINER ID        IMAGE                           COMMAND                  CREATED             STATUS              PORTS                NAMES
18508414acc2        nginx:latest                    "nginx -g 'daemon of..."   5 seconds ago       Up 4 seconds        0.0.0.0:89->80/tcp   nginx02
441d11db3bcf        nginx:latest                    "nginx -g 'daemon of..."   41 seconds ago      Up 40 seconds       0.0.0.0:88->80/tcp   nginx01
befb4e5e2b42        gliderlabs/registrator:latest   "/bin/registrator -i..."   4 minutes ago       Up 4 minutes                             registrator
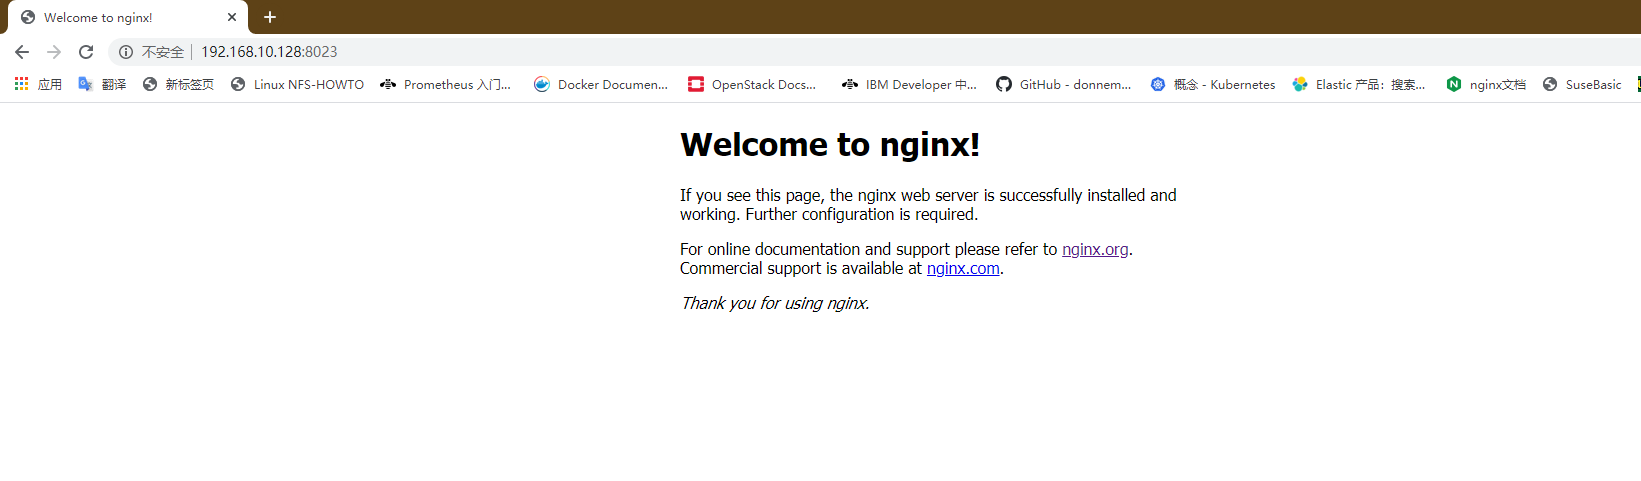
Test whether the running container can be opened in the browser

We visit the ip address of the consumer server node and port 8500 to view the automatic discovery and registration mechanism for verifying the consumer
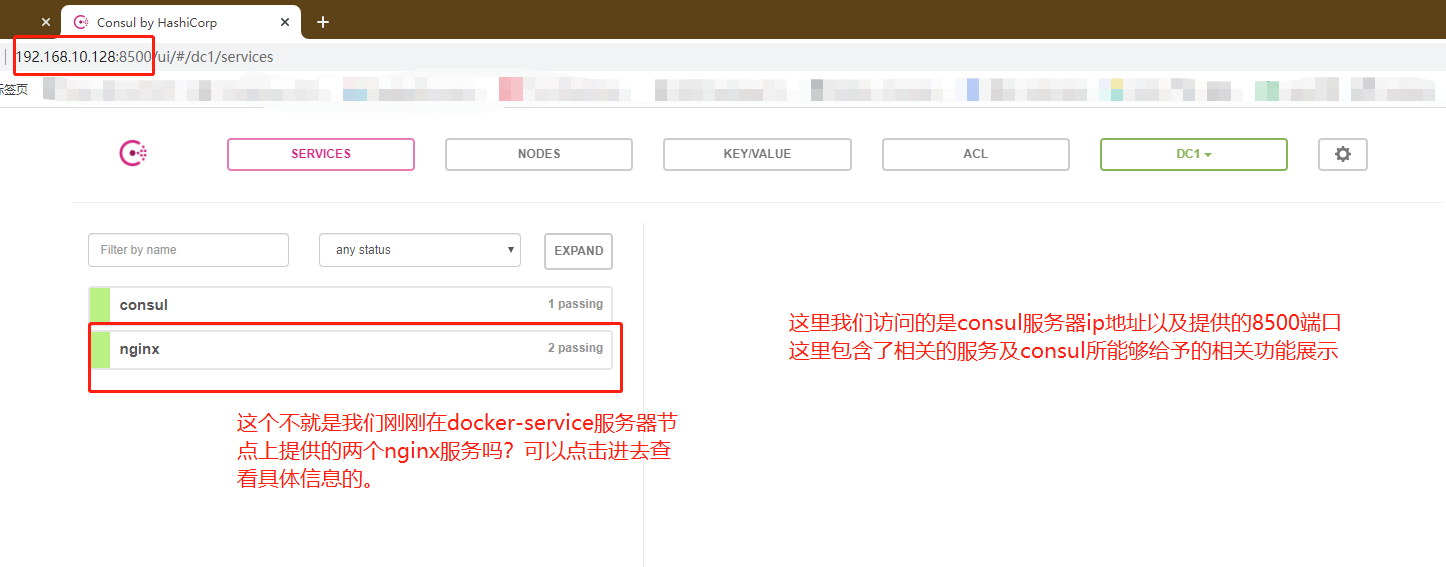
First verification completed
Of course, you can't access the back-end web Services page by directly accessing the consumer server at this time
So, next we need to verify the consumer automatic update mechanism
Second verification configuration process
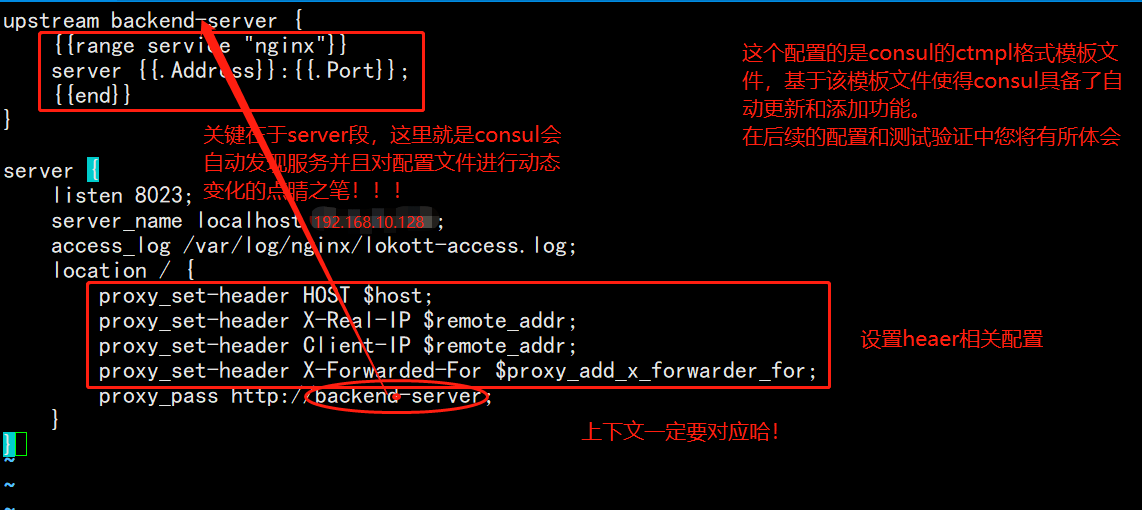
1. Writing template files on the consumer server node
[root@consul-server consul]# vim nginx.ctmpl
[root@consul-server consul]# cat nginx.ctmpl
upstream backend-server {
    {{range service "nginx"}}
    server {{.Address}}:{{.Port}};
    {{end}}
}

server {
    listen 8023;
    server_name localhost 192.168.10.128;
    access_log /var/log/nginx/lokott-access.log;
    location / {
    proxy_set_header HOST $host;
    proxy_set_header X-Real-IP $remote_addr;
    proxy_set_header Client-IP $remote_addr;
    proxy_set_header X-Forwarded-For $proxy_add_x_forwarder_for;
    #The above four lines can not be set. If there is an error in the setting, there will be errors in several cases when the consumer template is started
    #Especially the x-forward-for configuration item
    proxy_pass http://backend-server;
    }
}
Illustration of the above documents:
2. Here we need to manually compile and install nginx service (omitted here!) Just give me the results of the startup
[root@consul-server nginx-1.12.2]# ln -s /usr/local/nginx/sbin/nginx /usr/bin/
[root@consul-server nginx-1.12.2]# nginx -t
nginx: the configuration file /usr/local/nginx/conf/nginx.conf syntax is ok
nginx: configuration file /usr/local/nginx/conf/nginx.conf test is successful
[root@consul-server nginx-1.12.2]# nginx
[root@consul-server nginx-1.12.2]# netstat -natp | grep 80
tcp        0      0 0.0.0.0:80              0.0.0.0:*               LISTEN      44370/nginx: master
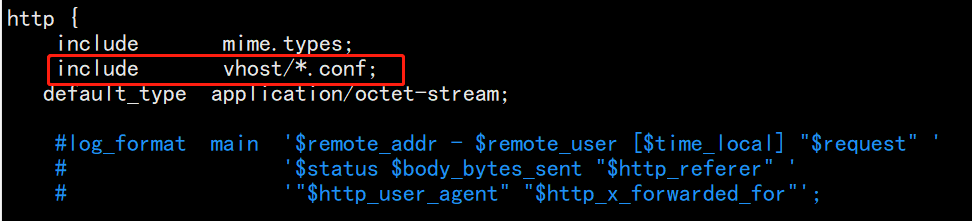
3. At this time, the nginx service on the consumer node server starts normally. We need to configure the nginx configuration file at this time
In fact, as long as you enter the configuration directory to create a vhost directory to store your other configuration files (high decoupling, easy to maintain and change the extension) and create a log directory (according to your template), then after executing the command of consult template and accessing the web, you will generate configuration files and log files in the corresponding directory
For the main configuration file, just add one line of code, which contains all the configuration files in the vhost directory
[root@consul-server nginx-1.12.2]# cd /usr/local/nginx/conf/
[root@consul-server conf]# mkdir /var/log/nginx
[root@consul-server conf]# mkdir vhost
[root@consul-server conf]# vim nginx.conf
#Just configure according to the figure below
4. At this point, we need to use our consumer template tool to start the service
[root@consul-server consul]# consul-template -consul-addr 192.168.10.128:8500 -template "/root/consul/nginx.ctmpl:/usr/local/nginx/conf/vhost/lokott.conf:/usr/local/nginx/sbin/nginx -s reload" --log-level=info
2020/04/24 02:15:57.369809 [INFO] consul-template v0.19.3 (ebf2d3d)
2020/04/24 02:15:57.369819 [INFO] (runner) creating new runner (dry: false, once: false)
2020/04/24 02:15:57.370054 [INFO] (runner) creating watcher
2020/04/24 02:15:57.370345 [INFO] (runner) starting
2020/04/24 02:15:57.370352 [INFO] (runner) initiating run
2020/04/24 02:15:57.371539 [INFO] (runner) initiating run
2020/04/24 02:15:57.372779 [INFO] (runner) rendered "/root/consul/nginx.ctmpl" => "/usr/local/nginx/conf/vhost/lokott.conf"
2020/04/24 02:15:57.372800 [INFO] (runner) executing command "/usr/local/nginx/sbin/nginx -s reload" from "/root/consul/nginx.ctmpl" => "/usr/local/nginx/conf/vhost/lokott.conf"
2020/04/24 02:15:57.372843 [INFO] (child) spawning: /usr/local/nginx/sbin/nginx -s reload
At this point, we open another terminal to view the file in vhost
[root@consul-server ~]# cd /usr/local/nginx/conf/vhost/
[root@consul-server vhost]# cat lokott.conf
upstream backend-server {

    server 192.168.10.129:88;

    server 192.168.10.129:89;

}

server {
    listen 8023;
    server_name localhost 192.168.10.128;
    access_log /var/log/nginx/lokott-access.log;
    location / {
    proxy_set_header HOST $host;
    proxy_set_header X-Real-IP $remote_addr;
    proxy_set_header Client-IP $remote_addr;
    proxy_pass http://backend-server;
    }
}
At this time, it will be found that the docker container service (nginx application service) we set has been provided, and load balancing is carried out in a round robin way. Note that the service provided by the container is the ip address of the host, because the network mode we set earlier (for docker network mode, please refer to another blog: See the essence through the phenomenon -- docker's network mode, troubleshooting while configuring docker's custom network (bridge mode) )It is host, so the container here uses the host ip address.
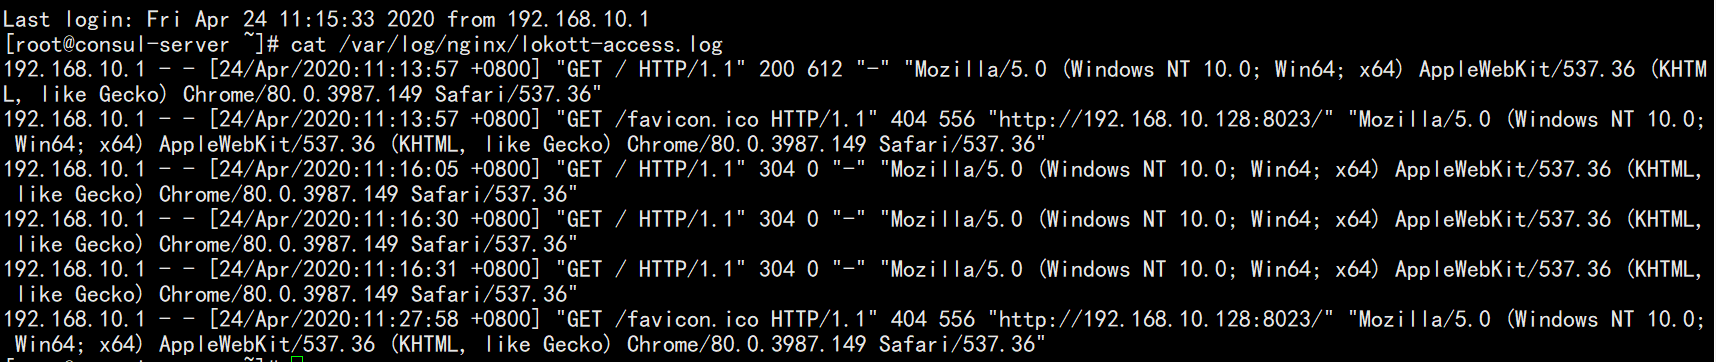
At this time, we can directly access the customer server address and the port number configured by you through the browser, and verify whether we can access the web page provided by nginx service
Can be viewed through log files
Then we add another nginx service on the docker service node, and then automatically add and update the configuration
[root@docker-service ~]# docker run -itd -p 90:80 --name nginx03 -h nginx-03 nginx:latest
144df900d69e682bf356c3b32d9aa043106327964c700cc99850ae2c1e7a5f3c
After running the instruction, we can view the information in the original terminal of the consumer server, because the service is monitoring all the time
You'll find a few more lines
2020/04/24 02:27:46.318181 [INFO] (runner) initiating run
2020/04/24 02:27:46.319400 [INFO] (runner) rendered "/root/consul/nginx.ctmpl" => "/usr/local/nginx/conf/vhost/lokott.conf"
2020/04/24 02:27:46.319434 [INFO] (runner) executing command "/usr/local/nginx/sbin/nginx -s reload" from "/root/consul/nginx.ctmpl" => "/usr/local/nginx/conf/vhost/lokott.conf"
2020/04/24 02:27:46.319467 [INFO] (child) spawning: /usr/local/nginx/sbin/nginx -s reload
At the same time, the lokott.conf file changes
[root@consul-server vhost]# cat lokott.conf
upstream backend-server {

    server 192.168.10.129:88;

    server 192.168.10.129:89;

    server 192.168.10.129:90;

}

server {
    listen 8023;
    server_name localhost 192.168.10.128;
    access_log /var/log/nginx/lokott-access.log;
    location / {
    proxy_set_header HOST $host;
    proxy_set_header X-Real-IP $remote_addr;
    proxy_set_header Client-IP $remote_addr;
    proxy_pass http://backend-server;
    }
}
Some summary
First of all, we need to understand the purpose of building docker container based on consumer to provide services. In terms of nginx in this paper, we can flexibly and quickly expand configuration update services to facilitate elastic scaling;
Secondly, it is necessary to understand the use and purpose of relevant tools;
In addition, we will not list some internal port services and corresponding protocols.
Follow up thinking and verification
At present, there are three nginx container services. If a service fails at this time, what will happen? What will happen to the running command terminal, configuration file and web ui interface content (ip: 8500)?
For simulation test, you can stop a nginx container service
[root@docker-sevice ~]# docker stop test03
test03
The result is:
The terminal will have relevant information at the same time, and the configuration file will change dynamically with it, kicking out the failed service. Then it can be imagined that the web UI interface will also change dynamically, returning to the original two nginx service states. You can check it by yourself!
Thank you for reading!