System environment: Ubuntu 16.04 (Docker container)
Architecture environment:
Keepalived/HAproxy MASTER: 172.17.0.4
Keepalived/HAproxy BACKUP: 172.17.0.6
MySQL MASTER: 172.17.0.2
MySQL SLAVE: 172.17.0.3
HAproxy version: haproxy-2.0.8.tar.gz
Keepalived version: keepalived-2.0.19.tar.gz
1. Install HAproxy (both MASTER/BACKUP)
1. Go to the official website https://www.haproxy.org/ Download HAproxy
Unzip and enter the haproxy-2.0.8 directory
vim INSTALL; see installation instructions

2. Compile and install HAproxy
(1) Compilation
Error 1:bash: make: command not found

It's easy for me to use the docker directly. The make command is not installed. Install it:
apt-get -y install make
Then execute:
make -j 2 TARGET=generic USE_GZIP=1
Error 2:/bin/sh: 1: gcc: not found

GCC not installed, install gcc:
apt-get -y install gcc
Then execute:
make -j 2 TARGET=generic USE_GZIP=1
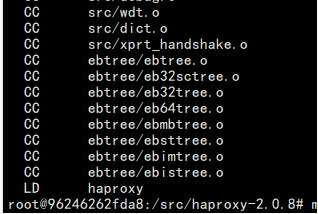
No errors reported for the time being:

(2) Installation
Direct execution:
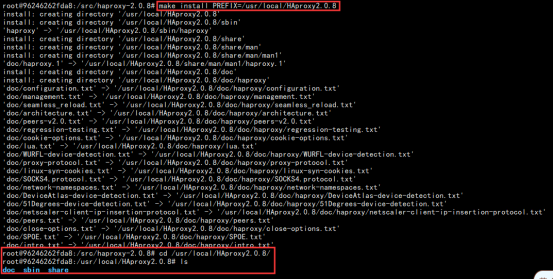
make install PREFIX=/usr/local/HAproxy2.0.8

(3) Copy commands to/usr/local/sbin/

3. Add Service Startup Script File
vim /etc/init.d/haproxy
#!/bin/bash
#
# chkconfig: 2345 85 15
# descrition: haproxy loadbalancer

DAEMON=haproxy
PROG_DIR=/usr/local/HAproxy2.0.8
RETVAL=0

success() {                       #Discuss with a friend using the shell itself; of course, you can also use for's traversal loop.
                                    //All in all, there are many ways
for ((i=0;i<=5;i++))
do
sleep 0.2
echo -n "."
done
}

start ()
{
    PROG_STAT=$(netstat -tlnp | grep ${DAEMON})
    if [ -z "$PROG_STAT" ]; then
  $PROG_DIR/sbin/$DAEMON -f $PROG_DIR/conf/${DAEMON}.cfg
        echo -ne "Starting ${DAEMON}......\t\t\t"  && success
  echo -e "\e[32m[OK]\e[0m"
    else
        echo "$DAEMON is already running"
RETVAL=65
    fi
}

stop ()
{
    PROG_STAT=$(netstat -tlnp | grep ${DAEMON})
    if [ -n "$PROG_STAT" ]; then
        echo -ne "stopping ${DAEMON}......\t\t\t"  && success
        PROG_PID=$(cat $PROG_DIR/run/${DAEMON}.pid)
        kill $PROG_PID
        echo -e "\e[32m[OK]\e[0m"
    else
        echo "$DAEMON is already stopped"
RETVAL=66
    fi
}

restart()
{
    echo -ne "restarting ${DAEMON}......\t\t\t"   && success
    PROG_PID=$(cat $PROG_DIR/run/${DAEMON}.pid)
    $PROG_DIR/sbin/$DAEMON -f $PROG_DIR/conf/${DAEMON}.cfg -st $PROG_PID
    echo -e "\e[32m[OK]\e[0m"
}

status ()
{
    PROG_STAT=$(netstat -tlnp | grep ${DAEMON})
    if [ -z "$PROG_STAT" ]; then
        echo "${DAEMON} stopped"
    else
        echo "${DAEMON} running"
    fi
}

case "$1" in
    start)
        start
        ;;
    stop)
        stop
        ;;
    restart)
        restart
        ;;
    status)
        status
        ;;
    *)
        echo "Usage /etc/init.d/$DAEMON {start | stop | restart | status}"
RETVAL=67
esac
exit $RETVAL
Give execution authority:
chmod +x /etc/init.d/haproxy
4. Add haproxy.conf profile
Create haproxy users and groups first:

Create a configuration file:
mkdir -p /etc/haproxy
vim /etc/haproxy/haproxy.conf
global
    log 127.0.0.1 local2 info    # Set log file output orientation, info at log level
    chroot /usr/local/HAproxy2.0.8    # Change the current working directory
    pidfile /usr/local/HAproxy2.0.8/run/haproxy.pid    #PID file location
    user haproxy    # Users and Groups
    group haproxy
    daemon    # Daemon is started and maintained in the background
    maxconn 4000    # maximum connection

# Acts on the listen block immediately following it until the next defaults block, where the next default replaces the previous block for subsequent listens
defaults
        log global      #Start Logging Events and Traffic per Instance
        mode http       #Default mode mode {tcp|http|health},tcp Is Four Layers,http It's seven levels, health Only returns ok
        retries 3       #Number of retries after failed connection to server
        option redispatch       #Enable or disable session reassignment in case of connection failure
        maxconn 4096    #maxconn Maximum number of connections available per process
        timeout http-request    10s
        timeout queue   1m
        timeout connect 10s
        timeout client 1m
        timeout server 1m
        timeout http-keep-alive 10s

frontend main
        bind 0.0.0.0:3307
        default_backend mysql

backend mysql
        balance leastconn    #Algorithms: Minimum number of connections
        server mysql1 172.17.0.2:3306 check port 3306 maxconn 300
        server mysql2 172.17.0.3:3306 check port 3306 maxconn 300
Copy a configuration file to the directory:
cp -a /etc/haproxy/haproxy.conf /usr/local/HAproxy2.0.8/conf/haproxy.cfg
To start the haproxyd service
/etc/init.d/haproxy start

Show that the service started successfully and the port is also in
2. Install Keepalived
1. Go to the official website to download the required version https://www.keepalived.org/
Unzip again, go to the directory, and view the installation instructions documentation (ignored here)
2. Compile Dress
(1) Check the environment
./configure --prefix=/usr/local/keepalived-2.0.19
Error 1: Can not include OpenSSL headers files

Without openssl, execute:
apt-get -y install openssl libssl-dev
Note: Openssl and openssl-devel need to be installed in redhat s and centos. In ubuntu, openssl-devel is replaced by libssl-dev, libssl-dev can be installed
Check the environment again~

ok, every problem, warning ignore
(2) Compile, compile and install
make && make install

ok, compilation and installation complete
3. Edit Profile
Cp/usr/local/keepalived-2.0.19/etc/keepalived/keepalived.conf/etc/keepalived/ #Copy profile
cp /usr/local/keepalived-2.0.19/sbin/keepalived /usr/local/sbin/
Cp/usr/local/keepalived-2.0.19/etc/rc.d/init.d/keepalived/etc/init.d/ #Copy the service startup file
chmod +x /etc/init.d/keepalived
Vim/etc/keepalived/keepalived.conf (MASTER machine)
! Configuration File for keepalived

global_defs {
   router_id r1         #Virtual route name, master and backup cannot be consistent
}

vrrp_script chk_haproxy {       #Define check script
        script "/etc/keepalived/chk_haproxy.sh"         #Script Location
        interval 3      #Detect every 3 seconds
        fall 3          #Failure judgement 3 times
#       weight  -2      #Weight after failure-2
}

vrrp_instance VI_1 {
    state MASTER        #Status, only MASTER or BACKUP
    interface eth0      #Network Card Name, be aware that it must be the name of the network card you are using
    virtual_router_id 53        #Virtual route id, the last two Macs of a virtual route
    priority 100                #priority
    advert_int 1                #Announcement interval
    authentication {            #Authentication
        auth_type PASS
        auth_pass 1111
    }

    track_script {     #Execute the above script
        chk_haproxy
    }

    virtual_ipaddress {         #VIP Address, Same Network Segment
        172.17.0.253
    }
#   notify_master "/etc/init.d/haproxy start"   #Tasks performed when the current node becomes master
#   notify_backup "/etc/init.d/haproxy restart" #Tasks performed when the current node becomes backup
#   notify_fault  "/etc/init.d/haproxy stop"    #Tasks performed when the current node fails
}
ok, create health check script file
vim /etc/keepalived/chk_haproxy.sh
#/bin/bash

STAT=`ps -C haproxy --no-header | wc -l`

if [[ ! "$STAT" -eq 1  ]];then
        /etc/init.d/keepalived stop
fi
Close keepalived directly if the process is not present
chmod +x chk_haproxy.sh #Give execute permission
4. Start the keepalived service
Some files in the startup file do not exist and need to be linked manually (ubuntu is a hassle):

ln -s /lib/lsb/init-functions /etc/init.d/functions
mkdir /etc/rc.d
ln -s /etc/init.d /etc/rc.d/
cp /src/keepalived-2.0.19/keepalived/etc/sysconfig/keepalived /etc/sysconfig/
Then install the daemon command:
apt-get -y install daemon
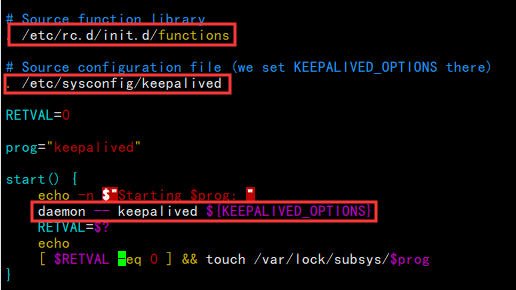
Notice in the diagram that daemon -- keepalived was previously daemon keepalived with two horizontal bars added
This command is problematic, where -D was originally intended for keepalived, but this combination is considered a parameter to the daemon command.This will cause the service to fail to start.If not modified, the startup will be prompted to fail, but no specific information will be output.
Note that since I installed keepalived using a docker container, I need to save the container as a mirror and then re-docker run, adding the parameter --privileged to display the keepalived VIP (not negligible if installed with a container)
docker run -dit --privileged --name ha_keep -p 3308:3307 ha_keep
Start service below:
/etc/init.d/keepalived start

Execution: ip addr

5. Configure BACKUP
haproxy serves MASTER consistently, and keepalived mainly modifies the main configuration file
Keepalived/BACKUP machine profile:
! Configuration File for keepalived

global_defs {
   router_id r2         #Virtual route name, master and backup cannot be consistent
}

vrrp_script chk_haproxy {       #Define check script
        script "/etc/keepalived.chk_haproxy.sh"         #Script Location
        interval 3      #Detect every 3 seconds
        fall 3          #Failure judgement 3 times
#       weight  -2      #Weight after failure-2
}

vrrp_instance VI_1 {
    state BACKUP        #Status, only MASTER or BACKUP
    interface eth0      #Network Card Name, be aware that it must be the name of the network card you are using
    virtual_router_id 53        #Virtual route id, the last two Macs of a virtual route
    priority 99                 #priority
    advert_int 1                #Announcement interval
    authentication {            #Authentication
        auth_type PASS
        auth_pass 1111
    }

    track_script {
        chk_haproxy
    }

    virtual_ipaddress {         #VIP Address, Same Network Segment
        172.17.0.253
    }
#   notify_master "/etc/init.d/haproxy start"   #Tasks performed when the current node becomes master
#   notify_backup "/etc/init.d/haproxy restart" #Tasks performed when the current node becomes backup
#   notify_fault  "/etc/init.d/haproxy stop"    #Tasks performed when the current node fails
}
The other configurations are the same, then start keepalived
6. Test whether the haproxy service stop of MASTER will automatically shut down the keepalived service and transfer VIP to BAKUP machine
The VIP to BACKUP shown in the figure below illustrates configuring ok

7. Load balancing is highly available, but this architecture is suitable for mysql master replication or shared storage servers. Personally, mysql master is prone to problems, which is not recommended.
If reproduced, please indicate the source