Read-write separation can improve system throughput. I have read a lot of articles about java springboot to do read-write separation on the web. Most of them are based on spring aop hard-coded java code. The code is more intrusive. The principle is: if you call the methods at the beginning of select and get, you call the slave library; otherwise, you call the main library. This article will base on sharding-jdbc when it is open source to do read-write separation., you know by name that it is on jdbc, code zero intrusion, and profile configuration master-slave library address.
1. Set up a read-write separation environment
-
Docker: While building the read-write separation in the docker environment, I encountered a pit. The latest mysql image is version 8.0 and cannot be successfully built. Just use 5.7.26 later.
Mirror address: https://hub.docker.com/_/mysql?tab=tags,docker pull mysql:5.7.26
I'm in the Mac OS environment. Here's a brief description of docker's mysql master-slave process -
a. Create two.cnf configuration files and two data storage directories on your machine to store mysql data

-
The b.mysql.cnf configuration file is as follows, only server-id cannot be the same
[mysqld]
pid-file    = /var/run/mysqld/mysqld.pid
socket    = /var/run/mysqld/mysqld.sock
datadir    = /var/lib/mysql
symbolic-links=0
character-set-server = utf8
#skip-networking
innodb_print_all_deadlocks = 1
max_connections = 2000
max_connect_errors = 6000
open_files_limit = 65535
table_open_cache = 128
max_allowed_packet = 4M
binlog_cache_size = 1M
max_heap_table_size = 8M
tmp_table_size = 16M
read_buffer_size = 2M
read_rnd_buffer_size = 8M
sort_buffer_size = 8M
join_buffer_size = 28M
key_buffer_size = 4M
thread_cache_size = 8
query_cache_type = 1
query_cache_size = 8M
query_cache_limit = 2M
ft_min_word_len = 4
log-bin = master-bin.log

server-id = 1

sync_binlog=1
binlog_format = mixed
performance_schema = 0
explicit_defaults_for_timestamp
#lower_case_table_names = 1
interactive_timeout = 28800
wait_timeout = 28800
# Recommended in standard MySQL setup
sql_mode=NO_ENGINE_SUBSTITUTION,NO_AUTO_CREATE_USER,STRICT_TRANS_TABLES
[mysqldump]
quick
max_allowed_packet = 16M
[myisamchk]
key_buffer_size = 8M
sort_buffer_size = 8M
read_buffer = 4M
write_buffer = 4M
- c.docker runs two mysql mirrors, changes the configuration file address and data storage directory of the master and slave libraries, and sets root's login password 123456 using the following commands
docker run -itd --name mysql_master -v /Users/zhuyu/zy/database/mysql/master.cnf:/etc/mysql/mysql.conf.d/mysqld.cnf -v /Users/zhuyu/zy/database/mysql/master_data:/var/lib/mysql -e MYSQL_ROOT_PASSWORD=123456 -p 3306:3306 mysql:5.7.26
- d. Find the main library container ID and enter the main library container console docker exec-it container id/bin/bash
- e. Enter MySQL command line, mysql-uroot-p123456, enter the following command:
Create this user to copy logs from the library through this user
 Create a user: create user'zhuyu'@'%'identified by'123456';
User grants permission: grant all privileges on *.* to'zhuyu'@'%'with grant option;
grant replication slave on *.* to'zhuyu'@'%'with grant option;
Make the just command take effect: flush privileges;
View the main library log file: show master status; remember the values of File and Position, use from the library

- f. Enter the mysql command line from the library container to connect to the main library
Connect to the main library: change master to master_host='192.168.0.115',master_user='zhuyu', master_password='123456',master_log_file='master-bin.000004',master_log_pos=1118;
Open slave library: start slave;
View slave status from library: show slave status\G
 If connection configuration errors are to be changed again, stop slave; reset slave can be used;
If you see two Yes in the red line part of the image below, the master and slave libraries are successfully built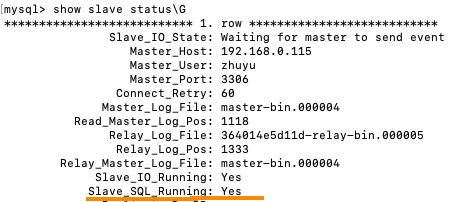
Connect to the main library using the mysql client, create a database, and then connect from the library to see if the database is synchronized