Recently, the project responsible for preparing large data platform storage mainly around the Hadoop platform. Although we plan to use the cdh version of hadoop, we will use the original Hadoop for development convenience before preparing a better environment for expansion.
Environmental preparation
The three server system environments are built on Centos7.6.And is built to run on the root account, if you need to use other user actions, pay attention to the issue of permissions
Base Machine Assignment
Build on three newly purchased servers.The server plan is as follows
| hostname | ip | Explain |
|---|---|---|
| tidb1 | 192.168.108.66 | namenode and datanode |
| tidb2 | 192.168.108.67 | namenode and datanode |
| tidb3 | 192.168.108.68 | namenode and datanode |
There are three basic machine configurations for building a large data cluster. Real-world deployment suggests that namenode be separated from datanode, two machines are dedicated to namenode nodes, and three others are datanode nodes.
Each machine is installed as follows:
| tidb1 | tidb2 | tidb3 | |
|---|---|---|---|
| NameNode | √ | √ | |
| DataNode | √ | √ | √ |
| ResourceManager | √ | √ | |
| NodeManager | √ | √ | √ |
| Zookeeper | √ | √ | √ |
| journalnode | √ | √ | √ |
| zkfc | √ | √ |
Over version 3.0, we can install multiple NameNode nodes to ensure higher high availability scenarios.However, it is possible to develop a test environment as a foundation where more machine extensions can be extended.
firewall
All three machines need to do this
Close the firewall of the cluster before deploying it, otherwise deployment will occur and access ports will not be accessible.
There are two firewalls in centos system, firewall and iptables. The default firewall after 7.0 is firewall. However, I also see other friends on the Internet have encountered two firewall policies on 7.0 system that make the layout program port unreachable.
firewall
- View the status of your firewall
[root@tidb1 sbin]# firewall-cmd --state
running
- Stop Firewall
systemctl stop firewalld.service
- Prevent startup
systemctl disbale firewalld.service
After performing the above three steps, there will be no firewall configuration problems after the program starts again.
iptabel
If this firewall is configured, we also need to close the firewall, if you are familiar with it, you can actually open the corresponding port policy.
- View the status of your firewall
service iptables status
- Stop Firewall
service iptables stop
Redirecting to /bin/systemctl stop  iptables.service
- Prevent startup
chkconfig iptables off
For cluster environments installed on other systems, the firewall should be closed according to the corresponding policy.
Selinux
All three machines need to do this
For this enhanced Linux, many Internet users recommend shutting down, and searched for relevant information here, mainly because no one has a special maintenance operation whitelist.
We also shut down the test environment to facilitate the building of our cluster.Official launch is deployed to meet operational needs.
- View the current state of SELinux:
getenforce
- Modify the SELinux state (temporary changes, invalid after restarting the machine)
 setenforce 0   #Modify SELinux to the Permissive state (warnings are taken to allow passage if a security policy violation is encountered)

  setenforce 1   #Modify the SELinux state to the Enforcing state (security violations are not allowed)
- Modify SELinuxw to disabled (permanent, effective after machine restart)
 Open file: /etc/selinux/config Modify SELINUX = disabled
 Effective after restarting the machine, restart machine command: reboot
ip Fixed
All three machines need to do this
In an enterprise environment, if it is a real server, not a cloud server, then we need to fix the ip before using the server, otherwise the server will restart unexpectedly, which will lead to changes in our ip and the cluster will not start properly.
Fixed ip, two implementations:
- There are dedicated personnel router-side fixed allocations, which is the simplest operation step.This is recommended
- Fixed ip for a dedicated network card. Most times the server has a dual network card and an optical port. Refer to the following steps for reference only
- View network card (file ifcfg-enp* is a network card file)
ls /etc/sysconfig/network-scripts/
- Configure Network Card ip
vi /etc/sysconfig/network-scripts/ifcfg-enp*
# Enable host-only network card
cd /etc/sysconfig/network-scripts/
cp ifcfg-enp0s3  ifcfg-enp0s8
- Modify network card to static ip
- Modify BOOTPROTO to static
- Modify NAME to enp0s8
- Modify the UUID (you can change a value at will, as long as it's not the same as the original)
- Adding IPADDR can be customized for host-connected virtual machine use.
- Add NETMASK=255.255.255.0 (Network management can also be as x.x.x.255 as network segments)
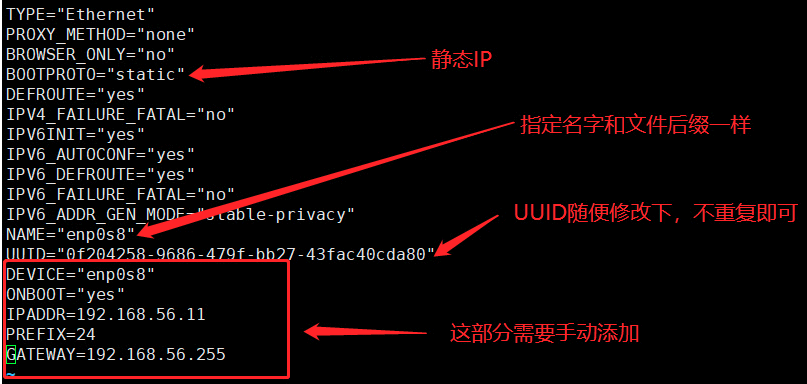
- Restart Network Card
service network restart
Configure hosts
All three machines need to do this
It is important to note that when configuring the primary node Namenode, you need to comment out the two lines of localhost, otherwise you will not find the hostname.Other nodes can exist
vim /etc/hosts

[root@tidb1 network-scripts]# cat /etc/hosts
#127.0.0.1   localhost localhost.localdomain localhost4 localhost4.localdomain4
#::1         localhost localhost.localdomain localhost6 localhost6.localdomain6
192.168.108.66 tidb1
192.168.108.67 tidb2
192.168.108.68 tidb3
Configure logon-free
As normal as old people, clusters need to communicate with each other through ssh, so login-free situations need to be set up.
The steps are as follows:
- Generate key
ssh-keygen -t rsa -P '' -f ~/.ssh/id_rsa
- Write authorized_keys
cat ~/.ssh/id_rsa.pub >> ~/.ssh/authorized_keys`
- Attention to permissions issues
chmod 0600 ~/.ssh/authorized_keys
- Copy to another server
ssh-copy-id root@tidb2
ssh-copy-id root@tidb3
- Try to free each other from landing
ssh tidb2
ssh tidb3
ssh tidb1
On each machine, operations are required to achieve logon-free, if there are logon-free failures
- Check that the configured logon-free key is correct, typically due to an error in the key.
- There is no problem with the secret key, the file permissions are correct, and the third step permissions are modified.
Directory permissions, solve the problem.
sudo chmod 700 ~
sudo chmod 700 ~/.ssh
sudo chmod 600 ~/.ssh/authorized_keys
Prepare the software you need to install
The hadoop HA version requires zookeeper, so there are three versions of hadoop, zookeeper, and JDK1.8 that need to be prepared.
1. Create storage locations for three software
mkdir zookeeper
mkdir hadoop
mkdir java
2. Download a software
//Move to the appropriate directory to download the software
wget http://mirror.bit.edu.cn/apache/zookeeper/zookeeper-3.4.13/zookeeper-3.4.13.tar.gz
wget http://mirrors.hust.edu.cn/apache/hadoop/common/hadoop-3.1.1/hadoop-3.1.1-src.tar.gz
jdk go oracle The website is downloaded and uploaded to the directory of our server.

3. Unzip accordingly

tar -zxvf zookeeper-3.4.13.tar.gz
tar -zxvf hadoop-3.1.1-src.tar.gz
tar -zxvf jdk1.8.tar.gz
install
Once all the above basics are configured, we can start the program installation.Send it synchronously via rsync after configuring it on the first machine
rsync Installation
Installation on centos, each required
Rpm-qa | grep rsync Check if no oh rsync is installed
Yum install-y rsync installs rsync using yum
Installation of Java Environment
- Enter unzipped Java file path
cd /home/bigdata/java/jdk1.8
pwd Find Path Information
- Configuring environment variables
JAVA_HOME=/home/bigdata/java/jdk1.8
JRE_HOME=/home/bigdata/java/jdk1.8/jre
CLASS_PATH=.:$JAVA_HOME/lib/dt.jar:$JAVA_HOME/lib/tools.jar:$JRE_HOME/lib
PATH=$PATH:$JAVA_HOME/bin:$JRE_HOME/bin
export JAVA_HOME JRE_HOME CLASS_PATH PATH
- Synchronize to other servers
tidb2:
rsync -avup /etc/profile root@tidb2:/etc/
tidb3:
rsync -avup /etc/profile root@tidb3:/etc/
- Effective execution
All three execute
 source /etc/profile
If it is a personal user that needs to be executed
source ~/.bashrc
zookeeper installation
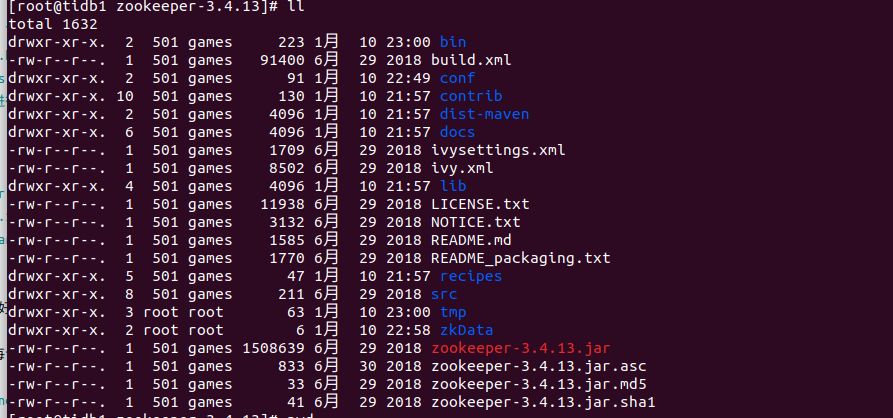
- Go to the decompressed directory above
cd /home/bigdata/zookeeper/zookeeper-3.4.13
- Add zoo.cfg file
cd /home/bigdata/zookeeper/zookeeper-3.4.13/conf
cp zoo_sample.cfg zoo.cfg
mv zoo_sample.cfg bak_zoo_sample.cfg  Backup Files
- Edit zoo.cfg
Create dataDir file mkdir-p/home/bigdata/zookeeper/zookeeper-3.4.13/tmp before modification
Adding server configuration content and configuring dataDir file content to the original base content
# The number of milliseconds of each tick
tickTime=2000
# The number of ticks that the initial
# synchronization phase can take
initLimit=10
# The number of ticks that can pass between
# sending a request and getting an acknowledgement
syncLimit=5
# the directory where the snapshot is stored.
# do not use /tmp for storage, /tmp here is just
#Modified dataDir file path, configure temporary file path content, configure file path needs to be created in advance
# example sakes.
dataDir=/home/bigdata/zookeeper/zookeeper-3.4.13/tmp
# the port at which the clients will connect
clientPort=2181
# Configure servers on just a few machines. Note the number of servers that we will need later
server.1=tidb1:2888:3888
server.2=tidb2:2888:3888
server.3=tidb3:2888:3888
# the maximum number of client connections.
# increase this if you need to handle more clients
#maxClientCnxns=60
#
# Be sure to read the maintenance section of the
# administrator guide before turning on autopurge.
#
# http://zookeeper.apache.org/doc/current/zookeeperAdmin.html#sc_maintenance
#
# The number of snapshots to retain in dataDir
#autopurge.snapRetainCount=3
# Purge task interval in hours
# Set to "0" to disable auto purg
The basic configuration information above is as follows:
- tickTime: The basic unit of time for a heartbeat in milliseconds. Basically all the time of the ZK is an integer multiple of this time.
- InitLimit: The number of tickTimes, indicating the time it takes for followers to synchronize with leaders after the end of the leader election. If more followers or more gray leaders occur, the synchronization time may increase accordingly, so will the value.Of course, this value is also the maximum wait time for follower and observer to start synchronizing leader's data (setSoTimeout)
- SyncLimit: The number of tickTimes, which is easily confused with the time above. It also indicates the maximum wait time for follower and observer to interact with leader, but the timeout for entering normal request forwarding or ping message interaction after synchronization with leader is complete.
- dataDir: Memory database snapshot storage address. If you do not specify a transaction log storage address (dataLogDir), it is also stored in this path by default. It is recommended that the two addresses be stored on separate devices
- ClientPort: Port clientPort=2181 that configures ZK to listen for client connections
server.serverid=host:tickpot:electionport fixed writing
 server: fixed writing
 serverid: The specified ID for each server (must be between 1-255, each machine must not be duplicated)
Host: host name
 tickpot: heartbeat communication port
 electionport: election port
- Create the folder you want
mkdir -p /home/bigdata/zookeeper/zookeeper-3.4.13/tmp
echo 1 > /home/bigdata/zookeeper/zookeeper-3.4.13/tmp/myid
- Synchronize to other servers
rsync -avup  /home/bigdata/zookeeper root@tibd2:/home/bigdata/
rsync -avup  /home/bigdata/zookeeper root@tibd3:/home/bigdata/
- Modify myid on other servers
tidb2:
vim /home/bigdata/zookeeper/zookeeper-3.4.13/tmp/myid  Change 1 to 2
tidb3:
vim /home/bigdata/zookeeper/zookeeper-3.4.13/tmp/myid  Change 1 to 3
- Configuring environment variables
JAVA_HOME=/home/bigdata/java/jdk1.8
JRE_HOME=/home/bigdata/java/jdk1.8/jre
CLASS_PATH=.:$JAVA_HOME/lib/dt.jar:$JAVA_HOME/lib/tools.jar:$JRE_HOME/lib
ZOOKEEPER_HOME=/home/bigdata/zookeeper/zookeeper-3.4.13
PATH=$PATH:$JAVA_HOME/bin:$JRE_HOME/bin:$ZOOKEEPER_HOME/bin
export JAVA_HOME JRE_HOME CLASS_PATH PATH ZOOKEEPER_HOME

source /etc/profile
- Verify that it is OK.
After these seven steps are completed, we need to verify that zookeeper is correct and start zookpeer on each server
Small blackboard, all three need to be executed
cd  /home/bigdata/zookeeper/zookeeper-3.4.13/bin
 Execute. /zkServer.sh start
Check whether to start

Mode 1:
Use the command jps to check if the execution was successful, and execute the installation without jps to check if there is this configuration export PATH=$PATH:/usr/java/jdk1.8/bin
 85286 QuorumPeerMain represents successful execution

Mode 2:
./zkServer.sh status
[root@tidb1 bin]# ./zkServer.sh  status
ZooKeeper JMX enabled by default
Using config: /home/bigdata/zookeeper/zookeeper-3.4.13/bin/../conf/zoo.cfg
 Mode: follower represents from node
 Mode: Leader represents the primary node
Installation of Hadoop
Creation of Base File
During the installation we need some directory files to store our data, log files, data storage files are all stored in different directories and need to be prepared in advance
- data storage
Three hard disks per machine, which require three directories to create
mkdir -p /media/data1/hdfs/data
mkdir -p /media/data2/hdfs/data
mkdir -p /media/data3/hdfs/data
- journal content storage
mkdir -p /media/data1/hdfs/hdfsjournal
- namenode content store path
mkdir -p /media/data1/hdfs/name
Modify related profiles
- Configuring the Java environment
Edit the hadoop-env.sh file in Hadoop
vim  /home/bigdata/hadoop/hadoop/etc/hadoop/hadoop-env.sh
 Configure the jdk environment, where you can also configure things like jvm memory size
export JAVA_HOME=/home/bigdata/java/jdk1.8
#export HADOOP_NAMENODE_OPTS=" -Xms1024m -Xmx1024m -XX:+UseParallelGC"
#export HADOOP_DATANODE_OPTS=" -Xms512m -Xmx512m"
#export HADOOP_LOG_DIR=/opt/data/logs/hadoop configuration log file
- Configure core-site.xmlvim/home/bigdata/hadoop/hadoop/etc/hadoop/core-site.xml
<?xml version="1.0" encoding="UTF-8"?>
<?xml-stylesheet type="text/xsl" href="configuration.xsl"?>
<!--
  Licensed under the Apache License, Version 2.0 (the "License");
  you may not use this file except in compliance with the License.
  You may obtain a copy of the License at

    http://www.apache.org/licenses/LICENSE-2.0

  Unless required by applicable law or agreed to in writing, software
  distributed under the License is distributed on an "AS IS" BASIS,
  WITHOUT WARRANTIES OR CONDITIONS OF ANY KIND, either express or implied.
  See the License for the specific language governing permissions and
  limitations under the License. See accompanying LICENSE file.
-->

<!-- Put site-specific property overrides in this file. -->

<configuration>
   <!-- Formulate hdfs Of nameservice ,Default link address, customizable by yourself-->
    <property>
        <name>fs.defaultFS</name>
        <value>hdfs://cluster</value>
    </property>
    <!--Temporary File Storage Directory   -->

    <property>
        <name>hadoop.tmp.dir</name>
        <value>/media/data1/hdfstmp</value>
    </property>

    <!--Appoint zookeeper  ,You can also set more timeouts, etc.-->
    <property>
        <name>ha.zookeeper.quorum</name>
        <value>tidb1:2181,tidb2:2181,tidb3:2181</value>
    </property>

</configuration>
- Configure hdfs-site.xmlvim/home/bigdata/hadoop/hadoop/etc/hadoop/hdfs-site.xml
<?xml version="1.0" encoding="UTF-8"?>
<?xml-stylesheet type="text/xsl" href="configuration.xsl"?>
<!--
  Licensed under the Apache License, Version 2.0 (the "License");
  you may not use this file except in compliance with the License.
  You may obtain a copy of the License at

    http://www.apache.org/licenses/LICENSE-2.0

  Unless required by applicable law or agreed to in writing, software
  distributed under the License is distributed on an "AS IS" BASIS,
  WITHOUT WARRANTIES OR CONDITIONS OF ANY KIND, either express or implied.
  See the License for the specific language governing permissions and
  limitations under the License. See accompanying LICENSE file.
-->

<!-- Put site-specific property overrides in this file. -->


<configuration>
   <!--Configured nameservice Name, required to be core-site.xml Medium consistent,And with its name and namenode Set Unique Identification-->
    <property>
        <name>dfs.nameservices</name>
        <value>cluster</value>
    </property>
    <!--Configured permission issues-->
    <property>
        <name>dfs.permissions.enabled</name>
        <value>false</varsync -avup hadoop-3.1.1 root@tidb2:/home/bigdata/hadoop/lue>
    </property>
    <!--To configure cluster Below namenode Name-->
    <property>
        <name>dfs.ha.namenodes.cluster</name>
        <value>nn1,nn2</value>
    </property>

    <!--To configure namenode Address and Port-->
    <property>
        <name>dfs.namenorsync -avup hadoop-3.1.1 root@tidb2:/home/bigdata/hadoop/de.rpc-address.cluster.nn1</name>
        <value>tidb1:9000</value>
    </property>
    <property>
        <name>dfs.namenode.rpc-address.cluster.nn2</name>
        <value>tidb2:9000</value>
    </property>

    <property>
        <name>dfs.namenode.http-address.cluster.nn1</name>
        <value>tidb1:50070</value>
    </property>

    <property>
        <name>dfs.namenode.http-address.cluster.nn2</name>
        <value>tidb2:50070</value>
    </property>
    <!-- journal namenode synchronization namenode The metadata shared storage location for.that is journal List information for->
    <property>
        <name>dfs.namenode.shared.edits.dir</name>
        <value>qjournal://tidb1:8485;tidb2:8485;tidb3:8485/cluster</value>
    </property>rsync -avup hadoop-3.1.1 root@tidb2:/home/bigdata/hadoop/

   <!--Configure highly available scenario content and how to switch automatically after failure-->
    <property>
        <name>dfs.client.failover.proxy.provider.cluster</name>
        <value>org.apache.hadoop.hdfs.server.namenode.ha.ConfiguredFailoverProxyProvider</value>
    </property>

    <!--ssh Schema Configuration-->
    <property>
        <name>dfs.ha.fencing.methods</name>
        <value>sshfence</value>
    </property>hdfs-site.xml
    <property>
        <name>dfs.ha.fencing.ssh.private-key-files</name>
        <value>/root/.ssh/id_rsa</value>
    </property>
    <!--journalnode Save File Path-->
    <property>
        <name>dfs.journalnode.edits.dir</name>
        <value>/media/data1/hdfs/hdfsjournal</value>
    </property>

   <!--open NameNode Failed Auto Switch-->
    <property>
        <name>dfs.ha.automatic-failover.enabled</name>
        <value>true</value>
    </property>
    <!--namenode File Path Information-->
    <property>
        <name>dfs.namenode.name.dir</name>
        <value>/media/data1/hdfs/name</value>
    </property>
    <!--datanode Data save path, configure multiple data disks-->
    <property><property>
        <name>dfs.namenode.name.dir</name>
        <value>/media/data1/hdfs/name</value>
    </property>
        <name>dfs.datanode.data.dir</name>
        <value>/media/data1/hdfs/data,
               /media/data2/hdfs/data,
               /media/data3/hdfs/data
        </value>
    </property>

    <!--Set the number of copies, the coefficient of which can be changed in the summary copy of the program-->
    <property>
        <name>dfs.replication</name>
        <value>3</value>
    </property>
    <!--open webhdfs Interface Access-->
    <property>
        <name>dfs.webhdfs.enabled</name>
        <value>true</value>
    </property>

    <property>
        <name>dfs.journalnode.http-address</name>
        <value>0.0.0.0:8480</value>
    </property>
    <property>
        <name>dfs.journalnode.rpc-address</name>
        <value>0.0.0.0:8485</value>
    </property>
    <!--To configure zookeeper-->
    <property>
        <name>ha.zookeeper.quorum</name>
        <value>tidb1:2181,tidb2:2181,tidb3:2181</value>
    </property>

</configuration>
- Modify mapred-site.xml vim/home/bigdata/hadoop/hadoop/etc/hadoop/mapred-site.xml
<?xml version="1.0"?>
<?xml-stylesheet type="text/xsl" href="configuration.xsl"?>
<!--
  Licensed under the Apache License, Version 2.0 (the "License");
  you may not use this file except in compliance with the License.
  You may obtain a copy of the License at

    http://www.apache.org/licenses/LICENSE-2.0

  Unless required by applicable law or agreed to in writing, software
  distributed under the License is distributed on an "AS IS" BASIS,
  WITHOUT WARRANTIES OR CONDITIONS OF ANY KIND, either express or implied.
  See the License for the specific language governing permissions and
  limitations under the License. See accompanying LICENSE file.
-->

<!-- Put site-specific property overrides in this file. -->

<configuration>
   <!--Appoint mr  To configure yarn information-->
    <property>
        <name>mapreduce.framework.name</name>
        <value>yarn</value>
    </property>

     <!-- Appoint mapreduce jobhistory address -->
    <property>
        <name>mapreduce.jobhistory.address</name>
        <value>tidb1:10020</value>
    </property>

    <!-- Task History Server's web address -->
    <property>
        <name>mapreduce.jobhistory.webapp.address</name>
        <value>tidb1:19888</value>  rsync -avup hadoop-3.1.1 root@tidb2:/home/bigdata/hadoop/
    </property>
</configuration>
- yarn-site.xmlvim /home/bigdata/hadoop/hadoop/etc/hadoop/yarn-site.xm
<?xml version="1.0"?>
<!--
  Licensed under the Apache License, Version 2.0 (the "License");
  you may not use this file except in compliance with the License.
  You may obtain a copy of the License at

    http://www.apache.org/licenses/LICENSE-2.0

  Unless required by applicable law or agreed to in writing, softwarersync -avup hadoop-3.1.1 root@tidb2:/home/bigdata/hadoop/
  distributed under the License is distributed on an "AS IS" BASIS,
  WITHOUT WARRANTIES OR CONDITIONS OF ANY KIND, either express or implied.
  See the License for the specific language governing permissions and
  limitations under the License. See accompanying LICENSE file.
-->

<!-- Site specific YARN configuration properties -->


<configuration>
   <!--To configure namenode Of ha id  namenode Configuration on nodes, not configurable-->
    <property>
      <name>yarn.resourcemanager.ha.id</name>
      <value>rm1</value>
    </property>
    <property>
        <name>yarn.nodemanager.aux-services</name>
        <value>mapreduce_shuffle</value>  rsync -avup hadoop-3.1.1 root@tidb2:/home/bigdata/hadoop/
    </property>
    <!-- Site specific YARN configuration properties -->
    <!--Enable resourcemanager ha-->
    <!--Is it on or off RM ha,Open by default-->
    <property>
       <name>yarn.resourcemanager.ha.enabled</name>
       <value>true</value>
    </property>
    <!--Declare two resourcemanager Address-->
    <property>
       <name>yarn.resourcemanager.cluster-id</name>
       <value>rmcluster</value>
    </property>
    <!--Formulate rm Name-->
    <property>
       <name>yarn.resourcemanager.ha.rm-ids</name>
       <value>rm1,rm2</value>
    </property>
    <!--Appoint rm Address-->
    <property>
       <name>yarn.resourcemanager.hostname.rm1</name>
       <value>tidb1</value>
    </property>
    <property>
       <name>yarn.resourcemanager.hostname.rm2</name>
       <value>tidb2</value>
    </property>

    <!--Appoint zookeeper Address of the cluster-->   rsync -avup hadoop-3.1.1 root@tidb2:/home/bigdata/hadoop/
    <property>
       <name>yarn.resourcemanager.zk-address</name>
        <value>tidb1:2181,tidb2:2181,tidb3:2181</value>
    </property>
    <!--Enable automatic recovery when the task is halfway through, rm If it's broken, start auto-recovery, default is false-->
    <property>
       <name>yarn.resourcemanager.recovery.enabled</name>
       <value>true</value>
    </property>

    <!--Appoint resourcemanager The status information of is stored in zookeeper Cluster, stored in by default FileSystem Inside.-->
    <property>
       <name>yarn.resourcemanager.store.class</name>
       <value>org.apache.hadoop.yarn.server.resourcemanager.recovery.ZKRMStateStore</value>
    </property>

</configuration>
- workers/home/bigdata/hadoop/hadoop/etc/hadoop/workers
#Add a data node to the workers, where a namenode does not join if it is separate from a datanode.
#No separation then join
tidb1
tidb2
tidb3
- start-dfs.sh stop-dfs.shvim /home/bigdata/hadoop/hadoop/sbin/start-dfs.sh vim /home/bigdata/hadoop/hadoop/sbin/stop-dfs.sh
3.0 The following will need to be added after version
HDFS_DATANODE_USER=root
HADOOP_SECURE_DN_USER=hdfs
HDFS_NAMENODE_USER=root
HDFS_SECONDARYNAMENODE_USER=root
HDFS_JOURNALNODE_USER=root
HDFS_ZKFC_USER=root
- start-yarn.sh stop-yarn.shvim /home/bigdata/hadoop/hadoop/sbin/start-yarn.sh vim /home/bigdata/hadoop/hadoop/sbin/stop-yarn.sh
YARN_RESOURCEMANAGER_USER=root
HADOOP_SECURE_DN_USER=yarn
YARN_NODEMANAGER_USER=root
- Synchronize to other machines via rsync
rsync -avup hadoop-3.1.1 root@tidb2:/home/bigdata/hadoop/
rsync -avup hadoop-3.1.1 root@tidb3:/home/bigdata/hadoop/
After synchronization, if the number of the configured namenode requires attention to the following:
Modify the id number on the namenode, delete the number on the datanode,
start-up
When all the above files are ready, we start.
Zookeeper->JournalNode->Format NameNode->Create Namespace zkfs->NameNode->Datanode->ResourceManager->NodeManager
Start zookeeper
Each goes into the installed zookeeper directory
./zkServer.sh start
Start journalnode
Go to the installation directory of hadoop and then into the sbin directory
 . /hadoop-daemon.sh start journalnode Starts journalnode
Format namenode
- Format
hadoop namenode -format
- Format synchronization content on other nodes, must do, otherwise other namenode s will not start
Synchronized content: configuration hdfs-site.xml Content under file path
    <property>
        <name>dfs.namenode.name.dir</name>
        <value>/media/data1/hdfs/name</value>
    </property>

//Synchronize
rsync -avup current  root@tidb2:/media/data1/hdfs/name/
rsync -avup current  root@tidb3:/media/data1/hdfs/name/
Format zkfc
Blackboard: namdenode1 can only be formatted on the namenode
./hdfs zkfs -formatZK
Close journalnode
./hadoop-daemon.sh stop journalnode
Start hadoop cluster
sbin directory execution under hadoop directory
 . /start-all.sh All started.
Startup View
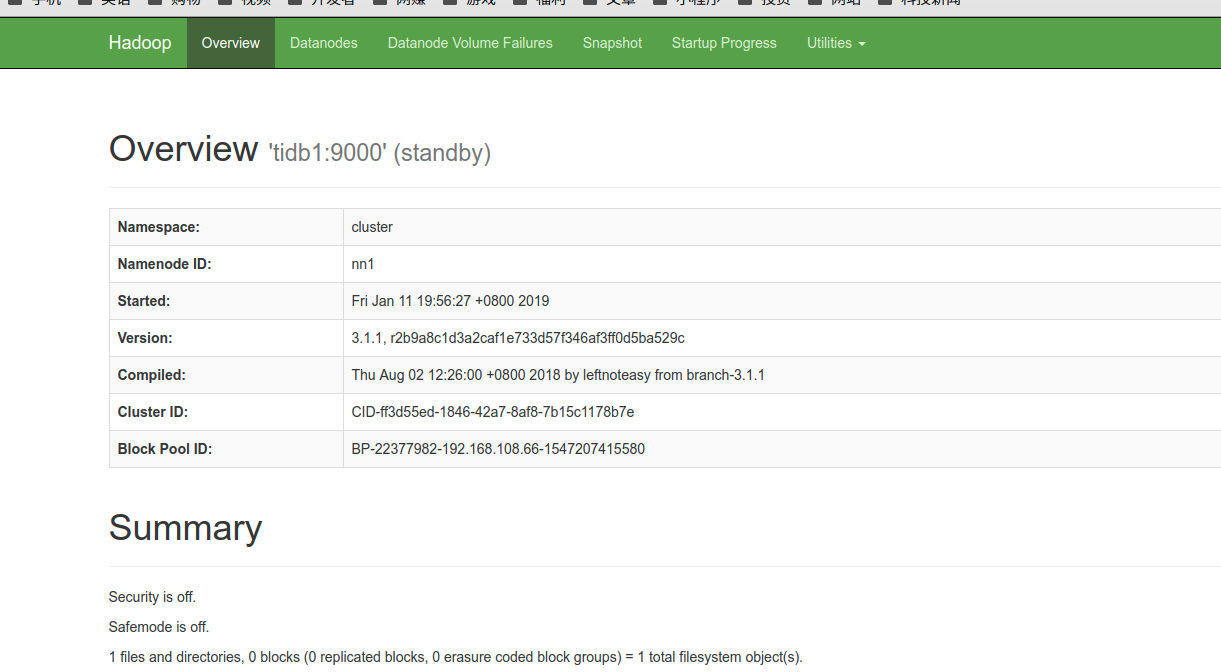
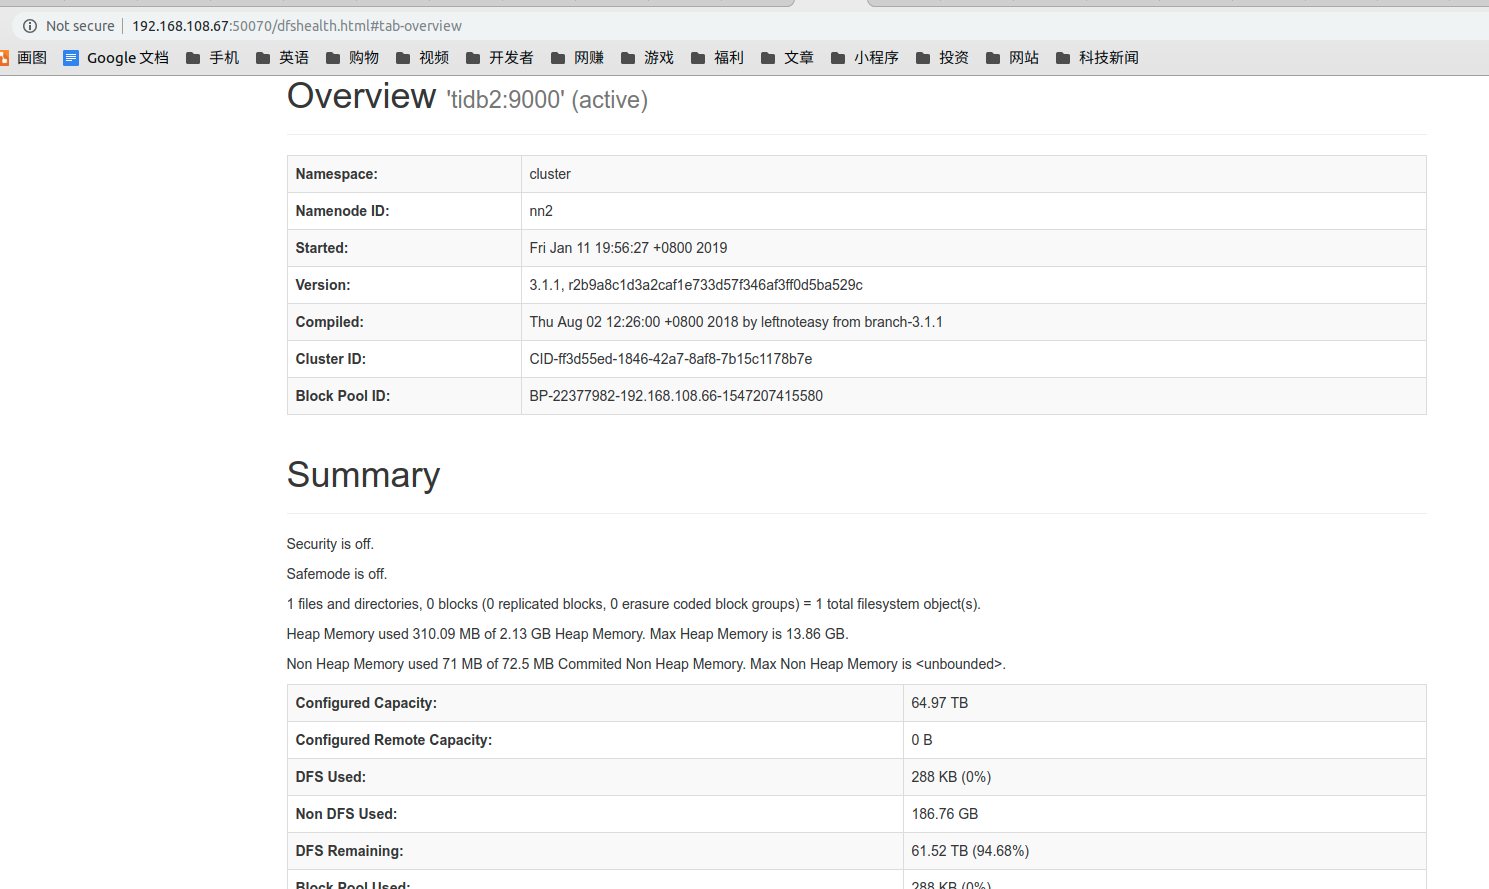
- View with commands
[root@tidb1 bin]# ./hdfs haadmin -getServiceState nn1
standby
[root@tidb1 bin]# ./hdfs haadmin -getServiceState nn2
active
- Interface Viewing
http://192.168.108.66:50070 #Note that this port is custom, not the default port
http://192.168.108.67:50070