according to Last article After setting up a set of Kubeflow Pipelines, we'll try it out together and use a real case to learn how to develop a machine learning workflow based on Kubeflow Pipelines.
Dead work
Machine learning workflow is a task-driven process as well as a data-driven process, which involves data import and preparation, model training Checkpoint export evaluation, and final model export.This requires distributed storage as the medium of transmission, where NAS is used as the distributed storage.
- Create distributed storage, taking NAS for example.Here NFS_SERVER_IP needs to be replaced with the real NAS server address
1. Create Ali Cloud NAS service for reference File
2. Need to create/data in NFS Server
# mkdir -p /nfs
# mount -t nfs -o vers=4.0 NFS_SERVER_IP:/ /nfs
# mkdir -p /data
# cd /
# umount /nfs
3. Create a corresponding Persistent Volume.
# cat nfs-pv.yaml
apiVersion: v1
kind: PersistentVolume
metadata:
  name: user-susan
  labels:
    user-susan: pipelines
spec:
  persistentVolumeReclaimPolicy: Retain
  capacity:
    storage: 10Gi
  accessModes:
  - ReadWriteMany
  nfs:
    server: NFS_SERVER_IP
    path: "/data"

# kubectl create -f nfs-pv.yaml
4. Create Persistent Volume Claim
# cat nfs-pvc.yaml
apiVersion: v1
kind: PersistentVolumeClaim
metadata:
  name: user-susan
  annotations:
    description: "this is the mnist demo"
    owner: Tom
spec:
  accessModes:
    - ReadWriteMany
  resources:
    requests:
       storage: 5Gi
  selector:
    matchLabels:
      user-susan: pipelines
# kubectl create -f nfs-pvc.yaml
Develop Pipeline
Since the examples provided by Kubeflow Pipelines rely on Google's storage services, domestic users cannot really experience Pipelines'capabilities.The Ali Cloud Container Service team provides examples of training MNIST models for you to use and learn Kubeflow Pipelines in Ali Cloud.Step 3:
(1) Download data
(2) Model training using TensorFlow
(3) Model Export
The latter of these three steps relies on the previous step to complete.
You can use Python code to describe a process in Kubeflow Pipelines where the complete code can be viewed standalone_pipeline.py .We used arena_op in this example, the default container_op encapsulation for Kubeflow, which enables seamless convergence between distributed training MPI and PS modes, simple access using heterogeneous devices such as GPU and RDMA, and distributed storage, as well as easy code synchronization from git sources.Is a more practical tool API.Arena_op is based on open source projects Arena.
@dsl.pipeline(
  name='pipeline to run jobs',
  description='shows how to run pipeline jobs.'
)
def sample_pipeline(learning_rate='0.01',
    dropout='0.9',
    model_version='1',
    commit='f097575656f927d86d99dd64931042e1a9003cb2'):
  """A pipeline for end to end machine learning workflow."""
  data=["user-susan:/training"]
  gpus=1

# 1. prepare data
  prepare_data = arena.standalone_job_op(
    name="prepare-data",
    image="byrnedo/alpine-curl",
    data=data,
    command="mkdir -p /training/dataset/mnist && \
  cd /training/dataset/mnist && \
  curl -O https://code.aliyun.com/xiaozhou/tensorflow-sample-code/raw/master/data/t10k-images-idx3-ubyte.gz && \
  curl -O https://code.aliyun.com/xiaozhou/tensorflow-sample-code/raw/master/data/t10k-labels-idx1-ubyte.gz && \
  curl -O https://code.aliyun.com/xiaozhou/tensorflow-sample-code/raw/master/data/train-images-idx3-ubyte.gz && \
  curl -O https://code.aliyun.com/xiaozhou/tensorflow-sample-code/raw/master/data/train-labels-idx1-ubyte.gz")

  # 2. downalod source code and train the models
  train = arena.standalone_job_op(
    name="train",
    image="tensorflow/tensorflow:1.11.0-gpu-py3",
    sync_source="https://code.aliyun.com/xiaozhou/tensorflow-sample-code.git",
    env=["GIT_SYNC_REV=%s" % (commit)],
    gpus=gpus,
    data=data,
    command='''
    echo %s;python code/tensorflow-sample-code/tfjob/docker/mnist/main.py \
    --max_steps 500 --data_dir /training/dataset/mnist \
    --log_dir /training/output/mnist  --learning_rate %s \
    --dropout %s''' % (prepare_data.output, learning_rate, dropout),
    metrics=["Train-accuracy:PERCENTAGE"])
  # 3. export the model
  export_model = arena.standalone_job_op(
    name="export-model",
    image="tensorflow/tensorflow:1.11.0-py3",
    sync_source="https://code.aliyun.com/xiaozhou/tensorflow-sample-code.git",
    env=["GIT_SYNC_REV=%s" % (commit)],
    data=data,
    command="echo %s;python code/tensorflow-sample-code/tfjob/docker/mnist/export_model.py --model_version=%s --checkpoint_path=/training/output/mnist /training/output/models" % (train.output, model_version))
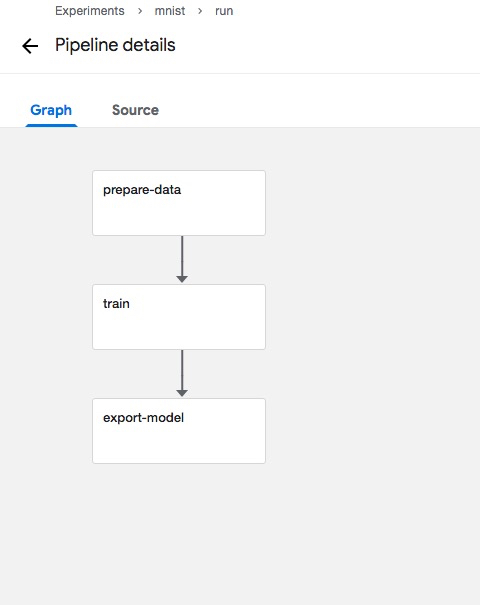
Kubeflow Pipelines converts the above code into a directed acyclic graph (DAG), where each node is a Component, and the lines between Components represent their dependencies.You can see the DAG diagram from the Pipelines UI:

First, let's take a closer look at the data preparation section. Here we provide the Python API for arena.standalone_job_op, which requires specifying the name of the step: name, the container image to be used: image, the data to be used, and its corresponding mount directory inside the container: data, where data is an array format, such as data=["user-susan:/training"], indicating that it can be mounted to multipleData.User-susan is the ersistent Volume Claim created earlier, and/training is the mount directory inside the container.
prepare_data = arena.standalone_job_op(
    name="prepare-data",
    image="byrnedo/alpine-curl",
    data=data,
    command="mkdir -p /training/dataset/mnist && \
  cd /training/dataset/mnist && \
  curl -O https://code.aliyun.com/xiaozhou/tensorflow-sample-code/raw/master/data/t10k-images-idx3-ubyte.gz && \
  curl -O https://code.aliyun.com/xiaozhou/tensorflow-sample-code/raw/master/data/t10k-labels-idx1-ubyte.gz && \
  curl -O https://code.aliyun.com/xiaozhou/tensorflow-sample-code/raw/master/data/train-images-idx3-ubyte.gz && \
  curl -O https://code.aliyun.com/xiaozhou/tensorflow-sample-code/raw/master/data/train-labels-idx1-ubyte.gz")
The above steps actually download data from curl at the specified address to the directory/training/dataset/mnist corresponding to the distributed storage. Note that/training is the root directory of the distributed storage, similar to the familiar root mount point; and/training/dataset/mnist is the subdirectory.The next steps can actually be performed by reading the data using the same root mount point.
The second step is to take advantage of the data downloaded to distributed storage and specify a fixed commit id through git to download the code and do model training
train = arena.standalone_job_op(
    name="train",
    image="tensorflow/tensorflow:1.11.0-gpu-py3",
    sync_source="https://code.aliyun.com/xiaozhou/tensorflow-sample-code.git",
    env=["GIT_SYNC_REV=%s" % (commit)],
    gpus=gpus,
    data=data,
    command='''
    echo %s;python code/tensorflow-sample-code/tfjob/docker/mnist/main.py \
    --max_steps 500 --data_dir /training/dataset/mnist \
    --log_dir /training/output/mnist  --learning_rate %s \
    --dropout %s''' % (prepare_data.output, learning_rate, dropout),
    metrics=["Train-accuracy:PERCENTAGE"])
You can see that this step is a bit more complex than data preparation, and in addition to the name, image, data, and command in the first step, you also need to specify in the model training step:
- How to get code: From the perspective of reproducible experimentation, tracing back the source of running test code is an important part.You can specify the git code source for sync_source at API call time and the commit id of the training code by setting GIT_SYNC_REV in env
- GPU: The default is 0, meaning no GPU is used; an integer value greater than 0 means that this number of GPUs is required for this step.
- Metrics: Also for reproducible and comparable experimental purposes, users can export a series of metrics they need and visually display and compare them on the Pipelines UI.The specific usage is divided into two steps, 1. When calling API, specify metrics name and display format PERCENTAGE or RAW in the form of an array to collect metrics, such as metrics=["Train-accuracy:PERCENTAGE"].2. Since Pipelines collects metrics from stdout logs by default, you need to output {metrics name}={value} or {metrics name}:{value} in the real running model code for specific reference. Sample Code


It is worth noting that:
In this step, you specify the same data parameter as prepare_data ["user-susan:/training"], so you can read the corresponding data in the training code, such as--data_dir/training/dataset/mnist.
In addition, because the step relies on prepare_data, you can indicate the dependency of the two steps in the method by specifying prepare_data.output.
Finally, export_model generates a training model based on the checkpoint generated by the train training:
export_model = arena.standalone_job_op(
    name="export-model",
    image="tensorflow/tensorflow:1.11.0-py3",
    sync_source="https://code.aliyun.com/xiaozhou/tensorflow-sample-code.git",
    env=["GIT_SYNC_REV=%s" % (commit)],
    data=data,
    command="echo %s;python code/tensorflow-sample-code/tfjob/docker/mnist/export_model.py --model_version=%s --checkpoint_path=/training/output/mnist /training/output/models" % (train.output, model_version))
export_model is similar, or even simpler, to the second step train, which simply exports code from the git synchronization model and executes the model export using the checkpoint in the shared directory/training/output/mnist.
The whole workflow still looks intuitive, so here's a Python method that can be defined to run through it.
@dsl.pipeline(
  name='pipeline to run jobs',
  description='shows how to run pipeline jobs.'
)
def sample_pipeline(learning_rate='0.01',
    dropout='0.9',
    model_version='1',
    commit='f097575656f927d86d99dd64931042e1a9003cb2'):
@dsl.pipeline is an ornament that represents a workflow and requires two attributes to be defined, name and description
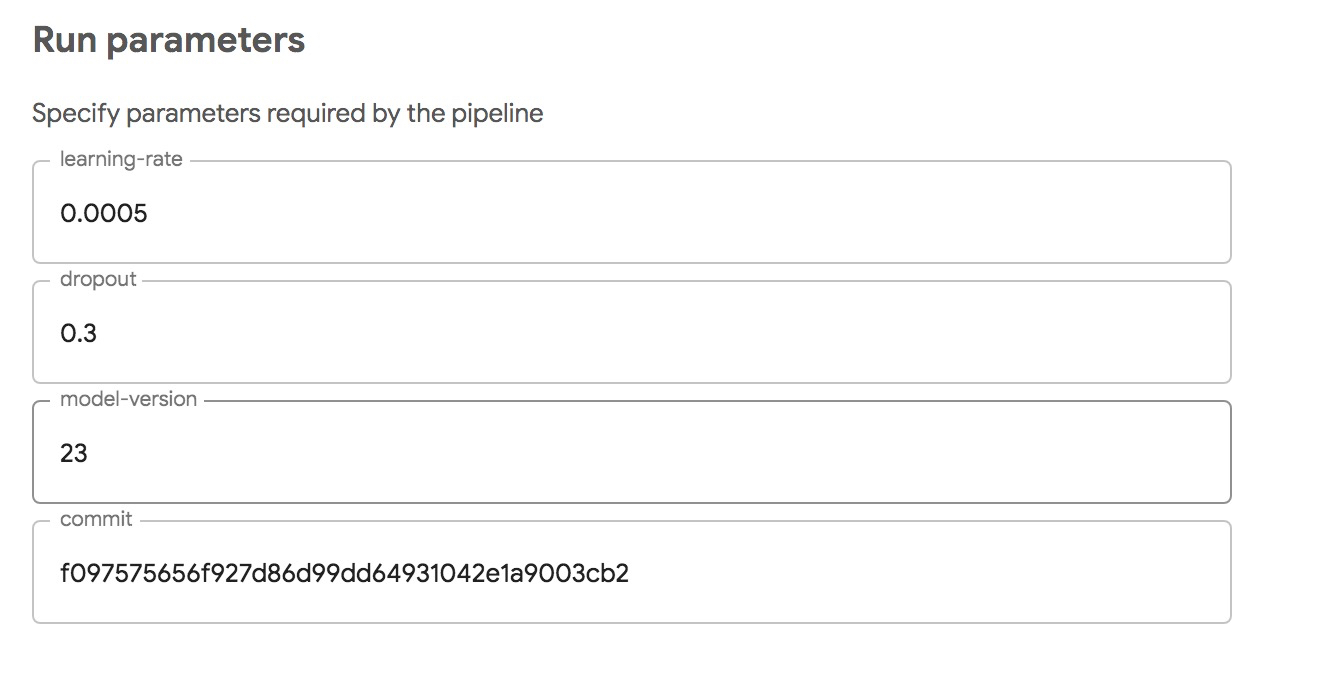
The entry method sample_pipeline defines four parameters, learning_rate,dropout,model_version, and commit, which can be used in the train and export_model phases above, respectively.The value of the parameter here is actually dsl.PipelineParam Type, defined as dsl.PipelineParam, is intended to be converted to an input form through the native UI of Kubeflow Pipelines, where the keyword is the parameter name and the default value is the parameter value.It is worth noting that dsl.PipelineParam corresponds to only strings and numbers; arrays and map s, as well as custom types, do not workTransformed by transition.
In fact, these parameters can be overridden when a user submits a workflow, and the following is the UI corresponding to the submission workflow:


Submit Pipeline
You can submit the Python DSL of the previous development workflow to the Kubeflow Pipelines service within your own Kubernetes, and the actual submission code is simple:
  KFP_SERVICE="ml-pipeline.kubeflow.svc.cluster.local:8888"
  import kfp.compiler as compiler
  compiler.Compiler().compile(sample_pipeline, __file__ + '.tar.gz')
  client = kfp.Client(host=KFP_SERVICE)
  try:
    experiment_id = client.get_experiment(experiment_name=EXPERIMENT_NAME).id
  except:
    experiment_id = client.create_experiment(EXPERIMENT_NAME).id
  run = client.run_pipeline(experiment_id, RUN_ID, __file__ + '.tar.gz',
                            params={'learning_rate':learning_rate,
                                     'dropout':dropout,
                                    'model_version':model_version,
                                    'commit':commit})
Compile Python code into a DAG configuration file recognized by the execution engine (Argo) using compiler.compile
Create or find an existing experiment with a Kubeflow Pipeline client and submit a previously compiled DAG configuration file
Prepare a python3 environment within the cluster and install the Kubeflow Pipelines SDK
# kubectl create job pipeline-client --namespace kubeflow --image python:3 -- sleep infinity
# kubectl  exec -it -n kubeflow $(kubectl get po -l job-name=pipeline-client -n kubeflow | grep -v NAME| awk '{print $1}') bash
After logging into the Python3 environment, execute the following command to submit two successive tasks with different parameters
# pip3 install http://kubeflow.oss-cn-beijing.aliyuncs.com/kfp/0.1.14/kfp.tar.gz --upgrade
# pip3 install http://kubeflow.oss-cn-beijing.aliyuncs.com/kfp-arena/kfp-arena-0.4.tar.gz --upgrade
# curl -O https://raw.githubusercontent.com/cheyang/pipelines/update_standalone_sample/samples/arena-samples/standalonejob/standalone_pipeline.py
# python3 standalone_pipeline.py --learning_rate 0.0001 --dropout 0.8 --model_version 2
# python3 standalone_pipeline.py --learning_rate 0.0005 --dropout 0.8 --model_version 3
View run results
UI to log in to Kubeflow Pipelines: https:// {pipeline address}/pipeline/#/experiments, such as
https://11.124.285.171/pipeline/#/experiments


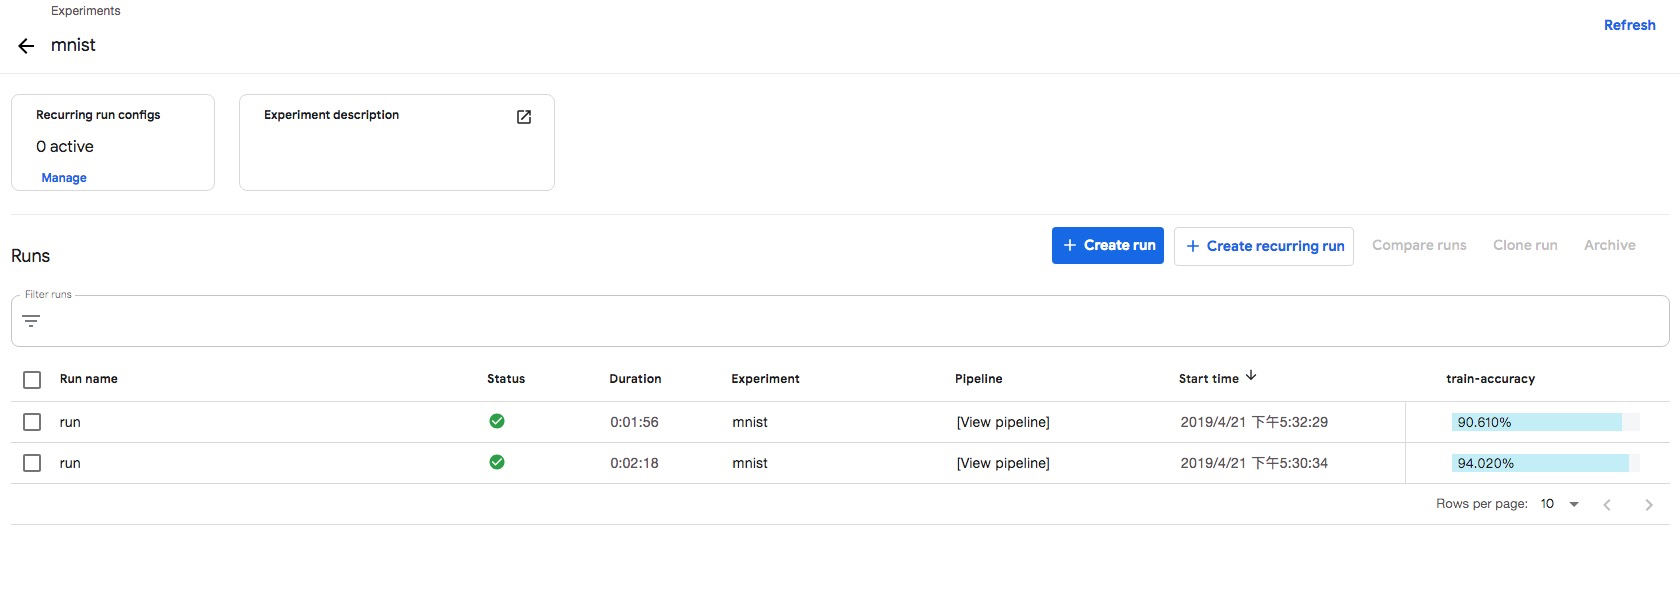
By clicking the Compare runs button, you can compare a series of indicators, such as input, time spent and accuracy, between the two experiments.Making experiments retrospective is the first step in making them reproducible, while using Kubeflow Pipelines'own experimental management capabilities is the first step in starting experiments reproducible.


summary
The steps required to implement a runnable Kubeflow Pipeline are:
1. Build the minimum executable unit Component needed in Pipeline (Pipeline). If you are using a natively defined dsl.container_ops, you need to build two parts of code:
- Build Runtime Code: Typically, a container image is built for each step as an adapter between Pipelines and the actual execution of business logic code.What it does is take input parameters for the Pipelines context, call business logic code, and place the output that needs to be passed to the next step in the container at the specified location according to Pipelines rules, which is passed by the underlying workflow component.The result is that the runtime code is coupled with the business logic code.Can be referred to An example of Kubeflow Pipelines
- Build client code: This step usually looks like the following, and friends who are familiar with Kubernetes will find that this step is actually writing a Pod Spec:
container_op = dsl.ContainerOp(
        name=name,
        image='<train-image>',
        arguments=[
            '--input_dir', input_dir,
            '--output_dir', output_dir,
            '--model_name', model_name,
            '--model_version', model_version,
            '--epochs', epochs
        ],
        file_outputs={'output': '/output.txt'}
    )
container_op.add_volume(k8s_client.V1Volume(
            host_path=k8s_client.V1HostPathVolumeSource(
                path=persistent_volume_path),
            name=persistent_volume_name))
container_op.add_volume_mount(k8s_client.V1VolumeMount(
            mount_path=persistent_volume_path,
            name=persistent_volume_name))
The advantage of using natively defined dsl.container_ops is flexibility, because of the open interaction interface with Piplines, users can do a lot at the container_ops level.But the problem is:
- Low reuse, each Component needs to build a mirror and develop runtime code
- High complexity, users need to understand Kubernetes concepts, such as resource limit, PVC, node selector and a series of other concepts
- Support for distributed training is difficult because container_op is a single container operation. If you need to support distributed training, you need to submit and manage TFJob-like tasks in container_ops.This presents a dual challenge of complexity and security, which is understandable, meaning that permissions to submit tasks such as TFJob require additional permissions to be opened to Pipeline developers.
Another way is to use arena_op, a reusable Component API that uses generic runtime code, eliminating the need to build runtime code over and over again; simplifies user use with a common set of arena_op API s; and supports scenarios such as Parameter Server and MPI.It is recommended that you compile Pipelines this way
2. Split the built Components into Pipelines
3. Compile the DAG profile recognized by Argo's execution engine (Argo) after Pipeline is compiled, submit the DAG profile to Kubeflow Pipelines, and view the process results using Kubeflow Pipelines'own UI.