I. PC-side web page effects
1.Element offset offset series
1.1 offset overview
Offset is translated as an offset, and its position (offset), size, and so on can be dynamically obtained using the offset series related attributes.
- Get the distance of the element with the positioned parent element
- Get the size (width and height) of the element itself
- Note: The returned values do not have units
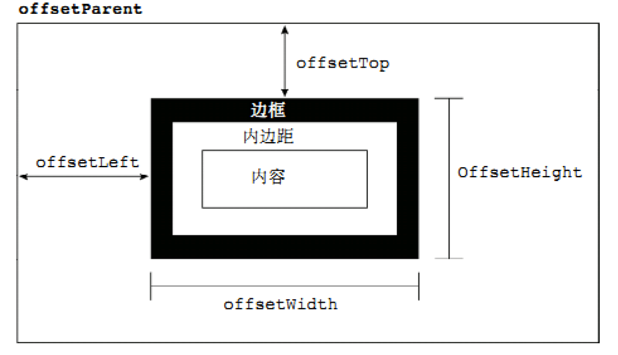
Common properties of offset series:
| offset series properties | Effect |
|---|---|
| element.offsetParent | Returns the parent element with positioning as the element, or the body if none of the parents is positioned |
| element.offsetTop | Returns the offset of an element relative to the one above the positioned parent element |
| element.offsetLeft | Returns the offset of an element relative to the left border of the positioned parent element |
| element.offsetWidth | Returns the width of itself including pading, borders, and content areas, returning values without units |
| element.offsetHeight | Returns the height of itself including padding, Biangkang, and the content area, returning values without units |
1.2 offset versus style
offset:
- offset gives style values in any style sheet
- The offset series yields values without units
- offsetWidth contains padding+border+width
- Attributes such as offsetWidth are read-only and can only be obtained without assignment
- So to get the element size position, offset is more appropriate
style:
- style values can only be obtained from inline stylesheets
- style.width gets a string with units
- style.width gets values that do not include padding and border
- style.width is a read-write property that can be obtained or assigned
- So, to change the value of an element, you need to change it with style
Case: Modal Box Drag
Requirements:
Pop-up boxes, also known as modal boxes.
- Clicking on the pop-up layer will pop up the modal box and show the gray translucent shield layer.
- Click the Close button to close the modal box and close the gray translucent obscure layer at the same time.
- Mouse over the top line of the modal box, you can hold down the mouse and drag the modal box to move around the page.
- Release the mouse to stop dragging the modal box.
Analysis:
- Click on the pop-up layer, and the modal box and the occlusion layer will show the display:block;
- Click the Close button and the modal box and the obscure layer will hide display:none;
- The principle of dragging on a page: the mouse is pressed and moved, then the mouse is released
- Trigger event is when mouse press mousedown, mouse move mousemove mouse release mouseup
- Drag process: During mouse movement, get the latest values assigned to the left and top values of the modal box so that it can follow the mouse
- The event source triggered by mouse-down is the top line with id title
- Mouse coordinates minus the coordinates of the mouse inside the box are the true positions of the modal box.
- When the mouse is pressed, we want to get the coordinates of the mouse in the box.
- Mouse movement sets the coordinates of the modal box to: Mouse coordinates minus box coordinates, note that the movement event is written to the press event.
- When the mouse is released, it stops dragging, that is, it can release the mouse movement event
Code:
<!DOCTYPE html>
<html lang="zh-CN">

<head>
    <meta charset="UTF-8">
    <meta http-equiv="X-UA-Compatible" content="IE=edge">
    <meta name="viewport" content="width=device-width, initial-scale=1.0">
    <title>Modal Box Drag</title>
    <style>
        .login-header {
            width: 100%;
            text-align: center;
            height: 30px;
            font-size: 24px;
            line-height: 30px;
        }

        ul,
        li,
        ol,
        dl,
        dt,
        dd,
        div,
        p,
        span,
        h1,
        h2,
        h3,
        h4,
        h5,
        h6,
        a {
            padding: 0px;
            margin: 0px;
        }

        .login {
            display: none;
            width: 512px;
            height: 280px;
            position: fixed;
            border: #ebebeb solid 1px;
            left: 50%;
            top: 50%;
            background: #ffffff;
            box-shadow: 0px 0px 20px #ddd;
            z-index: 9999;
            transform: translate(-50%, -50%);
        }

        .login-title {
            width: 100%;
            margin: 10px 0px 0px 0px;
            text-align: center;
            line-height: 40px;
            height: 40px;
            font-size: 18px;
            position: relative;
            cursor: move;
        }

        .login-input-content {
            margin-top: 20px;
        }

        .login-button {
            width: 50%;
            margin: 30px auto 0px auto;
            line-height: 40px;
            font-size: 14px;
            border: #ebebeb 1px solid;
            text-align: center;
        }

        .login-bg {
            display: none;
            width: 100%;
            height: 100%;
            position: fixed;
            top: 0px;
            left: 0px;
            background: rgba(0, 0, 0, .3);
        }

        a {
            text-decoration: none;
            color: #000000;
        }

        .login-button a {
            display: block;
        }

        .login-input input.list-input {
            float: left;
            line-height: 35px;
            height: 35px;
            width: 350px;
            border: #ebebeb 1px solid;
            text-indent: 5px;
        }

        .login-input {
            overflow: hidden;
            margin: 0px 0px 20px 0px;
        }

        .login-input label {
            float: left;
            width: 90px;
            padding-right: 10px;
            text-align: right;
            line-height: 35px;
            height: 35px;
            font-size: 14px;
        }

        .login-title span {
            position: absolute;
            font-size: 12px;
            right: -20px;
            top: -30px;
            background: #ffffff;
            border: #ebebeb solid 1px;
            width: 40px;
            height: 40px;
            border-radius: 20px;
        }
    </style>
</head>

<body>
    <div class="login-header"><a id="link" href="javascript:;">Click to pop up the login box</a></div>
    <div id="login" class="login">
        <div id="title" class="login-title">Login Members
            <span><a id="closeBtn" href="javascript:void(0);" class="close-login">Close</a></span>
        </div>
        <div class="login-input-content">
            <div class="login-input">
                <label>User name:</label>
                <input type="text" placeholder="enter one user name" name="info[username]" id="username" class="list-input">
            </div>
            <div class="login-input">
                <label>Login password:</label>
                <input type="password" placeholder="Please enter your login password" name="info[password]" id="password" class="list-input">
            </div>
        </div>
        <div id="loginBtn" class="login-button"><a href="javascript:void(0);" id="login-button-submit">Login Members</a></div>
    </div>
    <!-- masking layer -->
    <div id="bg" class="login-bg"></div>
    <script>
        // Clicking on the pop-up layer will pop up the modal box and show the gray translucent shield layer.
        // Click the Close button to close the modal box and close the gray translucent obscure layer at the same time.
        // Mouse over the top line of the modal box, you can hold down the mouse and drag the modal box to move around the page.
        // Release the mouse to stop dragging the modal box.

        // 1.Get Elements
        let login = document.querySelector('.login');
        let mask = document.querySelector('.login-bg');
        let link = document.querySelector('#link');
        let closeBtn = document.querySelector('#closeBtn');
        let title = document.querySelector('#title');
        // 2.Click link to show mask and login
        link.addEventListener('click', function() {
            mask.style.display = 'block';
            login.style.display = 'block';
        });
        // 3.Click close Btn to hide mask and login
        closeBtn.addEventListener('click', function() {
            mask.style.display = 'none';
            login.style.display = 'none';
        });
        // 4.Start dragging
        // (1) When the mouse is pressed, the coordinates of the mouse in the box are obtained.
        title.addEventListener('mousedown', function(e) {
            let x = e.pageX - login.offsetLeft;
            let y = e.pageY - login.offsetTop;
            // (2) When the mouse moves, subtracting the coordinates of the mouse from the page to the box is the left and top values of the modal box.
            document.addEventListener('mousemove', move)

            function move(e) {
                login.style.left = e.pageX - x + 'px';
                login.style.top = e.pageY - y + 'px';
            }
            // (3) When the mouse pops up
            document.addEventListener('mouseup', function() {
                document.removeEventListener('mousemove', move)
            })
        })
    </script>
</body>

</html>
Case Study: Imitate Jingdong Magnifier
Analysis:
-
-
The whole case can be divided into three functional modules
-
Mouse passes through small picture boxes, yellow screens and large picture boxes to show, leaving the hidden 2 boxes feature
-
The yellow shield follows the mouse function.
-
Move the Yellow blocking layer, big pictures follow the move function.
-
-
-
Mouse passes through small picture boxes, yellow screens and large picture boxes to show, leaving the hidden 2 boxes feature
-
Is to show and hide
-
-
-
The yellow shield follows the mouse function.
-
It is not appropriate to give the mouse coordinates to the obscuring layer because the obscuring layer coordinates are based on the parent box.
-
First, get the coordinates of the mouse in the box.
-
The value is then given to the occlusion layer as the left and top values.
-
The mouse movement event is used, but it is still moved inside the small picture box.
-
It was found that the shield layer was not in the right position and that half the height and width of the box itself had to be subtracted.
-
The obscuring layer cannot exceed the range of the small picture box.
-
If it is less than zero, set the coordinates to zero
-
If the maximum moving distance is greater than the obstruction layer, set the coordinates to the maximum moving distance
-
Maximum distance to move the cover layer: small picture box width minus the cover layer box width
-
-
-
Move the Yellow blocking layer, big pictures follow the move function.
-
Formula for Moving Distance of Large Pictures
Large Picture Move Distance = Shield Layer Move Distance * Large Picture Maximum Move Distance / Shield Layer Maximum Move Distance
-
Code:
window.addEventListener('load', function() {
    let preview_img = document.querySelector('.preview_img');
    let mask = document.querySelector('.mask');
    let big = document.querySelector('.big');
    // 1.Show and hide mask and BigBox when mouse passes preview_img
    preview_img.addEventListener('mouseover', function() {
        mask.style.display = 'block';
        big.style.display = 'block';
    })
    preview_img.addEventListener('mouseout', function() {
            mask.style.display = 'none';
            big.style.display = 'none';
        })
        // 2. Let the maks box follow as the mouse moves
    preview_img.addEventListener('mousemove', function(e) {
        // (1) Calculate the coordinates of the mouse in the box
        let x = e.pageX - this.offsetLeft;
        let y = e.pageY - this.offsetTop;
        // console.log(x, y);
        // (2) The mouse is in the middle of the mask box, subtracting half the height of the box from 200 is 100, which is the value of the mask's left and top.
        // (3) Moving distance of mask
        let maskX = x - mask.offsetWidth / 2;
        let maskY = y - mask.offsetWidth / 2;
        // (4) mask Move Distance
        //Maximum Shielding Distance
        let maskMax = preview_img.offsetWidth - mask.offsetWidth;
        if (maskX <= 0) {
            maskX = 0;
        } else if (maskX >= maskMax) {
            maskX = maskMax;
        }
        if (maskY <= 0) {
            maskY = 0;
        } else if (maskY >= maskMax) {
            maskY = maskMax;
        }
        mask.style.left = maskX + 'px';
        mask.style.top = maskY + 'px';
        //Large Picture Move Distance = Shield Layer Move Distance * Large Picture Maximum Move Distance / Shield Layer Maximum Move Distance
        let bigImg = document.querySelector('.bigImg');
        //Maximum moving distance for large pictures
        let bigMax = bigImg.offsetWidth - big.offsetWidth;
        //Large Picture Move Distance X Y
        let bigX = maskX * bigMax / maskMax;
        let bigY = maskY * bigMax / maskMax;
        bigImg.style.left = -bigX + 'px';
        bigImg.style.top = -bigY + 'px';
    })
})
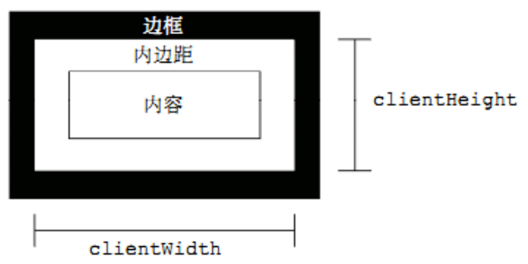
2.Element Visual Area client Series
Client is translated as a client and uses the county attributes of the client series to get information about the viewable area of an element. The border size, element size, etc. with the element can be dynamically changed by the related attributes of the client series.
| client Series Properties | Effect |
|---|---|
| element.clientTop | Returns the size of the top border of an element |
| element.clientLeft | Returns the size of the left border of an element |
| element.clientWidth | Returns the width of itself including padding, the content area, no borders, and the value without units |
| element.clientHeight | Returns the height of itself including padding, the content area, no borders, and the value without units |
Case: Source Code Analysis of Taobao Fle.js
Execute the function() {} () or (function() {} () immediately)
Main role: Create a separate scope. Avoid naming conflicts
(function flexible(window, document) {
    // The root element of the acquired html
    var docEl = document.documentElement
        // dpr physical pixel ratio
    var dpr = window.devicePixelRatio || 1

    // adjust body font size to set the font size of our body
    function setBodyFontSize() {
        // Set the font size of the body if the page has the body element
        if (document.body) {
            document.body.style.fontSize = (12 * dpr) + 'px'
        } else {
            // If there is no body on the page, wait until the main DOM elements of our page are loaded before setting the body
            // Font size of
            document.addEventListener('DOMContentLoaded', setBodyFontSize)
        }
    }
    setBodyFontSize();

    // set 1rem = viewWidth / 10 Sets the text size of our html element
    function setRemUnit() {
        var rem = docEl.clientWidth / 10
        docEl.style.fontSize = rem + 'px'
    }

    setRemUnit()

    // reset rem unit on page resize reset rem size when we change page size
    window.addEventListener('resize', setRemUnit)
        // pageshow is an event triggered by our reloading of the page
    window.addEventListener('pageshow', function(e) {
        // e.persisted returns true, which means that if the page is taken from the cache, the rem size needs to be recalculated
        if (e.persisted) {
            setRemUnit()
        }
    })

    // Detect 0.5px support Some mobile browsers do not support 0.5px writing
    if (dpr >= 2) {
        var fakeBody = document.createElement('body')
        var testElement = document.createElement('div')
        testElement.style.border = '.5px solid transparent'
        fakeBody.appendChild(testElement)
        docEl.appendChild(fakeBody)
        if (testElement.offsetHeight === 1) {
            docEl.classList.add('hairlines')
        }
        docEl.removeChild(fakeBody)
    }
}(window, document))
The load event is triggered when the page is refreshed in all three cases.
- Hyperlinks for label a
- F5 or refresh button (forced refresh)
- Forward and Back Button
However, Firefox has a feature, a "round-trip cache", which not only holds page data, but also the state of DOM and JavaScript; in fact, the entire page is saved in memory.
So the Back button cannot refresh the page at this time.
This can be triggered using the pageshow event. This event is triggered when the page is displayed, regardless of whether the page is from the cache or not. In a reloaded page, pageshow is triggered after the load event is triggered; depending on persisted in the event object, determine if it is a pageshow event triggered by the page in the cache, and note that this event is added to the window.
3.Element scroll series
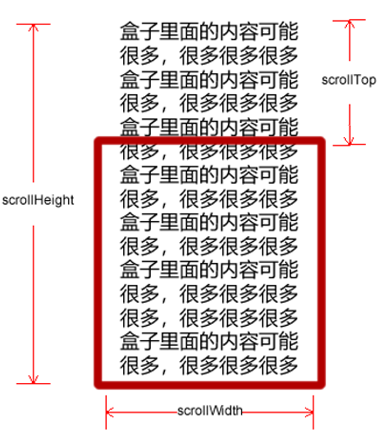
3.1 Element scroll series properties
The scroll is translated as scroll, and the size, scroll distance and so on of the element can be dynamically obtained by using the related properties of the scroll series.
| scroll series properties | Effect |
|---|---|
| element.scrollTop | Returns the upper distance rolled up, returning the value without units |
| element.scrollLeft | Returns the distance to the left of the rolled up value without units |
| element.scrollWidth | Returns its actual width, without borders, and values without units |
| element.scrollHeight | Returns its actual height, without borders, and values without units |
3.2 Page Scrolled Head
A scrollbar automatically appears if the browser's height (or width) is not large enough to display the entire page. When the scrollbar scrolls down, the hidden height on the page becomes the curled head of the page. The onscroll event is triggered when the scrollbar scrolls down.
Case: Mimicking Taobao to fix right sidebar
Requirements:
-
Original sidebar is absolutely positioned
-
When the page scrolls to a location, the sidebar changes to a fixed location
-
Continuing to scroll the page will bring you back to the top
Analysis:
- Page scroll event scroll is required because it is page scroll, so the event source is document
- To scroll to a location is to determine the upper value of the page being rolled up.
- Header of page scrolled: You can get the left window.pageXOffset if it is scrolled through window.pageYOffset
- Note that the element's scrolled head is element.scrollTop, and window.pageYOffset if the page is scrolled
- In fact, this value can be obtained from the offsetTop of the box. If it is greater than or equal to this value, the box can be fixed and positioned.
Code:
<body>
    <div class="slider-bar">
        <span class="goBack">Return to top</span>
    </div>
    <div class="header w">Head area</div>
    <div class="banner w">banner region</div>
    <div class="main w">Main body part</div>
    <script>
        //1.Get Elements
        let sliderBar = document.querySelector('.slider-bar');
        let banner = document.querySelector('.banner');
        // The size of the banner.offsetTop banner box with its head rolled off
        let bannerTop = banner.offsetTop;
        // Number that should change when our sidebar is fixed
        let sliderBarTop = sliderBar.offsetTop - bannerTop;
        // Get main body element
        let main = document.querySelector('.main');
        let goBack = document.querySelector('.goBack');
        //Head size of the main.offsetTop main box rolled up
        let mainTop = main.offsetTop;
        // 2.Page scroll event scroll
        document.addEventListener('scroll', function() {
            // console.log(window.pageYOffset);
            // Header of window.pageYOffset page rolled up
            // 3. When the page's scrolled head is greater than or equal to 170, the sidebar changes to fixed positioning
            if (window.pageYOffset >= bannerTop) {
                sliderBar.style.position = 'fixed';
                sliderBar.style.top = sliderBarTop + 'px';
            } else {
                sliderBar.style.position = 'absolute';
                sliderBar.style.top = '300px';
            }
            // 4.When our page scrolls to the main box, the goback module appears
            if (window.pageYOffset >= mainTop) {
                goBack.style.display = 'block';
            } else {
                goBack.style.display = 'none';
            }
        })
    </script>
3.3 Page Curled Head Compatibility Solution
It is important to note that the head of a page that is rolled up has compatibility issues, so there are usually several ways to write the head that is rolled up:
- Declare DTD, using document.documentElement.scrollTop
- DTD not declared, using document.body.scrollTop
- New methods window.pageYOffset and window.pageXOffset, IE9 started to support
 function getScroll() {
    return {
      left: window.pageXOffset || document.documentElement.scrollLeft || document.body.scrollLeft||0,
      top: window.pageYOffset || document.documentElement.scrollTop || document.body.scrollTop || 0
    };
 }
//getScroll().left when used
3.Summary of 4 Series
| Size comparison of three evil hunts | Effect |
|---|---|
| element.offsetWidth | Returns the width of itself including padding, borders, and content areas, returning values without units |
| element.clientWdith | Returns the width of the content area, including padding, without borders, and the value without units |
| element.scrollWidth | Returns its actual width, without borders, and values without units |
Main uses:
- The offset series is often used to get the element position offsetLeft offsetTop
- Clients are often used to get the element size clientWidth clientHeight
- Scroll is often used to get scroll distance scrollTop scrollLeft
- Note that the distance the page scrolls is obtained by window.pageXOffset
Differences between mouseenter and mouseover (interview questions)
mouseenter mouse event
The mouseenter event is triggered when the mouse moves over the element
Like mouseover, the difference between them is:
-
The mouseover mouse will be triggered by passing through its own box, and by passing through its subbox. The mouseenter will only be triggered by passing through its own box, because the mouseenter will not bubble.
-
Mouse away from mouseleave with mouseenter will also not bubble
4.Animation Function Encapsulation
4.1 Animation Implementation Principles
Core Principle: Constantly move the box position through the timer setInterval().
Steps to achieve:
-
Get the current position of the box
-
Add a moving distance to the box at its current position
-
Repeat this operation continuously with a timer
-
Add a condition to end the timer
-
Note that this element needs to be positioned to use element.style.left
<body>
    <div></div>
    <script>
        // 1.Get the current position of the box
        // 2.Add a moving distance to the box at its current position
        // 3.Repeat this operation continuously with a timer
        // 4.Add a condition to end the timer
        // 5.Note that this element needs to be positioned to use element.style.left
        let div = document.querySelector('div');
        let timer = setInterval(function() {
            div.style.left = div.offsetLeft + 1 + 'px';
            if (div.offsetLeft >= 300) {
                //Stopping animation is essentially stopping the timer
                clearInterval(timer);
            }
        }, 30)
    </script>
</body>
4.2 Simple encapsulation of animation functions
Note that the function passes two parameters, the animated object and the distance to which it moves.
<body>
    <div>Lvpu</div>
    <span>army officer's hat ornaments</span>
    <script>
        // Simple animation encapsulates obj target object, target location
        // Different timers are assigned to different elements
        var div = document.querySelector('div');
        var span = document.querySelector('span');

        function animate(obj, target) {
            var timer = setInterval(function() {
                obj.style.left = obj.offsetLeft + 1 + 'px';
                if (obj.offsetLeft >= target) {
                    clearInterval(timer);
                }
            }, 100)
        }
        animate(div, 300);
        animate(span, 200);
    </script>
</body>
4.3 Animation function records different timers for different elements
If multiple elements use this animation function, var declares the timer each time. You can use different timers for different elements (use your own timer exclusively).
Core Principle: JS is a dynamic language that allows you to add attributes to the current object.
<body>
    <button>Click the button Mink Cicada</button>
    <div>Lvpu</div>
    <span>army officer's hat ornaments</span>
    <script>
        let div = document.querySelector('div');
        let span = document.querySelector('span');
		let btn = document.querySelector('button');
        function animate(obj, target) {
            // When the button is clicked continuously, this element will be faster and faster because there are too many timers on
            // Solution: Make the element execute with only one timer
            // Clear previous timer first, keep only one current timer execution
            celarInterval(obj.timer);
             obj.timer = setInterval(function() {
                obj.style.left = obj.offsetLeft + 1 + 'px';
                if (obj.offsetLeft >= target) {
                    clearInterval(obj.timer);
                }
            }, 100)
        }
        animate(div, 300);
		btn.addEventListener('click',function() {
            animate(span, 200);
        })
    </script>
</body>
4.4 Slow motion effect principle
The effect of slowing is to change the speed of an element's movement, most often by slowing it down.
Ideas:
- Let the box move slowly each time, and the speed will slowly drop.
- Core algorithm: (Target value - present position) / 10 as the distance step for each move
- The task to stop is to stop the timer if the current box position equals the target position
- Note that step value needs to be rounded
code implementation
    <style>
        div {
            position: relative;
            left: 0;
            top: 0;
            width: 300px;
            height: 300px;
            background-color: skyblue;
        }
    </style>
<body>
    <button>Animation Slow</button>
    <div>army officer's hat ornaments</div>
    <script>
        let btn = document.querySelector('button');
        let div = document.querySelector('div');

        function animate(obj, target) {
            // Clear previous timer first, keep only one current timer execution
            clearInterval(obj.timer);
            obj.timer = setInterval(function() {
                // Step value written inside timer
                let step = (target - obj.offsetLeft) / 10;
                // Change the value of each step plus 1 to a slowly decreasing value step formula: (Target value - present position) / 10
                obj.style.left = obj.offsetLeft + step + 'px';
                if (obj.offsetLeft == target) {
                    // Stopping animation is essentially a stop timer
                    clearInterval(obj.timer);
                }
            }, 30);
        }
        btn.addEventListener('click', function() {
            // Call function
            animate(div, 1000);
        });
    </script>
</body>
4.5 Animation function moves between multiple targets
You can move the animation function from 800 to 500.
Determine if the step size is positive or negative when the button is clicked
- If it is a positive value, the step size is greater
- If it is negative, the step size is rounded down
code implementation
<head>
    <title>Slow motion animation</title>
    <style>
        div {
            position: absolute;
            left: 0;
            top: 150px;
            width: 300px;
            height: 300px;
            background-color: skyblue;
        }
    </style>
</head>

<body>
    <button class="btn500">Mink cicada to 500</button>
    <button class="btn800">Mink cicada to 800</button>
    <div>army officer's hat ornaments</div>
    <script>
        // Slow animation function encapsulates obj target object target target location
        // Ideas:
        // 1.Let the box slowly decrease each time it moves, and the speed will slowly fall down.
        // 2.Core algorithm: (Target value - present position) / 10 as the distance step for each move
        // 3.Stop the timer if the current box position equals the target position
        let btn500 = document.querySelector('.btn500');
        let btn800 = document.querySelector('.btn800');
        let div = document.querySelector('div');

        function animate(obj, target) {
            // Clear previous timer first, keep only one current timer execution
            clearInterval(obj.timer);
            obj.timer = setInterval(function() {
                // Step value written inside timer
                let step = (target - obj.offsetLeft) / 10;
                step = step > 0 ? Math.ceil(step) : Math.floor(step);
                if (obj.offsetLeft == target) {
                    // Stopping animation is essentially a stop timer
                    clearInterval(obj.timer);
                }
                // Change the value of each step plus 1 to a slowly decreasing value step formula: (Target value - present position) / 10
                obj.style.left = obj.offsetLeft + step + 'px';
            }, 15);
        }
        btn500.addEventListener('click', function() {
            // Call function
            animate(div, 500);
        });
        btn800.addEventListener('click', function() {
            // Call function
            animate(div, 800);
        });
        // A uniform animation is where the box is now + a fixed value of 10
        // Slow animation is the current position of the box + the changing value (target - present position) / 10)
    </script>
</body>
4.6 Animation function add callback function
Callback Function Principle: A function can be used as a parameter. Pass this function as a parameter into another function. When that function finishes executing, and then executes the incoming function, this process is called callback.
The position where the callback function is written: the position where the timer ends.
code implementation
<head>
   <title>Callback function for slow animation</title>
   <style>
       div {
           position: absolute;
           left: 0;
           top: 150px;
           width: 300px;
           height: 300px;
           background-color: skyblue;
       }
   </style>
</head>

<body>
   <button class="btn500">Mink cicada to 500</button>
   <button class="btn800">Mink cicada to 800</button>
   <div>army officer's hat ornaments</div>
   <script>
       let btn500 = document.querySelector('.btn500');
       let btn800 = document.querySelector('.btn800');
       let div = document.querySelector('div');

       function animate(obj, target, callback) {
           // Clear previous timer first, keep only one current timer execution
           clearInterval(obj.timer);
           obj.timer = setInterval(function() {
               // Step value written inside timer
               let step = (target - obj.offsetLeft) / 10;
               step = step > 0 ? Math.ceil(step) : Math.floor(step);
               if (obj.offsetLeft == target) {
                   // Stopping animation is essentially a stop timer
                   clearInterval(obj.timer);
                   if (callback) {
                       callback();
                   }
               }
               // Change the value of each step plus 1 to a slowly decreasing value step formula: (Target value - present position) / 10
               obj.style.left = obj.offsetLeft + step + 'px';
           }, 15);
       }
       btn500.addEventListener('click', function() {
           // Call function
           animate(div, 500);
       });
       btn800.addEventListener('click', function() {
           // Call function
           animate(div, 800, function() {
               div.style.backgroundColor = 'red';
           });
       });
   </script>
</body>
4.7 Animation function encapsulated in JS file
If you use this animation function frequently in the future, you can encapsulate it in a single JS file and reference it when you use it.
- Create a new JS file separately.
- HTML files are introduced into JS files.
code implementation
<head>
    <title>Reference animation function</title>
    <style>
        .sliderbar {
            position: fixed;
            right: 0;
            bottom: 100px;
            width: 40px;
            height: 40px;
            text-align: center;
            line-height: 40px;
            cursor: pointer;
            color: #fff;
        }

        .con {
            position: absolute;
            left: 0;
            top: 0;
            width: 200px;
            height: 40px;
            background-color: purple;
            z-index: -1;
        }
    </style>
    <script src="animate.js"></script>
</head>

<body>
    <div class="sliderbar">
        <span>←</span>
        <div class="con">Question Feedback</div>
    </div>
    <script>
        // When the mouse passes over the sliderbar, the con box slides to the left
        // When the mouse leaves the sliderbar, the con box slides to the right
        let sliderbar = document.querySelector('.sliderbar');
        let con = document.querySelector('.con');
        // let span = document.querySelector('span');
        sliderbar.addEventListener('mouseenter', function() {
            animate(con, -160, function() {
                sliderbar.children[0].innerHTML = '→';
                // span.innerHTML = '→';
            })
        })
        sliderbar.addEventListener('mouseleave', function() {
            animate(con, 0, function() {
                sliderbar.children[0].innerHTML = '←';
                // span.innerHTML = '←';
            })

        })
    </script>
</body>
5.Common Web page special effects cases
5.1 Case: Webcast Map
Round-robin maps, also known as focus maps, are the more common web page effects in Web pages.
Functional requirements:
- Mouse passes through the rotate map module, left and right buttons are displayed, left and right buttons are hidden.
- Click the right button once, play a picture to the left, and so on. The left button is the same.
- The small circle module below changes as the picture is played.
- Click on the small circle to play the corresponding picture.
- If the mouse does not go through a rotation map, the rotation map will automatically play the picture.
- When the mouse passes, the wheel plot module stops playing automatically.
Case Study:
First step
- Because there are many js, you can create a new JS folder separately, then create a new JS file to be introduced into the page.
- The load event needs to be added at this point.
- Mouse passes through the rotate map module, left and right buttons are displayed, left and right buttons are hidden.
- Show the hidden display button.
Second step
- Dynamic generation of small circles
- Core idea: the number of small circles should match the number of pictures
- So first get the number of pictures in ul (pictures put in li, so that's the number of li)
- Generate a small circle dynamically using a loop (this small circle is placed inside the ol)
- Create node createElement('li')
- Insert node ol.AppendChild (li)
- The first small circle needs to have the current class added
Third step
- Small Circle's Exclusive Ideas
- Click on the current circle to add the current class
- The remaining small circles remove the current class
- Note: This click event can be bound directly while the small circle has just been generated.
Fourth step
- Click on the small circle to scroll the picture
- The animate animation function is used to introduce the JS file (note that since index.js relies on animate.js, animate.js is written on index.js)
- The premise of using animation functions is that the element must be positioned
- Notice that ul moves instead of li
- Core algorithm for scrolling pictures: by clicking on a small circle, the index number of the small circle is multiplied by the width of the picture as the ul moving distance
- At this point, you need to know the index number of the small circle. We can set a custom property for the small circle when it is generated and get it when we click.
Step 5
- Click the right button once to scroll the picture.
- Declare a variable num, click once, increase by 1, multiply this variable by the width of the picture, and that is the scrolling distance of ul.
- Seamless scrolling principle for pictures
- Copy ul's first li and put it at the end of UL
- When the picture scrolls to the last picture in the clone, let ul skip to the left most quickly without animation: left 0
- num also has a value of 0, so you can scroll the picture from scroll
- Clone the first picture
- Cloning ul's first li cloneNode() plus true deep cloning
- Add to appendChild at the end of ul
Sixth step
- Click the button on the right and the circle follows the change
- The easiest way to do this is to declare another variable, circle, incrementing by one click at a time. Note that the left button also needs this variable, so declare the global variable.
- But there are five pictures, only four of our little circles are less than one, so we have to add a judgment
- If circle == 4, revert to zero from scratch
Step 7
- Autoplay function
- Add a timer
- Automatically playing a broadcast map is actually like clicking the button on the right
- At this point we click the event arrow_r.click() using the manual call to the right button
- Stop timer when mouse passes focus
- Turn on the timer when the mouse leaves the focus
Code implementation:
html file
<!DOCTYPE html>
<html lang="zh-CN">
<head>
<meta charset="UTF-8">
<meta http-equiv="X-UA-Compatible" content="IE=edge">
<meta name="viewport" content="width=device-width, initial-scale=1.0">
<title>Taobao Round-robin Map Case</title>
<style>
* {
margin: 0;
padding: 0;
}
a {
color: #666;
text-decoration: none;
}
a:hover {
color: #e33333;
}
li {
list-style: none;
}
.focus {
position: relative;
width: 721px;
height: 455px;
background-color: purple;
margin: 200px auto;
overflow: hidden;
}
.focus ul {
position: absolute;
top: 0;
left: 0;
width: 600%;
}
.focus ul li {
float: left;
}
.arrow-l,
.arrow-r {
display: block;
position: absolute;
top: 50%;
margin-top: -20px;
width: 24px;
height: 40px;
background: rgba(0, 0, 0, .3);
text-align: center;
line-height: 40px;
color: #fff;
font-size: 18px;
z-index: 2;
}
.arrow-r {
right: 0;
}
.circle {
position: absolute;
bottom: 10px;
left: 50px;
}
.circle li {
float: left;
width: 8px;
height: 8px;
/*background-color: #fff;*/
border: 2px solid rgba(255, 255, 255, 0.5);
margin: 0 3px;
border-radius: 50%;
/*Mouse Passes Show Hands*/
cursor: pointer;
}
.current {
background-color: #fff;
}
</style>
<script src="animate.js"></script>
<script src="index.js"></script>
</head>
<body>
<div class="focus">
<!-- Left Button -->
<a href="javascript:;" class="arrow-l"><</a>
<!-- Right Button -->
<a href="javascript:;" class="arrow-r">></a>
<!-- Core Scroll Area -->
<ul>
<li>
<a href="#"><img src="images/focus.jpg" alt=""></a>
</li>
<li>
<a href="#"><img src="images/focus1.jpg" alt=""></a>
</li>
<li>
<a href="#"><img src="images/focus2.jpg" alt=""></a>
</li>
<li>
<a href="#"><img src="images/focus3.jpg" alt=""></a>
</li>
</ul>
<!-- Small Circle -->
<ol class="circle">
</ol>
</div>
</body>
</html>
javascript file
window.addEventListener('load', function() {
    // 1.Get Elements
    let arrow_l = document.querySelector('.arrow-l');
    let arrow_r = document.querySelector('.arrow-r');
    let focus = document.querySelector('.focus');
    let focusWidth = focus.offsetWidth;
    // 2.Mouse over focus shows left and right buttons hide away
    focus.addEventListener('mouseenter', function() {
        arrow_l.style.display = 'block';
        arrow_r.style.display = 'block';
        clearInterval(timer);
        timer = null; //Clear timer variable
    });
    focus.addEventListener('mouseleave', function() {
        arrow_l.style.display = 'none';
        arrow_r.style.display = 'none';
        timer = setInterval(function() {
            arrow_r.click();
        }, 2000);
    });
    // 3.Dynamically generating small circles Several graphs generate several small circles
    let ul = focus.querySelector('ul');
    let ol = focus.querySelector('.circle');
    for (let i = 0; i < ul.children.length; i++) {
        //Create a li
        let li = document.createElement('li');
        // 5.Record the index number of the current small circle, by customizing attributes
        li.setAttribute('index', i);
        //Insert li into ul
        ol.appendChild(li);
        // 4.The exclusive idea of small circles directly binds click events while generating small circles
        li.addEventListener('click', function() {
            // Kill Everyone Clear All li s Clear Currt Class
            for (let i = 0; i < ol.children.length; i++) {
                ol.children[i].className = '';
            }
            // Leave your current li settings class
            this.className = 'current';
            // 5.Click li to move the picture, moving ul
            // ul's moving distance is the index number of the small circle*The width of the picture is negative (go left)
            // Click on a li to get the index number of the current li
            let index = this.getAttribute('index');
            // When a li is clicked, give num the index number of the li
            num = index;
            // When a li is clicked, give the index number of the li to circle
            circle = index;
            // num = circle = index;
            animate(ul, -index * focusWidth);
        })
    };
    // Add the first li in ol to the current class
    ol.children[0].className = 'current';
    // 6.Clone the first picture
    let first = ul.children[0].cloneNode(true);
    ul.appendChild(first);
    // 7.Click the button on the right to move the picture
    let num = 0;
    let circle = 0;
    arrow_r.addEventListener('click', function() {
        // If you get to the last picture you copied, ul needs to quickly restore left = 0.
        if (num == ul.children.length - 1) {
            ul.style.left = 0;
            num = 0;
        };
        num++;
        animate(ul, -num * focusWidth);
        // 8.Click the button on the right, and the circle changes with you to declare another variable to control the play of the circle
        circle++;
        // If circle == 4, it means you have reached the last cloned picture and need to recover
        // if (circle == ol.children.length) {
        //     circle = 0;
        // }
        circle = circle == ol.children.length ? 0 : circle;
        circleChange();
    });
    // 9.Left Button
    arrow_l.addEventListener('click', function() {
        if (num == 0) {
            num = ul.children.length - 1;
            ul.style.left = -num * focusWidth + 'px';
        };
        num--;
        animate(ul, -num * focusWidth);
        circle--;
        // If circle < 0 indicates the first picture, the small circle should be changed to the fourth small circle (3),
        if (circle < 0) {
            circle = ol.children.length - 1;
        }
        circleChange();
    });
    //Small Circle's Exclusive Ideas
    function circleChange() {
        //Clear the current class of other small circles
        for (let i = 0; i < ol.children.length; i++) {
            ol.children[i].className = '';
        };
        // Currt class that leaves the current small circle
        ol.children[circle].className = 'current';
    };
    // 10.Auto Play Roadmap Timer
    let timer = this.setInterval(function() {
        arrow_r.click();
    }, 2000);
});
function animate(obj, target, callback) {
    // Console.log (callback);Callback = function () {} callback() when called

    // Clear previous timer first, keep only one current timer execution
    clearInterval(obj.timer);
    obj.timer = setInterval(function() {
        // Step value written inside timer
        // Change our step value to an integer. Don't have decimal problems
        // var step = Math.ceil((target - obj.offsetLeft) / 10);
        var step = (target - obj.offsetLeft) / 10;
        step = step > 0 ? Math.ceil(step) : Math.floor(step);
        if (obj.offsetLeft == target) {
            // Stopping animation is essentially a stop timer
            clearInterval(obj.timer);
            // Callback function written to end of timer
            // if (callback) {
            //     //Call function
            //     callback();
            // }
            callback && callback();
        }
        // Change the value of each step plus 1 to a slowly decreasing value step formula: (Target value - present position) / 10
        obj.style.left = obj.offsetLeft + step + 'px';

    }, 5);
}
5.2 Throttle Valve
Prevent the wheel map button from clicking continuously causing the play to be too fast.
Throttle Valve Purpose: When the previous function animation is completed, then the next function animation is executed so that the event cannot be triggered continuously.
Core implementation ideas: using callback functions, add a variable to control, lock and unlock functions.
Start setting a variable var flag = true;
If(flag) {flag = false; do something} Close the tap
When the animation is finished using the callback function, flag = true opens the tap
  arrow_l.addEventListener('click', function() {
        if (flage) {
            flage = false;
            if (num == 0) {
                num = ul.children.length - 1;
                ul.style.left = -num * focusWidth + 'px';
            };
            num--;
            animate(ul, -num * focusWidth, function() {
                flage = true;
            });
            circle--;
            if (circle < 0) {
                circle = ol.children.length - 1;
            }
            circleChange();
        }
    });
5.3 Cases: Back to the Top
Requirements:
Scroll the window to a specific location in the document.
window.scroll(x, y)
Note that the x and y inside do not follow the unit, write numbers directly
Analysis:
- Return to top with animation
- You can continue to use our encapsulated animation functions at this point
- All you need to do is change all the left-related values to be relative to the vertical scrolling distance of the page.
- How much page scrolls is available through window.pageYOffset
- Finally, the page scrolls, using window.scroll(x,y)
Code implementation:
<!DOCTYPE html>
<html lang="zh-CN">

<head>
    <meta charset="UTF-8">
    <meta http-equiv="X-UA-Compatible" content="IE=edge">
    <meta name="viewport" content="width=device-width, initial-scale=1.0">
    <title>Case: Back to the top</title>
    <style>
        .slider-bar {
            position: absolute;
            left: 50%;
            top: 300px;
            margin-left: 600px;
            width: 45px;
            height: 130px;
            background-color: pink;
        }

        .w {
            width: 1200px;
            margin: 10px auto;
        }

        .header {
            height: 150px;
            background-color: purple;
        }

        .banner {
            height: 250px;
            background-color: skyblue;
        }

        .main {
            height: 1000px;
            background-color: yellowgreen;
        }

        span {
            display: none;
            position: absolute;
            bottom: 0;
        }
    </style>
</head>

<body>
    <div class="slider-bar">
        <span class="goBack">Return to top</span>
    </div>
    <div class="header w">Head area</div>
    <div class="banner w">banner region</div>
    <div class="main w">Main body part</div>
    <script>
        //1.Get Elements
        let sliderBar = document.querySelector('.slider-bar');
        let banner = document.querySelector('.banner');
        // The size of the banner.offsetTop banner box with its head rolled off
        let bannerTop = banner.offsetTop;
        // Number that should change when our sidebar is fixed
        let sliderBarTop = sliderBar.offsetTop - bannerTop;
        // Get main body element
        let main = document.querySelector('.main');
        let goBack = document.querySelector('.goBack');
        //Head size of the main.offsetTop main box rolled up
        let mainTop = main.offsetTop;
        // 2.Page scroll event scroll
        document.addEventListener('scroll', function() {
                // console.log(window.pageYOffset);
                // Header of window.pageYOffset page rolled up
                // 3. When the page's scrolled head is greater than or equal to 170, the sidebar changes to fixed positioning
                if (window.pageYOffset >= bannerTop) {
                    sliderBar.style.position = 'fixed';
                    sliderBar.style.top = sliderBarTop + 'px';
                } else {
                    sliderBar.style.position = 'absolute';
                    sliderBar.style.top = '300px';
                }
                // 4.When our page scrolls to the main box, the goback module appears
                if (window.pageYOffset >= mainTop) {
                    goBack.style.display = 'block';
                } else {
                    goBack.style.display = 'none';
                }
            })
            //When you click goback, go back to the top
        goBack.addEventListener('click', function() {
            //The scrolling object is a window, so it is a window
            animate(window, 0);
        });

        function animate(obj, target, callback) {
            clearInterval(obj.timer);
            obj.timer = setInterval(function() {
                let step = (target - window.pageYOffset) / 10;
                step = step > 0 ? Math.ceil(step) : Math.floor(step);
                if (window.pageYOffset == target) {
                    clearInterval(obj.timer);
                    // if (callback) {
                    //     callback();
                    // }
                    callback && callback();
                }
                let wpy = window.pageYOffset + step;
                window.scroll(0, wpy);
            }, 15);
        }
    </script>
</body>

</html>
5.4 Cases: Doughnut Cloud Case
Requirements:
- Mouse passes over a small li, and the dome cloud follows this to the current small Li position
- Mouse leaves this little li, the dome cloud returns to its original position
- When the mouse clicks on a small li, the dome cloud stays where it clicks
Analysis:
- Animate using animation functions
- Originally the dome cloud started at 0
- Mouse passes through a small li and the offsetLeft position of the current small li is the target value.
- Mouse leaves a small li and sets the target value to 0
- If you click on a little li, store its current location as the starting point for the dome cloud
Code implementation:
Animation effects JS
function animate(obj, target, callback) {
    clearInterval(obj.timer);
    obj.timer = setInterval(function() {
        let step = (target - obj.offsetLeft) / 10;
        step = step > 0 ? Math.ceil(step) : Math.floor(step);
        if (obj.offsetLeft == target) {
            clearInterval(obj.timer);
            // if (callback) {
            //     callback();
            // }
            callback && callback();
        }
        obj.style.left = obj.offsetLeft + step + 'px';
    }, 15);
}
<!DOCTYPE html>
<html>
<head lang="en">
    <meta charset="UTF-8">
    <title>Case study: Douyun</title>
    <style>
        * {
            margin: 0;
            padding: 0
        }

        ul {
            list-style: none;
        }

        body {
            background-color: black;
        }

        .c-nav {
            width: 900px;
            height: 42px;
            background: #fff url(images/rss.png) no-repeat right center;
            margin: 100px auto;
            border-radius: 5px;
            position: relative;
        }

        .c-nav ul {
            position: absolute;
        }

        .c-nav li {
            float: left;
            width: 83px;
            text-align: center;
            line-height: 42px;
        }

        .c-nav li a {
            color: #333;
            text-decoration: none;
            display: inline-block;
            height: 42px;
        }

        .c-nav li a:hover {
            color: white;
        }

        .cloud {
            position: absolute;
            left: 0;
            top: 0;
            width: 83px;
            height: 42px;
            background: url(images/cloud.gif) no-repeat;
        }
    </style>
    <script src="animate.js"></script>
    <script>
        window.addEventListener('load', function() {
            // Get Elements
            let c_nav = document.querySelector('.c-nav');
            let cloud = document.querySelector('.cloud');
            let lis = c_nav.querySelectorAll('li');
            // Bind events to so li
            let current = 0; // current as the starting point of the cloud
            for (let i = 0; i < lis.length; i++) {
                // (1) Mouse moves to target location through cloud
                lis[i].addEventListener('mouseenter', function() {
                    animate(cloud, this.offsetLeft);
                });
                // (2) Mouse leaves cloud to return to its starting position
                lis[i].addEventListener('mouseleave', function() {
                    animate(cloud, current);
                });
                // (3) When the mouse clicks on a li, the current position will be used as the starting position of the cloud.
                lis[i].addEventListener('click', function() {
                    current = this.offsetLeft;
                })
            }
        })
    </script>
</head>
<body>
    <div id="c_nav" class="c-nav">
        <span class="cloud"></span>
        <ul>
            <li><a href="javascript:;">Homepage News</a></li>
            <li><a href="javascript:;">Teachers</a></li>
            <li><a href="javascript:;">Event planning</a></li>
            <li><a href="javascript:;">corporate culture</a></li>
            <li><a href="javascript:;">Recruitment Information</a></li>
            <li><a href="javascript:;">Company Profile</a></li>
            <li><a href="javascript:;">I'm Page</a></li>
            <li><a href="javascript:;">What's Page?</a></li>
        </ul>
    </div>
</body>
</html>