Create the docker compose basic directory
mkdir -p /usr/local/docker
1. Install mysql
Create mysql directory in / usr/local/docker /
mkdir -p /usr/local/docker/mysql
Write the docker-compose.yml file in / usr/local/docker/mysql directory
Note: the vi editor can paste the content to the file with format by inputting set paste in command mode and then inputting i.
version: '3.1'
services:
  db:
   image: mysql
   restart: always
   environment:
    MYSQL_ROOT_PASSWORD: root
   command:
    --default-authentication-plugin=mysql_native_password
    --character-set-server=utf8mb4
    --collation-server=utf8mb4_general_ci
    --explicit_defaults_for_timestamp=true
    --lower_case_table_names=1
   ports:
    - 3306:3306
   volumes:
    - ./data:/var/lib/mysql
  adminer:
   image: adminer
   restart: always
   ports:
    - 9999:8080
Run container: docker compose - f docker compose.yml up - D
Destroy container docker compose down
2. Install gitlab
version: '3.1'
services:
  web:
    image: 'twang2218/gitlab-ce-zh'
    restart: always
    hostname: '192.168.100.102'
    environment:
      TZ: 'Asia/Shanghai'
      GITLAB_OMNIBUS_CONFIG: |
        external_url 'http://192.168.100.102'
        gitlab_rails['gitlab_shell_ssh_port'] = 2222
        unicorn['port'] = 8888
        nginx['listen_port'] = 80
    ports:
      - '8000:80'
      - '443:443'
      - '2222:22'
    volumes:
      - ./config:/etc/gitlab
      - ./data:/var/opt/gitlab
      - ./logs:/var/log/gitlab
Post startup access: http://192.168.100.102
3. Install nexus3
version: '3.1'
services:
  nexus:
    restart: always
    image: sonatype/nexus3
    container_name: nexus
    ports:
     - 8081:8081
    volumes:
     - nexus-data:/nexus-data
volumes:
  nexus-data:
Post startup access: http://192.168.100.102:8081
maven uses nexus3
Configure the authentication information in setting.xml, and add the following configuration in the < servers > node:
<server>
    <id>releases</id>
    <username>admin</username>
    <password>admin123</password>
</server>
<server>
    <id>snapshots</id>
    <username>admin</username>
    <password>admin123</password>
</server>
Add deployment configuration in pom.xml
<distributionManagement>
    <repository>
        <id>releases</id>
        <name>Nexus Release Repository</name>
        <url>http://192.168.100.101:8081/repository/maven-releases/</url>
    </repository>
    <snapshotRepository>
        <id>snapshots</id>
        <name>Nexus Snapshot Repository</name>
        <url>http://192.168.100.101:8081/repository/maven-snapshots/</url>
    </snapshotRepository>
</distributionManagement>
Set up a proxy warehouse in pom.xml
<repositories>
     <repository>
         <id>nexus</id>
         <name>Nexus Repository</name>
         <url>http://192.168.100.101:8081/repository/maven-public/</url>
         <snapshots>
             <enabled>true</enabled>
         </snapshots>
         <releases>
             <enabled>true</enabled>
         </releases>
     </repository>
</repositories>
<pluginRepositories>
    <pluginRepository>
        <id>nexus</id>
        <name>Nexus Plugin Repository</name>
        <url>http://192.168.100.101:8081/repository/maven-public/</url>
        <snapshots>
            <enabled>true</enabled>
        </snapshots>
        <releases>
            <enabled>true</enabled>
        </releases>
    </pluginRepository>
</pluginRepositories>
Configure the build information of pom.xml
<build>
    <finalName>myshop</finalName>
    <plugins>
        <plugin>
            <groupId>org.springframework.boot</groupId>
            <artifactId>spring-boot-maven-plugin</artifactId>
        </plugin>
        <plugin>
            <groupId>org.apache.maven.plugins</groupId>
            <artifactId>maven-deploy-plugin</artifactId>
            <version>2.8.2</version>
            <configuration>
                <skip>true</skip>
            </configuration>
        </plugin>
        <plugin>
            <groupId>org.apache.maven.plugins</groupId>
            <artifactId>maven-source-plugin</artifactId>
            <version>2.4</version>
            <executions>
                <execution>
                    <phase>package</phase>
                    <goals>
                        <goal>jar</goal>
                    </goals>
                </execution>
            </executions>
        </plugin>
        <!-- Resource file copy plug-in -->
        <plugin>
            <groupId>org.apache.maven.plugins</groupId>
            <artifactId>maven-resources-plugin</artifactId>
            <version>3.1.0</version>
            <configuration>
                <encoding>UTF-8</encoding>
            </configuration>
        </plugin>
        <!--Java Compiler plug-in-->
        <plugin>
            <groupId>org.apache.maven.plugins</groupId>
            <artifactId>maven-compiler-plugin</artifactId>
            <version>3.8.1</version>
            <configuration>
                <source>1.8</source>
                <target>1.8</target>
                <encoding>UTF-8</encoding>
            </configuration>
        </plugin>
        <!-- Skip test on packaging -->
        <plugin>
            <groupId>org.apache.maven.plugins</groupId>
            <artifactId>maven-surefire-plugin</artifactId>
            <version>2.19</version>
            <configuration>
                <skipTests>true</skipTests>
            </configuration>
        </plugin>
    </plugins>
</build>
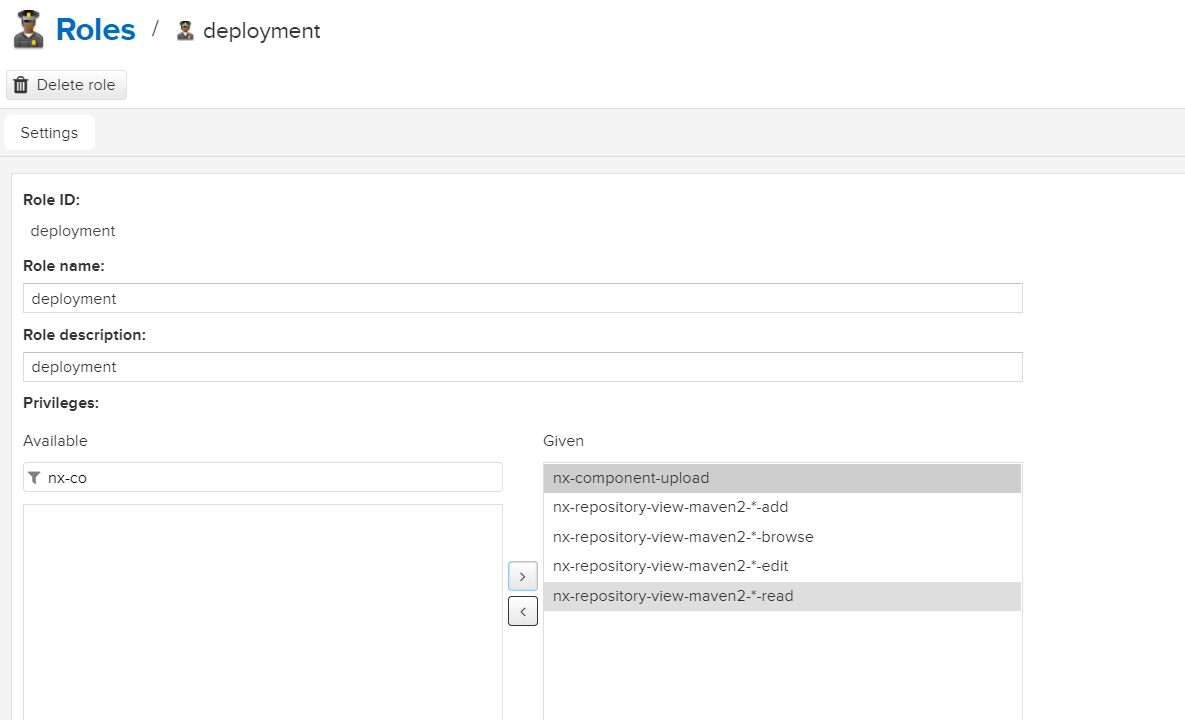
In nexus 3, there is no default user who can deploy Maven private server, only admin and anonymous users. To enable a role to deploy maven, you need to add all permissions of anonymous role and the following permissions:

4. Installing harbor
4.1 download the installation package: https://github.com/goharbor/harbor/releases
4.2. Upload to / usr/local/docker / directory
Unzip tar-zxvf harbor-offline-installer-v1.9.1-rc1.tgz
4.4. Enter the harbor directory to modify the harbor.yml file
hostname: 192.168.100.102
http:
  port: 8090
harbor_admin_password: Harbor12345
4.5. Execute install.sh.
Post startup access: http://192.168.100.101:8090 User name: admin Password: Harbor 12345
4.6. Configure the client
##Create without this file
vim /etc/docker/daemon.json

{
  "registry-mirrors":[
     "https://registry.docker-cn.com"
  ],
  "insecure-registries":[
   "192.168.100.101:8090"
  ]
}
Note: the file must conform to JSON specification, otherwise docker will not start
4.7 restart service
 systemctl daemon-reload
 systemctl restart docker
4.8. Check private server configuration
docker info
4.9 make image and submit it to harbor warehouse
##Pull nginx
docker pull nginx
## Mark mirror in project
## docker tag SOURCE_IMAGE[:TAG] 192.168.100.101:8090/itchao-saas/IMAGE[:TAG]
docker tag nginx:latest 192.168.100.101:8090/itchao-saas/nginx:latest
## Sign in
docker login 192.168.100.101:8090 -u admin -p Harbor12345
## Push image to current project
## docker push 192.168.100.101:8090/itchao-saas/IMAGE[:TAG]
docker push 192.168.100.101:8090/itchao-saas/nginx:latest
5. Docker compose setting network
Create a network in advance
##Create network
docker network create <Network Name>
##View existing networks
docker network list
Specify the network in docker-compose.yml
networks:
  default:
    external:
      name: myapp
6. nginx installation
version: '3.1'
services:
  nginx:
    restart: always
    image: nginx
    ports:
      - 8080:80
      - 80:80
      - 443:443
    volumes:
      - ./conf.d:/etc/nginx/conf.d
      - ./log:/var/log/nginx
      - ./www:/var/www
      - ./etc/letsencrypt:/etc/letsencrypt