Experiment 1 install OpenShift
1.1 preparation
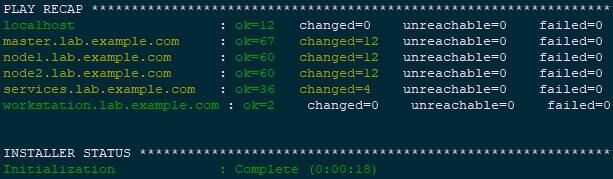
[student@workstation ~]$ lab review-install setup
1.2 configuration planning
OpenShift cluster has three nodes:
- master.lab.example.com: the OpenShift master node is a node that cannot be scheduled for pod.
- node1.lab.example.com : an OpenShift node that can run applications and infrastructure pod s at the same time.
- node2.lab.example.com : another OpenShift node that can run both the application and the infrastructure pod.
All nodes use the OverlayFS with the overlay2 driver to store Docker, and the second disk (vdb) in each node is reserved for Docker storage.
All nodes will use rpm based installation, using release v3.9 and OpenShift image tag version v3.9.14.
The default domain for routing is apps.lab.example.com. The Classroom DNS server has been configured to resolve all host names in this domain to node1 lab.example.com .
All container image s used by OpenShift clusters are stored in the registry.lab.example.com.
Two initial users based on HTPasswd authentication are used: developer and Admin. The initial password is redhat, developer is a normal user, and admin is a cluster administrator.
services.lab.example NFS volumes in. Com serve as persistent storage support for OpenShift's internal repository.
services.lab.example.com also provides NFS services for clustered storage.
etcd is also deployed on the master node, and the storage uses services.lab.example NFS shared storage provided by. Com host.
The cluster must be disconnected from the Internet, i.e. in the form of an offline package.
The internal OpenShift repository should be supported by NFS persistent storage, located at services.lab.example.com.
The master API and console will run on port 443.
The RPM package required to install OpenShift is defined by the Yum configuration file that has been used on all hosts.
/The home / student / do280 / labs / review install folder provides a partially completed Ansible directory file for the installation of OpenShift clusters. This folder contains the Ansible playbook required to perform the pre - and post installation steps.
Test application by Git server http://services.lab.example.com/phphelloworld Provided. This is a simple "hello, world" application. You can use source to image to deploy the application to verify that the OpenShift cluster was deployed successfully.
1.3 confirm Ansible
  1 [student@workstation ~]$ cd /home/student/DO280/labs/review-install/
  2 [student@workstation review-install]$ sudo yum -y install ansible
  3 [student@workstation review-install]$ ansible --version
  4 [student@workstation review-install]$ cat ansible.cfg
  5 [defaults]
  6 remote_user = student
  7 inventory = ./inventory
  8 log_path = ./ansible.log
  9
 10 [privilege_escalation]
 11 become = yes
 12 become_user = root
 13 become_method = sudo
1.4 check Inventory
  1 [student@workstation review-install]$ cp inventory.preinstall inventory		#This is the prepared Inventory
  2 [student@workstation review-install]$ cat inventory
  3 [workstations]
  4 workstation.lab.example.com
  5
  6 [nfs]
  7 services.lab.example.com
  8
  9 [masters]
 10 master.lab.example.com
 11
 12 [etcd]
 13 master.lab.example.com
 14
 15 [nodes]
 16 master.lab.example.com
 17 node1.lab.example.com
 18 node2.lab.example.com
 19
 20 [OSEv3:children]
 21 masters
 22 etcd
 23 nodes
 24 nfs
 25
 26 #Variables needed by the prepare_install.yml playbook.
 27 [nodes:vars]
 28 registry_local=registry.lab.example.com
 29 use_overlay2_driver=true
 30 insecure_registry=false
 31 run_docker_offline=true
 32 docker_storage_device=/dev/vdb
Tips:
Inventory defines six host groups:
- nfs: vm in the environment providing nfs service for cluster storage;
- masters: the node used as the master role in the OpenShift cluster;
- Etcd: the node of etcd service for OpenShift cluster. The master node is used in this environment;
- Node: node node in OpenShift cluster;
- OSEv3: all the receptions that make up the OpenShift cluster, including the nodes in the master, etcd, node or nfs group.
Note: by default, docker uses the online warehouse to download the container image. There is no network in this environment, so the docker warehouse is configured as an internal private warehouse. The warehouse configuration is introduced by using variables in yml.
In addition, the installation configures the docker daemons on each host to store container images using the overlay2 image driver. Docker supports many different image drivers. Such as AUFS, Btrfs, Device mapper and OverlayFS.
1.5 confirm node
  1 [student@workstation review-install]$ cat ping.yml
  2 ---
  3 - name: Verify Connectivity
  4   hosts: all
  5   gather_facts: no
  6   tasks:
  7     - name: "Test connectivity to machines."
  8       shell: "whoami"
  9       changed_when: false
 10 [student@workstation review-install]$ ansible-playbook -v ping.yml

1.6 preparations
  1 [student@workstation review-install]$ cat prepare_install.yml
  2 ---
  3 - name: "Host Preparation: Docker tasks"
  4   hosts: nodes
  5   roles:
  6     - docker-storage
  7     - docker-registry-cert
  8     - openshift-node
  9
 10   #Tasks below were not handled by the roles above.
 11   tasks:
 12     - name: Student Account - Docker Access
 13       user:
 14         name: student
 15         groups: docker
 16         append: yes
 17
 18 ...
 19 [student@workstation review-install]$ ansible-playbook prepare_install.yml

Note: as mentioned above, three roles have been introduced into yml. Please refer to step 2.5 of 002.OpenShift installation and deployment for specific role contents.
1.7 validation
1 [student@workstation review-install]$ ssh node1 'docker pull rhel7:latest' #Verify whether the image can be pulled normally

1.8 check Inventory
  1 [student@workstation review-install]$ cp inventory.partial inventory		#This is the full Inventory installed normally
  2 [student@workstation review-install]$ cat inventory
  3 [workstations]
  4 workstation.lab.example.com
  5
  6 [nfs]
  7 services.lab.example.com
  8
  9 [masters]
 10 master.lab.example.com
 11
 12 [etcd]
 13 master.lab.example.com
 14
 15 [nodes]
 16 master.lab.example.com
 17 node1.lab.example.com openshift_node_labels="{'region':'infra', 'node-role.kubernetes.io/compute':'true'}"
 18 node2.lab.example.com openshift_node_labels="{'region':'infra', 'node-role.kubernetes.io/compute':'true'}"
 19
 20 [OSEv3:children]
 21 masters
 22 etcd
 23 nodes
 24 nfs
 25
 26 #Variables needed by the prepare_install.yml playbook.
 27 [nodes:vars]
 28 registry_local=registry.lab.example.com
 29 use_overlay2_driver=true
 30 insecure_registry=false
 31 run_docker_offline=true
 32 docker_storage_device=/dev/vdb
 33
 34
 35 [OSEv3:vars]
 36 #General Variables
 37 openshift_disable_check=disk_availability,docker_storage,memory_availability
 38 openshift_deployment_type=openshift-enterprise
 39 openshift_release=v3.9
 40 openshift_image_tag=v3.9.14
 41
 42 #OpenShift Networking Variables
 43 os_firewall_use_firewalld=true
 44 openshift_master_api_port=443
 45 openshift_master_console_port=443
 46 #default subdomain
 47 openshift_master_default_subdomain=apps.lab.example.com
 48
 49 #Cluster Authentication Variables
 50 openshift_master_identity_providers=[{'name': 'htpasswd_auth', 'login': 'true', 'challenge': 'true', 'kind': 'HTPasswdPasswordIdentityProvider', 'filename': '/etc/origin/master/htpasswd'}]
 51 openshift_master_htpasswd_users={'admin': '$apr1$4ZbKL26l$3eKL/6AQM8O94lRwTAu611', 'developer': '$apr1$4ZbKL26l$3eKL/6AQM8O94lRwTAu611'}
 52
 53 #Need to enable NFS
 54 openshift_enable_unsupported_configurations=true
 55 #Registry Configuration Variables
 56 openshift_hosted_registry_storage_kind=nfs
 57 openshift_hosted_registry_storage_access_modes=['ReadWriteMany']
 58 openshift_hosted_registry_storage_nfs_directory=/exports
 59 openshift_hosted_registry_storage_nfs_options='*(rw,root_squash)'
 60 openshift_hosted_registry_storage_volume_name=registry
 61 openshift_hosted_registry_storage_volume_size=40Gi
 62
 63 #etcd Configuration Variables
 64 openshift_hosted_etcd_storage_kind=nfs
 65 openshift_hosted_etcd_storage_nfs_options="*(rw,root_squash,sync,no_wdelay)"
 66 openshift_hosted_etcd_storage_nfs_directory=/exports
 67 openshift_hosted_etcd_storage_volume_name=etcd-vol2
 68 openshift_hosted_etcd_storage_access_modes=["ReadWriteOnce"]
 69 openshift_hosted_etcd_storage_volume_size=1G
 70 openshift_hosted_etcd_storage_labels={'storage': 'etcd'}
 71
 72 #Modifications Needed for a Disconnected Install
 73 oreg_url=registry.lab.example.com/openshift3/ose-${component}:${version}
 74 openshift_examples_modify_imagestreams=true
 75 openshift_docker_additional_registries=registry.lab.example.com
 76 openshift_docker_blocked_registries=registry.access.redhat.com,docker.io
 77 openshift_web_console_prefix=registry.lab.example.com/openshift3/ose-
 78 openshift_cockpit_deployer_prefix='registry.lab.example.com/openshift3/'
 79 openshift_service_catalog_image_prefix=registry.lab.example.com/openshift3/ose-
 80 template_service_broker_prefix=registry.lab.example.com/openshift3/ose-
 81 ansible_service_broker_image_prefix=registry.lab.example.com/openshift3/ose-
 82 ansible_service_broker_etcd_image_prefix=registry.lab.example.com/rhel7/
 83 [student@workstation review-install]$ lab review-install verify		#Script validation is used in this environment
1.9 install OpenShift Ansible playbook
  1 [student@workstation review-install]$ rpm -qa | grep atomic-openshift-utils
  2 [student@workstation review-install]$ sudo yum -y install atomic-openshift-utils
1.10 Ansible installation OpenShift
  1 [student@workstation review-install]$ ansible-playbook \
  2 /usr/share/ansible/openshift-ansible/playbooks/prerequisites.yml
  1 [student@workstation review-install]$ ansible-playbook \
  2 /usr/share/ansible/openshift-ansible/playbooks/deploy_cluster.yml

1.11 validation
Using developer user access through the web console https://master.lab.example.com , verify that the cluster has been configured successfully.
1.12 authorization
  1 [student@workstation review-install]$ ssh root@master
  2 [root@master ~]# oc whoami
  3 system:admin
  4 [root@master ~]# oc adm policy add-cluster-role-to-user cluster-admin admin
Prompt: the root user of the master node is the cluster administrator by default.
1.13 login test
  1 [student@workstation ~]$ oc login -u admin -p redhat \
  2 https://master.lab.example.com
  3 [student@workstation ~]$ oc get nodes			#Verify node status

1.14 verify pod
1 [student@workstation ~]$ oc get pods -n default #View internal pod

1.15 test S2I
  1 [student@workstation ~]$ oc login -u developer -p redhat \
  2 https://master.lab.example.com
  3 [student@workstation ~]$ oc new-project test-s2i	#Create project
  4 [student@workstation ~]$ oc new-app --name=hello \
  5 php:5.6~http://services.lab.example.com/php-helloworld
1.16 test services
  1 [student@workstation ~]$ oc get pods			#View deployment
  2 NAME            READY     STATUS    RESTARTS   AGE
  3 hello-1-build   1/1       Running   0          39s
  4 [student@workstation ~]$ oc expose svc hello		#Exposure services
  5 [student@workstation ~]$ curl hello-test-s2i.apps.lab.example.com	#Test access
  6 Hello, World! php version is 5.6.25
1.17 experimental judgment
  1 [student@workstation ~]$ lab review-install grade #This environment uses script judgment
  2 [student@workstation ~]$ oc delete project test-s2i #Delete test item
Experiment 2 deploy an application
2.1 preparation
1 [student@workstation ~]$ lab review-deploy setup2.2 application planning
Deploy a TODO LIST application, including the following three containers:
A MySQL database container that stores data about tasks in the TODO list.
An Apache httpd web server front-end container (todoui), which has static HTML, CSS and Javascript of the application.
be based on Node.js API back-end container (todoapi), which exposes the RESTful interface to the front-end container. Todoapi container connects to MySQL database container to manage data in application
2.3 setting strategy
  1 [student@workstation ~]$ oc login -u admin -p redhat https://master.lab.example.com
  2 [student@workstation ~]$ oc adm policy remove-cluster-role-from-group \
  3 self-provisioner system:authenticated system:authenticated:oauth
  4 #Limit project creation to the cluster administrator role only, and normal users cannot create new projects.
2.4 create project
  1 [student@workstation ~]$ oc new-project todoapp
  2 [student@workstation ~]$ oc policy add-role-to-user edit developer	#Role edit that gives developer user access
2.5 setting quota
  1 [student@workstation ~]$ oc project todoapp
  2 [student@workstation ~]$ oc create quota todoapp-quota --hard=pods=1	#Set the quota of pod
2.6 create application
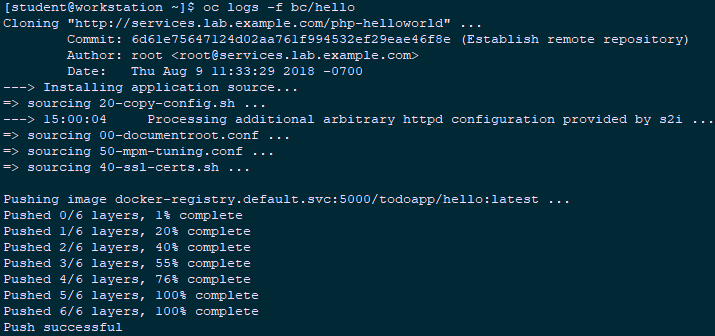
  1 [student@workstation ~]$ oc login -u developer -p redhat \
  2 https://master.lab.example.com						#Sign in with developer
  3 [student@workstation ~]$ oc new-app --name=hello \
  4 php:5.6~http://services.lab.example.com/php-helloworld			#Create app
  5 [student@workstation ~]$ oc logs -f bc/hello				#View build log
2.7 view deployment
  1 [student@workstation ~]$ oc get pods
  2 NAME             READY     STATUS      RESTARTS   AGE
  3 hello-1-build    0/1       Completed   0          2m
  4 hello-1-deploy   1/1       Running     0          1m
  5 [student@workstation ~]$ oc get events
  6 ......
  7 2m          2m           7         hello.15b54ba822fc1029            DeploymentConfig
  8 Warning   FailedCreate            deployer-controller              Error creating deployer pod: pods "hello-1-deploy" is forbidden: exceeded quota: todoapp-quota, requested: pods=1, used: pods=1, limited: pods=
  9 [student@workstation ~]$ oc describe quota
 10 Name:       todoapp-quota
 11 Namespace:  todoapp
 12 Resource    Used  Hard
 13 --------    ----  ----
 14 pods        1     1
Conclusion: due to the hard quota limitation of pod, the deployment failed.
2.8 extended quota
  1 [student@workstation ~]$ oc rollout cancel dc hello	#Cancel dc before correcting quota
  2 [student@workstation ~]$ oc login -u admin -p redhat
  3 [student@workstation ~]$ oc project todoapp
  4 [student@workstation ~]$ oc patch resourcequota/todoapp-quota --patch '{"spec":{"hard":{"pods":"10"}}}'
Tip: you can also use the OC edit resourcequota todoapp quota command to modify the quota configuration.
  1 [student@workstation ~]$ oc login -u developer -p redhat
  2 [student@workstation ~]$ oc describe quota		#Confirm quota
  3 Name:       todoapp-quota
  4 Namespace:  todoapp
  5 Resource    Used  Hard
  6 --------    ----  ----
  7 pods        0     10
2.9 redeployment
  1 [student@workstation ~]$ oc rollout latest dc/hello
  2 [student@workstation ~]$ oc get pods			#Confirm deployment success
  3 NAME            READY     STATUS      RESTARTS   AGE
  4 hello-1-build   0/1       Completed   0          9m
  5 hello-2-qklrr   1/1       Running     0          12s
  6 [student@workstation ~]$ oc delete all -l app=hello	#Delete hello
2.10 configuring NFS
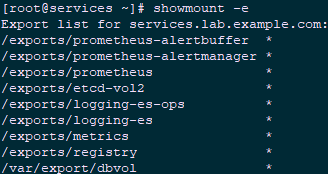
  1 [kiosk@foundation0 ~]$ ssh root@services
  2 [root@services ~]# mkdir -p /var/export/dbvol
  3 [root@services ~]# chown nfsnobody:nfsnobody /var/export/dbvol
  4 [root@services ~]# chmod 700 /var/export/dbvol
  5 [root@services ~]# echo "/var/export/dbvol *(rw,async,all_squash)" > /etc/exports.d/dbvol.exports
  6 [root@services ~]# exportfs -a
  7 [root@services ~]# showmount -e
Tip: this experiment uses the shared storage provided by NFS on services to provide persistent storage for subsequent experiments.
2.11 testing NFS
  1 [kiosk@foundation0 ~]$ ssh root@node1
  2 [root@node1 ~]# mount -t nfs services.lab.example.com:/var/export/dbvol /mnt
  3 [root@node1 ~]# ls -la /mnt ; mount | grep /mnt		#Test whether it can be mounted normally
Tip: it is recommended that node2 do the same test. After the test, it needs to be uninstalled, and the persistent volume will be automatically mounted.
2.12 create PV
  1 [student@workstation ~]$ vim /home/student/DO280/labs/review-deploy/todoapi/openshift/mysql-pv.yaml
  2 apiVersion: v1
  3 kind: PersistentVolume
  4 metadata:
  5  name: mysql-pv
  6 spec:
  7  capacity:
  8   storage: 2G
  9  accessModes:
 10   -  ReadWriteMany
 11  nfs:
 12   path: /var/export/dbvol
 13   server: services.lab.example.com
 14 [student@workstation ~]$ oc login -u admin -p redhat
 15 [student@workstation ~]$ oc create -f /home/student/DO280/labs/review-deploy/todoapi/openshift/mysql-pv.yaml
 16 [student@workstation ~]$ oc get pv

2.13 import template
1 [student@workstation ~]$ oc apply -n openshift -f /home/student/DO280/labs/review-deploy/todoapi/openshift/nodejs-mysql-template.yamlNote: see the attachment for template file.
2.14 creating image with dockerfile
  1 [student@workstation ~]$ vim /home/student/DO280/labs/review-deploy/todoui/Dockerfile
  2 FROM  rhel7:7.5
  3
  4 MAINTAINER Red Hat Training <training@redhat.com>
  5
  6 # DocumentRoot for Apache
  7 ENV HOME /var/www/html
  8
  9 # Need this for installing HTTPD from classroom yum repo
 10 ADD training.repo /etc/yum.repos.d/training.repo
 11 RUN yum downgrade -y krb5-libs libstdc++ libcom_err && \
 12     yum install -y --setopt=tsflags=nodocs \
 13     httpd \
 14     openssl-devel \
 15     procps-ng \
 16     which && \
 17     yum clean all -y && \
 18     rm -rf /var/cache/yum
 19
 20 # Custom HTTPD conf file to log to stdout as well as change port to 8080
 21 COPY conf/httpd.conf /etc/httpd/conf/httpd.conf
 22
 23 # Copy front end static assets to HTTPD DocRoot
 24 COPY src/ ${HOME}/
 25
 26 # We run on port 8080 to avoid running container as root
 27 EXPOSE 8080
 28
 29 # This stuff is needed to make HTTPD run on OpenShift and avoid
 30 # permissions issues
 31 RUN rm -rf /run/httpd && mkdir /run/httpd && chmod -R a+rwx /run/httpd
 32
 33 # Run as apache user and not root
 34 USER 1001
 35
 36 # Launch apache daemon
 37 CMD /usr/sbin/apachectl -DFOREGROUND
 38 [student@workstation ~]$ cd /home/student/DO280/labs/review-deploy/todoui/
 39 [student@workstation todoui]$ docker build -t todoapp/todoui .
 40 [student@workstation todoui]$ docker images
 41 REPOSITORY                       TAG                 IMAGE ID            CREATED             SIZE
 42 todoapp/todoui                   latest              0249e1c69e38        39 seconds ago      239 MB
 43 registry.lab.example.com/rhel7   7.5                 4bbd153adf84        12 months ago       201 MB
2.15 push warehouse
  1 [student@workstation todoui]$ docker tag todoapp/todoui:latest \
  2 registry.lab.example.com/todoapp/todoui:latest
  3 [student@workstation todoui]$ docker push \
  4 registry.lab.example.com/todoapp/todoui:latest
Tip: mark the image created from the dockerfile, and then push it to the internal warehouse.
2.16 import IS
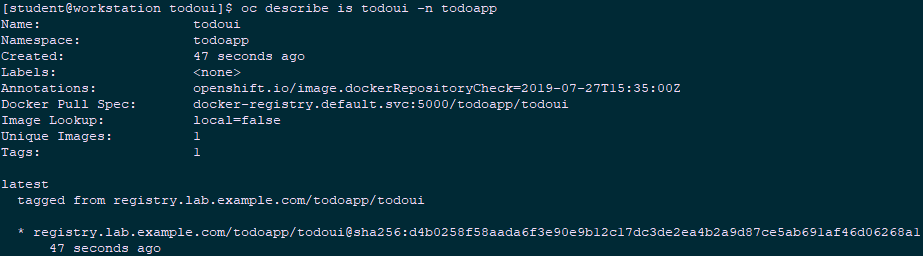
  1 [student@workstation todoui]$ oc whoami -c
  2 todoapp/master-lab-example-com:443/admin
  3 [student@workstation todoui]$ oc import-image todoui \
  4 --from=registry.lab.example.com/todoapp/todoui \
  5 --confirm -n todoapp					#Import docker image into Image Streams of OpenShift
  6 [student@workstation todoui]$ oc get is -n todoapp
  7 NAME      DOCKER REPO                                       TAGS      UPDATED
  8 todoui    docker-registry.default.svc:5000/todoapp/todoui   latest    13 seconds ago
  9 [student@workstation todoui]$ oc describe is todoui -n todoapp	#View is
2.17 create application
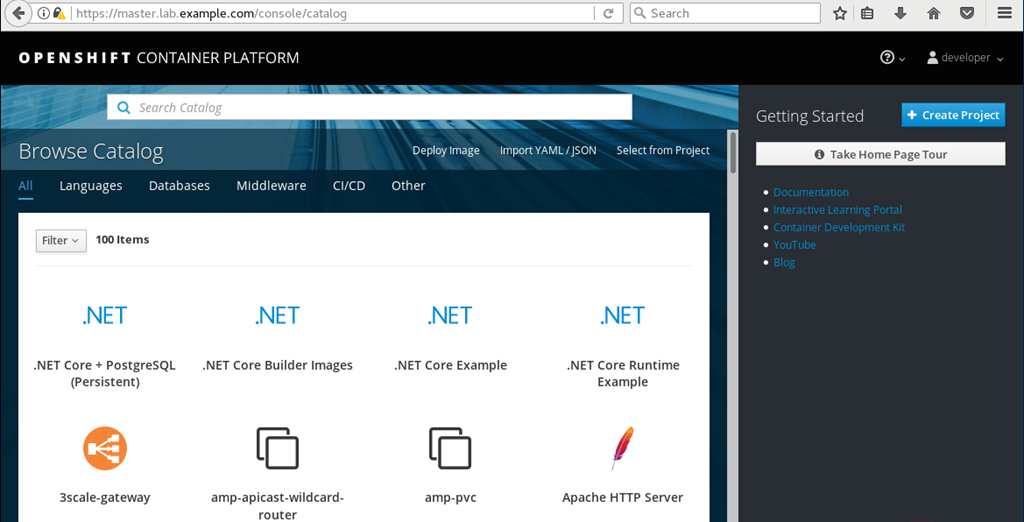
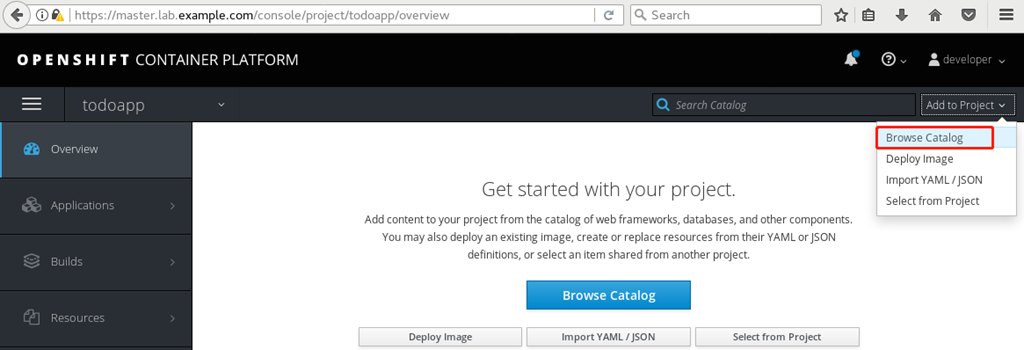
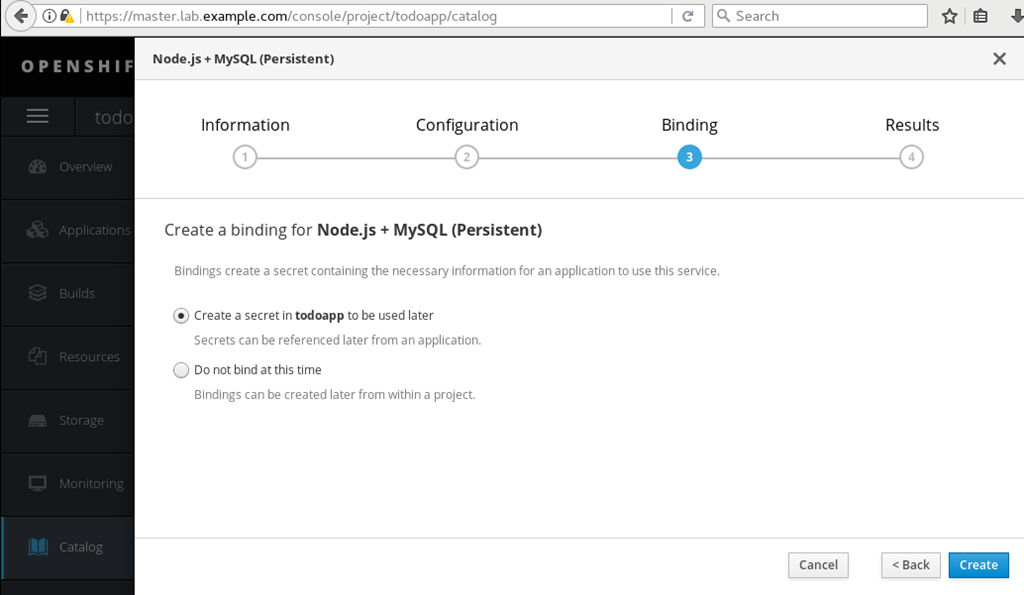
Browser login https://master.lab.example.com , select the project of todoapp.
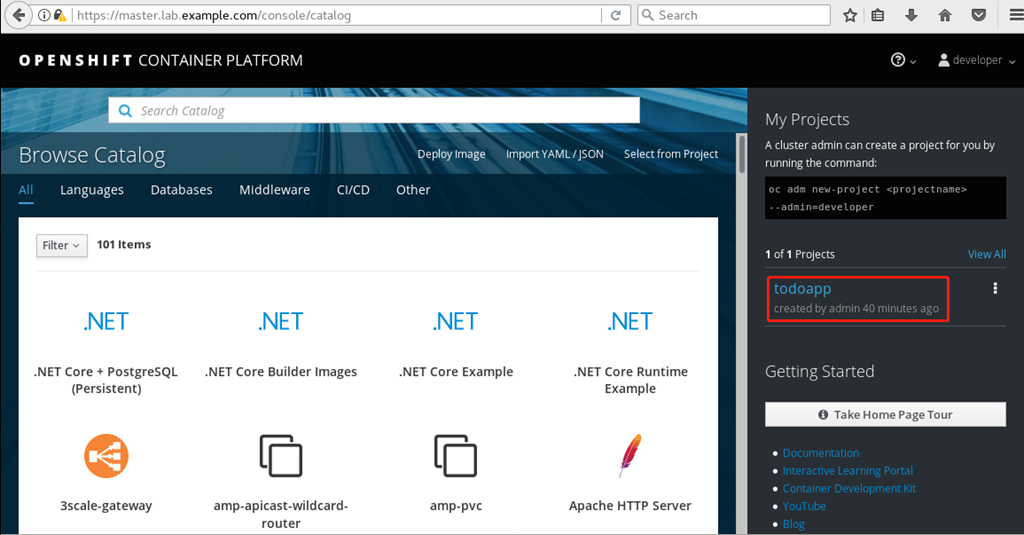
View the catalog.
Language > JavaScript—— Node.js + MySQL (Persistent).

Refer to the following table to establish the application:
|
name
|
value
|
|
Git Repository URL
|
http://services.lab.example.com/todoapi
|
|
Application Hostname
|
todoapi.apps.lab.example.com
|
|
MySQL Username
|
todoapp
|
|
MySQL Password
|
todoapp
|
|
Database name
|
todoappdb
|
|
Database Administrator Password
|
redhat
|
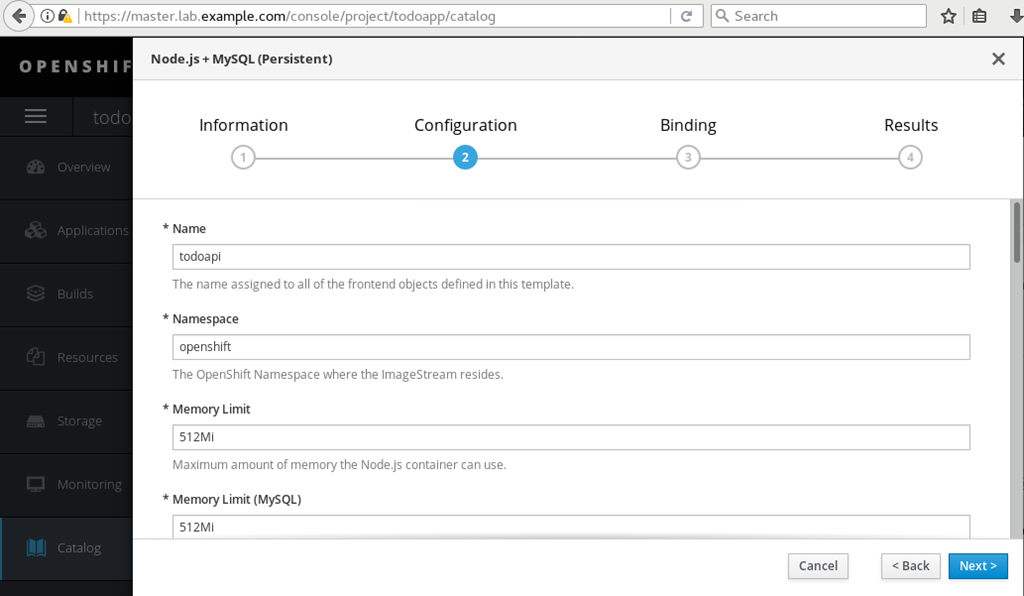
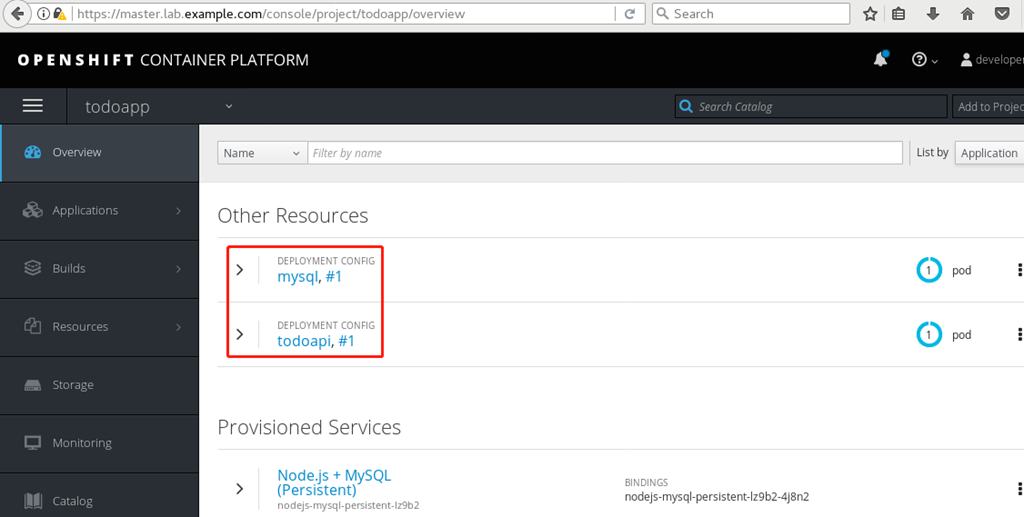
Create to create.
Overview to view.
2.18 test database
  1 [student@workstation ~]$ oc port-forward mysql-1-6hq4d 3306:3306		#Keep port forwarding
  2 [student@workstation ~]$ mysql -h127.0.0.1 -u todoapp -ptodoapp todoappdb < /home/student/DO280/labs/review-deploy/todoapi/sql/db.sql
  3 #Import test data to database
  4 [student@workstation ~]$ mysql -h127.0.0.1 -u todoapp -ptodoapp todoappdb -e "select id, description, case when done = 1 then 'TRUE' else 'FALSE' END as done from Item;"
  5 #Check whether the import is successful
2.19 access testing
  1 [student@workstation ~]$ curl -s http://todoapi.apps.lab.example.com/todo/api/host | python -m json.tool	#curl access
  2 {
  3     "hostname": "todoapi-1-kxlnx",
  4     "ip": "10.128.0.12"
  5 }
  6 [student@workstation ~]$ curl -s http://todoapi.apps.lab.example.com/todo/api/items | python -m json.tool	#curl access

2.20 creating applications
  1 [student@workstation ~]$ oc new-app --name=todoui -i todoui	#Using todoui is to create applications
  2 [student@workstation ~]$ oc get pods
  3 NAME              READY     STATUS      RESTARTS   AGE
  4 mysql-1-6hq4d     1/1       Running     0          9m
  5 todoapi-1-build   0/1       Completed   0          9m
  6 todoapi-1-kxlnx   1/1       Running     0          8m
  7 todoui-1-wwg28    1/1       Running     0          32s
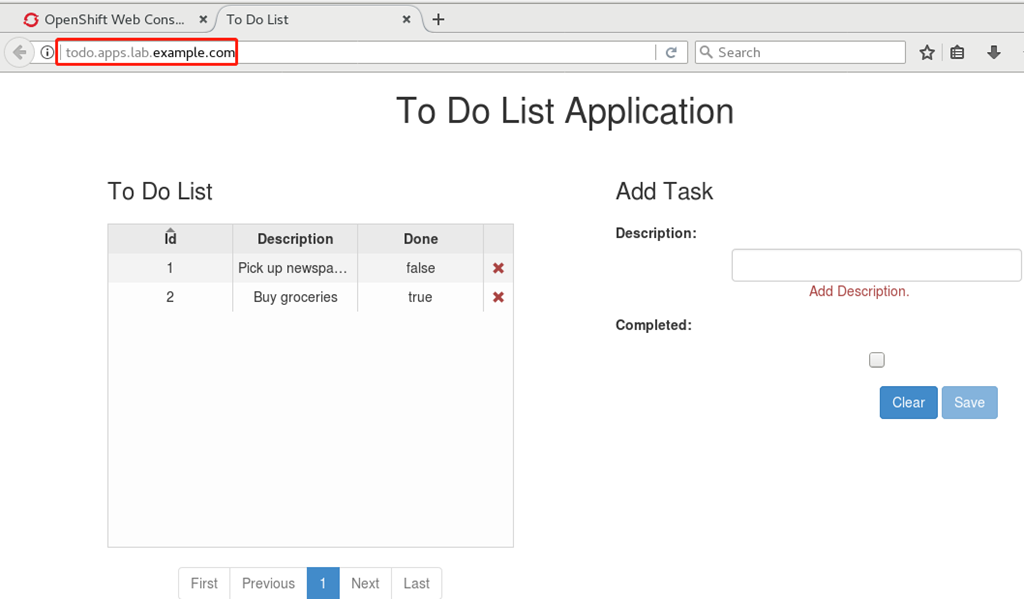
2.21 exposure services
1 [student@workstation ~]$ oc expose svc todoui --hostname=todo.apps.lab.example.comBrowser access: http://todo.apps.lab.example.com
2.22 experimental judgment
1 [student@workstation ~]$ lab review-deploy grade #This environment uses script judgment