brief introduction
Today we mainly study data verification.
When transferring parameters to a RESTful interface, we can't trust any user input, so we need to verify the data during development. For example, we often have to write to judge whether the field is empty, length limit, etc. these codes are cumbersome, lengthy and error prone. Here, we use hibernate validator to solve the data verification problem, which will make the solution of the problem much more elegant. So what is hibernate validator? At the beginning, Java specified a set of interfaces for validators, namely Bean Validation (JSR 303 and JSR 349). Bean Validation is not a technology, but a specification, which needs to be implemented. Here, the hibernate team provides a reference implementation, that is, hibernate validator
Common notes
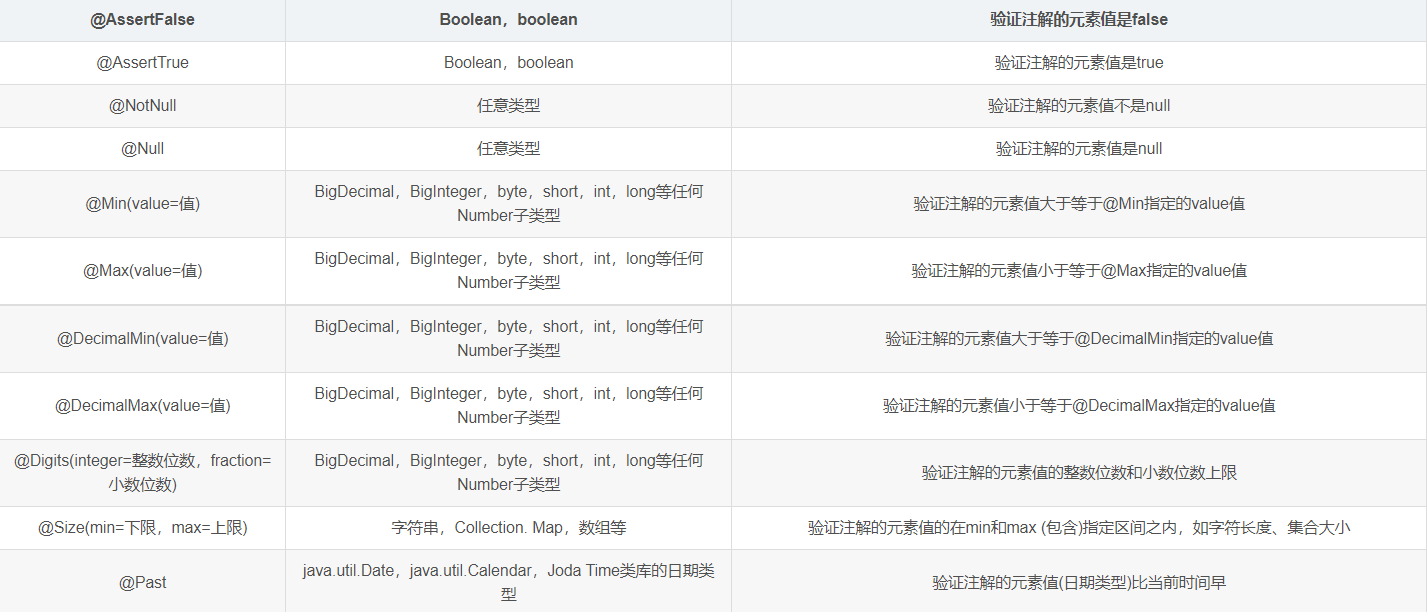
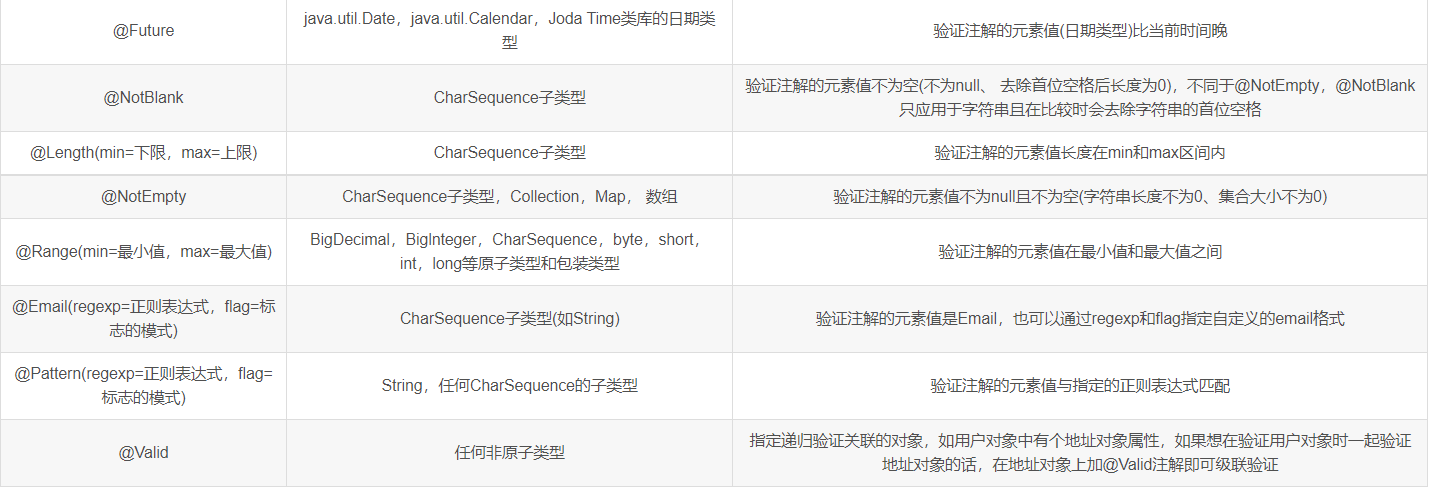
Note: @ NotNull, @ NotBlank is different from @ NotEmpty in usage: @ NotNull is used when int, long basic types, Integer, long and other wrapper types are judged to be non empty. String type strings generally use @ NotBlank, while collection classes generally use @ NotEmpty. However, specific problems should be analyzed in detail. For example, @ NotNull is required when null string is not allowed
In addition to these annotations, we can also customize verification annotations to cope with more business scenarios. You need to customize an annotation and implement the ConstraintValidator interface. There is no need to expand here. You can find it yourself
VO, DTO and DO
DO(Data Object): data object. Each field in the class corresponds to the database, that is, entity class
DTO(Data Transfer Object): data transfer object, which is the data transfer object between the presentation layer and the service layer
VO(View Object): view object, used for presentation layer, which is used to encapsulate all data of a specified page (or component)
In most cases, the attribute values of DTO and VO are basically the same, so many times the backend does not write VO at the implementation level. However, at the design level, there are essential differences between the two: DTO represents the data that the service layer needs to receive and return, while VO represents the data that the display layer needs to display. For example, 0 means male and 1 means female. In the DTO layer, it is 0 and 1, but in the VO layer, it may be 0 and 1, male and female, handsome and beautiful, handsome and beautiful. Here we use the API written in RESTful style, which is equivalent to only incoming or outgoing DTOs. The front and back ends are separated, that is, the front end helps us convert DTOs into corresponding Vos. If it is MVC mode and the view is bound with data, we need to add another layer of VO. For another example, when a framework (such as Flex) provides automatic conversion of POJO s to some fields in the UI, you can consider defining VO at the implementation level. Conclusion: there must be VO at the design level. The actual implementation of the back-end service layer depends on the situation
step
The dependency spring boot starter web before spring boot 2.2 contains the hibernate validator dependency, but it will not be included after spring boot 2.2. Here, you need to manually add it to pom.xml
        <!-- hibernate-validator -->
        <dependency>
            <groupId>org.hibernate</groupId>
            <artifactId>hibernate-validator</artifactId>
            <version>6.1.0.Final</version>
        </dependency>
Here, we simulate a normal interface request, and then verify the data of the incoming parameters in this process. First, we build a data table
create table employee
  (
      id int not NULL AUTO_INCREMENT,
      name varchar(255) not null,
      gender int not null,
      date_of_birth datetime null,
      phone varchar(255) null,
      email varchar(255) null,
      dept varchar(255) null,
      constraint goods_pk
          primary key (id)
  );

INSERT INTO employee (name, gender, date_of_birth, phone, email, dept) VALUES ('nail', 0, '1988-10-01', '18945174678', 'nail@163.com', 'Development');
INSERT INTO employee (name, gender, date_of_birth, phone, email, dept) VALUES ('bob', 0, '1990-05-01 00:00:00', '18647815474', 'bob@163.com', 'Test');
Right click on the top of the data table and start the operation as follows, and we will start to generate code
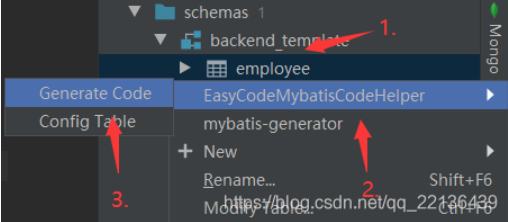
Fill in com.example.backend under Package_ Template, then select the six files to be generated, and finally click OK to generate six files. If you want to see more detailed steps, you can see this article code generation automatically

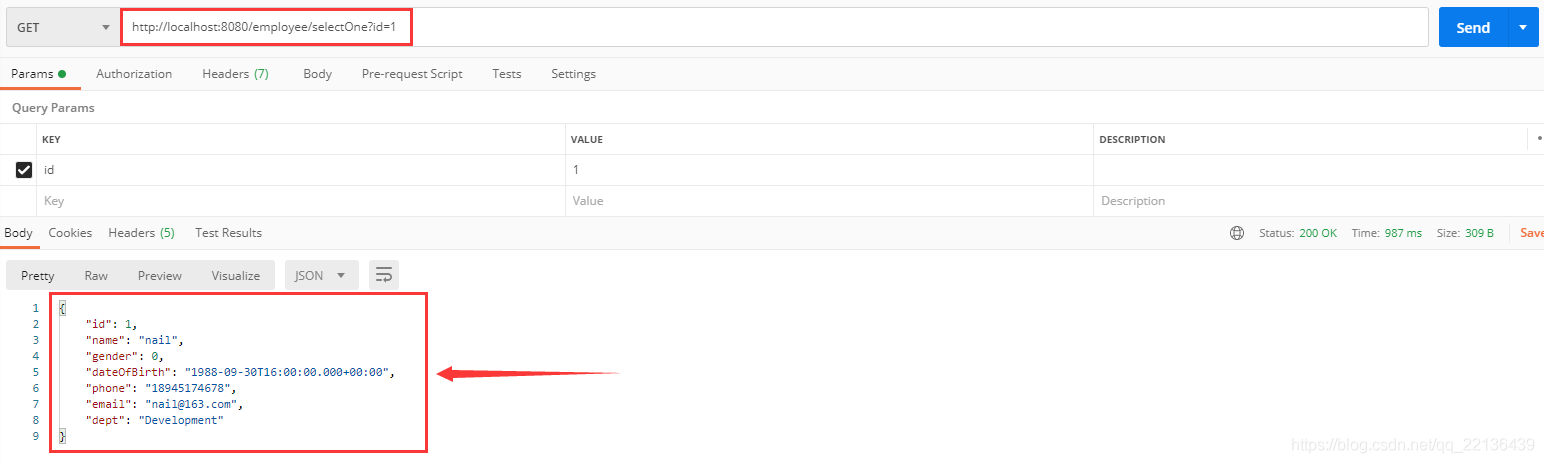
Run the project and access it with Postman http://localhost:8080/employee/selectOne?id=1 , if the following data appears, it indicates that the automatic code generation is successful, and then other steps can be carried out
Next, we add a new interface on the basis of the automatically generated code. Here, we first add an xxxDTO, and perform data verification on this xxxDTO at com.example.backend_template.dto create two new folders, one request and one response, and add the EmployeeDTO.java class under the request folder. Write the get and set methods here. There are too many, so don't write them
package com.example.backend_template.dto.request;

import com.fasterxml.jackson.annotation.JsonProperty;
import org.hibernate.validator.constraints.Range;
import org.springframework.format.annotation.DateTimeFormat;

import javax.validation.constraints.*;
import java.util.Date;

/**
 * @ClassName EmployeeDTO
 * @Description
 * @Author L
 * @Date Create by 2020/7/16
 */
public class EmployeeDTO {

    @NotBlank(message = "name must not be null!")
    private String name;
    @NotNull(message = "gender must not be null!")
    @Range(min = 0, max = 1, message = "gender must be one of the following 0 or 1!")
    private Integer gender;
    @DateTimeFormat(pattern = "yyyy-MM-dd")
    @NotNull(message = "date_of_birth must not be null!")
    @Past(message = "date_of_birth has to be past time!")
    @JsonProperty(value = "date_of_birth")
    private Date dateOfBirth;
    private String phone;
    @Email(message = "email format is incorrect! ")
    private String email;
    @NotBlank(message = "dept must not be null!")
    @Pattern(regexp = "Test|Development|Administration", message = "dept must be one of the following Test,Development,Administration!")
    private String dept;
    @NotNull(message = "salary must not be null!")
    private Integer salary;

    //get and set...
}
Note: we assume that the above information will be transferred to the page, although we may not save it all to the employee, because it may be transferred to other tables or processed under normal development
At com.example.backend_ Add the following interface methods under the template.service.employeeservice.java class. Pay attention to importing relevant classes, and then
    /**
     *  Create employee related information, including basic information and salary information
     *
     * @param dto
     * @return
     */
    EmployeeDTO createEmployeeInfo(EmployeeDTO dto);
For later convenience, click com.example.backend_ Two construction methods are added under the template.entity.employee.java class
	public Employee() {
    }

    public Employee(String name, Integer gender, Date dateOfBirth, String phone, String email, String dept) {
        this.id = id;
        this.name = name;
        this.gender = gender;
        this.dateOfBirth = dateOfBirth;
        this.phone = phone;
        this.email = email;
        this.dept = dept;
    }
At com.example.backend_ Under the template.service.employeeserviceimpl.java class, add the following implementation methods
    @Override
    public EmployeeDTO createEmployeeInfo(EmployeeDTO dto) {
        Employee employee = new Employee(dto.getName(), dto.getGender(),
                dto.getDateOfBirth(), dto.getPhone(), dto.getEmail(), dto.getDept());
        employeeDao.insert(employee);
        //Suppose the salary is stored for other processing
        dto.getSalary();

        return dto;
    }
At com.example.backend_ Under the template.controller.employeecontroller.java class, add the following interfaces and unify the returned results into the ResultData data data structure
    /**
     * Create employee related information, including basic information and salary information
     * @param dto
     * @return
     */
    @PostMapping("")
    public ResultData<Object> createEmployeeInfo(@RequestBody @Valid EmployeeDTO dto){
        EmployeeDTO employeeDTO = employeeService.createEmployeeInfo(dto);
        return ResultUtils.success(employeeDTO);
    }
Start the project with Postman http://localhost:8080/employee Initiate a POST request with the following parameters
{
    "name":"Tom",
    "gender":0,
    "date_of_birth":"1999-10-01",
    "phone":"13615498742",
    "email":"tom@163.com",
    "dept":"Development",
    "salary":2000
}
After success, the results are shown in the figure below

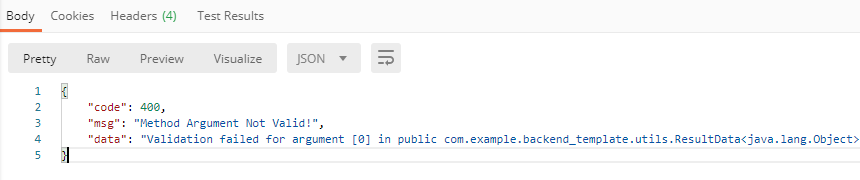
At this time, if the format of the transmitted data is incorrect, errors related to parameter verification will be reported. There are many errors. You can try it yourself. For example, if you leave name blank, the following errors will be reported
{
    "code": 400,
    "msg": "Method Argument Not Valid!",
    "data": "Validation failed for argument [0] in public com.example.backend_template.utils.ResultData<java.lang.Object> com.example.backend_template.controller.EmployeeController.createEmployeeInfo(com.example.backend_template.dto.request.EmployeeDTO): [Field error in object 'employeeDTO' on field 'name': rejected value [null]; codes [NotBlank.employeeDTO.name,NotBlank.name,NotBlank.java.lang.String,NotBlank]; arguments [org.springframework.context.support.DefaultMessageSourceResolvable: codes [employeeDTO.name,name]; arguments []; default message [name]]; default message [name must not be null!]] "
}
The results are shown below
After testing and knowing how to use it, you can delete these redundant classes.
This time is also full of harvest. Please try again, for the people you want to see, for the things you want to do, and for yourself.