1. Deploy server-side and agent-side
1. Preparing for the experiment
centos7.4 system servers, one serves as a monitoring server and one serves as a monitored node. The yum source, firewall shutdown, clock service synchronization of each node, and communication between nodes can be done through the host name.
1) All machines turn off firewalls and selinux
setenforing 0 (Modify Profile Close)
sed -i 's/SELINUX=enforcing/SELINUX=disabled/' /etc/selinux/config
systemctl stop firewalld.service
2) According to the schematic diagram, the basic experimental settings are as follows:
| Machine name | IP configuration | Service Role | Remarks |
|---|---|---|---|
| server | 192.168.246.228 | zabbix-server | Turn on monitoring |
| node1 | 192.168.246.226 | zabbix-agent-none1 | open |
2. Deploy zabbix-server [Monitoring End]
(1) Install zabbix-server
[root@youngfit ~]# rpm -ivh http://repo.zabbix.com/zabbix/3.4/rhel/7/x86_64/zabbix-release-3.4-2.el7.noarch.rpm
[root@youngfit ~]# yum -y install zabbix-server-mysql zabbix-web-mysql zabbix-agent httpd mariadb mariadb-server
(2) Start mariadb
[root@youngfit ~]# systemctl restart mariadb
[root@youngfit ~]# systemctl enable mariadb
(3) Preparing database and authorization
[root@youngfit ~]# mysql
Welcome to the MariaDB monitor. Commands end with ; or \g.
Your MariaDB connection id is 2
Server version: 5.5.56-MariaDB MariaDB Server
Copyright (c) 2000, 2017, Oracle, MariaDB Corporation Ab and others.
Type 'help;' or '\h' for help. Type '\c' to clear the current input statement.
MariaDB [(none)]> create database zabbix character set utf8 collate utf8_bin;
Query OK, 1 row affected (0.00 sec)
MariaDB [(none)]> grant all privileges on zabbix.* to zabbix@localhost identified by 'zabbix';
Query OK, 0 rows affected (0.00 sec)
MariaDB [(none)]> flush privileges;
Query OK, 0 rows affected (0.00 sec)
MariaDB [(none)]> \q
Bye
(4) Importing database files
[root@youngfit ~]# zcat /usr/share/doc/zabbix-server-mysql*/create.sql.gz | mysql -uzabbix -pzabbix zabbix
(5) Modify the zabbix configuration file
[root@youngfit ~]# vim /etc/zabbix/zabbix_server.conf
DBHost=localhost
DBName=zabbix
DBUser=zabbix
DBPassword=zabbix
 Note to delete the space before
(6) Start zabbix-server
[root@youngfit ~]# systemctl restart zabbix-server zabbix-agent //restart ZABBIX service and agent
[root@youngfit ~]# systemctl enable zabbix-server zabbix-agent //set to boot-up and start-up
(7) Modify Apache configuration files, modify time zones
[root@youngfit ~]# vim /etc/httpd/conf.d/zabbix.conf
php_value date.timezone Asia/Shanghai
(8) Start the Apache service
[root@youngfit ~]# systemctl restart httpd
[root@youngfit ~]# systemctl enable httpd
3. Deploy zabbix-agent [monitored end]
(1) Install zabbix-agent
[root@web1  ~]# rpm -i http://repo.zabbix.com/zabbix/3.4/rhel/7/x86_64/zabbix-release-3.4-2.el7.noarch.rpm
[root@web1  ~]# yum -y install zabbix-agent
(2) zabbix-agent configuration
[root@web1 ~]# vim /etc/zabbix/zabbix_agentd.conf
Server=47.75.81.162 //zabbix-server IP is the IP of the monitoring end
ServerActive=47.75.81.162 //zabbix-server IP is the IP of the monitoring end
UnsafeUserParameters=1 Whether to restrict user customization keys Use special character 1 to enable special character 0 or not
EnableRemoteCommands=0 Whether to allow others to execute remote operation commands, which are disabled by default, is a security risk when opened.
(3) Start zabbix-agent
[root@web1 ~]# systemctl start zabbix-agent
[root@web1  ~]# systemctl enable zabbix-agent
(4) Preparing the Web Site Test Environment (redis)
If redis has been previously installed, no action is required
First, we install redis on the agent side using yum:
[root@zabbix-agent-none1 ~]# yum -y install epel-release
[root@zabbix-agent-none1 ~]# yum install -y redis
Modify the configuration file:
[root@zabbix-agent-none1 ~]# vim /etc/redis.conf
bind 0.0.0.0        #Do not do any authentication
When the modification is complete, we start the service and check the port:
[root@zabbix-agent-none1 ~]# systemctl start redis
[root@zabbix-agent-none1 ~]# netstat -lntp | grep redis
tcp        0      0 0.0.0.0:6379            0.0.0.0:*               LISTEN      1353/redis-server 0
4. Implement web Server Monitoring [Monitoring End]
Next, we can go to the website to define the operation.
(1) Define monitoring items
Enter Configuration - > Host - > Noe1 - > Monitoring items - > Create Monitoring Item

When you have finished filling it out, we click Add below.
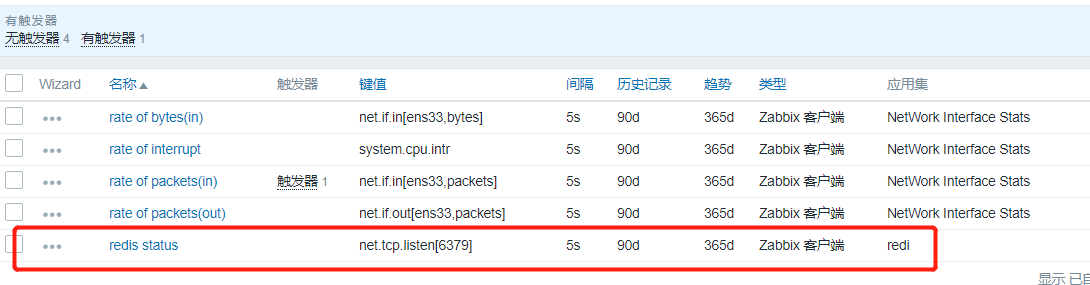
The monitoring item was added successfully.
We can check his value:
In Detection - >Latest Data

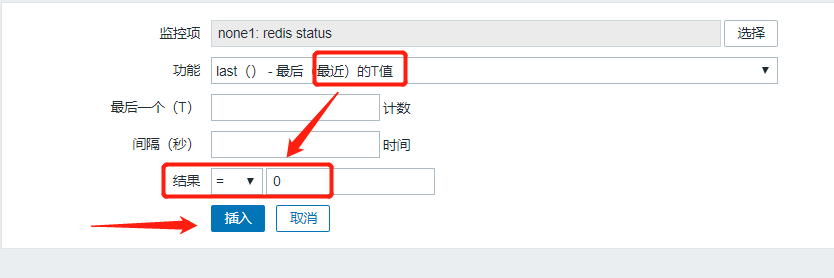
(2) Define triggers
Once you have defined your monitoring items, you can also define a trigger to let us know when there is a problem with the service:
Enter Configuration - > Host - > none1 - > trigger - > Create trigger
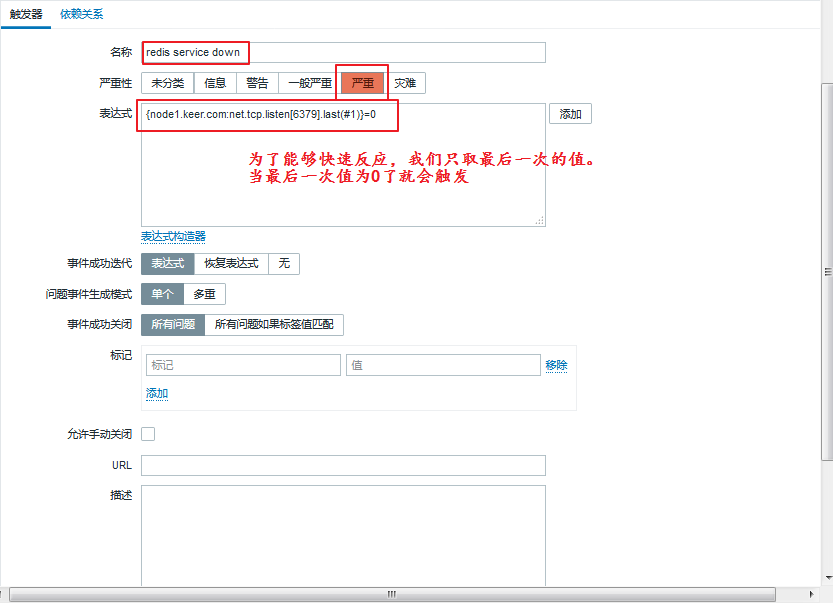
When you have finished filling it out, we click Add below.

The trigger was added successfully.
Let's check:
In Monitoring - >Latest Data

Let's manually turn off the redis service to detect:
[root@zabbix-agent-none1 ~]# systemctl stop redis
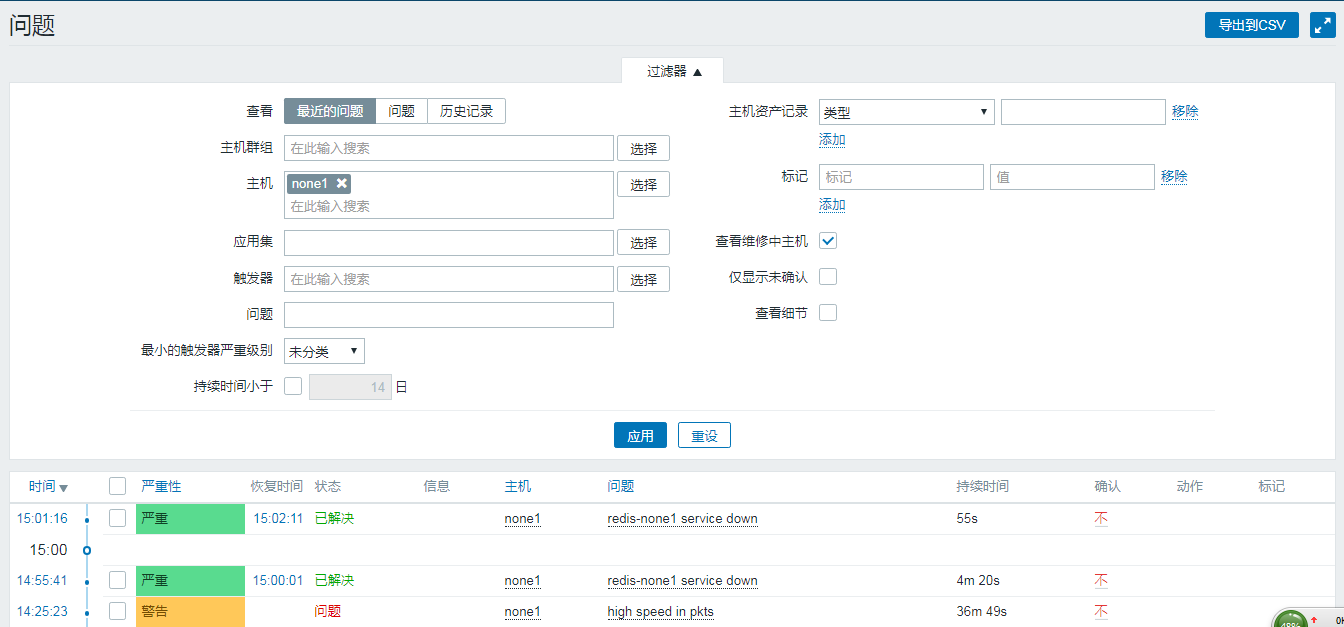
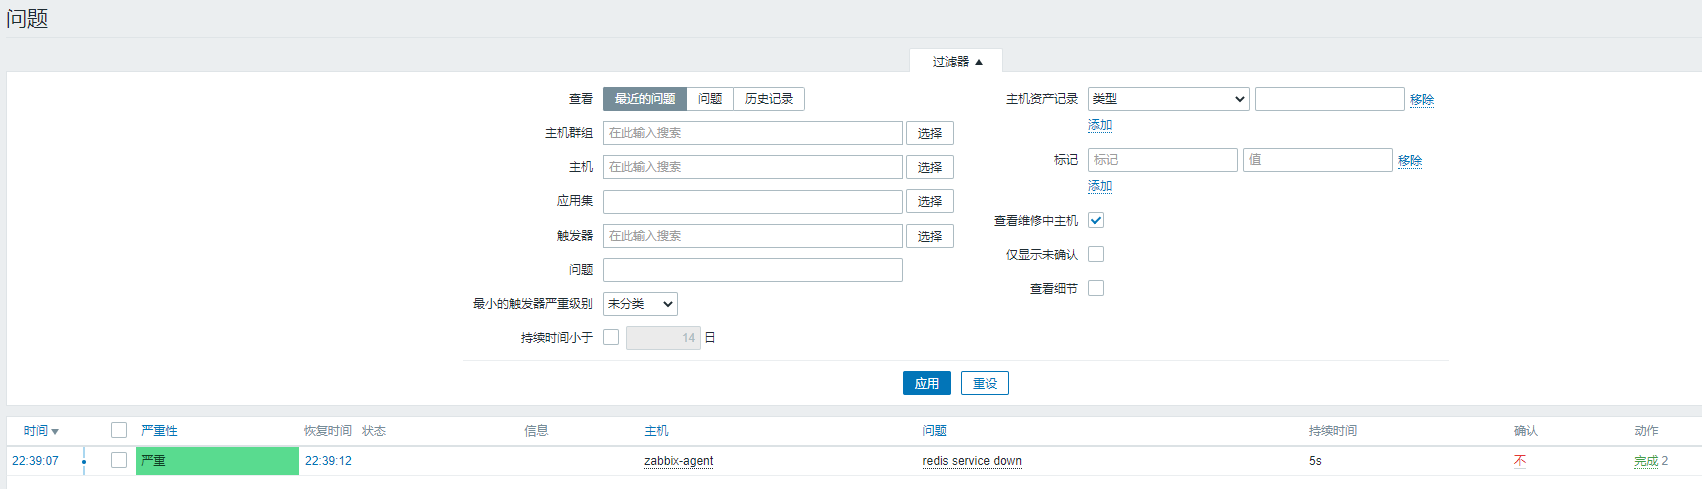
Enter Monitoring - >Problem
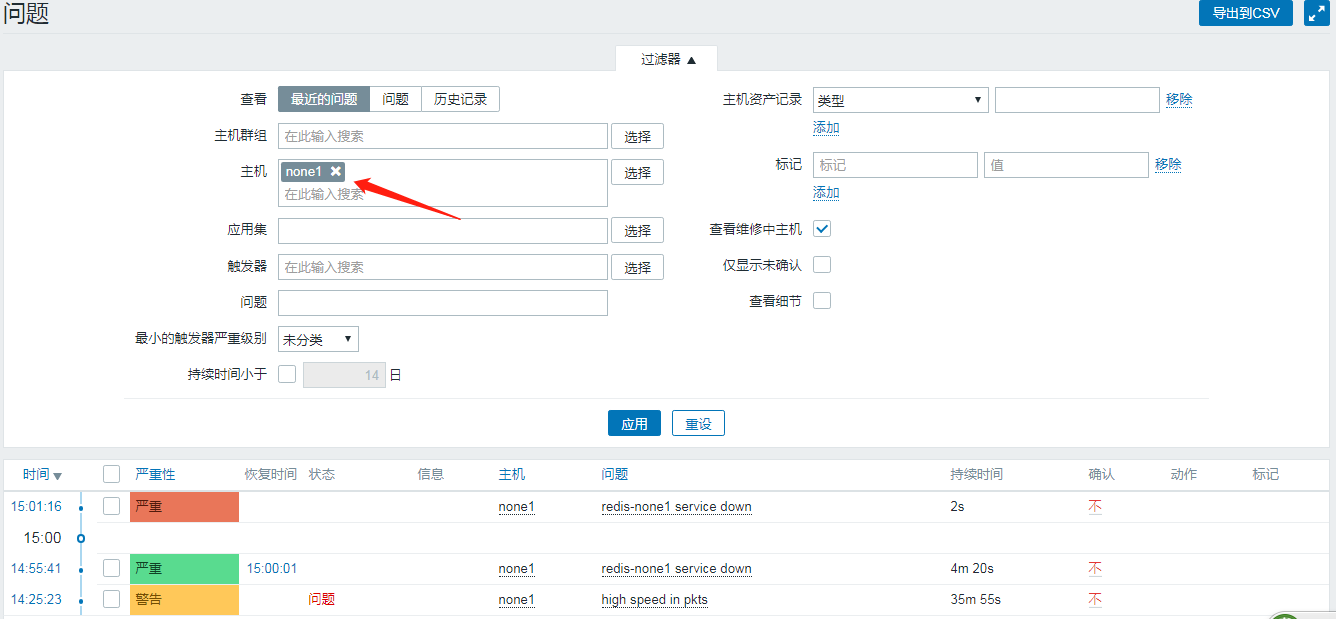
As you can see, the problem is now visible.And for a duration, when our services are opened, they become resolved:
[root@zabbix-agent-none1 ~]# systemctl start redis
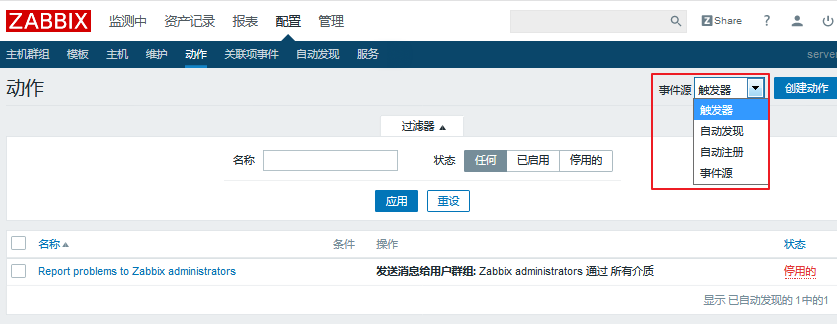
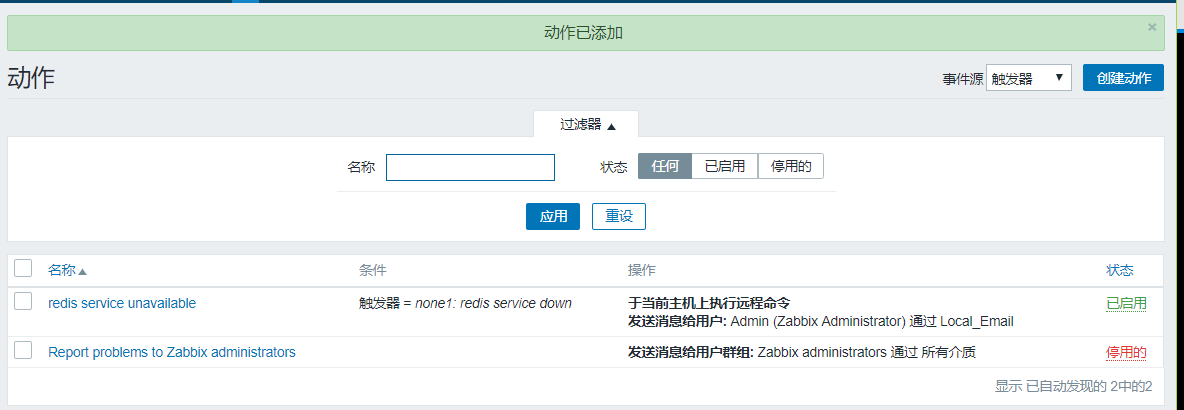
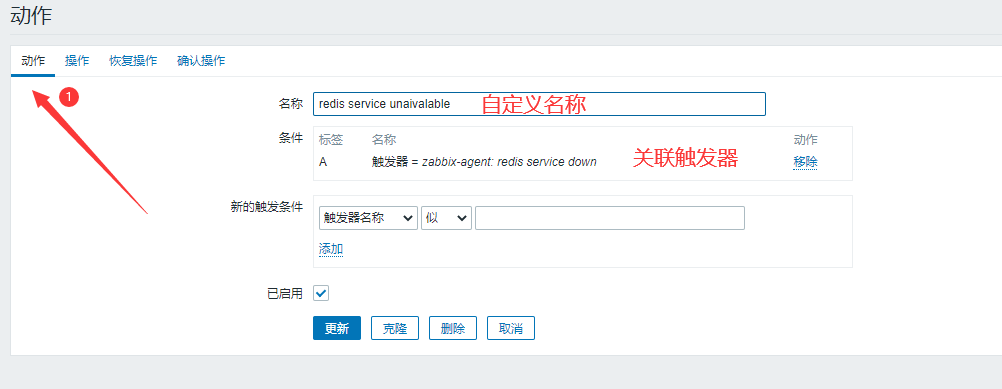
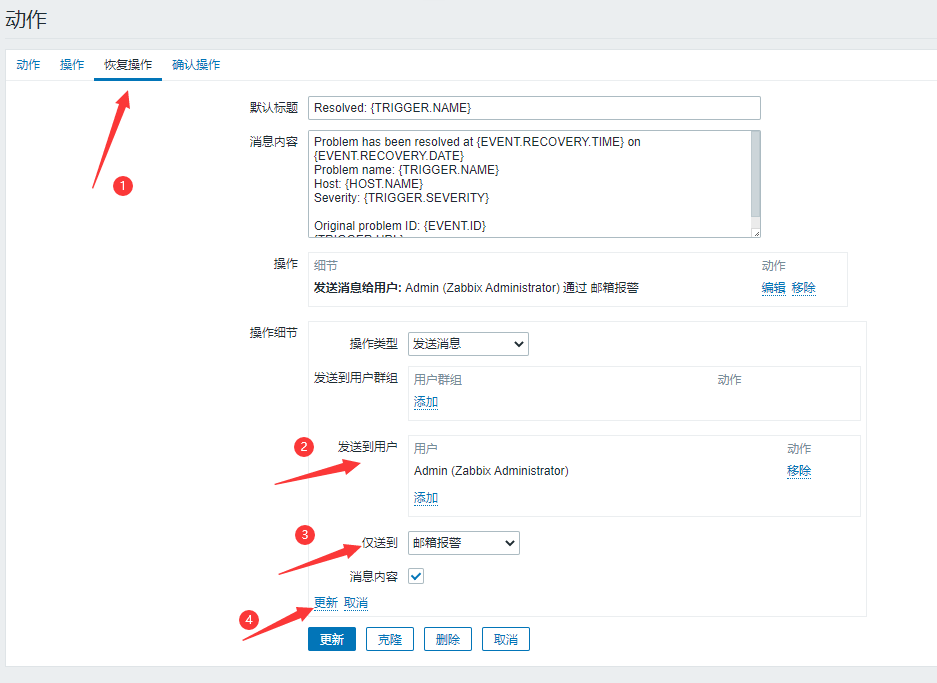
(3) Defining action s
Now we can define action s.
Enter Configuration - > Actions - > Create Actions (Note Selecting Event Source as Trigger)
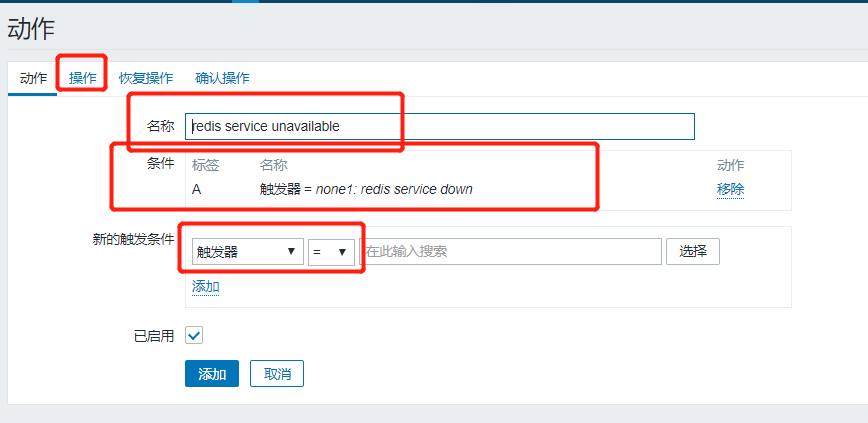
We can add:
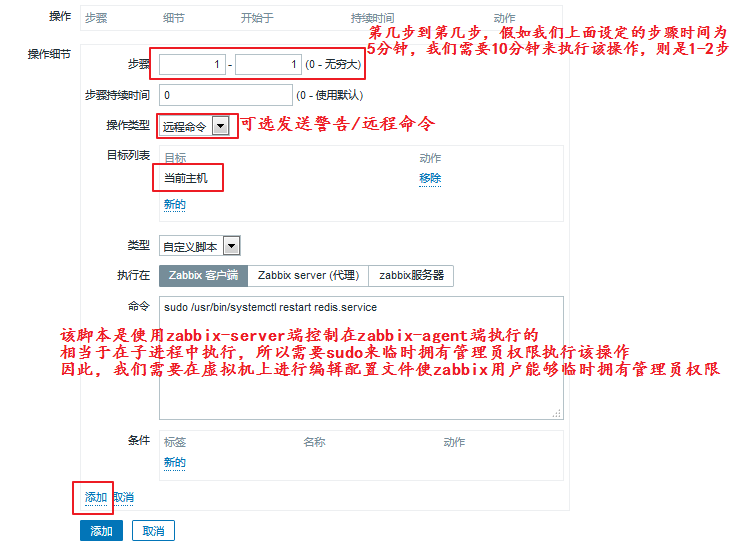
As we can see, there are two operations that need to be done on the virtual machine, one is to modify the sudo configuration file so that zabbix users can temporarily have administrator privileges;The second is to modify the zabbix configuration file to allow it to receive remote commands.We do the following:
[root@zabbix-agent-none1 ~]# visudo          #Equivalent to "vim/etc/sudoers"
    ## Allow root to run any commands anywhere
    root    ALL=(ALL)   ALL
    zabbix    ALL=(ALL)   NOPASSWD:ALL     #A line added to indicate that no password is required

[root@zabbix-agent-none1 ~]# vim /etc/zabbix/zabbix_agentd.conf
    EnableRemoteCommands=1          #Allow receiving remote commands
    LogRemoteCommands=1             #Log remote commands received

[root@zabbix-agent-none1 ~]# systemctl restart zabbix-agent.service
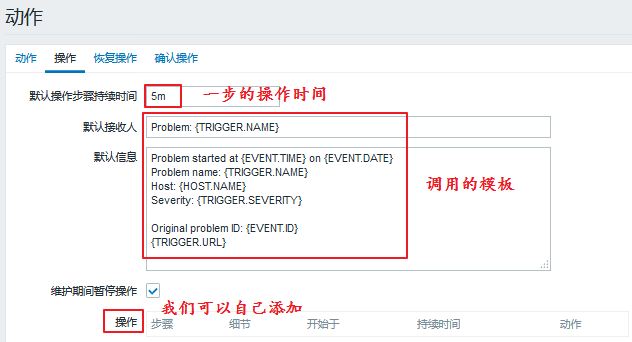
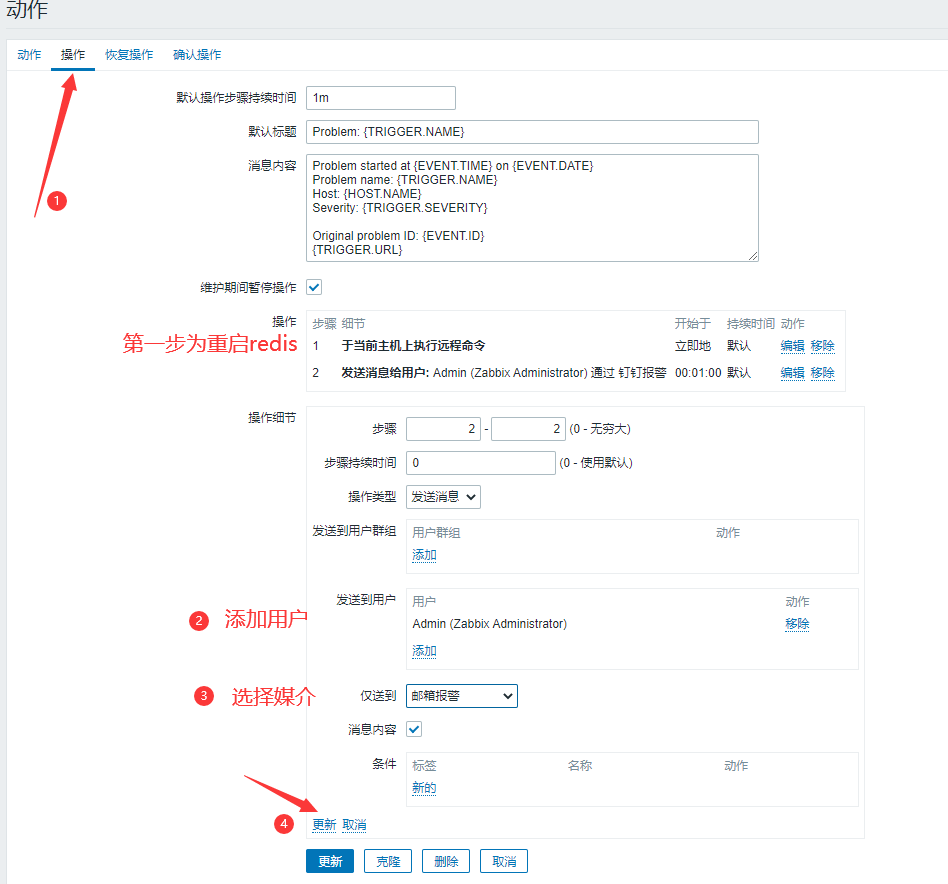
We added the first thing we need to do, that is, restart the service. What if the restart is not successful?We need to add the second step:
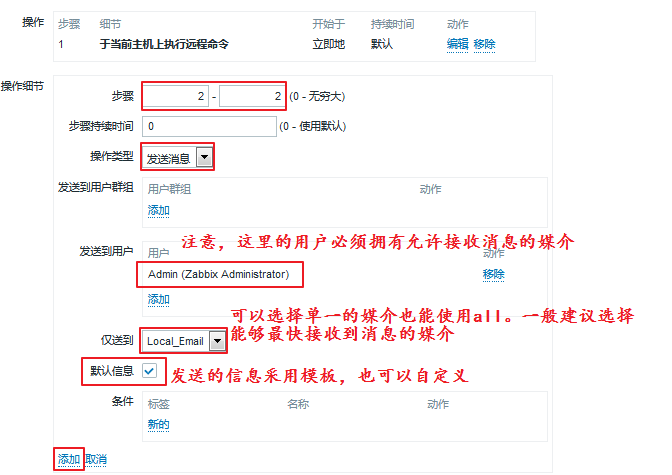
When the addition is complete, we can look at the following:
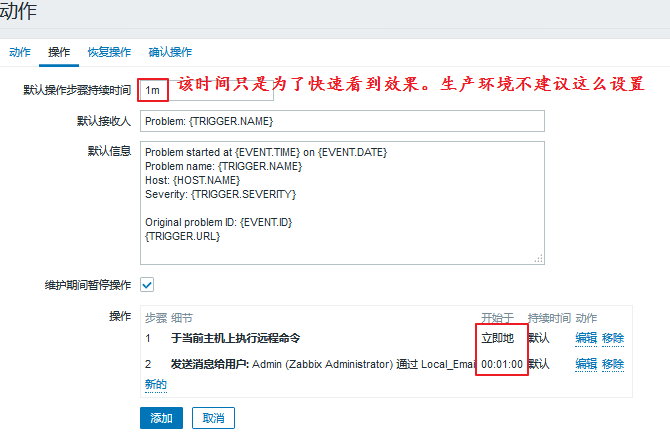
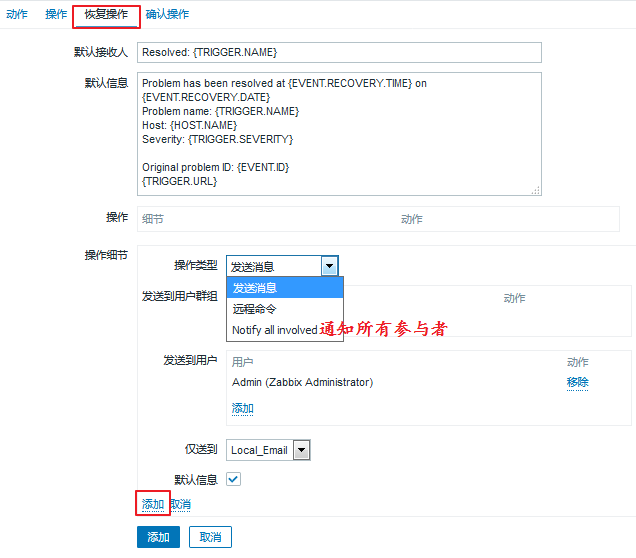
The operation is added. If the service is restored automatically, we can send a message to prompt:
Now that our actions are set, you can click Add, which automatically jumps to the following page:
Now we can stop the service manually for testing:
[root@zabbix-agent-none1 ~]# systemctl stop redis.service
Then we come to the Problem page and look at it. We find that there is a problem and it has been resolved: Wait a moment

You can also go to the agent side to see if the port is open:
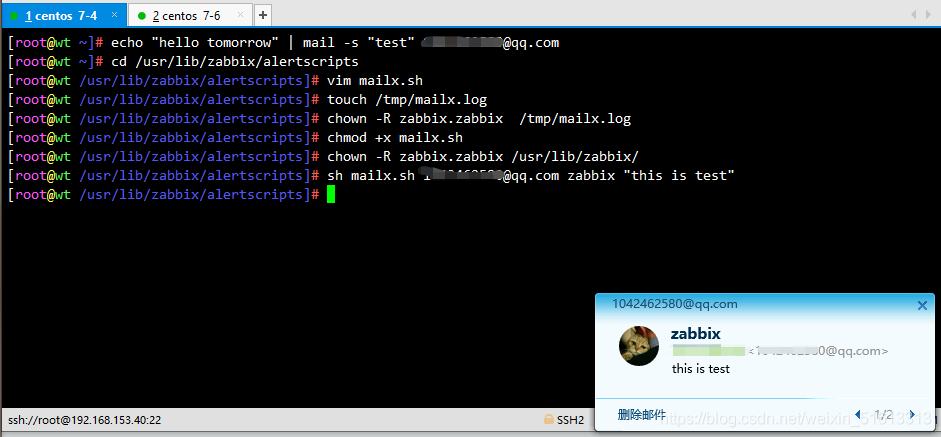
[root@zabbix-agent-none1 ~]# systemctl stop redis
[root@zabbix-agent-none1 ~]# netstat -lntp | grep redis
[root@zabbix-agent-none1 ~]# netstat -lntp | grep redis
tcp        0      0 0.0.0.0:6379            0.0.0.0:*               LISTEN      1957/redis-server 0

Check Mailbox Success
[root@zabbix-server ~]# yum -y install mailx
[root@zabbix-server ~]# mail
Heirloom Mail version 12.5 7/5/10.  Type ? for help.
"/var/spool/mail/root": 1 message 1 unread
>U  1 zabbix@localhost.loc  Thu Oct 10 00:51  21/865   "Resolved: redis service down"

Mailbox was also successful
You can see that the port is open properly and our action trigger is complete.
Supplement: We can also use scripts to send alerts, our script store path can be found in the configuration file, defined as AlterScriptsPath=/usr/lib/zabbix/alertscripts
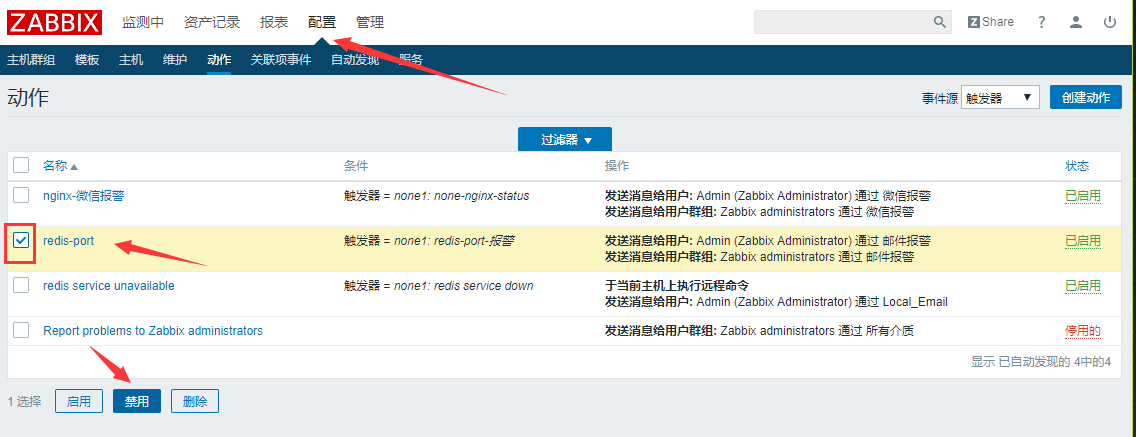
Then we turn off this action to prepare for a later mail alert.
2. Mail Alarm
1. Configure required mail information
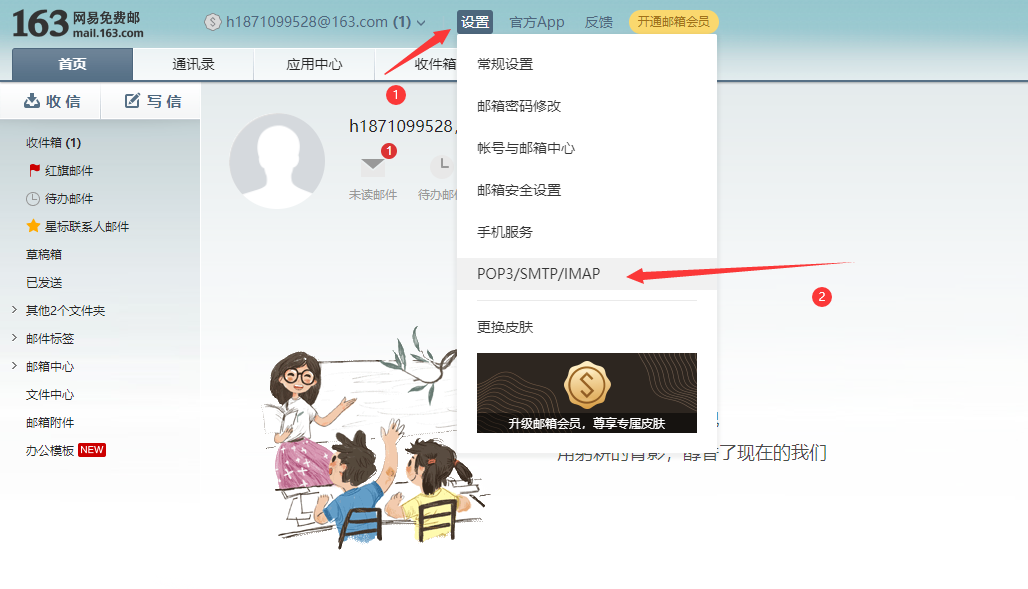
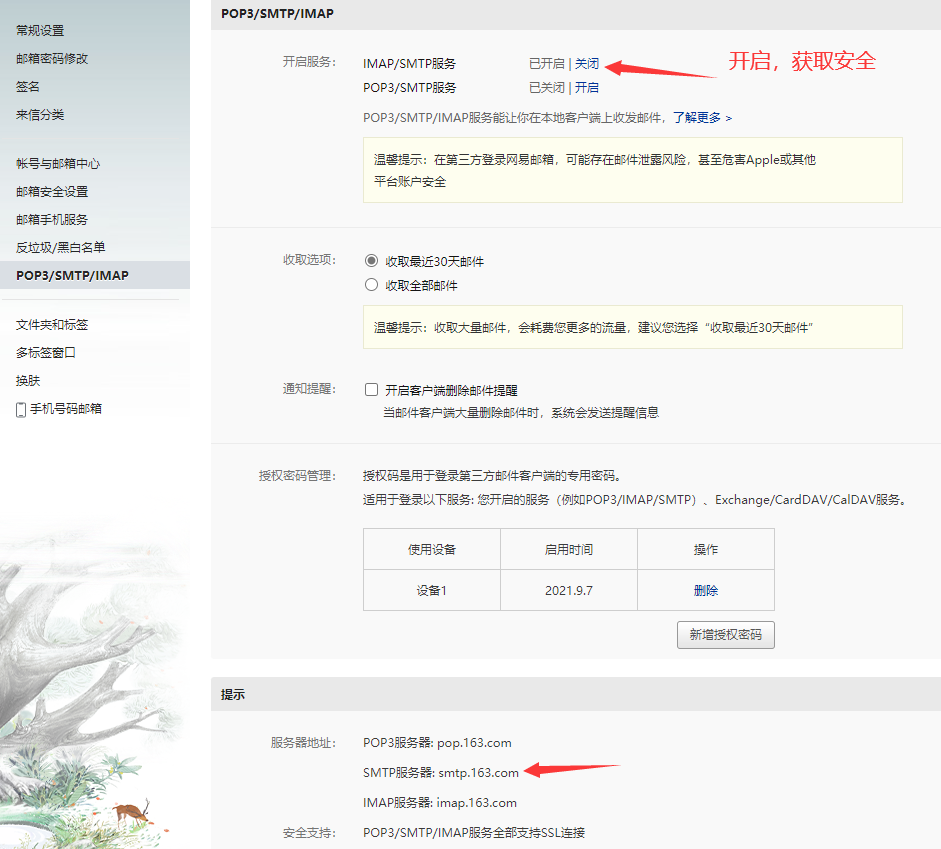
2. Configuration of zabbix monitoring end
yum -y install mailx

vim /etc/mail.rc
'//End Add'
set from=mailbox
set smtp=smtp.qq.com
set smtp-auth-user=mailbox
set smtp-auth-password=Mailbox Authorization Number
set smtp-auth=login
Test if mail can be sent
echo "hello tomorrow" | mail -s "test" mailbox

Script Mail
cd /usr/lib/zabbix/alertscripts
vim mailx.sh
#!/bin/bash
#send mail
messages=`echo $3 | tr '\r\n' '\n'`
subject=`echo $2 | tr '\r\n' '\n'`
echo "${messages}" | mail -s "${subject}" $1 >>/tmp/mailx.log 2>&1
Create log files and modify permissions and test
touch /tmp/mailx.log
chown -R zabbix.zabbix  /tmp/mailx.log
chmod +x mailx.sh
chown -R zabbix.zabbix /usr/lib/zabbix/
sh mailx.sh mailbox zabbix "this is test"
3. web Page Configuration (Script)
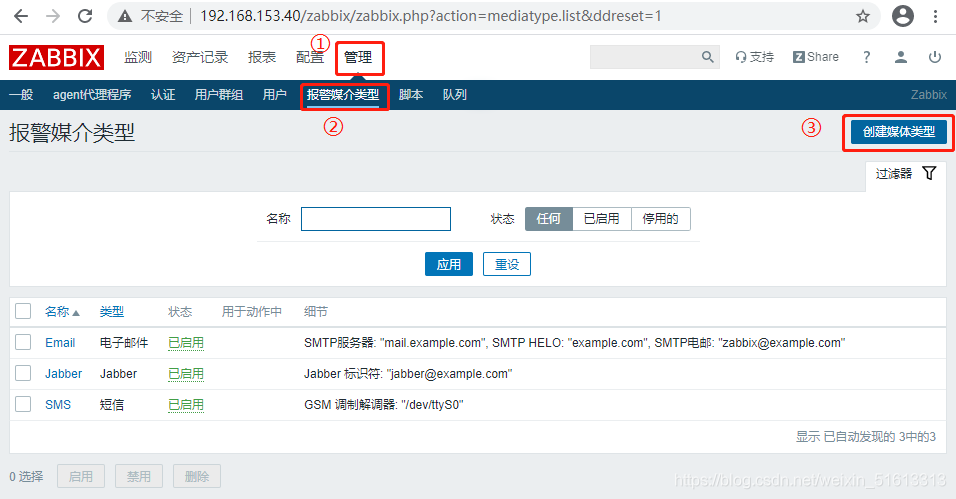
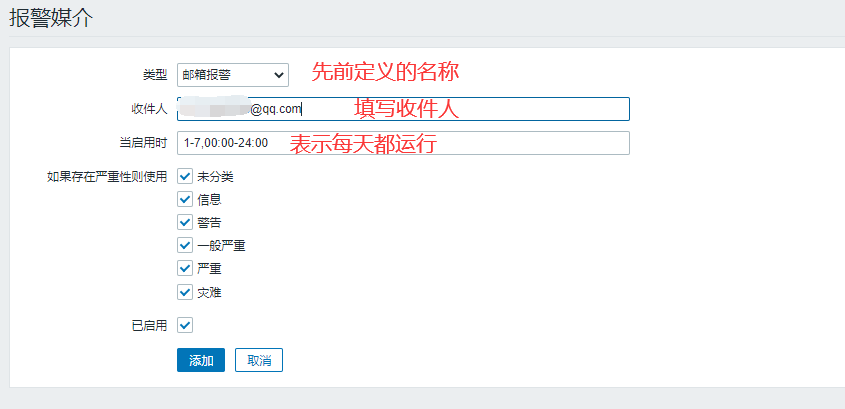
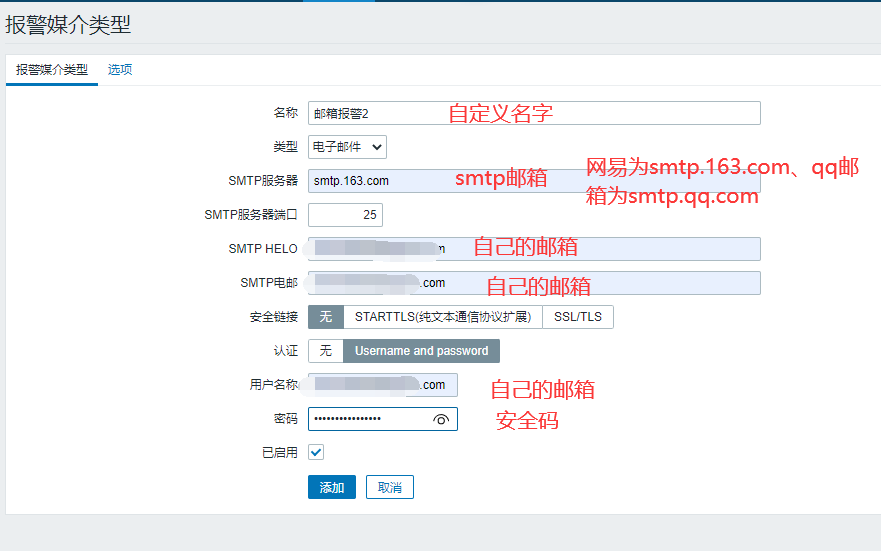
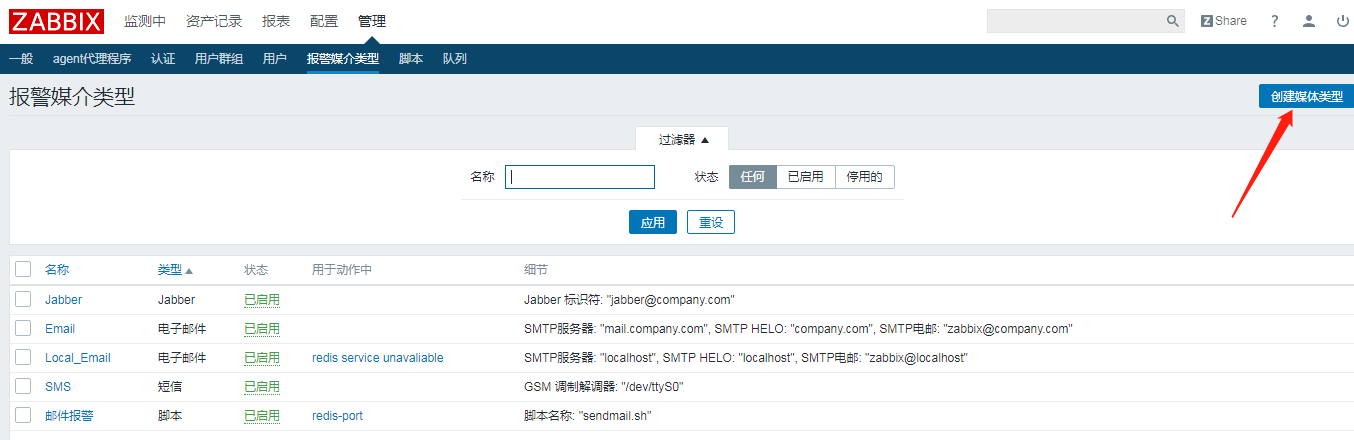
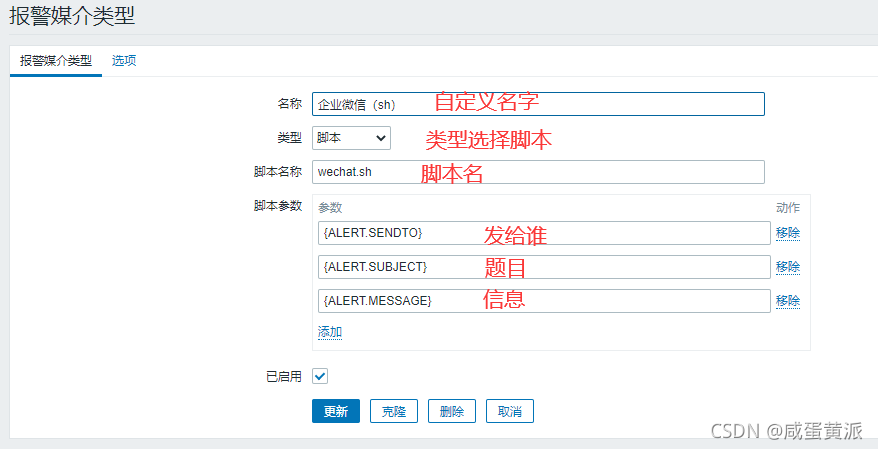
(1) Add alarm media
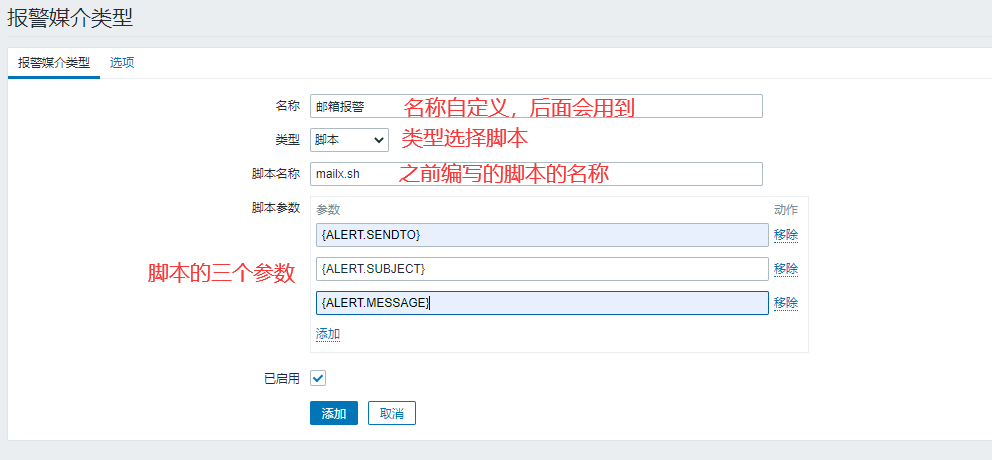
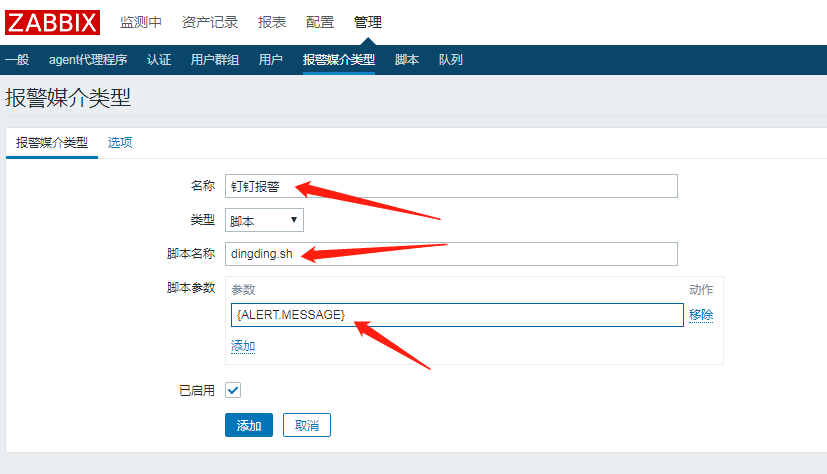
Manage > Alarm Media Type > Create Media Type
Name customization, followed by the three parameters of the script whose type selection script name was previously edited:
{ALERT.SENDTO}
{ ALERT.SUBJECT}
{ALERT.MESSAGE}
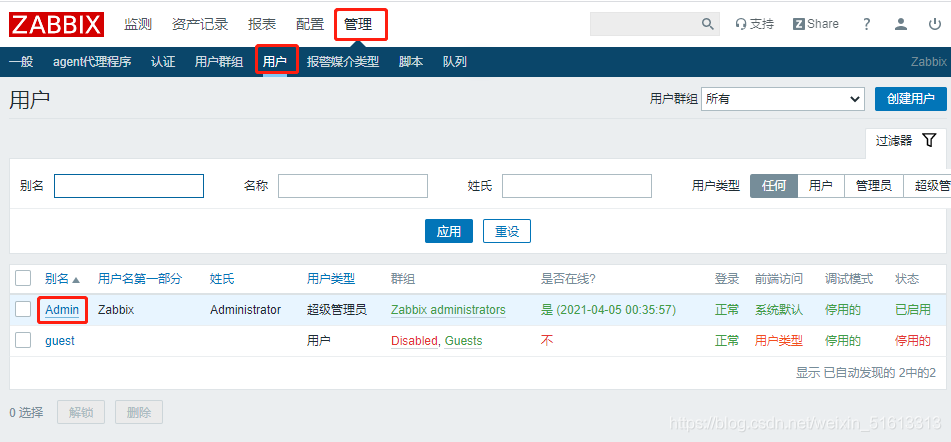
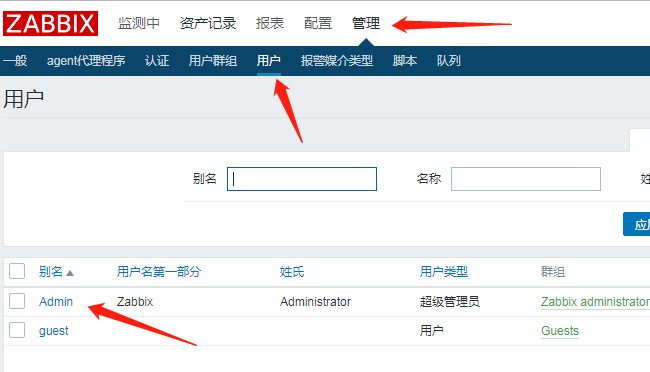
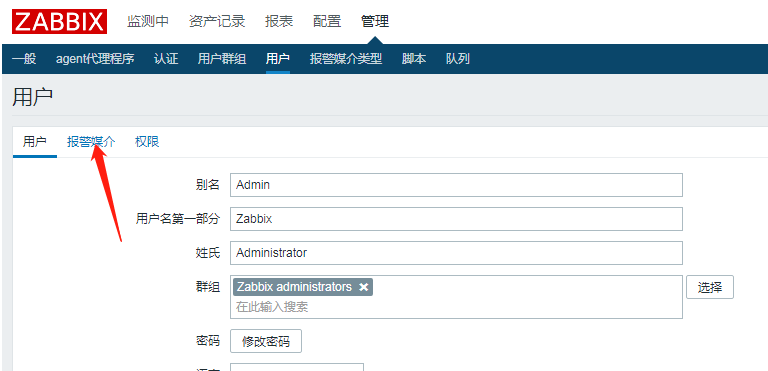
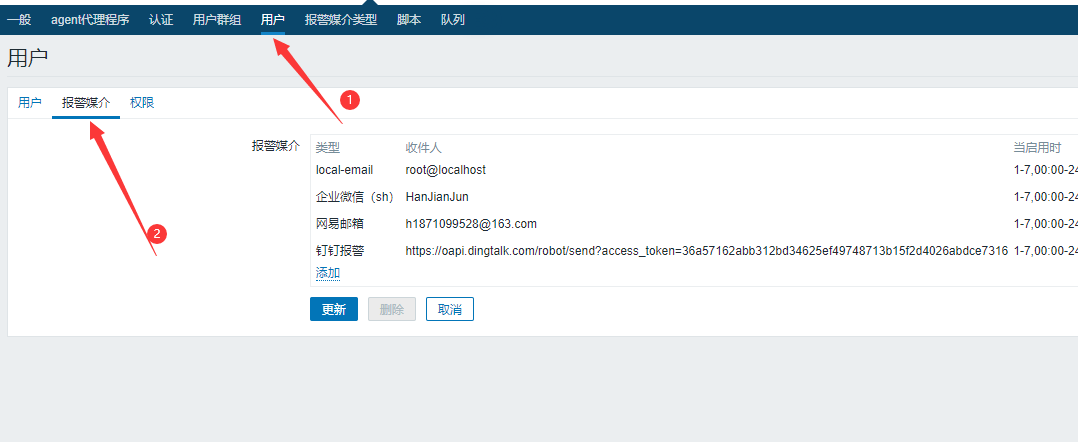
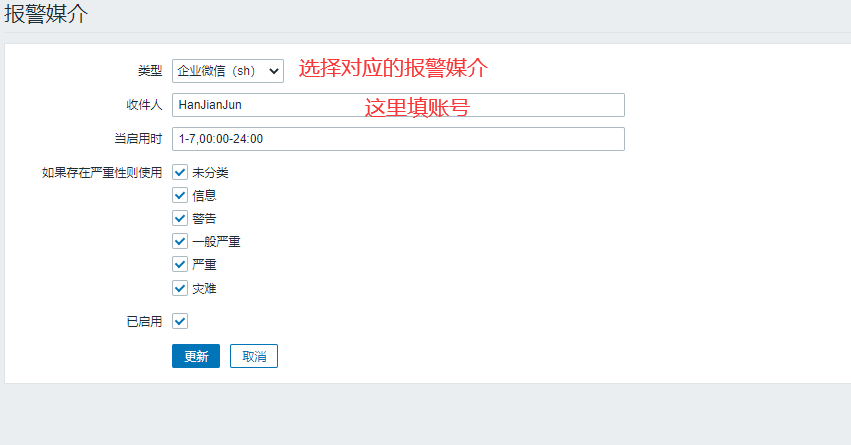
(2) Add users
Manage > User > Click Admin > Alarm Media > Add
Name Customized Before Type Selection
Recipients fill in their own mailboxes
Click Add
Click Update
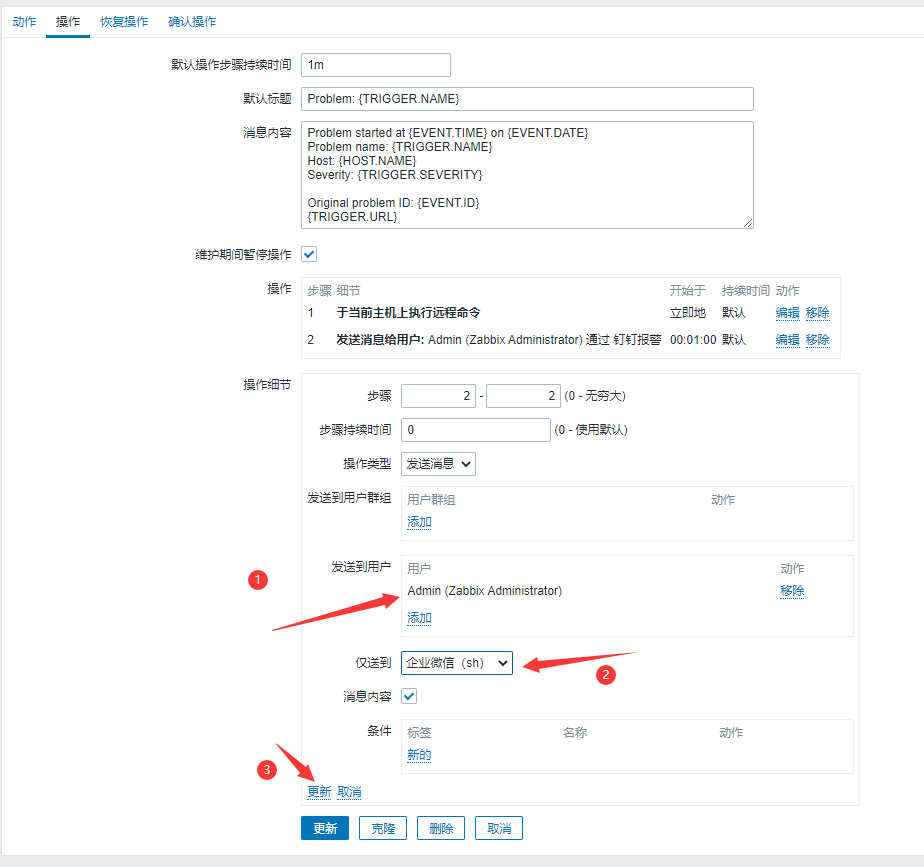
(3) Creating actions
Configuration>Action>Creation Action>Delete Default>Creation Action
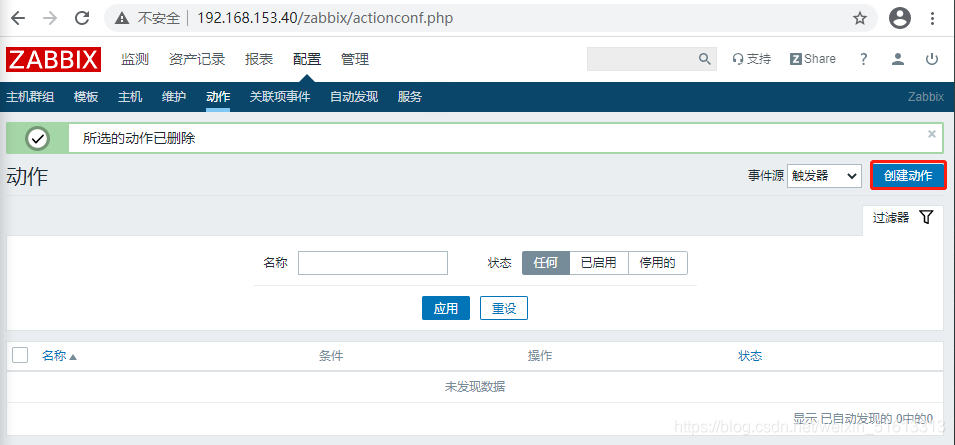
Add Execute Action
Note: Message content can also be customized
Default Title   {TRIGGER.STATUS}:{TRIGGER.NAME}
Message Content Alert Host:{HOST.NAME}
          Give an alarm IP:{HOST.IP}
          Warning Time:{EVENT.DATE}-{EVENT.TIME}
          sublist:{TRIGGER.SEVERITY}
          Alert information:{TRIGGER.NAME}-{ITEM.VALUE}
          Event ID:{EVENT.ID}
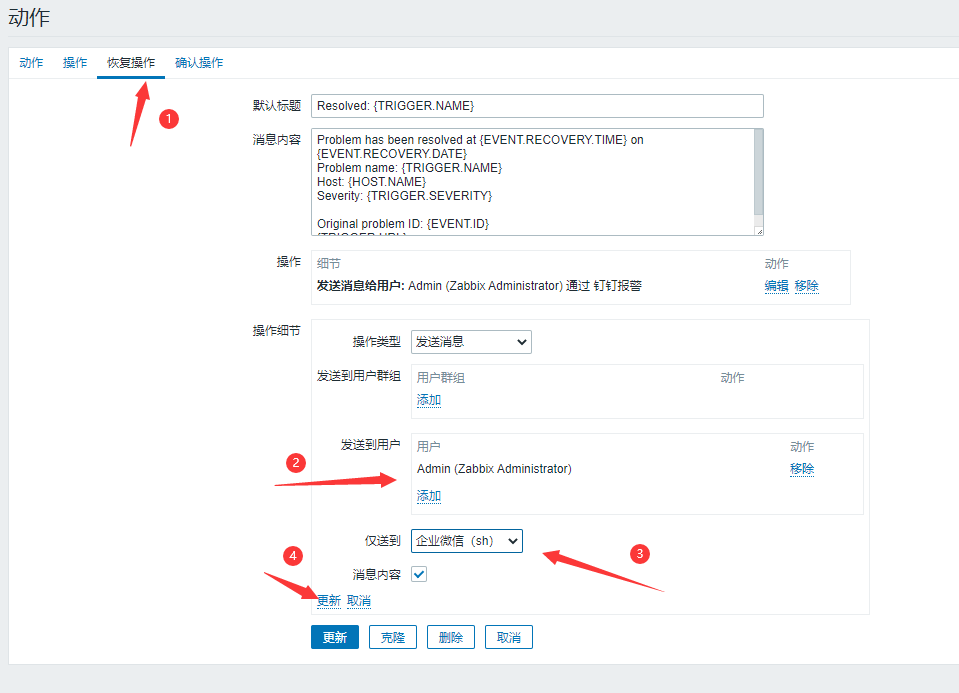
Add Recovery Action
In addition to the template for the message content, it is essentially identical to the previous step
Default Title   {TRIGGER.STATUS}:{TRIGGER.NAME}

Message Content Recovery Host:{HOST.NAME}
          recovery IP:{HOST.IP}
          recovery time:{EVENT.DATE}-{EVENT.TIME}
          Recovery Level:{TRIGGER.SEVERITY}
          Recovery Information:{TRIGGER.NAME}-{ITEM.VALUE}
          Event ID:{EVENT.ID}
Finally, make sure that all the actions have been added. If not, no mail will be sent!!
(4) Testing
The monitored end stops the sshd service
systemctl stop redis
You can see that the message has been sent and the problem interface of the dashboard is flashing
Mail will also be sent when the service is restarted
3. Another way: web page configuration (e-mail)
2. Nail alarm


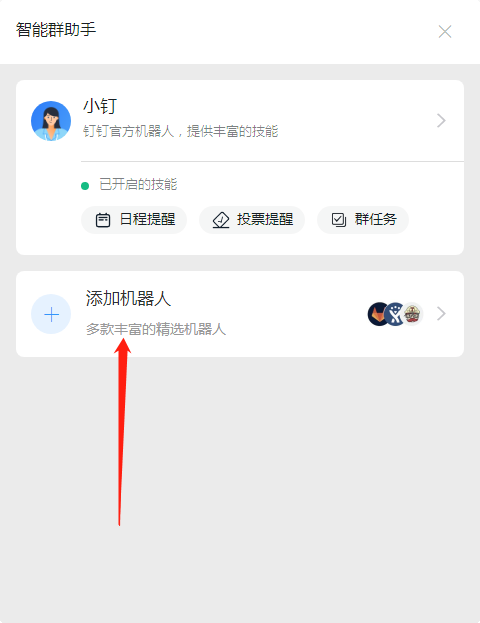
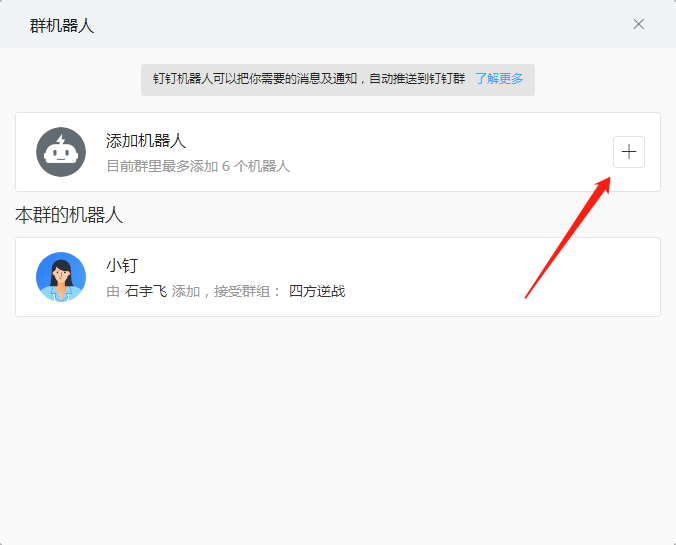

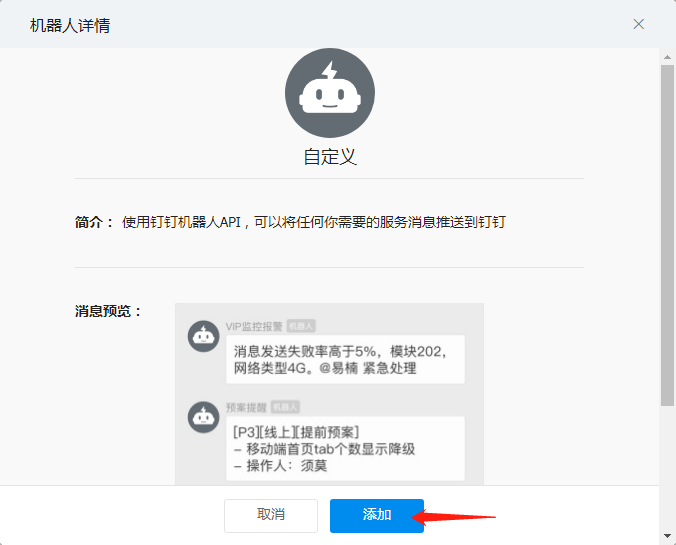
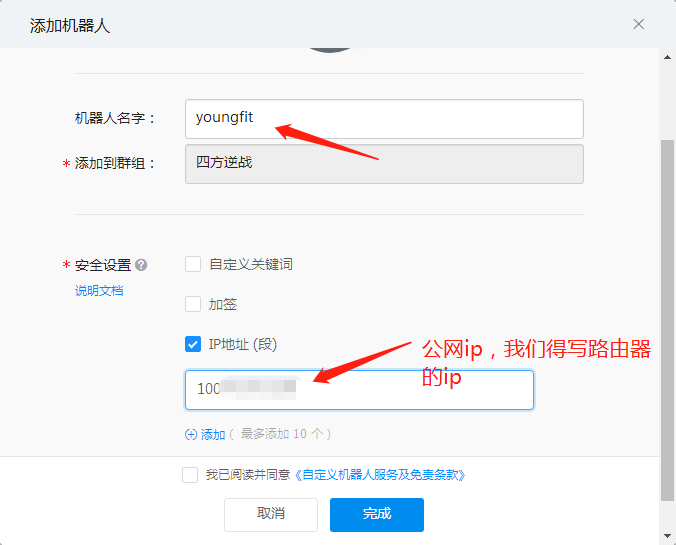
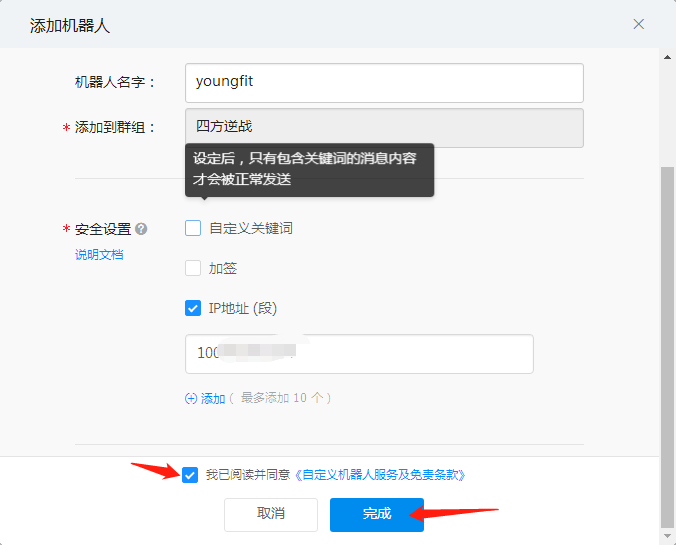
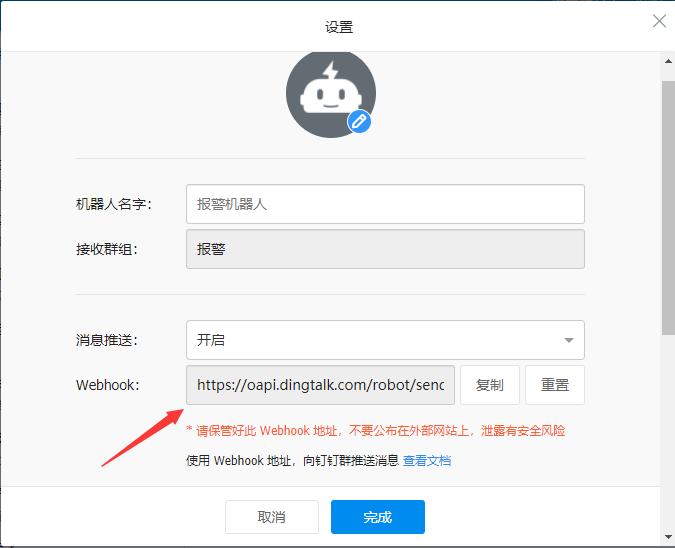
Click on the settings of the robot to record the address of the webhook (important)
Create scripts to give execution privileges
[root@zabbix-server ~]# cd /usr/lib/zabbix/alertscripts
[root@zabbix-server alertscripts]# vim dingding.py
#!/usr/bin/python
# -*- coding: utf-8 -*-
# Author: sxdswc999
import requests
import json
import sys
import os

headers = {'Content-Type': 'application/json;charset=utf-8'}
api_url = ""  #Webhook address of the robot

def msg(text):
    json_text= {
     "msgtype": "text",
        "text": {
            "content": text
        },
        "at": {
            "atMobiles": [
                ""    #Cell-phone number
            ],
            "isAtAll": False
        }
    }
    print requests.post(api_url,json.dumps(json_text),headers=headers).content

if __name__ == '__main__':
    text = sys.argv[1]
    msg(text)
[root@zabbix-server alertscripts]# chmod +x dingding.py
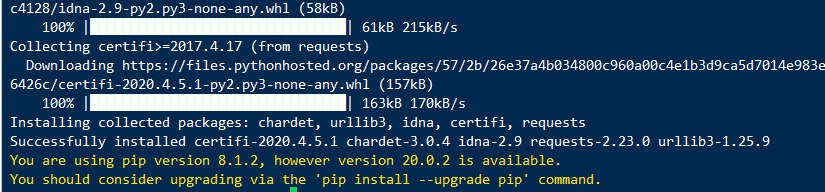
Install python-pip and requests Libraries
[root@zabbix-server alertscripts]# yum -y install epel-release
[root@zabbix-server alertscripts]# yum -y install python-pip
[root@zabbix-server alertscripts]# pip install requests
Test whether the script is feasible
[root@zabbix-server alertscripts]# . /dingding.py monitoring alarm
{"errcode":0,"errmsg":"ok"}

The pc side received successfully:

Mobile App Received Successfully:

Create media on the monitoring page:
Associate Admin users to this media:
Recipient stud webhook
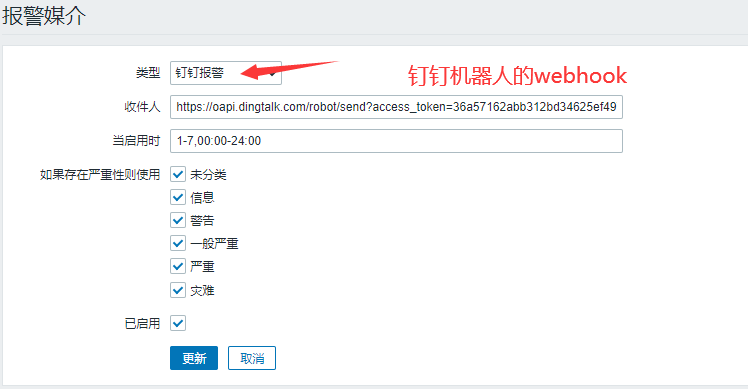
Configuration complete
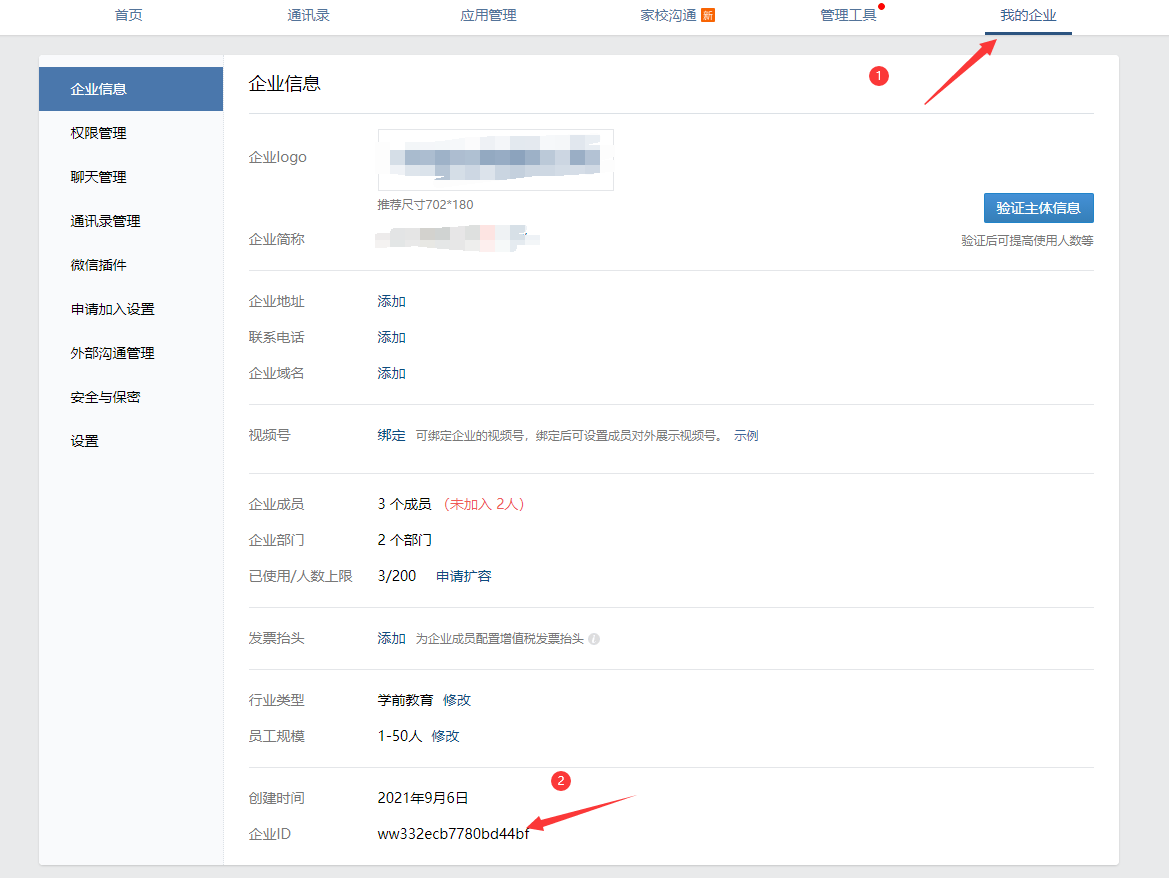
3. WeChat Alarm
-
Department ID
-
AgentID and Secret
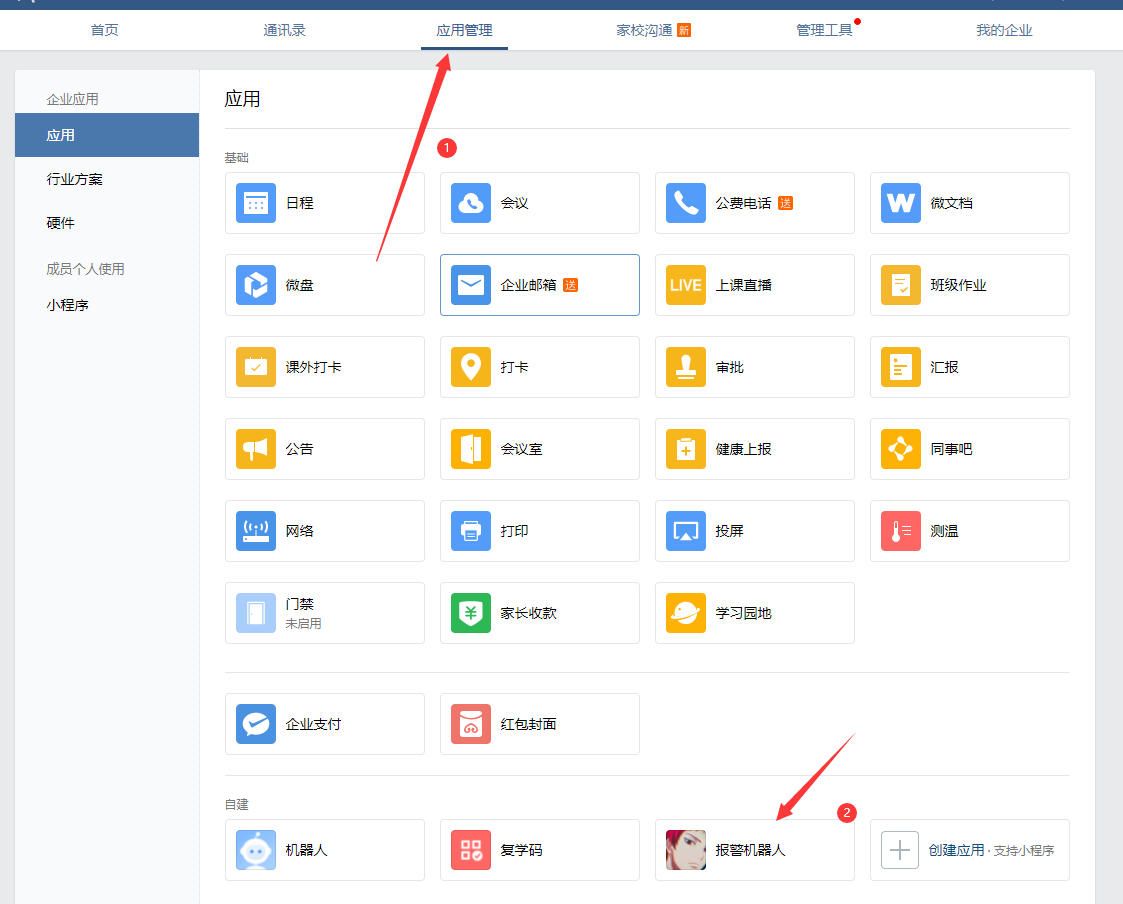

-
Enterprise ID
1. python alarm monitoring script
Four pieces of information in the script need to be modified:
self.__corpid = 'wwd5348195e1cdd809' //corpid of the company
self.__secret = '2QvlfpUxh4k-JeIuxVNmkh2N7ijfkCs1lzb4Tkgr6xQ' //Applied secret
'toparty':1, //Department id
'agentid':"1000002", //Apply id
[root@zabbix-server ~]# vim /usr/lib/zabbix/alertscripts/wechat.py
#!/usr/bin/env python
# -*- coding: utf-8 -*-

import urllib,urllib2,json
import sys
reload(sys)
sys.setdefaultencoding( "utf-8" )

class WeChat(object):
		__token_id = ''
		# init attribute
		def __init__(self,url):
				self.__url = url.rstrip('/')
				self.__corpid = 'wwd2385f23ad80ecef'
				self.__secret = '3gsEC6Mv3vQmdG5MOJBF65U0KzTl-1v2GKQhr479uso'
		# Get TokenID
		def authID(self):
				params = {'corpid':self.__corpid, 'corpsecret':self.__secret}
				data = urllib.urlencode(params)

				content = self.getToken(data)

				try:
						self.__token_id = content['access_token']
						# print content['access_token']
				except KeyError:
						raise KeyError


		# Establish a connection
		def getToken(self,data,url_prefix='/'):
				url = self.__url + url_prefix + 'gettoken?'
				try:
						response = urllib2.Request(url + data)
				except KeyError:
						raise KeyError
                result = urllib2.urlopen(response)
                content = json.loads(result.read())
				return content


        # Get sendmessage url
        def postData(self,data,url_prefix='/'):
				url = self.__url + url_prefix + 'message/send?access_token=%s' % self.__token_id
				request = urllib2.Request(url,data)
				try:
						result = urllib2.urlopen(request)
				except urllib2.HTTPError as e:
                        if hasattr(e,'reason'):
                       		 	print 'reason',e.reason
                        elif hasattr(e,'code'):
                        		print 'code',e.code
                        return 0
				else:
                        content = json.loads(result.read())
                        result.close()
				return content
		# send message
		def sendMessage(self,touser,message):
                self.authID()
                data = json.dumps({
                   	 	'touser':touser,
                    	'toparty':1,
                    	'msgtype':"text",
                    	'agentid':"1000002",
                    	'text':{
                    	'content':message
                         },
						 'safe':"0"
					},ensure_ascii=False)
                    response = self.postData(data)
                    print response
if __name__ == '__main__':
        a = WeChat('https://qyapi.weixin.qq.com/cgi-bin')
        a.sendMessage(sys.argv[1],sys.argv[3]
Monitoring script tests:
Note: Youngfit For the enterprise WeChat name shown above test As title yufei For content, both title and content can be customized

[root@youngfit ~]# /usr/lib/zabbix/alertscripts/wechat.py Youngfit test yufei
{u'invaliduser': u'', u'errcode': 0, u'errmsg': u'ok'}
2. zabbix Create Warning Media
Note: (In which way to send alarm messages, text messages, scripts, etc.)
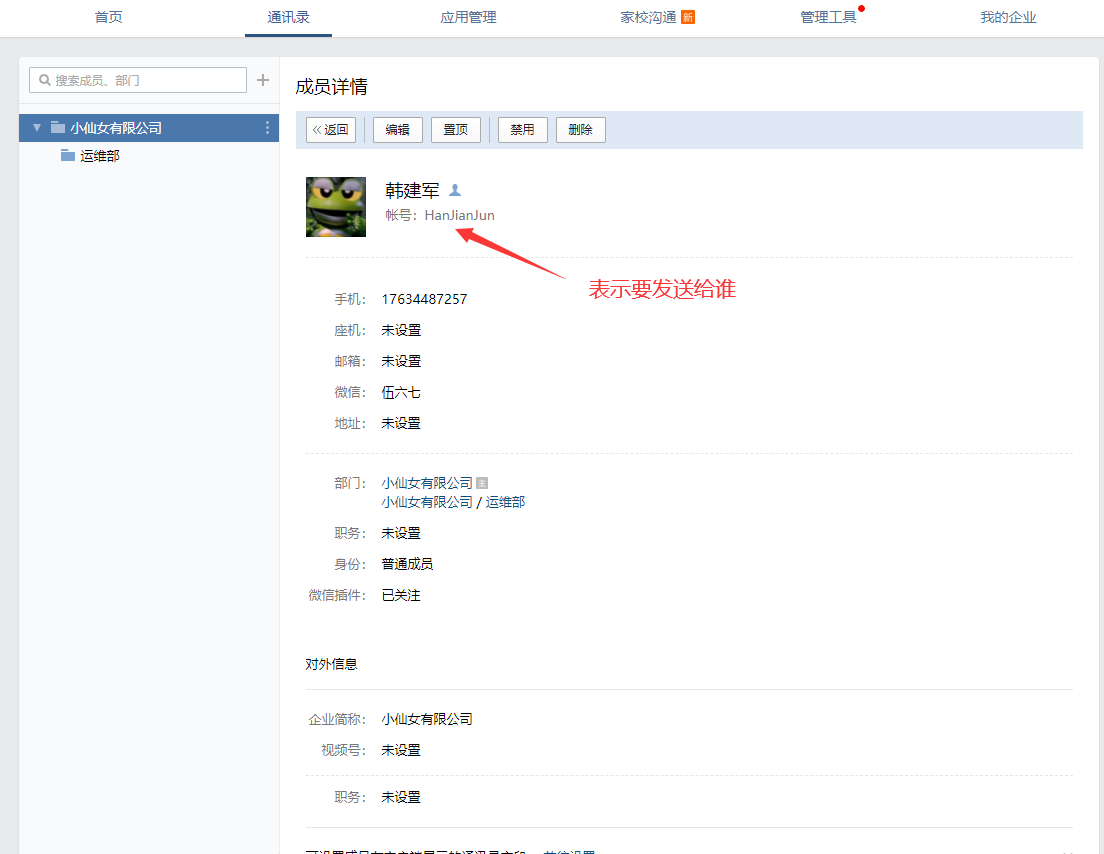
3. zabbix Add Alert User
Create user groups: web-group,Contain yangge,alice...Wait for user
 Create user: yangge,alice...Wait for user and associate with WeChat alert
 The desired result is: send a WeChat to the group web-group,Users in Groups yangge,alice Can receive
5.8 Zabbix Add Alarm Action
If you want to display in Chinese:
Alert Host: {HOST.NAME}
Warning Address: {HOST.IP}
Monitoring Projects: {ITEM.NAME}
sublist: {TRIGGER.SEVERITY}
Alert information: {TRIGGER.NAME}
Warning Time: {EVENT.DATE} {EVENT.TIME}
5.9 Testing WeChat Alarm
Monitored End Operations
[root@web1 ~]# systemctl stop httpd
