zabbix Foundation
Chapter 1 about zabbix
1.1 why to use monitoring
1. Continuous real-time monitoring of the system
2. Real time feedback system current status
3. Ensure service reliability and safety
4. Ensure the continuous and stable operation of business
1.2 how to monitor
For example, we need to monitor disk utilization
1. How to view disk utilization df -h
2. Monitor the block and inode indexes of the disk
3. How to obtain specific information df -h|awk'//$/{print $(NF-1)}'
4. Alarm 80% when the acquired value reaches
1.3 popular monitoring tools
1.cacti,Nagios,Zabbix,
2. Lepus database monitoring system
3. Open Falcon millet
4. Prometheus (Prometheus, Docker, K8s)
1.4 how to monitor a new company
1. Hardware monitoring router, switch and firewall
2. System monitoring CPU, memory, disk, network, process, TCP
3. Service monitoring nginx, php, tomcat, redis, memcache, mysql
4.WEB monitoring request time, response time, loading time
5. Log monitoring ELk (collection, storage, analysis, display) log is easy
6. Security monitoring: firewall, WAF(Nginx+lua), security treasure, niudunyun, security dog
7. Network monitoring smokeping multi machine room
8. Business monitoring
Chapter 2 zabbix deployment
2.1 division of basic environment
| host name | IP address | function |
|---|---|---|
| zabbix | 172.16.1.71 | zabbix server |
| web01 | 172.16.1.7 | zabbix client nginx |
| web02 | 172.16.1.8 | zabbix client nginx |
| db01 | 172.16.1.51 | data base |
2.2 installation of zabbix
ZABBIX server is a C/S and B/S structure
1. Install ZABBIX server
[root@zabbix ~]# rpm -ivhhttps://mirrors.aliyun.com/zabbix/zabbix/3.4/rhel/7/x86_64/zabbix-release-3.4-2.el7.noarch.rpm
[root@zabbix ~]# yum install -yzabbix-server-mysql zabbix-web-mysql zabbix-agent mariadb-server
2. Create Zabbix database and users
#Start the database and add it to the bootstrap
[root@zabbix ~]# systemctl enable mariadb
[root@zabbix ~]# systemctl start mariadb
Create database and authorize
[root@zabbix ~]# mysql -uroot -p
MariaDB [(none)]> create database zabbixcharacter set utf8 collate utf8_bin;
MariaDB [(none)]> grant all privileges on zabbix.*to zabbix@localhost identified by 'zabbix';
MariaDB [(none)]> exit
3. Import infrastructure and data
[root@zabbix ~]# cd/usr/share/doc/zabbix-server-mysql-3.4.14/
//Entering this directory may not report an error. The directory does not exist, mostly because the directory name changes due to different versions
[root@zabbix zabbix-server-mysql-3.4.14]# ll
total 2112
-rw-r--r-- 1 root root      98 Sep 14 04:04 AUTHORS
-rw-r--r-- 1 root root  857849 Sep 14 04:04 ChangeLog
-rw-r--r-- 1 root root   17990 Sep 14 04:04 COPYING
-rw-r--r-- 1 root root 1267039 Sep 14 04:09create.sql.gz
-rw-r--r-- 1 root root      52 Sep 14 04:04 NEWS
-rw-r--r-- 1 root root     188 Sep 14 04:04 README
[root@zabbix zabbix-server-mysql-3.4.14]#  zcat create.sql.gz |mysql -uroot zabbix
[root@zabbix zabbix-server-mysql-3.4.14]# Enter mysql-uroot-p into the database to confirm whether the import is successful
MariaDB [(none)]> use zabbix;
MariaDB [zabbix]> show tables;
140 rows in set (0.00 sec)  #Because of too much content, only paste the total here
4. Start the Zabbix Server process, and edit the database configuration in zabbix_server.conf
[root@m01 ~]# vi/etc/zabbix/zabbix_server.conf  #The following four need to be changed
//Most of the following four comments should be cancelled at first. Here is the line of the content to be modified
DBHost=localhost                         #91 elements
DBName=zabbix                            #101 elements
DBUser=zabbix                            #117 elements
DBPassword=zabbix                        #126 elements
# Start the ZabbixServer process
[root@zabbix ~]# systemctl enable zabbix-server
[root@zabbix ~]# systemctl start zabbix-server
5. Edit the PHP configuration of the Zabbix front end. The Apache configuration file of the Zabbix front end is located in / etc/httpd/conf.d/zabbix.conf. Some PHP settings have been configured.
[root@zabbix ~]# vim /etc/httpd/conf.d/zabbix.conf
php_value max_execution_time 300
php_value memory_limit 128M
php_value post_max_size 16M
php_value upload_max_filesize 2M
php_value max_input_time 300
php_value always_populate_raw_post_data -1
# php_value date.timezone Asia/Shanghai              #20 elements
//According to the time zone, uncomment the "date.timezone" setting and configure it correctly (Asia/Shanghai). After the configuration file changes, you need to restart the Apache Web server.
6. Start httpd service
[root@zabbix ~]#systemctl enable httpd
[root@zabbix ~]#systemctl start httpd
2.3 web page configuration ZABBIX web interface
After the above content is configured, enter 10.0.0.71/zabbix into the ZABBIX installation interface
Welcome to the next step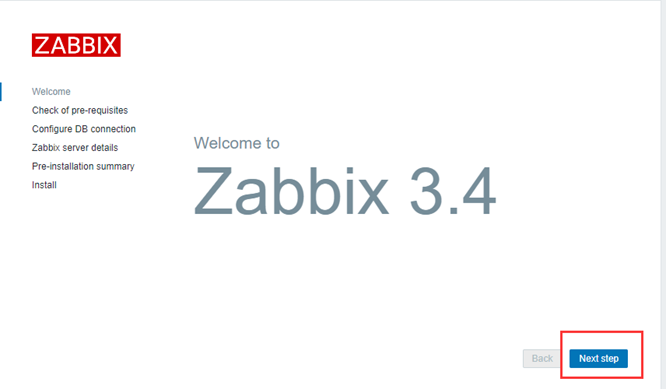
Check that the dependency does not have any exceptions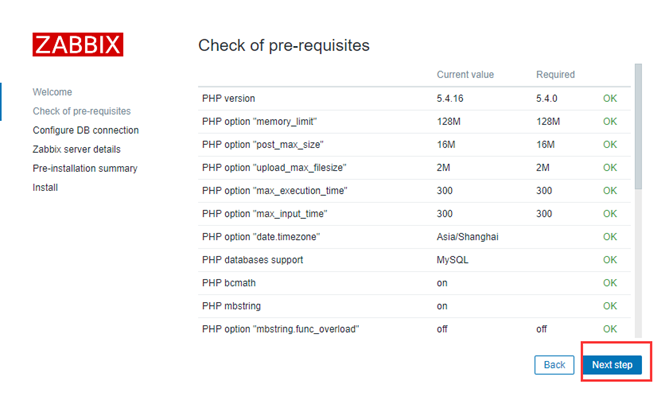
Configure ZABBIX web connection database (you can modify it here if you choose remote database directly)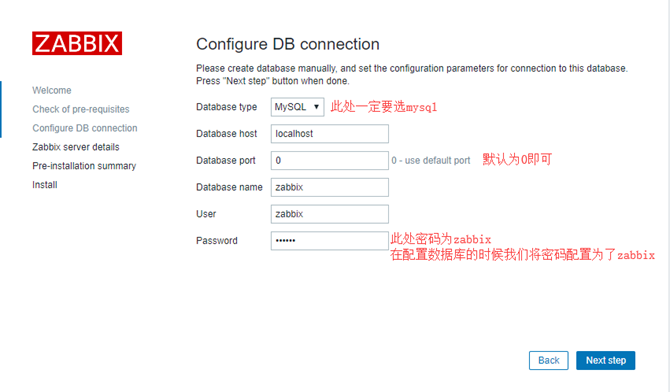
Configure the host name or host IP address and port number of the ZabbixServer server, as well as the name of the installation (optional)
Pre installation summary, check configuration parameters. If everything is correct, press the next button or the back button to change the configuration parameters.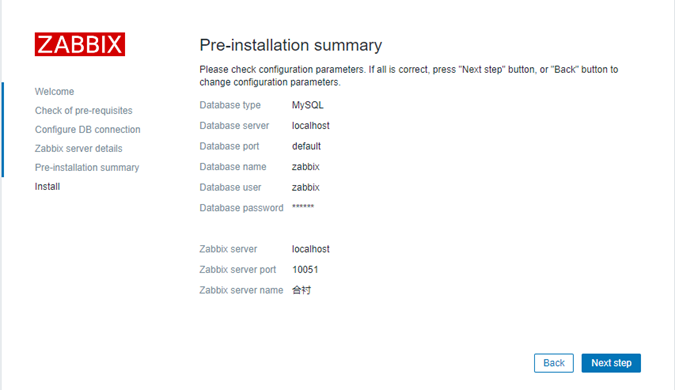
It indicates that the Zabbix front end has been successfully installed. The configuration file / etc/zabbix/web/zabbix.conf.php is created.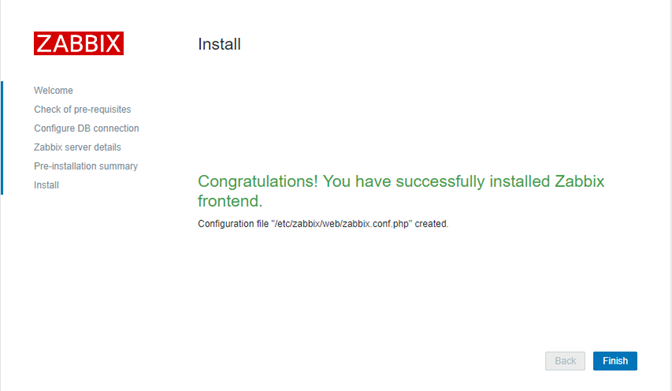
Zabbix is now installed
By default, the user name of ZabbixWeb is Admin, and the password is zabbix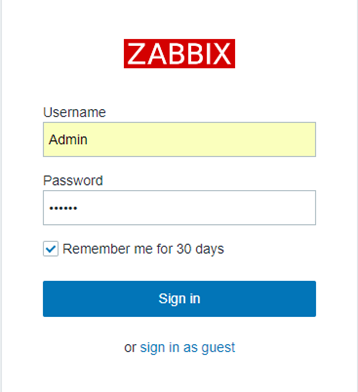
Chapter 3 ZABBIX web interface optimization
3.1 change to Chinese font

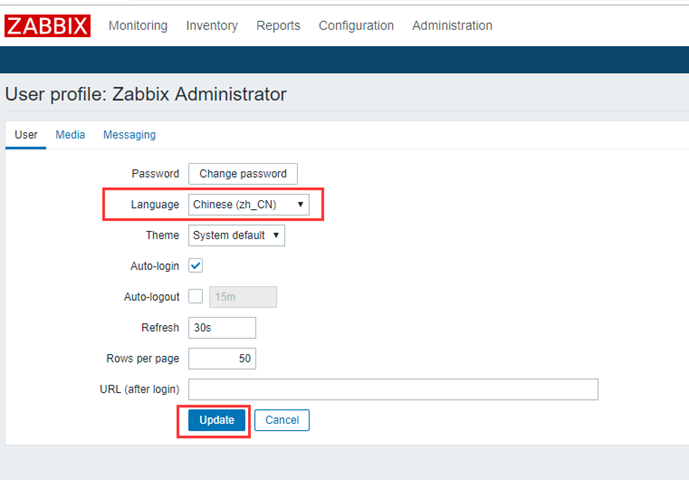
Click update to display Chinese font
(after changing to Chinese font, some interfaces may generate garbled code. We should also change the character set to prevent garbled code.)
3.2 adjust character set
1. Search the directory where the corresponding characters of ZABBIX web package are stored
[root@zabbix ~]# rpm -ql zabbix-web|grep fonts
/usr/share/zabbix/fonts
2. Enter the corresponding font directory and find that the font is a soft link
[root@zabbix ~]# cd /usr/share/zabbix/fonts/
[root@zabbix fonts]# ll
lrwxrwxrwx 1 root root 33 Oct 11 03:20graphfont.ttf -> /etc/alternatives/zabbix-web-font
3. Enter the directory corresponding to the soft link, and find the soft link or not
[root@zabbix fonts]# cd /etc/alternatives/
[root@zabbix alternatives]# ll
lrwxrwxrwx1 root root 38 Oct 11 03:20 zabbix-web-font ->/usr/share/fonts/dejavu/DejaVuSans.ttf
4. Enter the directory where the final font is stored
[root@zabbix alternatives]# cd/usr/share/fonts/dejavu/
5. Rename the default font
[root@zabbix-server alternatives]# mvDejaVuSans.ttf DejaVuSans.ttf_bak
6. Upload the font prepared by yourself. The font can be obtained through windows computer
(c:\windows\fonts)
7. Change the name of the newly uploaded font
[root@zabbix dejavu]# mv simkai.ttf DejaVuSans.ttf
Note: if the font is ttc, change it to ttf.
3.3 adjust the window position of web interface
This operation may not be performed
In order to facilitate our observation in the future, we modify the window arrangement of the web interface
The picture shows the default. Click the edit dashboard to drag each small window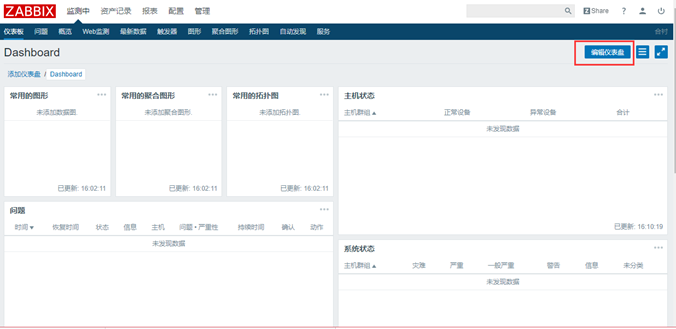
Lift up the four columns as shown in the figure below and save
The purpose is to facilitate future viewing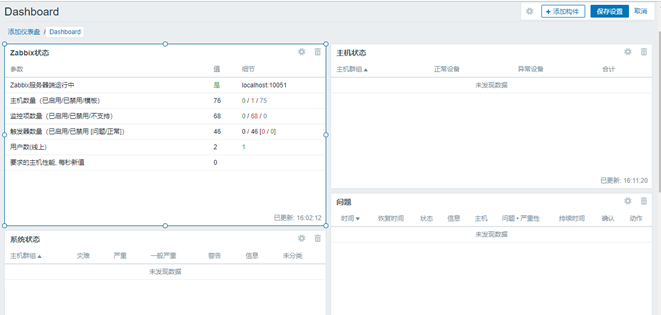
Chapter 4 monitoring content deployment
4.1 configure a host
1. Install ZABBIX agent on the client
[root@web01 ~]# rpm -ivhhttps://mirrors.aliyun.com/zabbix/zabbix/3.4/rhel/7/x86_64/zabbix-agent-3.4.12-1.el7.x86_64.rpm
2. Configure and modify the contents of / etc / ZABBIX / ZABBIX [agentd.conf
[root@web03 ~]# vim /etc/zabbix/zabbix_agentd.conf
Server=172.16.1.71  #Line 97 points to ZABBIX server
Timeout=30 #Line 238 the default here is comment 3 or 4. You can cancel the comment and change it to 30
3. Start the service and check
[root@web01 ~]# systemctl start zabbix-agent
[root@web01 ~]# systemctl enable zabbix-agent
[root@web01 ~]# netstat -lntp
Active Internet connections (only servers)
tcp0      0 0.0.0.0:10050           0.0.0.0:*               LISTEN      981/zabbix_agentd
Enter the web interface page configuration after the above configuration is confirmed
Click Create host
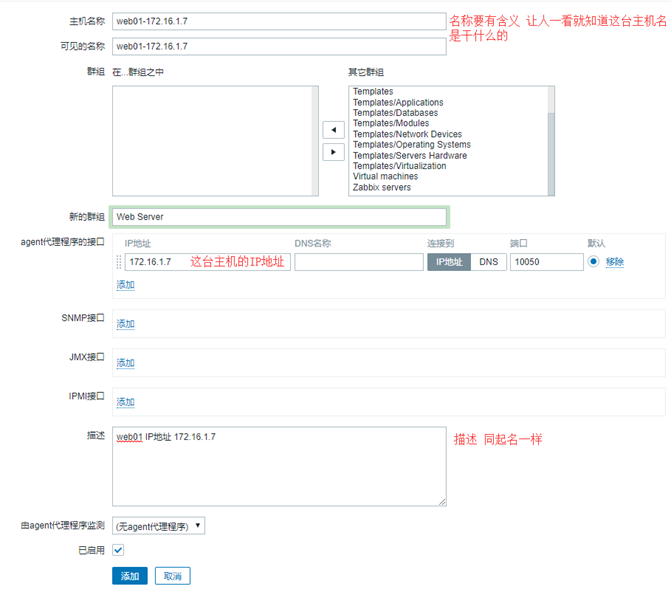
Do not click add directly after the above content is configured
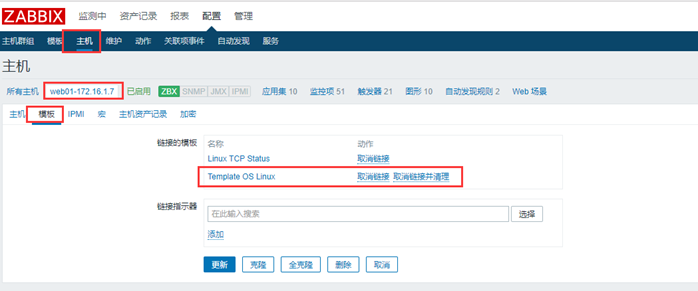
Click template - > select connection indicator - > Select - > search Linux - > Click small button to add - > add last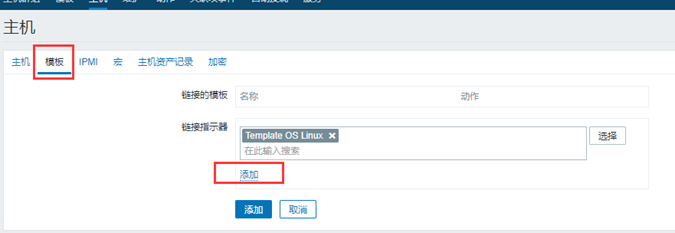

Template OS Linux is a must add monitoring
Click the host after adding (if ZBX is displayed after a few minutes, there is no problem)
4.2 custom monitoring TCP
12 states of TCP
tcp[ESTABLISHED]
tcp[SYN_SENT]
tcp[SYN_RECV]
tcp[FIN_WAIT1]
tcp[FIN_WAIT2]
tcp[TIME_WAIT]
tcp[CLOSE]
tcp[CLOSE_WAIT]
tcp[LAST_ACK]
tcp[LISTEN]
tcp[CLOSING]
tcp[UNKNOWN]
1. Write the 11 middle status of custom monitoring TCP on the corresponding host [take value locally, web01]
[root@web01 ~]# vim/etc/zabbix/zabbix_agentd.d/tcp.conf
UserParameter=tcp[*],netstat -ntal | awk'NR>1{print $NF}'| grep -i "$1" | wc -l
2. Use ZABBIX get on the server to get the value of the corresponding host
[root@zabbix ~]# yum install zabbix-get -y
[root@zabbix ~]# zabbix_get -s 172.16.1.7 -ktcp[estab]
Add after confirmation
Page configuration content
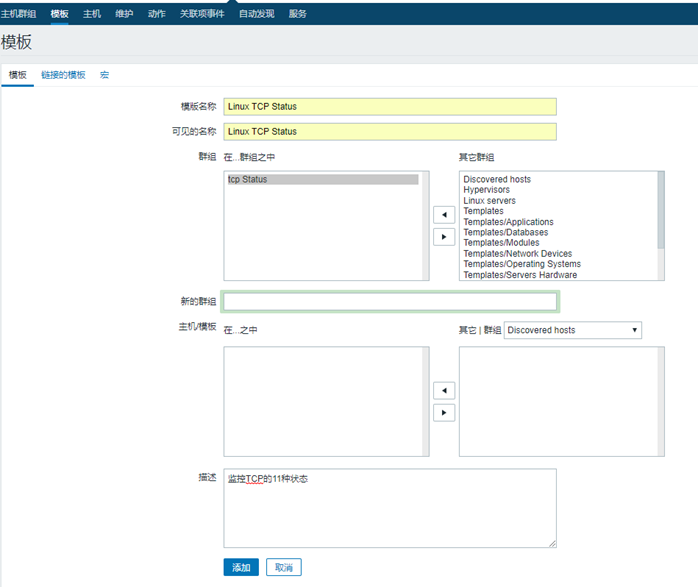
First, add a template to create monitoring items in the template so that you don't have to create them again later
Because template supports export and import
After creating the template, click the monitor item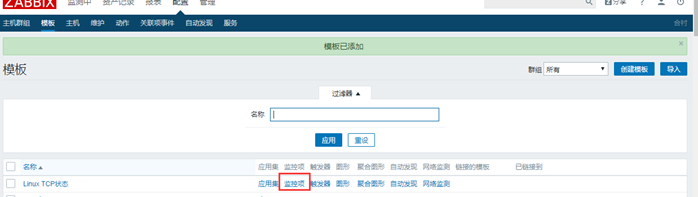
Click to create a monitor item
Then start creating
When creating, the name is only a visible key value, which is the most critical and cannot be changed
After adding one, you can use this to clone other
It is important to ensure that each key value is normal
After cloning, you need to enable everything. The default is enabled after creation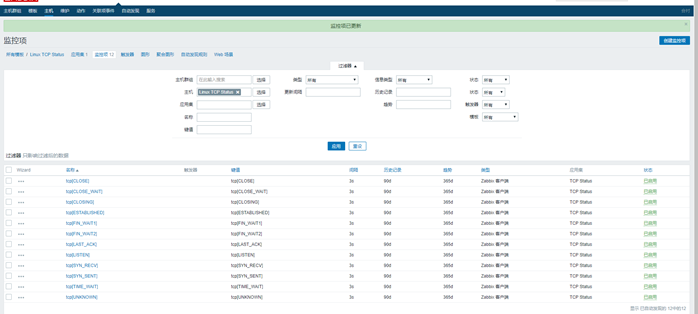
After adding the template, we need to add it to web01 for monitoring
Add the TCP template according to the template at the beginning
Check success
If there is data update, it will be successful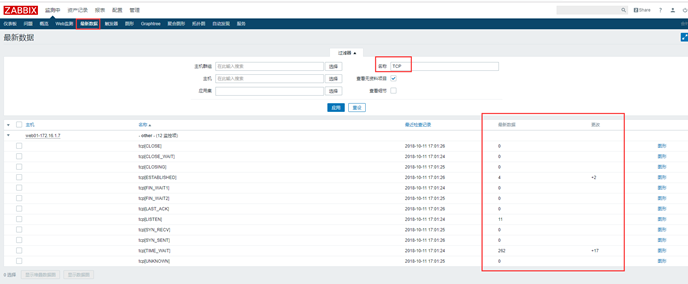
4.3 custom monitoring memory
1. In / etc / ZABBIX / ZABBIX [agentd. D / *. Conf of the Agent, use UserParameter=KEY,shell command to facilitate zabbixServer to obtain the data of the corresponding monitoring item of ZabbixAgent
[root@web01 zabbix_agentd.d]# vim mem.conf
UserParameter=Mem.Num,free -m |awk '/^Mem/{print$NF/$2*100}'
UserParameter=Swap.Num,free -m|awk '/^Swap/{print$3/$2*100}'- Use ZABBIX | agentd - P | grep key, if the value is obtained, it is normal
[root@web01 zabbix_agentd.d]# zabbix_agentd -p|grep-i Mem_Num
Mem_Num[t|38.501]
- Test whether it is normal to obtain the customized monitoring items of ZabbixAgent on the ZabbixServer side. ZABBIX? Get - s IP? Addr - K key
[root@zabbix ~]# zabbix_get -s 172.16.1.7 -k Mem.Num
38.7064
Then start page configuration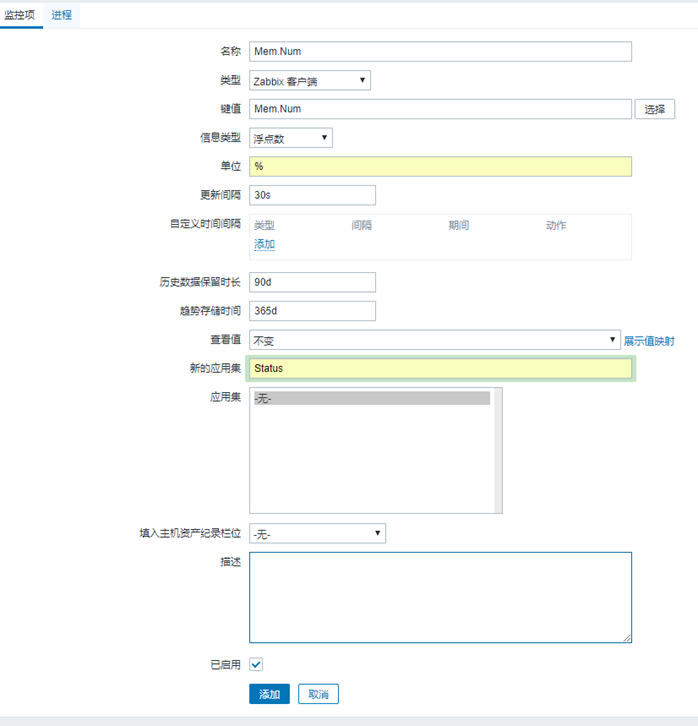

Add Swap.Num and Mem.Num to the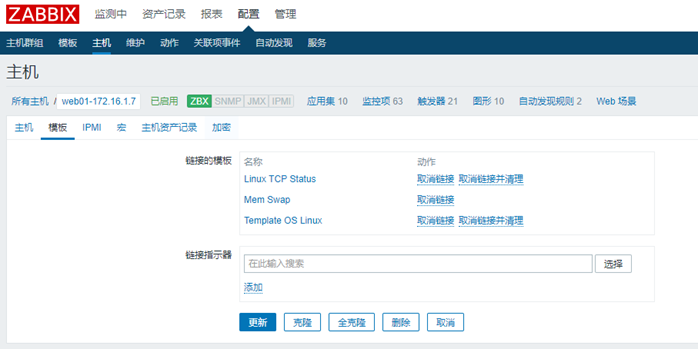
View the latest data after adding
Configuration completed
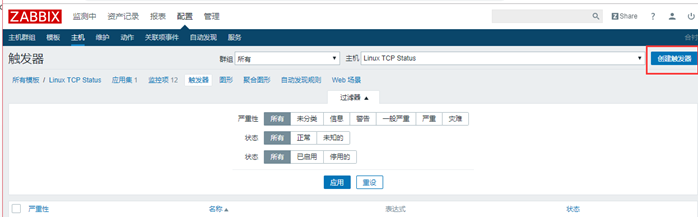
Chapter 5 configuring triggers
5.1 configure single condition trigger
Alarm when ESTAB exceeds 500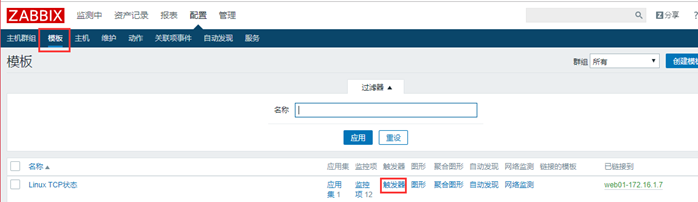
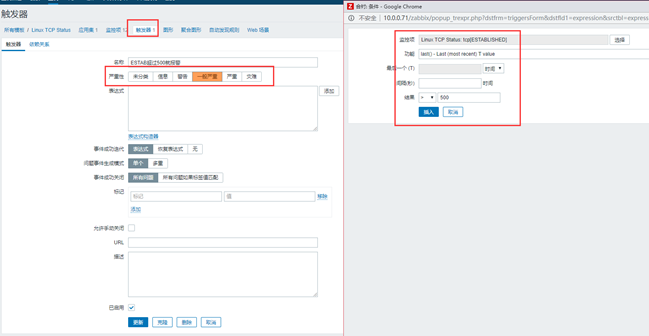
Check whether it is added successfully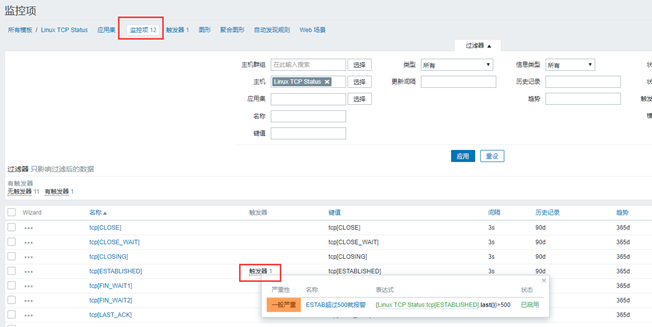
5.2 multi condition trigger
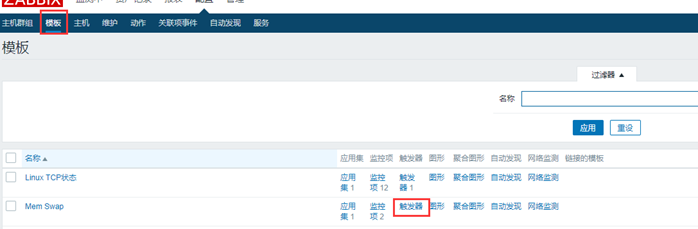
Alarm when less than 30% of memory is used and more than 1% of swap is used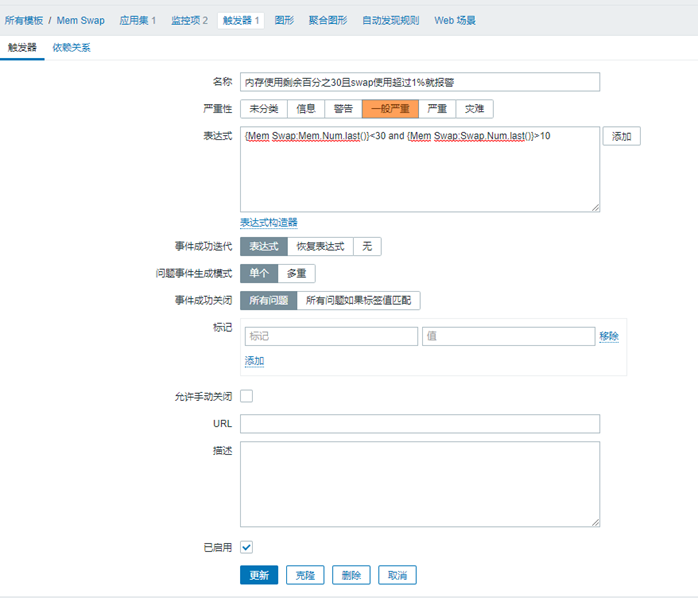
inspect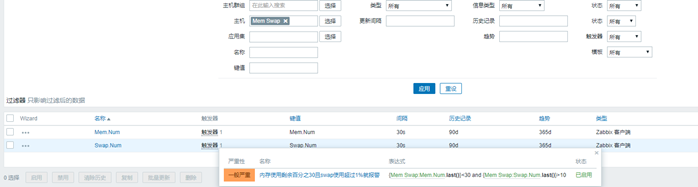
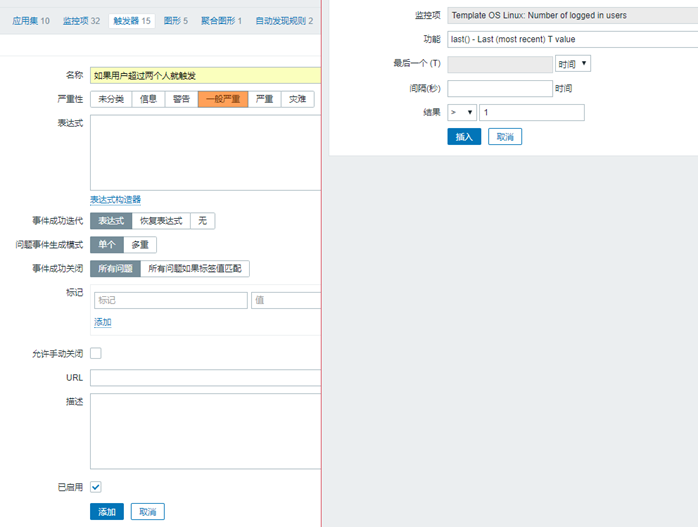
5.3 alarm when there are more than two logged in users
Chapter 6 configure alarms
6.1 configure web interface alarm

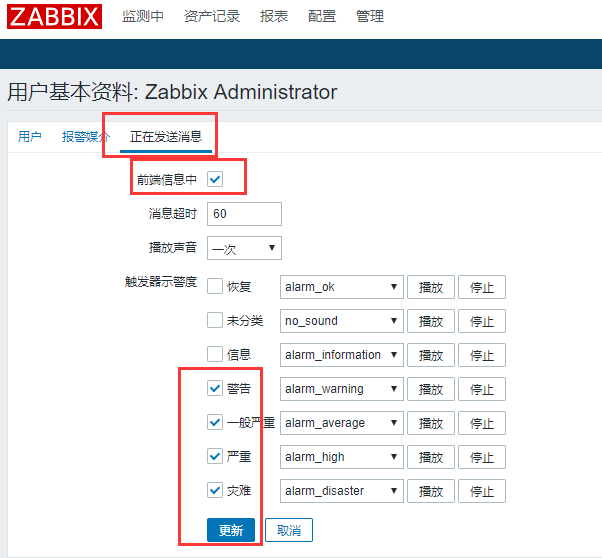
6.2 configure email alarm
Set the state of the trigger in the action to started (click to stop)
Note that the trigger is selected in the upper right corner of the interface, otherwise the display content is different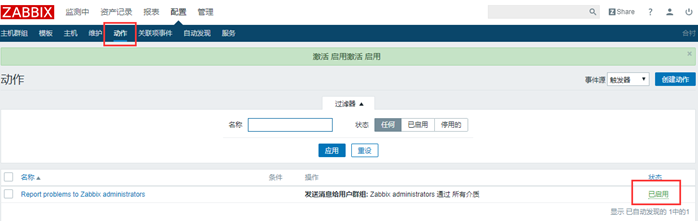
6.2.1 change alarm email information
Then we click the name to enter the configuration interface (change the information sent by the alarm email)
Delete and overwrite the default information
Fault!!!: {TRIGGER.NAME}
Alarm host: {HOST.NAME1}
Alarm service: {ITEM.NAME1}
Alarm Key1: {ITEM.KEY1}: {ITEM.VALUE1}
Alarm Key2: {ITEM.KEY2}: {ITEM.VALUE2}
Severity: {TRIGGER.SEVERITY}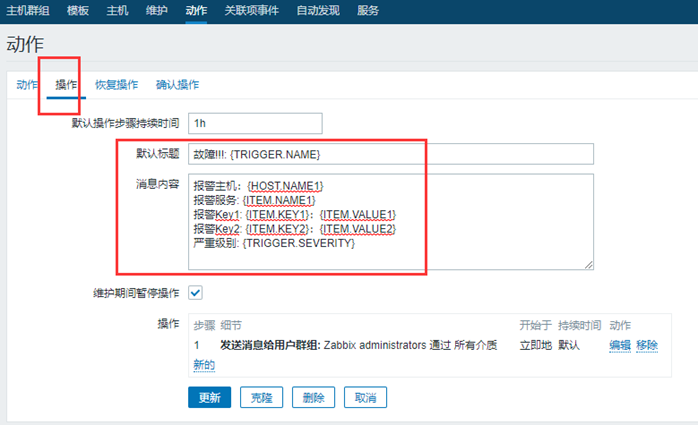
Recover: {TRIGGER.NAME}
Recovery host: {HOST.NAME1}
Resume service: {ITEM.NAME1}
Recover key1: {ITEM.KEY1}: {ITEM.VALUE1}
Recover Key2: {ITEM.KEY2}: {ITEM.VALUE2}
The recovered content should also be modified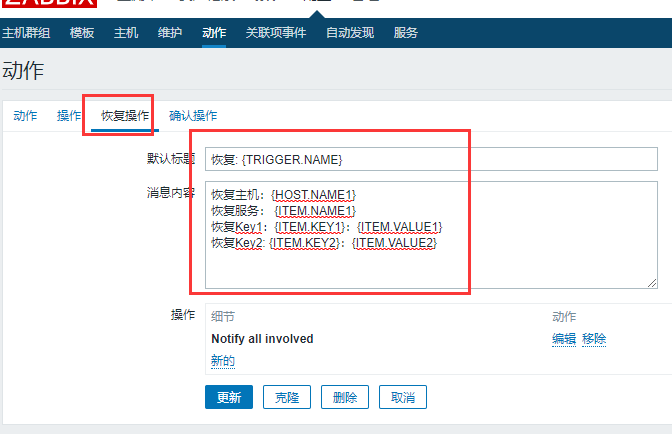
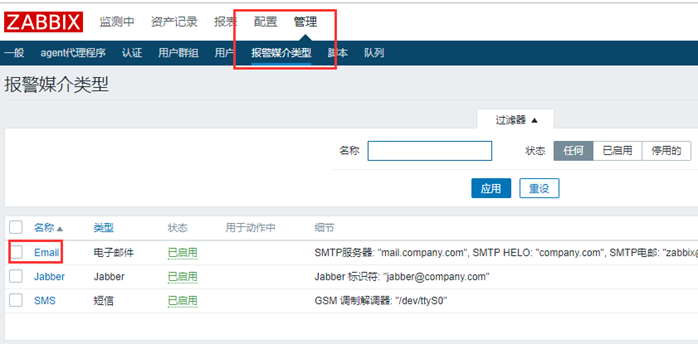
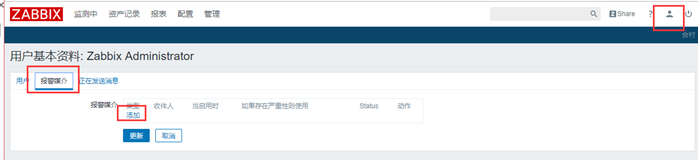
6.2.2 modify alarm medium type
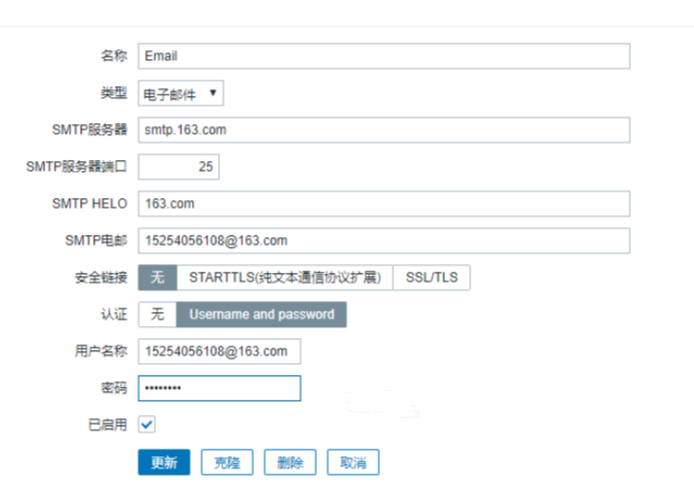
6.2.3 adding alarm media
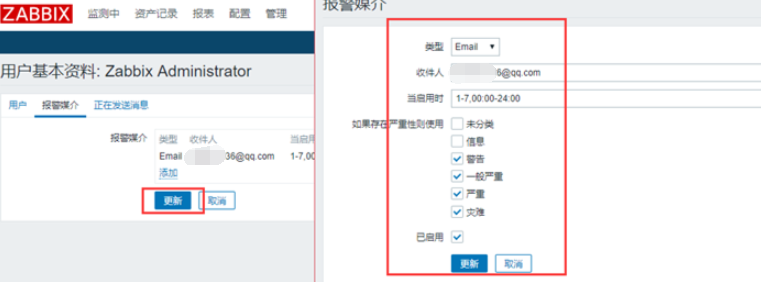
Click Update after adding to finish the mail configuration
6.3 enterprise wechat alarm
1. Prepare wechat alarm script, how to write the script - > where to put the script [equivalent to configuring the sender]
[root@zabbix ~]# yum install python-pip -y
[root@zabbix ~]# pip install requests
[root@zabbix ~]# cd /usr/lib/zabbix/alertscripts
Content of alarm script
[root@zabbix alertscripts]# vim weixin.py
#!/usr/bin/env python
#-*- coding: utf-8 -*-
#author: bgx
#date: 2018
#comment: zabbix access wechat alarm script

import requests
import sys
import os
import json
import logging

#!/usr/bin/env python
#-*- coding: utf-8 -*-
#author: bgx
#date: 2018
#comment: zabbix access wechat alarm script

import requests
import sys
import os
import json
import logging

logging.basicConfig(level = logging.DEBUG, format= '%(asctime)s, %(filename)s, %(levelname)s, %(message)s',
datefmt = '%a, %d %b %Y %H:%M:%S',
filename = os.path.join('/tmp','weixin.log'),
filemode = 'a')


corpid='wwabcf092986138a4f'
appsecret='47r80t2cfYbQfrOs8mRXUx84H44RdFTJ9BMvVaeQUVQ'
agentid=1000002
#Get accesstoken
token_url='https://qyapi.weixin.qq.com/cgi-bin/gettoken?corpid='+ corpid + '&corpsecret=' + appsecret
req=requests.get(token_url)
accesstoken=req.json()['access_token']

#send message
msgsend_url='https://qyapi.weixin.qq.com/cgi-bin/message/send?access_token='+ accesstoken

touser=sys.argv[1]
subject=sys.argv[2]
#toparty='3|4|5|6'
message=sys.argv[2] + "\n\n"+sys.argv[3]

params={
"touser": touser,
#"toparty": toparty,
"msgtype": "text",
"agentid": agentid,
"text": {
"content": message
        },
"safe":0
}

req=requests.post(msgsend_url,data=json.dumps(params))

logging.info('sendto:' + touser + ';;subject:' +subject + ';;message:' + message)
Add execute permission to script and test
[root@zabbix alertscripts]# chmod +x weixin.py
[root@zabbix alertscripts]# ./weixin.py  nfsnobodySubject Messages  #test
[root@zabbix alertscripts]# rm -f /tmp/weixin.log   #Delete this file or an error will be reported
Start web interface configuration
What needs to be added in the figure below (be careful not to leave blank space, otherwise it will report an error, which is hard to find)
{ALERT.SENDTO} to whom
{ALERT.SUBJECT} sent subject
{ALERT.MESSAGE} sent content
Just fill in the script name directly
Note that the script must be placed in the / usr/lib/zabbix/alertscripts directory on the server side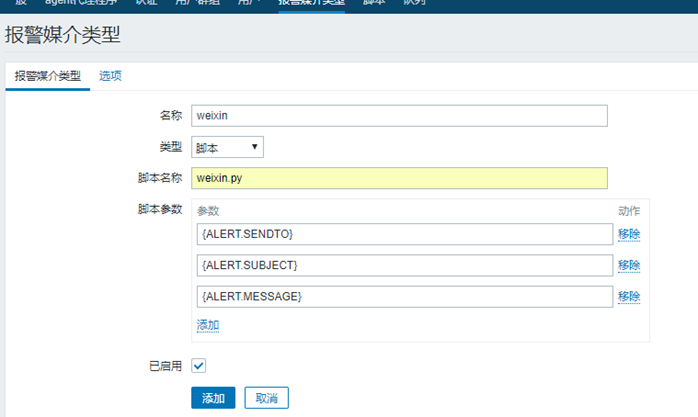
Add wechat alarm data in alarm media after adding alarm media type (don't forget to click Update after adding)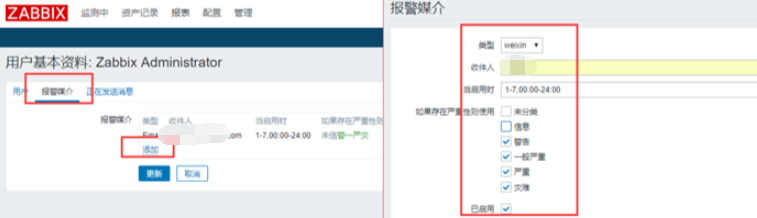
6.4 configure alarm upgrade
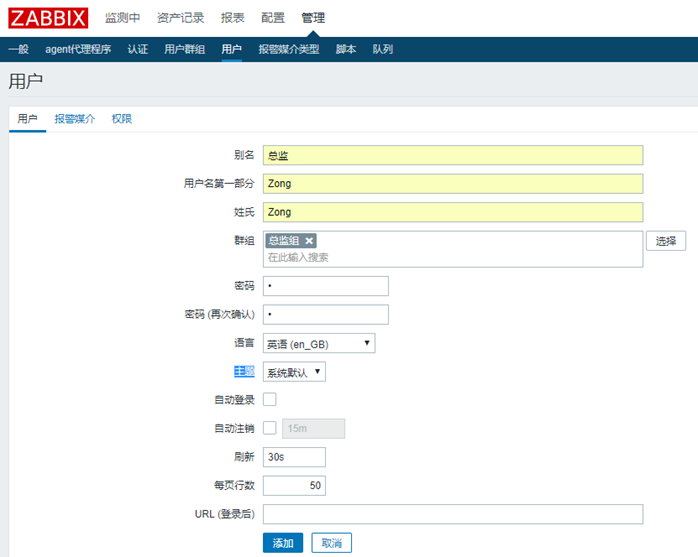
Create two user groups first
Add alarm medium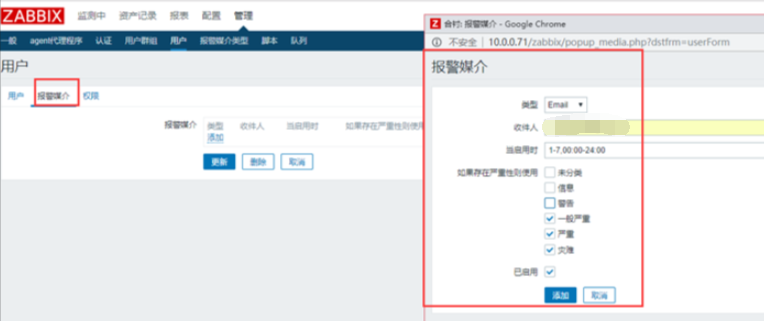
Modify user's permission only administrators can receive information
Click configuration action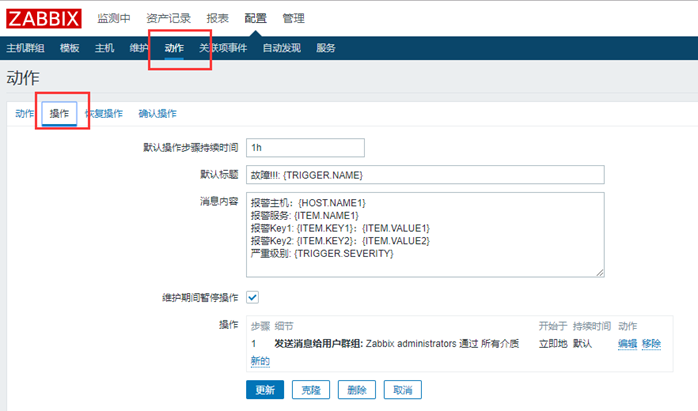
Update an existing item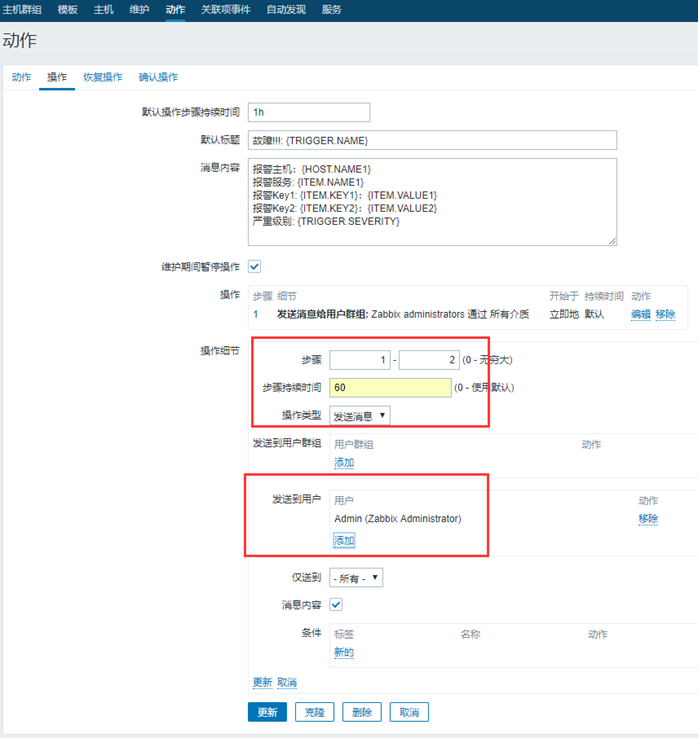
Then add a new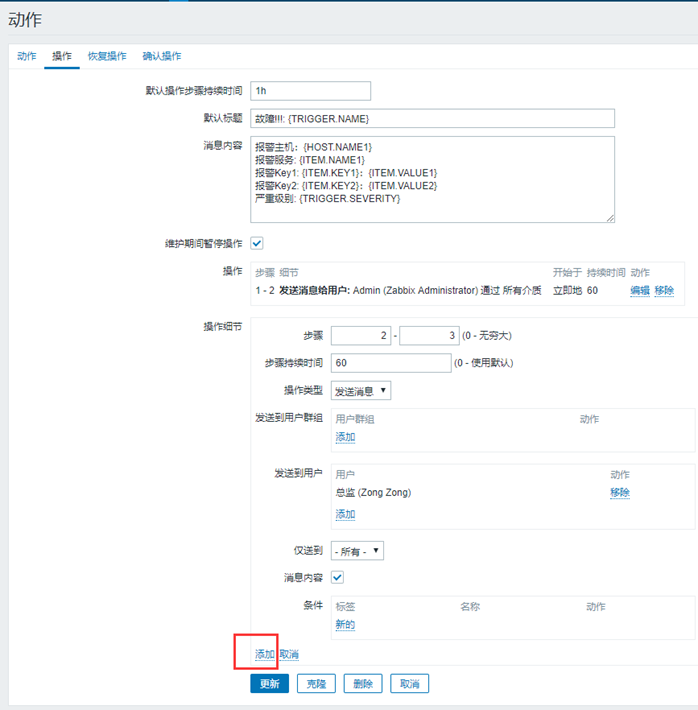
After adding, click Update. There are only two users added here. Three users can go down one by one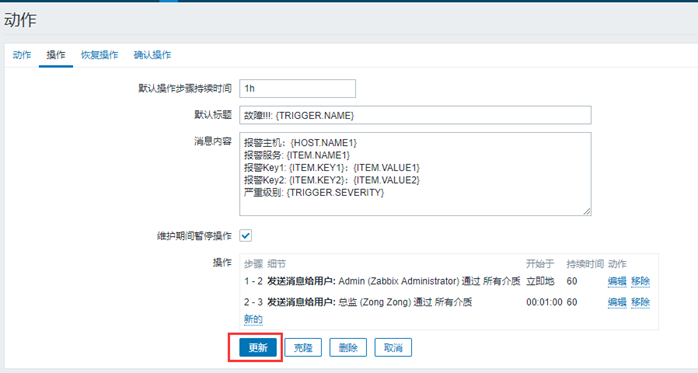
Chapter 7 quick configuration of new host
7.1 configure zabbix local
The server side is zabbix local server, which is slightly different from other servers
Download ZABBIX agent
[root@zabbix ~]# rpm -ivhhttps://mirrors.tuna.tsinghua.edu.cn/zabbix/zabbix/3.4/rhel/7/x86_64/zabbix-agent-3.4.14-1.el7.x86_64.rpm
[root@zabbix ~]# vim/etc/zabbix/zabbix_agentd.conf
When Timeout=30, change the uncomment to 30. The agent on the server side does not need to modify the server
Note that the address after ZABBIX get test-s should be written 127.0.0.1 on the server side
[root@zabbix ~]# systemctl enablezabbix-agent.service
[root@zabbix ~]# systemctl startzabbix-agent.service
Web page configuration (the server side has zabbix configured and only needs to be enabled)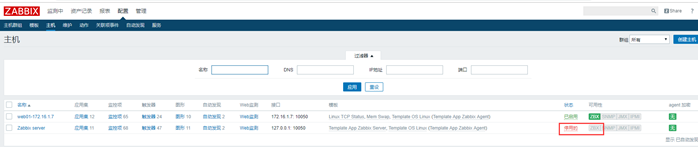
There are two configured templates on the server side. You only need to apply the templates of TCP and memory
(you also need to pull the agent's conf file from the web server.)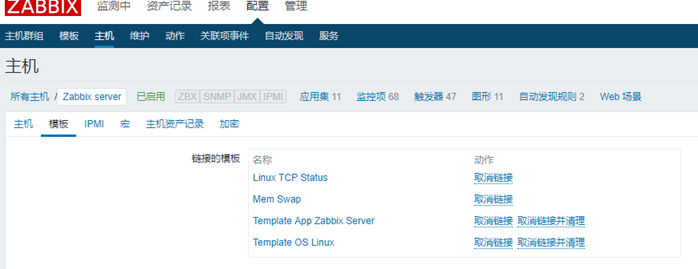

Drag the conf configuration file from the agent
[root@zabbix ~]# scp -rproot@172.16.1.7:/etc/zabbix/zabbix_agentd.d/* /etc/zabbix/zabbix_agentd.d/
Restart agent service
[root@zabbix ~]# systemctl restartzabbix-agent.service
7.2 other agent end
Take db01 configuration as an example (in fact, all configurations except the server are the same except for the IP address)
[root@db01 ~]# rpm -ivh https://mirrors.tuna.tsinghua.edu.cn/zabbix/zabbix/3.4/rhel/7/x86_64/zabbix-agent-3.4.14-1.el7.x86_64.rpm
Modifying the IP address pointed by the agent configuration file server must be modified
[root@db01 ~]# vim /etc/zabbix/zabbix_agentd.conf    #Here is the revised content
Server=172.16.1.71
Timeout=30
Start the service and join the startup
[root@db01 ~]# systemctl enablezabbix-agent.service
[root@db01 ~]# systemctl startzabbix-agent.service
Then go to the webpage to add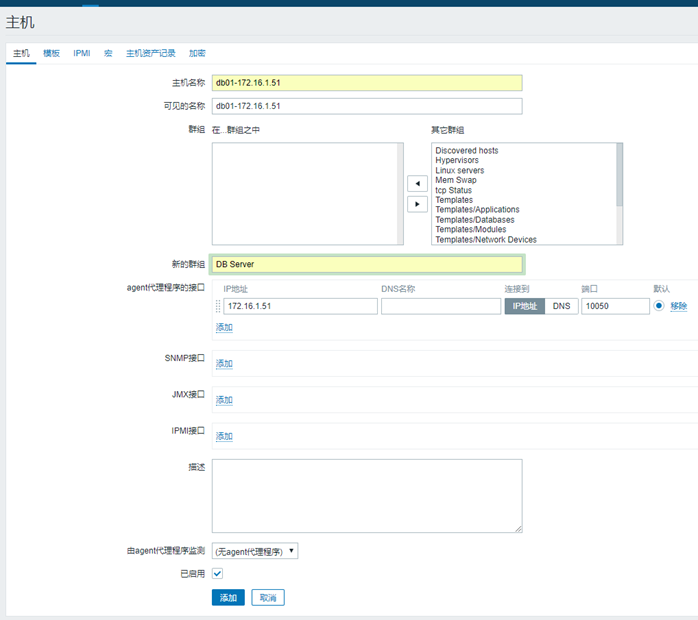
Add a template and apply it directly (this is one of the benefits of creating a template and you can apply it directly)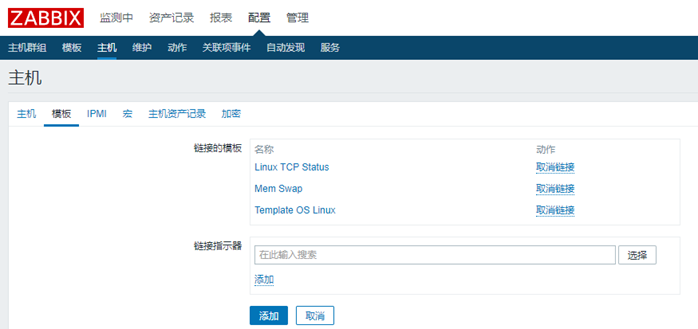
Pull the configuration file over and restart the agent
[root@db01 ~]# scp -rproot@172.16.1.7:/etc/zabbix/zabbix_agentd.d/* /etc/zabbix/zabbix_agentd.d/
[root@db01 ~]# systemctl restartzabbix-agent.service
Check whether there is any error as shown in Figure 2. The figure below has been configured
Chapter 8 user defined graphic configuration
8.1 aggregate graphics configuration
Aggregate graphics for observation
Click the name to enter editing or viewing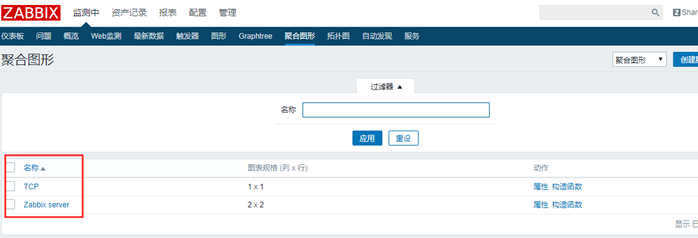
Click Edit to add picture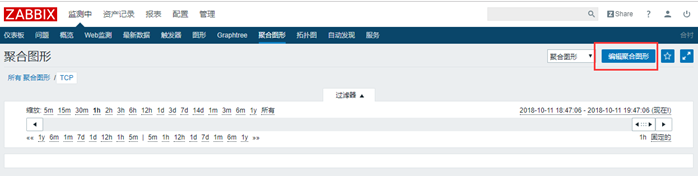
This is like adding rows and columns to a table. Click change to add pictures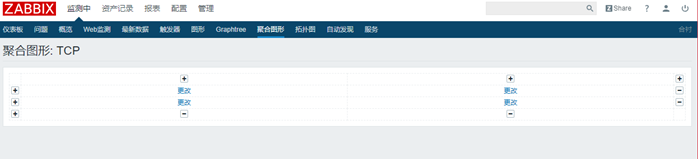
Click the picture to select the picture. In the upper right corner, you can select the group (the group is the host)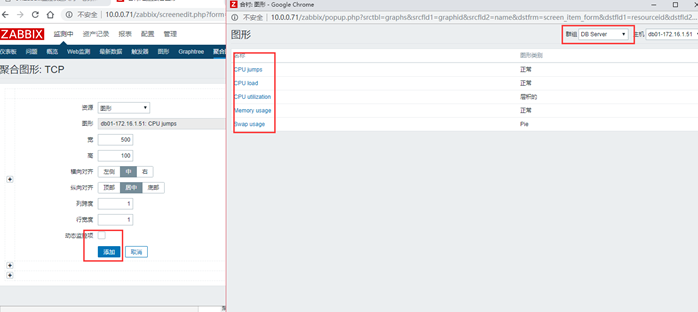
The figure below shows the added content. To modify the existing image, click Change and add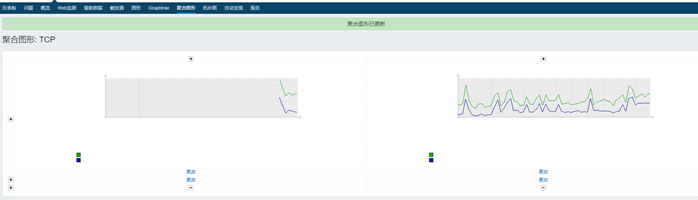
8.2 slide configuration
Slides are generally configured on the basis of aggregated graphics
To edit a slide, change the aggregate graph to a slide
You don't need a slide if you have only one aggregate graphic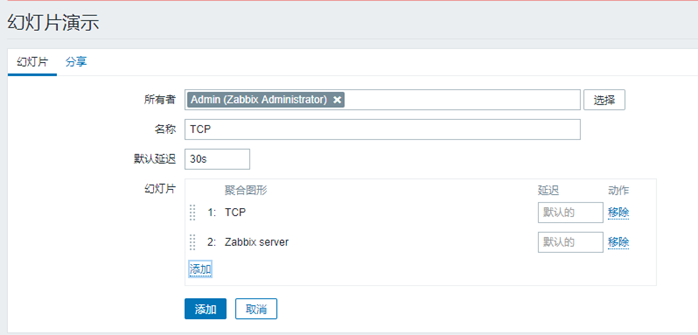
Click Add. The delay time is the change time of the picture
8.3 installation graphics tree
1. Install graphtree
[root@zabbix ~]# cd /usr/share/zabbix
[root@zabbix zabbix]# wget https://raw.githubusercontent.com/OneOaaS/graphtrees/master/graphtree3.0.4.patch
2. Import patch package
[root@zabbix zabbix]# yum install -y patch
[root@zabbix zabbix]# patch  -Np0 <graphtree3.0.4.patch
[root@zabbix zabbix]# chown -R apache.apacheoneoaas
3. Add Apache configuration file
[root@zabbix zabbix]# vim/etc/httpd/conf.d/zabbix.conf
Alias /zabbix /usr/share/zabbix
Alias /oneoaas /usr/share/zabbix/oneoaas
4. Restart httpd service
[root@zabbix zabbix]# systemctl restart httpd
Chapter 9 splitting database
9.1 split configuration process
LAP+MySQL architecture (modify the configuration information of the connection database in the following two files)
Split zabbix database to db01
To modify the contents of the following two files
[root@zabbix ~]#  ll /etc/zabbix/zabbix_server.conf
[root@zabbix ~]#  ll /etc/zabbix/web/zabbix.conf.php
1. Create zabbix library on the new database
[root@db01 ~]# mysql -uroot -pNfsnobody123.com
mysql> create database zabbix character setutf8 collate utf8_bin;
mysql> grant all privileges on zabbix.* tozabbix@'%' identified by 'Nfsnobody123.com';
#You will be prompted here that you do not need to pay attention to the excessive permission
2. Back up the database files on the old zabbix server, and then back up to the new database
[root@zabbix ~]#  mysqldump -uroot \
--databases zabbix \
--single-transaction > `date +%F%H`-zabbix.sql
[root@zabbix ~]#  cat 2018-08-2017-zabbix.sql |mysql -h10.0.0.51 -uzabbix -pNfsnobody123.com zabbix
3. Modify the database connection information of zabbixServer
[root@zabbix ~]# vim /etc/zabbix/zabbix_server.conf this is the modified content
DBHost=172.16.1.51
DBName=zabbix
DBUser=zabbix
DBPassword=Nfsnobody123.com
[root@m01 ~]# Systemctl restart ZABBIX server needs to be restarted after modification
4. Modify ZABBIX web connection database information
[root@m01 ~]# vim /etc/zabbix/web/zabbix.conf.php is modified as follows
$DB['TYPE']= 'MYSQL';
$DB['SERVER']= '172.16.1.51';
$DB['PORT']= '0';
$DB['DATABASE'] = 'zabbix';
$DB['USER']     = 'zabbix';
$DB['PASSWORD'] = 'Nfsnobody123.com';
[root@m01 ~]# systemctl restart httpd
9.2 error cases
If the following error occurs: please check whether the database allows remote connection, and whether the corresponding account and password are configured incorrectly
[root@m01 ~]# tail -f/var/log/zabbix/zabbix_server.log
 2189:20180820:173636.941 [Z3001] connection todatabase 'zabbix' failed: [2003] Can't connect to MySQL server on '172.16.1.51'(111)