Copyright Statement: This is Haiyu King's original article, reprinted please indicate the source!
Preface
This Demo only records the integration of millet push and cannot run.
Using steps
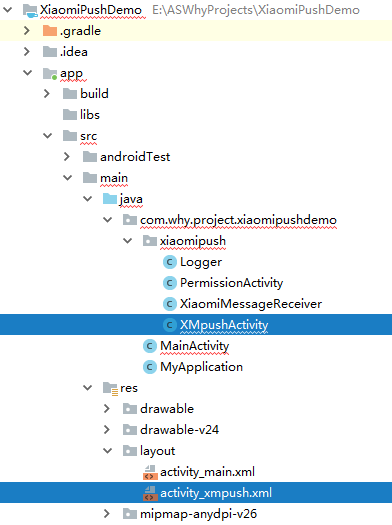
I. Project organization chart
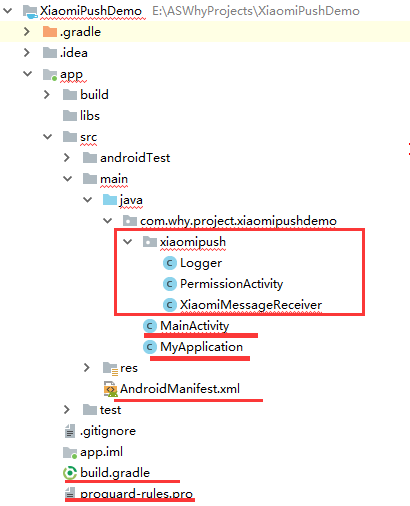
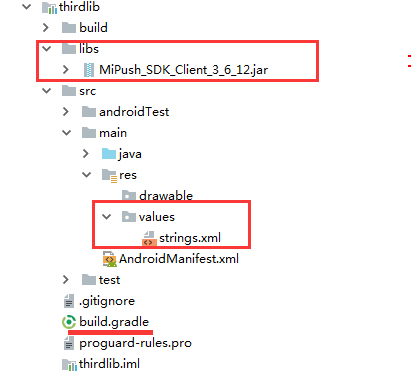
Matters needing attention:
1. change package name and re-import R file path are required after importing class files
2. Files in the Values directory (strings.xml, dimens.xml, colors.xml, etc.) If they exist in the project, copy the contents and do not overwrite them.
II. Import steps
2.1. Access preparation
Reference Official Website< Guidelines for Enabling Millet Push Service>
Registered Millet Developer Account - Enable Push
2.2. Download SDK
Download address: http://admin.xmpush.xiaomi.com/mipush/downpage/
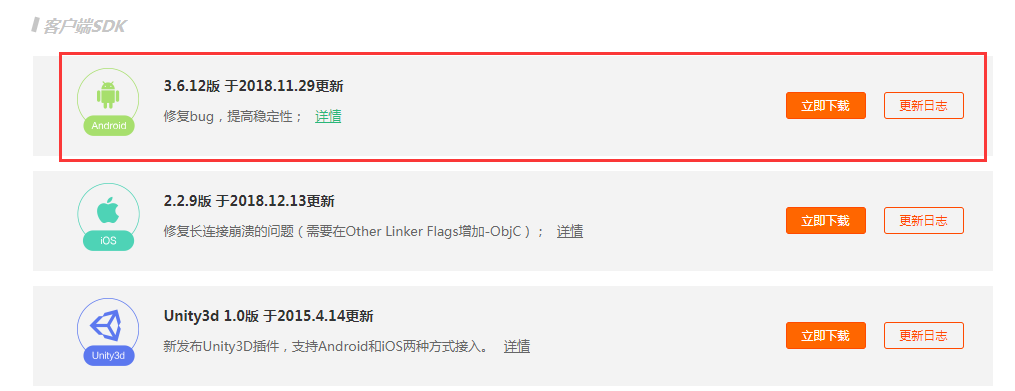
The decompressed directory of the downloaded compressed package:

2.3. Integrated SDK
For ease of administration, I created a new ThirdLib module in Demo to integrate SDK.
(1) Create a new module of ThirdLib and use it in app build.gradle
//Citing thirdlib
implementation project(':thirdlib')
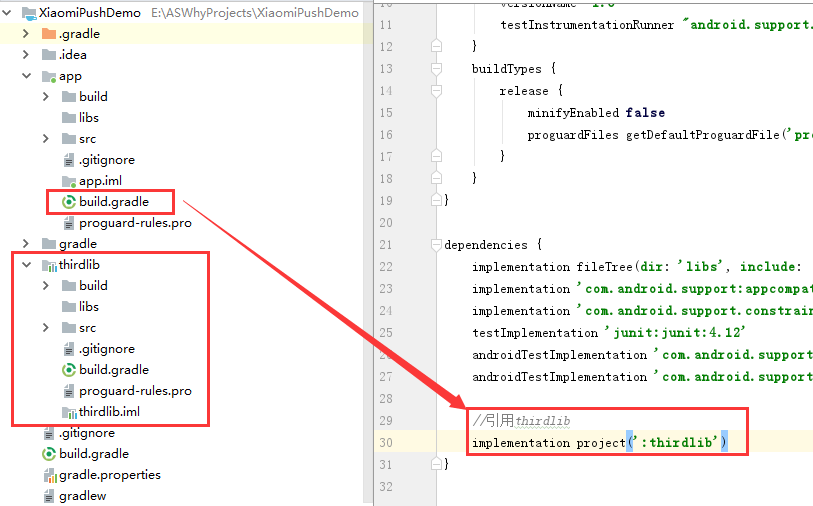
(2) Integrating SDK in ThirdLib module
Copy MiPush_SDK_Client_x_x.jar to the project libs/directory;
Because the jar package is integrated in thirdlib module, you also need to refer to the jar package in the libs directory in the build. grade file of thirdlib module.
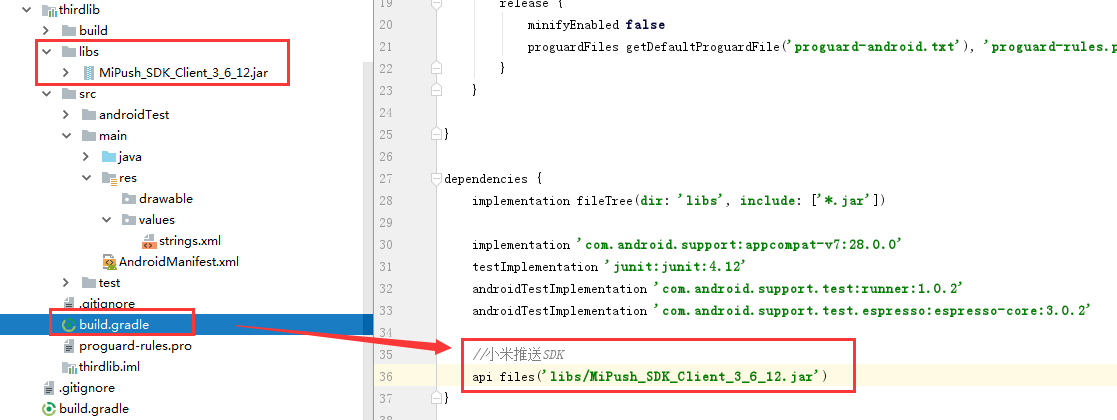
    //Millet Push SDK
    api files('libs/MiPush_SDK_Client_3_6_12.jar')
(3) Add the following code in the res/strings.xml file of ThirdLib module (called in custom XiaomiMessageReceiver)
<resources>
    <string name="app_name">ThirdLib</string>

    <!--=====================================Millet push SDK=====================================-->
    <string name="recv_passthrough_message"> Receive a passthrough message. Content is \"%1$s\"</string>
    <string name="click_notification_message"> Clicked a notification message. Content is \"%1$s\"</string>
    <string name="arrive_notification_message"> Arrived a notification message. Content is \"%1$s\"</string>
    <string name="register_success">Register push success.</string>
    <string name="register_fail">Register push fail.</string>
    <string name="set_alias_success"> Set alias \"%1$s\" success.</string>
    <string name="set_alias_fail"> Set alias fail for %1$s.</string>
    <string name="unset_alias_success"> Unset alias \"%1$s\" success.</string>
    <string name="unset_alias_fail"> Unset alias fail for %1$s.</string>
    <string name="set_account_success"> Set account \"%1$s\" success.</string>
    <string name="set_account_fail"> Set account fail for %1$s.</string>
    <string name="unset_account_success"> Unset account \"%1$s\" success.</string>
    <string name="unset_account_fail"> Unset account fail for %1$s.</string>
    <string name="subscribe_topic_success"> Subscribe topic \"%1$s\" success.</string>
    <string name="subscribe_topic_fail"> Subscribe topic fail for %1$s.</string>
    <string name="unsubscribe_topic_success"> Unsubscribe topic \"%1$s\" success.</string>
    <string name="unsubscribe_topic_fail"> Unsubscribe topic fail for %1$s.</string>
    <string name="set_accept_time_success"> Set accept time %1$s - %2$s success.</string>
    <string name="set_accept_time_fail"> Set accept time fail for %1$s.</string>
</resources>
(4) Configure Android Manifest. XML [Note that it's in app module, not thirdlib module]
Note the following tag orange code:
<?xml version="1.0" encoding="utf-8"?>
<manifest xmlns:android="http://schemas.android.com/apk/res/android"
          package="com.why.project.xiaomipushdemo">

    <!-- ======================Millet push SDK====================== -->
    <uses-permission android:name="android.permission.WRITE_EXTERNAL_STORAGE" />
    <uses-permission android:name="android.permission.INTERNET" />
    <uses-permission android:name="android.permission.ACCESS_NETWORK_STATE" />
    <uses-permission android:name="android.permission.ACCESS_WIFI_STATE" />
    <uses-permission android:name="android.permission.READ_PHONE_STATE" />
    <uses-permission android:name="android.permission.GET_TASKS" />
    <!-- the following 2 com.xiaomi.mipushdemo should be changed to your package name -->
    <permission
        android:name="${applicationId}.permission.MIPUSH_RECEIVE"
        android:protectionLevel="signature" />

    <uses-permission android:name="${applicationId}.permission.MIPUSH_RECEIVE" />
    <uses-permission android:name="android.permission.VIBRATE" />

    <application
        android:allowBackup="true"
        android:icon="@mipmap/ic_launcher"
        android:label="@string/app_name"
        android:roundIcon="@mipmap/ic_launcher_round"
        android:supportsRtl="true"
        android:theme="@style/AppTheme">
        <activity android:name=".MainActivity">
            <intent-filter>
                <action android:name="android.intent.action.MAIN"/>

                <category android:name="android.intent.category.LAUNCHER"/>
            </intent-filter>
        </activity>

        <!-- ======================Millet push SDK========================== -->
        <service
            android:name="com.xiaomi.push.service.XMJobService"
            android:enabled="true"
            android:exported="false"
            android:permission="android.permission.BIND_JOB_SERVICE"
            android:process=":pushservice" />

        <service
            android:name="com.xiaomi.push.service.XMPushService"
            android:enabled="true"
            android:process=":pushservice" />

        <service
            android:name="com.xiaomi.mipush.sdk.PushMessageHandler"
            android:enabled="true"
            android:exported="true" />
        <service
            android:name="com.xiaomi.mipush.sdk.MessageHandleService"
            android:enabled="true" />
        <!--Customize a BroadcastReceiver Class: To receive messages-->
        <receiver
            android:name="com.why.project.xiaomipushdemo.xiaomipush.XiaomiMessageReceiver"
            android:exported="true">
            <intent-filter>
                <action android:name="com.xiaomi.mipush.RECEIVE_MESSAGE" />
            </intent-filter>
            <intent-filter>
                <action android:name="com.xiaomi.mipush.MESSAGE_ARRIVED" />
            </intent-filter>
            <intent-filter>
                <action android:name="com.xiaomi.mipush.ERROR" />
            </intent-filter>
        </receiver>
        <receiver
            android:name="com.xiaomi.push.service.receivers.NetworkStatusReceiver"
            android:exported="true">
            <intent-filter>
                <action android:name="android.net.conn.CONNECTIVITY_CHANGE" />

                <category android:name="android.intent.category.DEFAULT" />
            </intent-filter>
        </receiver>
        <receiver
            android:name="com.xiaomi.push.service.receivers.PingReceiver"
            android:exported="false"
            android:process=":pushservice">
            <intent-filter>
                <action android:name="com.xiaomi.push.PING_TIMER" />
            </intent-filter>
        </receiver>
    </application>

</manifest>
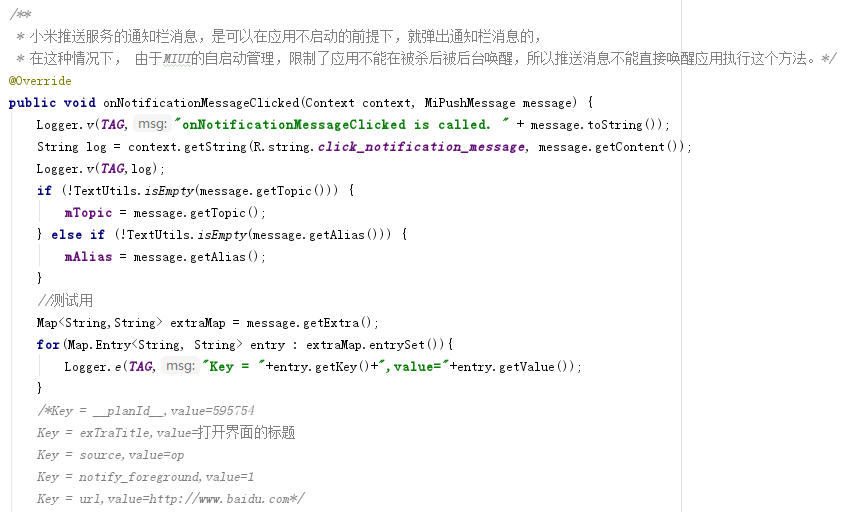
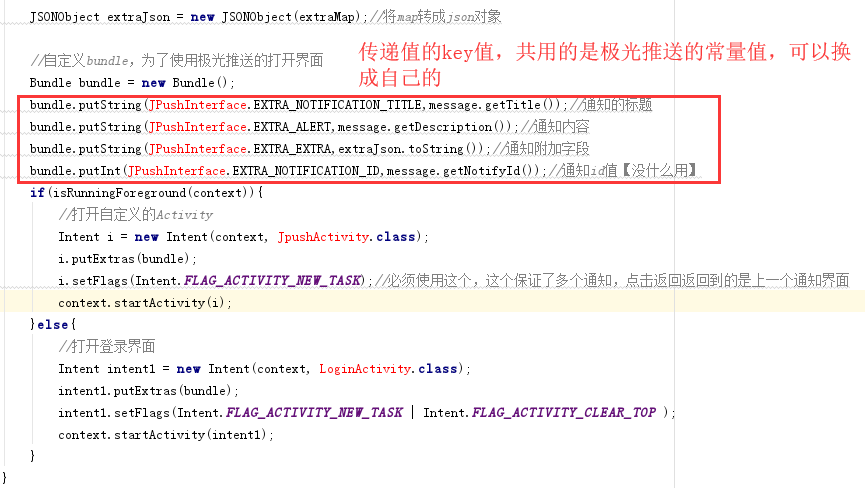
(5) Add files in the xiaomipush package to the project

1. The code in the custom MyApplication is needed in PermissionActivity. It will be added in the next step. There is no need to deal with errors here.

2. The string resources used in XiaomiMessageReceiver are defined in the res/strings.xml file of thirdLib.
3. XiaomiMessage Receiver Main Notification and Message Callback
(6) Initialization of SDK
To execute in MyApplication
package com.why.project.xiaomipushdemo;

import android.app.ActivityManager;
import android.app.Application;
import android.content.Context;
import android.os.Process;
import com.xiaomi.mipush.sdk.MiPushClient;

import java.util.List;

/**
 * Created by HaiyuKing
 * Used
 */
public class MyApplication extends Application {

    /*=================Millet Push SDK=====================*/
    // user your appid the key.
    private static final String APP_ID = "28823037343464645735";
    // user your appid the key.
    private static final String APP_KEY = "56545654754865";

    @Override
    public void onCreate() {
        super.onCreate();

        initXiaoMiPush();
    }

    //Millet push SDK
    private void initXiaoMiPush(){
        // register push Service, registered successfully to DemoMessageReceiver Transmit broadcast
        // Can from DemoMessageReceiver Of onCommandResult Method medium MiPushCommandMessage Getting Registration Information in Object Parameters
        if (shouldInit()) {
            MiPushClient.registerPush(this, APP_ID, APP_KEY);
        }
    }
    //Millet push SDK[Be used for PermissionActivity Medium invocation]
    public static void reInitPush(Context ctx) {
        MiPushClient.registerPush(ctx.getApplicationContext(), APP_ID, APP_KEY);
    }
    //Millet push SDK Relevant
    private boolean shouldInit() {
        ActivityManager am = ((ActivityManager) getSystemService(Context.ACTIVITY_SERVICE));
        List<ActivityManager.RunningAppProcessInfo> processInfos = am.getRunningAppProcesses();
        String mainProcessName = getPackageName();
        int myPid = Process.myPid();
        for (ActivityManager.RunningAppProcessInfo info : processInfos) {
            if (info.pid == myPid && mainProcessName.equals(info.processName)) {
                return true;
            }
        }
        return false;
    }
}
3. Use method (for reference only)
package com.why.project.xiaomipushdemo;

import android.os.Bundle;
import android.support.v7.app.AppCompatActivity;
import android.text.TextUtils;

import com.xiaomi.mipush.sdk.MiPushClient;

public class MainActivity extends AppCompatActivity {

    @Override
    protected void onCreate(Bundle savedInstanceState) {
        super.onCreate(savedInstanceState);
        setContentView(R.layout.activity_main);

        /*=======================================Millet Push SDK Related=============================================*/
        updateJpushDeviceId();
    }

    /*=======================================Millet Push SDK Related=============================================*/
    /**Update device id interface*/
    private void updateJpushDeviceId(){
        //====Millet push SDK Relevant====
        String regId = MiPushClient.getRegId(MyApplication.getAppContext());
        requestDeviceId(regId);//Determine whether to request an interface or pop up a dialog box
    }

    //Request Interface Storage Device id perhaps token Method
    private void requestDeviceId(String regId) {

        //The first condition is equipment. id Value or token Value is not empty, otherwise the following judgment is meaningless
        //If no alias has been set, or an alias needs to be set
        //If on the server deviceID Value is null, indicating that the current user has not bound any device, then directly request the interface, do not need to pop up the dialog box;
        //If on the server deviceID The value is not empty, and the device acquired by the client id Value and on the server deviceID With the same value, you do not need to pop up the dialog box to request the interface directly (this is the case of uninstall and reinstall)
        //If on the server deviceid The value is not empty, and the device acquired by the client id Value and on the server deviceID If the value is different, you need to pop up the dialog box (this is the case of equipment change)
        if (!TextUtils.isEmpty(regId)) {
            //If an alias has been set (the device has been stored) id Value, but the current alias (device) id Value) and server inconsistencies require the alias (storage device) to be reset id Value (This is the case of login on other devices)
        }

        //====Millet push SDK Relevant====
        //It seems that you need to set aliases every time.
        setAlias(PreferencesUtils.getString(mContext,Globals.USERNAME_KEY));
    }

    // This is from JPush Example Setting aliases Activity The code in it. commonly App The invocation entry of the settings can be invoked at any convenient place.
    private void setAlias(String alias) {
        if (TextUtils.isEmpty(alias)) {
            ToastUtil.showShortToast(getResources().getString(R.string.error_alias_empty));//alias Aliases cannot be empty
            return;
        }
        if (!ExampleUtil.isValidTagAndAlias(alias)) {
            ToastUtil.showShortToast(getResources().getString(R.string.error_tag_gs_empty));//Wrong format
            return;
        }
        //====Millet push SDK Relevant====
        MiPushClient.setAlias(MyApplication.getAppContext(), alias, null);
    }
}
IV. Sending Messages
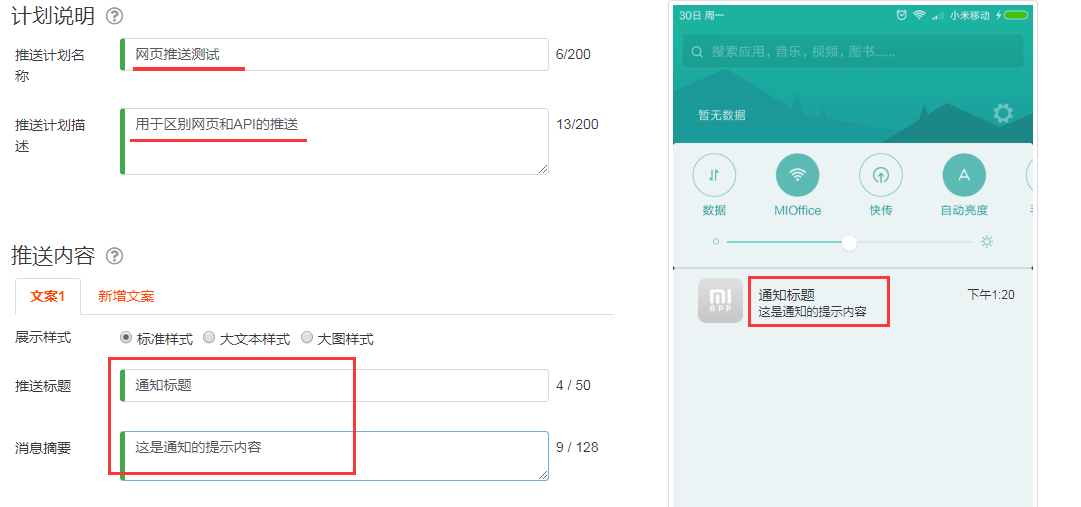
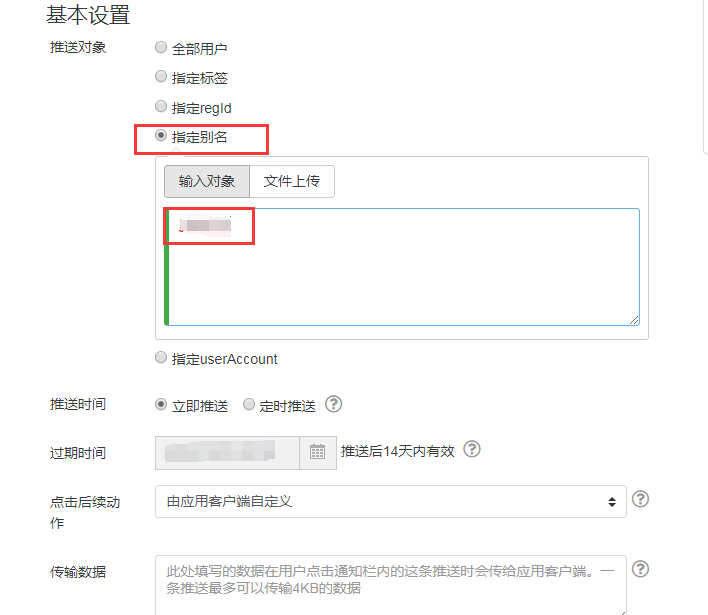
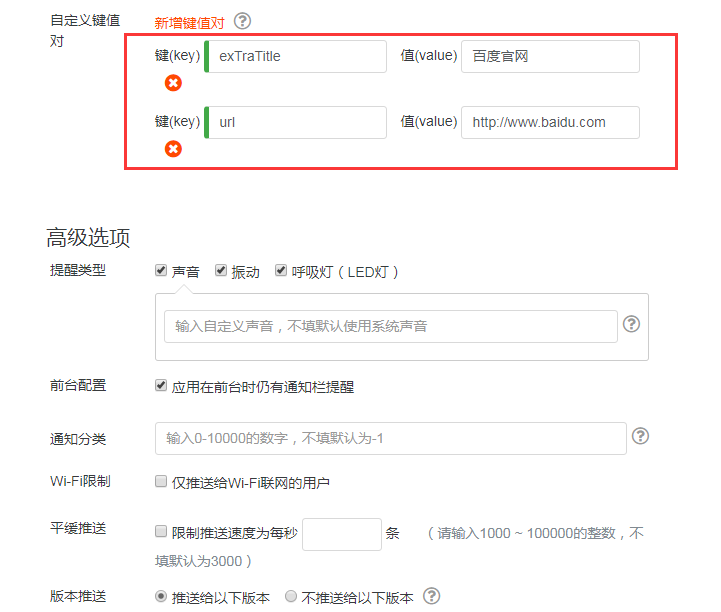

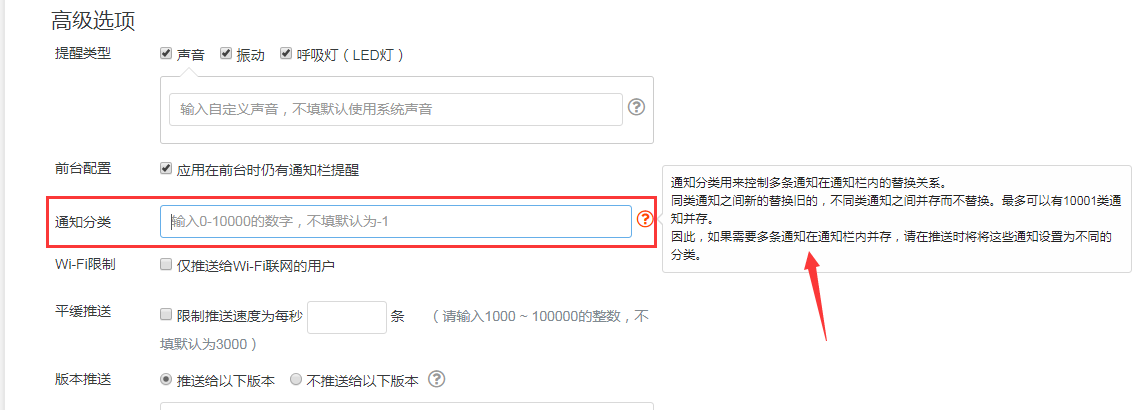
5. Realize the coexistence of multiple notifications in the notification bar
6. Implementing the effect of opening the specified page in the application
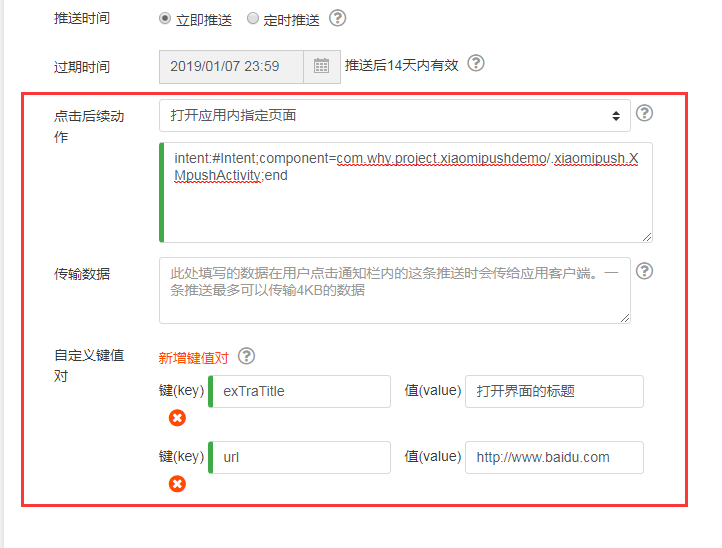
Generally, it can be customized by the application client, but it is possible to open the specified page in the application. Settings on the corresponding web page:

6.1. Add XMPushActivity [a transparent interface for data acquisition, data encapsulation, data transmission]
XMpushActivity.java package com.why.project.xiaomipushdemo.xiaomipush; import android.app.Activity; import android.content.Context; import android.content.Intent; import android.os.Bundle; import com.why.project.xiaomipushdemo.R; import com.xiaomi.mipush.sdk.MiPushMessage; import com.xiaomi.mipush.sdk.PushMessageHelper; import org.json.JSONObject; import cn.jpush.android.api.JPushInterface; /** * Created by HaiyuKing * Used Millet Push [Open App Designated Page] [Not for the time being] */ public class XMpushActivity extends Activity { private static final String TAG = XMpushActivity.class.getSimpleName(); private Context mContext; @Override protected void onCreate(Bundle savedInstanceState) { super.onCreate(savedInstanceState); setContentView(R.layout.activity_xmpush); mContext = this; //Get the value of a custom action Intent intent = getIntent(); String intentUri = intent.toUri(Intent.URI_INTENT_SCHEME); LogUtil.e(TAG,"action yes:" + intentUri); //intent:#Intent;launchFlags=0x10000000;package=com.why.project.xiaomipushdemo;component=com.why.project.xiaomipushdemo/.xiaomipush.XMpushActivity;S.messageId=sdm04994545992668152zH;i.eventMessageType=1000;end /*Get the value of a custom key-value pair*/ MiPushMessage msgContent = (MiPushMessage) intent.getSerializableExtra(PushMessageHelper.KEY_MESSAGE); //Close the current interface and jump to the specified interface try { String title = msgContent.getTitle(); String content = msgContent.getContent(); JSONObject extraJson = new JSONObject(msgContent.getExtra());//take map Turn into json object Bundle bundle = new Bundle(); bundle.putString(JPushInterface.EXTRA_NOTIFICATION_TITLE,title);//Title of notice bundle.putString(JPushInterface.EXTRA_ALERT,content);//Notification content bundle.putString(JPushInterface.EXTRA_EXTRA,extraJson.toString());//Notification Additional Field bundle.putInt(JPushInterface.EXTRA_NOTIFICATION_ID,msgContent.getNotifyId());//notice id Value Intent i = new Intent(mContext, JpushActivity.class); i.putExtras(bundle); i.setFlags(Intent.FLAG_ACTIVITY_NEW_TASK);//Must use this, this guarantees multiple notifications, click back to the previous notification interface mContext.startActivity(i); finish(); } catch (Exception e){ e.printStackTrace(); } } }

