In the previous section, we created a WebSocket application using the ws module. But it simply responds to ECHO: xxx messages, also belong to Hello, world-level applications.
To create a real WebSocket application, first of all, we need to have a MVC-based Web application, that is, the Web we created earlier with koa2 and Nunjucks. On this basis, we add WebSocket in order to be complete.
Therefore, the goal of this section is to create an online chat room based on WebSocket.
Firstly, we copy the MVC project we wrote before, and create a complete MVC Web application with the following structure:
ws-with-koa/
|
+- .vscode/
|  |
|  +- launch.json <-- VSCode configuration file
|
+- controllers/ <-- Controller
|
+- views/ <-- html template file
|
+- static/ <-- Static resource files
|
+- app.js <-- Use koa Of js
|
+- controller.js <-- Scan registration Controller
|
+- static-files.js <-- Processing static files
|
+- templating.js <-- Template Engine Entry
|
+- package.json <-- Project Description File
|
+- node_modules/ <-- npm All dependency packages installed
Then, add the dependency packages we need to package.json:
"dependencies": {
    "ws": "1.1.1",
    "koa": "2.0.0",
    "koa-bodyparser": "3.2.0",
    "koa-router": "7.0.0",
    "nunjucks": "2.4.2",
    "mime": "1.3.4",
    "mz": "2.4.0"
}
After installing with npm install, we first got a standard MVC-based koa2 application. The core of the application is an app variable representing the KOA application:
const app = new Koa();

// TODO: app.use(...);

app.listen(3000);
Now the first question is: koa responds to HTTP through 3000 ports, can we add a new WebSocket Server using 3000 ports?
The answer is yes. Although WebSocket Server can use other ports, a unified port has the greatest advantage:
In practice, both HTTP and WebSocket use standard ports 80 and 443 without exposing new ports or modifying firewall rules.
How does WebSocket Server use port 3000 after it is occupied by koa?
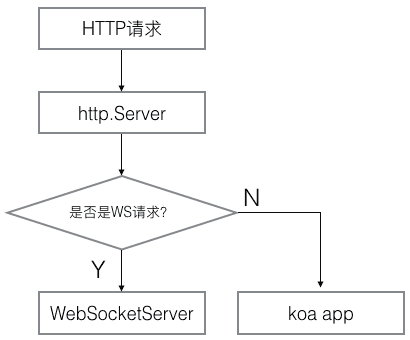
In fact, port 3000 is not monitored by Koa, but by http.Server created by Koa calling the Node standard HTTP module. Koa just registers the response function into the http.Server. Similarly, WebSocket Server can register its response function in http.Server, so that the same port, according to the protocol, can be processed by koa and ws respectively:
The key code to bind WebSocket Server to the same port is to obtain the reference of http.Server created by koa, and then create WebSocket Server according to http.Server:
// The listen() method of koa app returns http.Server:
let server = app.listen(3000);

// Create WebSocket Server:
let wss = new WebSocketServer({
    server: server
});
Always note that browsers still send standard HTTP requests when creating WebSockets. Whether it's a WebSocket request or a normal HTTP request, it's handled by http.Server. The specific processing method is implemented by callback functions injected by koa and WebSocket Server. WebSocket Server will first determine whether the request is a WS request, if so, it will process the request, if not, the request will still be processed by koa.
Therefore, the WS request will be processed directly by WebSocket Server, which will not go through koa at all, and any middleware in koa will not have the opportunity to process the request.
Now the second question is: in koa applications, it is easy to authenticate users, for example, through session s or cookie s, but how to identify users in response to WebSocket requests?
A simple and feasible solution is to write the user's logged-in identity to Cookie. In koa, you can use middleware to parse Cookie and bind the user to ctx.state.user.
WS requests are also standard HTTP requests, so the server also sends Cookies, so that when we process WS requests with WebSocket Server, we can identify users according to Cookies.
Firstly, the user identification logic is extracted into a separate function:
function parseUser(obj) {
    if (!obj) {
        return;
    }
    console.log('try parse: ' + obj);
    let s = '';
    if (typeof obj === 'string') {
        s = obj;
    } else if (obj.headers) {
        let cookies = new Cookies(obj, null);
        s = cookies.get('name');
    }
    if (s) {
        try {
            let user = JSON.parse(Buffer.from(s, 'base64').toString());
            console.log(`User: ${user.name}, ID: ${user.id}`);
            return user;
        } catch (e) {
            // ignore
        }
    }
}
Note: For demonstration purposes, the Cookie is not Hash processed. In fact, it is a JSON string.
In koa's middleware, it's easy to identify users:
app.use(async (ctx, next) => {
    ctx.state.user = parseUser(ctx.cookies.get('name') || '');
    await next();
});
In WebSocket Server, you need to respond to connection events and then identify users:
wss.on('connection', function (ws) {
    // ws.upgradeReq is a request object:
    let user = parseUser(ws.upgradeReq);
    if (!user) {
        // Cookie does not exist or is invalid. Close WebSocket directly:
        ws.close(4001, 'Invalid user');
    }
    // Identify success and bind user to the WebSocket object:
    ws.user = user;
    // Binding WebSocketServer objects:
    ws.wss = wss;
});
Next, we need to bind message, close, error and other event handlers for each WebSocket that has been created successfully. For chat applications, each message received requires that it be broadcast to all WebSocket connections.
First, add a broadcase() method for the wss object:
wss.broadcast = function (data) {
    wss.clients.forEach(function (client) {
        client.send(data);
    });
};
When a WebSocket receives a message, it can call wss.broadcast() to broadcast:
ws.on('message', function (message) {
    console.log(message);
    if (message && message.trim()) {
        let msg = createMessage('chat', this.user, message.trim());
        this.wss.broadcast(msg);
    }
});
There are many types of messages, not necessarily chat messages, but also access to user lists, user joining, user exit and other messages. So we use createMessage() to create a JSON-formatted string and send it to the browser. JavaScript on the browser side can be used directly:
// Message ID:
var messageIndex = 0;

function createMessage(type, user, data) {
    messageIndex ++;
    return JSON.stringify({
        id: messageIndex,
        type: type,
        user: user,
        data: data
    });
}
Writing pages
JavaScript code for pages is more complex than server-side code.
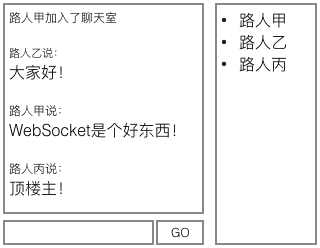
Chat room pages can be divided into two parts: the left session list and the right user list.
DOM here needs to be updated dynamically, so state management is the core of page logic.
To simplify state management, we use Vue to control the left and right lists:
var vmMessageList = new Vue({
    el: '#message-list',
    data: {
        messages: []
    }
});

var vmUserList = new Vue({
    el: '#user-list',
    data: {
        users: []
    }
});
Session lists and user lists are initialized to empty arrays.
Next, create a WebSocket connection, respond to server messages, and update the session list and user list:
var ws = new WebSocket('ws://localhost:3000/ws/chat');

ws.onmessage = function(event) {
    var data = event.data;
    console.log(data);
    var msg = JSON.parse(data);
    if (msg.type === 'list') {
        vmUserList.users = msg.data;
    } else if (msg.type === 'join') {
        addToUserList(vmUserList.users, msg.user);
        addMessage(vmMessageList.messages, msg);
    } else if (msg.type === 'left') {
        removeFromUserList(vmUserList.users, msg.user);
        addMessage(vmMessageList.messages, msg);
    } else if (msg.type === 'chat') {
        addMessage(vmMessageList.messages, msg);
    }
};
In this way, JavaScript is responsible for updating the state, and Vue is responsible for refreshing the DOM according to the state. Take the user list as an example, the HTML code is as follows:
<div id="user-list">
    <div class="media" v-for="user in users">
        <div class="media-left">
            <img class="media-object" src="/static/user.png">
        </div>
        <div class="media-body">
            <h4 class="media-heading" v-text="user.name"></h4>
        </div>
    </div>
</div>
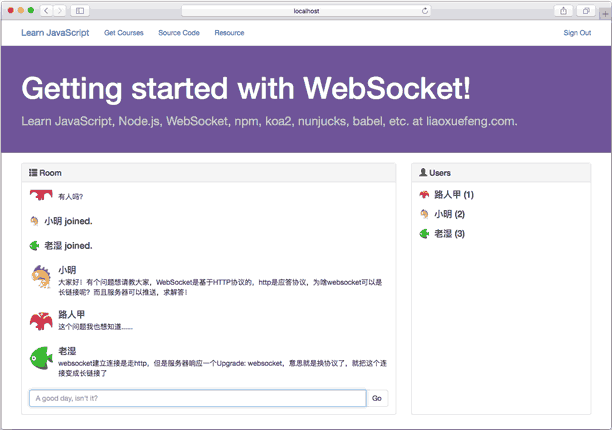
When testing, if you test locally, you need to use several different browsers at the same time, so that cookies do not interfere with each other.
The final chat room effect is as follows:
Configuration of reverse proxy
If the site is configured with reverse proxies, such as Nginx, HTTP and WebSocket must connect to the Node server through reverse proxies. HTTP reverse proxy is very simple, but to connect to WebSocket properly, the proxy server must support WebSocket protocol.
Let's take Nginx as an example and write a simple reverse proxy configuration file.
Detailed configuration can be consulted from Nginx's official blog: Using NGINX as a WebSocket Proxy
First, ensure that the Nginx version >= 1.3, and then, through the proxy_set_header instruction, set:
proxy_set_header Upgrade $http_upgrade;
proxy_set_header Connection "upgrade";
Nginx understands that the connection will use the WebSocket protocol.
An example configuration file is as follows:
server {
    listen      80;
    server_name localhost;

    # Processing static resource files:
    location ^~ /static/ {
        root /path/to/ws-with-koa;
    }

    # Processing WebSocket Connections:
    location ^~ /ws/ {
        proxy_pass         http://127.0.0.1:3000;
        proxy_http_version 1.1;
        proxy_set_header   Upgrade $http_upgrade;
        proxy_set_header   Connection "upgrade";
    }

    # All other requests:
    location / {
        proxy_pass       http://127.0.0.1:3000;
        proxy_set_header X-Real-IP $remote_addr;
        proxy_set_header Host $host;
        proxy_set_header X-Forwarded-For $proxy_add_x_forwarded_for;
    }
}