I. Current Objectives
Draw a relatively successful conclusion to this series of articles
- Admin - No Refresh Processing of Post Management
- Admin - User Management
- Admin - Small black house (equivalent to recycling bin)
- User - Simple Search Function
- User - Message Function
- User - Personal Information Settings
- User - Replace the Avatar
- extend
2. Post Management (No Refresh) - - Admin
This is actually very simple. In the final analysis, it's just the use of Fetch.
1, train of thought
- Click on the corresponding button and use fetch to send data to the back end
- The back end uses this data to perform related operations to determine what to return to the front end.
- The front end then processes the pages according to the data returned from the back end.
2, implementation
- To process the page label: replace < a > with < button >, delete href attribute, retain only type and class, and then add data-id attribute, whose value is set to the ID of topic. We will do the related operation according to the value of data-id later=>.
<button type="button" data-id="<%= topic.id %>" class="text-primary btn btn-danger text-light mr-3"> Delete </button>
- Front-end JS code and parsing
// Select all button s according to the label
let buttonArray = document.getElementsByTagName("button");
    // Traverse buttonArray to add click events to the button
    for(let i = 0; i < buttonArray.length; i++) {
        // Add Click Events
        buttonArray[i].onclick = function () {
            // Gets innerHTML of the button after processing (removing the spaces before and after the string),
            // For example: Delete, by which to determine what to do
            const buttonValue = this.innerHTML.substring(1,this.innerHTML.length-1);
            // jquery gets the data-id value of the button and uses this to determine which post is being operated on.
            let buttonDataId = $(this).attr("data-id");
            // url of fetch sending data
            const url = "/admin/manageTopics/all";
            // fetch start
            fetch(url, {
            // Data transmission mode, post is more secure
                method: 'POST',
            // Request header
                headers: {
                    'Accept': 'application/json',
                    'Content-Type': 'application/json',
                    'X-Requested-With': 'XMLHttpRequest'
                },
            // To send data, JSON.stringify() converts the data into Json format
                body: JSON.stringify({
                    buttonValue: buttonValue,
                    buttonDataId: buttonDataId
                })
            })
                    .then(function(response) {
                        // Return the data returned from the back end
                        return response.json();
                    })
                    // Processing data
                    .then(myJson => {

                        if(myJson.msg === "Delete success") {
                            // Delete the parent of the button's parent, tr
                            $(this.parentNode.parentNode).remove();

                        } else if (myJson.msg === "Set top success") {
                            // Set button.innerHTML to "Cancel top".
                            // Don't forget to add spaces before and after, or you'll make a mistake if you do it again.
                            // Because the previous interception of strings will result in different results
                            $(this).html(" Cancel top ");
                            // Replace btn-success in the button class attribute with btn-warning
                            $(this).toggleClass("btn-success btn-warning");

                        } else if (myJson.msg === "Cancel top success") {
                            // Set button.innerHTML to "Settop" and add spaces before and after the same
                            $(this).html(" Set top ");
                            // Replace btn-warning in the button class attribute with btn-success
                            $(this).toggleClass("btn-warning btn-success");

                        } else if (myJson.msg === "Set star success") {
                            // Set button.innerHTML to "Cancel star" and add spaces before and after the same
                            $ (this).html(" Cancel star ");
                            // Replace btn-success in the button class attribute with btn-warning
                            $(this).toggleClass("btn-success btn-warning");

                        } else if (myJson.msg === "Cancel star success") {
                            // Set button.innerHTML to "Setstar" and add spaces before and after the same
                            $(this).html(" Set star ");
                            // Replace btn-warning in the button class attribute with btn-success
                            $(this).toggleClass("btn-warning btn-success");
                        }
                    });
        }
    }
- Back-end code and parsing
router.post("/admin/manageTopics/all", async (ctx) => {
    // Get the data sent from the front end
    const postBody = ctx.request.body;
    // Get buttonValue, and use this to determine what kind of operation the user is doing
    const buttonValue = postBody.buttonValue;
    // Get buttonDataId, which is actually the id of topic
    const buttonDataId = postBody.buttonDataId;
    // Use switch to judge buttonValue
    switch(buttonValue) {
        // buttonValue === "Delete"
        case "Delete":
            // Operate the database and set the user full of topic with id buttonDataId to 0
            // That is to say, pseudo-delete the topic, and the topic will be displayed in a small black room in the back.
            const deleteTopicByIdPromise = editTopic.deleteTopicById(buttonDataId);
            await deleteTopicByIdPromise;
            // Return data to the front end
            ctx.body = {msg: "Delete success"};
            break;
        // buttonValue === "Set top"
        case "Set top":
            // Operate the database and set top of topic with id buttonDataId to 1, that is, top posts.
            const setTopTopicPromise = editTopic.setTopTopic(buttonDataId);
            await setTopTopicPromise;
            // Return data to the front end
            ctx.body = {msg: "Set top success"};
            break;
        // buttonValue === "Cancel top"
        case "Cancel top":
            // Operate the database, set top of top with id buttonDataId to 0, that is, cancel the top setting.
            const reduceTopTopicPromise = editTopic.reduceTopTopic(buttonDataId);
            await reduceTopTopicPromise;
            // Return data to the front end
            ctx.body = {msg: "Cancel top success"};
            break;
        // buttonValue === "Set star"
        case "Set star":
            // Operate the database, set the star of id for buttonDataId topic to 1, that is, set up the essence post.
            const setStarTopicPromise = editTopic.setStarTopic(buttonDataId);
            await setStarTopicPromise;
            // Return data to the front end
            ctx.body = {msg: "Set star success"};
            break;
        // buttonValue === "Cancel star"
        case "Cancel star":
            // Operate the database, set the star of id for buttonDataId topic to 0, that is, cancel the essences.
            const reduceStarTopicPromise = editTopic.reduceStarTopic(buttonDataId);
            await reduceStarTopicPromise;
            // Return data to the front end
            ctx.body = {msg: "Cancel star success"};
            break;
    }

});
-
Design sketch
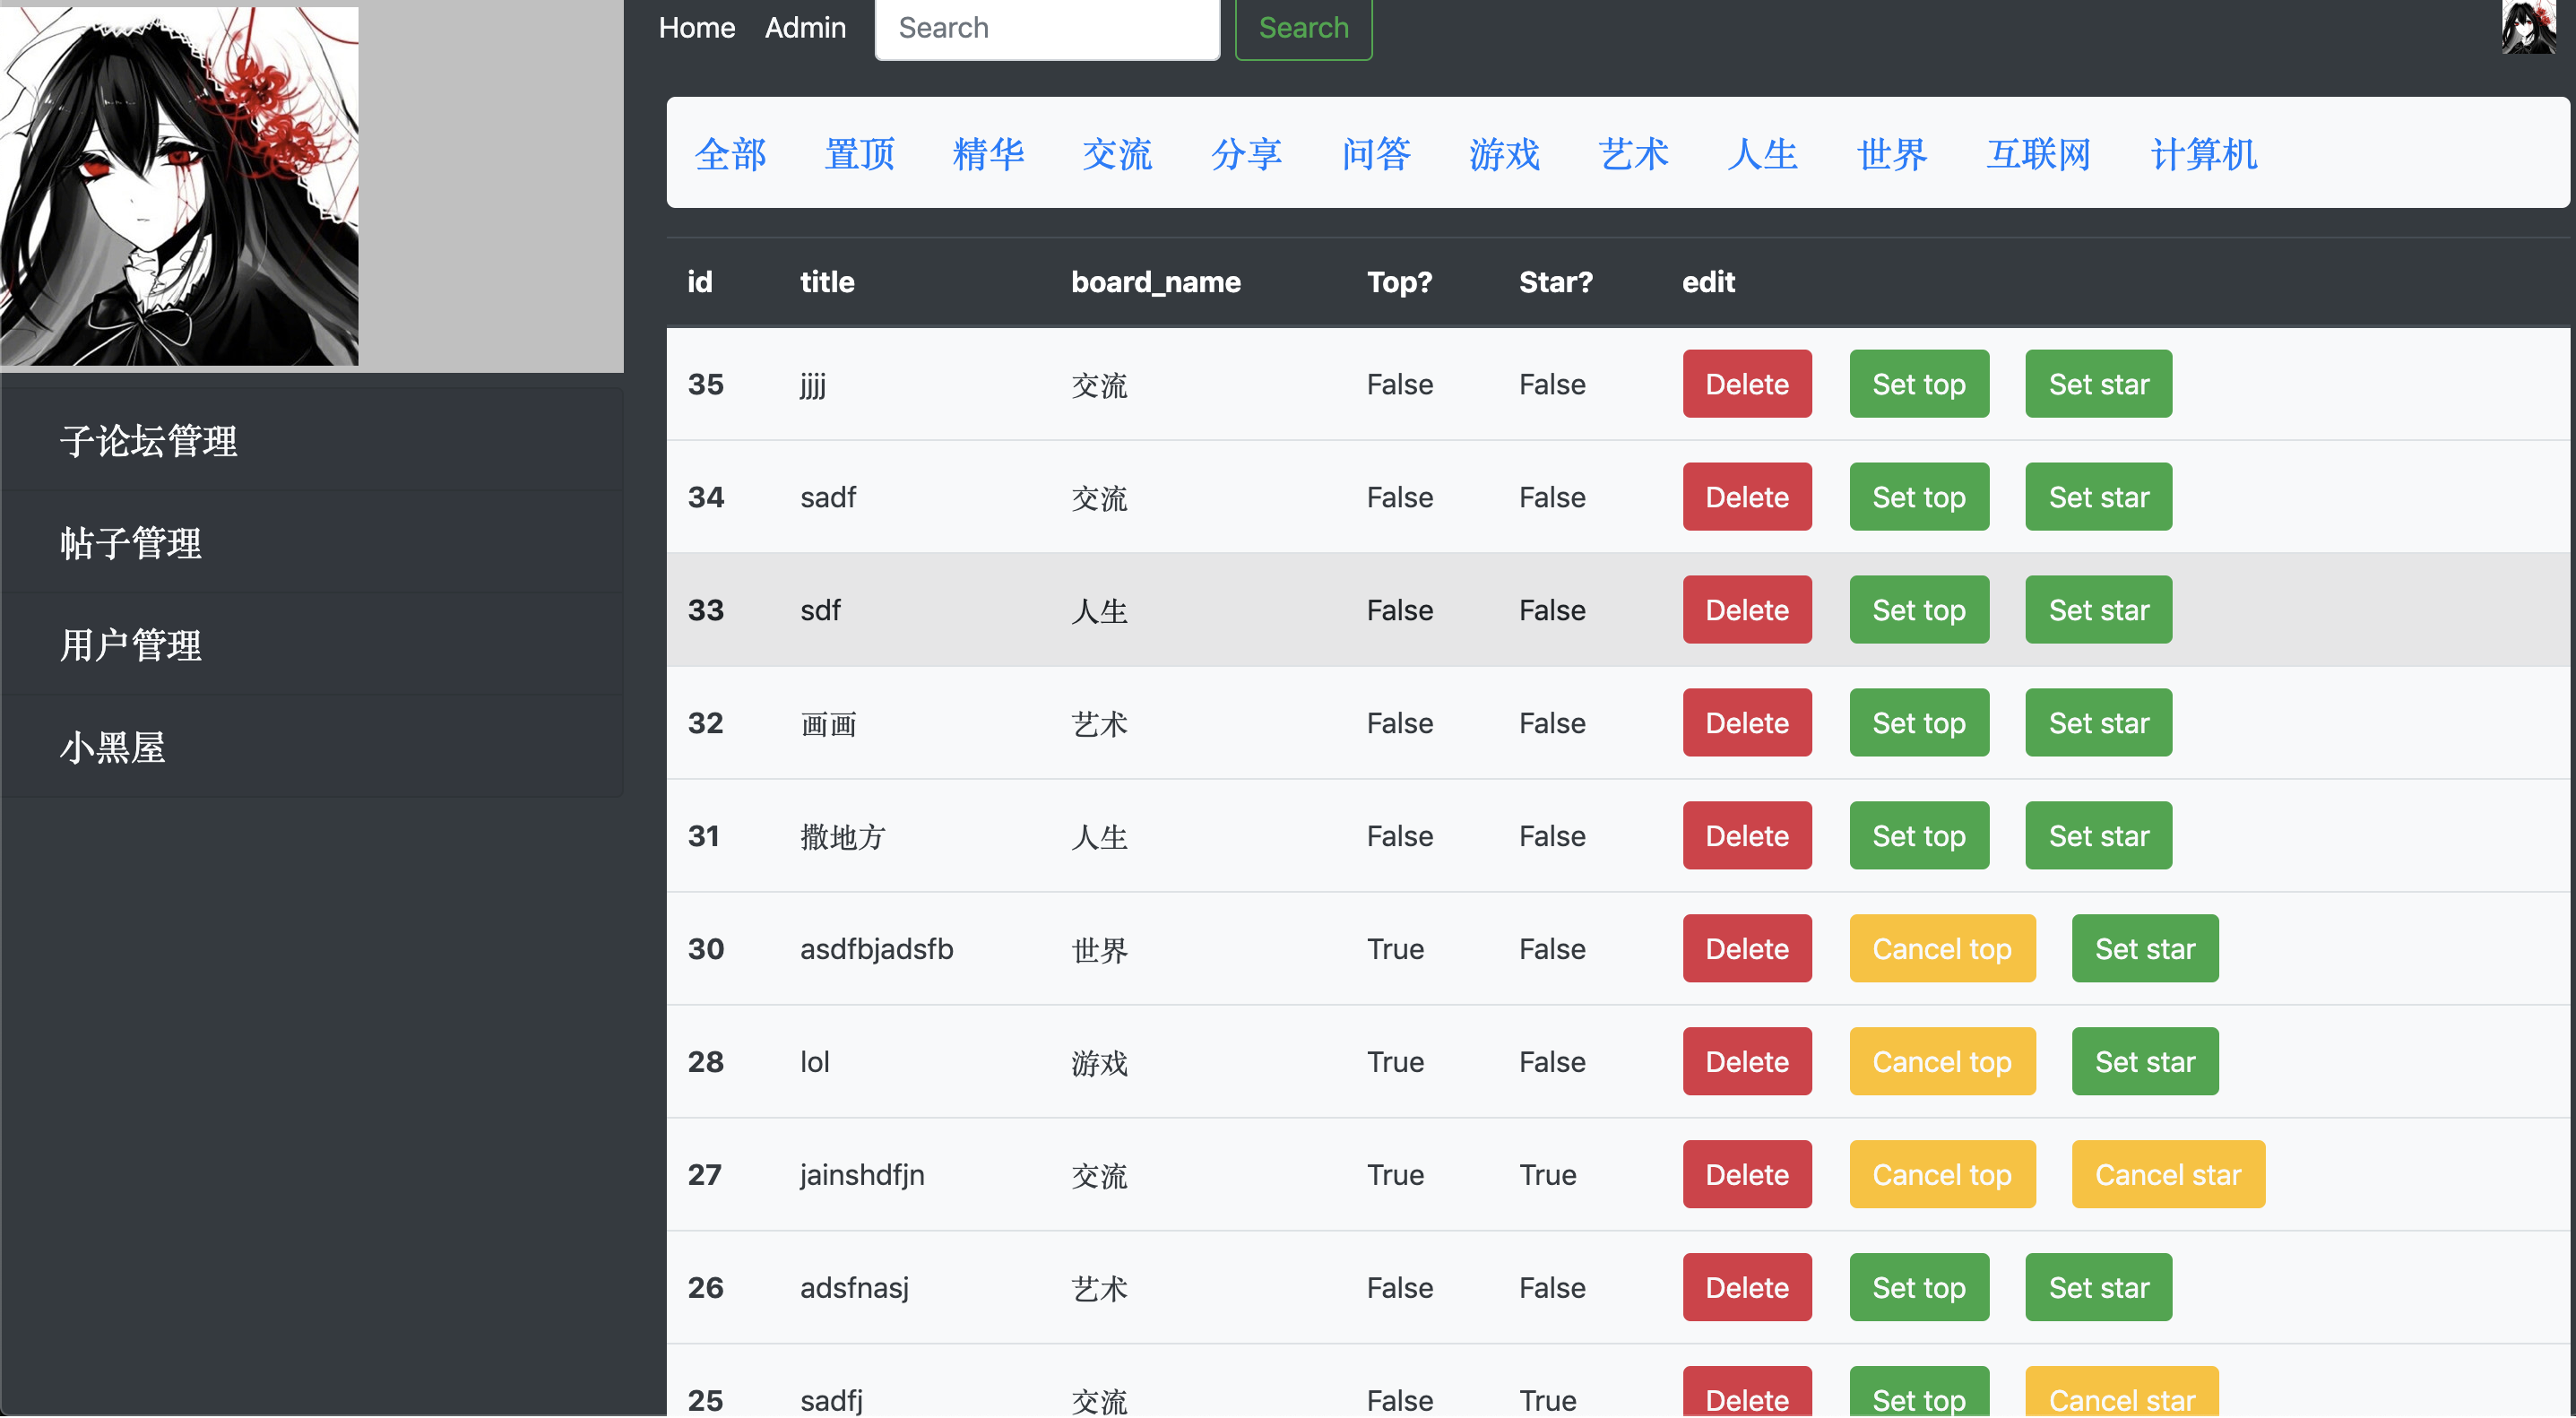 image.png
3. User Management--Admin
It's similar to the previous topic presentation, but there's no need to refresh the code and parse it directly.
- Backend implementation
// Managing users
router.get("/admin/manageUsers/all", async (ctx) => {
    // Operate the database and select all users whose useful field is 1
    const listAlluserPromise = editUser.listAlluser();
    const allUser = await listAlluserPromise;
    // Render Page
    await ctx.render("/admin/users", {
        allUser: allUser,
        layout: 'layouts/layout_admin',
    });
});
- Front end display
<% allUser.forEach(user => { %>
    <tr>
        <th scope="row"> <%= user.id %> </th>
        <td> <%= user.username %> </td>
        <td> <%= user.email %> </td>
        <td>
            <a class="text-light btn btn-danger mr-3" href="/admin/manageUsers/delete/<%= user.id %>">
                Delete
            </a>
        </td>
    </tr>
<% }) %>
-
Design sketch
 image.png
IV. Little Black House
1. Why should we have a small black house?
Think about it: Delete a sub-forum, and what do you do with the post under that sub-forum?
- In a standard forum system, it is not advisable to delete sub-forums, users and posts directly, because there are many intersections between data.
- So there's the notion of pseudo-deletion -- that is, instead of really deleting data from the data, it's set to an "unavailable" state.
- My approach: add a useful field in the sub-forum, post and user's information, default to 1, delete it is to set useful to 0, then add a restriction when reading data, that is: use = 1.
- Display sub-forums, posts, users only show usuful = 1 data
- The data for use = 0 is put in the "Recycle Bin" and "Little Black House" in the title.
2, back end
// Small Black House - Managing Pseudo Deleted Contents
router.get("/admin/blackHouse", async (ctx) => {
    const listDelBoardPromise = editBoard.listDelBoard();
    const listDelBoard = await listDelBoardPromise;

    const listDelUserPromise = editUser.listDelUser();
    const listDelUser = await listDelUserPromise;

    const listDelTopicPromise = editTopic.listDelTopic();
    const listDelTopic = await listDelTopicPromise;

    await ctx.render("/admin/black_house", {
        layout: 'layouts/layout_admin',
        listDelUser: listDelUser,
        listDelBoard: listDelBoard,
        listDelTopic: listDelTopic
    });
});
2. Front-end data processing
- Sub Forum
<% listDelBoard.forEach(board => { %>
    <tr>
        <th scope="row"> <%= board.id %> </th>
        <td> <%= board.board_name %> </td>
        <td>
            <a class="btn btn-info" href="/admin/blackHouse/out/board/<%= board.id %>"> Let out </a>
        </td>
    </tr>
<% }) %>
- user
<% listDelUser.forEach( user => { %>
    <tr>
        <th scope="row"> <%= user.id %> </th>
        <td> <%= user.username %> </td>
        <td> <%= user.email %> </td>
        <td>
            <a class="btn btn-info" href="/admin/blackHouse/out/user/<%= user.id %>"> Let out </a>
        </td>
    </tr>
<% }) %>
- Post
<% listDelTopic.forEach( topic => { %>
    <tr>
        <th scope="row"> <%= topic.id %> </th>
        <td> <%= topic.title %> </td>
        <td> <%= topic.board_name %> </td>
        <td>
            <% if(topic.top === 1) {%>
                True
            <%} else {%>
                False
            <% } %>
        </td>
        <td>
            <% if(topic.star === 1) {%>
                True
            <%} else {%>
                False
            <% } %>
        </td>
        <td>
            <a class="btn btn-info mr-2" href="/admin/blackHouse/out/topic/<%= topic.id %>"> Let out </a>
            <a class="btn btn-danger" href="/admin/blackHouse/delete/topic/<%= topic.id %>"> Delete thoroughly </a>
        </td>
    </tr>
<% }) %>
3. Effect demonstration

4. Reduction treatment
As a recycling bin, the small black house must have the function of restoring.
Before, we reserved a button (Let out) behind each message to restore data, so we'll now complete the functions of these buttons.
- Sub Forum
// Small Black House - Restoration Forum
router.get("/admin/blackHouse/out/board/:id", async (ctx) => {
    const id = ctx.params.id;
    const outBoardPromise = editBoard.outBoard(id);
    await outBoardPromise;
    await ctx.redirect("/admin/manageBoards");
});
- user
// Small Black House - Restore Users
router.get("/admin/blackHouse/out/user/:id", async (ctx) => {
    const id = ctx.params.id;
    const outUserPromise = editUser.outUser(id);
    await outUserPromise;
    await ctx.redirect("/admin/manageUsers/all");
});
- Post
There are two of them, one is recovery, the other is deletion.
//  Blackhouse - Remove Posts altogether
router.get("/admin/blackHouse/delete/topic/:id", async (ctx) => {
    const id = ctx.params.id;
    const deleteCompeteTopicPromise = editTopic.deleteCompeteTopic(id);
    await deleteCompeteTopicPromise;
    ctx.redirect("/admin/blackHouse");
});
//  Little Black House - Resume Posts
router.get("/admin/blackHouse/out/topic/:id", async (ctx) => {
    const id = ctx.params.id;
    const outTopicPromise = editTopic.outTopic(id);
    await outTopicPromise;
    ctx.redirect("/admin/manageTopics/all");
});
V. User Basic Information Settings
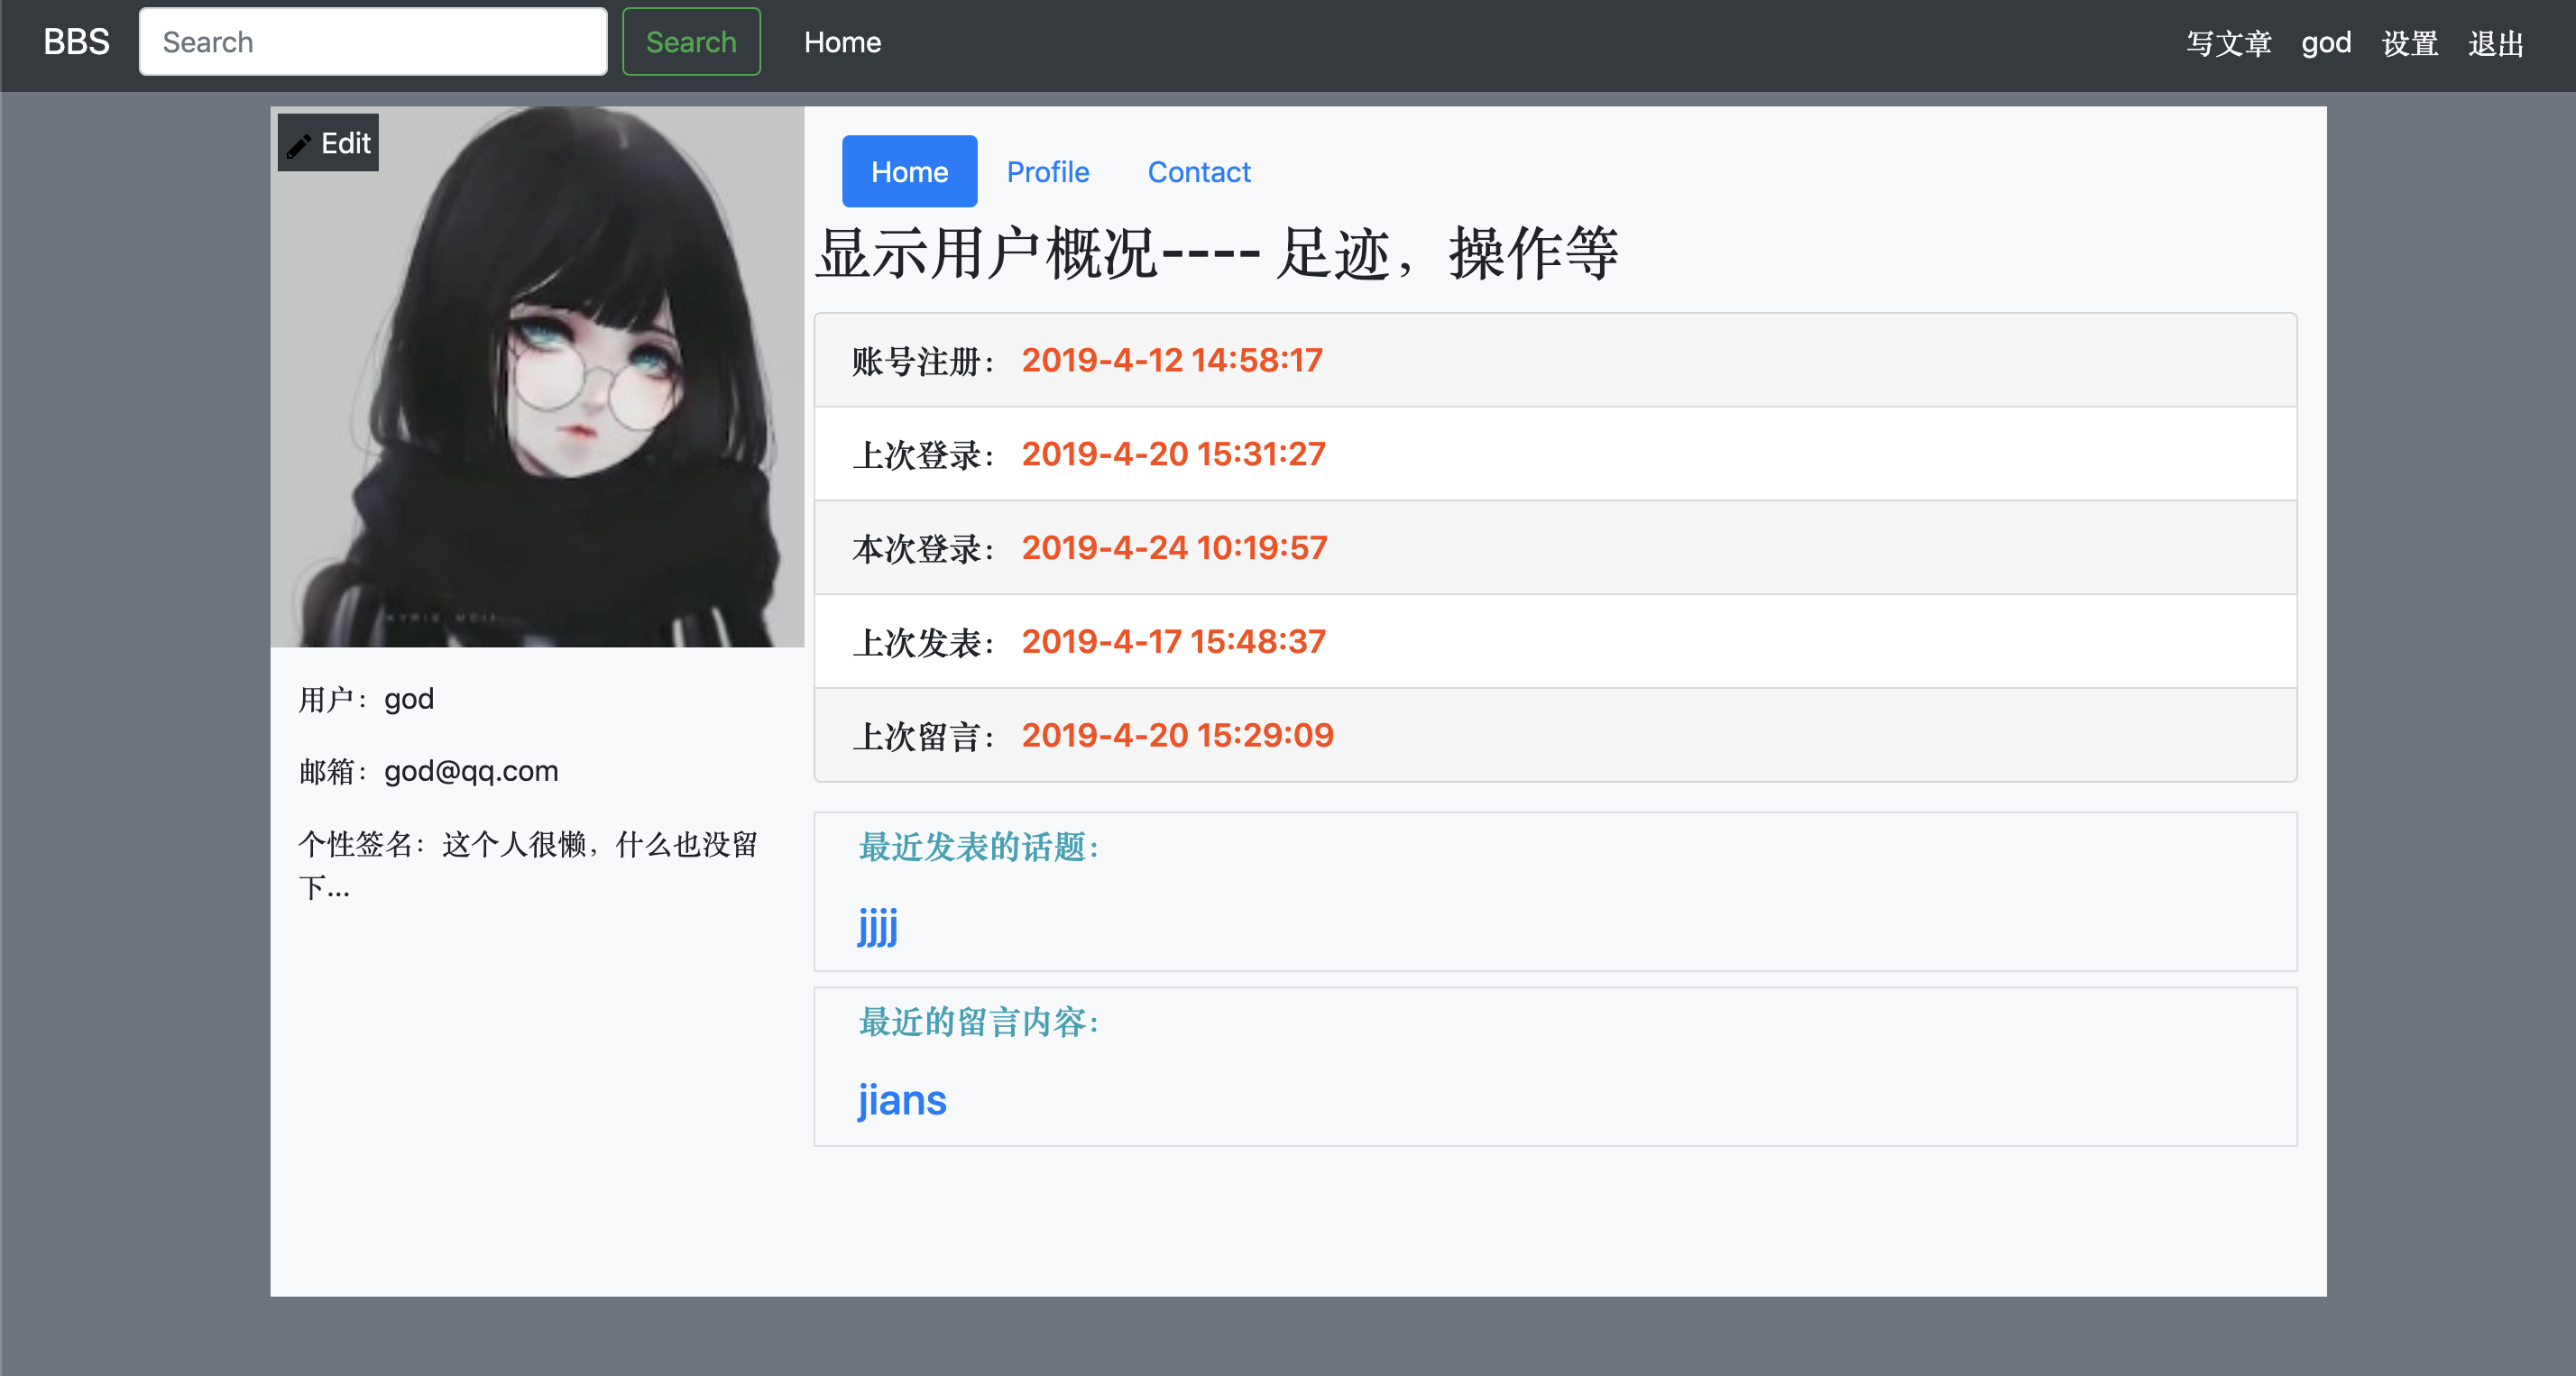
1. Overview of User Centers
2, left
- I added an edit button in the upper left corner of the avatar. Clicking on the button will jump to the avatar settings page.
- The rest is nothing special.
3,Home
As shown above, some common data of users, such as registration time, are displayed.
- My way of dealing with it is =>:
Add some fields to the user table to store the data (e.g. registration_time). Of course, this method is not good, and it will certainly be better.
// Get the current time
const date = new Date();
const registerTime = date.toLocaleString();
User registration time - - - register_time = >
When the user registers successfully, the current time is obtained by using the Date object provided by the system and stored in the database.Last login time - -- last_login_time=>
1. When the user registers, the system logs in by default. At this time, there is no last login time and the default value is displayed. Therefore, a default value can be set when this field is added.
2. Ordinary login: When the login is successful, the user's "last login time" is the "current login time" of the last login.login_time
1. System default login when user registers: the login time at this time is the registration time.
2. Ordinary login: The login time is the time when the login is successful.Last posting time--last_post_time
1. Users have not published posts: Display default values and set a default value when adding fields, such as "You have not published any posts yet".
2. Published posts: Get the time when the post was successful and store it in the databaseLast Message Time--last_msg_time
1. User has not left a message: Display the default value, set a default value when adding a field, such as "You haven't left a message yet".
2. Existing Messages: Get the time when the message succeeds and store it in the databaseLast post
1. Users have not published posts: Display default values and set a default value when adding fields, such as "You have not published any posts yet".
2. Published posts: Get the title of the post when it is successful and store it in the databaselast_msg
1. User has not left a message: Display the default value, set a default value when adding a field, such as "You haven't left a message yet".
2. Existing Messages: Get the content when the message is successful (part of the content can be displayed when it is too long) and store it in the database.
I will not post the specific code here, if you are interested, you can see the source code.
4,Profile
-
overview
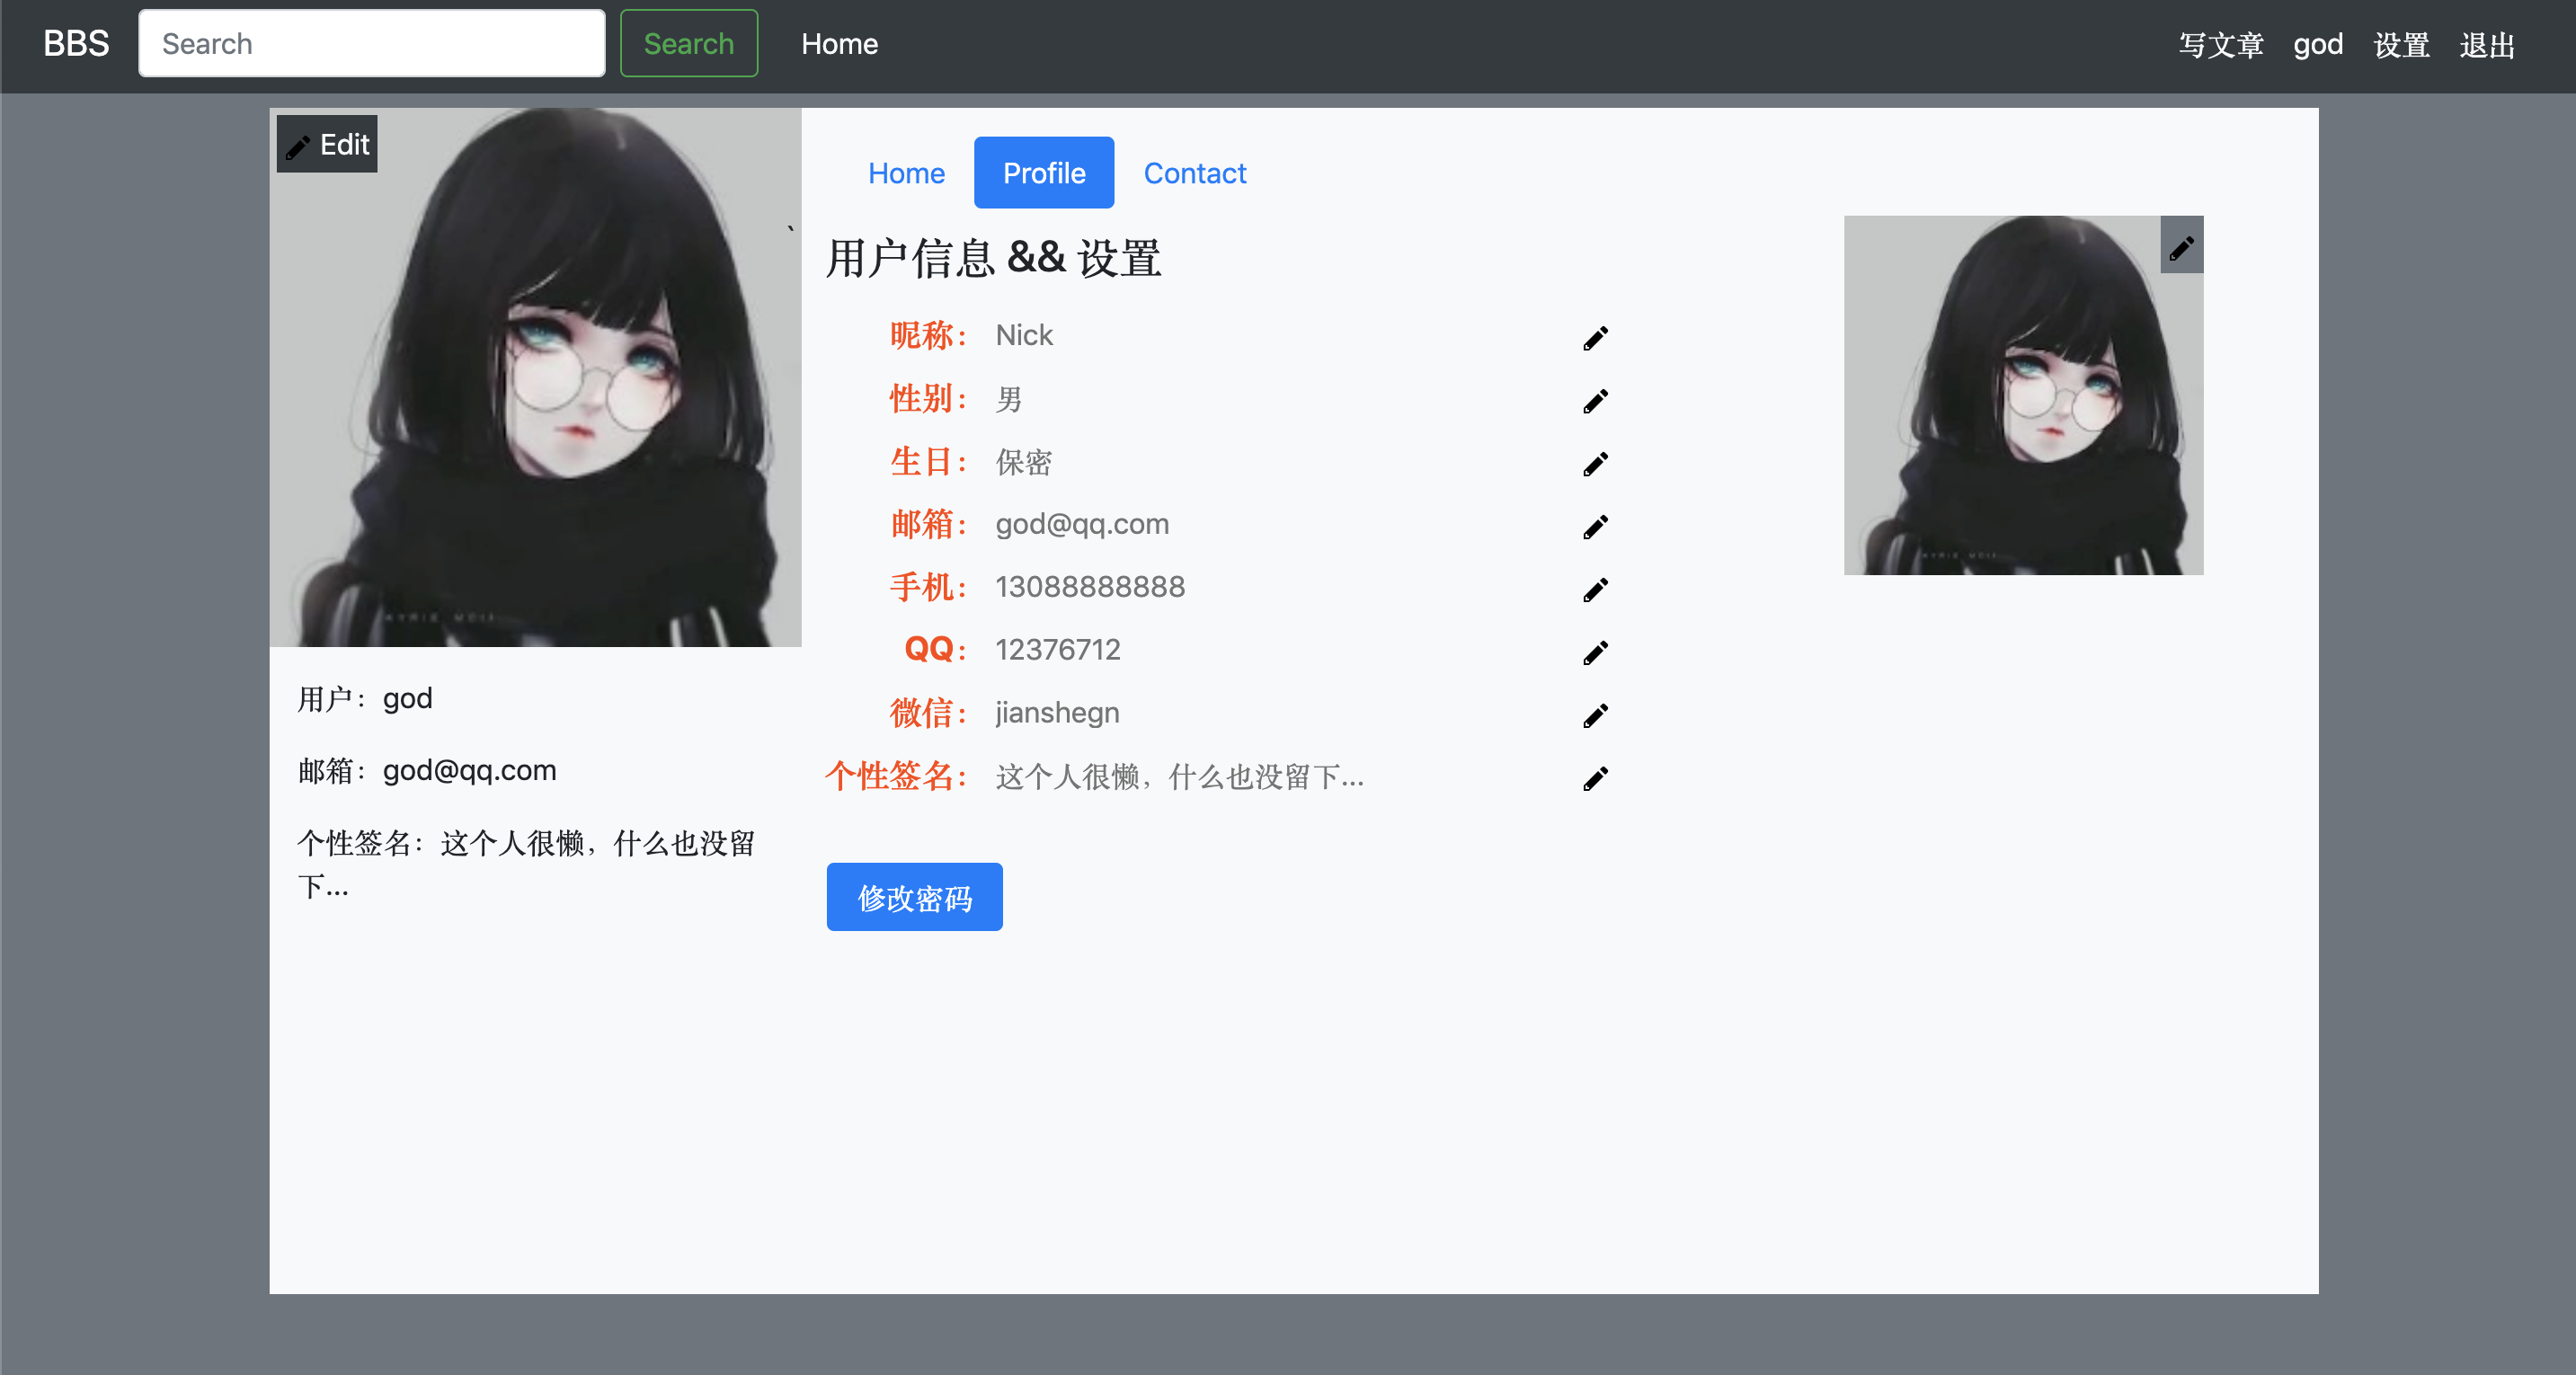 image.png
 - Idea = >
As we all know, there are many websites that support individual modification of a personal information. I think this is a good way, so I'm going in this direction.
Implementing ideas=>
1. Each piece of information is given an input tag to display the user's information in the placeholder.
2. Set disable for input to make it non-editable
3. Add a (viii) to each message. After the user clicks, delete the disabled attribute of input, make it editable, hide the (viii) and display the confirmation button.
4. After the user enters the content and clicks the confirmation button, fetch is used to transfer the data to the back segment, the back end processes the data, and then returns the data.
5. When the front end receives the data returned from the back end, it hides the confirmation button, displays the (viii), adds the disabled attribute to the input, and pays the value of the input to its placeholder.
PS: Previous nickname: There's nothing to say about anything like that. Use the span tag to wrap the package.Code and parsing
// Getting the element PS: This should not be as specific as it needs to be.
let editPen = document.getElementsByTagName("svg");
let inputArray = document.getElementsByTagName("input");
let btnArray = document.getElementsByTagName("button");
let spanArray = document.getElementsByTagName("span");
let sureBtn = document.getElementsByClassName("sure");
for(let i = 1; i < editPen.length; i++) {
      editPen[i].onclick = function() {
      // Concealment
      editPen[i].style.display = "none";
      // Delete disabled attribute of input
      inputArray[i].removeAttribute("disabled");
      // Modify border, but don't
      inputArray[i].style.border = "1px solid black";
      inputArray[i].style.padding = "2px";
      // Make the confirmation button on the same line as input
      sureBtn[i - 1].style.display = "inline-block";
      }
      btnArray[i+1].onclick = function() {
          const url = '/userHome';
          const inputValue = inputArray[i].value;
          // Cut out the text of the span tag, remove the blanks before and after it and the ":" after it.
          const spanValue = spanArray[i+8].innerHTML.substring(1, spanArray[i+8].innerHTML.length-1);
              fetch(url, {
                  method: 'POST',
                  headers: {
                      'Accept': 'application/json',
                      'Content-Type': 'application/json',
                      'X-Requested-With': 'XMLHttpRequest'
                  },
                  body: JSON.stringify({
                      spanValue: spanValue,
                      inputValue: inputValue,
                  })
              })
              .then(function(response) {
                  return response.json();
              })
              .then(function(myJson) {
                  // Set the place holder of input to myJson.inputValue, where myJson.inputValue === inputValue
                  inputArray[i].placeholder = myJson.inputValue;
                  inputArray[i].setAttribute("disabled", "disabled");
                  sureBtn[i-1].style.display = "none";
                  inputArray[i].style.border= "none";
                  editPen[i].style.display = "inline-block";
              });
    }
}
5. Password Change
Here I'm using the modal box approach.

1, logic
- The user's original password is equal to the new password => prompts the user that the password modification failed
- The user's original password is the same as the new password, but the new password 1 and 2 are not the same, prompting the user that the modification failed.
- The user's original password is equal to the new password, the new password 1 and 2 are equal, and the modification is successful.
2. Code Analysis
router.post("/settings/advanced", async (ctx) => {
    // Get new and old passwords entered by users
    const oldPassword = ctx.request.body.oldPassword;
    const newPassword1 = ctx.request.body.newPassword1;
    const newPassword2 = ctx.request.body.newPassword2;
    // Get the user id
    const id = ctx.session.user.id;
    // Getting User Information
    const getUserPromise = editUser.getUserById(id);
    const user = await getUserPromise;
    //Get the user's initial password
    const userPassword = user[0].password;
    const data = [newPassword2, id]
    if(oldPassword !== userPassword) {
        console.log('The old password you entered is incorrect. Please re-enter it.');
        ctx.redirect("/settings/advanced");
    } else {
        if(newPassword1 !== newPassword2) {
            console.log('The new password you entered two times is inconsistent. Please re-enter it.')
            ctx.redirect("/settings/advanced");
        } else {
            // Reset password
            const resetPasswordPromise = editUser.resetPassword(data);
            await resetPasswordPromise;
            console.log('Congratulations, the password was changed successfully, please remember your new password!');
            ctx.redirect("/userHome");
        }
    }
});
6,Contact
- I haven't written this yet. If you are interested, you can add it yourself.
VI. Replacing Head Portraits
In fact, this can also be written in the user information settings, but because this is more difficult, so write alone.
-
Portrait Setting Entrance
1. User Center => Left => Top-left corner of the Avatar
2. User Center => Profile => Upper Right Corner of the Head
-
Head clipping and uploading image path to back end
// Execution after page loading is completed
    // The clipping of images requires an external file, which is already written by someone else=>/public/js/cropbox.js.
    $(window).load(function() {
        var options =
            {
                thumbBox: '.thumbBox',
                spinner: '.spinner',
                // Set the default image
                imgSrc: '/public/images/wenyiXJJ_1.png'
            }
        var cropper = $('.imageBox').cropbox(options);
        $('#image').on('change', function(){
            var reader = new FileReader();
            reader.onload = function(e) {
                options.imgSrc = e.target.result;
                cropper = $('.imageBox').cropbox(options);
            }
            reader.readAsDataURL(this.files[0]);
        })
        // Zooms in
        $('#btnZoomIn').on('click', function(){
            cropper.zoomIn();
        })
        // Enlarge the picture.
        $('#btnZoomOut').on('click', function(){
            cropper.zoomOut();
        })
        $('#btnCrop').on('click', function(){
            // Get the address of img
            var img = cropper.getDataURL();
            $('.cropped').html('');
            $('.cropped').append('<img id="img1" src="'+img+'" align="absmiddle" style="width:64px;margin-top:4px;border-radius:64px;box-shadow:0px 0px 12px #7E7E7E;" ><p>64px*64px</p>');
            $('.cropped').append('<img id="img2" src="'+img+'" align="absmiddle" style="width:128px;margin-top:4px;border-radius:128px;box-shadow:0px 0px 12px #7E7E7E;"><p>128px*128px</p>');
            $('.cropped').append('<img id="img3" src="'+img+'" align="absmiddle" style="width:180px;margin-top:4px;border-radius:180px;box-shadow:0px 0px 12px #7E7E7E;"><p>180px*180px</p>');
            var img1Src = document.getElementById('img3').src;
            // Get input, implicitly upload data to the back end
            var upload_base = document.getElementById('upload_base');
            // Assign the src of img to type as hidden input to upload it to the back end
            upload_base.value = img1Src;
        });
    });
-
Back-end processing
router.post("/settings/profile/changeImage", upload.single('image'), async (ctx) => {
    // Get the base64 data uploaded from the front end
    const value = ctx.req.body.upload_base;
    // Use regular expressions to intercept useful information
    const base64Data = value.replace(/^data:image\/\w+;base64,/, "");
    // Using Buffer.from() function to process data
    const dataBuffer = Buffer.from(base64Data, 'base64');
    // Get the user's id
    const userId = ctx.session.user.id;
    // Define the storage path and name of the user's new avatar
    const newUserPicturePath = `public/uploads/${userId}.png`;
    // Write files, save header files
    fs.writeFile (newUserPicturePath, dataBuffer, function(err) {
        if (err) {
            console.log(err);
        }else{
            console.log("Save successfully!");
            if(ctx.req.file) {
                // Delete the base64 Avatar file. Without this part, every time you change the avatar, there will be one more image file you choose.
                const filename = ctx.req.file.filename;
                const savedFilePath = `public/uploads/${filename}`;
                fs.unlinkSync(savedFilePath);
            }
        }
    });
    // Get the user id
    const id = ctx.session.user.id;
    const data=[newUserPicturePath, id];
    // Update the user's avatar address
    const resetPicturePromise = editUser.resetPicture(data);
    await resetPicturePromise; //The new avatar path is saved, but the session needs to be updated to make the avatar take effect immediately.
    // Getting User Information
    const getUserInformationPromise = editUser.getUserById(id);
    const userArray = await getUserInformationPromise;
    const user = userArray[0];
    // Update session
    ctx.session.user = user;

    // After the user updates the avatar, we want to put the topic_image_path of all topics published by the user in the database.
    // Change the path to the user's current avatar, that is - > New User Picture Path
    // According to the post_man field of each topic in the data table topic, we can get the user who publishes the topic because the user name is unique.
    // In fact, the user name here is the current user's username attribute, because session, update, so we also use the new.
    // That is ctx.session.user.username. In fact, it=== user.username
    const userName = ctx.session.user.username;
    const data2 = [newUserPicturePath, userName]
    const updateTopicImagePathByPostManPromise = editTopic.updateTopicPic(data2);
    await updateTopicImagePathByPostManPromise;
    // Ibid., if the user changes his avatar, the picture before the user leaves a message should also be changed.
    const data3 = [newUserPicturePath, userName];
    const updateMessagePicPromise = editMessage.updateMessagePic(data3);
    await updateMessagePicPromise;
    ctx.redirect('/userHome');
});
User - Message Function
A forum, of course, has to have comment function
fetch is also used here
-
thinking
1. The user clicks the button
2. Getting the text input by the user in the text field
3. Get the value ID of data-id of button, use ID as the basis of judging posts, and ID as the ID of posts.
4. Use fetch to upload text and id to the back end
5. The back end processes these data accordingly: Store the message content in the database and specify which post it belongs to.
6. The back end returns the data to the front end, and the front end processes it accordingly: displaying the message to the page, adding style to the new message, and deleting the special style of the previous message.
-
Implementation Code and Parsing
// Get the number of messages, that is, the number of li in ul with id="messages"
    const length = document.getElementById("messages").getElementsByTagName("li").length;
    $("#btn").click(function(event){
        // Gets the id, which is === the ID of topic
        let id = $("#btn").attr("data-id");
        // Get the message content entered by the user
        let userMessage = $("#userMessage").val();
        const url = '/showTopics/all/' + id;
        fetch(url, {
            method: 'POST',
            headers: {
                'Accept': 'application/json',
                'Content-Type': 'application/json',
                'X-Requested-With': 'XMLHttpRequest'
            },
            body: JSON.stringify({
                id: id,
                message: userMessage,
            })
        })
        .then(function(response) {
            return response.json();
        })
        .then(function(myJson) {
            // If there is a message
            if(length !== 0) {
                // Set the background color to empty
                document.getElementsByTagName("li")[6].style.background = "";
                // Remove font style
                document.getElementsByTagName("li")[6].classList.remove("text-danger", "font-weight-bold");
            }
            // New definition of a label li to store new messages
            const newMessageLi = `
                <li class="list-group-item text-danger font-weight-bold" style="background:greenyellow">
                    <a class="user_avatar pull-left" href="/userHome" style="width:28px;height:28px">
                        <img src="../../${myJson[3]}" title="${myJson[2]}" style="width:28px;height:28px">
                    </a>
                    ${myJson[1]}
                </li>
            `;
            // Add a message to the page
            $("#messages").prepend(newMessageLi);
        });

        // Make the number of messages +
        document.getElementById("num_msg").innerHTML ++;
        // Empty the text field
        document.getElementById("userMessage").value = '';
    });
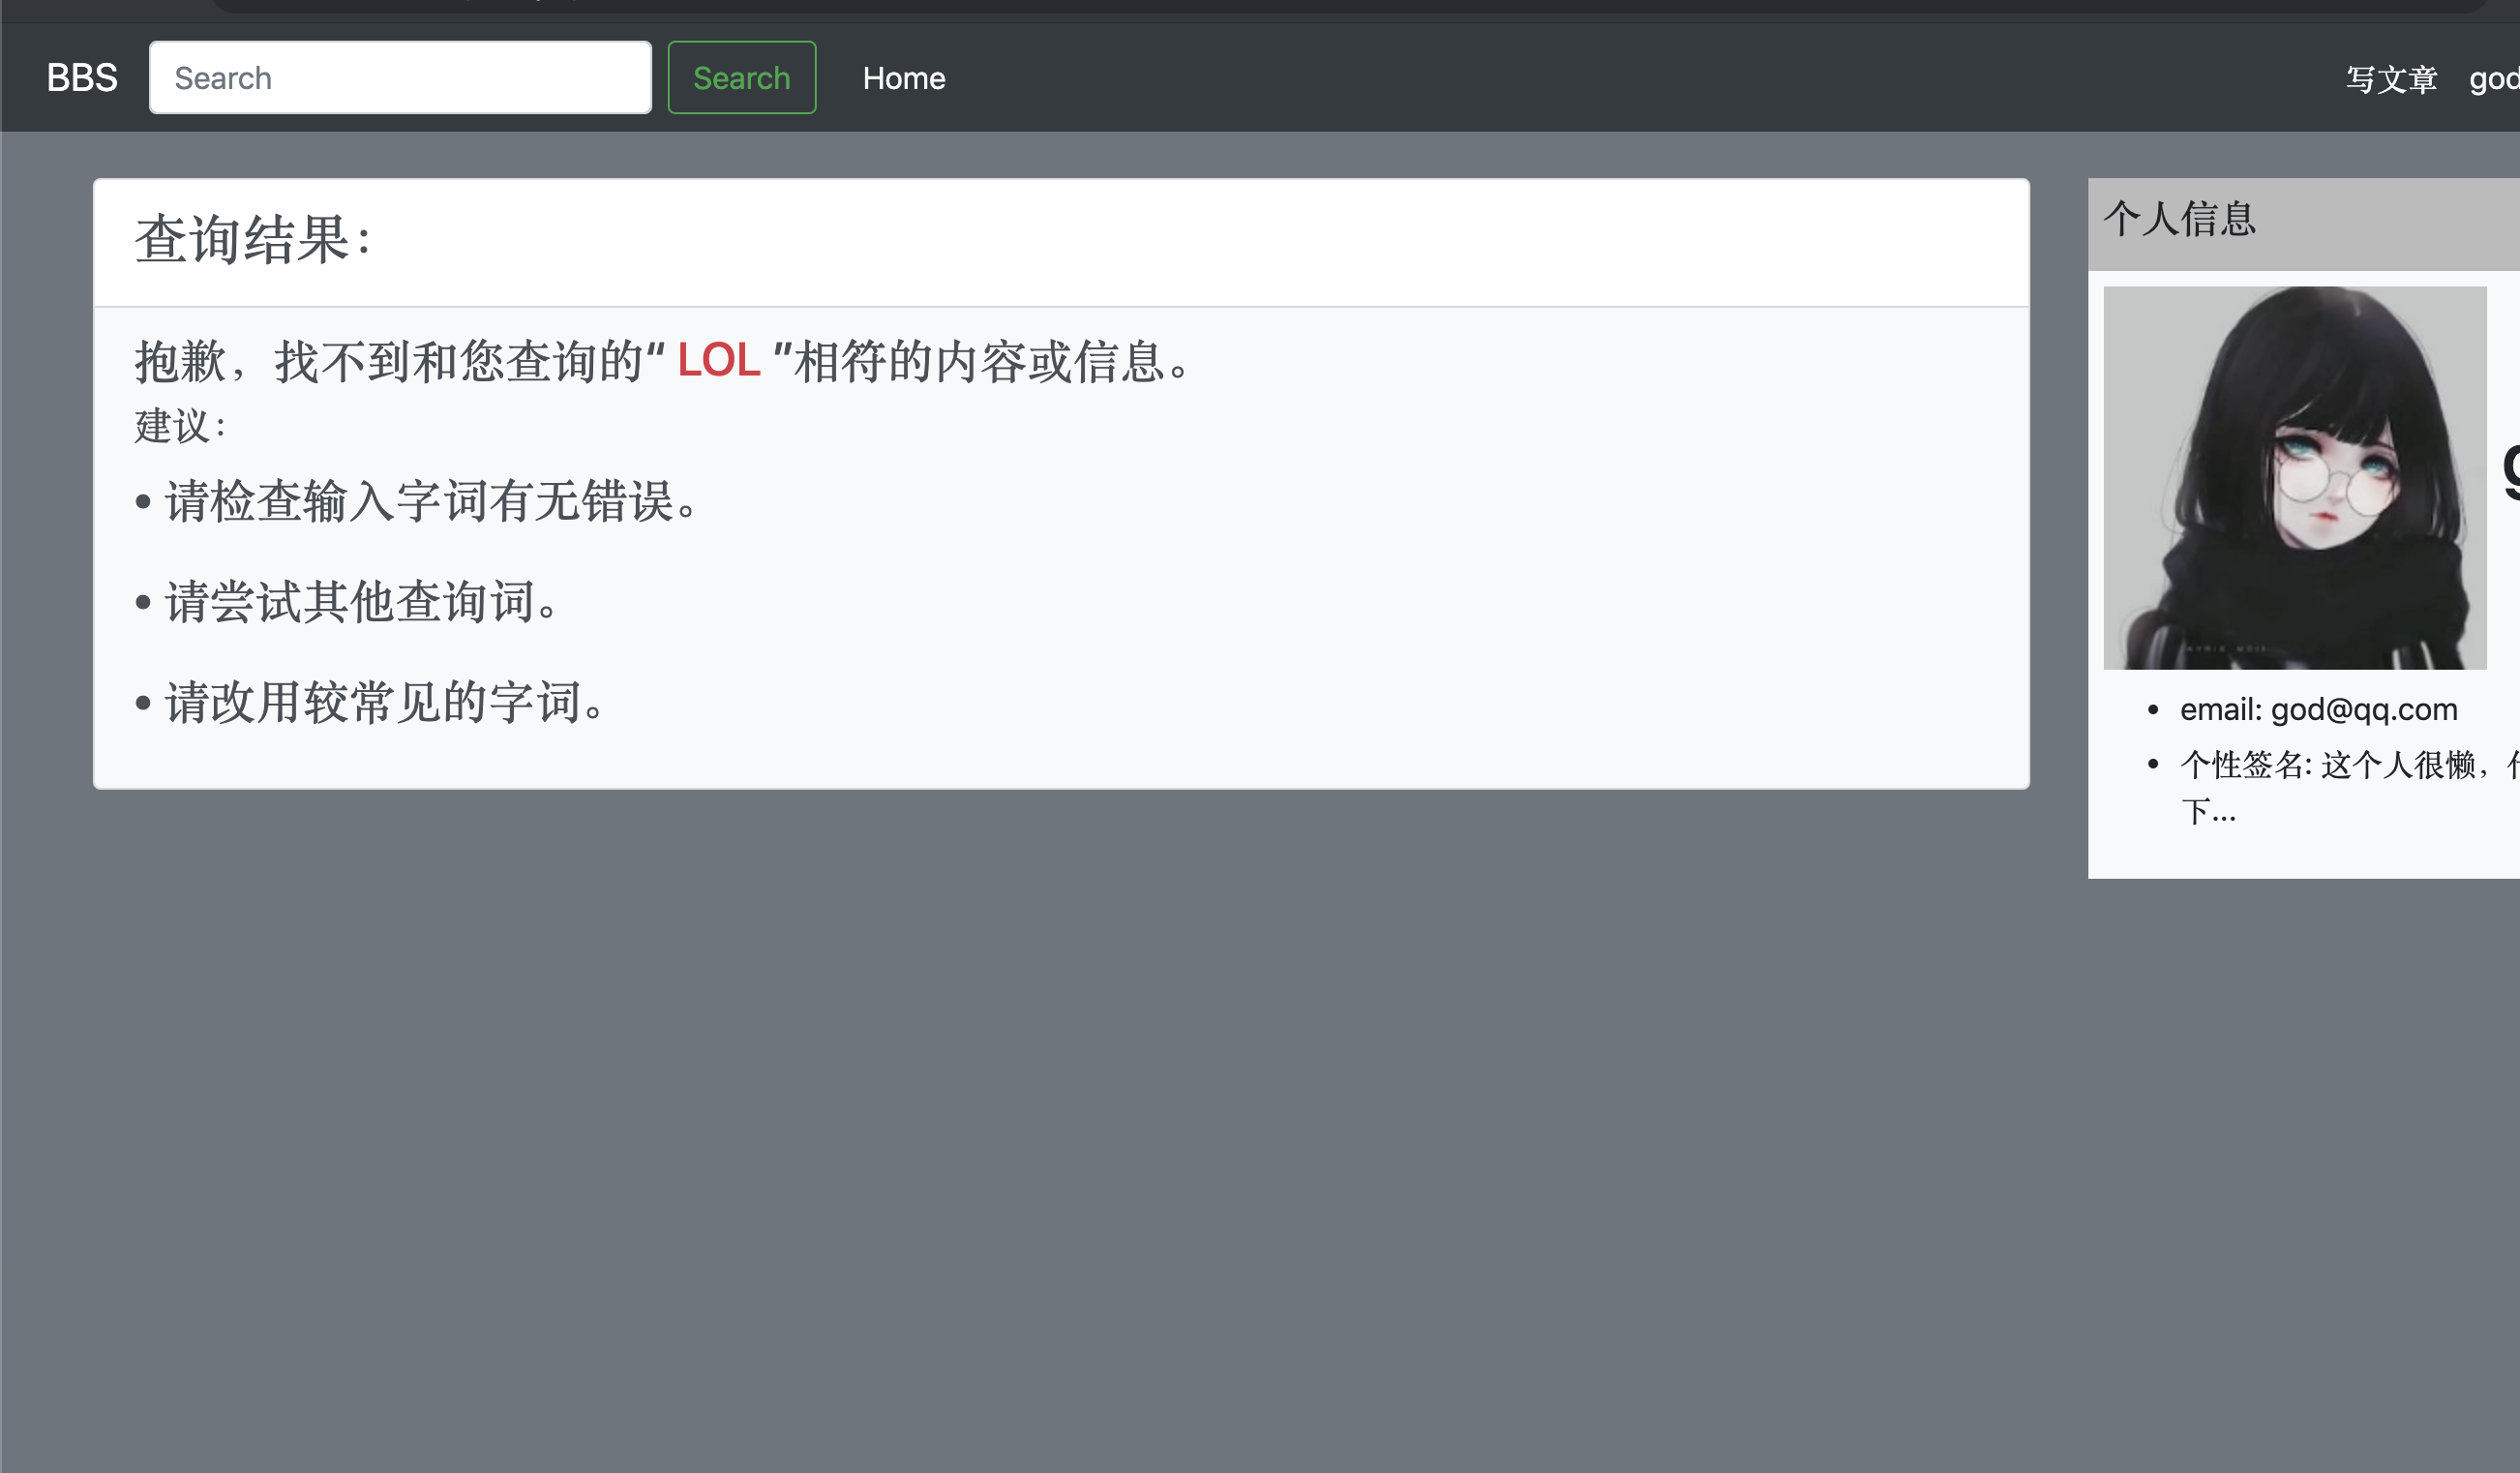
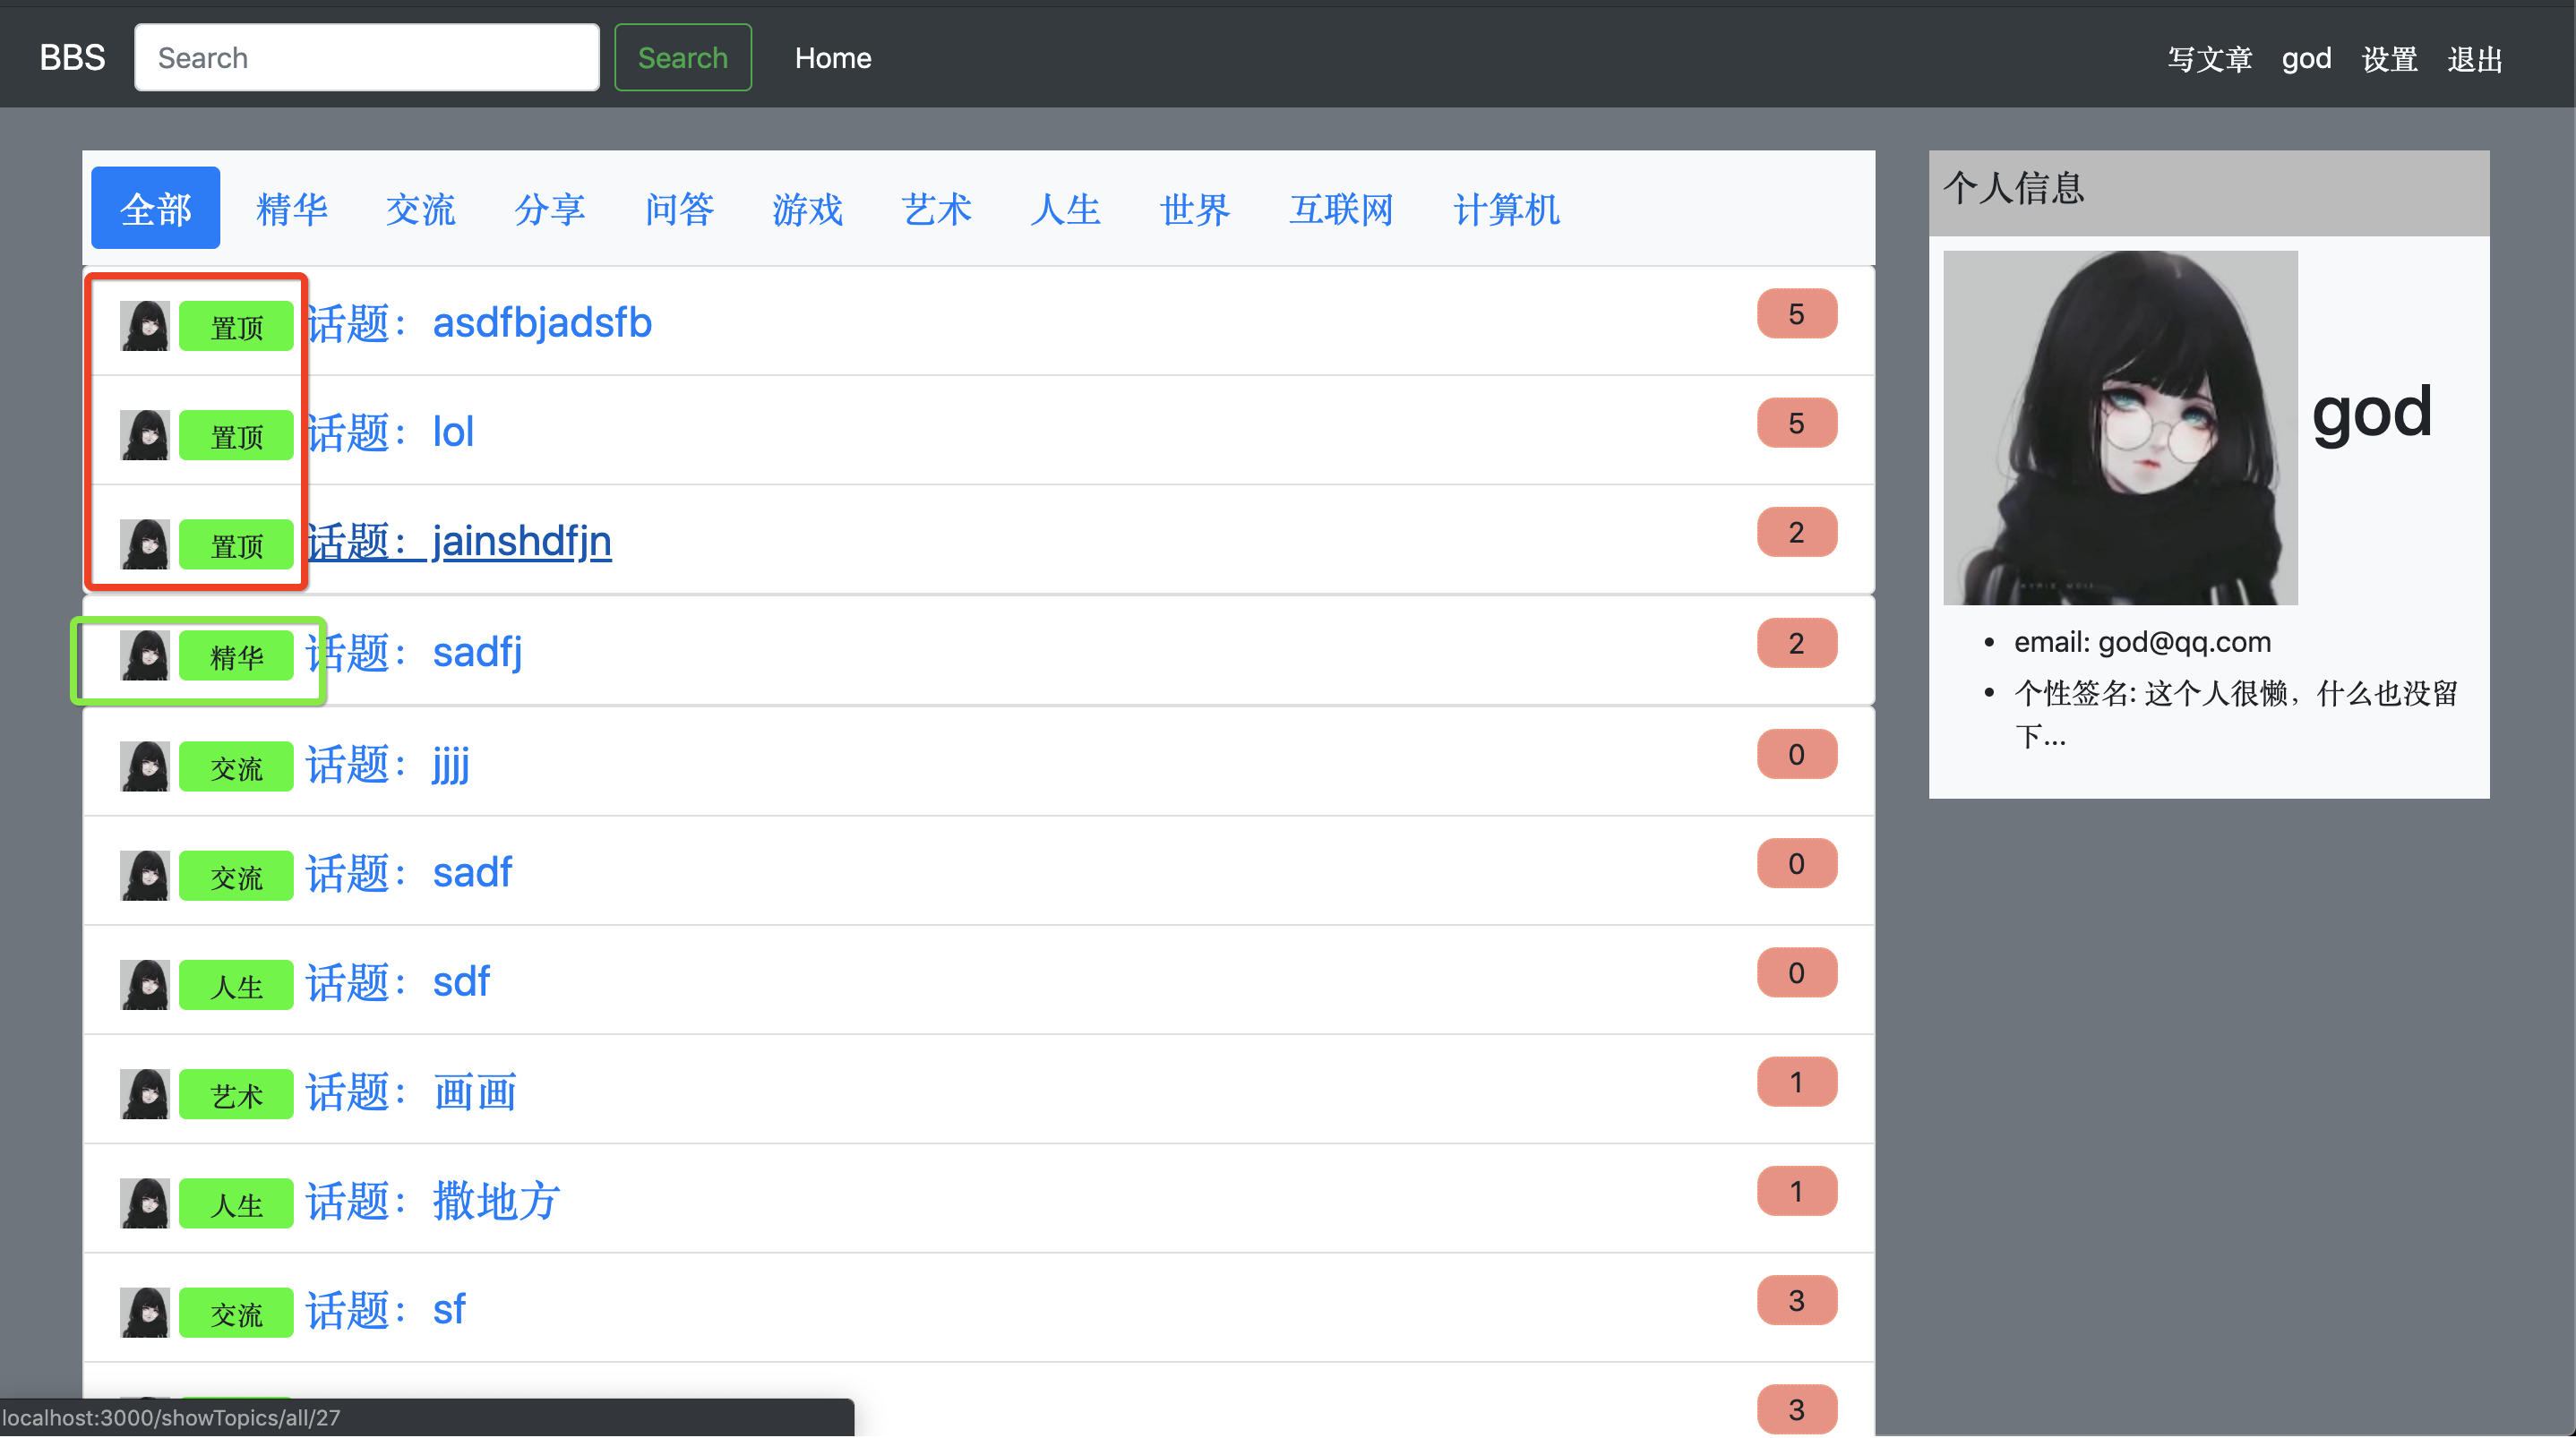
8. User - Simple Search Function
-
thinking
1. Get the string entered by the user in the input box
2. Get all useful=1 posts in the database
3. Define an array to hold the result resultArray
4. Traverse the title of topic, use indexOf to find the topic of the post containing string in title, and save it in result Array
5. Then, the result string and result are transmitted to the front end, and the front end is processed.
-
back-end
router.post("/allTopic/results", async (ctx) => {
    // Requirement: Get the string entered by the user in the search box and compare it with all topic title s in the Topic table.
    // The equivalent is displayed, and the user is prompted to say that if the content is not found, the search display page can be another page.

    // Get the string entered by the user in the search box
    const userInputString = ctx.request.body.user_input_string;

    const listAllTopicFromBBSPromise = editTopic.listAllTopic();
    const allTopic = await listAllTopicFromBBSPromise;

    // Define an array of results to store the results found
    let resultArray = [];
    // Add eligibility to results
    for(let i = 0; i < allTopic.length; i++) {
        if(allTopic[i].title.indexOf(userInputString) !== -1) {
            resultArray.push(allTopic[i]);
        }
    }
    const user = ctx.session.user;
    await ctx.render("/topics/show_results", {
        user: user,
        resultArray: resultArray,
        userInputString: userInputString
    });

});
-
Front end
<% if (resultArray.length === 0) { %>
     <li class="list-group-item list-group-item-action cell form-inline" style="font-size: 24px">
         <h4> Sorry, I can't find it with you.“ <span class="text-danger"> <%= userInputString %> </span> "Consistent content or information.</h4>
         <h5> Recommendation: </h5>
         <p> ∙ Please check the input words for errors. </p>
         <p> ∙ Please try other queries. </p>
         <p> ∙ Please change to more common words. </p>
     </li>
<% } %>

<% resultArray.forEach(topic => { %>
      <li class="list-group-item list-group-item-action cell form-inline" style="font-size: 24px">
          <a class="user_avatar pull-left" href="/userHome" style="width:28px;height:28px">
              <img src="../<%= topic.topic_image_path %>" title="<%= topic.post_man %>" style="width:28px;height:28px">
          </a>
          <span class="text-center bg-primary mr-1"> <%= topic.board_name%> </span>
          <a class="topic-link text-lg-center" href="/showTopics/all/<%= topic.id %>">Topic of conversation:<%= topic.title %></a>
      </li>
<% })%>
-
not found
Nine, expand
1. Number of messages displayed after the post
Implementation method
Add a span after the title of the post to show the number of messages msg_num
For convenience, add the field msg_num to the topic table, and then update the field when leaving a message.
-
Realization
 image.png
2. User Center - The content of the last post can be clicked to jump to the post page.
- Realization way
Wrap the title of topic with label a, and then set href
3. User Center - The content of the last message can be clicked to jump to the corresponding post page, and set the user's last message as a special style.
- When adding a message, set the style for it, and cancel the special style of the last message. The code is pasted in front of it, and the source code is also included.
- Wrap the message content in the label a in the user center, set href, and link to the corresponding topic page
- In fact, you can also add a page location function, such as clicking on the message content, jumping to the page, and then make the message in the middle of the browser, but I did not do it.
4. Subforum Display of Posts
- Add a new field board_name in table top to store the name of the corresponding sub-forum. When displaying the page, wrap it in span and render it. Style is customized=>
<span class="put_top"><%= topic.board_name %></span>
Because the top and the essence are not sub forums, special treatment is needed.
<span class="put_top">Essence</span>
<span class="put_top">Roof placement</span>
5. The Publisher's Head of the Post
- Similar to the sub-forum, define a new field, store the path of the avatar, and then render it.
- PS: Actually, this kind of problem should not be dealt with in this way, but should be queried by mysql's Association table. You can try it, because it's a little low now.
6. Priority of post presentation
Isn't that difficult, but it's a bit cumbersome when you show the page, because you have to use template grammar.
1, priority level > essence > ordinary
2, when a post is both the essence and the top, it displays the top.
PS: Specific code is not pasted, interested to see the source code bar
10. Concluding remarks
1, generalize
This series of articles totals 5 articles and takes 5 weeks.
2, feeling
I thought it was easy to write this, but the result was totally different. I estimated that the average time for each article was 4.5 hours, or more.
During this period, I doubted whether it was meaningful to write this, and wondered whether I would give up writing this. After all, it took too long. The advantage was that I could sort out my knowledge system, but it did not have any special effect. I still understood it, and the impression did not change much.
But as a person who has a beginning and a end, he will never be an eunuch. After some reflection, search and inquiry, I think the benefits of the article are certainly there, but in the short term is not very obvious, just like sports, persevere, and naturally harvest.
When I first wrote this kind of article, I felt that my writing style was not so good, my organization was not very clear, and my thoughtfulness might not be very good. I would also miss a lot of things and write some wrong typographic words. Please forgive me greatly.
If you have any doubts or suggestions, please leave a message or contact me. Thank you very much.