Shared Controlz for WPF
Support for. NET Framework (4.5.2, 4.6.2 and later),. NET Core (3.1), and. NET 5 (on Windows)


Let's get started
- Version and description [1]
- Build [2]ControlzEx solution
TextBoxInputMaskBehavior
TextBoxInputMaskBehavior can be used to display masks within text boxes.
Note: it is only a mask and does not validate your text.
<TextBlock Grid.Row="0"
           Grid.Column="0"
           Margin="4"
           Text="Datetime" />
<TextBox Grid.Row="0"
         Grid.Column="1"
         Margin="4">
    <behaviors:Interaction.Behaviors>
        <controlzEx:TextBoxInputMaskBehavior InputMask="00/00/0000" />
    </behaviors:Interaction.Behaviors>
</TextBox>

<TextBlock Grid.Row="1"
           Grid.Column="0"
           Margin="4"
           Text="Phone Number" />
<TextBox Grid.Row="1"
         Grid.Column="1"
         Margin="4">
    <behaviors:Interaction.Behaviors>
        <controlzEx:TextBoxInputMaskBehavior InputMask="( 999 ) 000 000 - 00"
                                             PromptChar="_" />
    </behaviors:Interaction.Behaviors>
</TextBox>
The original textboxinputmask behavior was taken from Blindmeis's blog.
- https://blindmeis.wordpress.com/2015/01/20/wpf-textbox-input-behavior/
- https://blindmeis.wordpress.com/2010/06/01/wpf-masked-textbox-behavior/

KeyboardNavigationEx
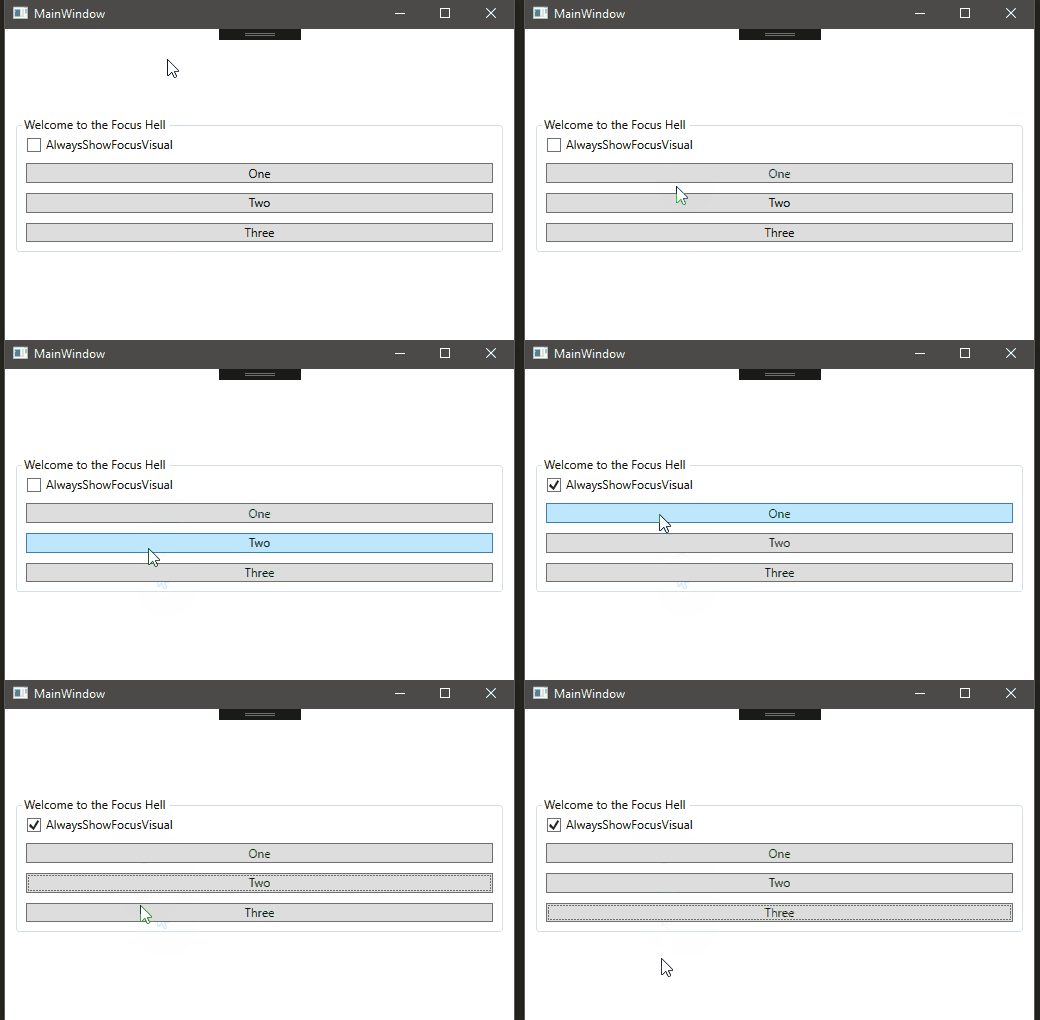
KeyboardNavigationEx is a helper class for common focus problems. The focus of the UI element itself is not a problem. However, if we use the common focusing method, the control obtains the focus, but does not obtain the focus visual style.
The original KeyboardNavigation class handles visual styles only when the control obtains focus from the keyboard device or SystemParameters.KeyboardCues is true.
With KeyboardNavigationEx, you can solve this problem in two simple ways.
Background code:
public partial class MainWindow : Window
{
    public MainWindow()
    {
        InitializeComponent();
        this.Loaded += (s, e) => { KeyboardNavigationEx.Focus(this.TheElementWhichShouldGetTheFocus); };
    }
}
Or in XAML:
<Button controlzex:KeyboardNavigationEx.AlwaysShowFocusVisual="True">Hey, I get the focus visual style on mouse click!</Button>

Auto move ToolTip
An automatically moving ToolTip. More information [3].
<Button Margin="5"
        Padding="5"
        Content="Test Button 2"
        ToolTipService.ShowDuration="20000">
    <Button.ToolTip>
        <ToolTip local:ToolTipAssist.AutoMove="True">
            <ToolTip.Template>
                <ControlTemplate>
                    <Grid>
                        <Border Background="Gray"
                                BorderBrush="Black"
                                BorderThickness="1"
                                Opacity="0.9"
                                SnapsToDevicePixels="True" />
                        <TextBlock Margin="5"
                                    Foreground="WhiteSmoke"
                                    FontSize="22"
                                    Text="ToolTipHelper AutoMove sample"
                                    TextOptions.TextFormattingMode="Display"
                                    TextOptions.TextRenderingMode="ClearType" />
                    </Grid>
                </ControlTemplate>
            </ToolTip.Template>
        </ToolTip>
    </Button.ToolTip>
</Button>


GlowWindowBehavior
GlowWindowBehavior adds a halo around the window.
WindowChromeBehavior
ControlzEx provides custom trim for WPF windows and some other deeper fixes.
Most of the fixes and improvements come from MahApps.Metro[4] and Fluent.Ribbon[5].
The specific technical implementation is described here:
http://blogs.msdn.com/b/wpfsdk/archive/2008/09/08/custom-window-chrome-in-wpf.aspx
It is a branch of the original Microsoft WPF Shell integration library. The current Microsoft implementation can be found here:
- https://github.com/dotnet/wpf
- http://referencesource.microsoft.com
PopupEx
A custom Popup window that can be used to validate error templates or other similar content in the MaterialDesignInXamlToolkit[6] or MahApps.Metro[7].
PopupEx provides some nice additional features:
- Relocate if the host window size or position changes
- Relocate if the host window is maximized, and vice versa
- If the host window is activated, it can only be the top level

TabControlEx
Customize the TabControl to keep the contents of the TabItem in the VisualTree when deselecting, so it will not be re created after selecting the TabItem again. The visibility behavior can be set through the ChildContentVisibility dependency property.
Usage:
<controlz:TabControlEx>
    <TabItem Header="Lorem">
        <TextBlock Text="Lorem ipsum dolor sit amet, consetetur sadipscing"
                   HorizontalAlignment="Center"
                   FontSize="30" />
    </TabItem>
    <TabItem Header="ipsum">
        <TextBox Text="Lorem ipsum dolor sit amet, consetetur sadipscing"
                 HorizontalAlignment="Center"
                 Margin="5" />
    </TabItem>
</controlz:TabControlEx>
PackIconBase
A help class for creating icon packages in WPF.
To create a new icon package, follow these steps:
Define a key (usually an enumeration):
public enum PackIconKind
{
    Happy,
    Sad
}
Subclass PackIconBase, add
- Default style key
- The factory that provides Path data for each key
public class PackIcon : PackIconBase<PackIconKind>
{
    static PackIcon()
    {
        DefaultStyleKeyProperty.OverrideMetadata(typeof(PackIcon), new FrameworkPropertyMetadata(typeof(PackIcon)));
    }

    public PackIcon() : base(CreateIconData)
    { }

    private static IDictionary<PackIconKind, string> CreateIconData()
    {
        return new Dictionary<PackIconKind, string>
        {
            {PackIconKind.Happy, "M20,12A8,8 0 0,0 12,4A8,8 0 0,0 4,12A8,8 0 0,0 12,20A8,8 0 0,0 20,12M22,12A10,10 0 0,1 12,22A10,10 0 0,1 2,12A10,10 0 0,1 12,2A10,10 0 0,1 22,12M10,9.5C10,10.3 9.3,11 8.5,11C7.7,11 7,10.3 7,9.5C7,8.7 7.7,8 8.5,8C9.3,8 10,8.7 10,9.5M17,9.5C17,10.3 16.3,11 15.5,11C14.7,11 14,10.3 14,9.5C14,8.7 14.7,8 15.5,8C16.3,8 17,8.7 17,9.5M12,17.23C10.25,17.23 8.71,16.5 7.81,15.42L9.23,14C9.68,14.72 10.75,15.23 12,15.23C13.25,15.23 14.32,14.72 14.77,14L16.19,15.42C15.29,16.5 13.75,17.23 12,17.23Z"},
            {PackIconKind.Sad, "M20,12A8,8 0 0,0 12,4A8,8 0 0,0 4,12A8,8 0 0,0 12,20A8,8 0 0,0 20,12M22,12A10,10 0 0,1 12,22A10,10 0 0,1 2,12A10,10 0 0,1 12,2A10,10 0 0,1 22,12M15.5,8C16.3,8 17,8.7 17,9.5C17,10.3 16.3,11 15.5,11C14.7,11 14,10.3 14,9.5C14,8.7 14.7,8 15.5,8M10,9.5C10,10.3 9.3,11 8.5,11C7.7,11 7,10.3 7,9.5C7,8.7 7.7,8 8.5,8C9.3,8 10,8.7 10,9.5M12,14C13.75,14 15.29,14.72 16.19,15.81L14.77,17.23C14.32,16.5 13.25,16 12,16C10.75,16 9.68,16.5 9.23,17.23L7.81,15.81C8.71,14.72 10.25,14 12,14Z"}
        };
    }
}
Provide default styles (usually in your Generic.xaml, for example:
<Style TargetType="{x:Type local:PackIcon}">
    <Setter Property="Height" Value="16" />
    <Setter Property="Width" Value="16" />
    <Setter Property="HorizontalAlignment" Value="Left" />
    <Setter Property="VerticalAlignment" Value="Top" />
    <Setter Property="IsTabStop" Value="False" />
    <Setter Property="Template">
        <Setter.Value>
            <ControlTemplate TargetType="{x:Type local:PackIcon}">
                <Viewbox>
                    <Canvas Width="24" Height="24">
                        <Path Data="{Binding Data, RelativeSource={RelativeSource TemplatedParent}}"
                              Fill="{TemplateBinding Foreground}" />
                    </Canvas>
                </Viewbox>
            </ControlTemplate>
        </Setter.Value>
    </Setter>
</Style>
Your users should now be able to use your icon pack in their applications in a simple way:
<ns:PackIcon Kind="HappyIcon" />
Theming
ControlzEx provides ThemeManager to help you provide topic management support for applications. For more information, see this section [8].
Licence
MIT
reference material
[1]
Version and Version Description: https://github.com/ControlzEx/ControlzEx/releases
[2]
Build: https://github.com/ControlzEx/ControlzEx/wiki/Home
[3]
Information: https://jkarger.de/2014/11/02/how-to-make-the-tooltip-follow-the-mouse/
[4]
MahApps.Metro: https://github.com/MahApps/MahApps.Metro
[5]
Fluent.Ribbon: https://github.com/fluentribbon/Fluent.Ribbon
[6]
MaterialDesignInXamlToolkit: https://github.com/ButchersBoy/MaterialDesignInXamlToolkit
[7]
MahApps.Metro: https://github.com/MahApps/MahApps.Metro
[8]
This section: https://github.com/ControlzEx/ControlzEx/blob/develop/Wiki/ThemeManager.md