Continue to play with rainbow text. This time, use linear gradient brush and make it into a button. Although it has no technical content, it is somewhat practical. Is this a return to nature.
First, let's recall LinearGradientBrush Usage of. LinearGradientBrush represents the brush of linear gradient, and its StartPoint and EndPoint represent the direction of gradient. LinearGradientBrush also contains a collection of GradientStops, where each object specifies a color and an offset along the brush gradient axis.
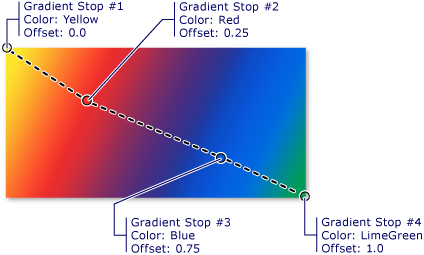
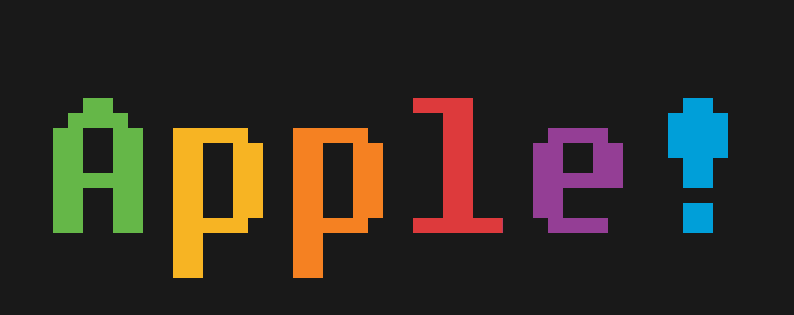
The concept is very simple, and it is also very simple to use in practice. For example, if the following LinearGradientBrush is applied to the text, the text will become rainbow:
<LinearGradientBrush x:Name="RainbowBrush" StartPoint="0,0.5" EndPoint="1,.5">
    <GradientStop x:Name="G2" Offset=".166" Color="#65b849" />
    <GradientStop x:Name="G4" Offset=".3333" Color="#f7b423" />
    <GradientStop x:Name="G6" Offset="0.5" Color="#f58122" />
    <GradientStop x:Name="G10" Offset="0.666" Color="#de3a3c" />
    <GradientStop x:Name="G12" Offset="0.8633" Color="#943f96" />
    <GradientStop x:Name="G14" Offset="01" Color="#009fd9" />
</LinearGradientBrush>
At this time, you can also see the specific content of the brush in the attribute window:

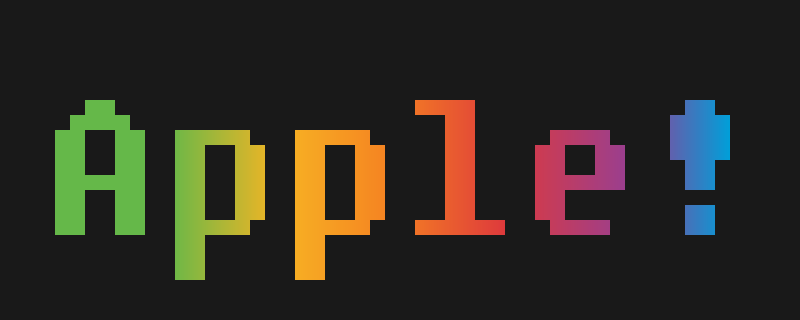
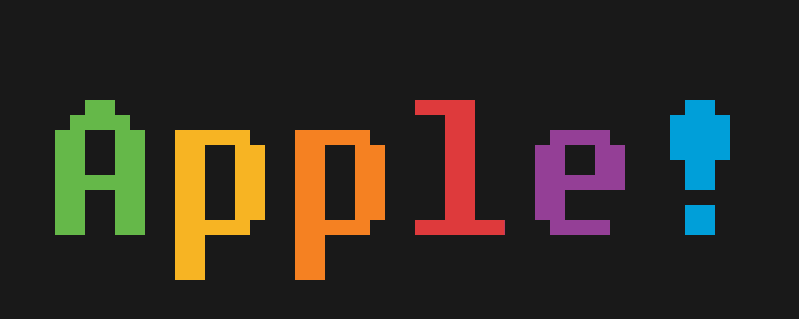
If the Color between two gradientstops is the same, no gradient will occur, and if the Offset between two gradientstops will change immediately. With this technique and the use of equal width fonts, I can create rainbow characters with different colors of each word:
<LinearGradientBrush x:Name="RainbowBrush" StartPoint="0,0.5" EndPoint="1,.5">
    <GradientStop x:Name="G1" Offset="0" Color="#65b849" />
    <GradientStop x:Name="G2" Offset=".166" Color="#65b849" />
    <GradientStop x:Name="G3" Offset=".166" Color="#f7b423" />
    <GradientStop x:Name="G4" Offset=".3333" Color="#f7b423" />
    <GradientStop x:Name="G5" Offset="0.3333" Color="#f58122" />
    <GradientStop x:Name="G6" Offset="0.5" Color="#f58122" />
    <GradientStop x:Name="G7" Offset="0.5" Color=" #f8f8f8" />
    <GradientStop x:Name="G8" Offset="0.5" Color=" #f8f8f8" />
    <GradientStop x:Name="G9" Offset="0.50" Color="#de3a3c" />
    <GradientStop x:Name="G10" Offset="0.666" Color="#de3a3c" />
    <GradientStop x:Name="G11" Offset="0.666" Color="#943f96" />
    <GradientStop x:Name="G12" Offset="0.8633" Color="#943f96" />
    <GradientStop x:Name="G13" Offset="0.8633" Color="#009fd9" />
    <GradientStop x:Name="G14" Offset="01" Color="#009fd9" />
</LinearGradientBrush>
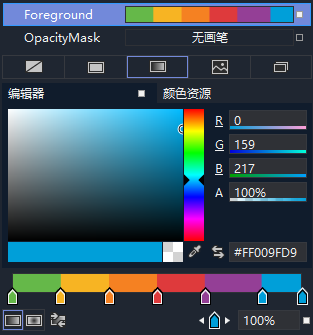
At this time, the brush in the attribute window is like this:
Next, I put this TextBlock into the control template of the button and control the LinearGradientBrush to change direction in the Storyboard of MouseOver. There are two ways to change its direction, one is to use PointAnimation to change StartPoint and EndPoint, and the other is to use DoubleAnimation to directly change LinearGradientBrush.RelativeTransform. The latter is written as follows:
<Storyboard>
    <DoubleAnimation Storyboard.TargetName="textBlock"
                     Storyboard.TargetProperty="(TextBlock.Foreground).(Brush.RelativeTransform).(RotateTransform.Angle)"
                     To="90"
                     Duration="0:0:0.5">
        <DoubleAnimation.EasingFunction>
            <QuarticEase EasingMode="EaseOut" />
        </DoubleAnimation.EasingFunction>
    </DoubleAnimation>
</Storyboard>


<LinearGradientBrush x:Name="RainbowBrush" StartPoint="0,0.5" EndPoint="1,.5">
    <LinearGradientBrush.RelativeTransform>
        <RotateTransform Angle="0" CenterX="0.5" CenterY="0.5" />
    </LinearGradientBrush.RelativeTransform>
The effect of running is to rotate all colors 90 degrees, which looks like the previous Apple Logo color matching.
In the LinearGradientBrush above, I secretly hide two white gradientstops (named G6 and G7). Their Offset is 0.5, in the middle. In the Pressed state of the button, use DoubleAnimation to set the Offset of all gradientstops before and after them to 0 or 1. The effect is to push all colors to both sides. Because it is now rotated 90 degrees, it is actually pushed up and down:
<DoubleAnimation Storyboard.TargetName="G2"
                 Storyboard.TargetProperty="Offset"
                 To="0" />


......
......


<DoubleAnimation Storyboard.TargetName="G13"
                 Storyboard.TargetProperty="Offset"
                 To="1" />

Here, a rainbow button is done.
Source code:- https://github.com/DinoChan/wpf_design_and_animation_lab