introduce
Like dependency properties, routing events are the upgrade of WPF to traditional. NET events, which makes events have stronger propagation ability.
Definition, registration and packaging
// Let's take an example of a Click event definition
public abstract class ButtonBase : ContentControl
{
    // Define routing events
    public static readonly RoutedEvent ClickEvent;

    // Register routing events
    static ButtonBase()
    {
        ButtonBase.ClickEvent = EventManager.RegisterRoutedEvent("Click", RoutingStrategy.Bubble, typeof(RoutedEventHandler), typeof(ButtonBase));
    }

    // Normal event wrapper routing event
    public event RoutedEventHandler Click
    {
        add
        {
            // AddHandler and RemoveHandler are both defined in FrameworkElement
            base.AddHandler(ButtonBase.ClickEvent, value);
        }
        remove
        {
            base.RemoveHandler(ButtonBase.ClickEvent, value);
        }
    }
}
Share
From the above definition, we can see that, like dependency properties, routing events are also statically defined and wrapped as ordinary events. Then we can naturally speculate that we can use other types of routing events as our own like dependency properties. Here we need to use RoutedEvent.AddOwner() method.
// The UIElement class adds the MouseUp event of the Mouse class
UIElement.MouseUpEvent = Mouse.MouseUpEvent.AddOwner(typeof(UIElement));
Use
Raising of routing events
Raising a routing event using the RaiseEvent method
RoutedEventArgs e = new RoutedEventArgs(ButtonBase.ClickEvent, this);
base.RaiseEvent(e);
Handling of routing events
Monitoring events
// Direct processing in xaml
<button Click="cmdOK_Click">OK</Button>
// Background code connection event
img.MouseUp += new MouseButtonEventHandler(img_MouseUp);
// It can even simplify the code
img.MouseUp += img_MouseUp;
// Call AddHandler method directly without binding through event wrapper
img.AddHandler(Image.MouseUpEvent, new MouseButtonEventHandler(image_MouseUp));
// As we mentioned before, this is a shared event. MouseUp methods in UIElement Image Mouse are shared, and you can also add handler to UIElement for processing. These two methods are equivalent. The only difference is that it's not easy to see that MouseUp is caused by Image without writing Image
img.AddHandler(UIElement.MouseUpEvent, new MouseButtonEventHandler(image_MouseUp));
Event handlers all have an Args parameter, which is inherited from RoutedEventArgs and contains the following properties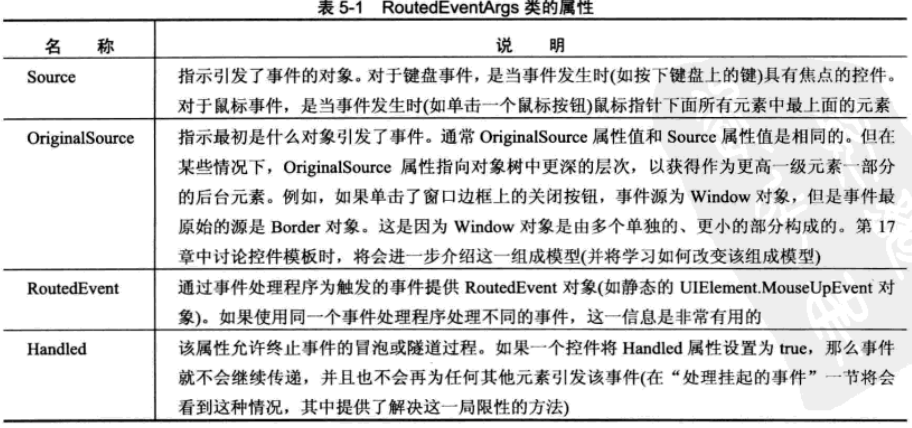
Route break event
Disconnect route event cannot be implemented in xaml, code must be used-=
// Use - = operator
img.MouseUp -= img_MouseUp;
// Using the RemoveHandler method directly
img.RemoveHandler(Image.MouseUpEvent, new MouseButtonEventHandler(image_MouseUp));
Classification of routing events
Classification description
- Direct route events originate from one element and are not passed to the next
- Bubbling route events are passed up the element tree (MouseUp event), if not handled, all the way to the top element of the element tree
- Tunnel route events are passed down the element tree (KeyDown event), which provides an opportunity to handle events in advance, such as PreviewKeyDown event
Set event type
When registering an event using the EventManager.RegistEvent method, you need to pass an enumeration value of RoutingStrategy and set the type of event.
1. Bubbling route event
xaml Code:
<Window x:Class="Charles.WPF.View.TestBubblingEvent"
        xmlns="http://schemas.microsoft.com/winfx/2006/xaml/presentation"
        xmlns:x="http://schemas.microsoft.com/winfx/2006/xaml"
        xmlns:d="http://schemas.microsoft.com/expression/blend/2008"
        xmlns:mc="http://schemas.openxmlformats.org/markup-compatibility/2006"
        xmlns:local="clr-namespace:Charles.WPF.View"
        mc:Ignorable="d"
        Title="TestBubblingEvent" Height="359" Width="329" MouseUp="SomethingClick">
    <Grid>
        <Grid Margin="3" MouseUp="SomethingClick">
            <Grid.RowDefinitions>
                <RowDefinition Height="Auto"></RowDefinition>
                <RowDefinition Height="*"></RowDefinition>
                <RowDefinition Height="Auto"></RowDefinition>
                <RowDefinition Height="Auto"></RowDefinition>
            </Grid.RowDefinitions>
            <Label Margin="5" Grid.Row="0" HorizontalAlignment="Left"
                   Background="AliceBlue" BorderBrush="Black" BorderThickness="1" MouseUp="SomethingClick">
                <StackPanel MouseUp="SomethingClick">
                    <TextBlock Margin="3" MouseUp="SomethingClick">Image and text label</TextBlock>
                    <Image Source="/Image/1.jpg" Stretch="None" MouseUp="SomethingClick" Width="30" Height="30"></Image>
                    <TextBlock Margin="3" MouseUp="SomethingClick">Courtesy of the StackPanel.</TextBlock>
                </StackPanel>
            </Label>
            <ListBox Grid.Row="1" Margin="5" Name="lstMessage"></ListBox>
            <CheckBox Grid.Row="2" Margin="5" Padding="3" HorizontalAlignment="Right"
                      Name="chk_Handle">Handle first event</CheckBox>
            <Button Grid.Row="3" Margin="5" Padding="3" HorizontalAlignment="Right" Name="cmd_Clear" Click="cmd_Clear_Click">
                Clear List
            </Button>
        </Grid>
    </Grid>
</Window>
Background code:
public partial class TestBubblingEvent : Window
{
    protected int eventCount = 0;
    public TestBubblingEvent()
    {
        InitializeComponent();
    }

    private void SomethingClick(object sender, MouseButtonEventArgs e)
    {
        eventCount++;
        string message = "#" + eventCount.ToString() + ":\r\n" +
            " Sender: " + sender.ToString() + ":\r\n" +
            " Source: " + e.Source + ":\r\n" +
            " Original Source: " + e.OriginalSource;
        lstMessage.Items.Add(message);
        e.Handled = (bool)chk_Handle.IsChecked;
    }

    private void cmd_Clear_Click(object sender, RoutedEventArgs e)
    {
        lstMessage.Items.Clear();
    }
}
This example shows the sequence of event transfer of bubble event. When clicking the picture, the event is triggered by the Image and transferred up layer by layer. If e.Handled = True is not encountered, the transfer will not be terminated.
Some tips for bubbling events:
- Sender is the control triggered by the current event, and Source is the trigger Source
- Both MouseButtonEventArgs and RoutedEventArgs can be used for event processing
- We also monitored the MouseUp event of the window, which makes us trigger the MouseUp event when we Click in any blank position of the window. However, we found that when we Click the Button, we do not trigger the MouseUp event of the window, but the Click event of the Button. This is because the MouseUp event is suspended in the Button's source code, and a more advanced Click event is triggered
- In WinForm, most controls have Click events. In WPF, only a few controls have Click events
- There is a way to listen to the event with Handled as true. Although this is not recommended, it can be implemented. By passing the last parameter true, you can receive the suspended event (not recommended)
cmdClear.AddHandler(UIElement.MouseUpEvent, new MouseButtonEventHandler(cmdClear_MouseUp), true);
- As we mentioned above, most controls have no Click event, so how does the Click event bubble? In fact, Click events support bubbling, but handling Click events requires some special techniques
An error will be reported when writing this way, because there is no Click event in the StackPanel. At this time, if we want to listen to all Button Click events, we need to use the skill of an attachment event// StatckPanel doesn't have a Click, but it needs to monitor the Click of the Button in it // It's not possible to use the following methods <StackPanel Click="DoSomething"> <Button/> <Button/> <Button/> </StackPanel>
Use the class name plus the event to get the Click event of the Button in the StackPanel, which is the use of additional properties. In the code, you need to pay attention that you cannot use the + = method to bind the event handling method, because + = is bound to the StackPanel by default, and you need to use the AndHandler method<StackPanel Button.Click="DoSomething"> <Button/> <Button/> <Button/> </StackPanel>
To determine which button in the StackPanel raised the event, use the following method// The name of StackPanel is pnlButtons pnlButtons.AddHandler(Button.Click, new RoutedEventHandler(DoSomething));
// Method 1. Use the x:Name property of the control
private void DoSomething(object sender, RoutedEventArgs args)
{
    // cmd1 is the Name property of button control 1
    if(sender == cmd1)
    {
        // The first button is triggered
    }
    else if(sender == cmd1)
    ...
}
// Method 2. Add Tag to the button
<Button Tag="first button"/>

object tag = ((FrameworkElement)sender).Tag;
2. Tunnel routing events
- Tunnel routing events work the same way as bubble routing events, but in the opposite direction
- Tunnel routing events are all events starting with Preview
- The tunnel route event and the bubbling route event share the same RoutedEventArgs, so if the tunnel route event is marked as handled, the bubbling route event will not be triggered. This attribute is very suitable for preprocessing
- Tunnel events are always triggered before bubbling events
- As can be seen from the figure below, the event will be triggered first and then up, so if you let e.Handler=true in any intermediate element, the bubbling event will not be triggered


