1 Overview
In my last article, we learned how to quickly build various development environments through Scoop and WSL, but did you find that the default powershell is ugly and difficult to use. Today, I teach you how to install and beautify Windows Terminal. Windows Terminal is an ideal matching for WSL2. It is fast, configurable and beautiful, It also provides all the advantages of windows and Linux development.
Not much to say, let's take a look at the beautified Windows Terminal.
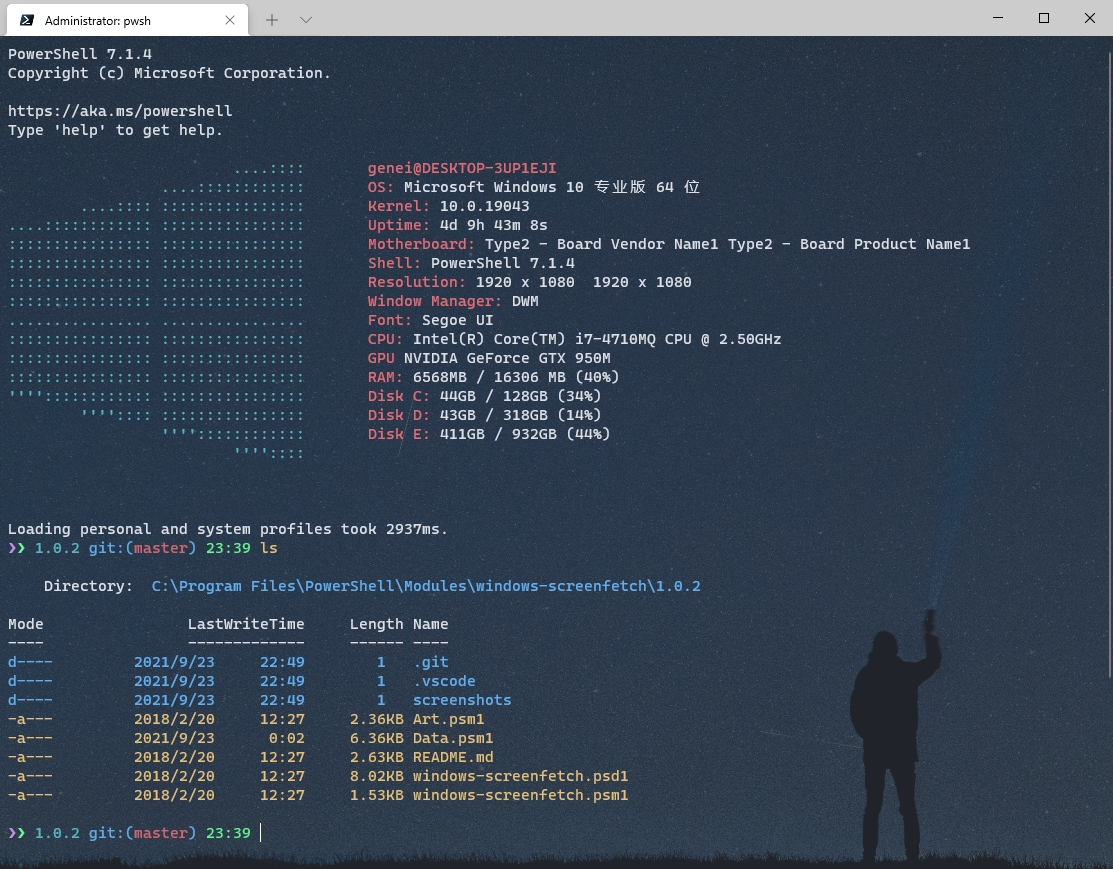
2 installation
Open powershell with administrator privileges and run the following command:
# Install the latest version of Windows Terminal
scoop install -g extras/windows-terminal
# Install the latest version of powershell. The default version of powershell for windows is very low
scoop install -g main/pwsh
# install font
scoop install -g nerd-fonts/Cascadia-Code
# Install openssh
scoop install -g main/openssh
3 Windows terminal configuration
3.1 configure right-click menu
Create a new windows-terminal.reg file with the following contents:
Windows Registry Editor Version 5.00

[HKEY_CLASSES_ROOT\Directory\Background\shell\WindowsTerminal]
@="Windows Terminal Here"
"Icon"="D:\\Softwares\\Scoop\\GlobalApps\\apps\\windows-terminal\\current\\WindowsTerminal.exe"

[HKEY_CLASSES_ROOT\Directory\Background\shell\WindowsTerminal\command]
@="D:\\Softwares\\Scoop\\GlobalApps\\apps\\windows-terminal\\current\\WindowsTerminal.exe"
The path is the path to install Windows terminal. After configuration, double-click to run.
3.2 configuring pwsh
-
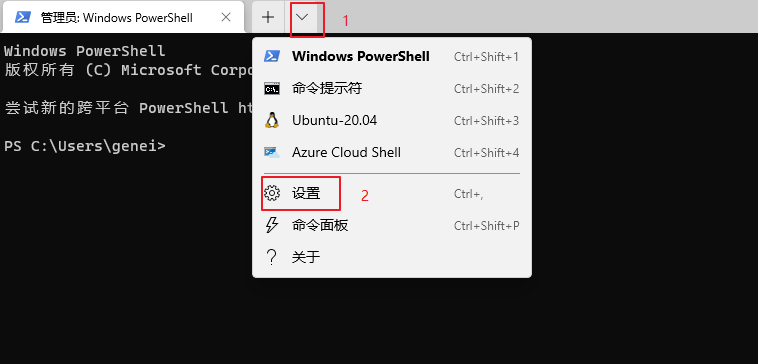
Right click to open windows terminal and select settings.
-
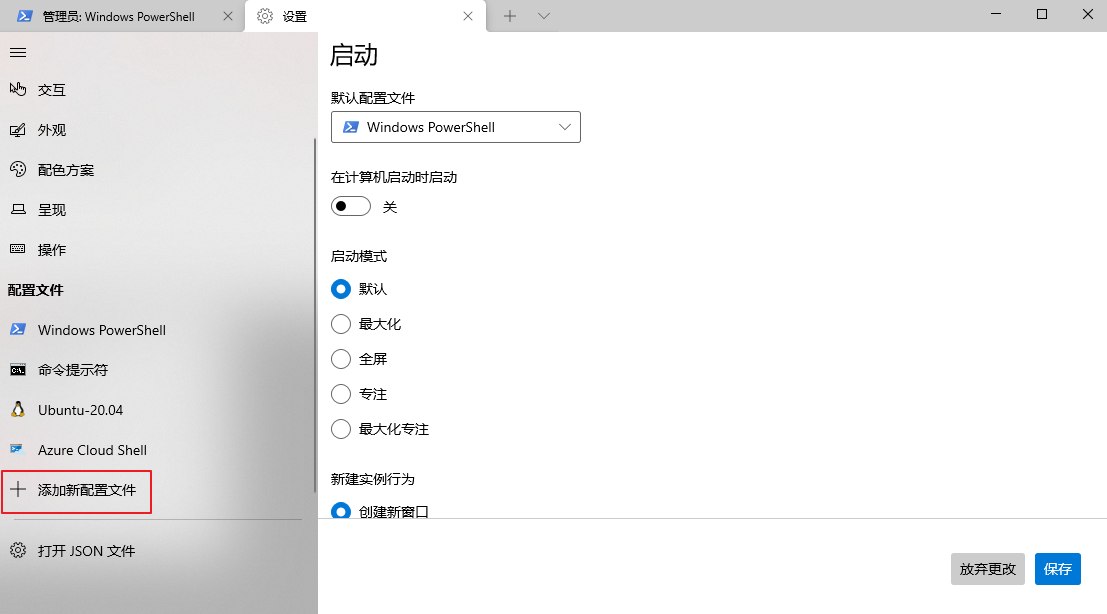
Select add new profile.
-
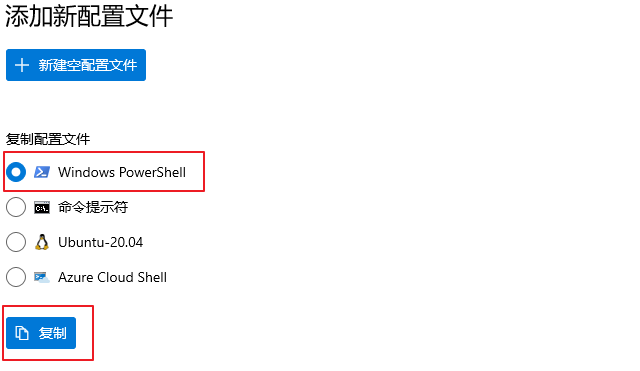
Select Copy profile.
-
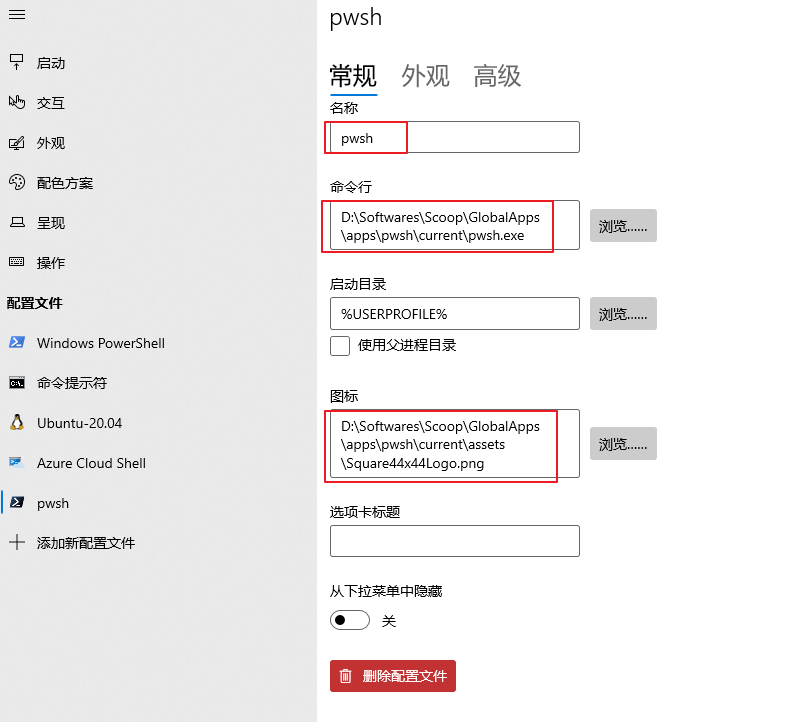
Modify the configuration file with pwsh.
-
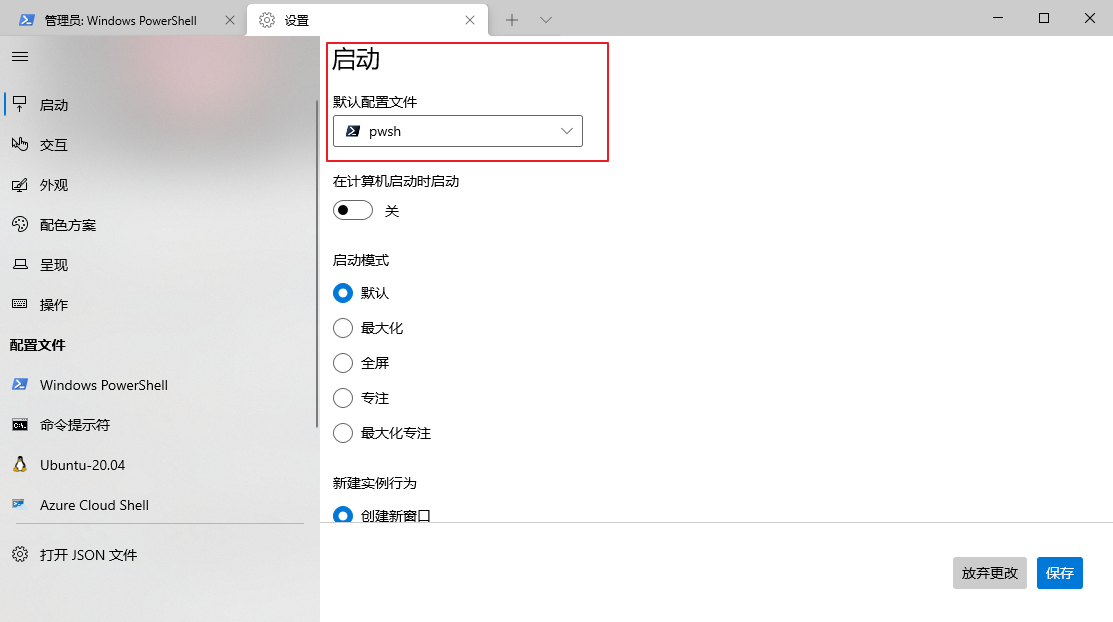
Modify startup to pwsh.
-
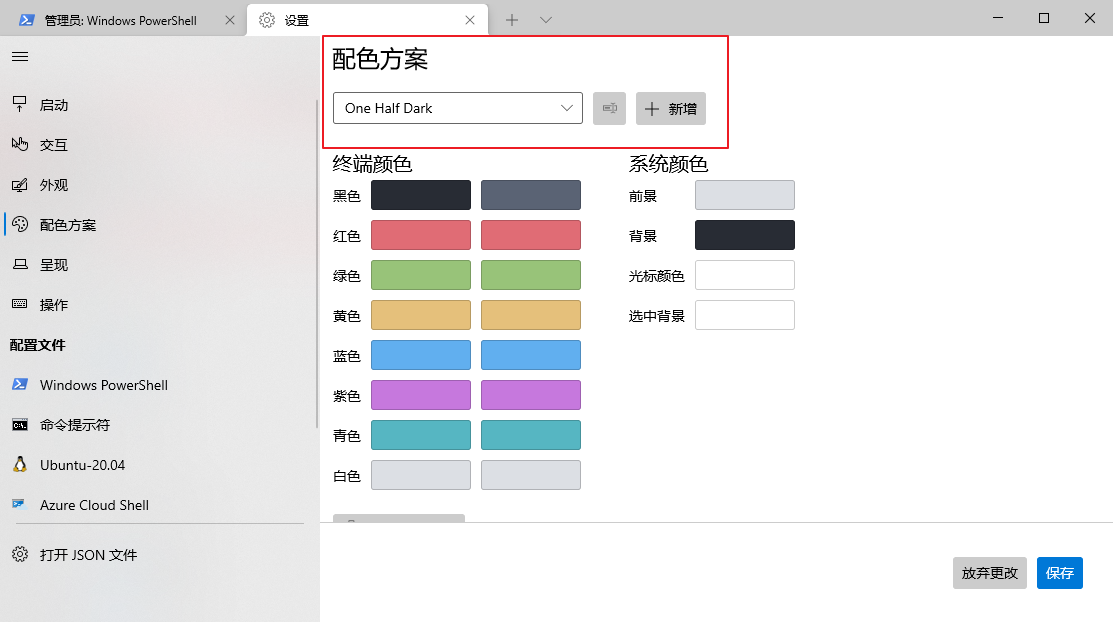
Select a color scheme
3.3 global configuration
Open the configuration file for global configuration. The global configuration is configured under defaults. Each command line is configured separately under list. The configuration under list will overwrite the global configuration. If it has been configured under defaults, the same configuration under list needs to be deleted. The global configuration is as follows:
"defaults": {
    // Configure background picture
    "backgroundImage": "D:\\SoftwareConfigs\\Windows-terminal\\background.jpg",
    // Configure transparency
    "backgroundImageOpacity": 0.1,
    // Configure theme
    "colorScheme": "One Half Dark",
    // Configure font
    "font": {
        "face": "Cascadia Mono",
        "size": 12
    },
    // Configure History Size
    "historySize": 9001,
    // Configure the directory entered during startup. When the configuration is null, it will enter the directory where it is opened by right clicking
    "startingDirectory": null,
    // Select text background
    "selectionBackground": "#EE3A8C"
},
4 pwsh configuration
4.1 installing plug-ins
To make pwsh work better, we need to install some powershell plug-ins and run the following command:
Set-PSRepository -Name PSGallery -InstallationPolicy Trusted
Set-ExecutionPolicy remotesigned
# List of color files for PowerShell
Install-Module -AllowClobber Get-ChildItemColor -Scope AllUsers
# Enhanced git functionality
PowerShellGet\Install-Module -Name posh-git -Scope AllUsers -AllowPrerelease -Force
PowerShellGet\Install-Module posh-sshell -Scope AllUsers
# Beautify powershell
Install-Module -Name oh-my-posh -Scope AllUsers
# git alias support
Install-Module -Name git-aliases -Scope AllUsers
# powershell enhancements
Install-Module -Name PSReadLine -AllowPrerelease -Scope AllUsers -Force -SkipPublisherCheck
# System information output
Install-Module windows-screenfetch -Scope AllUsers -AllowClobber
Install-Module -Name InstallModuleFromGitHub -Scope AllUsers
4.2 windows screenfetch configuration
Windows screenfetch is no longer applicable to the latest version of powershell, so you need to change the source code, find the Data.psm1 file under C: \ program files \ powershell \ modules \ windows screenfetch \ 1.0.2, and replace all the contents with the following:
Add-Type -AssemblyName System.Windows.Forms

Function Get-SystemSpecifications()
{

    $UserInfo = Get-UserInformation;
    $OS = Get-OS;
    $Kernel = Get-Kernel;
    $Uptime = Get-Uptime;
    $Motherboard = Get-Mobo;
    $Shell = Get-Shell;
    $Displays = Get-Displays;
    $WM = Get-WM;
    $Font = Get-Font;
    $CPU = Get-CPU;
    $GPU = Get-GPU;
    $RAM = Get-RAM;
    $Disks = Get-Disks;


    [System.Collections.ArrayList] $SystemInfoCollection =
        $UserInfo,
        $OS,
        $Kernel,
        $Uptime,
        $Motherboard,
        $Shell,
        $Displays,
        $WM,
        $Font,
        $CPU,
        $GPU,
        $RAM;

    foreach ($Disk in $Disks)
    {
        [void]$SystemInfoCollection.Add($Disk);
    }

    return $SystemInfoCollection;
}

Function Get-LineToTitleMappings()
{
    $TitleMappings = @{
        0 = "";
        1 = "OS: ";
        2 = "Kernel: ";
        3 = "Uptime: ";
        4 = "Motherboard: ";
        5 = "Shell: ";
        6 = "Resolution: ";
        7 = "Window Manager: ";
        8 = "Font: ";
        9 = "CPU: ";
        10 = "GPU ";
        11 = "RAM: ";
    };

    return $TitleMappings;
}

Function Get-UserInformation()
{
    return $env:USERNAME + "@" + (Get-CimInstance Win32_OperatingSystem).CSName;
}

Function Get-OS()
{
    return (Get-CimInstance Win32_OperatingSystem).Caption + " " +
        (Get-CimInstance Win32_OperatingSystem).OSArchitecture;
}

Function Get-Kernel()
{
    return (Get-CimInstance  Win32_OperatingSystem).Version;
}

Function Get-Uptime()
{
    $Uptime = (Get-CimInstance Win32_OperatingSystem).LocalDateTime - (Get-CimInstance Win32_OperatingSystem).LastBootUpTime;

    $FormattedUptime =  $Uptime.Days.ToString() + "d " + $Uptime.Hours.ToString() + "h " + $Uptime.Minutes.ToString() + "m " + $Uptime.Seconds.ToString() + "s ";
    return $FormattedUptime;
}

Function Get-Mobo()
{
    $Motherboard = Get-CimInstance Win32_BaseBoard | Select-Object Manufacturer, Product;
    return $Motherboard.Manufacturer + " " + $Motherboard.Product;

}

Function Get-Shell()
{
    return "PowerShell $($PSVersionTable.PSVersion.ToString())";
}

Function Get-Displays()
{
    $Displays = New-Object System.Collections.Generic.List[System.Object];

    # This gives the available resolutions
    $monitors = Get-CimInstance -N "root\wmi" -Class WmiMonitorListedSupportedSourceModes

    foreach($monitor in $monitors)
    {
        # Sort the available modes by display area (width*height)
        $sortedResolutions = $monitor.MonitorSourceModes | sort -property {$_.HorizontalActivePixels * $_.VerticalActivePixels}
        $maxResolutions = $sortedResolutions | select @{N="MaxRes";E={"$($_.HorizontalActivePixels) x $($_.VerticalActivePixels) "}}

        $Displays.Add(($maxResolutions | select -last 1).MaxRes);
    }

    return $Displays;
}

Function Get-WM()
{
    return "DWM";
}

Function Get-Font()
{
    return "Segoe UI";
}

Function Get-CPU()
{
    return (((Get-CimInstance Win32_Processor).Name) -replace '\s+', ' ');
}

Function Get-GPU()
{
    return (Get-CimInstance Win32_DisplayConfiguration).DeviceName;
}

Function Get-RAM()
{
    $FreeRam = ([math]::Truncate((Get-CimInstance Win32_OperatingSystem).FreePhysicalMemory / 1KB));
    $TotalRam = ([math]::Truncate((Get-CimInstance Win32_ComputerSystem).TotalPhysicalMemory / 1MB));
    $UsedRam = $TotalRam - $FreeRam;
    $FreeRamPercent = ($FreeRam / $TotalRam) * 100;
    $FreeRamPercent = "{0:N0}" -f $FreeRamPercent;
    $UsedRamPercent = ($UsedRam / $TotalRam) * 100;
    $UsedRamPercent = "{0:N0}" -f $UsedRamPercent;

    return $UsedRam.ToString() + "MB / " + $TotalRam.ToString() + " MB " + "(" + $UsedRamPercent.ToString() + "%" + ")";
}

Function Get-Disks()
{
    $FormattedDisks = New-Object System.Collections.Generic.List[System.Object];

    $NumDisks = (Get-CimInstance Win32_LogicalDisk).Count;

    if ($NumDisks)
    {
        for ($i=0; $i -lt ($NumDisks); $i++)
        {
            $DiskID = (Get-CimInstance Win32_LogicalDisk)[$i].DeviceId;

            $FreeDiskSize = (Get-CimInstance Win32_LogicalDisk)[$i].FreeSpace
            $FreeDiskSizeGB = $FreeDiskSize / 1073741824;
            $FreeDiskSizeGB = "{0:N0}" -f $FreeDiskSizeGB;

            $DiskSize = (Get-CimInstance Win32_LogicalDisk)[$i].Size;
            $DiskSizeGB = $DiskSize / 1073741824;
            $DiskSizeGB = "{0:N0}" -f $DiskSizeGB;

            $FreeDiskPercent = ($FreeDiskSizeGB / $DiskSizeGB) * 100;
            $FreeDiskPercent = "{0:N0}" -f $FreeDiskPercent;

            $UsedDiskSizeGB = $DiskSizeGB - $FreeDiskSizeGB;
            $UsedDiskPercent = ($UsedDiskSizeGB / $DiskSizeGB) * 100;
            $UsedDiskPercent = "{0:N0}" -f $UsedDiskPercent;

            $FormattedDisk = "Disk " + $DiskID.ToString() + " " +
                $UsedDiskSizeGB.ToString() + "GB" + " / " + $DiskSizeGB.ToString() + "GB " +
                "(" + $UsedDiskPercent.ToString() + "%" + ")";
            $FormattedDisks.Add($FormattedDisk);
        }
    }
    else
    {
        $DiskID = (Get-CimInstance Win32_LogicalDisk).DeviceId;

        $FreeDiskSize = (Get-CimInstance Win32_LogicalDisk).FreeSpace
        $FreeDiskSizeGB = $FreeDiskSize / 1073741824;
        $FreeDiskSizeGB = "{0:N0}" -f $FreeDiskSizeGB;

        $DiskSize = (Get-CimInstance Win32_LogicalDisk).Size;
        $DiskSizeGB = $DiskSize / 1073741824;
        $DiskSizeGB = "{0:N0}" -f $DiskSizeGB;

        if ($DiskSize -gt 0)
        {
            $FreeDiskPercent = ($FreeDiskSizeGB / $DiskSizeGB) * 100;
            $FreeDiskPercent = "{0:N0}" -f $FreeDiskPercent;

            $UsedDiskSizeGB = $DiskSizeGB - $FreeDiskSizeGB;
            $UsedDiskPercent = ($UsedDiskSizeGB / $DiskSizeGB) * 100;
            $UsedDiskPercent = "{0:N0}" -f $UsedDiskPercent;

            $FormattedDisk = "Disk " + $DiskID.ToString() + " " +
                $UsedDiskSizeGB.ToString() + "GB" + " / " + $DiskSizeGB.ToString() + "GB " +
                "(" + $UsedDiskPercent.ToString() + "%" + ")";
            $FormattedDisks.Add($FormattedDisk);
        }
        else
        {
            $FormattedDisk = "Disk " + $DiskID.ToString() + " Empty";
            $FormattedDisks.Add($FormattedDisk);
        }
    }

    return $FormattedDisks;
}
4.3 loading plug-ins at startup
In order to load the plug-in at startup, we need to create a Microsoft. PowerShell_ The profile.ps1 file is placed in C:\Users \ user name \ Documents\PowerShell directory. The file content is:
Import-Module windows-screenfetch
Import-Module posh-git
Import-Module posh-sshell
Import-Module oh-my-posh
Import-Module git-aliases -DisableNameChecking
Import-Module PSReadLine
Import-Module InstallModuleFromGitHub
Import-Module Get-ChildItemColor

Screenfetch
Set-PoshPrompt -Theme Material # Set the theme to Material
Set-PSReadlineKeyHandler -Key Tab -Function Complete # Set Tab completion
Set-PSReadLineKeyHandler -Key "Ctrl+d" -Function MenuComplete # Set Ctrl+d to menu completion and Intellisense
Set-PSReadLineKeyHandler -Key "Ctrl+z" -Function Undo # Set Ctrl+z to undo
Set-PSReadLineKeyHandler -Key UpArrow -Function HistorySearchBackward # Set the up key to backward search history
Set-PSReadLineKeyHandler -Key DownArrow -Function HistorySearchForward # Set the down key to forward search history
5 Summary
The installation and beautification of Windows Terminal has ended here. If you want to know the specific usage of some plug-ins installed by pwsh, you can go to the official website.