Before, many friends asked me what my open source project documentation website was built with. In fact, it is built with Docsify. For details, please refer to How to write elegant open source project documents . Docsify is basically enough to build a systematic document website, but sometimes we have both systematic and fragmented articles. If we hang up all the articles, it looks a little messy. At this time, we may need to build a website similar to the knowledge base. Recently, I found that using VuePress can build a powerful document website. I recommend it to you!
SpringBoot e-commerce project mall (50k+star) address: https://github.com/macrozheng/mall
Introduction to VuePress
VuePress is a Vue driven static website generator. Compared with our Docsify dynamically generated website, it is more SEO friendly.
Using VuePress has the following advantages:
- Using Markdown to write articles is easy for programmers to write, and the configuration of the website is very simple.
- We can use Vue components in Markdown, which is very convenient if you are familiar with Vue.
- When packaging the website, static HTML will be generated for each page pre rendering, which has good performance and is also conducive to SEO.
Vdoing theme
Generally, when we use VuePress to build a website, we will choose a theme. Here we choose VuePress theme vdoing, a concise and efficient knowledge management blog theme, which is more than enough to build a document website.
Learn technology and forget how to break it? Try building a knowledge base with Vdoing! It can help us better manage knowledge and quickly find the forgotten knowledge points.
Using the Vdoing theme has the following advantages:
- Knowledge management: because this topic has the functions of catalog, classification and label, it can easily integrate structured or fragmented content.
- Concise and efficient: Markdown centered project structure with built-in automation tools to accomplish more with less configuration.
- Immersive reading: the UI designed for reading, combined with multiple color modes, closable sidebar and navigation bar, brings you an immersive reading experience.
Effect demonstration
Let's first look at the finished product effect. There are three different modes to choose from. Is it cool enough!
build
Building a website through Vdoing is very simple, even if you are not familiar with Vue.
- First, we need to go to the official website of Vdoing to download the project. The download address is: https://github.com/xugaoyi/vuepress-theme-vdoing

- After the download is completed, it is imported into the IDEA. Because it is a Vue project, after the import is successful, you need to use the following command to install the dependency, and then run it in dev mode;
# install
npm install
# function
npm run dev
- After running successfully, find an article and experience it. The interface is still very good. Visit address: http://localhost:8080/
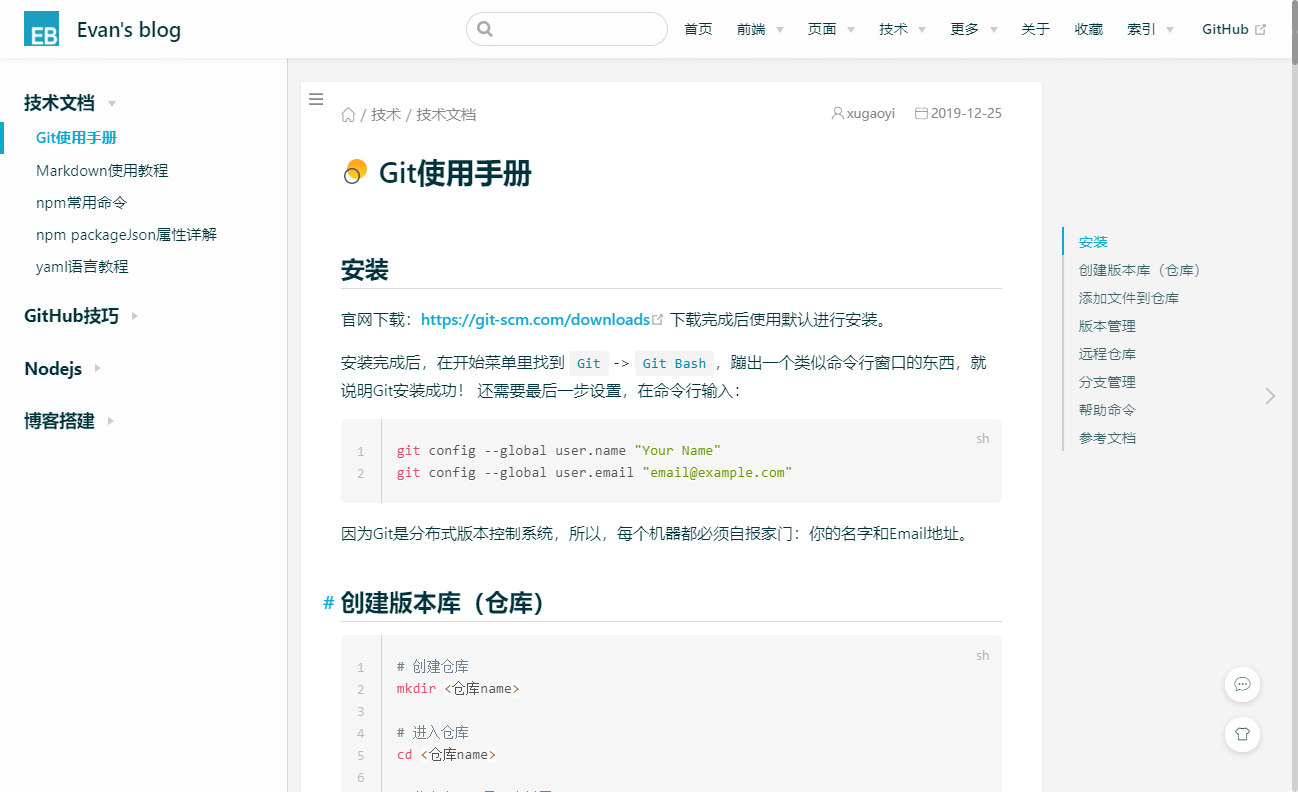
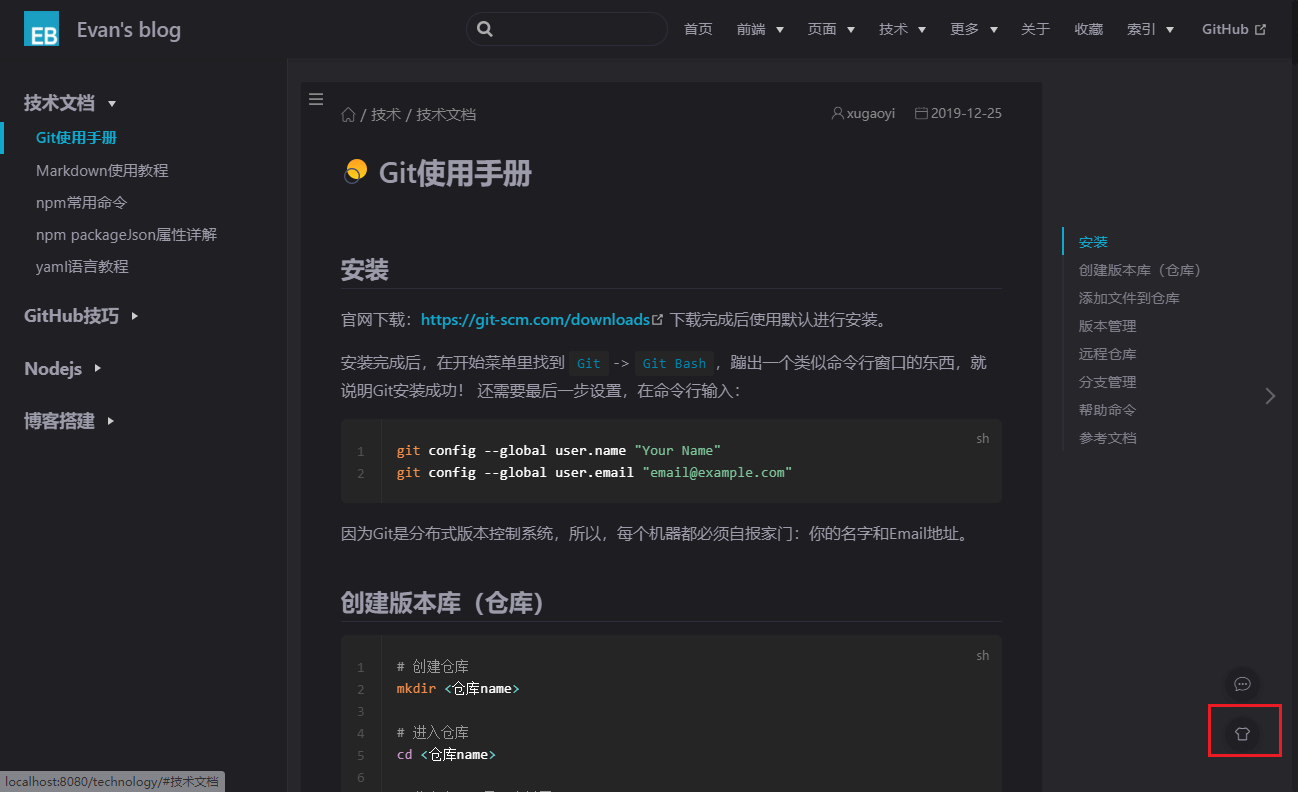
- It also supports theme switching, such as switching to dark mode.
to configure
Since Vdoing itself is a complete website, there are many articles and configurations we don't need, so we have to replace these articles and customize these configurations.
- Let's take a look at the effect of my customized home page. This theme is still very concise and looks very comfortable;

- The project files are basically in the docs directory. Let's take a look at the functions of these files;
docs
│  index.md -- Home page configuration
├─.vuepress -- It is used to store global configurations, components, static resources, etc
│  │  config.js -- Entry file for configuration file
│  │  enhanceApp.js -- Client application enhancements
│  ├─config
│  │      head.js -- Inject into page<head>Configuration in
│  │      htmlModules.js -- Insert custom html modular
│  │      nav.js -- Top navigation bar configuration
│  │      plugins.js -- Plug in configuration
│  │      themeConfig.js -- Theme configuration
│  ├─public -- Static resource directory
│  │  └─img -- For storing pictures
│  ├─styles
│  │       palette.styl -- Theme presentation configuration
│  └─<Structured directory>
├─@pages --Automatically generated folders
│      archivesPage.md -- Archive page
│      categoriesPage.md -- Classification page
│      tagsPage.md -- Tab
├─images -- Can be used to store their own pictures
└─_posts -- Folders dedicated to storing fragmented blog posts will not automatically generate directories
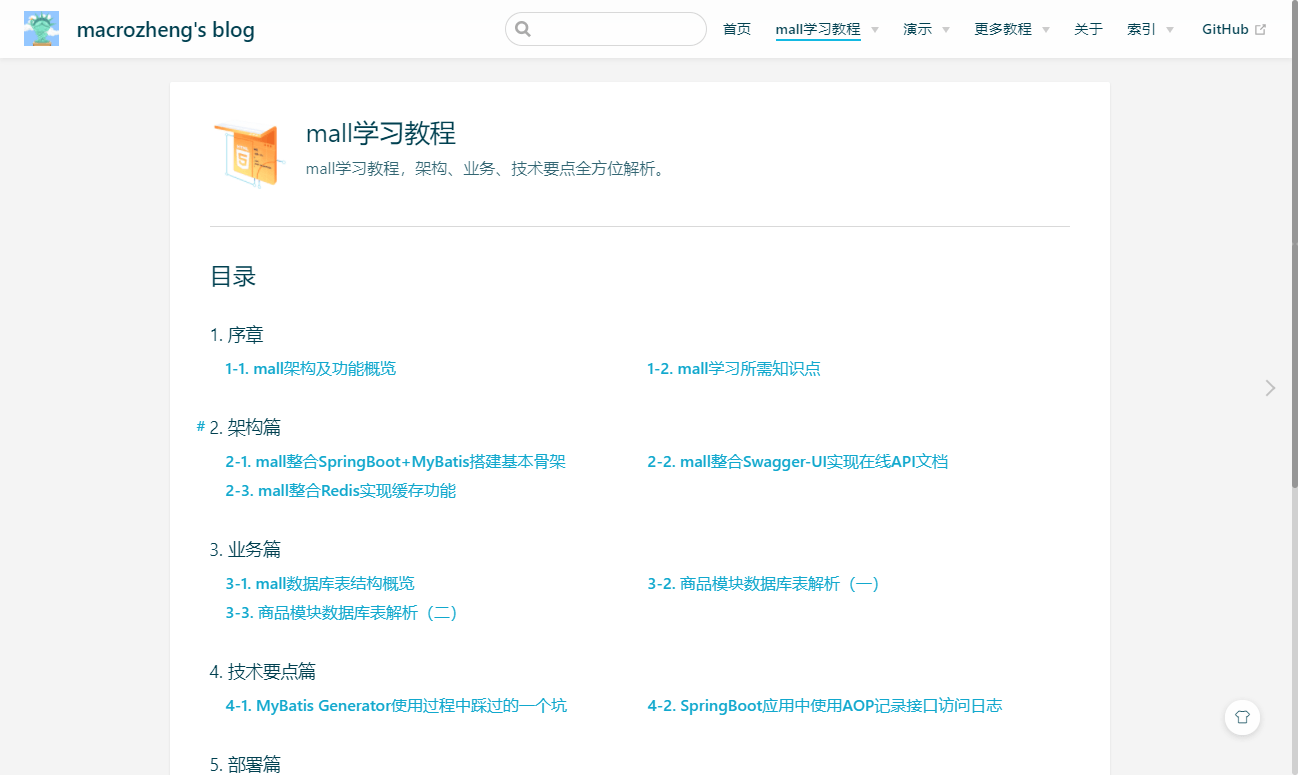
- Everyone has used SpringBoot. There is a saying that convention is better than configuration. Vdoing also has this saying. If we want to automatically generate article directories according to the directory structure, we need to add serial numbers to directories and files, such as the following directories;

- Under this directory structure, the primary directory is called column, and the secondary directory is column content. Columns are independent of each other. The above directory structure will generate the sidebar of the following structure and the outline bar on the right;

- If you still want to add a directory page to the column, you can add 02.mall learning tutorial.md as the directory in the 00. Directory page folder. The contents of the directory page are as follows. permalink can specify the permanent path of the directory page;
---
pageComponent:
  name: Catalogue
  data:
    key: 02.mall Learning tutorial
    imgUrl: /img/ui.png
    description: mall Learn the tutorial and analyze the key points of architecture, business and technology in an all-round way.
title: mall Learning tutorial
date: 2020-03-11 21:50:54
permalink: /mall-learning
sidebar: false
article: false
comment: false
editLink: false
---
- Next, you can access the directory page through the following address: http://localhost:8080/mall-learning/
- Of course, you can also modify the navigation bar to configure nav.js, which will be much more convenient to access;
module.exports = [
  { text: 'home page', link: '/' },
  {
    text: 'mall Learning tutorial',
    link: '/mall-learning/',
    items: [
      { text: 'prologue ', link: '/pages/72bed2/' },
      { text: 'Architecture', link: '/pages/c68875/' },
      { text: 'Business section', link: '/pages/c981c1/' },
      { text: 'Technical essentials', link: '/pages/fab7d9/' },
      { text: 'Deployment', link: '/pages/db2d1e/' },
    ],
  }
]
- After adding successfully, the navigation bar will display as follows. Click the navigation bar to jump to the directory;

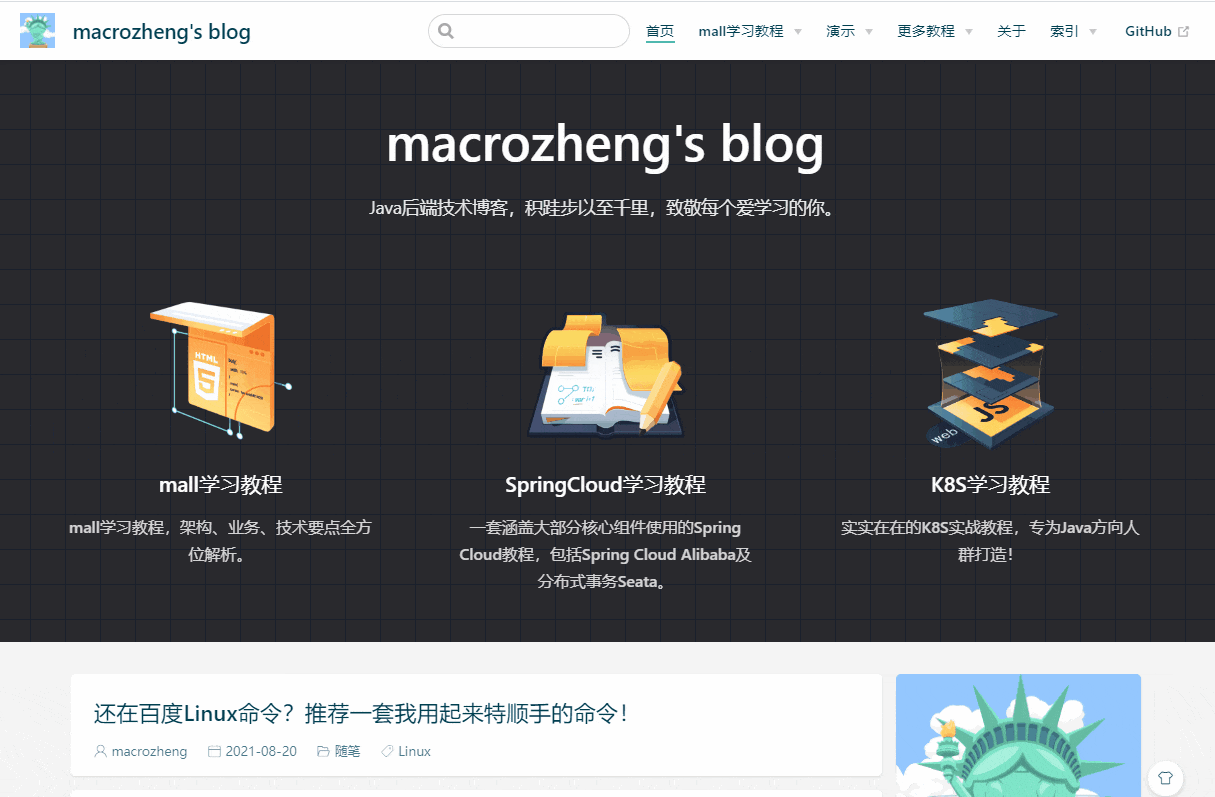
- In fact, you can also add features to index.md on the home page to achieve quick access. Here we have created three features;
---
home: true
# heroImage: /img/web.png
heroText: macrozheng's blog
tagline: Java The back-end technology blog pays tribute to everyone who loves to learn.

features: # Optional
  - title: mall Learning tutorial
    details: mall Learn the tutorial and analyze the key points of architecture, business and technology in an all-round way.
    link: /mall-learning/
    imgUrl: /img/ui.png
  - title: SpringCloud Learning tutorial
    details: A set of that covers most of the core components Spring Cloud Tutorials, including Spring Cloud Alibaba Distributed transaction Seata.
    link: /springcloud-learning/
    imgUrl: /img/other.png
  - title: K8S Learning tutorial
    details: Real K8S Practical tutorial, designed for Java Create direction for the crowd!
    link: /springcloud-learning/ # Optional
    imgUrl: /img/web.png # Optional
---
- The display effect of the home page is as follows;

- Every time we create a Markdown file of an article, we will automatically generate a front matter, such as the following format;
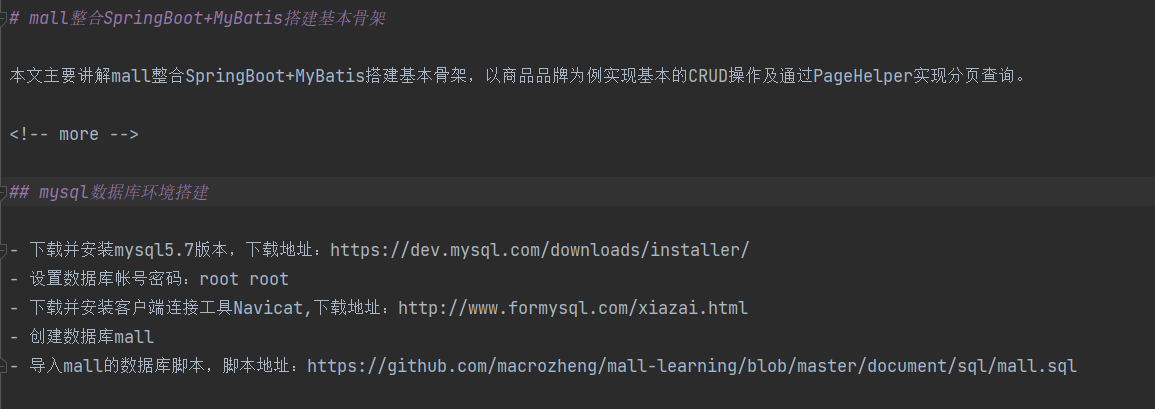
---
title: mall integration SpringBoot+MyBatis Build basic skeleton
date: 2021-08-19 16:30:11
permalink: /pages/c68875/
categories:
  - mall Learning tutorial
  - Architecture
tags:
  - SpringBoot
  - MyBatis
---
-
The following describes the functions of these attributes:
- Title: the title of the article, which is the file name by default;
- Date: the date of the article. The default is the file creation date;
- permalink: permanent link for file access, which can be modified by yourself;
- categories: the classification of articles, which will be automatically generated according to the directory;
- tags: article tag, which is convenient for finding fragmented articles.
-
If you look at the list of articles carefully, you can find that some articles will display summaries, while others will not. We can use <-- More -- > note to control the display of the summary. The contents before the note will be displayed as a summary;
- Whether the summary is displayed in the article list is compared as follows;

- If you want to modify the author information, whether the sidebar is folded, social information, copyright information at the bottom of the page and other information, you can modify the theme configuration file themeConfig.js;
// Theme configuration
module.exports = {
  nav,
  sidebarDepth: 2, // Sidebar display depth, default 1, maximum 2 (display to h3 title)
  logo: '/img/avatar.png', // Navigation bar logo
  repo: 'macrozheng', // Github links are generated on the right side of the navigation bar
  searchMaxSuggestions: 10, // Maximum number of search results displayed
  lastUpdated: 'Last update', // Start the update time and configure the prefix text string | boolean (the value is git submission time)
  docsDir: 'docs', // Edited folder
  editLinks: false, // Enable editing
  editLinkText: 'edit',

  sidebar: { mode: 'structuring', collapsable: false}, // Sidebar 'structuring' | {mode: 'structuring', collapsable: Boolean} | 'auto' | custom warm tip: the directory page data depends on the structured sidebar data. If you do not set it to 'structuring', the directory page will not be used

  author: {
    // The default author information of the article. This information can be configured separately in the md file. String | {name: String, link: String}
    name: 'macrozheng', // essential
    link: 'https://github.com/macrozheng ', / / optional
  },
  blogger: {
    // Blogger information is displayed in the sidebar of the home page
    avatar: '/img/avatar.png',
    name: 'macrozheng',
    slogan: 'This guy is lazy and doesn't write anything...',
  },
  social: {
    // Social icons are displayed in the blogger information bar and footer bar
    // iconfontCssFile: '//at.alicdn.com/t/font_1678482_u4nrnp8xp6g.css', / / optional. The online css file address of Ali icon library. Icons without themes can be added freely
    icons: [
      {
        iconClass: 'icon-github',
        title: 'GitHub',
        link: 'https://github.com/macrozheng',
      },
      {
        iconClass: 'icon-gitee',
        title: 'Gitee',
        link: 'https://gitee.com/macrozheng',
      },
      {
        iconClass: 'icon-juejin',
        title: 'Nuggets',
        link: 'https://juejin.cn/user/958429871749192',
      }
    ],
  },
  footer: {
    // Footer information
    createYear: 2019, // Blog creation year
    copyrightInfo:
      'marcozheng | <a href="https://github.com/xugaoyi/vuepress-theme-vdoing/blob/master/LICENSE" target="_ Blank "> MIT license < / a > '/ / blog copyright information, support a tag
  },
  htmlModules // Insert html module
}
- Vdoing adds many plug-ins, some of which you can't use. You can disable them by modifying plugins.js. For example, disable Baidu statistics plug-in, and change the second parameter to false;
// Plug in configuration
module.exports = [
  [
    'vuepress-plugin-baidu-tongji', // Baidu statistics
    false, //Disable
    {
      hm: 'xxx',
    },
  ],
]
- Vdoing light color theme the default code block theme is also a light color theme. We can change it to a dark color theme by modifying the palette.styl e file;
 // Light mode
 .theme-mode-light
   // Code block light theme
   //--codeBg: #f6f6f6
   //--codeColor: #525252
   //codeThemeLight()
    // Code block dark theme
    --codeBg: #252526
    --codeColor: #fff
    codeThemeDark()
- The columns with serial numbers placed in the docs primary directory will generate a directory by default. If we don't want to generate a structured directory for some fragmented articles, we can put them in the _posts directory;
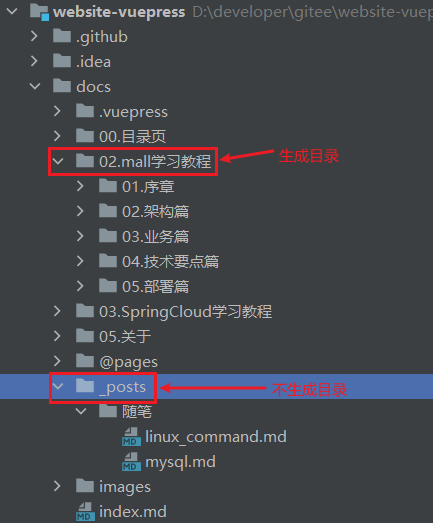
- The Linux command article does not generate a structured directory, but uses the secondary title in the article to generate a directory.

deploy
VuePress is also very simple to generate a website. You can package it with one command, and then place it in the html directory of Nginx.
- Use the npm run build command on the command line to package the project into a static file. The output file directory is docs/.vuepress/dist;

- Next, copy all the files in the dist directory to the html directory of Nginx to complete the deployment. The displayed content after deployment is as follows.

summary
Using VuePress+Vdoing to build document websites is not only cool, but also powerful! Compared with docsify's dynamic document generation, VuePress generates static pages with better performance and is more SEO friendly. Docsify is basically enough if you only want to build simple single project documents. If you want to build multi project documents or Blog websites, it is recommended that you use it Use VuePress.
reference material
- Vuepress theme vdoing official website: https://doc.xugaoyi.com/
- VuePress website: https://vuepress.vuejs.org/zh/
Project address
https://github.com/xugaoyi/vuepress-theme-vdoing
This article GitHub https://github.com/macrozheng/mall-learning Already included, welcome to Star!