When the WeChat applet encounters AR, what kind of sparks will it wipe out?Expectation and excitement...
Through this tutorial, you can start from the foundation to create an AR framework for a WeChat applet, all of which are open source and available for everyone to learn.
This course requires some foundation: WeChat Developer Tools, JavaScript, Html, Css
Chapter IV: Foundation - Combination of Camera and Three.js
[Summary of Previous Situation]
In the previous two chapters, we learned the basic camera data reading and the creation of Three.js three-dimensional scenes.After learning these two chapters, we can do a lot of more customized development.For example:
1. We can already develop AR content based on camera images (e.g. face recognition, AR make-up, lipstick, hat, glasses, etc.)
2. WebGL's three-dimensional games.
This chapter is both a foundation and a sublimation, mainly discussing how to present the background of the camera picture in the WeChat applet, and then render the three-dimensional content of WebGL on the background.
| 1. To access the camera in the WeChat applet, and to get the data of each frame in real time. |
| 2. Implement access to WebGL interface in the WeChat applet to draw three-dimensional objects.This tutorial uses the Three.js engine |
| 3. Realize the display of 3D objects of WebGL on the background of the real-time picture of the camera. |
| 4. Whole Frame Building |
| 5. Image algorithm access |
[Objective]
WebGL content is rendered on the background of the camera picture in the WeChat applet
[scenario]
Before we start development, we want to list the possible solutions.
To render WebGL content on top of a camera picture, one solution is easy to think of:
Option 1: Double-Layer Canvas Structure
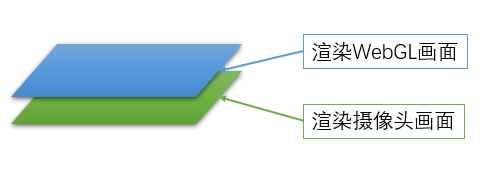
As shown in the image above, we can build two canvas, one to render the camera's image and the other to render the WebGL's image.The WebGL picture is on the top, while the camera picture is on the bottom, and the background of the WebGL canvas is transparent.
This scenario requires that our canvas support multilayer structure and that the WebGL background support transparency.
Scenario 2: Single layer Canvas, WebGL interior plane map
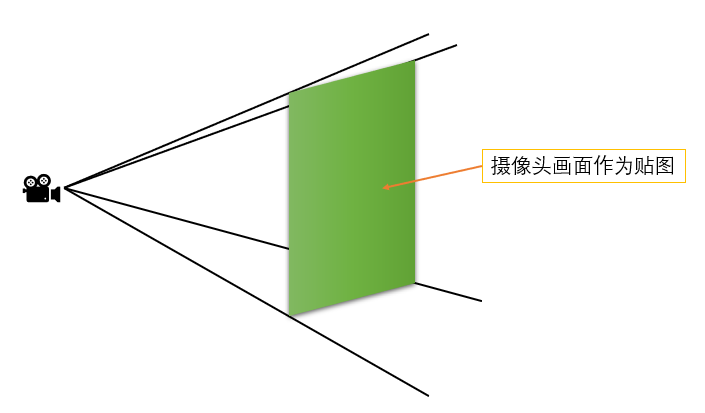
This scenario uses a pure WebGL canvas to create a vertical plane facing the camera in the scene and display each frame of the camera picture as a map on the plane.
Of course, each has its own advantages and disadvantages, for the moment:
1. The advantage of Scheme 1 is that it is simple and does not require adding objects to the scene and mapping each frame.However, the WebGL transparent background may not be well supported by different mobile phones. In addition, when calculating the position of objects on the WebGL layer, coordinates on the camera screen layer need to be converted to display normally.
2. Scenario 2, the structure is relatively complex, but it can be more adaptable, all using WebGL hardware acceleration.The coordinate conversion between the three-dimensional object and the camera picture is done in the same scene.
[Prepare]
Next, we need to set up the environment and do some preparatory work.
First, you need to register the WeChat applet developer. Registration Address=>
After successful registration, you need to download the WeChat applet development tool. Download Address=>
The current development environment of the author is Windows 10
The downloaded version of the WeChat applet is RC v1.0.2.1909111
[Create a project]
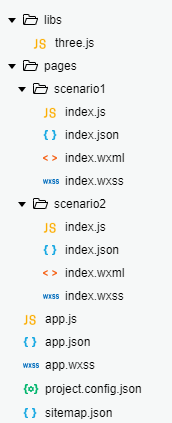
Follow the same steps as in Chapter 2 above to create a simple basic project.That's not going to be repeated here.Here we set up two page s, scenario 1 and scenario 2, to demonstrate the two scenarios.Also add the "libs" folder and put in the 3.js file that was modified in Chapter 3.Once established, the project directory is as follows:
[Development: scenario one (under scenario 1 folder)]
First, in the index.wxml file, we sequentially add two layers for the camera and WebGL:
<!--index.wxml-->
<view>
  <!--WebGL layer-->
  <canvas
    type="webgl"
    id="webgl"
    canvas-id="webgl"
    style="position:fixed;top:0;width:{{canvasWidth}}px;height:{{canvasHeight}}px;z-index:1;">
  </canvas>
  <!--Camera Layer-->
  <camera
    mode="normal"
    device-position="back"
    flash="auto"
    frame-size="medium"
    style="position:fixed;top:0;width:100%;height:100%;z-index:0;">
  </camera>
</view>
Note that the style attribute in both tags adds position,top, and z-index field settings to the previous two chapters so that each layer starts at the top of the most mobile screen and ensures that the WebGL layer is on top.
Next, we can copy the code from the previous chapter about rotating cube created by 3.js.That is, copy the contents of the index.js file from the previous chapter.The only modification you need to make is to specify that the background of the WebGLRenderer renderer is transparent when you create it.The code is as follows:
//index.js

//Import three.js library
import * as THREE from '../../libs/three.js'

//Get Application Instances
const app = getApp();

Page({
  data: {
    canvasWidth: 0,
    canvasHeight: 0
  },

  /**
   * Page Load Callback Function
   */
  onLoad: function () {
    //Initialization Canvas object
    this.initWebGLCanvas();
  },
  /**
   * Initialize Canvas object
   */
  initWebGLCanvas: function () {
    //Get the labels on the page id by webgl Object to get the canvas object
    var query = wx.createSelectorQuery();
    query.select('#webgl').node().exec((res) => {
      var canvas = res[0].node;
      this._webGLCanvas = canvas;
      //Get system information, including screen resolution, display area size, pixel ratio, etc.
      var info = wx.getSystemInfoSync();
      this._sysInfo = info;
      //Set up canvas Size, which is defined by multiplying the window size by the pixel ratio
      this._webGLCanvas.width = this._sysInfo.windowWidth * this._sysInfo.pixelRatio;
      this._webGLCanvas.height = this._sysInfo.windowHeight * this._sysInfo.pixelRatio;
      //Set up canvas Style
      this._webGLCanvas.style = {};
      this._webGLCanvas.style.width = this._webGLCanvas.width.width;
      this._webGLCanvas.style.height = this._webGLCanvas.width.height;
      //Set Display Layer canvas Binding Style style Data, the page layer is defined directly by the window size
      this.setData({
        canvasWidth: this._sysInfo.windowWidth,
        canvasHeight: this._sysInfo.windowHeight
      });
      this.initWebGLScene();
    });
  },
  /**
   * Initialize WebGL Scenarios
   */
  initWebGLScene: function () {
    //Create Camera
    var camera = new THREE.PerspectiveCamera(60, this._webGLCanvas.width / this._webGLCanvas.height, 1, 1000);
    this._camera = camera;
    //Create Scene
    var scene = new THREE.Scene();
    this._scene = scene;

    //Establish Cube Geometry
    var cubeGeo = new THREE.CubeGeometry(30, 30, 30);
    //Create materials and set them as basic materials (no light will be reflected, set the material color to green)
    var mat = new THREE.MeshBasicMaterial({ color: 0x00FF00 });
    //Establish Cube Of Mesh object
    var cube = new THREE.Mesh(cubeGeo, mat);
    //Set up Cube Position of object
    cube.position.set(0, 0, -100);
    //take Cube Join the scene
    this._scene.add(cube);

    //Create Renderer,Specify renderer background transparency
    var renderer = new THREE.WebGLRenderer({
      canvas: this._webGLCanvas,
      alpha:true
    });
    //Set Renderer Size
    this._renderer = renderer;
    this._renderer.setSize(this._webGLCanvas.width, this._webGLCanvas.height);
    //Record the current time
    var lastTime = Date.now();
    this._lastTime = lastTime;
    //Start Rendering
    this.renderWebGL(cube);
  },
  /**
   * renderer
   */
  renderWebGL: function (cube) {
    //Get the time of the current frame
    var now = Date.now();
    //Calculate time interval,Because Date Object returns in milliseconds, so divide by 1000 to get the time interval in seconds
    var duration = (now - this._lastTime) / 1000;
    //Print frame rate
    console.log(1 / duration + 'FPS');
    //Re-assign last frame time
    this._lastTime = now;
    //rotate Cube Object, where you want every second Cube Object follows Y Rotate axis 180 degrees ( Three.js Medium radian is, so is Math.PI)
    cube.rotation.y += duration * Math.PI;

    //Render the execution scene, specifying what the camera sees
    this._renderer.render(this._scene, this._camera);
    //Set the frame callback function and call the custom rendering function for each frame
    this._webGLCanvas.requestAnimationFrame(() => {
      this.renderWebGL(cube);
    });
  }
})
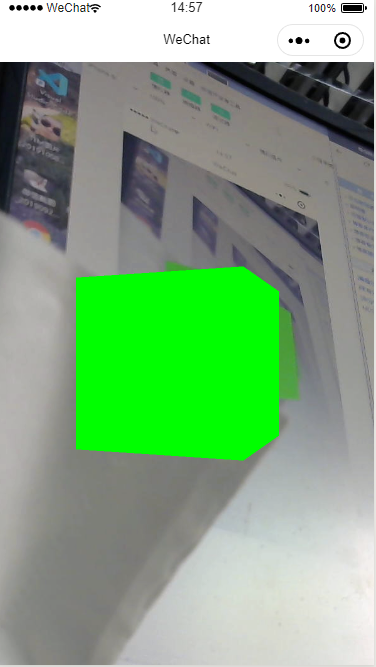
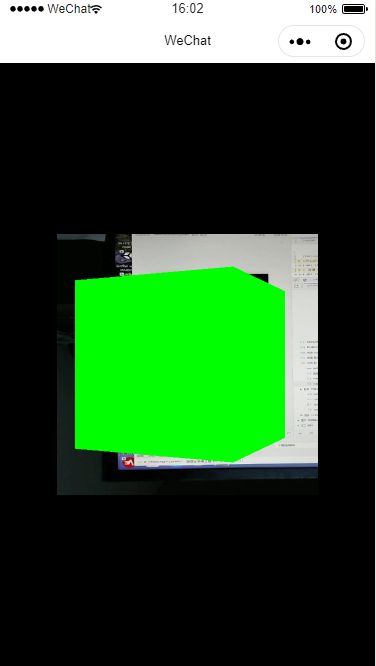
Save the code, compile and run, and we can see that our rotating Cube appears on the background of the camera picture (the same effect is tested on the real machine), and the frame rate is maintained around 60FPS.
[Development: Scenario 2 (under scenario 2 folder)]
Following the previous description of the scenario, we:
1. First create a Geometry with a Plane plane in the scene
2. Next we update a map in Camera's callback function
3. Finally apply the new map to the Plane plane in the Renderer Update
First, let's write the index.wxml file with the following code:
<!--pages/scenario2/index.wxml-->
<view>
<canvas
    type="webgl"
    id="webgl"
    canvas-id="webgl"
    style="position:fixed;top:0;width:{{canvasWidth}}px;height:{{canvasHeight}}px;">
  </canvas>
  <!--Camera Layer-->
  <camera
    mode="normal"
    device-position="back"
    flash="auto"
    frame-size="medium"
    style="position:fixed;top:-100%;width:100%;height:100%;">
  </camera>
</view>
In this code, instead of specifying a z-index value, set the top property of the camera Camera tag to -100%, so that this layer is outside the screen and will not be displayed.Because we will show the webcam display in WebGL later.
Next, we can write the index.js file.
//index.js

//Import three.js library
import * as THREE from '../../libs/three.js'

//Get Application Instances
const app = getApp();

Page({
  data: {
    canvasWidth: 0,
    canvasHeight: 0
  },

  /**
   * Page Load Callback Function
   */
  onLoad: function () {
    //Initialization Camera
    this.initCamera();
    //Initialization Canvas object
    this.initWebGLCanvas();
  },
  /**
   * Initialize Canvas object
   */
  initWebGLCanvas: function () {
    //Get the labels on the page id by webgl Object to get the canvas object
    var query = wx.createSelectorQuery();
    query.select('#webgl').node().exec((res) => {
      var canvas = res[0].node;
      this._webGLCanvas = canvas;
      //Get system information, including screen resolution, display area size, pixel ratio, etc.
      var info = wx.getSystemInfoSync();
      this._sysInfo = info;
      //Set up canvas Size, which is defined by multiplying the window size by the pixel ratio
      this._webGLCanvas.width = this._sysInfo.windowWidth * this._sysInfo.pixelRatio;
      this._webGLCanvas.height = this._sysInfo.windowHeight * this._sysInfo.pixelRatio;
      //Set up canvas Style
      this._webGLCanvas.style = {};
      this._webGLCanvas.style.width = this._webGLCanvas.width.width;
      this._webGLCanvas.style.height = this._webGLCanvas.width.height;
      //Set Display Layer canvas Binding Style style Data, the page layer is defined directly by the window size
      this.setData({
        canvasWidth: this._sysInfo.windowWidth,
        canvasHeight: this._sysInfo.windowHeight
      });
      //Initialize scene
      this.initWebGLScene();
    });
  },
  /**
   * Initialize camera
   */
  initCamera:function()
  {
    //Obtain Camera Coontext object
    const cContex = wx.createCameraContext();
    //Add Frame Callback Event Listener
    const listener = cContex.onCameraFrame((frame) => {
      //In the callback event, get the data for each frame
      var data = new Uint8Array(frame.data);
      //adopt RGBA Data format generation map
      var tex = new THREE.DataTexture(data, frame.width, frame.height, THREE.RGBAFormat);
      //Clean up the map of secondary camera data
      if(this._tex != null)
      {
        this._tex.dispose();
      }
      //Keep the map of the latest frame
      this._tex = tex;
    });
    //lsnrctl start
    listener.start();
  },
  /**
   * Initialize WebGL Scenarios
   */
  initWebGLScene: function () {
    //Create Camera
    var camera = new THREE.PerspectiveCamera(60, this._webGLCanvas.width / this._webGLCanvas.height, 1, 1000);
    this._camera = camera;
    //Create Scene
    var scene = new THREE.Scene();
    this._scene = scene;

    //Establish Cube Geometry
    var cubeGeo = new THREE.CubeGeometry(30, 30, 30);
    //Create materials and set them as basic materials (no light will be reflected, set the material color to green)
    var mat = new THREE.MeshBasicMaterial({ color: 0x00FF00 });
    //Establish Cube Of Mesh object
    var cube = new THREE.Mesh(cubeGeo, mat);
    //Set up Cube Position of object
    cube.position.set(0, 0, -100);
    //take Cube Join the scene
    this._scene.add(cube);

    //Create Planar Geometry
    var planeGeo = new THREE.PlaneGeometry(100,100);
    //Creating planar MEsh
    var plane = new THREE.Mesh(planeGeo,new THREE.MeshBasicMaterial());
    //Set the position of the plane so that it does not block the front Cube,So set the plane farther away.
    plane.position.set(0,0,-200);
    //Add a plane to the scene
    this._scene.add(plane);

    //Create Renderer,Specify renderer background transparency
    var renderer = new THREE.WebGLRenderer({
      canvas: this._webGLCanvas,
    });
    //Set Renderer Size
    this._renderer = renderer;
    this._renderer.setSize(this._webGLCanvas.width, this._webGLCanvas.height);
    //Record the current time
    var lastTime = Date.now();
    this._lastTime = lastTime;
    //Start Rendering
    this.renderWebGL(cube,plane);
  },
  /**
   * renderer
   */
  renderWebGL: function (cube,plane) {
    //Get the time of the current frame
    var now = Date.now();
    //Calculate time interval,Because Date Object returns in milliseconds, so divide by 1000 to get the time interval in seconds
    var duration = (now - this._lastTime) / 1000;
    //Print frame rate
    //console.log(1 / duration + 'FPS');
    //Re-assign last frame time
    this._lastTime = now;
    //rotate Cube Object, where you want every second Cube Object follows Y Rotate axis 180 degrees ( Three.js Medium radian is, so is Math.PI)
    cube.rotation.y += duration * Math.PI;
    //Set up plane Mapping of
    if(this._tex != null)
    {
      //When the current camera map exists
      if(plane.material != null)
      {
        //Clean up the material of the last frame
        plane.material.dispose();
      }
      //Generate new materials with new maps and assign them to flat objects
      plane.material = new THREE.MeshBasicMaterial({color: 0xFFFFFF, map: this._tex});
    }
    //Render the execution scene, specifying what the camera sees
    this._renderer.render(this._scene, this._camera);
    //Set the frame callback function and call the custom rendering function for each frame
    this._webGLCanvas.requestAnimationFrame(() => {
      //Start next frame rendering
      this.renderWebGL(cube,plane);
    });
  }
})
There are several changes to the new Js:
1. First, a custom function initCamera to initialize Camera is added to the OnLoad function, which adds a frame event listener and generates a new map on this._tex object with the data returned from each frame.Where we created the map, we used the DataTexture map type of Three.js, which creates the map from an array of pixel values.In Chapter 2, we already know that the data returned from the frame callback function of a mobile phone camera is in the form of RGBA, so you can create the map correctly in this format.
2. In the scene initialization function, a new plane is created, which is placed farther away from Cube than Camera.This will not block Cube.
3. In the rendering function, a plane object is passed in, and the map of the plane is updated with each rendering.
Save, compile, and we'll see the final result (live testing works as well):
However, we will find that there are some problems now, that is, the map of the camera on Plane is reversed, with the left and right side upside down.In other words, the order of pixels in the value of each frame returned from the frame event of the face camera is different from that in the Texture of the map in 3.js.So we need to rotate the planes to see the correct results.On the other hand, the opposite problem is left and right. After rotation, it reaches the back of the plane. By default, the back of the plane will not be displayed.So we need to set the flat material to be double-sided so that we can show the content on the back.
So to modify it, the code at the time the plane was created:
//Create Planar Geometry
    var planeGeo = new THREE.PlaneGeometry(100,100);
    //Creating planar MEsh
    var plane = new THREE.Mesh(planeGeo,new THREE.MeshBasicMaterial());
    //Set the position of the plane so that it does not block the front Cube,So set the plane farther away.
    plane.position.set(0,0,-200);
    //Rotate the direction of the plane to display the camera picture correctly
    plane.rotation.z = Math.PI;
    plane.rotation.y = Math.PI;
    //Add a plane to the scene
    this._scene.add(plane);
And code for creating materials in rendering functions
//Set up plane Mapping of
    if(this._tex != null)
    {
      //When the current camera map exists
      if(plane.material != null)
      {
        //Clean up the material of the last frame
        plane.material.dispose();
      }
      //Generate new textures with new maps to assign to flat objects and set to double-sided textures
      plane.material = new THREE.MeshBasicMaterial({color: 0xFFFFFF, map: this._tex, side:THREE.DoubleSide});
    }
This gives us the right picture.
But now careful friends will have new questions.The length and width of the map created by the camera is based on the length and width of each frame, i.e. frame.height s and frame.width, but we have pasted this map on a square plane. Because the size of the map is not square, it will stretch or compress the last view.In addition, the whole plane does not occupy the whole screen.
These problems require understanding the three-dimensional spatial knowledge of Three.js, and using the aspect ratio and perspective matrix of the screen to calculate the correct plane width of the plane object, so that the plane can be displayed in full screen.
You will be asked again that the plane and Cube are now in a three-dimensional scene. If the object in the scene is enlarged or the position is close to the plane, collisions will occur, resulting in display bug s.
This is one drawback of our scheme two.It can also take many forms to repair.For example, multiple cameras render camera images and three-dimensional scenes and then paste them together, which is a bit like the hierarchy of multiple Canvas in CSS.You can also change the position of the plane s at the farthest point all the time, and so on.
These require specific outcomes in the actual application scenario.
[Summary]
Through this chapter, we have finally made some qualitative changes.Three-dimensional objects can be displayed against the background of the camera.Of course, through this chapter, we also learned how to turn the camera picture into a map and apply it to three-dimensional objects.
So far, several basic elements of AR have been technically implemented to acquire camera data, display three-dimensional objects, and display three-dimensional objects in front of camera images.This allows us to implement the existing AR scheme described in Chapter 1 in our applet, which identifies a picture showing a three-dimensional object without following information.
There is no follow information, that is, there is no need to change the position of a three-dimensional object at any time according to the change of the camera picture behind it.
If you want to make a real AR, you need a more complete framework for applying different algorithms to achieve different effects.So the following sections will provide a deeper and more structured explanation.Start with the framework of the program to open the real door of AR.