WeChat Applet
1. Introduction of WeChat applet
WeChat Program, short for Mini Program, is a kind of Mini Program that can make without download and installation.
Applying the dream of "reachable", users can sweep or search under it to open the corresponding
1.1 Overview
1. WeChat has a large number of products, and is very sticky. It is easier to reach them when developing products in WeChat.
2. The cost of pushing app s or public numbers is too high.
3. Low cost of development and adaptation.
4. Easy scale trial and error, then fast iteration.
5. Cross-platform.
1.2 History
- 2016 Year 1 11, WeChat's Zhang Mu appeared in public after many years, interpreting WeChat's four values.Zhang Qimu points out that more and more products are made with public numbers because it is cheaper to develop, acquire and disseminate.The split service number does not provide better service, so WeChat is researching a new form inside, called「WeChat Program」It is important to note that it was called Ying_before

- 2016 On September 21, the WeChat program officially opened internal testing.In the state of WeChat, the programs of WeChat that are within reach and completed have attracted wide attention.Tencent Cloud officially launched WeChat program to solve cases, providing programs in the cloud server technology cases.

- 2017 In year 1_9_, the program launched by WeChat officially came online.Program"is a kind of machine which needs to be installed to make the machine"respond".No need to download as usual App,_In a micro-letter, is complete.
2. Catalogue of Applet Structure
The goal of the applet framework is to enable developers to re-tweet services with a native APP experience in as simple and efficient a way as possible
The applet framework provides its own view layer description languages, WXML and WXSS, as well as JavaScript, and data transfer and event systems between view and logical layers, enabling developers to focus on data and logic
2.1 Applet file structure versus traditional web
| structure | Traditional web | WeChat Applet |
|---|---|---|
| structure | HTML | WXML |
| style | CSS | WXSS |
| logic | Javascript | Javascript |
| To configure | nothing | JSON |
From the above comparison, the traditional web is a three-tiered structure.The WeChat applet is a four-tier structure with one more layer of configuration.json
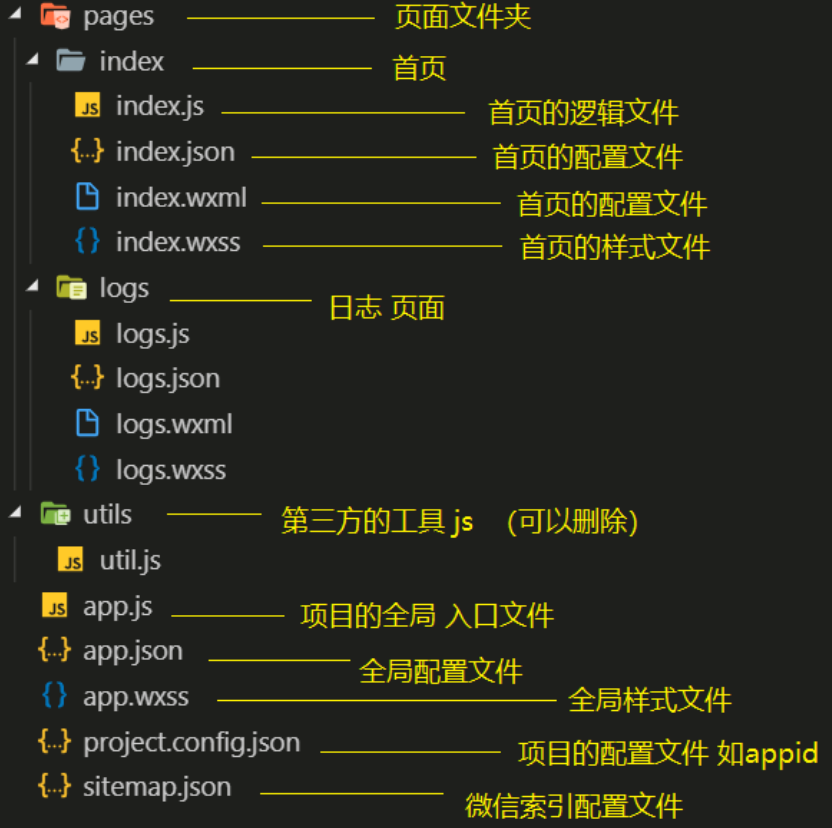
2.2 Basic Project Directory
3. Applet Profile
A applet application consists of two basic configuration files.One is the global app.json and the page.json of the page itself
Note: Notes cannot appear in the configuration file
3.1 Global configuration app.json
app.json is the global configuration of the current program, including all paths, boundaries, network timeout, bottom of the program
Department tab, etc.app.json Configuration for Common Quick Launch Item_Edge
{
 "pages":[
  "pages/index/index",
  "pages/logs/logs"
	],
 "window":{
  "backgroundTextStyle":"light",
  "navigationBarBackgroundColor": "#fff",
  "navigationBarTitleText": "WeChat",
  "navigationBarTextStyle":"black"
	}
}
The meaning of the field:
1. Page field - Used to describe all the page paths of the current applet, in order to let the WeChat client know which directory your applet pages are currently defined in
2. window field - Defines the top background color, text color definition, etc. for all pages of the applet
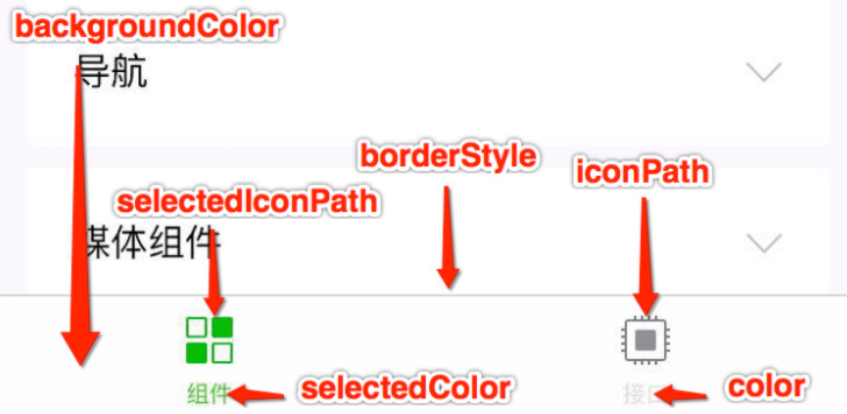
3.1.1 tabbar
3.2 Page Configuration page.json
page.json is a configuration used to represent pages.json in the page directory and related to applet pages.
Developers can independently define some properties of each page, such as the top color, whether drop-down refreshes are allowed, and so on
The configuration of the page can only set the content of the window configuration item in app.json, which overrides the same configuration item in app.json's window
| attribute | type | Default value | describe |
|---|---|---|---|
| navigationBarBackgroundColor | HexColor | #000000 | Navigation bar background color, such as #000000 |
| navigationBarTextStyle | String | white | Navigation bar Title Yan, only hold black / white |
| navigationBarTitleText | String | Navigation bar Title word content | |
| backgroundColor | HexColor | #ffffff | Background of window |
| backgroundTextStyle | String | dark | Drop-down loading style, dark / light only |
| enablePullDownRefresh | Boolean | false | Whether to turn on drop-down refresh globally |
| onReachBottomDistance | Number | 50 | Distance from the bottom of a drag-up bottom event in px when triggered |
| disableScroll | Boolean | false | When set to true, the scroll cannot go up or down as a whole.Valid only in configuration, method sets this item in app.json |
3.3 sitemap Configuration
Program Root Recorded sitemap.json Items Configuring Programs and whether they are allowed to be indexed by WeChat
IV. Template Grammar
WXML (WeiXin Markup Language) is a tag language for framework design, which combines basic components and event systems to build a page structure
4.1 Data Binding
<!--
  1 text Equivalent to previous web In span Label inline elements do not wrap
  2 view Equivalent to previous web In div Label block level elements wrap
  3 checkbox Previous check box labels
 -->
4.1.1 Common Writing
<!-- 1 Character string -->
<view> {{msg}} </view>
<!-- 2 Number type -->
<view>{{num}}</view>
<!-- 3 bool type  -->
<view> Is it a pseudonym: {{isGirl}} </view>
<!-- 4 object type -->
<view>{{person.age}}</view>
<view>{{person.height}}</view>
<view>{{person.weight}}</view>
<view>{{person.name}}</view>
<!-- 5 Use in tag properties -->
<view data-num="{{num}}"> Custom Properties</view>
Page({
    data: {
        msg: "hello mina",
        num: 10000,
        isGirl: false,
        person: {
            age: 74,
            height: 145,
            weight: 200,
            name: "rich woman"
        },
        isChecked:false,
        list:[
            {
                id:0,
                name:"Zhu Bajie"
            },
            {
                id:1,
                name:"Cop-Tur"
            },
            {
                id:2,
                name:"Enlightenment"
            }
        ]
    }
});
4.1.2 Component Properties
<view id="item-{{id}}"> </view>
Page({
    data: {
        id: 0
    }
})
4.1.3 bool type
Do not write checked="false" directly, it evaluates to a string
<!--
  6 Use bool Types act as attributes checked
    1 There must be no space between the string and curly brackets or recognition will fail
      The following are examples of errors
         <checkbox checked="       {{isChecked}}"> </checkbox>

 -->
             <view>
             <checkbox checked="{{isChecked}}"> </checkbox>
</view>
4.2 Operation
4.2.1 Ternary Operator
<view hidden="{{flag ? true : false}}"> Hidden </view>
4.2.2 Arithmetic operations
<view> {{a + b}} + {{c}} + d </view>
Page({
    data: {
        a: 1,
        b: 2,
        c: 3
    }
})
4.2.3 Logical Judgment
<view wx:if="{{length > 5}}"> </view>
4.2.4 String Operations
<!--
  7 operation => Expression
    1 You can include expressions in curly brackets --  "Statement"
    2 Expression
      Refers to some simple arithmetic operations, string splicing logical operations.
      1 Add or subtract numbers.
      2 StringBuilder
      3 Ternary expression
    3 Sentence
      1 Complex code snippets
        1 if else
        2 switch
        3 do while . . . .
        4 for . . .
 -->
<view>{{1+1}}</view>

<view>{{'1'+'1'}}</view>

<view>{{ 11%2===0 ? 'Even numbers' : 'Odd Number' }}</view>
4.2.5 Notes
If there is a space between curly brackets and quotation marks, it will eventually be parsed into a string
4.3 List Rendering
4.3.1 wx:for
The variable name of an item defaults to item wx:for-item to specify the variable name of the current element of the array
The following table variable name defaults to index wx:for-index to specify the variable name of the current subscript of the array
wx:key is used to improve the performance of array rendering
The value of the wx:key binding is selected as follows
1. string type, only attributes in loop items such as
list:[{id:0,name:"Fried rice"},{id:1,name:"Stir-Fried Noodles with Vegetables"}]
wx:key="id"
2. The reserved word *this, which means the item itself, *this must represent a unique string and array
list:[1,2,3,4,5]
wx:key="*this"
Example:
<!--
  8 List Loop
    1 wx:for="{{Array or object}}"  wx:for-item="Name of loop item"  wx:for-index="Index of Circular Items"
    2 wx:key="Unique value" Used to improve list rendering performance
      1 wx:key When binding a normal string, the string name must be the only property of the object in the loop array
      2 wx:key ="*this"  That means your array is a normal array  *this Representation is a circular item
        [1,2,3,44,5]
        ["1","222","adfdf"]
    3 When a nested loop of arrays occurs, it is especially important to note that the following bindings do not have duplicate names
        wx:for-item="item" wx:for-index="index"
    4 By default, we don't write
       wx:for-item="item" wx:for-index="index"
       The applet also adds the name of the loop item and the name of the index item and index
       If there is only one loop ( wx:for-item="item" wx:for-index="index") Can be omitted

  9 Object Loop
    1 wx:for="{{object}}" wx:for-item="Value of object"  wx:for-index="Object Properties"
    2 It's best to loop through objects item and index All names have been changed
      wx:for-item="value"  wx:for-index="key"

 -->
<view>
    <view
          wx:for="{{list}}"
          wx:for-item="item"
          wx:for-index="index"
          wx:key="id"
          >
        Indexes:{{index}}
        --
        value:{{item.name}}
    </view>
</view>

<view>
    <view>Object Loop</view>
    <view
          wx:for="{{person}}"
          wx:for-item="value"
          wx:for-index="key"
          wx:key="age"
          >
        attribute:{{key}}
        --
        value:{{value}}
    </view>
</view>
Page({
    data: {
        person: {
            age: 74,
            height: 145,
            weight: 200,
            name: "rich woman"
        },
        list:[
            {
                id:0,
                name:"Zhu Bajie"
            },
            {
                id:1,
                name:"Cop-Tur"
            },
            {
                id:2,
                name:"Enlightenment"
            }
        ]
    }
});
4.3.2 block
Render block s containing multiple nodes?Blocks don't end up being real dom elements
<block wx:for="{{[1, 2, 3]}}" wx:key="*this" >
    <view> {{index}}: </view>
    <view> {{item}} </view>
</block>
Example
<!--
   10 block
    1 Label for placeholders
    2 You can see the label exists when you write the code
    3 Page Rendering Applet will remove it
  -->

<view>
    <block
           wx:for="{{list}}"
           wx:for-item="item"
           wx:for-index="index"
           wx:key="id"
           class="my_list"
           >
        Indexes:{{index}}
        --
        value:{{item.name}}
    </block>
</view>
4.4 Conditional Rendering
4.4.1 wx:if
In the framework, let wx:if='{{condition}}'determine if the code block needs to be rendered:
<view wx:if="{{false}}">1</view>
<view wx:elif="{{true}}">2</view>
<view wx:else>3</view>
4.4.2 hidden
<view hidden="{{condition}}"> True </view>
Contrast the two
  <!--
    11 conditional rendering
      1 wx:if="{{true/false}}"
        1 if , else , if else
        wx:if
        wx:elif
        wx:else
      2 hidden
        1 Add attributes directly to labels hidden
        2 hidden="{{true}}"

      3 Which scene to use in which
        1 Show preference when labels are not frequently switched wx:if
          Remove labels directly from the page structure
        2 Preferred when labels frequently switch display hidden
          Switch display by adding styles
          hidden Property Do Not and Style display Use together
   -->

<view>
    <view>conditional rendering</view>
    <view wx:if="{{true}}">display</view>
    <view wx:if="{{false}}">hide</view>

    <view wx:if="{{flase}}">1</view>
    <view wx:elif="{{flase}}">2 </view>
    <view wx:else> 3 </view>

    <view>---------------</view>
    <view hidden >hidden1</view>
    <view hidden="{{false}}" >hidden2</view>

    <view>-----000-------</view>
    <view wx:if="{{false}}">wx:if</view>
    <view hidden  style="display: flex;" >hidden</view>
</view>
5. Binding of applet events
Bind events in applets, through the bind keyword.Different components such as bindtap, bindinput, bindchange support different events.
5.1 wxml
<input bindinput="handleInput" />
5.2 page
Page({
    // Binded Events
    handleInput: function(e) {
        console.log(e);
        console.log("Value changed");
    }
})
5.3 Instances
<!--
  1 Need to give input Label binding input Event
    Binding Keyword bindinput
  2 How to get the value of an input box
    Get by Event Source Object
    e.detail.value
  3 Assign the value of the input box to data Among
    Not directly
      1 this.data.num=e.detail.value
      2 this.num=e.detail.value
    Correct Writing
      this.setData({
        num:e.detail.value
      })
  4 Need to join a click event
      1 bindtap
      2 Cannot pass directly through events in applets
      3 Passing parameters by custom attributes
      4 Get custom properties from event source
 -->
<input type="text" bindinput="handleInput" />
<button bindtap="handletap" data-operation="{{1}}" >+</button>
<button bindtap="handletap" data-operation="{{-1}}">-</button>
<view>
    {{num}}
</view>
Page({
    data: {
        num: 0
    },
    // Execution logic for input box input events
    handleInput(e) {
        // console.log(e.detail.value );
        this.setData({
            num: e.detail.value
        })
    },
    // Events for the plus or minus buttons
    handletap(e) {
        // console.log(e);
        // 1 Get the custom property operation
        const operation = e.currentTarget.dataset.operation;
        this.setData({
            num: this.data.num + operation
        })
    }
})
5.4 Special attention
1. When binding an event, it must not have parameters or parentheses. The following is the wrong way to write
<input bindinput="handleInput(100)" />
2. Event Pass value, Customize Attributes by Label and value
<input bindinput="handleInput" data-item="100" />
3. Get data when an event triggers
handleInput: function(e) {
    // {item:100}
    console.log(e.currentTarget.dataset)

    // Value of input box
    console.log(e.detail.value);
}
6. Style WXSS
WXSS (WeiXin Style Sheets) is a set of style languages that describe the component styles of WXML
WXSS extensions have the following features compared to CSS:
- Responsive length unit rpx
- Style Import
6.1 Size Units
Rpx (responsive pixel): Adaptable to screen width.The specified screen width is 750rpx.For example, on an iPhone, with a screen width of 375 PX and a total of 750 physical pixels, 750 rpx = 375 PX = 750 physical pixels and 1 rpx = 0.5 PX = 1 Physical pixel
| equipment | rpx to px (screen width/750) | px to rpx (750/screen width) |
|---|---|---|
| iPhone5 | 1rpx = 0.42px | 1px = 2.34rpx |
| iPhone6 | 1rpx = 0.5px | 1px = 2rpx |
| iPhone6 Plus | 1rpx = 0.552px | 1px = 1.81rpx |
Suggestion: Designers can use the iPhone as a standard for visual drafts when developing WeChat applets
Steps to use:
1. Determine the width of the design draft pageWidth
2. Scale 750rpx = pageWidth px, so 1px = 750rpx/pageWidth
3. In less file, simply put PX => 750/pageWidth rpx in the design draft
/*
1 Style files do not need to be introduced actively in applets
2 You need to change the units of some elements on the page from px to rpx
  1 Design Draft 750x
    750 px = 750 rpx
    1 px = 1 rpx
  2 Change screen width to 375px
    375 px = 750 rpx
    1 px = 2rpx
    1rpx = 0.5px
3 There is a design draft width of 414 or an unknown page
  1 Design page has an element width of 100px
  2 Use the above requirements to fit pages of different widths

  page px = 750 rpx
  1 px = 750 rpx / page
  100 px = 750 rpx * 100 / page
  Assume page = 375px
4 Both css and wxss support one property with one property calc attribute
  1 750 Don't leave a space between and rpx
  2 Do not leave spaces on either side of the operator
 */

view{
    /* width: 200rpx; */
    height: 200rpx;
    font-size: 40rpx;
    background-color: aqua;
    /* The following code was written incorrectly  */
    /*  width:750 rpx * 100 / 375 ;  */
    width:calc(750rpx * 100 / 375);
}
6.2 Style Import
Supported directly in wxss, style import functionality, or mixed with import in less
Use the @import statement to import an outbound stylesheet, supporting only relative paths
Code:
/** common.wxss **/
.small-p {
 padding:5px;
}
/** app.wxss **/
@import "common.wxss";
.middle-p {
    padding:15px;
}
6.3 Selector
What needs special attention is the program?No wildcards * so the following code works!
*{
    margin:0;
    padding:0;
    box-sizing:border-box;
}
Selector:
| selector | Sample | Sample Description |
|---|---|---|
| .class | .intro | Select all components that have class=intro |
| #id | #firstname | Select the component with id= firstname |
| element | view | Select all view components |
| element,element | view,checkbox | Select view components and all checkbox components for all files |
| nth-child(n) | view:nth-child(n) | Select a label for an index |
| ::after | view::after | Insert content behind view component |
| ::before | view::before | Insert content in front of view component |