1. Introduction to websocket
Similar to HTTP, WebSocket is a network communication protocol.

1.1. Why do I need WebSocket s
We already have the HTTP protocol. Why do we need another protocol? What benefits can it bring?
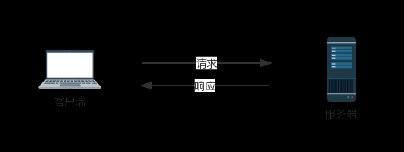
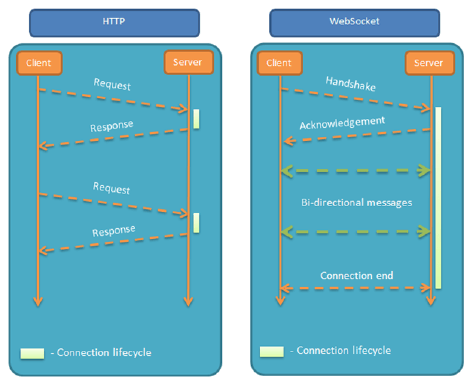
The answer is very simple, because the HTTP protocol has a defect: communication can only be initiated by the client, and there is no response without a request.

For example, when we think about today's weather, the client can only send a request to the server, and the server returns the query results. The HTTP protocol can't do anything. The server can actively push information to the client.
This one-way request is doomed to be very troublesome for the client to know if the server has continuous state changes. We can only use "polling": every once in a while, we send a query to see if the server has any new information. The most typical scene is the chat room.
Polling is inefficient and a waste of resources (because the connection must be kept, or the HTTP connection is always open). Therefore, engineers have been thinking about whether there is a better way. This is how WebSocket was invented.
1.2. Is it WebSocket
WebSocket protocol was born in 2008 and became an international standard in 2011. All browsers are already supported.
Its biggest feature is that the server can actively push information to the client, and the client can also actively send information to the server. It is a real two-way equal dialogue and belongs to a kind of server push technology.

Other features include:
2. Based on the TCP protocol, the implementation of the server side is relatively easy.
3. It has good compatibility with HTTP protocol. The default ports are 80 and 443, and the HTTP protocol is used in the handshake stage. Therefore, it is not easy to shield the handshake and can be accessed through various HTTP proxy servers.
4. The data format is light, the performance overhead is small, and the communication is efficient.
5. You can send text or binary data.
6. There is no source restriction, and the client can communicate with any server.
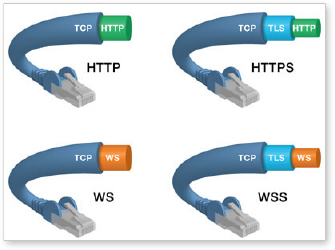
7. The protocol identifier is ws (wss if encrypted), and the server URL is the URL.
ws://example.com:80/some/path

2. Client WebSocket
2.1. Basic examples
WebSocket objects are provided in the browser to create and manage WebSocket connections, as well as API s that can send and receive data through the connections.
Here is a simple example
var ws = new WebSocket("wss://echo.websocket.org");
ws.onopen = function(evt) {
  console.log("Connection open ...");
  ws.send("Hello WebSockets!");
};
ws.onmessage = function(evt) {
  console.log( "Received Message: " + evt.data);   ws.close();
};
ws.onclose = function(evt) {
  console.log("Connection closed.");
};
2.2. Common API
2.2.1. WebSocket constructor
WebSocket object is used as a constructor to create a new WebSocket instance.
var ws = new WebSocket('ws://localhost:8080');
After executing the above statement, the client will connect with the server.
2.2.2. Event: onopen
The onopen property of the instance object is used to specify the callback function after successful connection.
ws.onopen = function () {
  // When sending a message, be sure to ws.send('Hello Server! ');
  }
If you want to specify multiple callback functions, you can use the addEventListener method.
ws.addEventListener('open', function (event) {
  ws.send('Hello Server!');
});
2.2.3. Event: onclose
The onclose property of the instance object is used to specify the callback function after the connection is closed.
ws.onclose = function(event) {
  var code = event.code;
  var reason = event.reason;   var wasClean = event.wasClean;   // handle close event
  };
  ws.addEventListener("close", function(event) {
    var code = event.code;
  var reason = event.reason;   var wasClean = event.wasClean;   // handle close event
  });
2.2.4. Event: onmessage
The onmessage property of the instance object is used to specify the callback function after receiving the server data.
ws.onmessage = function(event) {
  var data = event.data;
  // Processing data
};
ws.addEventListener("message", function(event) {
  var data = event.data;
  // Processing data
});
Note that the server data may be text or binary data (blob object or Arraybuffer object).
ws.onmessage = function(event){
  if(typeof event.data === String) {
      console.log("Received data string");
        }
          if(event.data instanceof ArrayBuffer){
              var buffer = event.data;
    console.log("Received arraybuffer");
      }
      }
In addition to dynamically judging the received data type, you can also use the binaryType attribute to explicitly specify the received binary data type.
// Received blob data
ws.binaryType = "blob";
ws.onmessage = function(e) {
  console.log(e.data.size);
};
// Received ArrayBuffer data
ws.binaryType = "arraybuffer"; ws.onmessage = function(e) {
  console.log(e.data.byteLength); };
2.2.5. Event: onerror
The onerror property of the instance object is used to specify the callback function when an error is reported.
socket.onerror = function(event) {
  // handle error event
};
socket.addEventListener("error", function(event) {
  // handle error event
});
2.2.6. Method: send()
The send() method of the instance object is used to send data to the server.
ws.send('your message');
Send an example of a Blob object.
var file = document
  .querySelector('input[type="file"]')
    .files[0]; ws.send(file);
Send an example of an ArrayBu "er" object.
// Sending canvas ImageData as ArrayBuffer
var img = canvas_context.getImageData(0, 0, 400, 320); var binary = new Uint8Array(img.data.length);
for (var i = 0; i < img.data.length; i++) {
  binary[i] = img.data[i];
}
ws.send(binary.buffer);
2.2.7. Method: close()
The close() method of the instance object is used to close the connection.
ws.close()
After the connection is closed, the onclose event of the instance object will be triggered.
2.2.8. Instance attribute: bu "eredamamount"
The bufferedAmount attribute of the instance object indicates how many bytes of binary data have not been sent. It can be used to determine whether the transmission is over.
var data = new ArrayBuffer(10000000); socket.send(data);
if (socket.bufferedAmount === 0) {
  // Send complete
} else {
  // Sending is not over yet
  }
3. Server WebSocket implementation
For the implementation of WebSocket server, you can view the Wikipedia column table. There are three common Node implementations.
µWebSockets
Socket.IO
Server implementation
It provides support for the server side of all streams, such as Java, PHP, Python, Node.js, etc
Client implementation
Browser, websocket node
Please check their documentation for specific usage. Here we take Socket.IO as an example.
4. Comprehensive case example: chat room
4.1. Case demonstration
https://socket.io/demos/chat/
4.2. Start
//Create project directory chat
//npm init -y initializes the package.json file
//npm install express
//Write the following code
const express = require('express') const app = express()
const http = require('http').Server(app)
app.get('/', function(req, res){
  res.send('<h1>Hello world</h1>');
})
http.listen(3000, () => {
  console.log('listening on *:3000')
})
Start service test
Service static web page
Replace the app.get(/) code with the following
app.use(express.static('./public'))
Test page access
Using Socket.IO
Install npm i socket.io and modify the server code as follows
const express = require('express') const app = express()
const http = require('http').Server(app) const io = require('socket.io')(http)
app.use(express.static('./public/'))
io.on('connection', socket => {
  console.log('a user connected');
})
http.listen(3000, () => {
  console.log('listening on *:3000')
})
In web pages
<script src="/socket.io/socket.io.js"></script>
<script>
  // The default link is the current web page address, that is, WS: / / localhost: 3000 var socket = IO ()
</script>
Refresh the web page to test the effect
Each socket has a disconnect event
io.on('connection', function(socket){
  console.log('a user connected')   socket.on('disconnect', () => {
      console.log('user disconnected')   })
})
Refresh the web page to test the effect
Client send message
socket.emit('chat message', 'hello');
The server receives the message
socket.on('chat message', function(msg){
  console.log('message: ' + msg);
});
test
Send a message to the currently connected socket
socket.emit('request', 'news');
The server sends a broadcast message
If you want to send a message to everyone except a socket
socket.broadcast.emit('hi');
Send the message to everyone, including the client that sent the message
io.emit('chat message', msg)
Client receives message
socket.on('chat message', function(msg){
  $('#messages').append($('<li>').text(msg)); });
Thank you for your attention and sharing!