Summary: This article mainly paves the way for react in advance. Webpack is a tool for modular management and packaging of front-end resources. To put it plainly, it is convenient for us to manage some of our commonly used codes, such as sass and jade in your development and es6 in the same time. You can't change one place to another in order to convert to the browser to see the effect. As a result, that's very inefficient. So webpack saves us those extra steps
Basic installation of webpack
Installation is absolutely indispensable before the start:
npm install webpack -g
After installation, a folder is created to create a new package.json dependency management file
npm init //After running, follow the instructions to fill in. Of course, if you don't feel bothered, you can go straight to the next step.
Now install our webpack
npm install webpack --save-dev
//--save-dev means to record the installation process in our package.json dependency management file
After that, a new file named webpack.config.js (like our regular gulpfile.js and Gruntfile.js) is a configuration item that tells webpack what it needs to do.
Open webpack.config.js and introduce webpack
var webpack = require('webpack');
Basic introduction to webpack
The main structure of webpack is divided into three parts: entry, output, loader and other configurations.
- Entry file configuration
entry: {
        index : './src/main.js'
    },
- Entry file output configuration
//Configure where files are stored after successful compilation
output: {
        path: 'dist/js',  //The folder where the compiled file resides
        filename: '[name].js'  //Name the compiled file name according to the entry file name. The compiled file is still called main.js.
    },
- Loader configuration
module: {
        //The most critical piece of configuration tells webpack what loaders are needed for each file
        loaders: [
            { test: /\.css$/, loader: 'style-loader!css-loader' },
            { test: /\.js$/, loader: 'jsx-loader?harmony' },
            { test: /\.scss$/, loader: 'style!css!sass?sourceMap'},
            { test: /\.(png|jpg)$/, loader: 'url-loader?limit=8192'}
        ]
    },
- Other configurations
resolve: {

        //Automatically expanding file suffix names means that our require module can omit not writing suffix names
        extensions: ['', '.js', '.json', '.scss']

    }
ok! Good memory is better than bad writing. Now let's build a react development environment for ourselves.
Refer to my directory structure first.
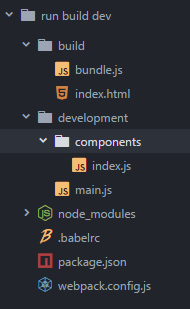
build stores compiled files, development stores react code folders, components stores react components folders, node_modules stores installation dependencies
First we need to install some project dependencies:
npm install --save-dev react react-dom

npm install --save-dev babel-core babel-loader  babel-preset-es2015 babel-preset-react

npm install --save-dev style-loader css-loader sass-loader url-loader

npm install --save-dev webpack-dev-server
//Automatically refresh the modified results and configure webpack-dev-server in webpack.config.js.
//Here you need to modify the path of entry and add a webpack/hot/dev-server to it, which will be mentioned later.
If the installation fails, install them separately. If not, use Taobao's cnpm. If not, look at the configuration of your node and npm's environment variables (experience T_T first-hand).
npm install cnpm -g
That's ok! Next comes the content of the file.
The configuration of webpack.config.js file is as follows:
var path = require('path');
var webpack = require('webpack');  //Loading web pack dependency packages
module.exports = {
    entry: ['webpack/hot/dev-server', path.resolve(__dirname, './development/main.js')],
    //Entry file and add hot load
    output: {
        path: path.resolve(__dirname, './build'),
        filename: 'bundle.js'  //output file
    },
    module: {
        loaders: [
            {
                test: /\.js?$/,
                exclude: /(node_modules|bower_components)/,
                loader: 'babel',
                query: {
                    presets: ['es2015', 'react']
                } //Compile react into js file
            },
            { test: /\.css$/, loader: 'style-loader!css-loader' },
            //Packing css files
            { test: /\.scss$/, loader: 'style!css!sass?sourceMap'},
            //Compile sass files
            { test: /\.(png|jpg)$/, loader: 'url-loader?limit=8192'}
            //Packing pictures
        ]
    },
    plugins: [
        new webpack.HotModuleReplacementPlugin()
    ],
    resolve: {
        //Automatic extension of file suffix names
        extensions: ['', '.js', '.json', '.scss', '.ts']
    }
};
main.js is as follows:
let React = require('react');
let ReactDOM = require('react-dom');
let AppComponent = require('./components/index.js');
ReactDOM.render(<AppComponent />, document.getElementById('content'));
index.js is as follows:
var React = require('react');
var ProductBox;
ProductBox = React.createClass({
    render: function () {
        return (
            <div className="productBox">
                hello react&es2015&webpack!!!
            </div>
        );
    }
});

module.exports = ProductBox;
index.html reads as follows:
<!DOCTYPE html>
<html>
<head lang="en">
    <meta charset="UTF-8">
    <title>React Project</title>
</head>
<body>
<script src="http://localhost:8080/webpack-dev-server.js"></script>
<div id="content"></div>
<script src="./bundle.js"></script>
</body>
</html>
Write the above file and put it in the corresponding folder. Run the command npm run build dev. When the browser accesses the address location:8080 successfully, it will show the corresponding interface.
Result:
hello react&es2015&webpack!!!