1. Introduction to webpack
1.1 static module bundler for modern javascript applications
Static: file resources
1.2 in addition to merging code, you can also translate and compress code
less/sass -> css
less/sass -> css
HTML / CSS / JS - > compact merge

2. Preparations before using webpack
2.1 webpack depends on Node environment
2.2 module management tools such as NPM or yarn
node.js official website address: Node.js
yarn official website: Yan Chinese documents
be careful:
1. It is not recommended to install it under the Chinese path
2. If an error is reported, refer to the error document: https://lidongxuwork.gitee.io/error/#811
3. Preparation before use
3.1 create webpack basic usage folder
3.2 initialization package environment
yarn init
3. Install dependent packages
Why to specify a version: the version should be corresponding to each other to prevent future package updates from causing content errors
yarn add webpack@5.31.2 webpack-cli@4.6.0 -D
4. In package.json, configure scripts (custom command)
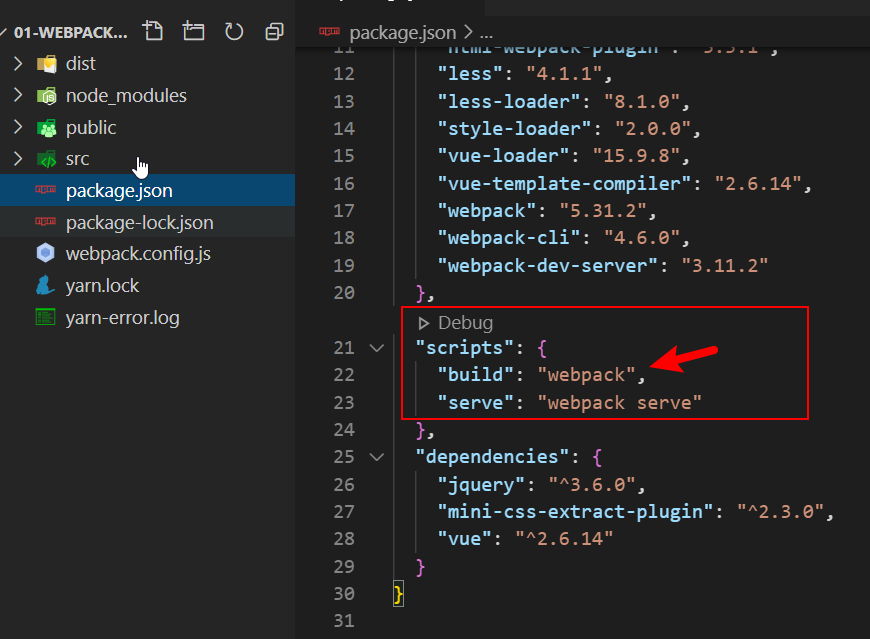
scripts: {
	"build": "webpack"
}
4.webpack configuration modification
4.1 modify default entry and exit
Default entry: src/index.js
Default entry: src/index.js
Configuration document: Concept | webpack Chinese document
1. Project root directory - create a new webpack.config.js file (default configuration file name)
2. Fill in the configuration item
const path = require("path")
module.exports = {
entry: "./src/main.js", // enter: default entry
output: {
path: path.join(__dirname, "dist"), // Exit folder name
filename: "bundle.js" // Export file name
}
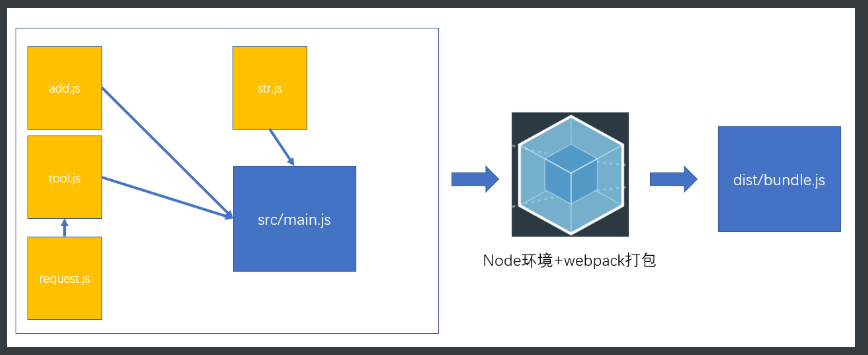
}five webpack packaging flowchart
5.1 packaging command:
yarn build
5.2 what happens when you run yarn build? Tap the command to execute the code

5.3 relationship diagram between code source file and webpack
The source code must have a direct relationship with the portal/Indirect introduction relationship, Will be packaged together
 6.webpack plug-in - automatically generate html files
six point one Download plug-ins
yarn add html-webpack-plugin@5.3.1 -D
6.2 webpack.config.js configuration
// Introduce a plug-in for automatically generating html
const HtmlWebpackPlugin = require('html-webpack-plugin')

module.exports = {
    // ... omit other code
    plugins: [
        new HtmlWebpackPlugin({
            // Based on this, the packaged html file is generated
            template: './public/index.html'
        })
    ]
}
six point three After repackaging, observe dist
Automatically generate html files
Automatically import packaged js files
7.webpack loader handling css files
7.1 installation dependency
yarn add css-loader@5.2.1 style-loader@2.0.0 -D
seven point two webpack.config.js configuration
module.exports = {
    // ... other codes
    module: { // How to handle different module files in a project
        rules: [ // rule
          {
            test: /\.css$/, // Match all css files
            // Run from right to left in the use array
            // First, use css loader to enable webpack to recognize the contents of css files and package them
            // Then use style loader to insert css into dom
            use: [ "style-loader", "css-loader"]
          }
        ]
    }
}
seven point three Execute the packaging command and observe the dist after packaging
8. webpack loader process less files
eight point one New src/less/index.less - set li font size 24px
@size:24px;
ul, li{
    font-size: @size
}
eight point two Introduced into main.js
import "./less/index.less"
eight point three Download dependent packages
yarn add less@4.1.1 less-loader@8.1.0 -D
eight point four webpack.config.js configuration
module: {
  rules: [
    // ... omit other
    {
    	test: /\.less$/, // Match. less end file
    	// Use less loader to let webpack process less files. The built-in less module is also used to translate less code into css code
        use: [ "style-loader", "css-loader", 'less-loader']
    }
  ]
}
9.webpack loader process picture files
9.1 material folder / 2 drawing files
nine point two In css/less/index.less - use the small picture as the background
body{
    background: url(../assets/logo_small.png) no-repeat center;
}
9.3 in src/main.js - insert the large image into the created img tag and add it to the body for display
// Import picture - use
import imgUrl from './assets/1.gif'
const theImg = document.createElement("img")
theImg.src = imgUrl
document.body.appendChild(theImg)
9.4 configuration: webpack5 has a built-in processing scheme. You only need to fill in the configuration
webpack.config.js
module: {
    rules: [
        // ... omit other
        {
            test: /\.(png|jpg|gif|jpeg)$/i, // Matching picture files
            type: 'asset' // Automatic selection between exporting a data URI and a separate file
            // If it is less than 8kb, it will be converted into data URI (the picture will be converted into base64 string and packaged into js)
            // If it is larger than 8kb, directly copy the file to dist directory (because converting to base64 will increase the volume by 30%)
        }
    ]
}
After packaging, run dist/index.html to observe the difference
ten webpack loader process font files
10.1 material folder / font library fonts folder
ten point two Introduce iconfont.css in main.js
// Import font icon file
import './assets/fonts/iconfont.css'
10.3 use font icon style in public/index.html
<i class="iconfont icon-weixin"></i>
10.4 configuration: webpack5, using asset module technology
{
    test: /\.(eot|svg|ttf|woff|woff2)$/,
    type: 'asset/resource',  // Copy files directly as static resources
    generator: {
    	filename: 'font/[name].[hash:6][ext]' // Put it in dist/font folder, and the file name format is as shown on the left
    }
}
eleven webpack loader - handles higher version js syntax
1. Let webpack downgrade the syntax of the higher version js
2. Introduction:
babel compiler = > used to handle compatibility of higher version js syntax babel official website
webpack handles js syntax with Babel loader Babel loader document
3. Steps:
11.1 src/main.js - write arrow function
const fn = () => { // Advanced Grammar
  console.log("Hello babel");
}
console.log(fn) // Only when the function is printed can the "function body" be packaged by webpack
eleven point two Installation package
yarn add -D babel-loader@8.2.2 @babel/core@7.13.15 @babel/preset-env@7.13.15
eleven point three webpack.config.js configuration rules
module: {
    rules: [
        {
            test: /\.js$/, // Match js end file
            exclude: /(node_modules|bower_components)/, // Do not convert js in these two folders
            use: {
                loader: 'babel-loader', // Using loader - processing
                options: {
                    presets: ['@babel/preset-env'] // Default: transcoding rules (originally preset in bable development environment)
                }
            }
        }
    ]
}
11.4 after packaging, observe the js file of dist / and automatically turn it into an ordinary function
12.webpack - development server - Learning
12.1 learning purpose
-
Build the portal and all module dependency diagrams
-
The disk reads the corresponding file into memory before it can be loaded
-
Use the corresponding loader for processing and translation
-
Output the processed content to memory instead of disk
-
After the code changes, the packaged code will be automatically updated and displayed on the browser
12.2 steps
1. Download package
yarn add webpack-dev-server@3.11.2 -D
2. Configure the custom command serve
scripts: {
	"build": "webpack",
	"serve": "webpack serve"   //Server command
}
3. Run the command - start the webpack development server
yarn serve
#Or npm run serve
4. Start a web server and port and view it in the browser
effect: Later change src Code under, Automatically package updates to the browser
13.webpack development server configuration
Configuration document: Webpack dev server configuration document
thirteen point one Add server configuration in webpack.config.js
module.exports = {
    // ... other configurations
    devServer: {
      port: 3000, // Port number
      open: true // Automatically open browser after startup
    }
}
thirteen point two Restart the development server and observe the effect
ctrl + c //Stop server
//Restart the server
yarn serve
#Or npm run serve
14.webpack - Project packaging and release
After the project is completed, what should I do if I go online
fourteen point one Execute the previous yarn build to generate the dist directory
All codes, Integrated and packaged
fourteen point two Give the dist directory to the background / O & M and deploy it to customers
The code of the development environment does not need to be sent