Recently, in learning the front-end knowledge, I have skimmed through the documents of webpack and gulp. Although I have used Vue before, as far as the community is concerned, the current mainstream is React, so I also have to study vulgarly to lay a good foundation for the future construction of React Native's hybird architecture.

Speaking of React, the most commonly heard is functional programming, which is quite different from the template advocated by Vue. This is also something we need to study from a different perspective.
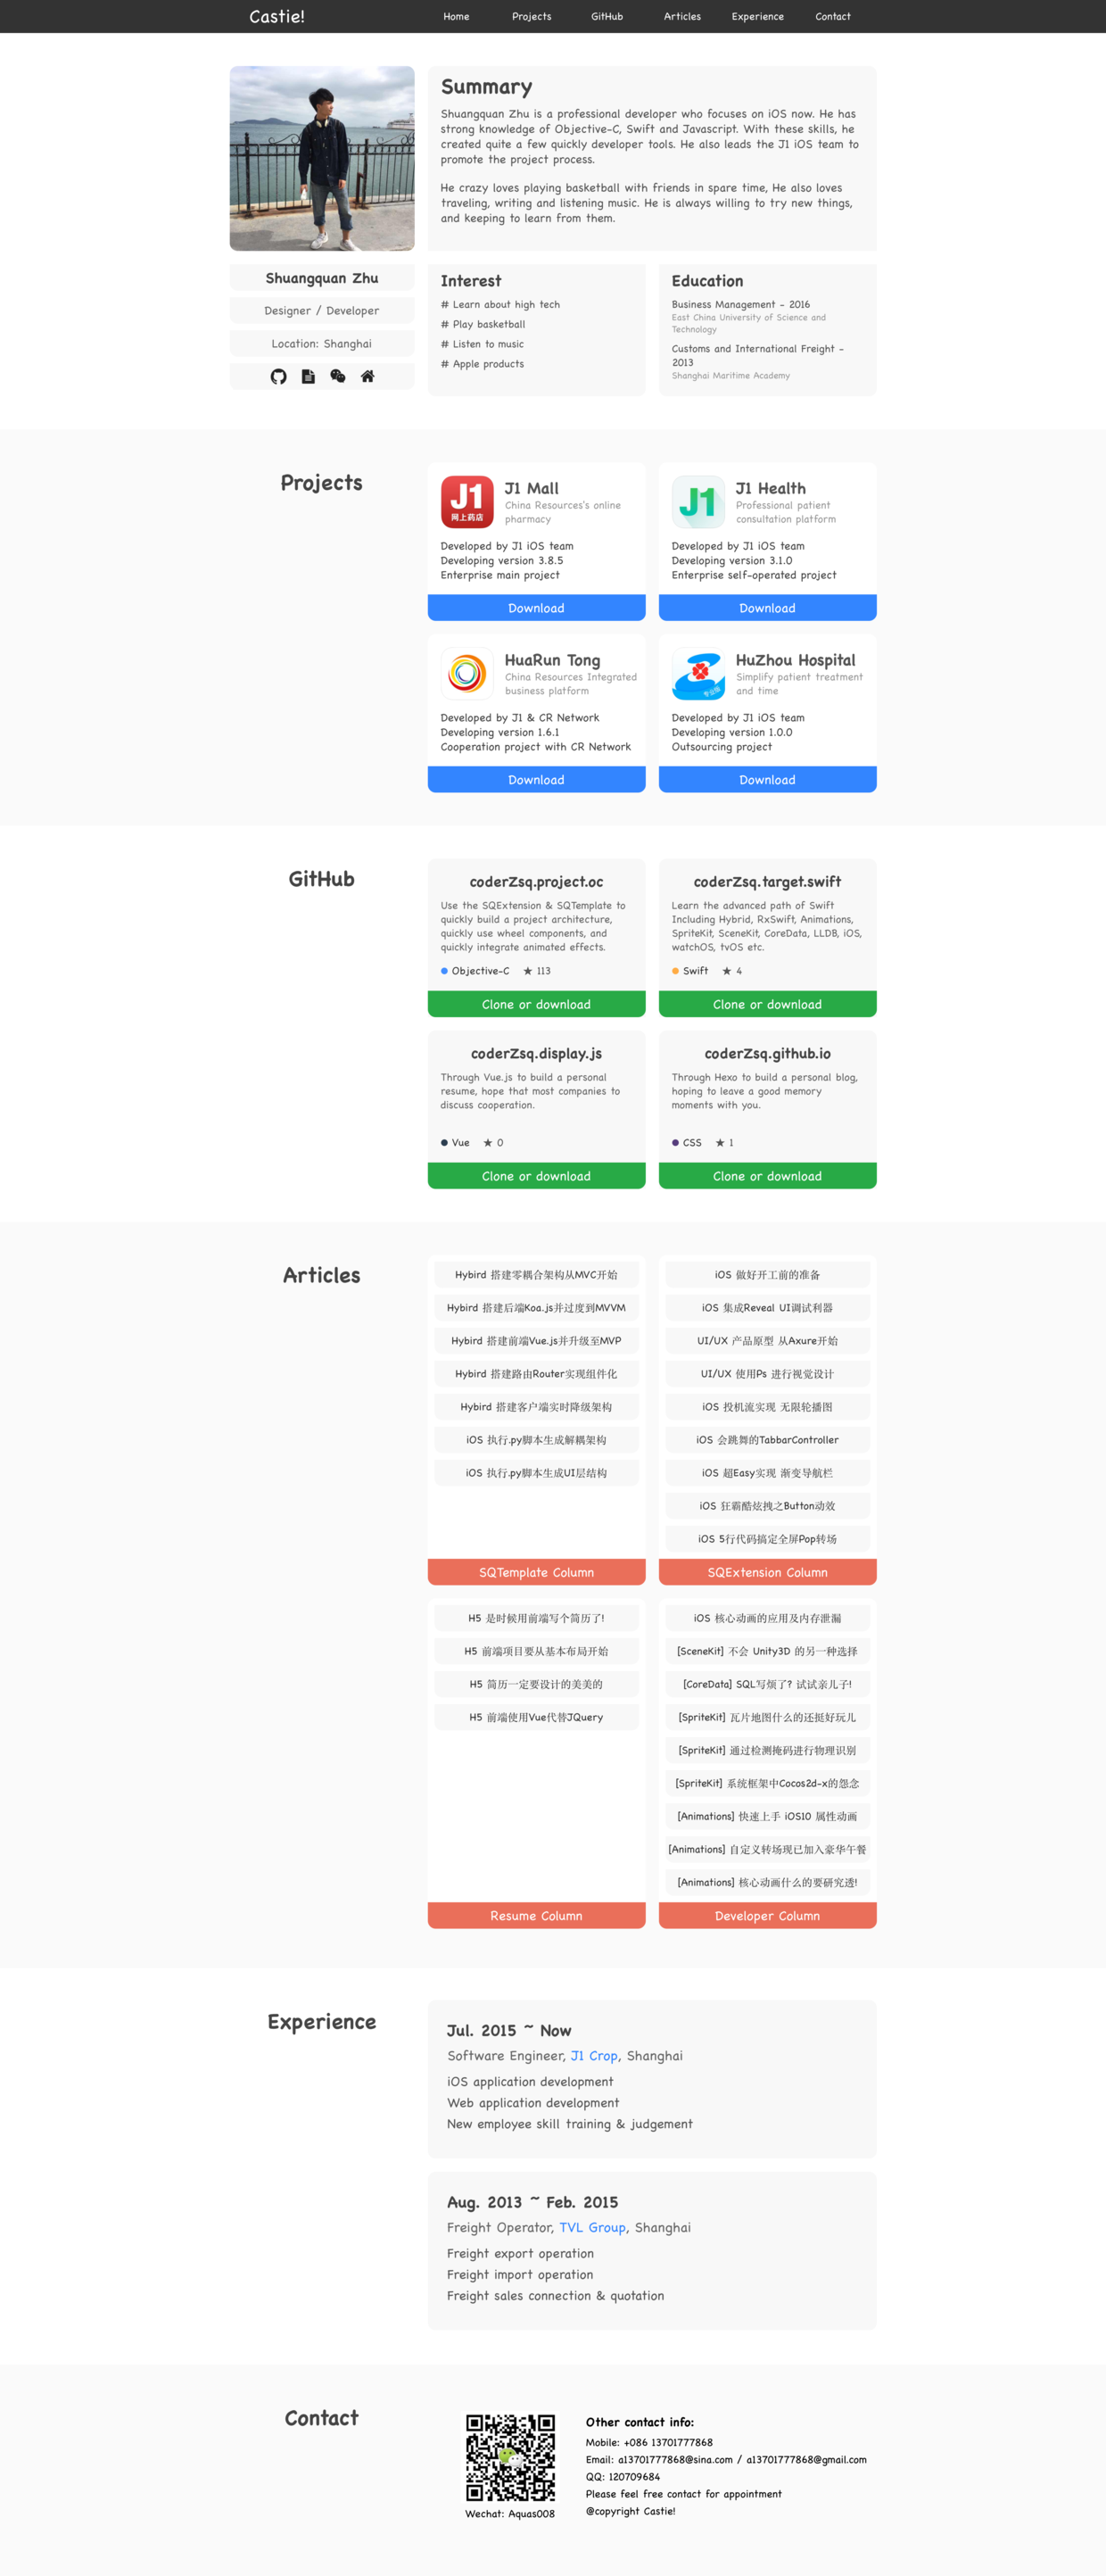
In order to learn how to use React, we migrate the previous Vue project to React and see how to use React during the migration process.
create-react-app
First of all, we need to build a development environment. In the first part, we built a basic development environment through webpack, but without optimized webpack, the speed is not ideal, so we directly use facebook's official scaffold create-react-app to build the project environment.
First, let's look at the following documents - >. Official documents
Quick Overview

npm install -g create-react-app

create-react-app my-app
cd my-app/
npm start
Then open http://localhost:3000/ to see your app.
When you're ready to deploy to production, create a minified bundle with npm run build.
After very simple terminal commands, scaffolding tools help us build a development environment.
package.json
{
  "name": "react-resume",
  "version": "0.1.0",
  "private": true,
  "dependencies": {
    "react": "^15.6.2",
    "react-dom": "^15.6.2"
    "react-scripts": "1.0.13"
  },
  "scripts": {
    "start": "react-scripts start",
    "build": "react-scripts build",
    "test": "react-scripts test --env=jsdom",
    "eject": "react-scripts eject"
  }
}
But we can't see the configuration of webpack in scaffolding generation projects.
react
Anyway, let's start with the Index skeleton. Let's take a look at the previous Vue and make an optional duplication.
Index.vue
<template>
<div>
  <navigation></navigation>
  <div class="odd">
    <div class="content">
      <home></home>
    </div>
  </div>
  <div class="even">
    <div class="content">
      <projects></projects>
    </div>
  </div>
  <div class="odd">
    <div class="content">
      <github></github>
    </div>
  </div>
  <div class="articles">
    <div class="content">
      <articles></articles>
    </div>
  </div>
  <div class="odd">
    <div class="content">
      <experience></experience>
    </div>
  </div>
  <div class="contact">
    <div class="content">
      <contact></contact>
    </div>
  </div>
</div>
</template>

<script>
import navigation from './navigation'
import home from './home'
import projects from './projects'
import github from './github'
import articles from './articles'
import experience from './experience'
import contact from './contact'
export default {
  data() {
    return {

    }
  },
  components: {
    navigation,
    home,
    projects,
    github,
    articles,
    experience,
    contact
  }
}
</script>

<style scoped>
.even {
  width: 100%;
  height: 600px;
  background-color: #fafafa;
}

.odd {
  width: 100%;
  height: 600px;
  background-color: #fff;
}

.articles {
  width: 100%;
  height: 1130px;
  background-color: #fafafa;
}

.contact {
  width: 100%;
  height: 320px;
  background-color: #fafafa;
}

.content {
  margin: 0 auto;
  width: 1000px;
  height: inherit;
}
</style>
For Vue, React, we generate Index.js and Index.css
Index.css
.even {
    width: 100%;
    height: 600px;
    background-color: #fafafa;
}

.odd {
    width: 100%;
    height: 600px;
    background-color: #fff;
}

.articles {
    width: 100%;
    height: 1130px;
    background-color: #fafafa;
}

.contact {
    width: 100%;
    height: 320px;
    background-color: #fafafa;
}

.content {
    margin: 0 auto;
    width: 1000px;
    height: inherit;
}
Index.css is just extracting css from vue. Let's look at Index.js again.
Index.js
import React, {Component} from 'react';
import CSSModules from 'react-css-modules';
import styles from './pc_Index.css';
import PCNavigation from './pc_navigation';
import PCHome from './pc_home';
import PCProducts from './pc_projects';
import PCGithub from './pc_github';
import PCArticles from './pc_articles';
import PCExperience from './pc_experience';
import PCContact from './pc_contact';

export default class PCIndex extends Component {

    render() {
        return (
            <div>
                <PCNavigation/>
                <div className={styles.odd}>
                    <div className={styles.content}>
                        <PCHome/>
                    </div>
                </div>
                <div className={styles.even}>
                    <div className={styles.content}>
                        <PCProducts/>
                    </div>
                </div>
                <div className={styles.odd}>
                    <div className={styles.content}>
                        <PCGithub/>
                    </div>
                </div>
                <div className={styles.articles}>
                    <div className={styles.content}>
                        <PCArticles/>
                    </div>
                </div>
                <div className={styles.odd}>
                    <div className={styles.content}>
                        <PCExperience/>
                    </div>
                </div>
                <div className={styles.contact}>
                    <div className={styles.content}>
                        <PCContact/>
                    </div>
                </div>
            </div>
        )
    }
}
Index.js is done through modular injection, but we found that this modularization is problematic and still causes global pollution. At this time, we thought about going to see the configuration of webpack, but there is no webpack in the project... What to do.. Once in a deadlock, let's go to the document of scaffolding tools to see...
With documentation
Limitations

Some features are currently not supported:

Server rendering.
Some experimental syntax extensions (e.g. decorators).
CSS Modules (see #2285).
Importing LESS or Sass directly (but you still can use them).
Hot reloading of components.
Some of them might get added in the future if they are stable, are useful to majority of React apps, don't conflict with existing tools, and don't introduce additional configuration.
Look, look, we actually see that CSS Modules are not supported, Nima is kidding me? This is so difficult to support baa.
Philosophy

One Dependency: There is just one build dependency. It uses Webpack, Babel, ESLint, and other amazing projects, but provides a cohesive curated experience on top of them.

No Configuration Required: You don't need to configure anything. Reasonably good configuration of both development and production builds is handled for you so you can focus on writing code.

No Lock-In: You can "eject" to a custom setup at any time. Run a single command, and all the configuration and build dependencies will be moved directly into your project, so you can pick up right where you left off.
Then we saw this paragraph, the last sentence, you can eject, and customize the configuration, but the official does not recommend it to do so.. You can not complete the function I want, I also care whether you recommend it or not... Naive....
npm run eject
Okay, I see a config folder, and finally we can configure webpack, so how should we configure it? Let's go to react-css-modules. File.
webpack css-loader

CSS Modules is a specification that can be implemented in multiple ways. react-css-modules leverages the existing CSS Modules implementation webpack css-loader.
With the help of css-loader, let's go to css.loader again. File
webpack.config.js

{
 test: /\.css$/,
 use: [
   {
     loader: 'css-loader',
     options: {
       modules: true,
       localIdentName: '[path][name]__[local]--[hash:base64:5]'
     }
   }
 ]
}
Finally, we found the configuration item, and we went to our webpack to configure it. When the configuration was completed, the modularization was finally over. It was really troublesome to check the documents at the front end. Documents were scattered and pitted.~~
CSSModules
Although the modularization of CSS has been completed, the injection is really painful. Is there any better way to do it? Let's go back to the document of react-css-modules.
import React from 'react';
import styles from './table.css';

export default class Table extends React.Component {
    render () {
        return <div className={styles.table}>
            <div className={styles.row}>
                <div className={styles.cell}>A0</div>
                <div className={styles.cell}>B0</div>
            </div>
        </div>;
    }
}
We are currently using this method, injecting very painful eggs...
import React from 'react';
import CSSModules from 'react-css-modules';
import styles from './table.css';

class Table extends React.Component {
    render () {
        return <div styleName='table'>
            <div styleName='row'>
                <div styleName='cell'>A0</div>
                <div styleName='cell'>B0</div>
            </div>
        </div>;
    }
}

export default CSSModules(Table, styles);
Look down, and then we find this elegant way, you can directly use the string of css to introduce, this meets our requirements! Clap hands.
import React from 'react';
import CSSModules from 'react-css-modules';
import styles from './table.css';

@CSSModules(styles)
export default class extends React.Component {
    render () {
        return <div styleName='table'>
            <div styleName='row'>
                <div styleName='cell'>A0</div>
                <div styleName='cell'>B0</div>
            </div>
        </div>;
    }
}
I searched tirelessly and found a more elegant way to use decorator, which is ES7's grammar. To use it, we need to add the babel-plugin-transform-decorators-legacy plug-in.
npm i babel-plugin-transform-decorators-legacy --save
{
  test: /\.(js|jsx)$/,
  include: paths.appSrc,
  loader: require.resolve('babel-loader'),
  options: {

    // This is a feature of `babel-loader` for webpack (not Babel itself).
    // It enables caching results in ./node_modules/.cache/babel-loader/
    // directory for faster rebuilds.
    cacheDirectory: true,
    "plugins":["transform-decorators-legacy"]
  },
},
Once we have installed it, we can configure it in webpack and use it.
Index.js
import React, {Component} from 'react';
import CSSModules from 'react-css-modules';
import styles from './pc_Index.css';
import PCNavigation from './pc_navigation';
import PCHome from './pc_home';
import PCProducts from './pc_projects';
import PCGithub from './pc_github';
import PCArticles from './pc_articles';
import PCExperience from './pc_experience';
import PCContact from './pc_contact';

@CSSModules(styles)
export default class PCIndex extends Component {

    render() {
        return (
            <div>
                <PCNavigation/>
                <div styleName="odd">
                    <div styleName="content">
                        <PCHome/>
                    </div>
                </div>
                <div styleName="even">
                    <div styleName="content">
                        <PCProducts/>
                    </div>
                </div>
                <div styleName="odd">
                    <div styleName="content">
                        <PCGithub/>
                    </div>
                </div>
                <div styleName="articles">
                    <div styleName="content">
                        <PCArticles/>
                    </div>
                </div>
                <div styleName="odd">
                    <div styleName="content">
                        <PCExperience/>
                    </div>
                </div>
                <div styleName="contact">
                    <div styleName="content">
                        <PCContact/>
                    </div>
                </div>
            </div>
        )
    }
}
In this way, we finished this CSS modularization problem gracefully, and still spent some time.
But how do we bind multiple styles to a dom?
@CSSModules(styles, {allowMultiple: true})
Add one more parameter, although the document is not very recommended, but the user demand is greater than the day, is not it?
transfer
Having worked out the most troublesome CSS modularization above, our migration has also become smooth, basically without any problems, and it is not difficult for students who use Vue to migrate to React.
Vue
<template>
<div class="column">
  <div class="column-block">
    <div class="column-list">
      <div class="row" v-for="article in articles">
        <a :href="article.href">{{article.name}}</a>
      </div>
    </div>
    <div class="column-title">
      {{name}}
    </div>
  </div>
</div>
</template>

<script>
export default {
  data() {
    return {

    }
  },
  props: {
    articles: Array,
    name: String
  }
}
</script>
React
import React, {Component} from 'react';
import CSSModules from 'react-css-modules';
import styles from './pc_column.css';

@CSSModules(styles)
export default class PCColumn extends Component {

    render() {

        const rows = this.props.articles.map((article, index) => (
            <div styleName="row" key={index}>
                <a href={article.href}>{article.name}</a>
            </div>
        ))

        return (
            <div styleName="column">
                <div styleName="column-block">
                    <div styleName="column-list">
                        {rows}
                    </div>
                    <div styleName="column-title">
                        {this.props.name}
                    </div>
                </div>
            </div>
        )
    }
}
We can see that the focus of Vue is on template rendering, using the grammatical sugar of v-for. React is more suitable for our usual programming habits, that is, code injection.
Exhibition

The whole migration process is relatively smooth, one of the reasons is that the page is relatively simple. What we learned is the configuration problem of CSS Modules. After solving this problem, migration becomes very easy.
But as a front-end Xiaobai, this is only for the front-end project of simple learning, there are still many things to learn, continue to refuel.
About:
