Last article: [WEB API Project Practical Dry Goods Series] - Introduction to Web API 2 (1)
In this article, we mainly introduce how to do API help documentation, introduce API callers to the API functions, input parameters, output parameters, and online testing API functions (this is also convenient for our own development and debugging)
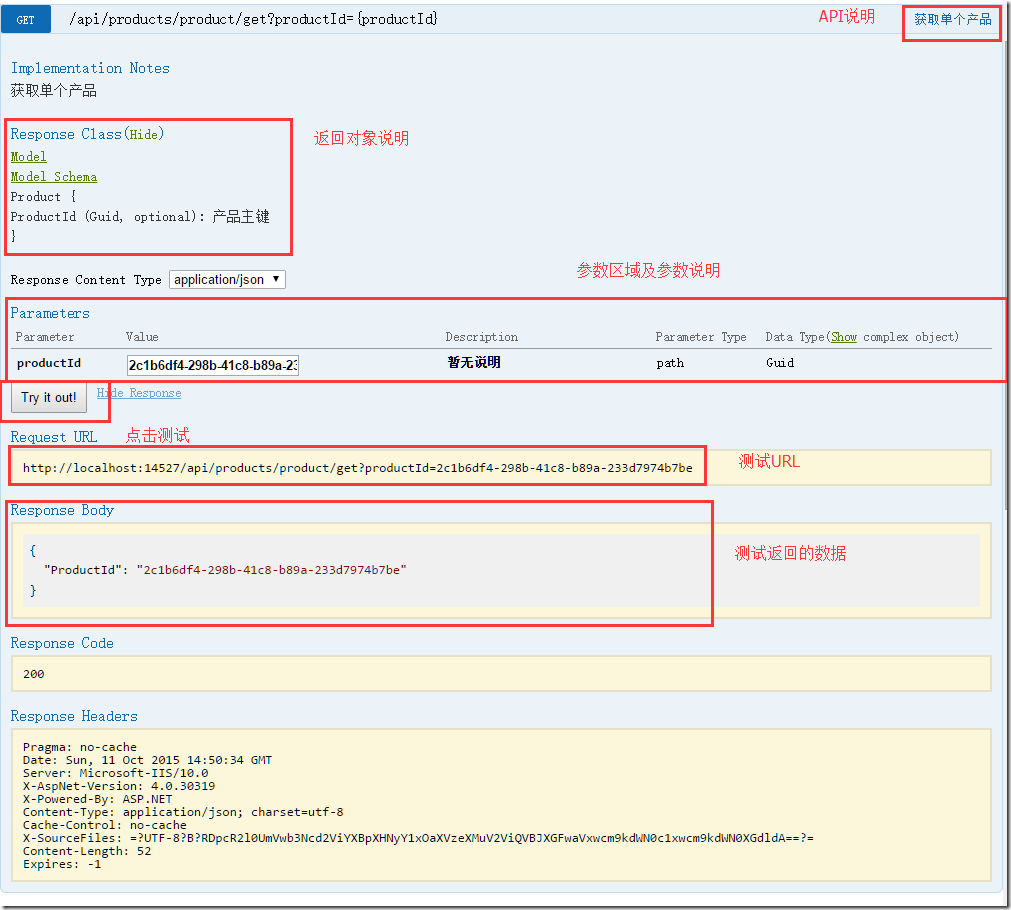
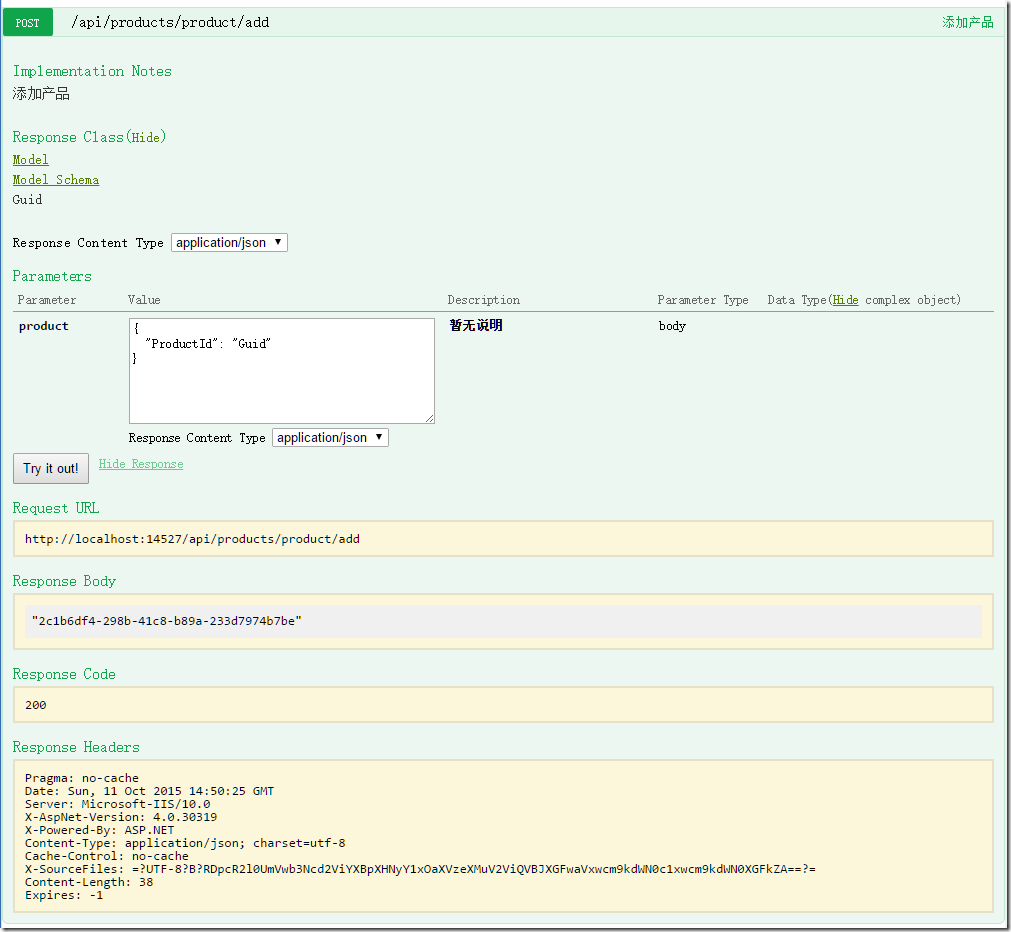
Let's first look at what our API ultimately does to help document and online testing:
Sketch map
GET API
Add product API:
Delete product API
Next, let's start to implement the above functions.
Add annotation information to all API s
The code is as follows
[RoutePrefix("api/products")]
    public class ProductController : ApiController
    {
        /// <summary>
        /// Product Paging Data Acquisition
        /// </summary>
        /// <returns></returns>
        [HttpGet, Route("product/getList")]
        public Page<Product> GetProductList()
        {
            throw new NotImplementedException();
        }

        /// <summary>
        /// Getting a single product
        /// </summary>
        /// <param name="productId"></param>
        /// <returns></returns>
        [HttpGet, Route("product/get")]
        public Product GetProduct(Guid productId)
        {
            throw new NotImplementedException();
        }

        /// <summary>
        /// Add product
        /// </summary>
        /// <param name="product"></param>
        /// <returns></returns>
        [HttpPost, Route("product/add")]
        public Guid AddProduct(Product product)
        {
            throw new NotImplementedException();
        }

        /// <summary>
        /// Update product
        /// </summary>
        /// <param name="productId"></param>
        /// <param name="product"></param>
        [HttpPost, Route("product/update")]
        public void UpdateProduct(Guid productId, Product product)
        {
            throw new NotImplementedException();
        }

        /// <summary>
        /// Delete product
        /// </summary>
        /// <param name="productId"></param>
        [HttpDelete, Route("product/delete")]
        public void DeleteProduct(Guid productId)
        {
            throw new NotImplementedException();
        }
    }
The API help information shown in the figure above is all extracted from our annotation information, so the API annotation information here is essential.
Add Swagger.Net Components (Custom Modified Version, Official has not updated for many years, can only update themselves)
Swagger.Net component is added to the project. Because this component has been updated a lot in the official version, people copy it directly from the project code in the process of practice (when necessary, it can be made into a Nuget component for everyone to use after it is released).
Add Swagger.NET steps:
1. Introduce Swagger.Net Project into the project.
2. Add SwaggerNet.cs under App_Start of the Web API project
The code is as follows
[assembly: WebActivatorEx.PreApplicationStartMethod(typeof(SwaggerNet), "PreStart")]
[assembly: WebActivatorEx.PostApplicationStartMethod(typeof(SwaggerNet), "PostStart")]
namespace Niusys.WebAPI.App_Start
{
    public static class SwaggerNet
    {
        public static void PreStart()
        {
            RouteTable.Routes.MapHttpRoute(
                name: "SwaggerApi",
                routeTemplate: "api/docs/{controller}/{action}",
                defaults: new { swagger = true }
            );
        }

        public static void PostStart()
        {
            var config = GlobalConfiguration.Configuration;
            config.Filters.Add(new SwaggerActionFilter());
        }
    }
}
It mainly registers the request routing of api document and intercepts the request of document.
3. Copy the SwaggerUI folder in the Web API project, here is the page processing file for the help document.
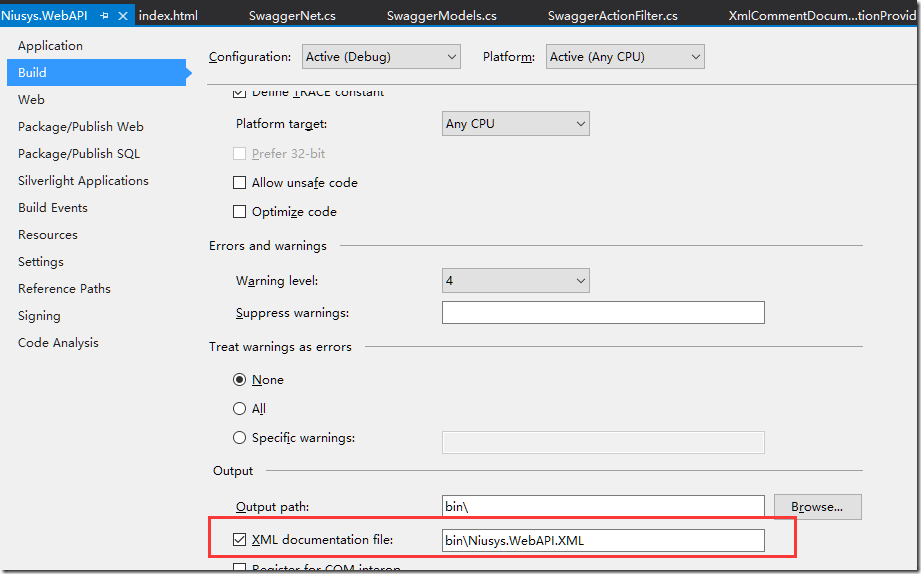
4. Web API Project Enables XML Document Generation
At this point, you can start the project and enter swaggerui in the URL.( http://localhost:14527/swaggerui/ ) Directory, you can access our API to help document systems and online testing.
Conclusion:
The principle of Help Document here is realized by our XML annotations in the code. The principle is also to fetch the XML Help Document corresponding to the controller/action when we request api/doc, and let it be displayed later.
Its testing is done by jQuery Ajax, which is in full swing, and highly integrated with the interface to fully meet the needs of our project.
This code: Code download (code hosted in CSDN Code)
Reference page: http://qingqingquege.cnblogs.com/p/5933752.html


