1. Ecology and advantages of vue3
- Community ecology - gradually improved
- Overall optimization - Performance Optimization / TS support optimization / combined API blessing
- Market use - some companies with radical technology selection have used vue3 in the production environment
Community ecology
| Component (plug-in) name | Official address | brief introduction |
|---|---|---|
| ant-design-vue | https://antdv.com/docs/vue/introduce-cn/ | Ant Design Vue is the Vue implementation of ant design, and the style of components is synchronized with ant design |
| element-plus | https://element-plus.gitee.io/#/zh-CN | Element Plus, a desktop component library based on Vue 3.0 for developers, designers and product managers |
| vant | https://vant-contrib.gitee.io/vant/v3/#/zh-CN | Youzan front-end team's open source mobile terminal component library was opened in 2016 and has been maintained for 4 years |
| Naive UI | https://www.naiveui.com/zh-CN/ | A Vue 3 component library is relatively complete with adjustable topics. Using TypeScript is not too slow. It's a little interesting |
| VueUse | https://vueuse.org/ | Based on the common collection of composition composition APIs, the little rabbit fairy project will use some of them |
Overall optimization
- Performance improvement
- Faster first render
- diff algorithm is faster
- Less memory
- Smaller packaging volume
- Better Typescript support
- Composition API (key)
Related reading:
- Vue3 Chinese documents https://vue3js.cn/docs/zh/
- Vue3 design concept https://vue3js.cn/vue-composition/
Market use
It has great potential and hasn't completely caught fire yet
2. Vue3 development environment construction
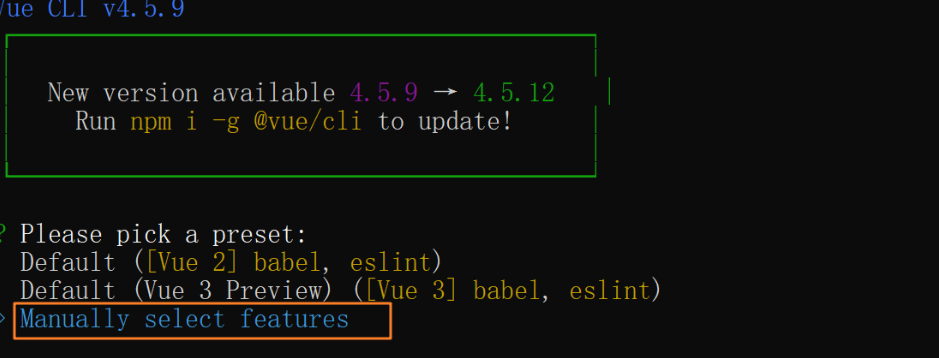
Next, we will learn some new syntax of vue3. First, let's build a basic environment or use the familiar Vue cli to quickly generate an environment integrated with vue3
Tasks in this section: master how to use Vue cli to build a development environment based on Vue3.0
1) Select custom configuration
2) Check the custom installation version
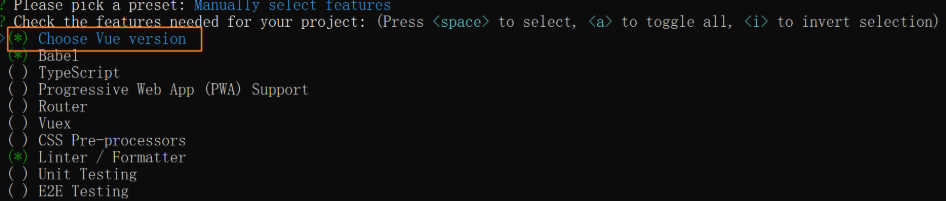
3) Select version 3.x

After entering the above steps, Vue cli will help us run a Vue project with built-in vue3 version
First, we can take a look at the package.json file. It shows in the dependencies configuration item that we are currently using version 3.2.0
"dependencies": {
    "vue": "^3.2.0"
}
Then open the main.js entry file and find that the instantiation of Vue has changed from the previous new keyword instantiation to the call form of createApp method (more details: https://www.bilibili.com/read/cv10133036)
vue2.x
new Vue({
  el: '#app',
  render: h => h(App)
})
vue3.x
import { createApp } from 'vue'
import App from './App.vue'
createApp(App).mount('#app')
Finally, we opened a single file component and found that the single file component of vue3.0 no longer requires a unique root element
<template>
  <img alt="Vue logo" src="./assets/logo.png">
  <HelloWorld msg="Welcome to Your Vue.js App"/>
</template>
The above is all we need to focus on at the current stage. Next, we can learn vue3's new composition API based on the current environment
Two API s in Vue3
The Composition API is vue3 a very valuable API update for our developers. We don't pay attention to the specific syntax, but have a big perception of it
Objective of this section: to have a general perceptual understanding of the composition api
3. Style comparison
Case comparison
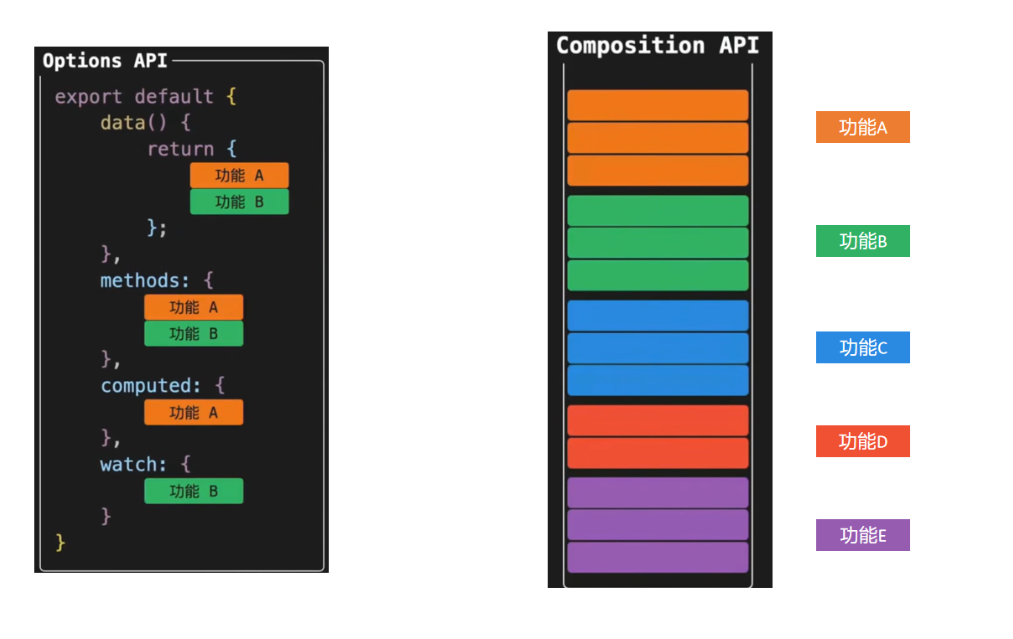
We briefly understand the new api form brought by vue3 through the diagram. In this section, we have a more in-depth experience of the comparison of the development modes under the two APIs through a specific small case. We temporarily ignore the syntax details and only focus on the code writing form
The goal of this section is to realize the same requirement through two Api forms and understand the benefits brought by the compatibility Api
Understanding needs
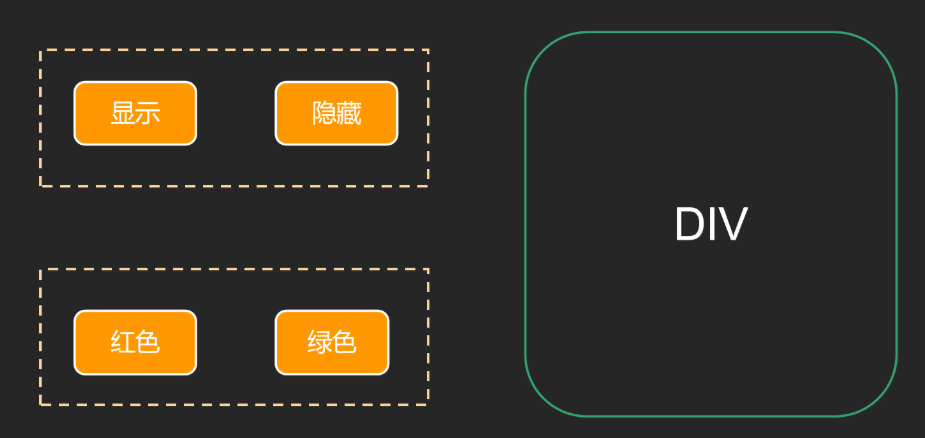
4. Optional Api version implementation
<template>
  <div>
    <!-- The first mock exam template -->
    <button @click="show">display</button>
    <button @click="hide">hide</button>
    <div v-if="showDiv">A controlled explicit implicit div</div>
  </div>
  <div>
    <!-- Function two template -->
    <button @click="changeRed">gules</button>
    <button @click="changeYellow">blue</button>
    <div :style="`color:${fontColor}`">A that controls the font color div</div>
  </div>
</template>

<script>
export default {
  name: 'App',
  data() {
    return {
      showDiv: true, // Function I data
      fontColor: '' // Function II data
    }
  },
  methods: {
    // Function I method
    show() {
      this.showDiv = true
    },
    hide() {
      this.showDiv = false
    },
    // Function II method
    changeRed() {
      this.fontColor = 'red'
    },
    changeYellow() {
      this.fontColor = 'blue'
    }
  }
}
</script>
5. Combined API version
<template>
  <div>
    <!-- The first mock exam template -->
    <button @click="show">display</button>
    <button @click="hide">hide</button>
    <div v-if="showDivFlag">A controlled explicit implicit div</div>
  </div>
  <div>
    <!-- Function two template -->
    <button @click="changeRed">gules</button>
    <button @click="changeBlue">blue</button>
    <div :style="`color:${fontColor}`">A that controls the font color div</div>
  </div>
</template>

<script>
import { ref } from 'vue'
export default {
  name: 'App',
  setup() {
    // Function one
    const showDivFlag = ref(true)
    function show() {
      showDivFlag.value = true
    }
    function hide() {
      showDivFlag.value = false
    }
    // Function two

    const fontColor = ref('')
    function changeRed() {
      fontColor.value = 'red'
    }
    function changeBlue() {
      fontColor.value = 'blue'
    }
    return { showDivFlag, show, hide, fontColor, changeRed, changeBlue }
  }
}
</script>
Combined API optimized version
You may have doubts. Now we are maintaining all data and behaviors related to functions together. If there are many functions, won't the setup function become large? Won't it become more difficult to maintain? Next, let's disassemble the huge setup function
<script>
import { ref } from 'vue'
// Function A
function useShow() {
  const showDivFlag = ref(true)
  function show() {
    showDivFlag.value = true
  }
  function hide() {
    showDivFlag.value = false
  }
  return { showDivFlag, show, hide }
}
// Function B
function useColor() {
  const fontColor = ref('')
  function changeRed() {
    fontColor.value = 'red'
  }
  function changeBlue() {
    fontColor.value = 'blue'
  }
  return { fontColor, changeRed, changeBlue }
}
export default {
  name: 'App',
  setup() {
    // Function one
    const { showDivFlag, show, hide } = useShow()
    // Function two
    const { fontColor, changeRed, changeBlue } = useColor()
    return { showDivFlag, show, hide, fontColor, changeRed, changeBlue }
  }
}
</script>
In the above, we separate the codes related to the two functions into an independent small function by defining the function function, and then combine the two small function functions in the setup function. In this way, we can not only refresh the setup function, but also facilitate maintenance and quickly locate the function location
6. Relationship between optional and combined API s
Objective of this section: to be able to clarify the relationship between the two API s
- The purpose of the composite API is to enhance, not replace, the optional API. vue3.x supports both APIs
- For simple scenarios, it is easier and more convenient to use the optional API
- The preferred composite API for projects requiring strong TS support
- Composite API s are preferred for scenarios that require a lot of logical reuse
nice ~ so far, we don't pay attention to the details of the api. We just appreciate the benefits of the combined api. Next, we'll go deep into the details of the api and see how to use the new api
Combined API
7. setup entry function
Objective of this section: be able to understand the function and call timing of setup function
primary coverage
- The setup function is a new component option, which serves as the starting point (entry) of the composite API in the component
- The setup function is executed only once when the component is initialized
- The setup function is executed before the beforeCreate life cycle hook is executed. The instance has not been generated and there is no this
Code demonstration
export default {
  setup () {
    console.log('setup Yes')
    console.log(this)
  },
  beforeCreate() {
    console.log('beforeCreate Yes')
    console.log(this)
  }
}
8. Responsive API - reactive
Objective of this section: master the function and use steps of reactive function
effect
reactive is a function that receives an ordinary object, converts the object data into a responsive object and returns it
Use steps
- Import the reactive function from the vue framework
- Call the reactive function in the setup function and import the object data that is intended to be responsive as a parameter.
- In the setup function, return the return value after the reactive function is called in the form of an object
Code demonstration
<template>
  <div>{{ state.name }}</div>
  <div>{{ state.age }}</div>
  <button @click="state.name = 'pink'">Modified value</button>
</template>

<script>
import { reactive } from 'vue'
export default {
  setup () {
    const state = reactive({
      name: 'zs',
      age: 18
    })
    return {
      state
    }
  }
}
</script>
9. Responsive API - ref
Objective of this section: to understand the role and steps of ref function
effect
Ref is a function that accepts the input of a simple type or complex type and returns a responsive and variable ref object
Use steps
- Exporting ref functions from vue framework
- Call ref function in setup function and import data (simple type or complex type).
- In the setup function, return the return value of the ref function as an object
- **Note: * * if you use the ref result in the setup function, you need to access it through. value. If you use it in the template, you don't need to add. value
Code demonstration
<template>
  <div>{{ money }}</div>
  <button @click="changeMondy">Modified value</button>
</template>

<script>
import { ref } from 'vue'
export default {
  setup() {
    let money = ref(100)
    console.log(money.value)
    return {
      money
    }
  }
}
</script>
10. reactive vs. ref
Objective of this section: to know the specific of the two API s and how to select them in the project
- The ref function can receive a value of a simple type and return a changeable ref responsive object, which makes up for the problem that the reactive function does not support simple types
- Both reactive and ref functions can provide the conversion of responsive data. There is no best practice in the specific API community when to use. You can use your own skilled API for conversion for the time being
- **Recommended writing * * only when we know the field name inside the object to be converted, we can use reactive, otherwise we will always use ref, so as to reduce the mental burden on syntax selection
11. Responsive API - computed
Objective of this section: master the function and steps of calculating attribute function computed
effect
According to the existing response data, new data can be obtained through certain calculation
Use steps
- Importing the computed function from the vue framework
- Execute the computed function in the setup function, pass in a function, and define the calculation formula in the function
- Put the return value of the calculated function call into the object returned by the setup function
Code demonstration
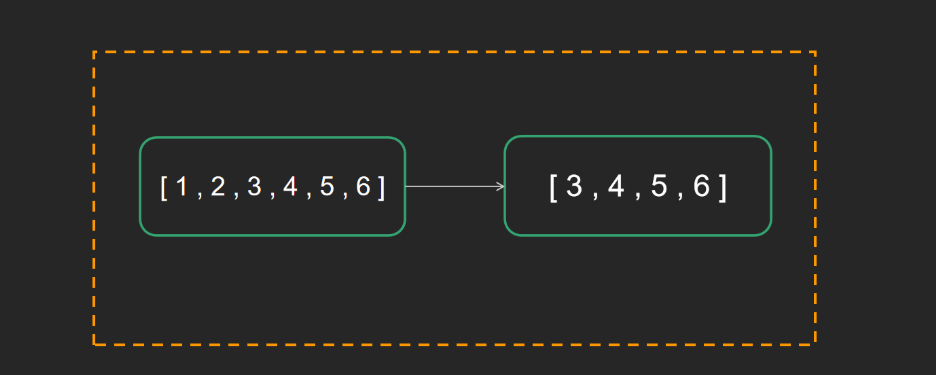
<template>
  {{ list }}
  {{ filterList }}
  <button @click="changeList">change list</button>
</template>

<script>
import { computed, ref } from 'vue'
export default {
  setup() {
    const list = ref([1, 2, 3, 4, 5, 6])
    // Enter a number greater than 2
    const filterList = computed(() => {
      return list.value.filter(item => item > 2)
    })
    // Modify the function of list
    function changeList() {
      list.value.push(6, 7, 8)
    }
    return {
      list,
      filterList,
      changeList
    }
  }
}
</script>
12. Responsive API - watch
Objective of this section: to master the functions and use steps of the listener watch function
effect
Execute callback logic based on the change of responsive data, which is consistent with the function of watch in vue2
- General monitoring
- Execute now
- Depth monitoring
Use steps
- Importing the watch function from the vue framework
- Execute the watch function in the setup function to enable listening for responsive data
- The watch function receives three general parameters
- The first parameter is the function, which returns the responsive data you want to listen for changes
- The second parameter is the callback function to be executed after the responsive data changes
- The third parameter is an object in which you can configure whether to enable immediate execution or deep listening
Code demonstration
1) General monitoring
<template>
  {{ age }}
  <button @click="age++">change age</button>
</template>

<script>
import { ref, watch } from 'vue'
export default {
  setup() {
    const age = ref(18)
    watch(() => {
      return age.value
    }, () => {
      // Callback function after data change
      console.log('age Has changed')
    })
    return {
      age
    }
  }
}
</script>
2) Start immediately
The effect of watch. By default, the callback will be executed only when the monitored data changes. If you need to execute it immediately when you come up, you need to configure the immediate property
<template>
  {{ age }}
  <button @click="age++">change age</button>
</template>
<script>
import { ref, watch } from 'vue'
export default {
  setup() {
    const age = ref(18)
    watch(() => {
      // Return the responsive property you want to listen to (the object generated by ref must be added with. value)
      return age.value
    }, () => {
      // Callback function after data change
      console.log('age Has changed')
    },{ immediate: true})
    return {
      age
    }
  }
}
</script>
3) Turn on depth monitoring
When the data we listen to is an object, by default, changes in the internal attributes of the object will not cause the callback function to execute. If you want all the attributes under the object to be listened to, you need to enable deep configuration
<template>
  {{ state.name }}
  {{ state.info.age }}
  <button @click="name = 'pink'">change name</button>
  <button @click="info.age++">change age</button>
</template>

<script>
import { reactive, toRefs, watch } from 'vue'
export default {
  setup() {
    const state = reactive({
      name: 'zs',
      info: {
        age: 18
      }
    })
    watch(() => {
      return state
    }, () => {
      // Callback function after data change
      console.log('age Has changed')
    }, {
      deep: true
    })
    return {
      state
    }
  }
}
</script>
4) Better practices
When using watch, try to specify which attribute you want to listen to in detail to avoid performance problems caused by using deep. For example, I just want to execute a callback when the age attribute of the state object changes
<template>
  {{ state.name }}
  {{ state.info.age }}
  <button @click="state.name = 'pink'">change name</button>
  <button @click="state.info.age++">change age</button>
</template>

<script>
import { reactive, toRefs, watch } from 'vue'
export default {
  setup() {
    const state = reactive({
      name: 'zs',
      info: {
        age: 18
      }
    })
    watch(() => {
      // Tell you who you want to monitor in detail
      return state.info.age
    }, () => {
      // Callback function after data change
      console.log('age Has changed')
    })
    return {
      state
    }
  }
}
</script>
Life cycle function
13. Review the life cycle
Objective of this section: review the life cycle and understand the role of the life cycle
14. Use the life cycle hook function in the setup function
Objective of this section: master how to use lifecycle functions in setup functions
Use steps
- First, import the life cycle hook function starting with on from vue
- Calling the lifecycle function in the setup function and passing in the callback function
- The lifecycle hook function can be called multiple times
Code demonstration
<template>
  <div>Life cycle function</div>
</template>

<script>
import { onMounted } from 'vue'
export default {
  setup() {
    // When the time is ripe, the callback function executes automatically
    onMounted(() => {
      console.log('mouted Life cycle execution')
    })
    onMounted(() => {
      console.log('mouted The lifecycle function executes again')
    })
  }
}
</script>
| Use of life cycle function under optional API | Life cycle function usage under composite API |
|---|---|
| beforeCreate | No (write directly to the setup function) |
| created | No (write directly to the setup function) |
| beforeMount | onBeforeMount |
| mounted | onMounted |
| beforeUpdate | onBeforeUpdate |
| updated | onUpdated |
| beforeDestroy | onBeforeUnmount |
| destroyed | onUnmounted |
15. Usage scenario of life cycle hook function
| Lifecycle hook function | Application scenario |
|---|---|
| created | Send ajax request / Mount common properties |
| mounted | Send ajax requests / dom dependent services, such as maps and charts |
| destroyed | Destroy operations, such as timers |
16. Parent child communication
Objective of this section: Master parent-child communication under combined API
In the composite API of vue3, the basic routine of parent to child is exactly the same, and the basic idea is still as follows: parent to child is passed in through prop, and child to parent is completed by calling custom events
Implementation steps
- The setup function provides two parameters. The first parameter is props and the second parameter is an object context
- props is an object, which contains all the prop data passed by the parent component. The context object contains attrs, slots and emit attributes, in which emit can trigger the execution of user-defined events to complete the transfer of child to parent
Code demonstration
[the external chain picture transfer fails. The source station may have an anti-theft chain mechanism. It is recommended to save the picture and upload it directly (img-YPgbEQow-1638093509814)(assets/vue3/props.png)]
app.vue
<template>
  <son :msg="msg" @get-msg="getMsg"></son>
</template>

<script>
import { ref } from 'vue'
import Son from './components/son'
export default {
  components: {
    Son
  },
  setup() {
    const msg = ref('this is msg')
    function getMsg(msg) {
      console.log(msg)
    }
    return {
      msg,
      getMsg
    }
  }
}
</script>
components/Son.vue
<template>
  <div>
    {{msg}}
    <button @click="setMsgFromSon">set</button>
  </div>
</template>

<script>
export default {
  props: {
    msg: {
      type: String
    }
  },
  emits: ['get-msg'], // Declare the custom event triggered by the current component
  setup(props,{emit}) {
    function setMsgFromSon(){
      emit('get-msg','This is a new message from the subcomponent msg information')
    }
    return {
      setMsgToSon
    }
  }
}
</script>
17. provide and inject
1. Usage scenario
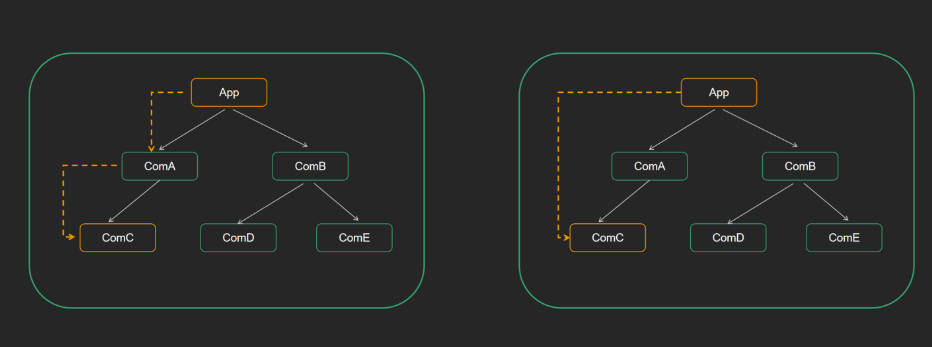
Objective of this section: to be able to explain clearly the usage scenarios of the API and what problems have been solved
Usually, we use props to transfer data between parents and children, but if the nesting level of components is deep, it will become very cumbersome to transfer from one layer to the next. Is there a way to simplify this process? Yes, we will learn about provide and input, Together, they can easily transfer data from top-level components to any bottom-level components
2. Foundation use
Objective of this section: master the basic usage of provide and inject in setup function
Requirement: a data in the master component is passed to the sub component for direct use
Implementation steps
-
The top-level component uses the provide function in the setup method to provide data
provide('key ', data)
-
Any underlying component uses the inject function in the setup method to get data
const data = inject('key')
Code landing
Grandpa component - app.vue
<template>
  <father></father>
</template>

<script>
import Father from '@/components/Father'
import { provide } from 'vue'
export default {
  components: {
    Father
  },
  setup() {
    let name = 'Zhang San'
    // Inject data key - value using the provide configuration item
    provide('name', name)
  }
}
</script>
Sun components - components/Son.vue
<template>
  I am a subcomponent
  {{ name }}
</template>

<script>
import { inject } from 'vue'
export default {
  setup() {
    const name = inject('name')
    return {
      name
    }
  }
}
</script>
In fact, as long as it is a descendant component, it can easily obtain the data provided by the top-level component
3. Transfer responsive data
By default, the data transmitted by provide is not responsive, that is, if you modify the data provided by provide, it will not affect the data used by the underlying components in a responsive manner. If you want to transmit the response data, you only need to generate the transmitted data using ref or reactive
Objective of this section: master how to transfer responsive data through provide/inject
app.vue
<template>
  <father></father>
  <button @click="changeName">change name</button>
</template>

<script>
import Father from '@/components/Father'
import { provide, ref } from 'vue'
export default {
  components: {
    Father
  },
  setup() {
    // Use ref to convert to responsive retransmission
    let name = ref('Zhang San')
    function changeName(){
      name.value = 'pink'
    }
    provide('name', name)
    return {
      changeName
    }
  }
}
</script>
18. TemplateRef
Objective of this section: master how to use ref to obtain dom node or component instance object in setup function
background knowledge
When using ref in a template, we all know that it generally has three usage scenarios
- ref + ordinary dom tag to get the real dom object this.$refs.box
- ref + component tag to get the component instance object this.$refs.form.validate()
- ref + v-for gets an array of dom objects (instance objects) (infrequently used)
Implementation steps
- Use ref function to pass in null to create ref object = > const href = ref (null)
- In the template, the association is established by defining the ref object name created in the ref attribute equal to 1 = > < H1 ref = "href" ></h1>
- Get the hrefleturn out
- Use = > href.value
Code landing
components/RefComponent.vue
<template>
  I am an ordinary component
</template>
app.vue
<template>
  <h1 ref="h1Ref">I'm ordinary dom label</h1>
  <ref-component ref="comRef"></ref-component>
</template>

<script>
import { onMounted, ref } from 'vue'
import RefComponent from '@/components/RefComponent'
export default {
  components: {
    RefComponent
  },
  setup() {
    const h1Ref = ref(null)
    const comRef = ref(null)
    onMounted(() => {
      console.log(h1Ref.value)
      console.log(comRef.value)
    })
    // You must return
    return {
      h1Ref,
      comRef
    }
  }
}
</script>
19. Incompatible syntax
Vue 3.0 is compatible with most of the syntax of version 2.0, but there are also some destructive syntax updates, which we should pay special attention to
-
The instance method $on is removed (the existing implementation mode of eventBus is no longer supported and can be replaced by a third-party plug-in)
event Bus 1. Vue.prototype.$eventBus = new Vue() 2. In the component receiving data this.$eventBus.$on('get-msg',(msg)=>{ }) 3. In the component that sends data this.$eventBus.$emit('get-msg','Transmitted data') vue3 By default eventBus Mode is not supported Use third-party plug-ins instead -
Remove the filter (the filter can no longer be used in the interpolation expression, but can be replaced by methods)
filter filter The string formatting method receives the original string and returns the formatted string {{ msg | formatMsg }} vue3 The syntax is removed directly and can be used directly methods replace {{ formatMsg('this is msg') }} // What is the result of rendering? Function return value methods:{ formatMsg(msg){ return msg + 'zs' } } -
. sync syntax removal (combined with v-model syntax)
.sync grammar
elementUI  -> Dialog  visible.sync="showFlag"
effect: Simplify triggering of custom events for parent-child communication
.sync -> v-model(a key)
Read more: https://v3.cn.vuejs.org/guide/migration/introduction.html