Vue.js component
Component is one of the most powerful functions of Vue.js.
Components can extend HTML elements and encapsulate reusable code.
<template>
  <div id="app">
    <!-- Use custom components -->
    <runoob></runoob>

  </div>
</template>

<script>
import Vue from 'vue'

// Register components
Vue.component('runoob', {
  template: '<h1>Custom components!</h1>'
})

var count=1;
export default {
  name: 'App',
  data(){
    return{
    }
  },
  methods:{
  },
}

</script>

<style scoped>

</style>
You can also register a local component in the instance option, so that the component can only be used in this instance:
<template>
  <div id="app">
    <!-- Use custom components -->
    <runoob></runoob>

  </div>
</template>

<script>
import Vue from 'vue'

var Child = {
  template: '<h1>Custom components!</h1>'
}

var count=1;
export default {
  name: 'App',
  data(){
    return{
    }
  },
  components:{
    'runoob':Child
  },
  methods:{
  },
}

</script>

<style scoped>

</style>
prop is a custom property used by a child component to accept the data passed by the parent component.
The data of the parent component needs to be passed to the child component through props. The child component needs to explicitly declare "prop" with props option:
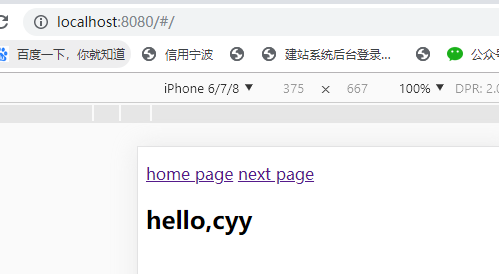
<template>
  <div id="app">
    <!-- Use custom components -->
    <child msg="hello,cyy"></child>

  </div>
</template>

<script>
import Vue from 'vue'

Vue.component('child',{
  props:['msg'],
  template:'<span>{{msg}}</span>'
})

var count=1;
export default {
  name: 'App',
  data(){
    return{
    }
  },
  methods:{
  },
}

</script>

<style scoped>

</style>

Similar to using v-bind to bind HTML features to an expression, you can also use v-bind to dynamically bind the value of props to the data of the parent component. Whenever the data of the parent component changes, the change is also transmitted to the child component:
<template>
  <div id="app">
    <input type="text" v-model="info">
    <!-- Use custom components -->
    <child v-bind:msg="info"></child>

  </div>
</template>

<script>
import Vue from 'vue'

Vue.component('child',{
  props:['msg'],
  template:'<span>template content: {{msg}}</span>'
})

var count=1;
export default {
  name: 'App',
  data(){
    return{
      info:''
    }
  },
  methods:{
  },
}

</script>

<style scoped>

</style>

The following example uses the v-bind instruction to pass the item to each duplicate component:
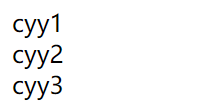
<template>
  <div id="app">
    <!-- Use custom components -->
    <child v-for="(item,index) in list" :key="index" v-bind:msg="item.name"></child>

  </div>
</template>

<script>
import Vue from 'vue'

Vue.component('child',{
  props:['msg'],
  template:'<span>{{msg}}<br></span>'
})

var count=1;
export default {
  name: 'App',
  data(){
    return{
      list:[
        {
          name:'cyy1'
        },
        {
          name:'cyy2'
        },
        {
          name:'cyy3'
        }
      ]
    }
  },
  methods:{
  },
}

</script>

<style scoped>

</style>
Note: prop is one-way bound: when the properties of the parent component change, it will be passed to the child component, but not vice versa.
Components can specify validation requirements for props.
To customize the verification method of props, you can provide an object with verification requirements for the values in props, rather than an array of strings. For example:
Vue.component('my-component', {
  props: {
    // Basic type check ('null' and 'undefined' will pass any type verification)
    propA: Number,
    // Multiple possible types
    propB: [String, Number],
    // Required string
    propC: {
      type: String,
      required: true
    },
    // Number with default
    propD: {
      type: Number,
      default: 100
    },
    // Objects with default values
    propE: {
      type: Object,
      // Object or array defaults must be obtained from a factory function
      default: function () {
        return { message: 'hello' }
      }
    },
    // Custom validation function
    propF: {
      validator: function (value) {
        // This value must match one of the following strings
        return ['success', 'warning', 'danger'].indexOf(value) !== -1
      }
    }
  }
})
When the verification of prop s fails, Vue will generate a console warning.
type can be the following native constructor:
- String
- Number
- Boolean
- Array
- Object
- Date
- Function
- Symbol
type can also be a custom constructor, using instanceof detection.
The parent component uses props to pass data to the child component, but if the fruit component wants to pass data back, it needs to use custom events!
We can use v-on to bind custom events. Each Vue instance implements the events interface, which is:
- Use $on(eventName) to listen for events
- Use $emit(eventName) to trigger events
In addition, the parent component can directly use v-on to listen for events triggered by the child component where the child component is used.
In the following example, the sub component has been completely decoupled from its external part. All it does is trigger an internal event that the parent component cares about.
<template>
  <div id="app">
    <!-- Use custom components -->
    <child @add-count="addCount"></child>
    <child @add-count="addCount"></child>
    <p>{{total}}</p>
  </div>
</template>

<script>
import Vue from 'vue'

Vue.component('child',{
  template:'<button @click="addNum">click me</button>',
  data(){
    return{
      num:0
    }
  },
  methods:{
    addNum(){
      this.num+=1;
      this.$emit('add-count');
    }
  }
})

var count=1;
export default {
  name: 'App',
  data(){
    return{
      total:0
    }
  },
  methods:{
    addCount(){
      this.total+=1;
    }
  },
}

</script>

<style scoped>

</style>
If you want to listen for a native event on the root element of a component. You can use. Native to decorate v-on. For example:
<my-component v-on:click.native="doTheThing"></my-component>
When a child component triggers a parent component's method through $emit, if you need to pass parameters, you can add optional parameters after the method name, separated by commas.
For example, $emit("FunctionName") when passing parameters: $emit("FunctionName",[arg1,arg2...]).
In addition to the core instructions (v-model and v-show) set by default, Vue also allows you to register custom instructions.
Next, we register a global instruction v-focus. The function of this instruction is to get the focus of the element when the page is loaded:
<template>
  <div id="app">
    <input type="text" v-focus>
  </div>
</template>

<script>
import Vue from 'vue'

//Register custom instructions v-focus
Vue.directive('focus',{
  inserted:function(el){
    el.focus();
  }
})

var count=1;
export default {
  name: 'App',
  data(){
    return{

    }
  },
  methods:{

  },
}

</script>
You can also use the directives option in an instance to register local directives, so that directives can only be used in this instance:
<template>
  <div id="app">
    <input type="text" v-focus>
  </div>
</template>

<script>
import Vue from 'vue'

var count=1;
export default {
  name: 'App',
  data(){
    return{

    }
  },
  directives:{//Register custom instructions v-focus
    focus:{
      inserted:function(el){
        el.focus();
      }
    }
  }
}

</script>
The instruction definition function provides several hook functions (optional):
-
bind: it is only called once. When an instruction is bound to an element for the first time, the hook function can be used to define an initialization action to be executed once during binding.
-
Inserted: called when the bound element is inserted into the parent node (the parent node can be called if it exists, and does not need to exist in the document).
-
Update: called when the template of the bound element is updated, regardless of whether the binding value changes. By comparing the binding values before and after the update, unnecessary template updates can be ignored (see the following for detailed hook function parameters).
-
componentUpdated: called when the template of the bound element completes an update cycle.
-
unbind: only called once, when the instruction and element are unbound.
The parameters of the hook function are:
- el: the element bound by the instruction, which can be used to directly operate DOM.
-
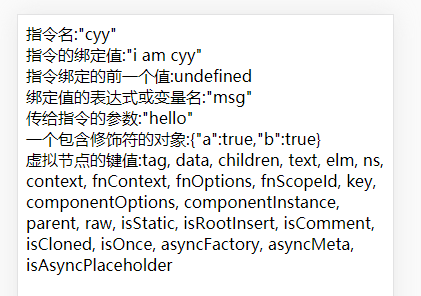
binding: an object containing the following properties:
- Name: instruction name, excluding the v-prefix.
- Value: the binding value of the instruction, for example: v-my-directive = "1 + 1", the value of value is 2.
- oldValue: the previous value of the instruction binding, only available in the update and componentUpdated hooks. Available regardless of value change.
- Expression: the expression or variable name of the bound value. For example, v-my-directive="1 + 1", the value of expression is "1 + 1".
- Arg: parameter passed to the instruction. For example, v-my-directive:foo, the value of arg is "foo".
- Modifiers: an object containing modifiers. For example: v-my-directive.foo.bar, the value of modifier object modifiers is {foo: true, bar: true}.
- Vnode: the virtual node generated by Vue compilation.
- oldVnode: last virtual node, available only in the update and componentUpdated hooks.
<template>
  <div id="app">
    <div v-cyy:hello.a.b="msg"></div>
  </div>
</template>

<script>
import Vue from 'vue'

//Custom instruction cyy
Vue.directive('cyy',{
  bind:function(el,binding,vnode){
    el.innerHTML=`
      //Instruction Name: ${JSON.stringify(binding.name)}<br/>
      Binding value of instruction:${JSON.stringify(binding.value)}<br/>
      Previous value of instruction binding:${JSON.stringify(binding.oldValue)}<br/>
      The expression or variable name of the bound value:${JSON.stringify(binding.expression)}<br/>
      Parameters passed to the command:${JSON.stringify(binding.arg)}<br/>
      An object with modifiers:${JSON.stringify(binding.modifiers)}<br/>
      Key value of virtual node:${Object.keys(vnode).join(', ')}<br/>
    `;
  }
})

export default {
  name: 'App',
  data(){
    return{
      msg:'i am cyy'
    }
  },
}

</script>
When you do not need other hook functions, you can abbreviate them as follows
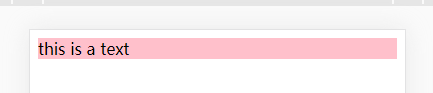
<template>
  <div id="app">
    <div v-cyy:backgroundColor="styleCls">this is a text</div>
  </div>
</template>

<script>
import Vue from 'vue'

//Custom instruction cyy
Vue.directive('cyy',{
  bind:function(el,binding){
    el.style.backgroundColor=binding.value.backgroundColor;
  }
})

export default {
  name: 'App',
  data(){
    return{
      styleCls:{
        backgroundColor:'pink'
      }
    }
  },
}

</script>
The instruction function can accept all legal JavaScript expressions. The following example passes in JavaScript objects:
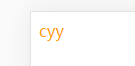
<template>
  <div id="app">
    <div v-cyy="{text:text,color:color}">this is a text</div>
  </div>
</template>

<script>
import Vue from 'vue'

//Custom instruction cyy
Vue.directive('cyy',{
  bind:function(el,binding){
    el.innerHTML=binding.value.text;
    el.style.color=binding.value.color;
  }
})

export default {
  name: 'App',
  data(){
    return{
      text:'cyy',
      color:'orange'
    }
  },
}

</script>
cnpm install vue-router

< router link > is a component used to set a navigation link and switch different HTML content. The to property is the destination address, which is the content to display.
In the following example, we add Vue router, configure components and route mapping, and then tell Vue router where to render them. The code is as follows:
Use modularization mechanism to program, import Vue and VueRouter, and call Vue.use(VueRouter)
App.vue
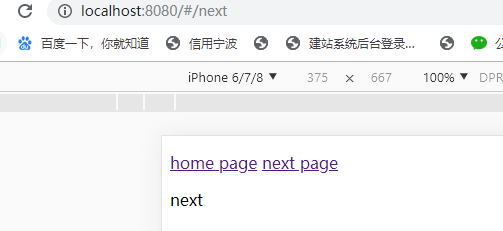
<template>
  <div id="app">
    <p>
      <!-- By incoming `to` Property specifies the link. -->
      <!-- <router-link> By default, it will be rendered as a `<a>` Label -->
      <router-link to="/">home page</router-link>
      <router-link to="/next">next page</router-link>
    </p>
    <!-- The components to which the route matches will be rendered here -->
    <router-view></router-view>
  </div>
</template>

<script>
import Vue from 'vue'

export default {
  name: 'App',
  data(){
    return{

    }
  },
}

</script>
router/index.js
import Vue from 'vue'
import Router from 'vue-router'
import HelloWorld from '@/components/HelloWorld'
//1. Define (route) components from other files import come in
const Next = { template: '<div>next</div>' }

const routes = [
  { path: '/Next', component: Next },
  { path: '/', component: HelloWorld },
]

Vue.use(Router)

export default new Router({
  routes
})
design sketch
The style "router link exact active router link active" will be added to the clicked navigation links.
to
Represents the link to the destination route. After being clicked, the value of to will be passed to router.push() immediately, so this value can be a string or an object describing the target location.
<!-- character string -->
<router-link to="home">Home</router-link>
<!-- Render results -->
<a href="home">Home</a>

<!-- Use v-bind Of JS expression -->
<router-link v-bind:to="'home'">Home</router-link>

<!-- Not write v-bind Yes, just like binding other properties -->
<router-link :to="'home'">Home</router-link>

<!-- Ditto -->
<router-link :to="{ path: 'home' }">Home</router-link>

<!-- Named route -->
<router-link :to="{ name: 'user', params: { userId: 123 }}">User</router-link>

<!-- With query parameters, the following results are /register?plan=private -->
<router-link :to="{ path: 'register', query: { plan: 'private' }}">Register</router-link>
replace
If you set the replace property, when you click, router.replace() will be called instead of router.push(), and no history record will be left after navigation.
<router-link :to="{ path: '/abc'}" replace></router-link>
append
After the append property is set, the base path is added before the current (relative) path. For example, we navigate from / A to a relative path B. If append is not configured, then the path is / b. if it is configured, then it is / a/b
<router-link :to="{ path: 'relative/path'}" append></router-link>
tag
Sometimes you want < router link > to render as a label, such as < li >. So we use the tag prop class to specify which tag to use. Similarly, it will listen for clicks and trigger navigation.
<router-link to="/foo" tag="li">foo</router-link>
<!-- Render results -->
<li>foo</li>
active-class
Sets the CSS class name to use when the link is activated. It can be replaced by the following code.
<style>
   ._active{
      background-color : red;
   }
</style>
<p>
   <router-link v-bind:to = "{ path: '/route1'}" active-class = "_active">Router Link 1</router-link>
   <router-link v-bind:to = "{ path: '/route2'}" tag = "span">Router Link 2</router-link>
</p>
Note that class uses active class.
exact-active-class
Configure the class that should be activated when the link is precisely matched. It can be replaced by the following code.
<p>
   <router-link v-bind:to = "{ path: '/route1'}" exact-active-class = "_active">Router Link 1</router-link>
   <router-link v-bind:to = "{ path: '/route2'}" tag = "span">Router Link 2</router-link>
</p>
event
Declare events that can be used to trigger navigation. It can be a string or an array of strings.
<router-link v-bind:to = "{ path: '/route1'}" event = "mouseover">Router Link 1</router-link>
The above code sets the event as mouseover, and the HTML content of navigation will change when the mouse moves to Router Link 1.
The difference between exact active class and active class
By default, the route of router link is fuzzy matching. For example, if the current path is / article/1, then < router link to = "/ article" > will also be activated. Therefore, after setting the exact active class, this router link will only be activated when the current route is fully inclusive of matching. For example:
<router-link to="/article" active-class="router-active"></router-link>
When the user accesses / article/1, it is activated as:
<a href="#/article" class="router-active" rel="nofollow"></a>
When using:
<router-link to="/article" exact-active-class="router-active"></router-link>
When the user accesses / article/1, the class of this link will not be activated:
<a href="#/article" rel="nofollow"></a>