1.Vue overview
1.1MVVM mode
M: That is, Model, including data and some basic operations
5: That is, View, page rendering results
VM: view model, two-way operation between model and view (without developer intervention)
Before MVVM, developers obtain the required data Model from the back end, and then render the Model into the View through DOM operation. Then when the user operates
View, we also need to get the data in the view through the DOM, and then synchronize it to the Model.
What the VM in MVVM needs to do is to completely encapsulate the DOM operation. Developers no longer need to care about how the Model and View affect each other:
As long as the Model changes, it will naturally appear on the View.
When the user modifies the View, the data in the Model will also change.
Liberate developers from cumbersome DOM operations and focus on how to operate the Model.
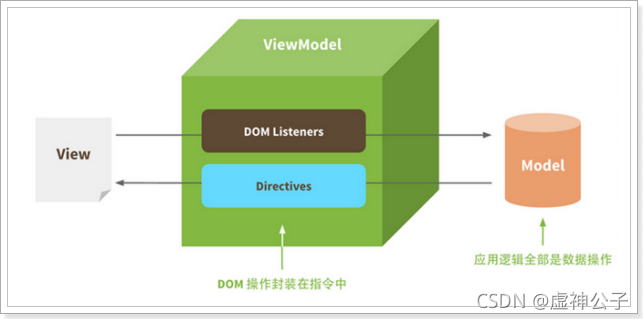
Framework of MVVM pattern: Vue
1.2 understanding Vue
Vue (pronunciation / vju) ː/, Similar to view) is a progressive framework for building user interfaces. Unlike other large frameworks, Vue is designed to be applied layer by layer from bottom to top. Vue's core library only focuses on view layers, which is not only easy to start, but also easy to integrate with third-party libraries or existing projects. On the other hand, when combined with modern tool chains and various supporting class libraries, Vue can also provide drivers for complex single page applications.
Front end frame big three: Vue.js,React.js,AngularJS,vue.js Known for its light weight and ease of use, vue.js and React.js The development speed is the fastest.
Progressive: you can selectively use one or some components of the framework, and the use of these components does not need to apply all components of the framework; and
 Using these components does not require your system to use the framework.
Official website: https://cn.vuejs.org/
reference resources: https://cn.vuejs.org/v2/guide/
Git Address: https://github.com/vuejs
2. Quick start
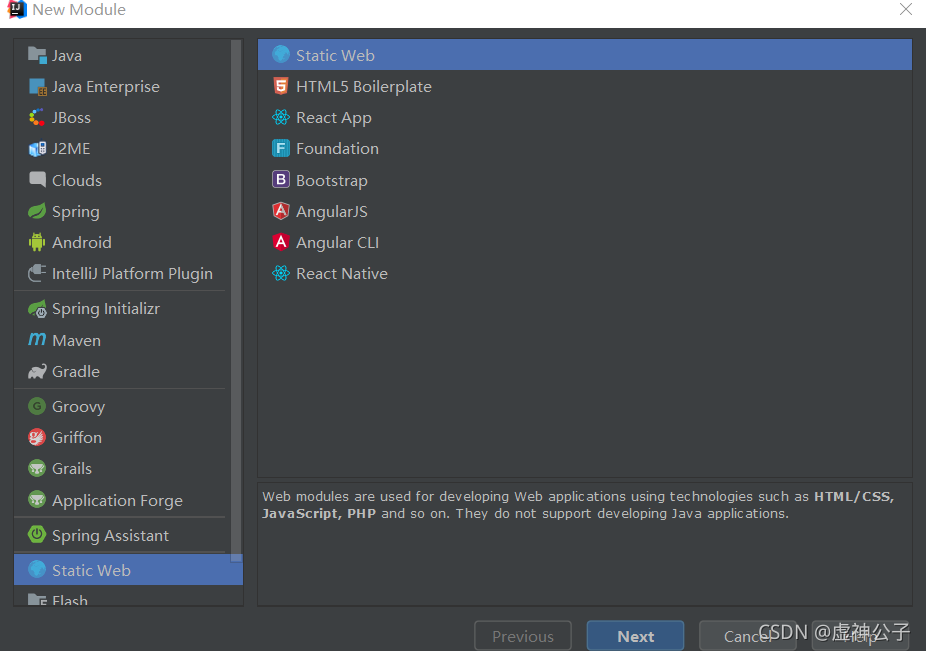
2.1 create project
Create a new project; Select a static web type project:
Project–>Static Web -->Static Web–>Next

2.2. Installing Vue
2.2.1 download and installation
Download address: https://github.com/vuejs/vue
You can download version 2.6.10 https://github.com/vuejs/vue/archive/v2.6.10.zip
Download and unzip. You can get the vue.js file in dist.
2.2.2. Using CDN
Or you can directly use the public CDN (content distribution network) service:
<!-- Development environment version, including command line warnings with help -->
<script src="https://cdn.jsdelivr.net/npm/vue/dist/vue.js"></script>
Or:
<!-- Production environment version, optimized size and speed -->
<script src="https://cdn.jsdelivr.net/npm/vue"></script>
2.2.3.npm installation
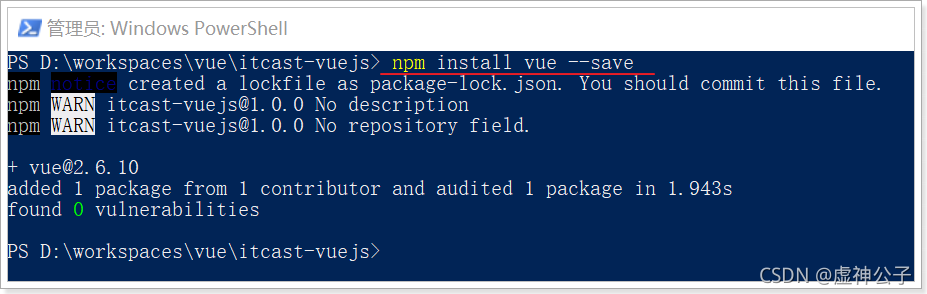
In the lower left corner of idea - > terminal button, click to open the console:
Input: npm init -y
Initialize project
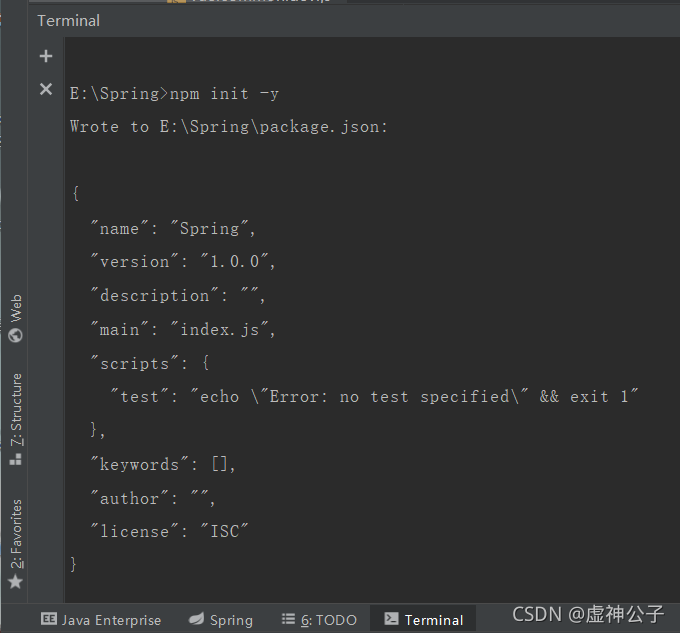
A package.json file will appear in the project directory.
This is the basic description of the project. For example, the name, version, etc. are somewhat similar to the pom file in java.
To install Vue, enter the command:
# save means to install the module in the project directory and write the dependencies in the dependencies node of the package file
npm install vue --save
If the following errors occur during execution; Then use the administrator to enter the project path and execute the above command:
Right click package.json in idea – > show in Explorer, and the file view will appear – > click the red file button – > open Windows Powershell – > run as administrator
Then a node will be found in the project directory_ Modules directory, and there is a vue directory below.
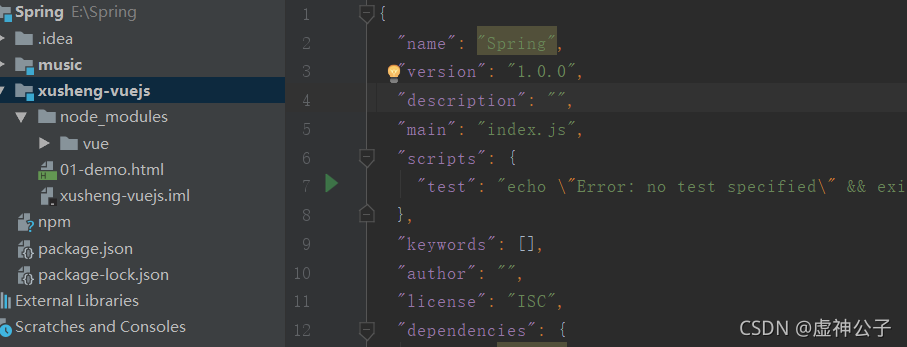
node_modules is the default location for all modules installed through npm.
At this time, if you check package.json again, you will find that there is a change: vue version information appears
2.3. vue introduction case
2.3.1. HTML template
Create a new HTML file in the project directory
2.3.2. vue rendering
The html content is as follows:
<!DOCTYPE html>
<html lang="en">
<head>
<meta charset="UTF-8">
<title>vuejs test</title>
</head>
<body>
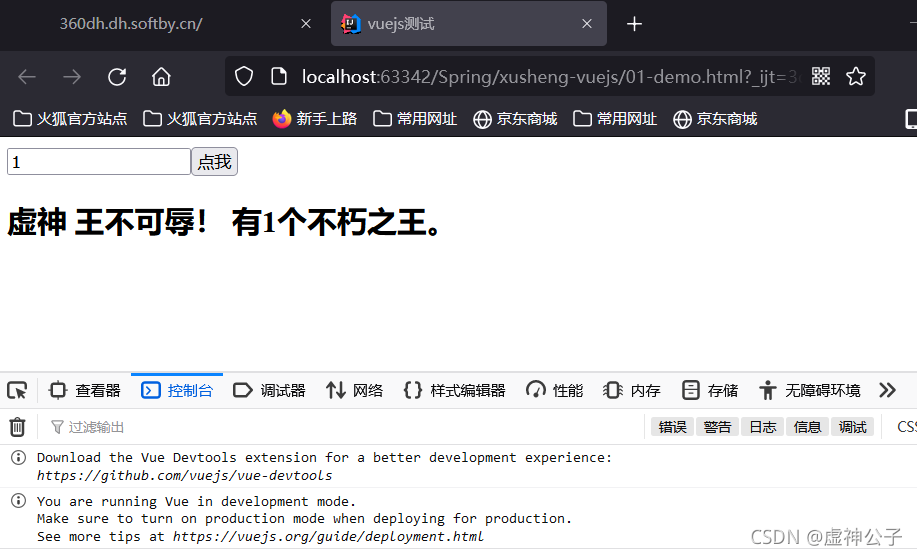
<div id="app">
<h2>{{name}} The king must not be humiliated!</h2>
</div>
<script src="node_modules/vue/dist/vue.js"></script>
<script>
var app = new Vue({
el:"#app",//el is element, the page element to be rendered
data: {
name:"Virtual God"
}
});
</script>
</body>
</html>
First, create a Vue instance through new Vue()
Then the constructor receives an object with some properties:
el: is the abbreviation of element. Select the page element to be rendered by id. in this case, it is a div
Data: data. Data is an object with many attributes that can be rendered to the view
Name: a name attribute is specified here
In the h2 element in the page, the name attribute just defined is rendered by {name}}.
2.3.3. Bidirectional binding
Simply modify the case just now:
Add a new attribute in data: num
There is an input element in the page, which is bound to num through v-model.
At the same time, output on the page through {{num}};
Add a button to the page:
<!DOCTYPE html>
<html lang="en">
<head>
    <meta charset="UTF-8">
    <title>vuejs test</title>
    <script src="node_modules/vue/dist/vue.js"></script>
</head>
<body>
<div id="app">
    <input type="text" v-model="num"><button v-on:click="num++">Point me</button>
    <h2>{{name}} Don't insult the king{{num}}An Immortal King.</h2>
</div>
<script type="text/javascript">
    var app = new Vue({
       el:"#app",
        data:{
           name:"Virtual God",
            num: 1
        }
    });
</script>
</body>
</html>
effect:
It can be observed that the change of input box causes the change of num in data, and the page output also changes.
Input is bound to num, and the value of input changes, affecting the value of num in data
The page {{num}} is bound to the data num, so the change of num value causes the change of page effect.
There is no dom operation, which is the charm of two-way binding.
Bind the click event with the v-on instruction instead of the ordinary onclick, and then directly operate num
Normal onclick cannot directly operate num.
3. Vue instance
3.1. Create Vue instance
Each Vue application starts by creating a new Vue instance with the Vue function:
var vm = new Vue({
 // option
})
Pass in an object in the constructor, and declare various data and methods required by Vue in the object, including:
el
data
methods
...
3.2. Template or element
Each Vue instance needs to be associated with an Html template, and Vue will render the view based on this template; it can be specified through the el attribute.
For example, an html template:
<div id="app">

</div>
Then create a Vue instance and associate the div
var vm = new Vue({
el:"#app"
})
In this way, Vue can render based on the div element with id app as a template. The Vue feature cannot be used in parts outside this div range.
3.3. Data
When a Vue instance is created, it will try to obtain all the attributes defined in the data for rendering the view, and monitor the attribute changes in the data
When the data changes, all relevant views will be re rendered, which is the "responsive" system.
html:
<div id="app">
  <input type="text" v-model="name"/>
</div>
js:
var vm = new Vue({
  el:"#app",
  data:{
    name:"dark horse"
 }
})
The change of name will affect the value of input
The value entered in input will also cause the name in vm to change
3.4. Method
In Vue instances, in addition to defining data attributes, methods can also be defined and used within the scope of Vue.
html:
<div id="app">
  <button v-on:click="add">Point me</button>
</div>
js:
var vm = new Vue({
  el:"#app",
  data:{
 },
  methods:{
    add:function(){
      console.log("Order me...233")
   }
 }
})
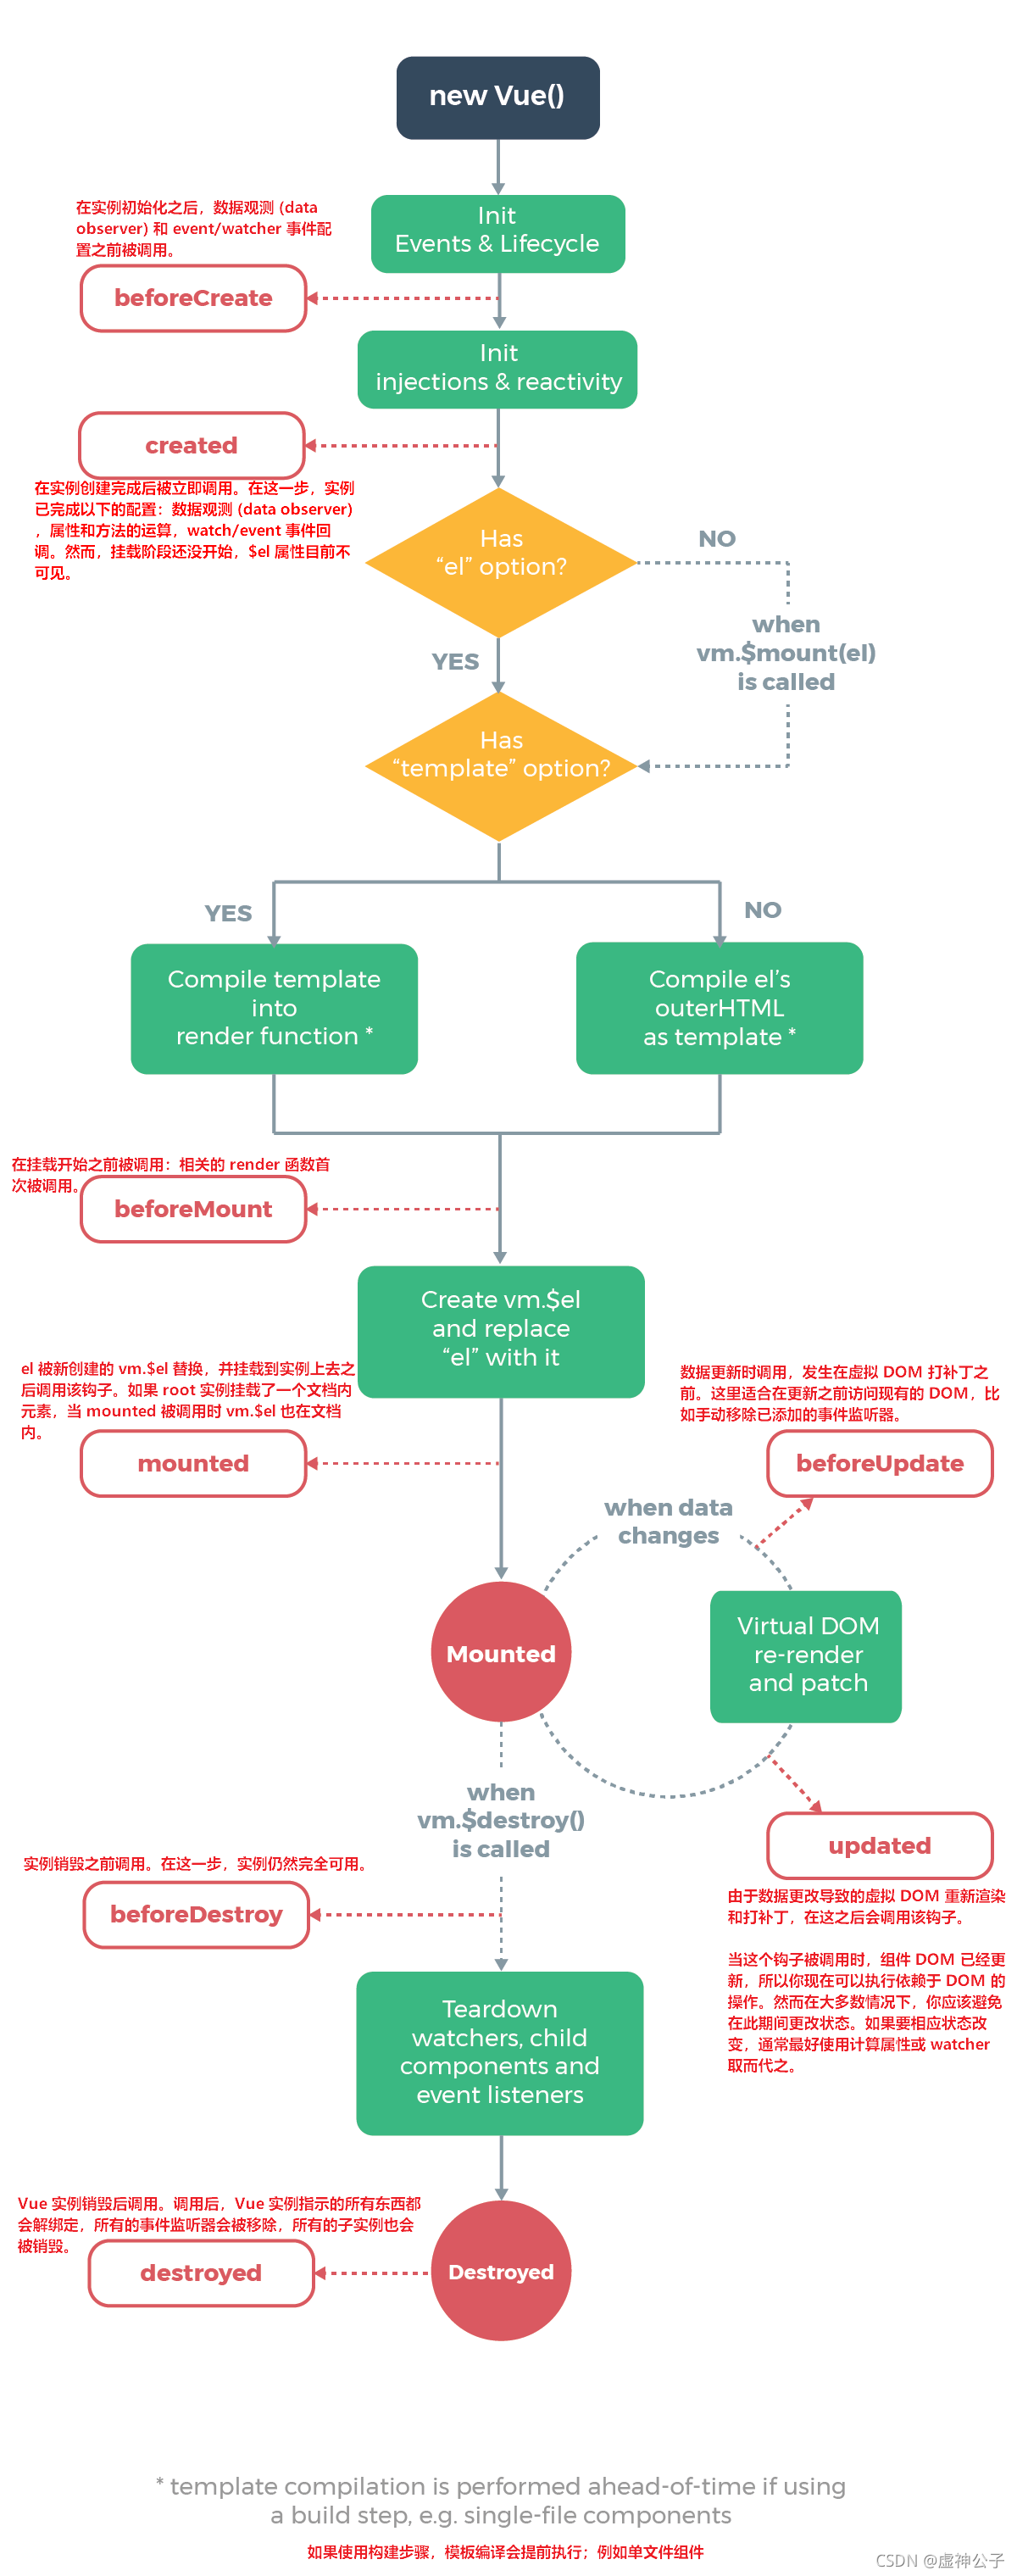
3.5. Life cycle hook
3.5.1. Life cycle
When each Vue instance is created, it must go through a series of initialization processes: creating an instance, loading a template, rendering a template, etc. Vue is an instance in the life cycle
Hook functions (listener functions) are set for each state. Each time a Vue instance is in a different life cycle, the corresponding function will be triggered and called.
All lifecycle hooks are automatically bound this Context to instance, so you can access data and operate on properties and methods. This means that you can't use arrow functions to define a lifecycle method (for example created: () => this.fetchTodos() ). This is because of the arrow
 The header function is bound to the parent context, so this With what you expect Vue Different instances, this.fetchTodos The behavior of is undefined.
Life cycle:
vm.
e
l
:
V
u
e
real
example
send
use
of
root
D
O
M
element
element
v
m
.
el: the root DOM element vm. Used by the Vue instance
el: root DOM element used by Vue instance vm.root: root Vue instance of the current component tree. If the current instance does not have a parent instance, the instance will be its own.
3.5.2. Hook function
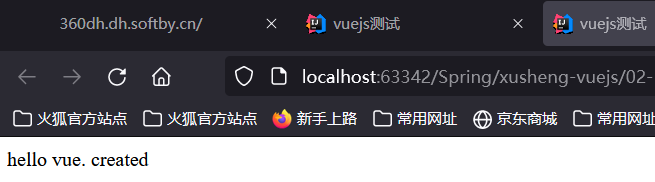
For example: created means after the vue instance is created;
You can define a created function in Vue to represent the constructor of this period:
Create a sample html page 02 as follows:
<!DOCTYPE html>
<html lang="en">
<head>
    <meta charset="UTF-8">
    <title>vuejs test</title>
    <script src="node_modules/vue/dist/vue.js"></script>
</head>
<body>
<div id="app">
    {{msg}}
</div>
<script type="text/javascript">
    var app = new Vue({
        el: "#app",
        data:{//Initialization is null
        msg: ""
    },
        //Hook function
        created(){
            this.msg = "hello vue. created";
        }
    });
</script>
</body>
</html>
3.5.3.this
You can see who the this variable in vue is and print this when it is created
created(){
            this.msg = "hello vue. created";
            console.log(this);
Console output:
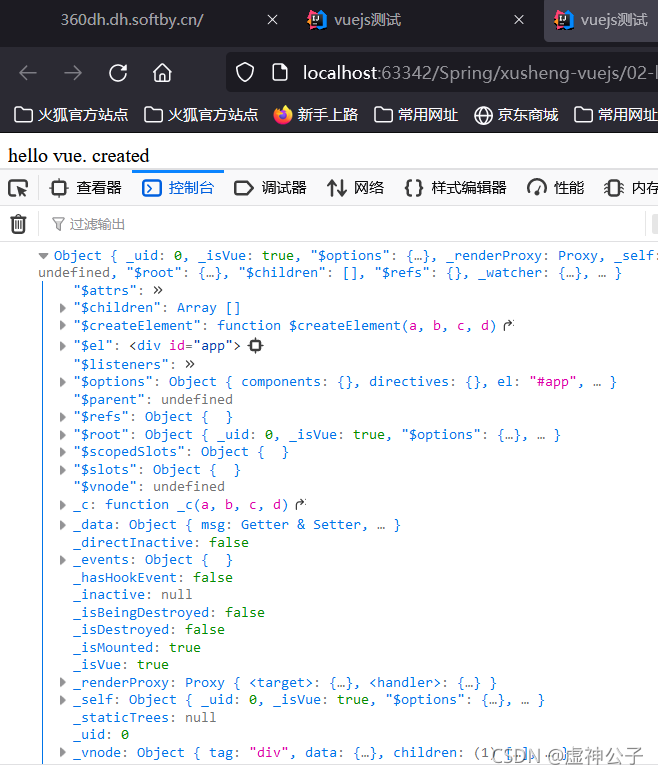
Summary: This is the current Vue instance. Within the Vue object, you must use this to access the data attributes and methods defined in Vue.