The code comes from the e-commerce system of a horse
1, Create a new project and create a schema
vue ui create a new project, and then
Add plug-ins: Vue cli plugin element,
Installation dependencies: axios, router, vuex
1.1 routing interface analysis
1,Vue.use(VueRouter)
2. Both routing components are written as follows, and the second is more concise:
component: (Home);# import Home from '.../views/Home.vue'
component: () => import('.../views/About.vue')
3. New vuerouter ({routes}) is used to create a router
import Vue from 'vue'
import VueRouter from 'vue-router'
import Home from '../views/Home.vue'

Vue.use(VueRouter)

const routes = [
  {
    path: '/',
    name: 'Home',
    component: (Home)
  },
  {
    path: '/about',
    name: 'About',
    // route level code-splitting
    // this generates a separate chunk (about.[hash].js) for this route
    // which is lazy-loaded when the route is visited.
    component: () => import(/* webpackChunkName: "about" */ '../views/About.vue')
  }
]

const router = new VueRouter({
  routes
})

export default router
1.2 primary routing architecture
(1) main.js: generally unchanged. It is the following fixed format
import Vue from 'vue'
import App from './App.vue'
import router from './router'
import store from './store'
import './plugins/element.js'//Import components in element UI

Vue.config.productionTip = false

new Vue({
  router,
  store,
  render: h => h(App)
}).$mount('#app')
(2) router/index.js lock the relationship between components and router placeholders
import Vue from 'vue'
import VueRouter from 'vue-router'
import Login from '../components/Login.vue'

Vue.use(VueRouter)

const routes = [
  {
    path:'/',
    redirect:'/login'
  },
  {
    path: '/login',
    component: Login
  }

]

const router = new VueRouter({
  routes
})

export default router
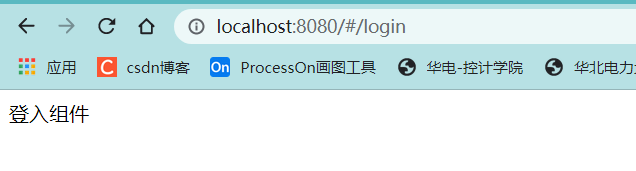
(3) Router component: Login.vue
<template>
    <div>
        Login component
    </div>
</template>

<script>

export default {

}
</script>


<style lang="less" scoped>
//1. Less is a CSS preprocessing language, which endows CSS with the characteristics of dynamic language.
//2. scoped: this style is only effective in this file to prevent style conflicts
</style>
(4) Router placeholder: App.vue
<template>
  <div id="app">
    <!-- Route placeholder-->
    <router-view></router-view>
  </div>
</template>

<script>
export default {
  name: "app"
}
</script>

<style>
</style>
Successful implementation of basic routing effects:
1.3 registering element UI
-------------------------plugins/element.js
import Vue from 'vue'
import Element from 'element-ui'
import 'element-ui/lib/theme-chalk/index.css'

Vue.use(Element)
1.4 using vuex:/store/index.js
import Vue from 'vue'
import Vuex from 'vuex'

Vue.use(Vuex)

export default new Vuex.Store({
  state: {
  },
  mutations: {
  },
  actions: {
  },
  modules: {
  }
})
[error 1] cannot resolve 'less loader' error
Install less and less loader
npm install less less-loader --save-dev
yarn add less less-loader --dev
[error 2] this.getOptions is not a function
Reduce the less loader version: npm install --only=dev less-loader@7.3.0
2, Complete the login page
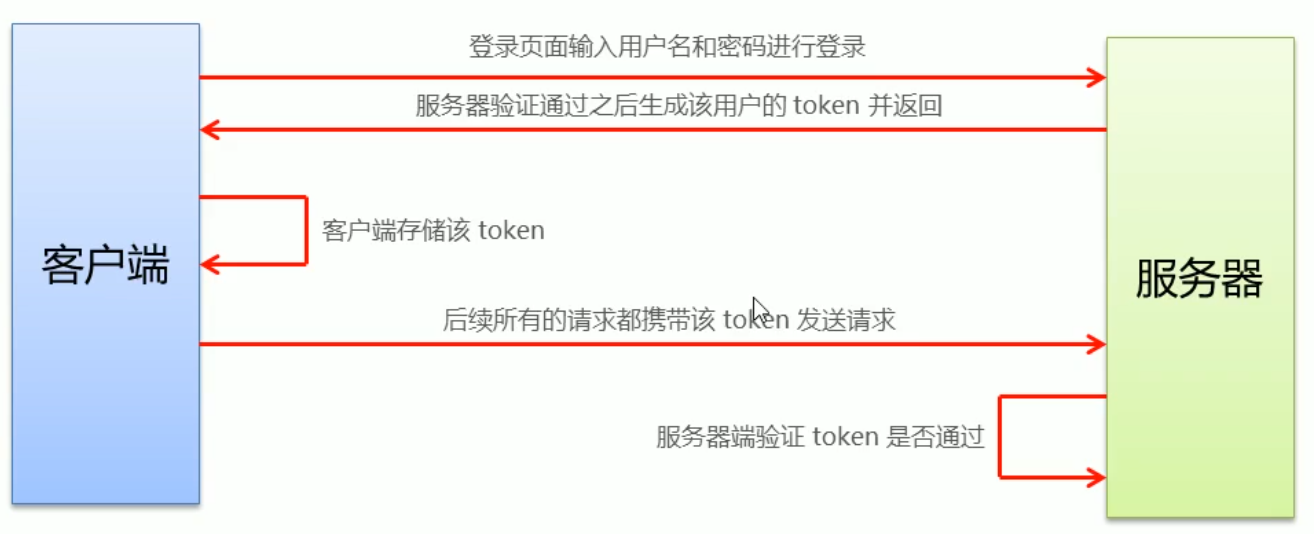
1. http is stateless,
2. We will use cookie s to record the status on the client,
3. The session will be used to record the status on the server,
4. And use token to maintain the state. The principle analysis of token is shown in the figure below
2.1 page layout
1. Element UI is used to layout the login page
The layout structure of the login page is as follows:
- El form: form component
- el-form-item
- El input: implement text input box
- El button: button
- Font Icon
2. Use shift+Alt+f to automatically adjust the indent format
(1) Create a global style sheet assets/css/global.css
Vue.prototype is used to set global variables
----------------------assets/css/global.css configuring global styles
/*Global style sheet*/
html,
body,
#app {
    height: 100%;
    margin: 0;
    padding: 0;
}
--------------------Import global styles in main.js
import Vue from 'vue'
import App from './App.vue'
import router from './router'
import store from './store'
import './plugins/element.js'
import './assets/css/global.css'//Import global style sheet

Vue.config.productionTip = false

//Vue.prototype is used to set global variables. We can use this.$http to represent this axios in this Vue program
//This vue program includes components imported from router. Where $is just an identifier and has no effect
Vue.prototype.$http = axios;

new Vue({
  router,
  store,
  render: h => h(App)
}).$mount('#app')
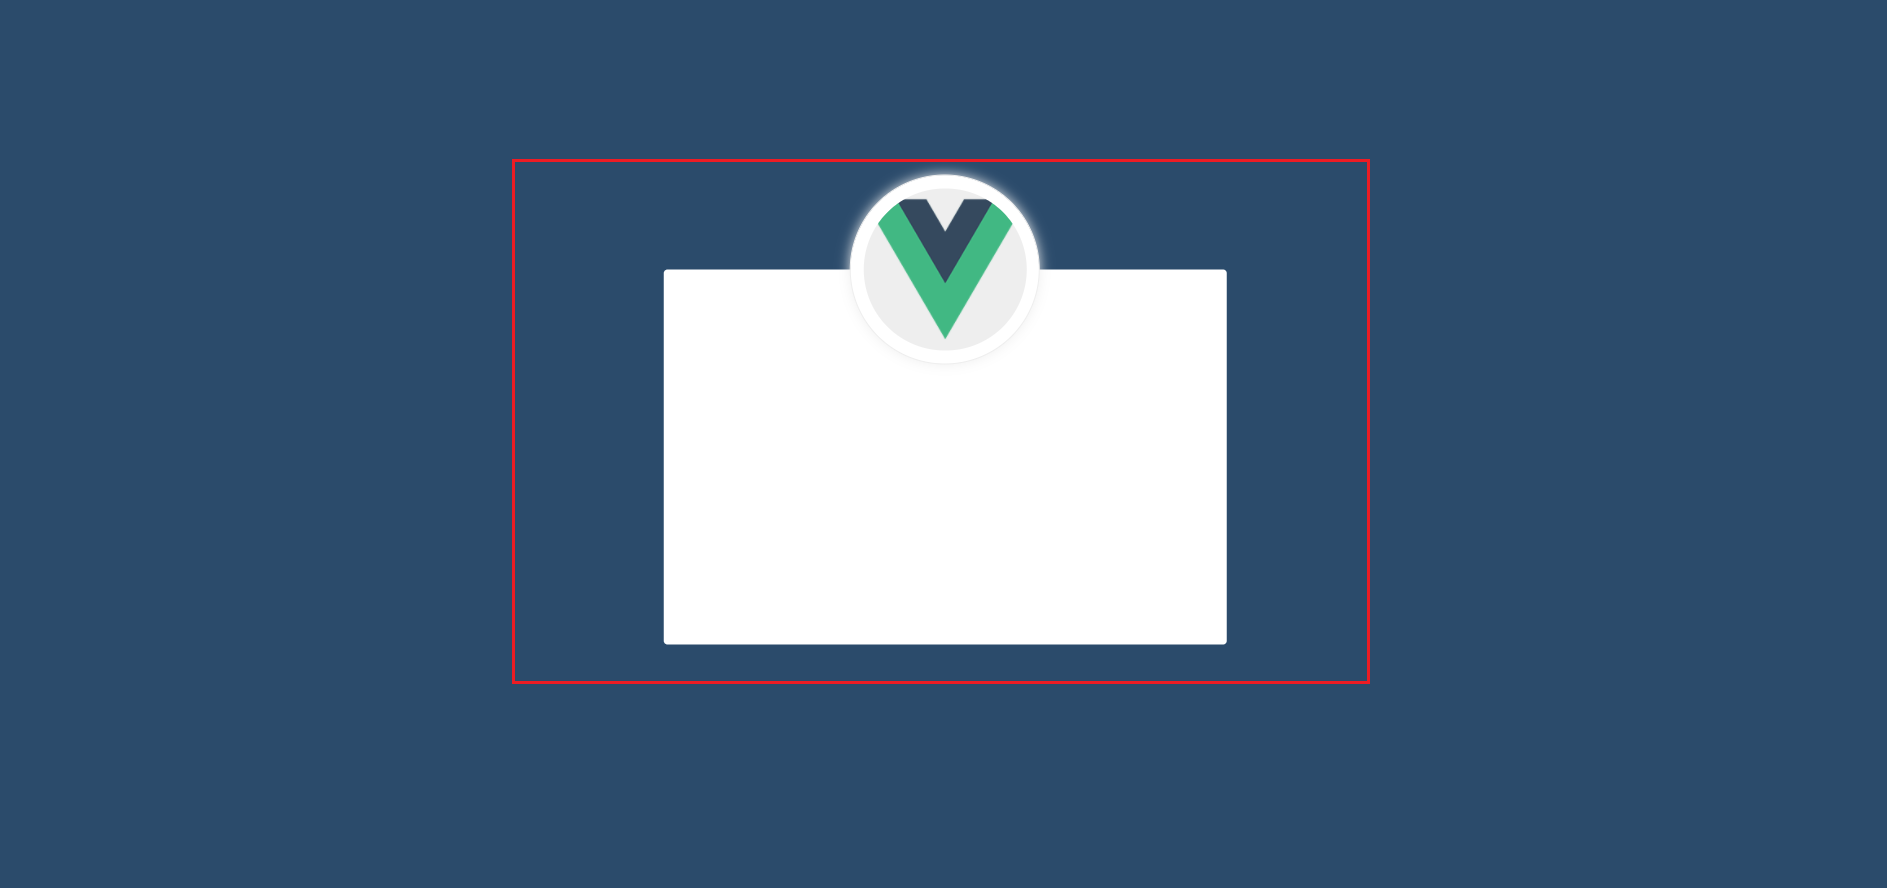
(2) Modify the style of the login page
--------------components/Login.vue
<template>
    <div class="login_container">
        <div class="login_box">
            <div class="avatar_box">
                <img src="../assets/logo.png" alt="">
            </div>
        </div>
    </div>
</template>

<script>

export default {

}
</script>


<style lang="less" scoped>
//1. Less is a CSS preprocessing language, which endows CSS with the characteristics of dynamic language.
//2. scoped: this style is only effective in this file to prevent style conflicts
.login_container {
    background-color:#2b4b6b;
    height: 100%;
}
.login_box {
    width: 450px;
    height: 300px;
    background-color: #fff;
    border-radius: 3px;
    position: absolute;
    left: 50%;
    top: 50%;
    transform: translate(-50%,-50%);

    .avatar_box {
        height: 130px;
        width:130px;
        border: 1px solid #eee;
        border-radius: 50%;
        padding: 10px;
        box-shadow: 0 0 10px #eee;
        position: absolute;
        left: 50%;
        transform: translate(-50%,-50%);
        background-color: #fff;

        img {
            width: 100%;
            height: 100%;
            border-radius: 50%;
            background-color: #eee;
        }
    }
}


</style>
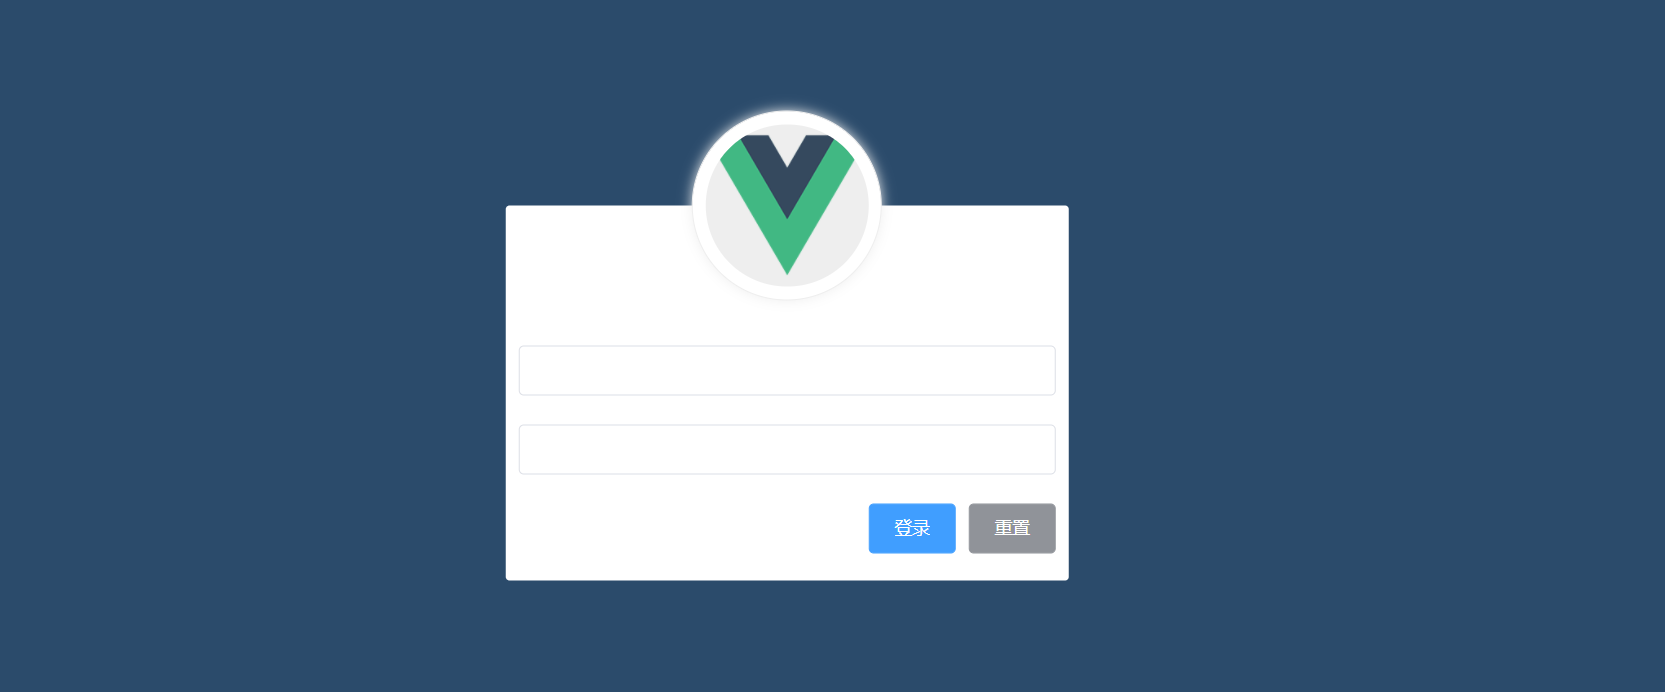
The results are as follows
(3) Add a form component on the login page
--------------components/Login.vue
<template>
    <div class="login_container">
        <div class="login_box">
            <!-- Avatar area -->
            <div class="avatar_box">
                <img src="../assets/logo.png" alt="">
            </div>
            <!-- Login form area -->
            <el-form class="login_from" label-width="0px"><!--label-width Is the distance from the form to the left -->
                <!-- user name-->
                <el-form-item label=""><!--label Property is the text on the left side of the form -->
                    <el-input ></el-input>
                </el-form-item>
                <!-- password-->
                <el-form-item label="">
                    <el-input ></el-input>
                </el-form-item>
                <!-- Button area-->
                <el-form-item class="btns" label="">
                    <el-button type="primary">Sign in</el-button>
                    <el-button type="info">Reset</el-button>
                </el-form-item>

            </el-form>

        </div>
    </div>
</template>

<script>

export default {

}
</script>


<style lang="less" scoped>
//1. Less is a CSS preprocessing language, which endows CSS with the characteristics of dynamic language.
//2. scoped: this style is only effective in this file to prevent style conflicts
.login_container {
    background-color:#2b4b6b;
    height: 100%;

}
.login_box {
    width: 450px;
    height: 300px;
    background-color: #fff;
    border-radius: 3px;
    position: absolute;
    left: 50%;
    top: 50%;
    transform: translate(-50%,-50%);

    .avatar_box {
        height: 130px;
        width:130px;
        border: 1px solid #eee;
        border-radius: 50%;
        padding: 10px;
        box-shadow: 0 0 10px #eee;
        position: absolute;
        left: 50%;
        transform: translate(-50%,-50%);
        background-color: #fff;

        img {
            width: 100%;
            height: 100%;
            border-radius: 50%;
            background-color: #eee;
        }
    }
}
.login_from {
    position: absolute;
    bottom: 0;
    width:100%;
    padding: 0% 10px;
    box-sizing: border-box;//
}

.btns {
    display: flex;
    justify-content: flex-end;//Right align
}

</style>
The results are as follows:
(4) Add a text Icon on the login page
Add icons in the input column by adding two attributes: suffix icon = "El icon date" and prefix icon = "El icon search"
--------------components/Login.vue
<template>
    <div class="login_container">
        <div class="login_box">
            <!-- Avatar area -->
            <div class="avatar_box">
                <img src="../assets/logo.png" alt="">
            </div>
            <!-- Login form area -->
            <el-form class="login_from" label-width="0px"><!--label-width Is the distance from the form to the left -->
                <!-- user name-->
                <el-form-item label=""><!--label Property is the text on the left side of the form -->
                    <el-input prefix-icon="el-icon-user-solid" ></el-input>
                </el-form-item>
                <!-- password-->
                <el-form-item label="">
                    <el-input prefix-icon="el-icon-key" suffix-icon="el-icon-view"></el-input>
                </el-form-item>
                <!-- Button area-->
                <el-form-item class="btns" label="">
                    <el-button type="primary">Sign in</el-button>
                    <el-button type="info">Reset</el-button>
                </el-form-item>

            </el-form>

        </div>
    </div>
</template>
2.2 realize the login function of the login page
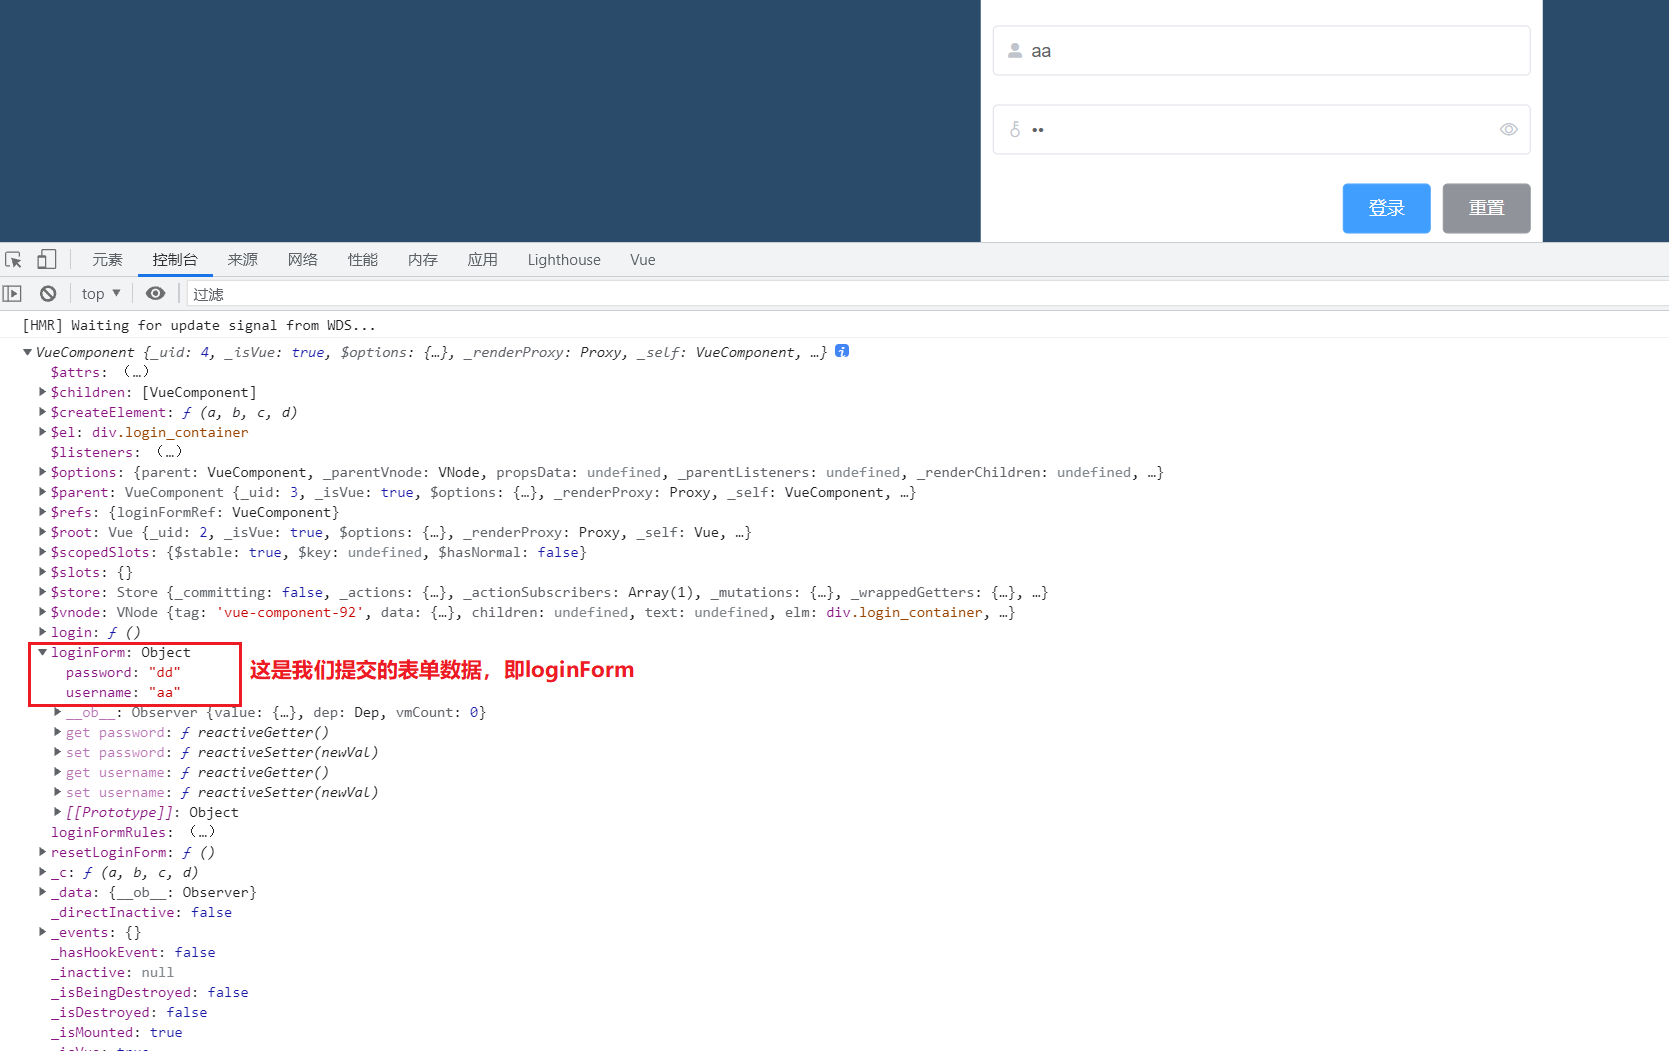
(1) Data binding of login component form
1. Add: model="form" to El form for object binding,
2. Then use v-model = "form.name" to bind the data in input with attributes.
3. Hide password box: add the attribute type = "password" to the password box
Test: set username: ''aa "and password:" b "to see whether the binding is successful.
--------------components/Login.vue
<template>
    <div class="login_container">
        <div class="login_box">
            <!-- Avatar area -->
            <div class="avatar_box">
                <img src="../assets/logo.png" alt="">
            </div>
            <!-- Login form area -->
            <el-form class="login_from" :model="loginForm" label-width="0px"><!--label-width Is the distance from the form to the left -->
                <!-- user name-->
                <el-form-item label=""><!--label Property is the text on the left side of the form -->
                    <el-input v-model="loginForm.username" prefix-icon="el-icon-user-solid" ></el-input>
                </el-form-item>
                <!-- password-->
                <el-form-item label="">
                    <el-input v-model="loginForm.password" type="password" prefix-icon="el-icon-key" suffix-icon="el-icon-view"></el-input>
                </el-form-item>
                <!-- Button area-->
                <el-form-item class="btns" label="">
                    <el-button type="primary">Sign in</el-button>
                    <el-button type="info">Reset</el-button>
                </el-form-item>

            </el-form>

        </div>
    </div>
</template>

<script>

export default {
    data(){
        return {
            loginForm: {//This is the data bound object of the login form
                username: '',
                password: ''
            }
        }
    }
}
</script>


<style lang="less" scoped>
...slightly
</style>
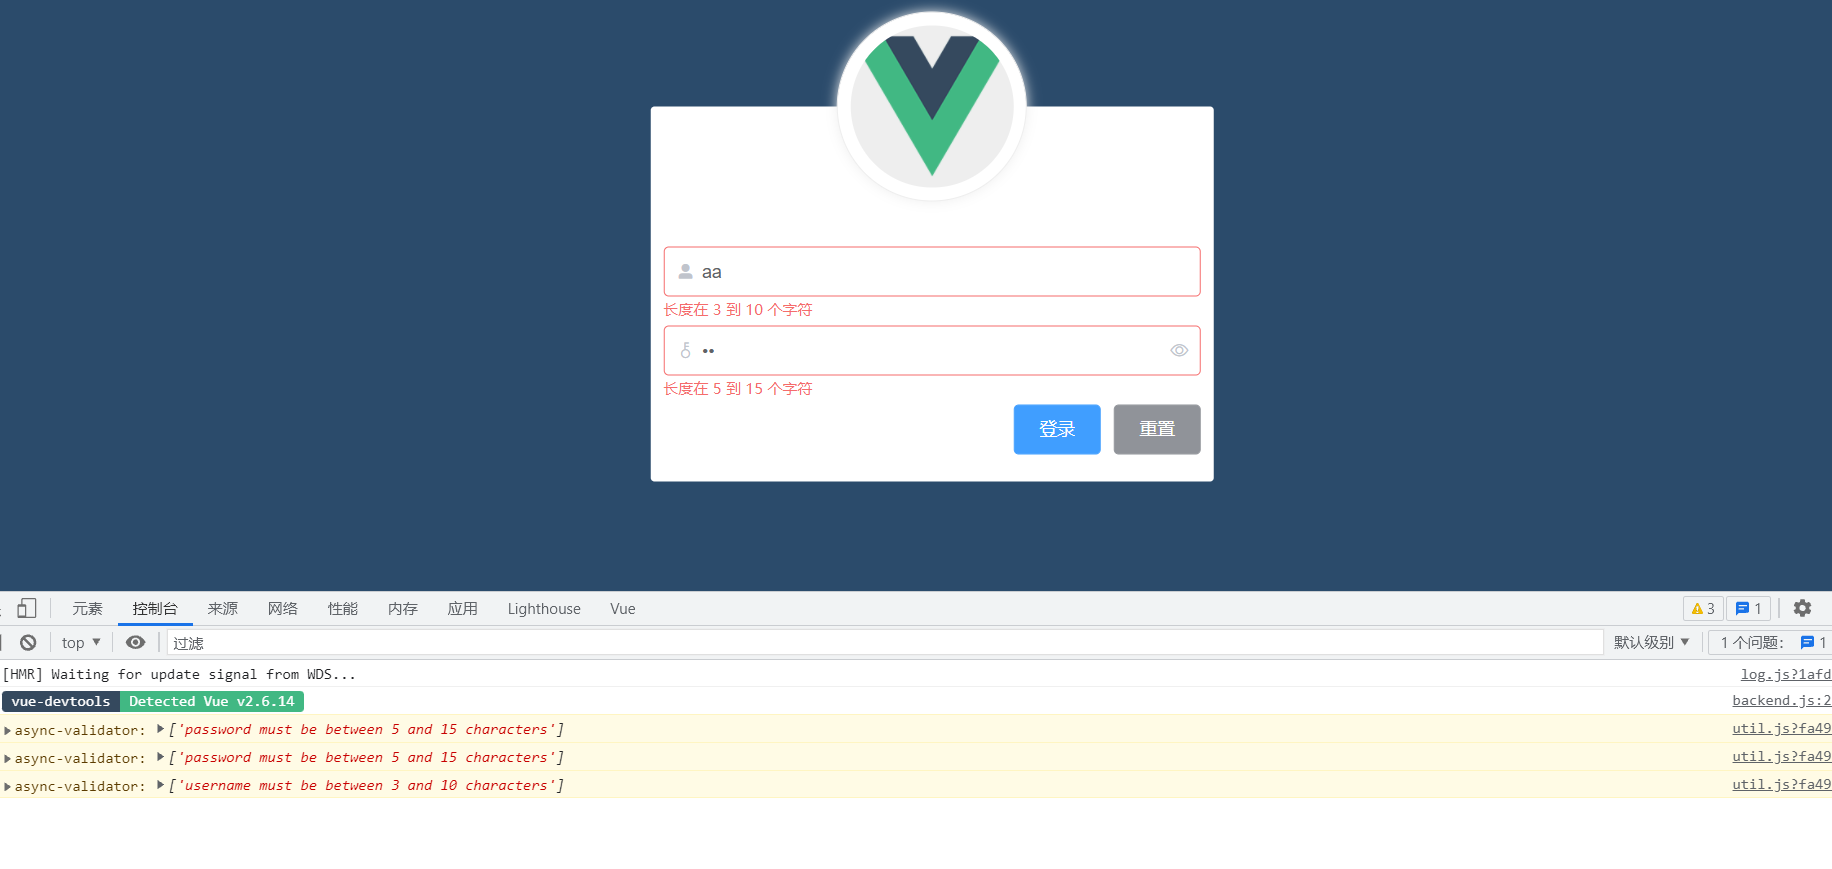
(2) Form for data validation
When the mouse leaves the form, the data will be verified automatically.
Copy the code in the element UI = > form = > form validation
1. Define the attribute rules (prompt information, trigger method, etc.) of the rules object in data.
2. Use: rules = "loginfomrules" on the form El form to bind the "loginfomrules" object
3. Add the attribute prop = "username" (loginfomrules. Username is not allowed) on El form item (instead of input) to bind the attributes in the rules object to specify the validation rules to be used.
--------------components/Login.vue
<template>
    <div class="login_container">
        <div class="login_box">
            <!-- Avatar area -->
            <div class="avatar_box">
                <img src="../assets/logo.png" alt="">
            </div>
            <!-- Login form area -->
            <el-form class="login_from" :model="loginForm" :rules="loginFormRules" label-width="0px"><!--label-width Is the distance from the form to the left -->
                <!-- user name-->
                <el-form-item prop="username" label=""><!--label Property is the text on the left side of the form -->
                    <el-input v-model="loginForm.username"  prefix-icon="el-icon-user-solid" ></el-input>
                </el-form-item>
                <!-- password-->
                <el-form-item prop="password" label="">
                    <el-input v-model="loginForm.password" type="password" prefix-icon="el-icon-key" suffix-icon="el-icon-view"></el-input>
                </el-form-item>
                <!-- Button area-->
                <el-form-item class="btns" label="">
                    <el-button type="primary">Sign in</el-button>
                    <el-button type="info">Reset</el-button>
                </el-form-item>

            </el-form>

        </div>
    </div>
</template>

<script>

export default {
    data(){
        return {
            loginForm: {//This is the data bound object of the login form
                username: 'aa',
                password: 'dd'
            },
            loginFormRules: {//This is the validation rule object for the form
                //Verify that the user name is legal
                username: [
                    { required: true, message: 'Please enter login name', trigger: 'blur' },//Triggered when blur loses focus
                    { min: 3, max: 10, message: 'The length is between 3 and 10 characters', trigger: 'blur' }
                ],
                //Verify that the password is valid
                password: [
                    { required: true, message: 'Please enter the login password', trigger: 'blur' },//Triggered when blur loses focus
                    { min: 5, max: 15, message: 'The length is between 5 and 15 characters', trigger: 'blur' }
                ]
            }

        }
    }
}
</script>


<style lang="less" scoped>
...
</style>
The triggering effect is as follows:
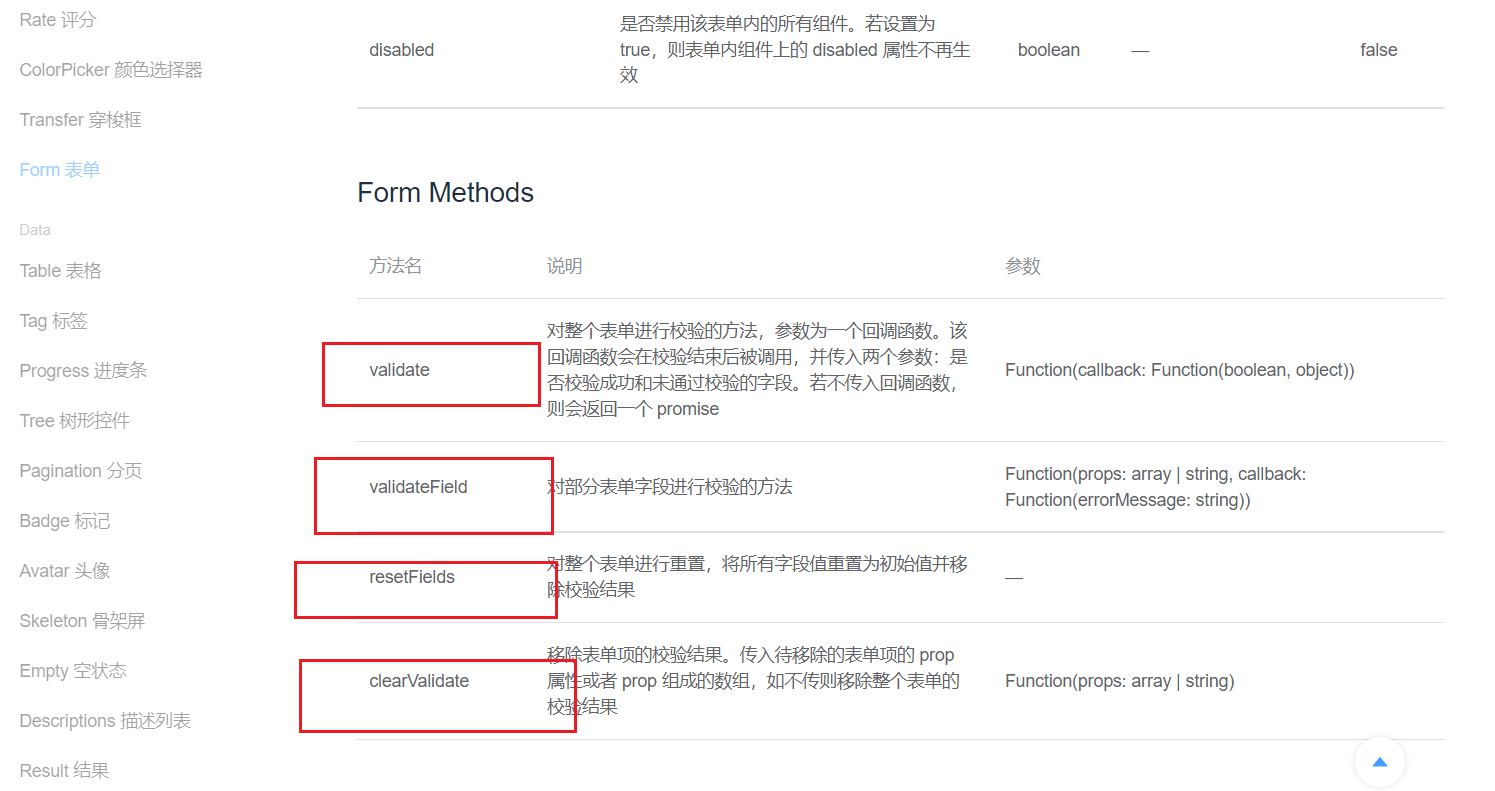
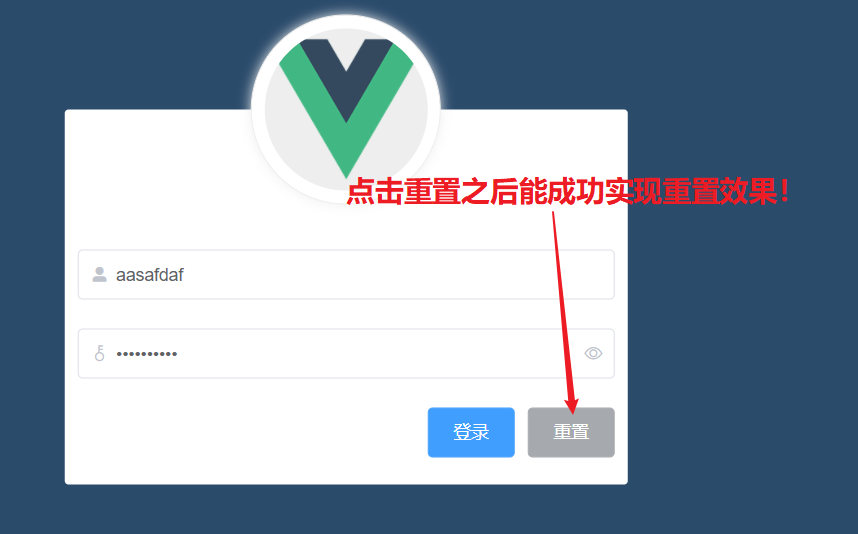
(3) Realize the reset function of the form
1. Get the instance object of the form through ref = "loginfomref",
2. Bind click event (@ Click = ""): call this. $refs. Loginfomref. resetFields() to reset the form. Note that resetFields() is a function defined in element UI, not vue, so there are three points below.
3,
--------------components/Login.vue
<template>
    <div class="login_container">
        <div class="login_box">
            <!-- Avatar area -->
            <div class="avatar_box">
                <img src="../assets/logo.png" alt="">
            </div>
            <!-- Login form area -->
            <el-form ref="loginFormRef" class="login_from" :model="loginForm" :rules="loginFormRules" label-width="0px"><!--label-width Is the distance from the form to the left -->
                <!-- user name-->
                <el-form-item prop="username" label=""><!--label Property is the text on the left side of the form -->
                    <el-input v-model="loginForm.username"  prefix-icon="el-icon-user-solid" ></el-input>
                </el-form-item>
                <!-- password-->
                <el-form-item prop="password" label="">
                    <el-input v-model="loginForm.password" type="password" prefix-icon="el-icon-key" suffix-icon="el-icon-view"></el-input>
                </el-form-item>
                <!-- Button area-->
                <el-form-item class="btns" label="">
                    <el-button type="primary">Sign in</el-button>
                    <el-button type="info" @click="resetLoginForm">Reset</el-button>
                </el-form-item>

            </el-form>

        </div>
    </div>
</template>

<script>

export default {
    data(){
        return {
            loginForm: {//This is the data bound object of the login form
                username: 'aa',
                password: 'dd'
            },
            loginFormRules: {//This is the validation rule object for the form
                //Verify that the user name is legal
                username: [
                    { required: true, message: 'Please enter login name', trigger: 'blur' },//Triggered when blur loses focus
                    { min: 3, max: 10, message: 'The length is between 3 and 10 characters', trigger: 'blur' }
                ],
                //Verify that the password is valid
                password: [
                    { required: true, message: 'Please enter the login password', trigger: 'blur' },//Triggered when blur loses focus
                    { min: 5, max: 15, message: 'The length is between 5 and 15 characters', trigger: 'blur' }
                ]
            }

        }
    },
    methods: {
        resetLoginForm(){//Click the reset button to reset the login form data
            //console.log(this) / / you can get such an object: VueComponent {_uid: 214, _isVue: true, $options: {...}, _renderProxy: Proxy, _self: VueComponent,...}
            this.$refs.loginFormRef.resetFields();
        }
    }

}
</script>


<style lang="less" scoped>
...
</style>
this in resetLoginForm is VueComponent, as shown below:

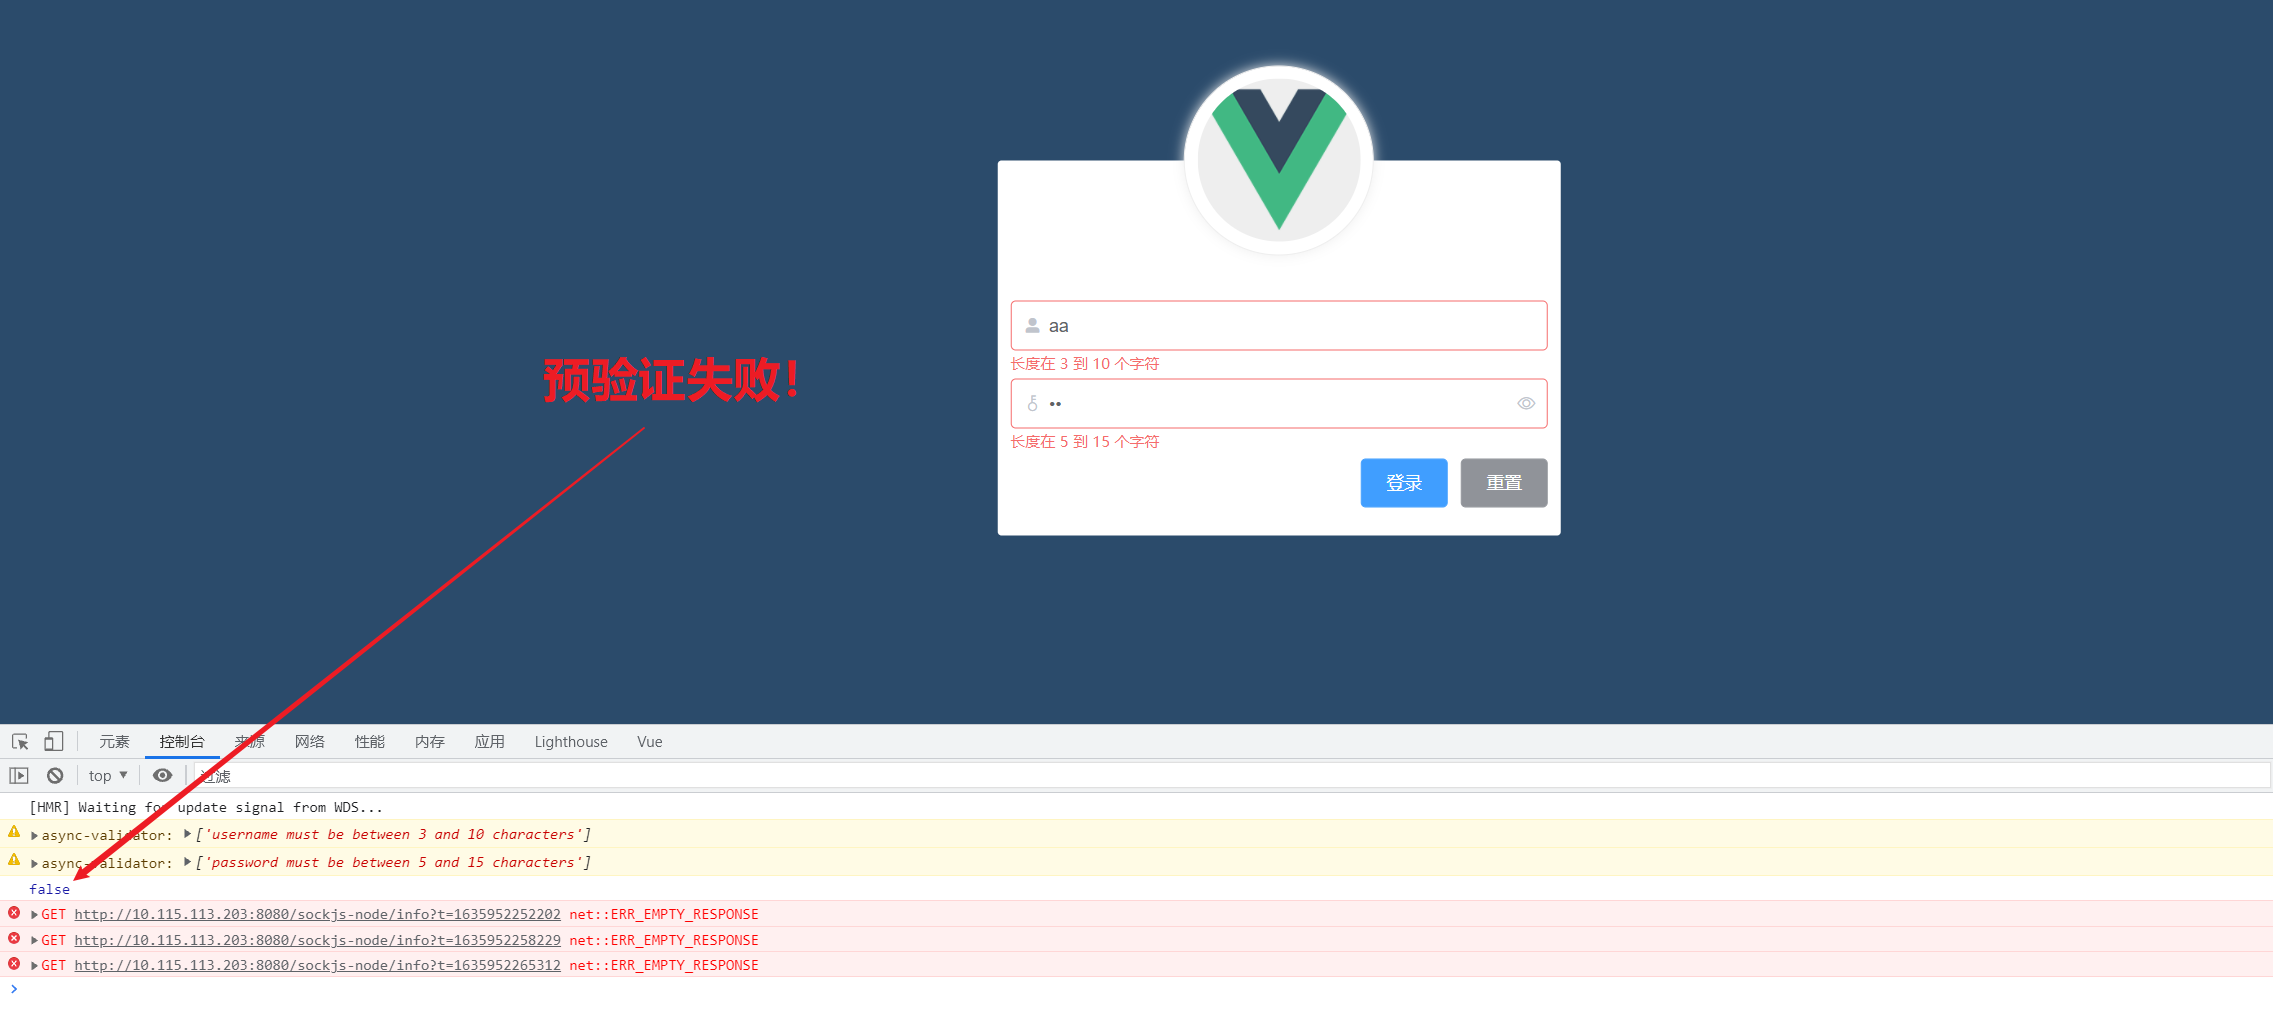
(4) Pre verification before login
1. Use this. $refs.loginfomref.validate (valid = > {}) to pre verify the data before login, and whether the value of the parameter valid passed the pre verification. It is worth noting that this. $refs.loginfomref.validate is a function defined in element UI, not in vue (so there are three points...).
2. Bind the login pre verification function to the login button (@ click).
3. Import axios in main.js and send the request if it passes the pre verification.
<template>
    <div class="login_container">
        <div class="login_box">
            <!-- Avatar area -->
            <div class="avatar_box">
                <img src="../assets/logo.png" alt="">
            </div>
            <!-- Login form area -->
            <el-form ref="loginFormRef" class="login_from" :model="loginForm" :rules="loginFormRules" label-width="0px"><!--label-width Is the distance from the form to the left -->
                <!-- user name-->
                <el-form-item prop="username" label=""><!--label Property is the text on the left side of the form -->
                    <el-input v-model="loginForm.username"  prefix-icon="el-icon-user-solid" ></el-input>
                </el-form-item>
                <!-- password-->
                <el-form-item prop="password" label="">
                    <el-input v-model="loginForm.password" type="password" prefix-icon="el-icon-key" suffix-icon="el-icon-view"></el-input>
                </el-form-item>
                <!-- Button area-->
                <el-form-item class="btns" label="">
                    <el-button type="primary" @click="login">Sign in</el-button>
                    <el-button type="info" @click="resetLoginForm">Reset</el-button>
                </el-form-item>

            </el-form>

        </div>
    </div>
</template>

<script>

export default {
    data(){
        return {
            loginForm: {//This is the data bound object of the login form
                username: 'aa',
                password: 'dd'
            },
            loginFormRules: {//This is the validation rule object for the form
                //Verify that the user name is legal
                username: [
                    { required: true, message: 'Please enter login name', trigger: 'blur' },//Triggered when blur loses focus
                    { min: 3, max: 10, message: 'The length is between 3 and 10 characters', trigger: 'blur' }
                ],
                //Verify that the password is valid
                password: [
                    { required: true, message: 'Please enter the login password', trigger: 'blur' },//Triggered when blur loses focus
                    { min: 5, max: 15, message: 'The length is between 5 and 15 characters', trigger: 'blur' }
                ]
            }

        }
    },
    methods: {
        resetLoginForm(){//Click the reset button to reset the login form data
            //console.log(this) / / you can get such an object: VueComponent {_uid: 214, _isVue: true, $options: {...}, _renderProxy: Proxy, _self: VueComponent,...}
            this.$refs.loginFormRef.resetFields();
        },
        login(){
            this.$refs.loginFormRef.validate(valid => {//Pre check the whole form
            console.log(valid);//valid is whether it has passed the pre validation.
            });
        }
    }

}
</script>


<style lang="less" scoped>
...
</style>
-------------In main.js, 1. Import Axios. 2. Configure baseurl. 3. Assign value to custom variable $http
import Vue from 'vue'
import App from './App.vue'
import router from './router'
import store from './store'
import './plugins/element.js'
import './assets/css/global.css'//Import global style sheet
import axios from 'axios' //Import axios


axios.defaults.baseURL='http://localhost:8001 / '/ / root path of configuration request
//After being added to vue.prototype.$http, axios can be obtained through this.$http on each component without having to import axios on each page
//$http is a custom attribute name, which can be used at will
Vue.prototype.$http = axios;
Vue.config.productionTip = false

new Vue({
  router,
  store,
  render: h => h(App)
}).$mount('#app')
(5) Realize login function
1. If the pre inspection is successful, log in:
2. What is promise: in concurrent programming, because some calculations (or network requests) have not ended yet, we need an object to proxy for unknown results. The object that proxy for unknown results is called Promises.
A Promise must be in one of these three states at a certain time: pending, completed, or rejected
Promise must provide then to access the value of the Promises proxy
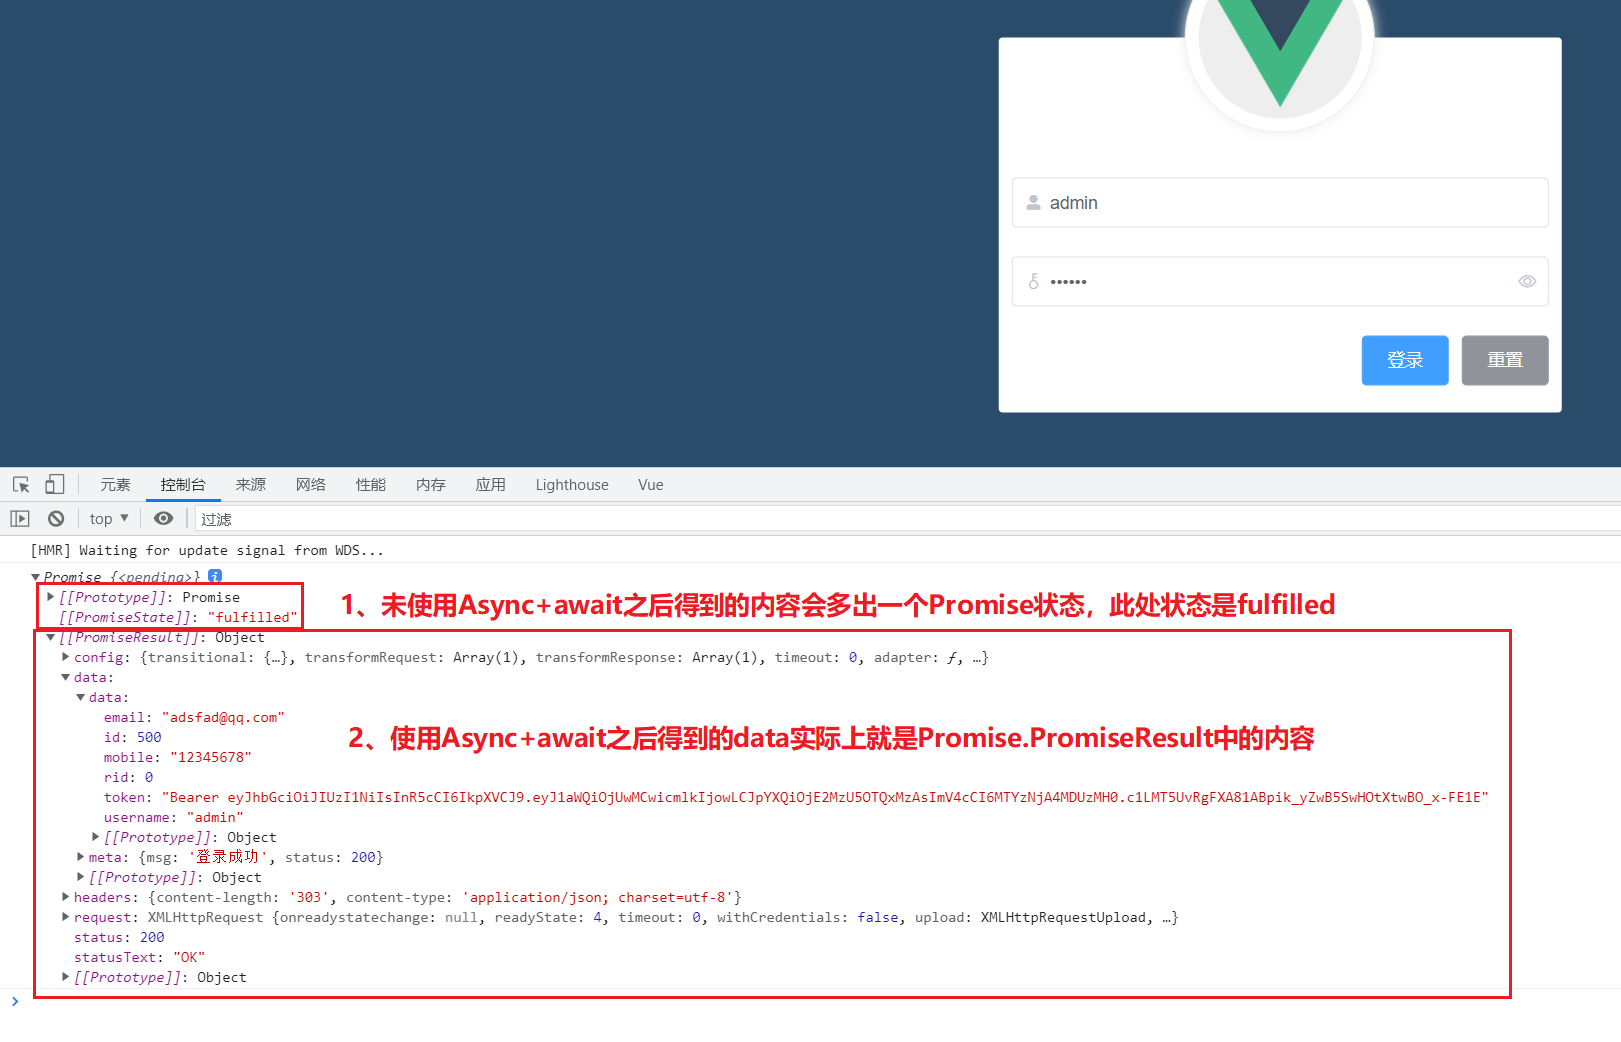
3. Use async+await to parse promise (equivalent to promise. Then (result = > {})):
Async means that this is an async function. await can only be used in async functions and cannot be used alone
async returns a promise object. await waits for the return result of this promise before continuing execution
await is waiting for a Promise object, which must be followed by a Promise object, but the return value can be obtained directly without writing then()
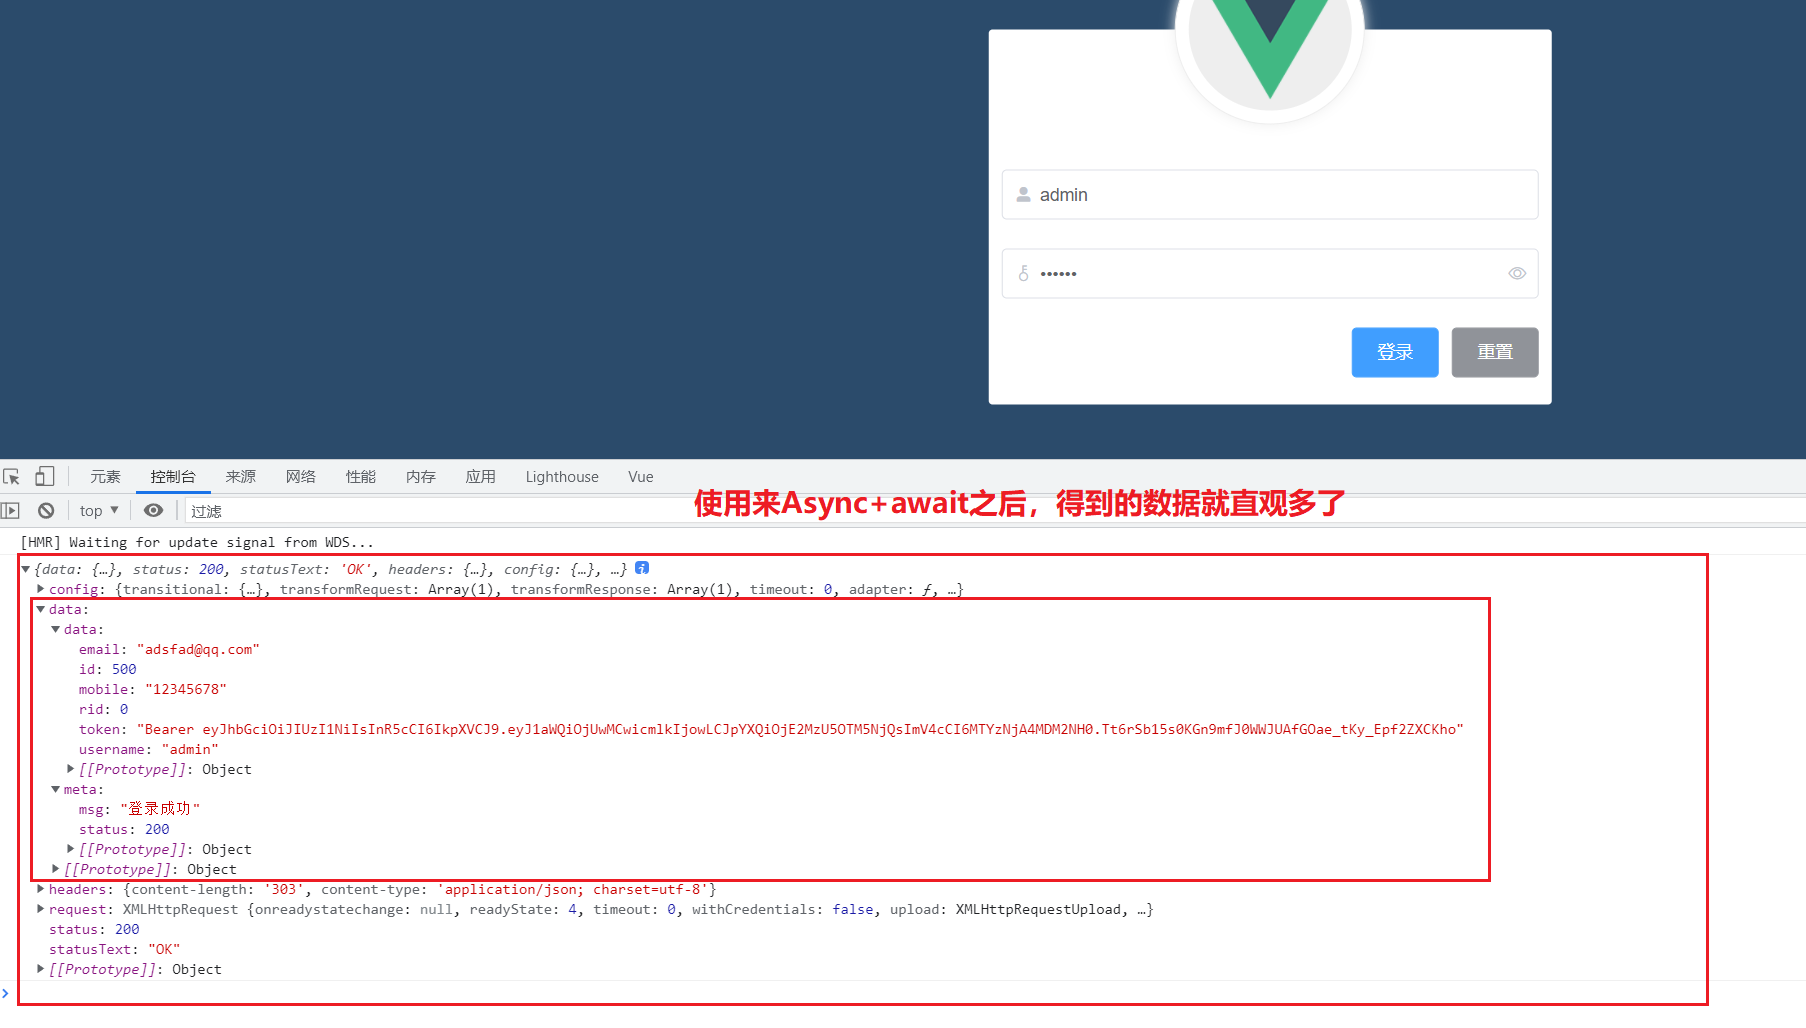
			//The following two effects are the same.
			//First kind
            this.$refs.loginFormRef.validate(async valid => {
            if(!valid) return;//If valid is false, the verification fails
            const result=await this.$http.post("login",this.loginForm);
            console.log(result);
});
			//Second
           	this.$refs.loginFormRef.validate(async valid => {
            if(!valid) return;//If valid is false, the verification fails
            this.$http.post("login",this.loginForm).then(result =>{
             console.log(result);//The result here is the data in data
            });
});
-------------------components/Login.vue
<template>
    <div class="login_container">
        <div class="login_box">
            <!-- Avatar area -->
            <div class="avatar_box">
                <img src="../assets/logo.png" alt="">
            </div>
            <!-- Login form area -->
            <el-form ref="loginFormRef" class="login_from" :model="loginForm" :rules="loginFormRules" label-width="0px"><!--label-width Is the distance from the form to the left -->
                <!-- user name-->
                <el-form-item prop="username" label=""><!--label Property is the text on the left side of the form -->
                    <el-input v-model="loginForm.username"  prefix-icon="el-icon-user-solid" ></el-input>
                </el-form-item>
                <!-- password-->
                <el-form-item prop="password" label="">
                    <el-input v-model="loginForm.password" type="password" prefix-icon="el-icon-key" suffix-icon="el-icon-view"></el-input>
                </el-form-item>
                <!-- Button area-->
                <el-form-item class="btns" label="">
                    <el-button type="primary" @click="login">Sign in</el-button>
                    <el-button type="info" @click="resetLoginForm">Reset</el-button>
                </el-form-item>

            </el-form>

        </div>
    </div>
</template>

<script>

export default {
    data(){
        return {
            loginForm: {//This is the data bound object of the login form
                username: 'aa',
                password: 'dd'
            },
            loginFormRules: {//This is the validation rule object for the form
                //Verify that the user name is legal
                username: [
                    { required: true, message: 'Please enter login name', trigger: 'blur' },//Triggered when blur loses focus
                    { min: 3, max: 10, message: 'The length is between 3 and 10 characters', trigger: 'blur' }
                ],
                //Verify that the password is valid
                password: [
                    { required: true, message: 'Please enter the login password', trigger: 'blur' },//Triggered when blur loses focus
                    { min: 5, max: 15, message: 'The length is between 5 and 15 characters', trigger: 'blur' }
                ]
            }

        }
    },
    methods: {
        resetLoginForm(){//Click the reset button to reset the login form data
            // console.log(this)//this is an object: VueComponent {_uid: 214, _isVue: true, $options: {...}, _renderProxy: Proxy, _self: VueComponent,...}
            this.$refs.loginFormRef.resetFields();
        },
        login(){
            this.$refs.loginFormRef.validate(async valid => {//1. The function is to pre verify the whole form. 2. Async indicates that this is an async function. await can only be used in async functions and cannot be used alone
            //console.log(valid);//valid is whether it has passed the pre validation.
            if(!valid) return;//If valid is false, the verification fails

            //{meta:res} is to pass the data part of data to res. The attributes in the data object include {config,data,headers,request}
            const {data:res}=await this.$http.post("login",this.loginForm);//1. If valid is true, send a post request to baseURL+"login", and the request body is loginForm. 2. this.$http.post is a Promise, so you need to use await and async to make the result a normally displayed data
            // console.log(res);
            if(res.meta.status !== 200) return console.log("Login failed") ;//Use the status of the returned data to judge whether the login is successful.
            console.log("Login succeeded");
            });
        }
    }
}
</script>


<style lang="less" scoped>
...
</style>
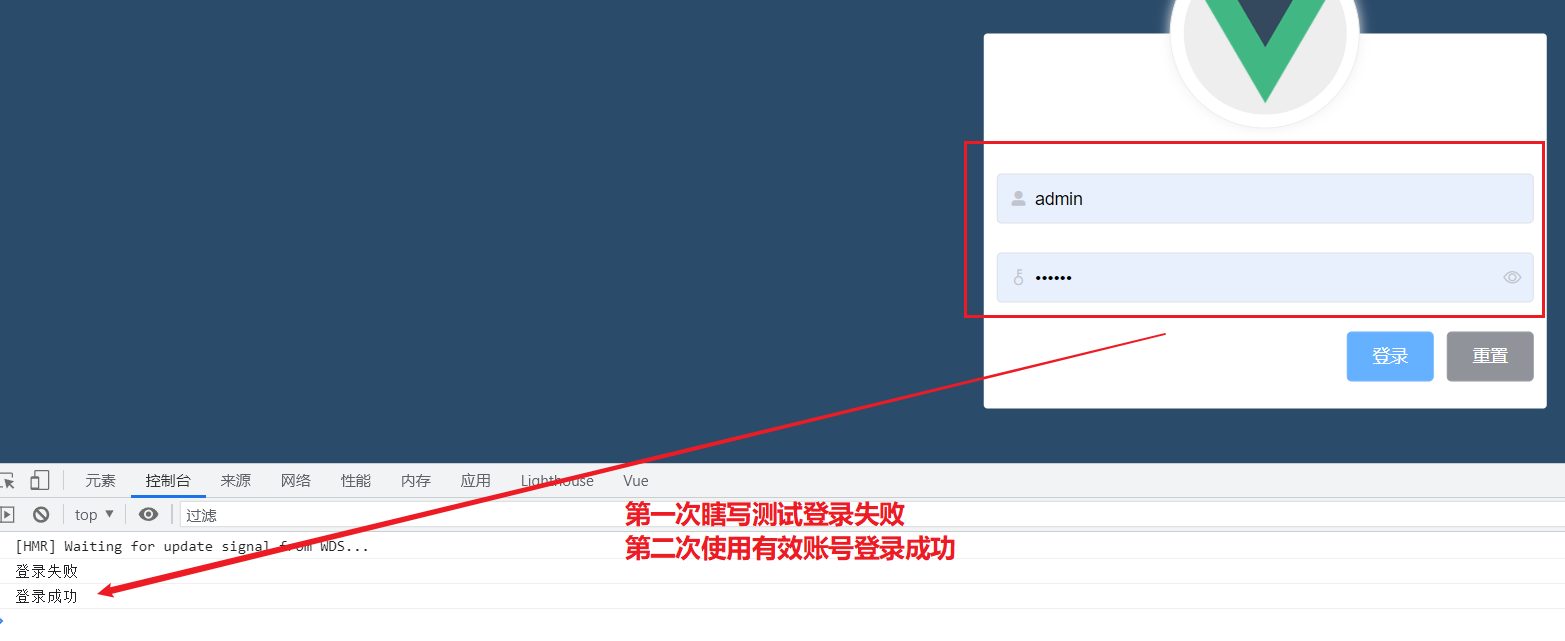
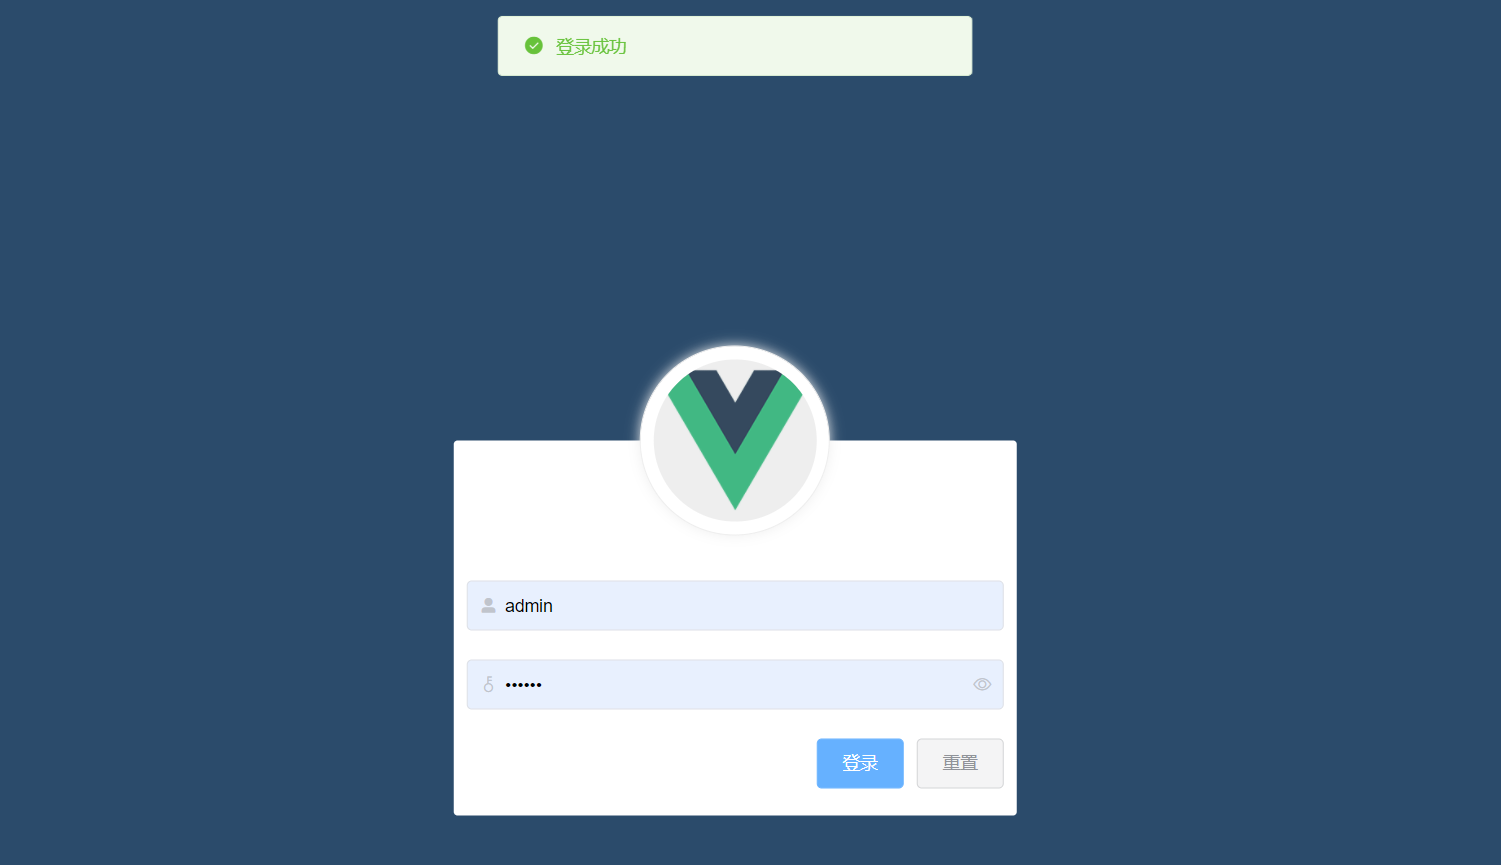
(6) Configure pop-up prompt at login
1. Bind button click event @ Click = "open1"
: plain = "true": use transparent colors for buttons
2,
-
When the login is successful, call this.$message.success("login successful"): a green pop-up window
-
When login fails, call this.$message.error("login failed"): a red pop-up window
-
Give a warning when logging in this.$message.warning("warning");: Yellow pop-up window
<template>
    <div class="login_container">
        <div class="login_box">
            <!-- Avatar area -->
            <div class="avatar_box">
                <img src="../assets/logo.png" alt="">
            </div>
            <!-- Login form area -->
            <el-form ref="loginFormRef" class="login_from" :model="loginForm" :rules="loginFormRules" label-width="0px"><!--label-width Is the distance from the form to the left -->
                <!-- user name-->
                <el-form-item prop="username" label=""><!--label Property is the text on the left side of the form -->
                    <el-input v-model="loginForm.username"  prefix-icon="el-icon-user-solid" ></el-input>
                </el-form-item>
                <!-- password-->
                <el-form-item prop="password" label="">
                    <el-input v-model="loginForm.password" type="password" prefix-icon="el-icon-key" suffix-icon="el-icon-view"></el-input>
                </el-form-item>
                <!-- Button area-->
                <el-form-item class="btns" label="">
                    <el-button type="primary" @click="login">Sign in</el-button>
                    <el-button :plain="true" type="info" @click="resetLoginForm">Reset</el-button>
                </el-form-item>

            </el-form>

        </div>
    </div>
</template>

<script>

export default {
    data(){
        return {
            loginForm: {//This is the data bound object of the login form
                username: 'aa',
                password: 'dd'
            },
            loginFormRules: {//This is the validation rule object for the form
                //Verify that the user name is legal
                username: [
                    { required: true, message: 'Please enter login name', trigger: 'blur' },//Triggered when blur loses focus
                    { min: 3, max: 10, message: 'The length is between 3 and 10 characters', trigger: 'blur' }
                ],
                //Verify that the password is valid
                password: [
                    { required: true, message: 'Please enter the login password', trigger: 'blur' },//Triggered when blur loses focus
                    { min: 5, max: 15, message: 'The length is between 5 and 15 characters', trigger: 'blur' }
                ]
            }

        }
    },
    methods: {
        resetLoginForm(){//Click the reset button to reset the login form data
            // console.log(this)//this is an object: VueComponent {_uid: 214, _isVue: true, $options: {...}, _renderProxy: Proxy, _self: VueComponent,...}
            this.$refs.loginFormRef.resetFields();
        },
        login(){
            this.$refs.loginFormRef.validate(async valid => {//1. The function is to pre verify the whole form. 2. Async indicates that this is an async function. await can only be used in async functions and cannot be used alone
            //console.log(valid);//valid is whether it has passed the pre validation.
            if(!valid) return;//If valid is false, the verification fails
            //{meta:res} is to pass the data part of data to res. The attributes in the data object include {config,data,headers,request}
            const {data:res}=await this.$http.post("login",this.loginForm);//1. If valid is true, send a post request to baseURL+"login", and the request body is loginForm. 2. this.$http.post is a Promise, so you need to use await and async to make the result a normally displayed data
            // console.log(res);
            if(res.meta.status !== 200) return this.$message.error("Login failed");
            this.$message.success("Login succeeded");
            });
        }
    }

}
</script>
...
</style>
Effect achieved:
2.3 operation after successful login
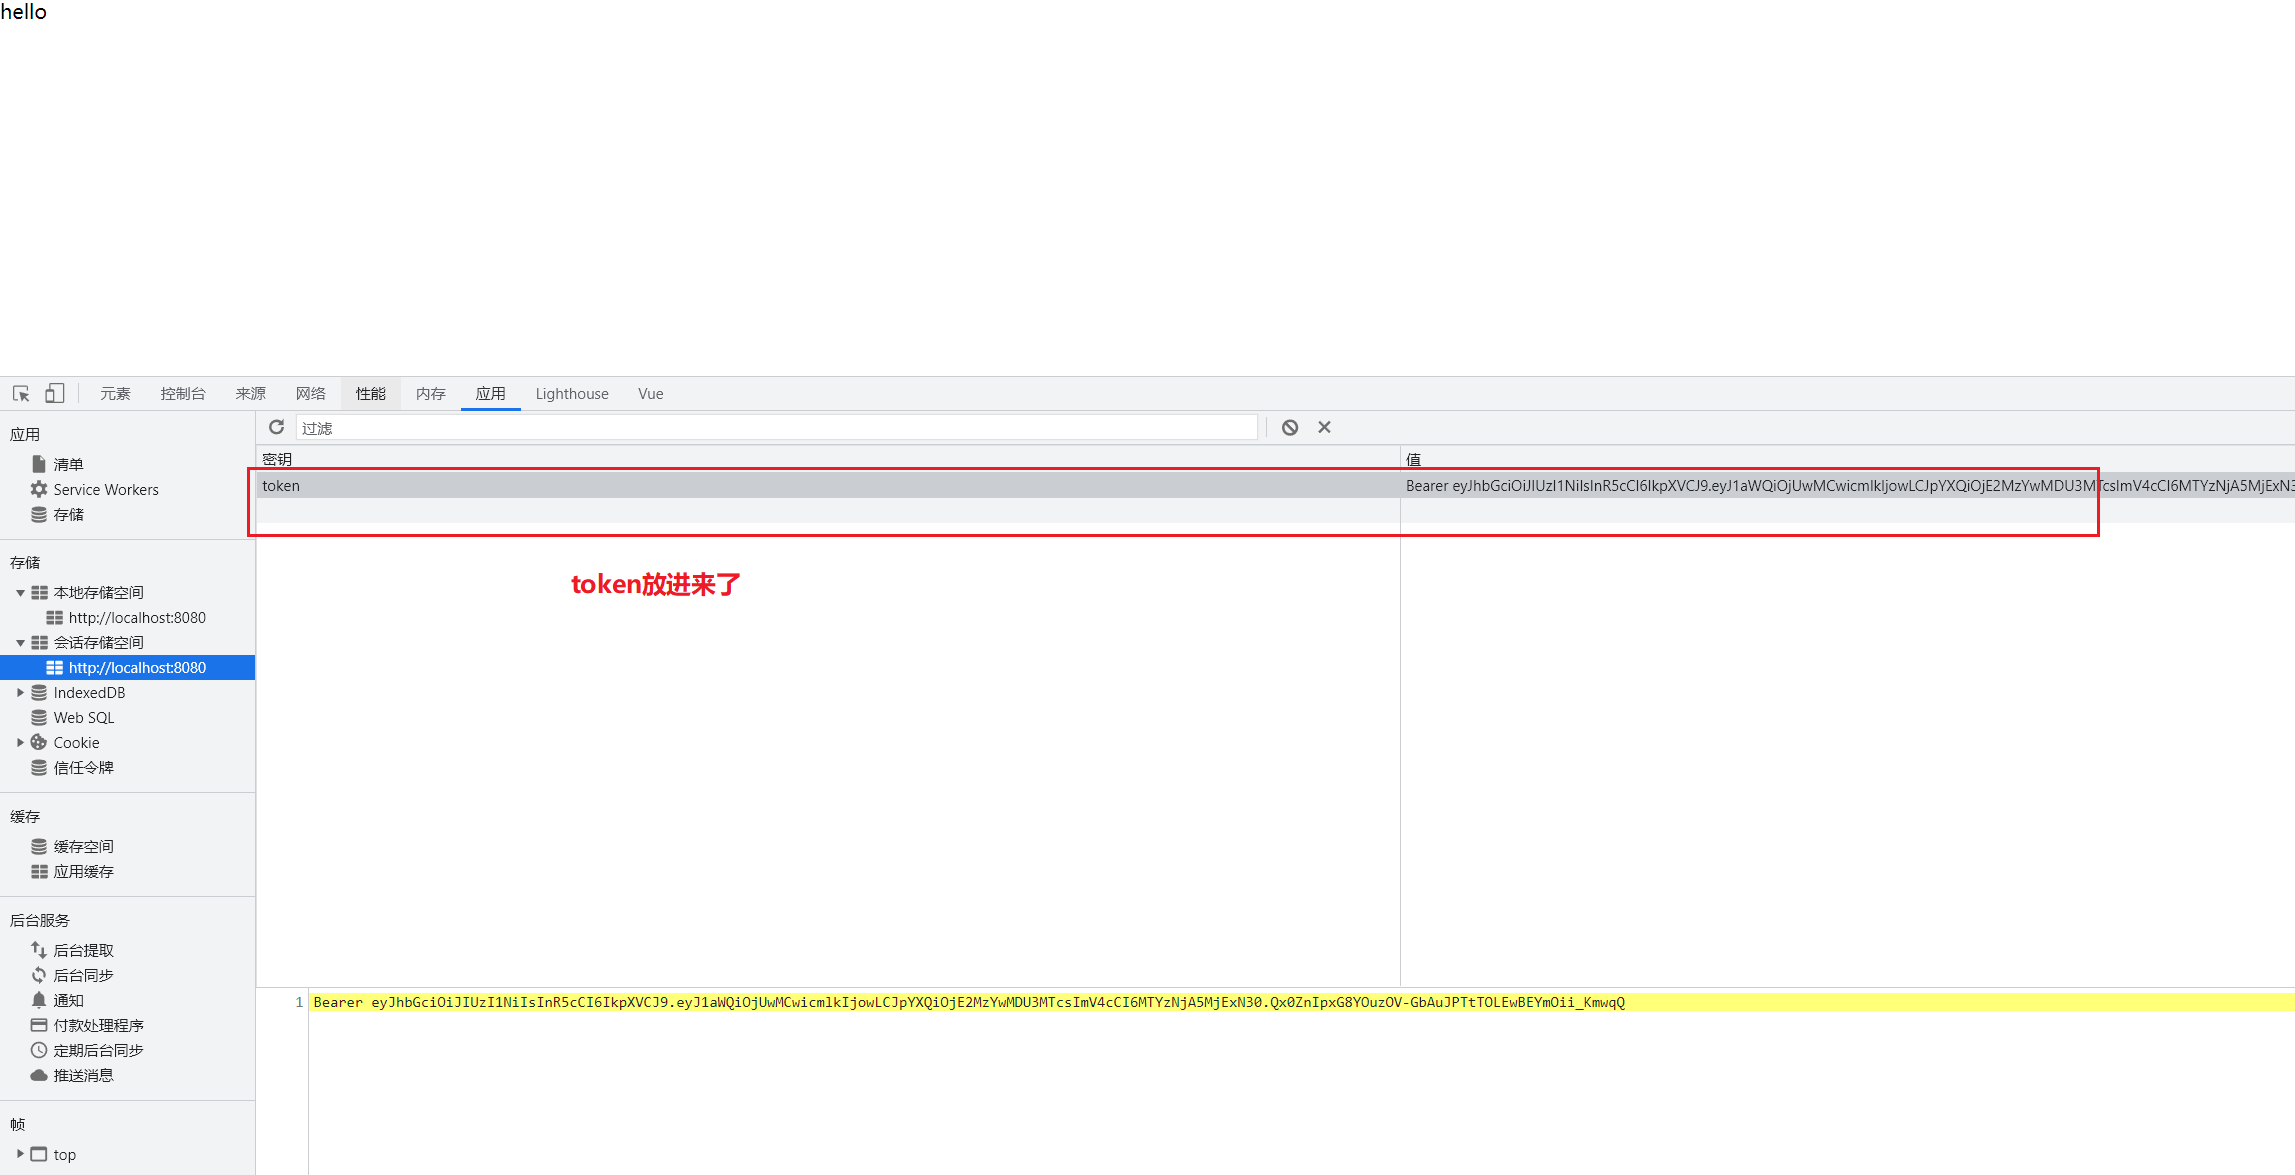
(1) Click to jump and keep the token: window.sessionStorage
1. Save the token after successful login to the sessionStorage of the client
1.1 interfaces other than login in the project can only be accessed after login
1.2 the token takes effect only when the website is opened, so the token is saved in sessionStorage
2. Jump to the background home page through routing (the address of the background home page is: / home): this.$router.push("/home")
Router.push is the main method for router navigation. We click < router link: to = "..." > to call router.push(...) inside the program.
We call < router link: to = "..." > declarative navigation
Call this.$router.push("/home") programmatic navigation
<template>
<div class="login_container">
<div class="login_box">
<!-- Avatar area -->
<div class="avatar_box">
<img src="../assets/logo.png" alt="">
</div>
<!-- Login form area -->
<el-form ref="loginFormRef" class="login_from" :model="loginForm" :rules="loginFormRules" label-width="0px"><!--label-width Is the distance from the form to the left -->
<!-- user name-->
<el-form-item prop="username" label=""><!--label Property is the text on the left side of the form -->
<el-input v-model="loginForm.username" prefix-icon="el-icon-user-solid" ></el-input>
</el-form-item>
<!-- password-->
<el-form-item prop="password" label="">
<el-input v-model="loginForm.password" type="password" prefix-icon="el-icon-key" suffix-icon="el-icon-view"></el-input>
</el-form-item>
<!-- Button area-->
<el-form-item class="btns" label="">
<el-button type="primary" @click="login">Sign in</el-button>
<el-button :plain="true" type="info" @click="resetLoginForm">Reset</el-button>
</el-form-item>
</el-form>
</div>
</div>
</template>
<script>
export default {
data(){
return {
loginForm: {//This is the data bound object of the login form
username: 'aa',
password: 'dd'
},
loginFormRules: {//This is the validation rule object for the form
//Verify that the user name is legal
username: [
{ required: true, message: 'Please enter login name', trigger: 'blur' },//Triggered when blur loses focus
{ min: 3, max: 10, message: 'The length is between 3 and 10 characters', trigger: 'blur' }
],
//Verify that the password is valid
password: [
{ required: true, message: 'Please enter the login password', trigger: 'blur' },//Triggered when blur loses focus
{ min: 5, max: 15, message: 'The length is between 5 and 15 characters', trigger: 'blur' }
]
}
}
},
methods: {
resetLoginForm(){//Click the reset button to reset the login form data
// console.log(this)//this is an object: VueComponent {_uid: 214, _isVue: true, $options: {...}, _renderProxy: Proxy, _self: VueComponent,...}
this.$refs.loginFormRef.resetFields();//
},
login(){
this.$refs.loginFormRef.validate(async valid => {//1. The function is to pre verify the whole form. 2. Async indicates that this is an async function. await can only be used in async functions and cannot be used alone
//console.log(valid);//valid is whether it has passed the pre validation.
if(!valid) return;//If valid is false, the verification fails
//{meta:res} is to pass the obtained data value to res. The attributes in res (i.e. data object) include {config,data,headers,request}
const {data:res}=await this.$http.post("login",this.loginForm);//1. If valid is true, send a post request to baseURL+"login", and the request body is loginForm. 2. this.$http.post is a Promise, so you need to use await and async to make the result a normally displayed data
// console.log(res);
if(res.meta.status !== 200) return this.$message.error("Login failed");
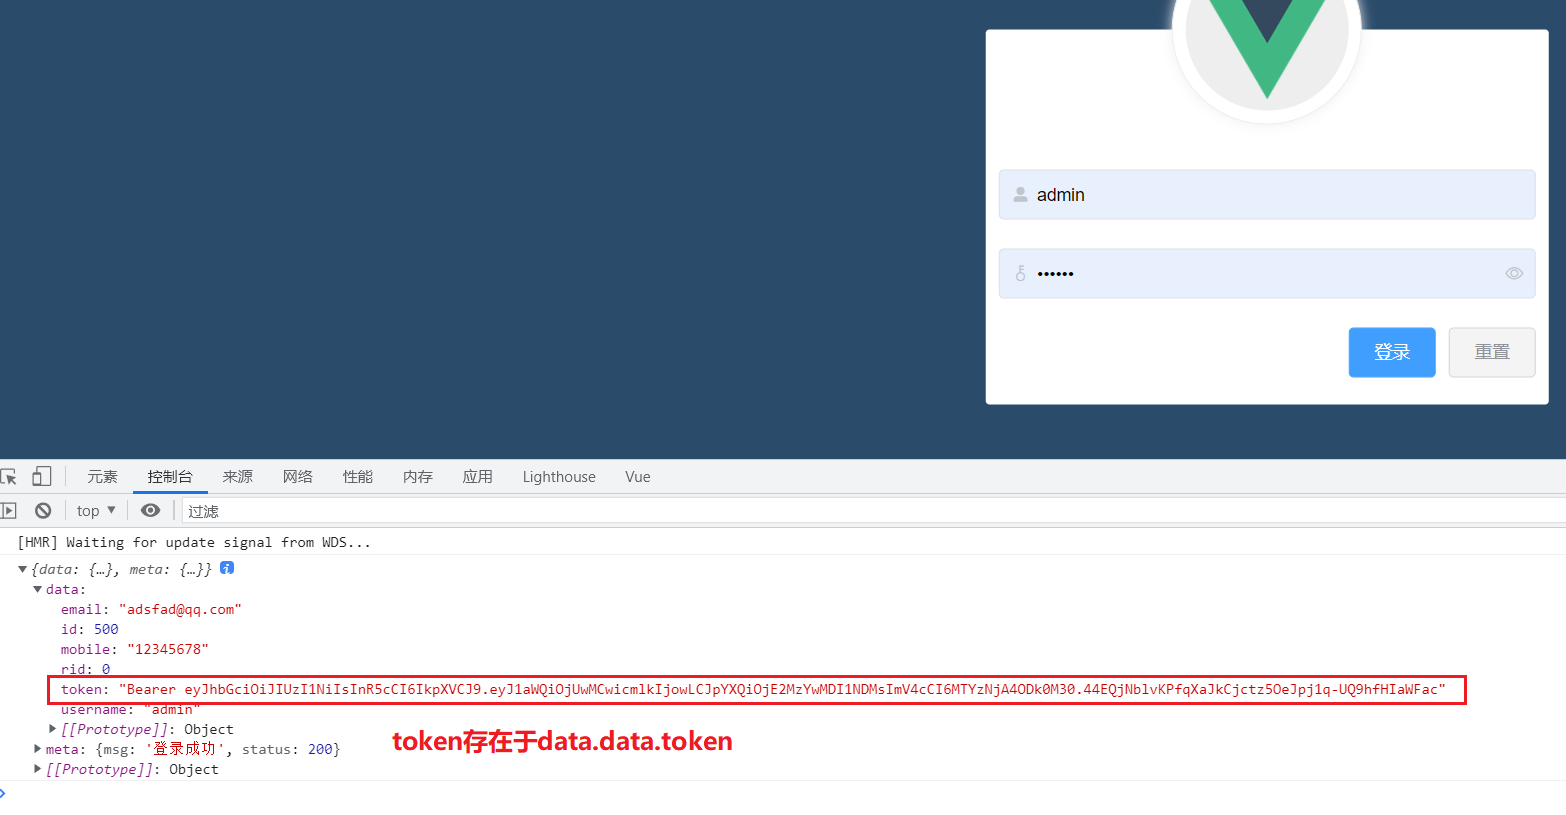
console.log(res.data);
this.$message.success("Login succeeded");
//1. Save the logged in token to the token:
window.sessionStorage.setItem("token",res.data.token);
//2. Page Jump to home page
console.log(this);
this.$router.push("/home");//Programmed routing
});
}
}
}
</script>
...
</style>
-----------------------router/index.js
import Vue from 'vue'
import VueRouter from 'vue-router'
import Login from '../components/Login.vue'

Vue.use(VueRouter)

const routes = [
  {
    path:'/',
    redirect:'/login'
  },
  {
    path: '/login',
    component: Login
  },
  {
    path:'/home',
    component: ()=> import ('../components/home.vue')
  }

]

const router = new VueRouter({
  routes
})

export default router
(2) Implement route navigation guard control access rights: router.beforeEach
Realize the above functions 1: the interfaces other than login in the project can only be accessed after login. If the user does not have a token and directly accesses our internal API through the URL, he / she needs to navigate to the login page again. Use router. Beforeeach ((to, from, next) = > {})
-------------------------/router/index.js
import Vue from 'vue'
import VueRouter from 'vue-router'
import Login from '../components/Login.vue'


Vue.use(VueRouter)

const routes = [
  {
    path:'/',
    redirect:'/login'
  },
  {
    path: '/login',
    component: Login
  },
  {
    path:'/home',
    component: ()=> import ('../components/home.vue')
  }

]

const router = new VueRouter({
  routes
})

//Mount route navigation guard (this function will be executed before each route starts)
router.beforeEach((to,from,next)=>{
  //To indicates the path to be accessed
  //From stands for which path to jump from
  //Next is a function that indicates release. Where next() is release and next('/login') is forced jump
  if(to.path === '/login') return next();
  if(!window.sessionStorage.getItem('token')){//If the token does not exist
    return next('/login');
  }
  next();
})

export default router
(3) Realize exit function
You have to destroy the token
<template>
    <div>
        <el-button type="info" @click="loginOut">sign out</el-button>
    </div>
</template>

<script>
export default {
    methods:{
        loginOut(){
            window.sessionStorage.clear();
            this.$router.push("/login");
        }
    }
}
</script>
3, Completing the main page
3.1 main page layout
el-menu > el-submenu > el-menu-item
1. El menu is used to store all menu bars. It has no title, and its son has no slot.
2. Any content in El submenu will be stored, including text. Unless you use slot="title" to declare content that is a parent tag
3. El menu item is the minimum level. It can't contain anything (including span) and can't use the title tag
[note]
1. El menu item group is used to group El menu items. It does not have the function of storing El menu items.
2. Template has no meaning. It is generally used to < template slot = "title" > serve as the content of the parent label
3. i labels are text icons
4. slot = "title" in the tag indicates that the value in the tag is the data in the parent tag, and title = "description is the content of this tag
5. The disabled attribute in the tag indicates that the tag will be dark and will not be clicked
Details of submenu
<template>
    <el-container class="home-container">
        <el-header class="el-header">
            <div>
                <img src="../assets/logo.png">
                <span>E-commerce background management system</span>
            </div>
            <el-button type="info" @click="loginOut">sign out</el-button></el-header><!--head -->
        <el-container>
            <!--sidebar -->
            <el-aside class="el-aside" width="200px">
                <!--Sidebar menu area-->
                <el-menu background-color="#545c64" text-color="#fff" active-text-color="#ffd04b">
                    <!-- First level menu bar -->
                    <el-submenu index="1">
                    <!-- The template of the first level menu bar, i It's an icon, span It's text-->
                        <template slot="title">
                            <i class="el-icon-location"></i>
                            <span>Navigation one</span>
                        </template>
                        <!-- Secondary menu bar -->
                        <el-menu-item index="1-4-1">
                            <i class="el-icon-location"></i>
                            <span>Option one</span>
                        </el-menu-item>
                    </el-submenu>
                </el-menu>
            </el-aside>
            <el-main class="el-main">Main</el-main><!--Right main interface -->
        </el-container>
    </el-container>
</template>

<script>
export default {
    methods:{
        loginOut(){
            window.sessionStorage.clear();
            this.$router.push("/login");
        }
    }
}
</script>


<style lang="less" scoped>
.home-container {
    height: 100%;//Make the container height full screen
}

.el-header {
    background-color : #373d41;
    display: flex;
    justify-content: space-between;
    padding-left: 0%;
    align-content: center;
    color: #fff;
    font-size: 20px;
    > div{
        display: flex;
        align-items: center;
        span {
            margin-left: 15px;
        }
    }
}
.el-aside {
    background-color: #333744;

}
.el-main {
    background-color: #eee;
}


</style>
3.2 give the token value to the Authorization attribute of all request headers sent by the front end, so that the requests of the front end can be validated by the back end
1. The API that needs Authorization needs to use the Authorization field in the request header to provide a token token. Therefore, we need to add the Authorization field in the request header, and then add a token through the Axios request interceptor to ensure that we have the permission to obtain data. axios.interceptors.request.use(config=>{ }).
2. The back-end code will check whether there is a token in the request header and check whether it is a valid token (if not, a warning will be returned).
-----------------main.js
import Vue from 'vue'
import App from './App.vue'
import router from './router'
import store from './store'
import './plugins/element.js'//Import styles in element UI
import './assets/css/global.css'//Import global style sheet
import axios from 'axios' //Import axios


axios.defaults.baseURL='http://localhost:8888/api/private/v1 / '/ / configuration request
//After being added to vue.prototype.$http, axios can be obtained through this.$http on each component without having to import axios on each page
//$http is a custom attribute name, which can be used at will


//Configure the interceptor, add the Authorization attribute to all request headers sent by the front end and give the token value.
axios.interceptors.request.use(config => {
  // console.log(config);
  config.headers.Authorization = window.sessionStorage.getItem("token");
  return config;//Finally, you must return config
})

Vue.prototype.$http = axios;
Vue.config.productionTip = false

new Vue({
  router,
  store,
  render: h => h(App)
}).$mount('#app')
3.3 get menu bar data from the back end
1. If the acquisition is successful, the returned data.meta.status is 200,
Otherwise, the error message this. Will pop up if an error is returned
m
e
s
s
a
g
e
.
e
r
r
o
r
(
r
e
s
.
m
e
t
a
.
m
s
g
)
<
/
k
b
d
>
2
from
after
end
Obtain
take
number
according to
of
The first
two
species
write
method
:
t
h
i
s
.
message.error(res.meta.msg) < / KBD > 2 the second way to get data from the back end: this
message.error(res.meta.msg) < / KBD > 2 the second way to get data from the back end: this.http.get('Menu '). Then (response = > {}). The response here is the response data of the back end (not promise).
<template>
    <el-container class="home-container">
        <el-header class="el-header">
            <div>
                <img src="../assets/logo.png">
                <span>E-commerce background management system</span>
            </div>
            <el-button type="info" @click="loginOut">sign out</el-button></el-header><!--head -->
        <el-container>
            <!--sidebar -->
            <el-aside class="el-aside" width="200px">
                <!--Sidebar menu area-->
                <el-menu background-color="#545c64" text-color="#fff" active-text-color="#ffd04b">
                    <!-- First level menu bar -->
                    <el-submenu index="1">
                    <!-- The template of the first level menu bar, i It's an icon, span It's text-->
                        <template slot="title">
                            <i class="el-icon-location"></i>
                            <span>Navigation one</span>
                        </template>
                        <!-- Secondary menu bar -->
                        <el-menu-item index="1-4-1">
                            <i class="el-icon-location"></i>
                            <span>Option one</span>
                        </el-menu-item>
                    </el-submenu>
                </el-menu>
            </el-aside>
            <el-main class="el-main">Main</el-main><!--Right main interface -->
        </el-container>
    </el-container>
</template>

<script>
export default {
    data(){
        return {
            //Left menu bar data
            memuliet: []
        }
    },
    created() {
        this.getMenuList();
    },
    methods:{
        loginOut(){
            window.sessionStorage.clear();
            this.$router.push("/login");
        },
        //Get all menu bars
        //The second way to write: this. $http. Get ('Menu '). Then (response = > {}), where the res is response.data.
        async getMenuList() {
            const {data: res} = await this.$http.get('menus');//Menu is the request path of the backend api.
            console.log(res);
            if(res.meta.status !== 200) this.$message.error("error code "+res.meta.status+":"+res.meta.msg);
            this.$message.success("Menu information obtained successfully");
        }
    }
}
</script>
...
</style>
We can find that the data obtained is a secondary menu
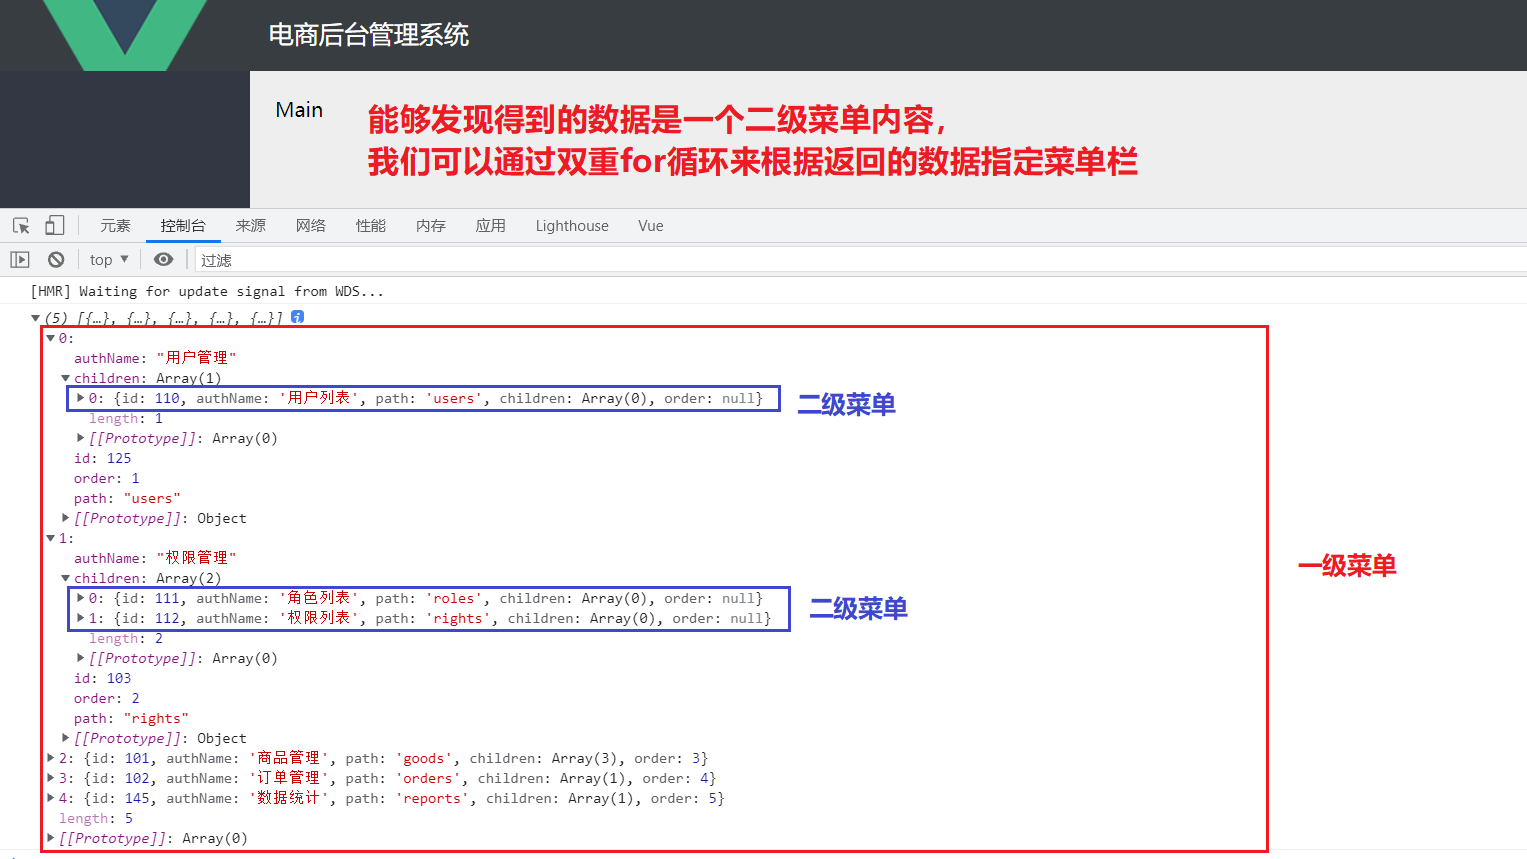
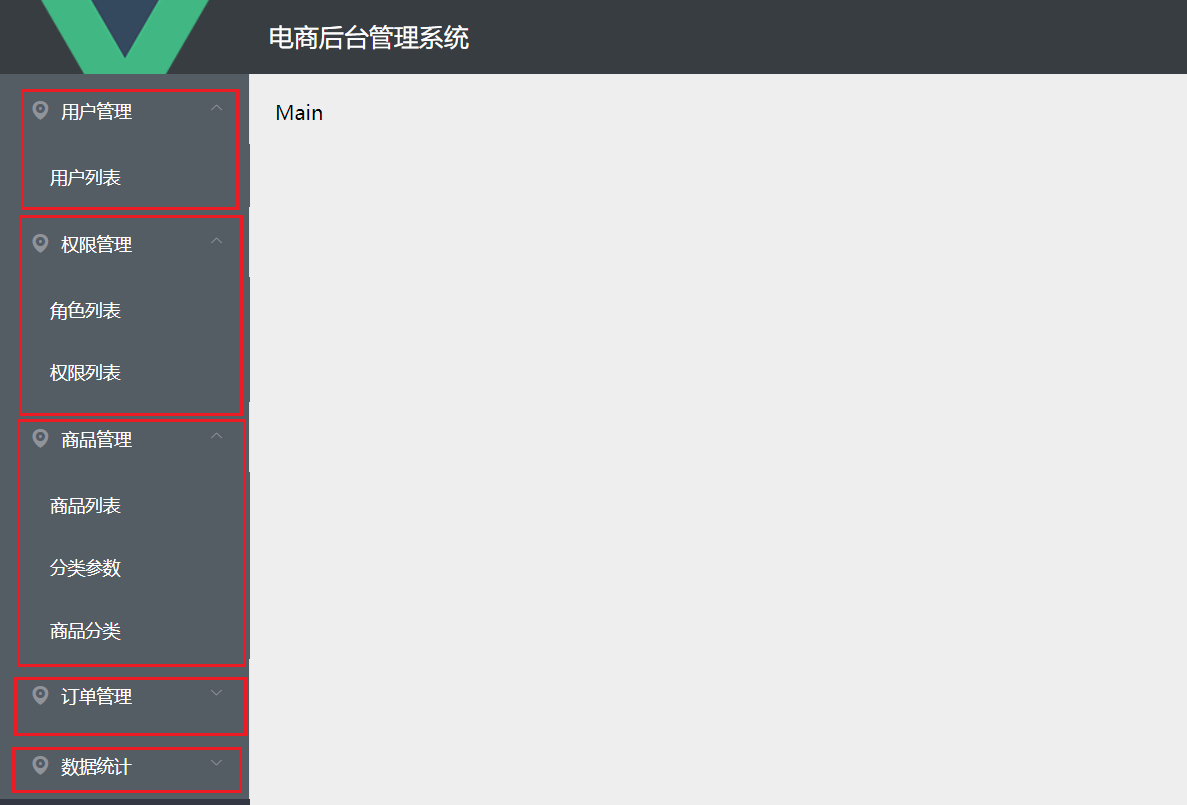
3.4 UI drawing of left menu bar (important)
Draw the menu bar on the left according to the returned data: loop rendering using dual v-for.
1. : is a short form of Vue bind: to identify the variables and symbols (+, -, true, false, etc.) in the item data; the same principle applies to: key
2. item.id + '' is to convert a number into a string (because the default value of index is a string). Otherwise, an error will be reported: Invalid prop
[note]
It is important to look carefully at the notes in the menu bar.
<template>
    <el-container class="home-container">
        <el-header class="el-header">
            <div>
                <img src="../assets/logo.png">
                <span>E-commerce background management system</span>
            </div>
            <el-button type="info" @click="loginOut">sign out</el-button></el-header><!--head -->
        <el-container>
            <!--sidebar -->
            <el-aside class="el-aside" width="200px">
                <!--Sidebar menu area-->
                <el-menu background-color="#545c64" text-color="#fff" active-text-color="#ffd04b">
                    <!-- First level menu bar -->
                    <!--1,:yes vue-bind:An abbreviation for,This is to be able to identify item this data Variables and plus signs in;:key The same principle
                        2,item.id+''To convert a number into a string (because index The default value is string), otherwise an error will be reported:Invalid prop -->
                    <el-submenu :index="item.id+''" v-for="item in menulist" :key="item.id">
                    <!-- The template of the first level menu bar, i It's an icon, span It's text-->
                        <template slot="title">
                            <i class="el-icon-location"></i>
                            <span>{{item.authName}}</span>
                        </template>
                        <!-- Secondary menu bar -->
                        <el-menu-item :index="subitem.id+''" v-for="subitem in item.children" :key="subitem.id"> <!-- 1,Note that item.children instead of item oh -->
                        	<i class="el-icon-location"></i>
                            <span slot="title">{{subitem.authName}}</span>
                        </el-menu-item>
                    </el-submenu>
                </el-menu>
            </el-aside>
            <el-main class="el-main">Main</el-main><!--Right main interface -->
        </el-container>
    </el-container>
</template>

<script>
export default {
    data(){//This is the es6 way to write the data object in vue. There are three ways to write variables in data
        return {
            //Left menu bar data
            menulist: []
        }
    },
    created() {
        this.getMenuList();
    },
    methods:{
        loginOut(){
            window.sessionStorage.clear();
            this.$router.push("/login");
        },
        //Get all menu bars
        async getMenuList() {
            const {data: res} = await this.$http.get('menus');//Menu is the request path of the backend api
            // console.log(res);
            if(res.meta.status !== 200) this.$message.error("error code "+res.meta.status+":"+res.meta.msg);
            this.menulist=res.data;
            console.log(this.menulist);
            this.$message.success("Menu information obtained successfully");

        }
    }
}
</script>


<style lang="less" scoped>
...
</style>
[additional] three ways to define variables in data
************The first way to write******************
var app = new Vue({
  el: '#app',
  data: {
    mess: 'aerchi'
  }
});

************The second way to write******************
var app = new Vue({
  el: '#app',
  data: function() {
    return {
      mess: 'aerchi'
    }
  }
})

************The third way to write******************
var app = new Vue({
  el: '#app',
  data() {
    return {
      mess: 'aerchi'
    }
  }
})
[additional] 6 special attributes in vue
key, ref, is, slot, slot-scope, scope
[additional] two ways to render placeholders using components
1. Rendering directly through components
1. Import components
2. Use components
3. Use component placeholders
Placeholders are component names
<template>
  <div :class="classObj" class="app-wrapper">
    <div v-if="device==='mobile'&&sidebar.opened" class="drawer-bg" @click="handleClickOutside"/><!--Click to expand and close the sidebar-->
    <sidebar class="sidebar-container"/><!--Interface composition 1. Side navigation bar  -->
    <div class="main-container">
      <navbar/><!--Interface composition 2. Top navigation bar  -->
      <app-main/><!--Interface composition 3. Main page  -->
    </div>
  </div>
</template>

<script>
import { Navbar, Sidebar, AppMain } from './components'
import ResizeMixin from './mixin/ResizeHandler'

export default {
  name: 'Layout',
  components: {
    Navbar,
    Sidebar,
    AppMain
  }
}
</script>
2. Transfer rendering through router: router/index.js
Placeholders are < router view / >
1. Level 1 Router: generally, it renders a full page, that is, < router view / > in App.vue. It usually [{level 1}, {level 1}, {level 1}]
2. Level 2 Router: it renders local pages, such as [{children [{Level 2}, {Level 2}, {Level 2}]}, {level 1}, {level 1}]
3. Level 3 routers: small areas, such as commodity lists. Such as [{children[{children [{Level 3}, {Level 3}, {Level 3}]}, {Level 2}, {Level 2}]}, {level 1}, {level 1}]
export const constantRouterMap = [
  { path: '/login', component: () => import('@/views/login/index'), hidden: true },
  { path: '/404', component: () => import('@/views/404'), hidden: true },

  {
    path: '/',
    component: Layout,//layout is a component of the whole page. There are three placeholders in it. It is rendered directly by importing components, not by routing components.
    redirect: '/dashboard',
    name: 'Dashboard',
    hidden: true,
    children: [{//The component in children here will replace the placeholder < router view / > in the reference component appMain.vue in Layout
      path: 'dashboard',
      component: () => import('@/views/dashboard/index')//@For src, jump to src/views/table/index
    }]
  },
 ...
]
3.4 color beautification and font icons in the left menu bar
1. Change color after clicking: active text color = "#409eff"
2. Change the text Icon of the secondary menu bar: < I class = "El icon menu" >:
3. Change the text Icon of the first level menu bar: create an object containing key value pairs, and then obtain the corresponding text icon through ID< i :class=“iconsObj[item.id]”>< /i>
<template>
    <el-container class="home-container">
        <el-header class="el-header">
            <div>
                <img src="../assets/logo.png">
                <span>E-commerce background management system</span>
            </div>
            <el-button type="info" @click="loginOut">sign out</el-button></el-header><!--head -->
        <el-container>
            <!--sidebar -->
            <el-aside class="el-aside" width="200px">
                <!--Sidebar menu area-->
                <el-menu background-color="#545c64" text-color="#fff" active-text-color="#409eff">
                    <!-- First level menu bar -->
                    <!--1,:yes vue-bind:An abbreviation for,This is to be able to identify item this data Variables and plus signs in;:key The same principle
                        2,item.id+''To convert a number into a string (because index The default value is string), otherwise an error will be reported:Invalid prop -->
                    <el-submenu :index="item.id+''" v-for="item in menulist" :key="item.id">
                    <!-- The template of the first level menu bar, i It's an icon, span It's text-->
                        <template slot="title">
                            <i :class="iconsObj[item.id]"></i>
                            <span>{{item.authName}}</span>
                        </template>
                        <!-- Secondary menu bar -->
                        <el-menu-item :index="subitem.id+''" v-for="subitem in item.children" :key="subitem.id"> <!-- 1,Note that item.children instead of item oh -->
                            <i class="el-icon-menu"></i>
                            <span slot="title">{{subitem.authName}}</span>
                        </el-menu-item>
                    </el-submenu>
                </el-menu>
            </el-aside>
            <el-main class="el-main">Main</el-main><!--Right main interface -->
        </el-container>
    </el-container>
</template>

<script>
export default {
    data(){//This is the es6 writing method of the data object in vue. There are three ways to write variables in data
        return {
            //Left menu bar data
            menulist: [],
            iconsObj:{
                '125':'el-icon-user-solid',//125 is the id of the first level menu bar
                '103':'el-icon-discount',
                '101':'el-icon-shopping-bag-1',
                '102':'el-icon-shopping-cart-2',
                '145':'el-icon-edit-outline',
            },
        }
    },
    created() {
        this.getMenuList();
    },
    methods:{
        loginOut(){
            window.sessionStorage.clear();
            this.$router.push("/login");
        },
        //Get all menu bars
        async getMenuList() {
            const {data: res} = await this.$http.get('menus');//Menu is the request path of the backend api
            // console.log(res);
            if(res.meta.status !== 200) this.$message.error("error code "+res.meta.status+":"+res.meta.msg);
            this.menulist=res.data;
            console.log(this.menulist);
            this.$message.success("Menu information obtained successfully");

        }
    }
}
</script>
...
</style>
3.5 beautification of the left menu bar
1. Only one child can be expanded at a time, and the unique opened attribute is added to the El menu tag
2. The right side of the sub item will be highlighted and aligned with the right border line: remove the border line of the sub item
<template>
    <el-container class="home-container">
        <el-header class="el-header">
            <div>
                <img src="../assets/logo.png">
                <span>E-commerce background management system</span>
            </div>
            <el-button type="info" @click="loginOut">sign out</el-button></el-header><!--head -->
        <el-container>
            <!--sidebar -->
            <el-aside class="el-aside" width="200px">
                <!--Sidebar menu area-->
                <el-menu background-color="#545c64" text-color="#fff" active-text-color="#409eff" unique-opened>
                    <!-- First level menu bar -->
                    <!--1,:yes vue-bind:An abbreviation for,This is to be able to identify item this data Variables and plus signs in;:key The same principle
                        2,item.id+''To convert a number into a string (because index The default value is string), otherwise an error will be reported:Invalid prop -->
                    <el-submenu :index="item.id+''" v-for="item in menulist" :key="item.id">
                    <!-- The template of the first level menu bar, i It's an icon, span It's text-->
                        <template slot="title">
                            <i :class="iconsObj[item.id]"></i>
                            <span>{{item.authName}}</span>
                        </template>
                        <!-- Secondary menu bar -->
                        <el-menu-item :index="subitem.id+''" v-for="subitem in item.children" :key="subitem.id"> <!-- 1,Note that item.children instead of item oh -->
                            <i class="el-icon-menu"></i>
                            <span slot="title">{{subitem.authName}}</span>
                        </el-menu-item>
                    </el-submenu>
                </el-menu>
            </el-aside>
            <el-main class="el-main">Main</el-main><!--Right main interface -->
        </el-container>
    </el-container>
</template>
.el-aside {
    background-color: #333744;
    .el-menu{
        border-right: 0px;
    }
}
3.6 realize the folding and expansion function of the whole menu bar
1. Add a div tag that says|||
2. Click to collapse and expand the label:
: collapse = "this.isCollapse": collapse transition = "false" define isCollapse in data and turn off collapse animation.
3. Achieve the folding effect of the background menu bar after clicking. To realize folding, the width is reduced, and the three eye operator is used: width = "this.isCollapse? '64px': '200px'"
3.7 realize the routing effect of the home page
1. Use placeholders < router view / > in the home page (home.vue)
2. Add the chidren [] attribute to the home object in the router and write a router in it. In this way, you can render the < router view / > in home.vue through components instead of < router view / > in App.vue.
---------------component/welcome.vue
<template>
    <div>
        welcome
    </div>
</template>
---------------router/index.js
import Vue from 'vue'
import VueRouter from 'vue-router'
import Login from '../components/Login.vue'


Vue.use(VueRouter)

const routes = [
  {
    path:'/',
    redirect:'/login'
  },
  {
    path: '/login',
    component: Login
  },
  {
    path:'/home',
    component: ()=> import ('../components/home.vue'),
    redirect:'/welcome',//Redirect is used here to jump to the welcome component in the home interface (if you don't redirect, you won't jump)
    children:[{//children are placed here to render < router view / > in home.vue, not < router view / > in App.vue
      path:'/welcome',
      component: ()=>import ('../components/welcome')
    }]
  }

]

const router = new VueRouter({
  routes
})

//Mount route navigation guard (this function will be executed before each route starts)
router.beforeEach((to,from,next)=>{
  //To indicates the path to be accessed
  //From stands for which path to jump from
  //Next is a function that indicates release. Where next() is release and next('/login') is forced jump
  if(to.path === '/login') return next();
  if(!window.sessionStorage.getItem('token')){//If the token does not exist
    return next('/login');
  }
  next();
})

export default router
---------------home.vue
<template>
    <el-container class="home-container">
        <el-header class="el-header">
            <div>
                <img src="../assets/logo.png">
                <span>E-commerce background management system</span>
            </div>
            <el-button type="info" @click="loginOut">sign out</el-button></el-header><!--head -->
        <el-container>
            <!--sidebar -->
            <el-aside class="el-aside" :width="this.isCollapse? '64px':'200px'" >
                <div class="toggle-button" @click="toggleCollapse">|||</div>
                <!--Sidebar menu area-->
                <el-menu
                    background-color="#545c64"
                    text-color="#fff"
                    active-text-color="#409eff"
                    unique-opened
                    :collapse="this.isCollapse"
                    :collapse-transition="false"
                    >
                    <!-- First level menu bar -->
                    <!--1,:yes vue-bind:An abbreviation for,This is to be able to identify item this data Variables and plus signs in;:key The same principle
                        2,item.id+''To convert a number into a string (because index The default value is string), otherwise an error will be reported:Invalid prop -->
                    <el-submenu :index="item.id+''" v-for="item in menulist" :key="item.id">
                    <!-- The template of the first level menu bar, i It's an icon, span It's text-->
                        <template slot="title">
                            <i :class="iconsObj[item.id]"></i>
                            <span>{{item.authName}}</span>
                        </template>
                        <!-- Secondary menu bar -->
                        <el-menu-item :index="subitem.id+''" v-for="subitem in item.children" :key="subitem.id"> <!-- 1,Note that item.children instead of item oh -->
                            <i class="el-icon-menu"></i>
                            <span slot="title">{{subitem.authName}}</span>
                        </el-menu-item>
                    </el-submenu>
                </el-menu>
            </el-aside>
            <router-view/><!--The main interface on the right is a placeholder for routing -->
        </el-container>
    </el-container>
</template>
<script>
...
<script>
<style lang="less" scoped>
...
<style>
3.8 transform the left menu into routing link
1. Add router to El menu. Using Vue router mode, add a route to all modules in one step. The default jump route is http://localhost:8080/#/xxx Where XXX is the value in the index attribute of this tag. If the value of the index property is empty, you cannot jump.
2. We want to modify the jump address of the route: change the secondary menu: index = "'/' + subitem.path"
<template>
    <el-container class="home-container">
        <el-header class="el-header">
            <div>
                <img src="../assets/logo.png">
                <span>E-commerce background management system</span>
            </div>
            <el-button type="info" @click="loginOut">sign out</el-button></el-header><!--head -->
        <el-container>
            <!--sidebar -->
            <el-aside class="el-aside" :width="this.isCollapse? '64px':'200px'" >
                <div class="toggle-button" @click="toggleCollapse">|||</div>
                <!--Sidebar menu area-->
                <el-menu
                    background-color="#545c64"
                    text-color="#fff"
                    active-text-color="#409eff"
                    unique-opened
                    :collapse="this.isCollapse"
                    :collapse-transition="false"
                    router
                    >
                    <el-submenu :index="item.id+''" v-for="item in menulist" :key="item.id">
                        <template slot="title">
                            <i :class="iconsObj[item.id]"></i>
                            <span>{{item.authName}}</span>
                        </template>
                        <el-menu-item :index="'/' + subitem.path" v-for="subitem in item.children" :key="subitem.id">
                            <i class="el-icon-menu"></i>
                            <span slot="title">{{subitem.authName}}</span>
                        </el-menu-item>
                    </el-submenu>
                </el-menu>
            </el-aside>
            <router-view/><!--The main interface on the right is a placeholder for routing -->
        </el-container>
    </el-container>
</template>
3.9 maintain the highlight effect of the module
The highlight effect of the selected module in the menu bar can be maintained even if the page is refreshed during login. If the default active of menu = {a module has the value of index}, the module will be highlighted
1. Specifically use a variable activePath in data to keep it highlighted:: default active = "this.activePath"
2. It turns on when clicked @ Click = "savenavstate" ('/' + subitem.path)
3. During refresh, the highlighted state is continuously saved according to the value in window.sessionStorage.
-------------------home.vue
<template>
    <el-container class="home-container">
        <el-header class="el-header">
            <div>
                <img src="../assets/logo.png">
                <span>E-commerce background management system</span>
            </div>
            <el-button type="info" @click="loginOut">sign out</el-button></el-header><!--head -->
        <el-container>
            <!--sidebar -->
            <el-aside class="el-aside" :width="this.isCollapse? '64px':'200px'" >
                <div class="toggle-button" @click="toggleCollapse">|||</div>
                <!--Sidebar menu area-->
                <el-menu
                    background-color="#545c64"
                    text-color="#fff"
                    active-text-color="#409eff"
                    unique-opened
                    :collapse="this.isCollapse"
                    :collapse-transition="false"
                    router
                    :default-active="this.activePath"
                    >
                    <!-- First level menu bar -->
                    <!--1,:yes vue-bind:An abbreviation for,This is to be able to identify item this data Variables and plus signs in;:key The same principle
                        2,each el-submenu of index The properties must be different, otherwise click one submenu It will expand or close at the same time, so submenu.
                        3,item.id+''To convert a number into a string (because index The default value is string), otherwise an error will be reported:Invalid prop -->
                    <el-submenu :index="item.id+''" v-for="item in menulist" :key="item.id">
                    <!-- The template of the first level menu bar, i It's an icon, span It's text-->
                        <template slot="title">
                            <i :class="iconsObj[item.id]"></i>
                            <span>{{item.authName}}</span>
                        </template>
                        <!-- Secondary menu bar -->
                        <el-menu-item
                        :index="'/' + subitem.path"
                        v-for="subitem in item.children"
                        :key="subitem.id"
                        @click="saveNavState('/' + subitem.path)"
                        > <!-- 1,Note that item.children instead of item oh -->
                            <i class="el-icon-menu"></i>
                            <span slot="title">{{subitem.authName}}</span>
                        </el-menu-item>
                    </el-submenu>
                </el-menu>
            </el-aside>
            <router-view/><!--The main interface on the right is a placeholder for routing -->
        </el-container>
    </el-container>
</template>

<script>
export default {
    data(){//This is the es6 way to write the data object in vue. There are three ways to write variables in data
        return {
            //Left menu bar data
            menulist: [],
            iconsObj:{
                '125':'el-icon-user-solid',//125 is the id of the first level menu bar
                '103':'el-icon-discount',
                '101':'el-icon-shopping-bag-1',
                '102':'el-icon-shopping-cart-2',
                '145':'el-icon-edit-outline',
            },
            isCollapse: false,
            activePath: ''
        }
    },
    created() {
        this.getMenuList();
        this.activePath=window.sessionStorage.getItem('activePath');
    },
    methods:{
        loginOut(){
            window.sessionStorage.clear();
            this.$router.push("/login");
        },
        //Get all menu bars
        async getMenuList() {
            const {data: res} = await this.$http.get('menus');//Menu is the request path of the backend api
            // console.log(res);
            if(res.meta.status !== 200) this.$message.error("error code "+res.meta.status+":"+res.meta.msg);
            this.menulist=res.data;
            console.log(this.menulist);
            this.$message.success("Menu information obtained successfully");

        },
        //Click the button to switch the folding and expanding function of the menu
        toggleCollapse() {
            this.isCollapse=!this.isCollapse;
        },
        //The highlight effect of the selected module in the menu bar can be maintained even if the page is refreshed during login
        //The passed in parameter activePath is the index of the tag
        saveNavState(activePath) {
            window.sessionStorage.setItem('activePath',activePath);
            this.activePath = activePath;
        }
    }
}
</script>


<style lang="less" scoped>
...
</styel>
4, Implement user list development
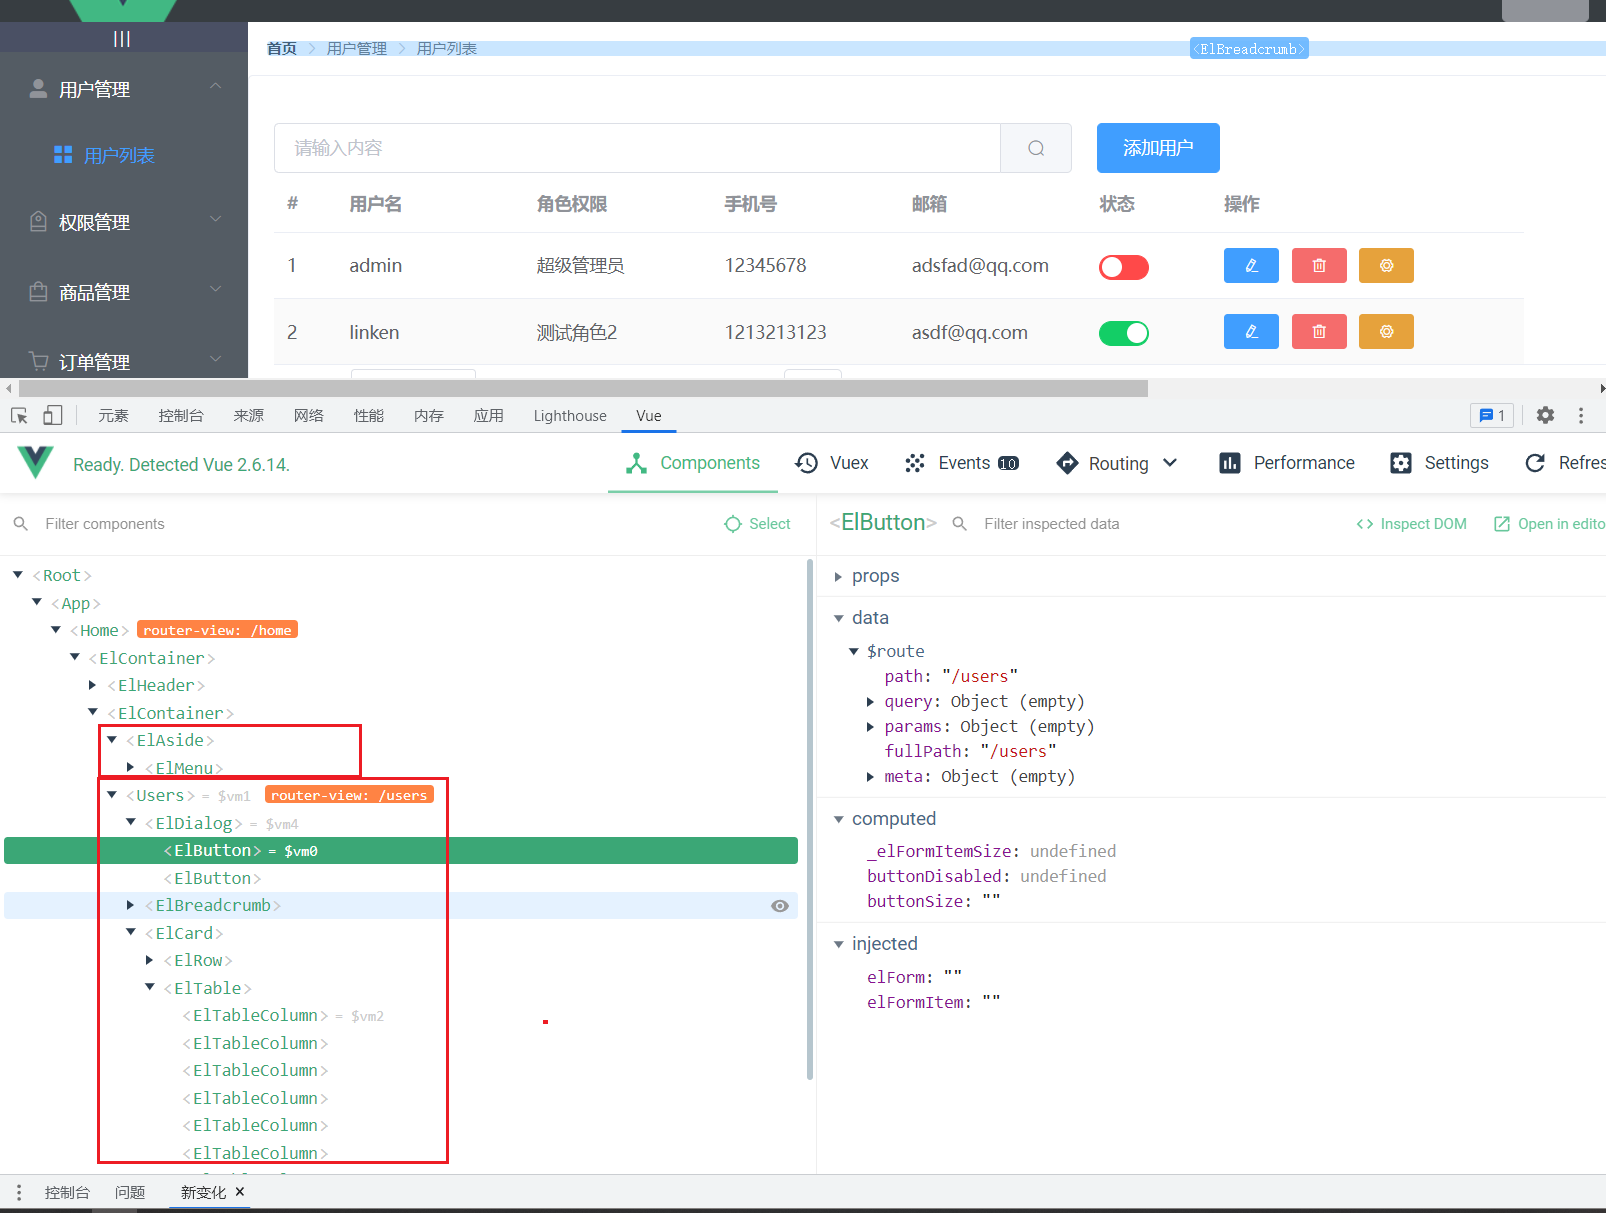
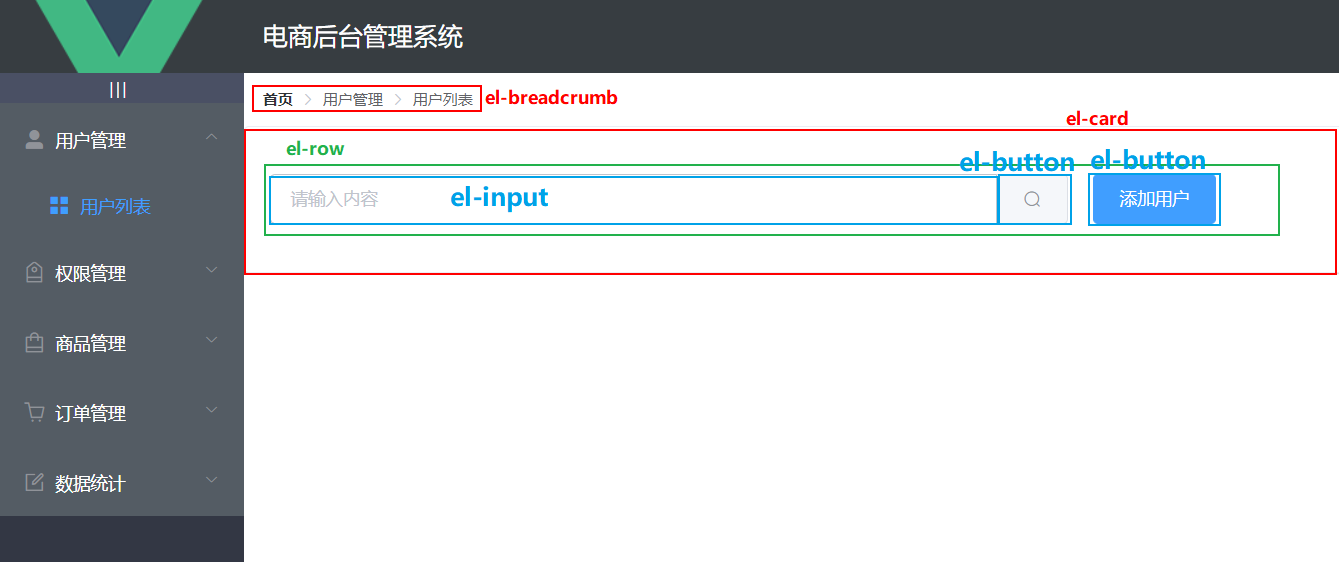
4.1 user list layout
---------------------------Users.vue
<template>
  <div>
    <!-- Breadcrumb navigation area -->
    <el-breadcrumb separator-class="el-icon-arrow-right">
      <el-breadcrumb-item :to="{ path: '/home' }">home page</el-breadcrumb-item>
      <el-breadcrumb-item>user management </el-breadcrumb-item>
      <el-breadcrumb-item>User list</el-breadcrumb-item>
    </el-breadcrumb>
    <!-- Card view area -->
    <el-card>
      <!-- gutter Is the distance between modules in the line -->
      <el-row :gutter="20">
        <!-- span Is the width of this module -->
        <el-col :span="10">
          <!-- Search and add areas -->
          <el-input class="input" placeholder="Please enter the content">
            <!-- slot="append"Description This button is in input Append after -->
            <el-button slot="append" icon="el-icon-search"></el-button>
          </el-input>
        </el-col>
        <el-col :span="4">
          <el-button type="primary">Add user</el-button>
        </el-col>
      </el-row>
    </el-card>
  </div>
</template>

<script>
export default {
  data() {
    return {};
  },
};
</script>

<style lang="less" scoped>
</style>
----------global.css
/*Global style sheet*/
html,
body,
#app {
    height: 100%;
    margin: 0;
    padding: 0;
}

.el-breadcrumb {
    margin: 15px;
    font-size: 12px;
}
.el-card {
    box-shadow: 0 1px 1px rgba(0,0,0,0.15)!important;
    width: 1600px;
    padding: 18px 0;
    font-size: 14px;
}
4.2 obtaining data in user list
<template>
 ...
<script>
export default {
  data() {
    return {
      //Gets the parameter object of the user list
      queryInfo: {
        query: "",
        pagenum: 1,//The first page, for testing, will be changed later
        pagesize: 2,//Two per page, for testing, which will be changed later
      },
      userList: [],
      total: 0,
    };
  },
  created() {
    this.getUserList();
  },
  methods: {
    getUserList() {
      this.$http
        .get("users", {
          params: this.queryInfo,
        })
        .then( response => {
          console.log(response.data);
          if(response.data.meta.status !== 200) return this.$message.error('Failed to get user list!');
          this.userList=response.data.data.users;
          this.total=response.data.data.total;
          console.log(this.userList);
        });
    },
  },
};
</script>
<style lang="less" scoped>
</style>
4.3 rendering user list data
1. Take a good look at the notes
2. : data="userList" write the array of incoming data, and prop write the key (attribute) of the data in the array
<template>
  <div>
    <!-- Breadcrumb navigation area -->
    <el-breadcrumb separator-class="el-icon-arrow-right">
      <el-breadcrumb-item :to="{ path: '/home' }">home page</el-breadcrumb-item>
      <el-breadcrumb-item>user management </el-breadcrumb-item>
      <el-breadcrumb-item>User list</el-breadcrumb-item>
    </el-breadcrumb>
    <!-- Card view area -->
    <el-card>
      <!-- The first row is the search bar row. gutter Is the distance between modules in the line -->
      <el-row :gutter="20">
        <!-- span Is the width of this module -->
        <el-col :span="10">
          <!-- Search and add areas -->
          <el-input class="input" placeholder="Please enter the content">
            <!-- slot="append"Description This button is in input Append after -->
            <el-button slot="append" icon="el-icon-search"></el-button>
          </el-input>
        </el-col>
        <el-col :span="4">
          <el-button type="primary">Add user</el-button>
        </el-col>
      </el-row>
      <!-- form  :data="userList"Write an array of incoming data, prop Write data in array key(Properties)-->
      <el-table :data="userList" stripe style="width: 100%">
        <!-- type="index"Description is an index column for counting-->
        <el-table-column type="index" label="#" width="50"> </el-table-column>
        <el-table-column prop="role_name" label="Role permissions" width="150"></el-table-column>
        <el-table-column prop="mobile" label="cell-phone number" width="150"></el-table-column>
        <el-table-column prop="email" label="mailbox" width="150"></el-table-column>
        <!-- The contents of this column are switch buttons -->
        <el-table-column prop="mg_state" label="state" width="100">
           <!-- slot-scope Is from data Data accepted in. among socpe.row Is each data object,scope.row.mg_state For each piece of data mg_state attribute-->
           <template slot-scope="scope">
            <!--v-model Is a two-way binding-->
            <el-switch v-model="scope.row.mg_state" active-color="#13ce66" inactive-color="#ff4949"/>
          </template>
        </el-table-column>
        <!-- The contents of this column are delete and modify operations -->
        <el-table-column label="operation" width="250">
          <template >
            <!-- Modify button -->
            <el-button type="primary" icon="el-icon-edit" size="mini"></el-button>
            <!-- Delete button danger Yes, assigned as red -->
            <el-button type="danger" icon="el-icon-delete" size="mini"></el-button>
            <!-- Assign a role button and its text prompt, warning It's yellow-->
            <el-tooltip  effect="dark" content="Assign roles" placement="top" :enterable="false">
                <el-button type="warning" icon="el-icon-setting" size="mini"/>
            </el-tooltip>
          </template>
        </el-table-column>


      </el-table>
    </el-card>
  </div>
</template>

<script>
export default {
  data() {
    return {
      //Gets the parameter object of the user list
      queryInfo: {
        query: "",
        pagenum: 1, //first page
        pagesize: 2, //Two per page
      },
      userList: [],
      total: 0,
    };
  },
  created() {
    this.getUserList();
  },
  methods: {
    getUserList() {
      this.$http
        .get("users", {
          params: this.queryInfo,
        })
        .then((response) => {
          console.log(response.data);
          if (response.data.meta.status !== 200)
            return this.$message.error("Failed to get user list!");
          this.userList = response.data.data.users;
          this.total = response.data.data.total;
          console.log(this.userList);
        });
    },
  },
};
</script>

<style lang="less" scoped>
</style>
4.4 realize data paging function
1. Use El pagination and bind its properties to variables in data() {}
2. @ size change = "handlesizechange" how many pieces of data per page will be automatically transferred in after the change
@Current change = "handlecurrentchange" automatically passes in the changed page: which page is displayed.
3. When @ size change and @ current change are triggered, getUserList() needs to be called again to get new paging data, and then render.
<template>
  <div>
    <!-- Breadcrumb navigation area -->
    <el-breadcrumb separator-class="el-icon-arrow-right">
      <el-breadcrumb-item :to="{ path: '/home' }">home page</el-breadcrumb-item>
      <el-breadcrumb-item>user management </el-breadcrumb-item>
      <el-breadcrumb-item>User list</el-breadcrumb-item>
    </el-breadcrumb>
    <!-- Card view area -->
    <el-card>
      <!-- The first row is the search bar row. gutter Is the distance between modules in the line -->
      <el-row :gutter="20">
        <!-- span Is the width of this module -->
        <el-col :span="10">
          <!-- Search and add areas -->
          <el-input class="input" placeholder="Please enter the content">
            <!-- slot="append"Description This button is in input Append after -->
            <el-button slot="append" icon="el-icon-search"></el-button>
          </el-input>
        </el-col>
        <el-col :span="4">
          <el-button type="primary">Add user</el-button>
        </el-col>
      </el-row>
      <!-- form  :data="userList"Write an array of incoming data, prop Write data in array key(Properties)-->
      <el-table :data="userList" stripe style="width: 100%">
        <!-- type="index"Description is an index column for counting-->
        <el-table-column type="index" label="#" width="50"> </el-table-column>
        <el-table-column prop="role_name" label="Role permissions" width="150"></el-table-column>
        <el-table-column prop="mobile" label="cell-phone number" width="150"></el-table-column>
        <el-table-column prop="email" label="mailbox" width="150"></el-table-column>
        <!-- The contents of this column are switch buttons -->
        <el-table-column prop="mg_state" label="state" width="100">
           <!-- slot-scope Is from data Data accepted in. among socpe.row Is each data object,scope.row.mg_state For each piece of data mg_state attribute-->
           <template slot-scope="scope">
            <!--v-model Is a two-way binding-->
            <el-switch v-model="scope.row.mg_state" active-color="#13ce66" inactive-color="#ff4949"/>
          </template>
        </el-table-column>
        <!-- The contents of this column are delete and modify operations -->
        <el-table-column label="operation" width="250">
          <template >
            <!-- Modify button -->
            <el-button type="primary" icon="el-icon-edit" size="mini"></el-button>
            <!-- Delete button danger Yes, assigned as red -->
            <el-button type="danger" icon="el-icon-delete" size="mini"></el-button>
            <!-- Assign a role button and its text prompt, warning It's yellow-->
            <el-tooltip  effect="dark" content="Assign roles" placement="top" :enterable="false">
                <el-button type="warning" icon="el-icon-setting" size="mini"/>
            </el-tooltip>
          </template>
        </el-table-column>
      </el-table>
      <!-- Page number
      1,size-change Triggered when the page number drop-down box changes (that is, how many pieces of data displayed on each page change)
      2,handleCurrentChange The currently displayed page number change trigger (whether clicking 1234 or entering to page n Value)
      3,:current-page Which page is currently displayed
      4,:page-sizes A is displayed on the left n strip/Drop down box for page
      5,:page-size Is how many pieces of data are displayed per page: 2 strip/page
      6,layout How many functions are used
      7,:total How many pages are displayed-->
      <div class="block">
         <el-pagination
          @size-change="handleSizeChange"
          @current-change="handleCurrentChange"
          :current-page="this.queryInfo.pagenum"
          :page-sizes="[1, 2, 5, 10]"
          :page-size="this.queryInfo.pagesize"
          layout="total, sizes, prev, pager, next, jumper"
          :total="total">
        </el-pagination>
      </div>
    </el-card>
  </div>
</template>

<script>
export default {
  data() {
    return {
      //Gets the parameter object of the user list
      queryInfo: {
        query: "",
        pagenum: 1, //The current number of pages, which is displayed from the first page by default
        pagesize: 2, //By default, there are two pieces of data per page
      },
      userList: [],
      total: 0,//How many pieces of data are there
    };
  },
  created() {
    this.getUserList();
  },
  methods: {
    getUserList() {
      this.$http.get("users", {
          params: this.queryInfo,
        }).then((response) => {
          console.log(response.data);
          if (response.data.meta.status !== 200)
            return this.$message.error("Failed to get user list!");
          this.userList = response.data.data.users;
          this.total = response.data.data.total;
          console.log(this.userList);
        });
    },
    //Triggered when the page number drop-down box changes (that is, how many pieces of data displayed on each page change)
    handleSizeChange(newSize) {
      console.log(1);
      this.queryInfo.pagesize =newSize;
      this.getUserList();//Reissue the request and render
    },
    //Trigger for changing the currently displayed page number (whether clicking 1234 or entering the value to the nth)
    handleCurrentChange (newPage) {
      console.log(2);
      this.queryInfo.pagenum=newPage;
      this.getUserList();//Reissue the request and render
    }
  },
};
</script>

<style lang="less" scoped>
</style>
4.5 change of user status
1. Note that the incoming variables in put(${}) will be recognized, while the variables in put(') will not be recognized.
2,
<template>
  <div>
    <!-- Breadcrumb navigation area -->
    <el-breadcrumb separator-class="el-icon-arrow-right">
      <el-breadcrumb-item :to="{ path: '/home' }">home page</el-breadcrumb-item>
      <el-breadcrumb-item>user management </el-breadcrumb-item>
      <el-breadcrumb-item>User list</el-breadcrumb-item>
    </el-breadcrumb>
    <!-- Card view area -->
    <el-card>
      <!-- The first row is the search bar row. gutter Is the distance between modules in the line -->
      <el-row :gutter="20">
        <!-- span Is the width of this module -->
        <el-col :span="10">
          <!-- Search and add areas -->
          <el-input class="input" placeholder="Please enter the content">
            <!-- slot="append"Description This button is in input Append after -->
            <el-button slot="append" icon="el-icon-search"></el-button>
          </el-input>
        </el-col>
        <el-col :span="4">
          <el-button type="primary">Add user</el-button>
        </el-col>
      </el-row>
      <!-- form  :data="userList"Write an array of incoming data, prop Write data in array key(Properties)-->
      <el-table :data="userList" stripe style="width: 100%">
        <!-- type="index"Description is an index column for counting-->
        <el-table-column type="index" label="#" width="50"> </el-table-column>
        <el-table-column prop="role_name" label="Role permissions" width="150"></el-table-column>
        <el-table-column prop="mobile" label="cell-phone number" width="150"></el-table-column>
        <el-table-column prop="email" label="mailbox" width="150"></el-table-column>
        <!-- The contents of this column are switch buttons, which can change the user status -->
        <el-table-column prop="mg_state" label="state" width="100" >
           <!-- slot-scope Is from data Data accepted in. among socpe.row Is each data object,scope.row.mg_state For each piece of data mg_state attribute-->
           <template slot-scope="scope">
            <!--v-model Is a two-way binding-->
            <el-switch v-model="scope.row.mg_state" active-color="#13ce66" inactive-color="#ff4949" @change="userStateChanged(scope.row)">
            {{scope.row}}
            </el-switch>
          </template>
        </el-table-column>
        <!-- The contents of this column are delete and modify operations -->
        <el-table-column label="operation" width="250">
          <template >
            <!-- Modify button -->
            <el-button type="primary" icon="el-icon-edit" size="mini"></el-button>
            <!-- Delete button danger Yes, assigned as red -->
            <el-button type="danger" icon="el-icon-delete" size="mini"></el-button>
            <!-- Assign a role button and its text prompt, warning It's yellow-->
            <el-tooltip  effect="dark" content="Assign roles" placement="top" :enterable="false">
                <el-button type="warning" icon="el-icon-setting" size="mini"/>
            </el-tooltip>
          </template>
        </el-table-column>
      </el-table>
      <!-- Page number
      1,size-change Triggered when the page number drop-down box changes (that is, how many pieces of data displayed on each page change)
      2,handleCurrentChange The currently displayed page number change trigger (whether clicking 1234 or entering to page n Value)
      3,:current-page Which page is currently displayed
      4,:page-sizes A is displayed on the left n strip/Drop down box for page
      5,:page-size Is how many pieces of data are displayed per page: 2 strip/page
      6,layout How many functions are used
      7,:total How many pages are displayed-->
      <div class="block">
         <el-pagination
          @size-change="handleSizeChange"
          @current-change="handleCurrentChange"
          :current-page="this.queryInfo.pagenum"
          :page-sizes="[1, 2, 5, 10]"
          :page-size="this.queryInfo.pagesize"
          layout="total, sizes, prev, pager, next, jumper"
          :total="total">
        </el-pagination>
      </div>
    </el-card>
  </div>
</template>

<script>
export default {
  data() {
    return {
      //Gets the parameter object of the user list
      queryInfo: {
        query: "",
        pagenum: 1, //The current number of pages, which is displayed from the first page by default
        pagesize: 2, //By default, there are two pieces of data per page
      },
      userList: [],
      total: 0,//How many pieces of data are there
    };
  },
  created() {
    this.getUserList();
  },
  methods: {
    getUserList() {
      this.$http.get("users", {
          params: this.queryInfo,
        }).then((response) => {
          console.log(response.data);
          if (response.data.meta.status !== 200)
            return this.$message.error("Failed to get user list!");
          this.userList = response.data.data.users;
          this.total = response.data.data.total;
          console.log(this.userList);
        });
    },
    //Triggered when the page number drop-down box changes (that is, how many pieces of data displayed on each page change)
    handleSizeChange(newSize) {
      // console.log(newSize);// How many pieces of data per page will be automatically transferred in after detection
      this.queryInfo.pagesize =newSize;
      this.getUserList();//Reissue the request and render
    },
    //Trigger for changing the currently displayed page number (whether clicking 1234 or entering the value to the nth)
    handleCurrentChange (newPage) {
      // console.log(newPage);// Detection finds that the changed page will be automatically passed in: what page is displayed
      this.queryInfo.pagenum=newPage;
      this.getUserList();//Reissue the request and render
    },
    userStateChanged(row){//Change the user status according to the user id. note that the incoming variables in put(` ${} `) will be recognized, while the variables in put('') will not be recognized.
      this.$http.put(`users/${row.id}/state/${row.mg_state}`).then(response =>{

        console.log(response);
        if(response.data.meta.status !== 200){
        	row.mg_state=!row.mg_state;//If the update fails, the status will not be changed
        	return this.$message.error('Update failed');
        }
        this.$message.success('User status updated successfully');
      })
    }
  },
};
</script>

<style lang="less" scoped>
</style>
4.6 realize the search function of the search bar
1. The search box binds variables in data. Search icon binding search function
2,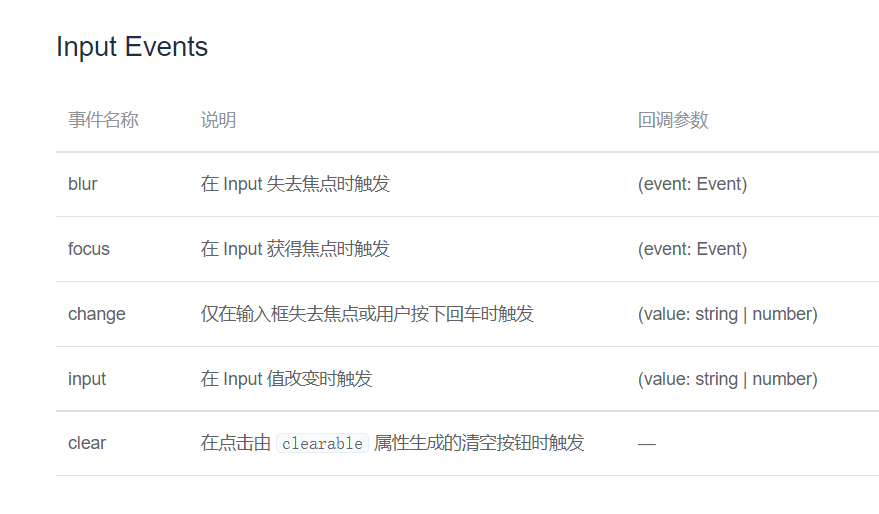
<template>
  <div>
    <!-- Breadcrumb navigation area -->
    <el-breadcrumb separator-class="el-icon-arrow-right">
      <el-breadcrumb-item :to="{ path: '/home' }">home page</el-breadcrumb-item>
      <el-breadcrumb-item>user management </el-breadcrumb-item>
      <el-breadcrumb-item>User list</el-breadcrumb-item>
    </el-breadcrumb>
    <!-- Card view area -->
    <el-card>
      <!-- The first row is the search bar row. gutter Is the distance between modules in the line -->
      <el-row :gutter="20">
        <!-- span Is the width of this module -->
        <el-col :span="10">
          <!-- Search and add areas, using v-model="queryInfo.query"Data binding instead of using v-model="this.queryInfo.query",Otherwise, an error is reported -->
          <el-input v-model="queryInfo.query" placeholder="Please enter the content"
          clearable @input="getUserList"
          >
            <!-- slot="append"Description This button is in input Append after -->
            <el-button slot="append" icon="el-icon-search" @click="getUserList"></el-button>
          </el-input>
        </el-col>
        <el-col :span="4">
          <el-button type="primary">Add user</el-button>
        </el-col>
      </el-row>
      <!-- form  :data="userList"Write an array of incoming data, prop Write data in array key(Properties)-->
      <el-table :data="userList" stripe style="width: 100%">
        <!-- type="index"Description is an index column for counting-->
        <el-table-column type="index" label="#" width="50"> </el-table-column>
        <el-table-column prop="username" label="user name" width="150"></el-table-column>
        <el-table-column prop="role_name" label="Role permissions" width="150"></el-table-column>
        <el-table-column prop="mobile" label="cell-phone number" width="150"></el-table-column>
        <el-table-column prop="email" label="mailbox" width="150"></el-table-column>
        <!-- The contents of this column are switch buttons, which can change the user status -->
        <el-table-column prop="mg_state" label="state" width="100" >
           <!-- slot-scope Is from data Data accepted in. among socpe.row Is each data object,scope.row.mg_state For each piece of data mg_state attribute-->
           <template slot-scope="scope">
            <!--v-model Is a two-way binding-->
            <el-switch v-model="scope.row.mg_state" active-color="#13ce66" inactive-color="#ff4949" @change="userStateChanged(scope.row)">
            {{scope.row}}
            </el-switch>
          </template>
        </el-table-column>
        <!-- The contents of this column are delete and modify operations -->
        <el-table-column label="operation" width="250">
          <template >
            <!-- Modify button -->
            <el-button type="primary" icon="el-icon-edit" size="mini"></el-button>
            <!-- Delete button danger Yes, assigned as red -->
            <el-button type="danger" icon="el-icon-delete" size="mini"></el-button>
            <!-- Assign a role button and its text prompt, warning It's yellow-->
            <el-tooltip  effect="dark" content="Assign roles" placement="top" :enterable="false">
                <el-button type="warning" icon="el-icon-setting" size="mini"/>
            </el-tooltip>
          </template>
        </el-table-column>
      </el-table>
      <!-- Page number
      1,size-change Triggered when the page number drop-down box changes (that is, how many pieces of data displayed on each page change)
      2,handleCurrentChange The currently displayed page number change trigger (whether clicking 1234 or entering to page n Value)
      3,:current-page Which page is currently displayed
      4,:page-sizes A is displayed on the left n strip/Drop down box for page
      5,:page-size Is how many pieces of data are displayed per page: 2 strip/page
      6,layout How many functions are used
      7,:total How many pages are displayed-->
      <div class="block">
         <el-pagination
          @size-change="handleSizeChange"
          @current-change="handleCurrentChange"
          :current-page="this.queryInfo.pagenum"
          :page-sizes="[1, 2, 5, 10]"
          :page-size="this.queryInfo.pagesize"
          layout="total, sizes, prev, pager, next, jumper"
          :total="total">
        </el-pagination>
      </div>
    </el-card>
  </div>
</template>

<script>
export default {
  data() {
    return {
      //Gets the parameter object of the user list
      queryInfo: {
        query: '',
        pagenum: 1, //The current number of pages, which is displayed from the first page by default
        pagesize: 2, //By default, there are two pieces of data per page
      },
      userList: [],
      total: 0,//How many pieces of data are there
    };
  },
  created() {
    this.getUserList();
  },
  methods: {
    getUserList() {
      this.$http.get("users", {
          params: this.queryInfo,
        }).then((response) => {
          console.log(response.data);
          if (response.data.meta.status !== 200)
            return this.$message.error("Failed to get user list!");
          this.userList = response.data.data.users;
          this.total = response.data.data.total;
          console.log(this.userList);
        });
    },
    //Triggered when the page number drop-down box changes (that is, how many pieces of data displayed on each page change)
    handleSizeChange(newSize) {
      // console.log(newSize);// How many pieces of data per page will be automatically transferred in after detection
      this.queryInfo.pagesize =newSize;
      this.getUserList();//Reissue the request and render
    },
    //Trigger for changing the currently displayed page number (whether clicking 1234 or entering the value to the nth)
    handleCurrentChange (newPage) {
      // console.log(newPage);// Detection finds that the changed page will be automatically passed in: what page is displayed
      this.queryInfo.pagenum=newPage;
      this.getUserList();//Reissue the request and render
    },
    userStateChanged(row){//Change the user status according to the user id. note that the incoming variables in put(` ${} `) will be recognized, while the variables in put('') will not be recognized.
      this.$http.put(`users/${row.id}/state/${row.mg_state}`).then(response =>{
        // console.log(response);
        if(response.data.meta.status !== 200) {
          row.mg_state=!row.mg_state;//If the update fails, the status will not be changed. Note that this can affect the status of the switch in the status bar.
          return this.$message.error('Update failed');
        }

        this.$message.success('User status updated successfully');
      })
    }
  },
};
</script>

<style lang="less" scoped>
</style>
4.7 realize the function of adding new users
1. By adding @ click="addDialogVisible = true" to the key, you can click to change the variable value in data, so as to control whether the dialog box for adding users is displayed.
2. Add the object variables of the form and the rule validation object variables in the dialog box
3. Use custom validation rules for email and mobile phone numbers (using data)
4. Close the dialog box and clear the data in the dialog box @ close = "addDialogClose"
<template>
  <div>
    <!-- Breadcrumb navigation area -->
    <el-breadcrumb separator-class="el-icon-arrow-right">
      <el-breadcrumb-item :to="{ path: '/home' }">home page</el-breadcrumb-item>
      <el-breadcrumb-item>user management </el-breadcrumb-item>
      <el-breadcrumb-item>User list</el-breadcrumb-item>
    </el-breadcrumb>
    <!-- Card view area -->
    <el-card>
      <!-- The first row is the search bar row. gutter Is the distance between modules in the line -->
      <el-row :gutter="20">
        <!-- span Is the width of this module -->
        <el-col :span="10">
          <!-- Search and add areas, using v-model="queryInfo.query"Data binding instead of using v-model="this.queryInfo.query",Otherwise, an error is reported -->
          <el-input v-model="queryInfo.query" placeholder="Please enter the content" clearable @input="getUserList">
            <!-- slot="append"Description This button is in input Append after -->
            <el-button slot="append" icon="el-icon-search" @click="getUserList"></el-button>
          </el-input>
        </el-col>
        <el-col :span="4">
          <el-button type="primary" @click="addDialogVisible = true">Add user</el-button>
        </el-col>
      </el-row>
      <!-- form  :data="userList"Write an array of incoming data, prop Write data in array key(Properties)-->
      <el-table :data="userList" stripe style="width: 100%">
        <!-- type="index"Description is an index column for counting-->
        <el-table-column type="index" label="#" width="50"> </el-table-column>
        <el-table-column prop="username" label="user name" width="150"></el-table-column>
        <el-table-column prop="role_name" label="Role permissions" width="150"></el-table-column>
        <el-table-column prop="mobile" label="cell-phone number" width="150"></el-table-column>
        <el-table-column prop="email" label="mailbox" width="150"></el-table-column>
        <!-- The contents of this column are switch buttons, which can change the user status -->
        <el-table-column prop="mg_state" label="state" width="100" >
           <!-- slot-scope Is from data Data accepted in. among socpe.row Is each data object,scope.row.mg_state For each piece of data mg_state attribute-->
           <template slot-scope="scope">
            <!--v-model Is a two-way binding-->
            <el-switch v-model="scope.row.mg_state" active-color="#13ce66" inactive-color="#ff4949" @change="userStateChanged(scope.row)">
            {{scope.row}}
            </el-switch>
          </template>
        </el-table-column>
        <!-- The contents of this column are delete and modify operations -->
        <el-table-column label="operation" width="250">
          <template >
            <!-- Modify button -->
            <el-button type="primary" icon="el-icon-edit" size="mini"></el-button>
            <!-- Delete button danger Yes, assigned as red -->
            <el-button type="danger" icon="el-icon-delete" size="mini"></el-button>
            <!-- Assign a role button and its text prompt, warning It's yellow-->
            <el-tooltip  effect="dark" content="Assign roles" placement="top" :enterable="false">
                <el-button type="warning" icon="el-icon-setting" size="mini"/>
            </el-tooltip>
          </template>
        </el-table-column>
      </el-table>
      <!-- Page number
      1,size-change Triggered when the page number drop-down box changes (that is, how many pieces of data displayed on each page change)
      2,handleCurrentChange The currently displayed page number change trigger (whether clicking 1234 or entering to page n Value)
      3,:current-page Which page is currently displayed
      4,:page-sizes A is displayed on the left n strip/Drop down box for page
      5,:page-size Is how many pieces of data are displayed per page: 2 strip/page
      6,layout How many functions are used
      7,:total How many pages are displayed-->
      <div class="block">
         <el-pagination
          @size-change="handleSizeChange"
          @current-change="handleCurrentChange"
          :current-page="this.queryInfo.pagenum"
          :page-sizes="[1, 2, 5, 10]"
          :page-size="this.queryInfo.pagesize"
          layout="total, sizes, prev, pager, next, jumper"
          :total="total">
        </el-pagination>
      </div>
    </el-card>
    <!-- Dialog box for adding and inserting new users: Click to display the data to be filled in by the inserted user
      1,title Is the title
      2,visible.sync Used to control the display and hiding of dialog boxes( true|false).
      3,:before-close Is a function triggered before the trigger box is hidden
      -->
    <el-dialog
    title="Please fill in user information"
    :visible.sync="this.addDialogVisible"
    width="50%"
    @close="addDialogClosed"
    >
      <!-- Content main area 1 addForm stay data 2:rules Is validation rule 3 ref Yes el-form A name was given -->
      <el-form :model="addForm" :rules="addFormRules" ref="addFormRef"  label-width="70px">
        <!-- user name, prop Is the corresponding attribute -->
        <el-form-item label="user name" prop="username">
          <el-input v-model="addForm.username"></el-input>
        </el-form-item>
        <!-- Password box -->
        <el-form-item label="password" prop="password">
          <el-input v-model="addForm.password"></el-input>
        </el-form-item>
        <!-- Mailbox box -->
        <el-form-item label="mailbox" prop="email">
          <el-input v-model="addForm.email"></el-input>
        </el-form-item>
        <!-- Mobile phone number box -->
        <el-form-item label="Mobile phone frame" prop="mobile">
          <el-input v-model="addForm.mobile"></el-input>
        </el-form-item>
      </el-form>

      <!-- Bottom area -->
      <span slot="footer">
        <el-button @click="addDialogVisible = false">Cancel</el-button>
        <el-button type="primary" @click="addDialogVisible = false">determine</el-button>
      </span>
    </el-dialog>
  </div>
</template>

<script>
export default {
  data() {
    //For the custom validation rule of the mailbox, the callback(new Error()) will input, and the message content in the validation rule object will be displayed below
    var checkEmail=(rule,value,callback)=>{
      //regEmail is a regular expression used to validate the mailbox.
      const regEmail= /^([a-zA-Z0-9_-])+@([a-zA-Z0-9_-])+(\.[a-zA-Z0-9_-])+/;
      if(regEmail.test(value)){
        return callback();
      }
      callback(new Error());//If not, an error prompt is displayed under input, which is the content of message in the validation rule object
    }
    //Custom validation rules for phones
    var checkMobile=(rule,value,callback)=>{
      //Verify the regular expression of the phone number
      const regMobile = /^(0|86|17951)?(13[0-9]|15[0123456789]|17[678]|18[0-9]|14[57])[0-9]{8}$/;
      if(regMobile.test(value)) {
        return callback();
      }
      callback(new Error());
    }
    return {
      //Gets the parameter object of the user list
      queryInfo: {
        query: '',
        pagenum: 1, //The current number of pages, which is displayed from the first page by default
        pagesize: 2, //By default, there are two pieces of data per page
      },
      userList: [],
      total: 0,//How many pieces of data are there
      addDialogVisible: false,
      //Add user's form data
      addForm: {
        username: '',
        password: '',
        email: '',
        mobile: ''
      },
      //Add validation rule object for form
      addFormRules: {
        username: [
          { required: true, message: 'enter one user name', trigger: 'blur' },
          { min: 2, max: 10, message: 'The user name is between 2 and 10 characters long', trigger: 'blur' }
        ],
        password:[
          { required: true, message: 'Please input a password', trigger: 'blur' },
          { min: 2, max: 10, message: 'The password is between 2 and 10 characters long', trigger: 'blur' },
          ],
        email:[{ required: true, message: 'Please enter a legal email address', trigger: 'blur' , validator:checkEmail}],
        mobile: [{ required: true, message: 'Please enter a valid mobile phone number', trigger: 'blur' ,validator:checkMobile}]
      }
    };
  },
  created() {
    this.getUserList();
  },
  methods: {
    getUserList() {
      this.$http.get("users", {
          params: this.queryInfo,
        }).then((response) => {
          console.log(response.data);
          if (response.data.meta.status !== 200)
            return this.$message.error("Failed to get user list!");
          this.userList = response.data.data.users;
          this.total = response.data.data.total;
          console.log(this.userList);
        });
    },
    //Triggered when the page number drop-down box changes (that is, how many pieces of data displayed on each page change)
    handleSizeChange(newSize) {
      // console.log(newSize); / / how many pieces of data will be automatically passed in after the change is detected
      this.queryInfo.pagesize =newSize;
      this.getUserList();//Reissue the request and render
    },
    //Trigger for changing the currently displayed page number (whether clicking 1234 or entering the value to the nth)
    handleCurrentChange (newPage) {
      // console.log(newPage); / / after detection, it is found that the changed page will be automatically passed in: which page is displayed
      this.queryInfo.pagenum=newPage;
      this.getUserList();//Reissue the request and render
    },
    userStateChanged(row){//Change the user status according to the user id. note that the incoming variables in put(` ${} `) will be recognized, while the variables in put('') will not be recognized.
      this.$http.put(`users/${row.id}/state/${row.mg_state}`).then(response =>{
        // console.log(response);
        if(response.data.meta.status !== 200) {
          row.mg_state=!row.mg_state;//If the update fails, the status will not be changed. Note that this can affect the status of the switch in the status bar.
          return this.$message.error('Update failed');
        }

        this.$message.success('User status updated successfully');
      })
    },
    addDialogClosed () {
      this.$refs.addFormRef.resetFields();
    },
  },
};
</script>

<style lang="less" scoped>
</style>
4.8 add the pre verification function of the form and successfully initiate a request to the back end
Use this. $refs. Addformref. Validate (valid = > {}) for pre validation, and send a post request to pass in this.addForm form form object.
*******************Confirm key*******************
 <el-button type="primary" @click="addUser">determine</el-button>
********************js****************************

    addUser(){
      this.$refs.addFormRef.validate(valid=>{
        //valid is the result of verification. true|false
        // console.log(valid);
        if(valid) return this.$http.post(`users`,this.addForm).then(
          response=>{
            response.data.meta.status===201 ?
            this.$message.success("User added successfully"):this.$message.error("Failed to add user");
            this.addDialogVisible = false;//Hide the add user dialog box
            this.getUserList();//Refresh user list data
          })
      })
    }
4.8 modification
4.9 delete
[project improvement points] unified management of public data, methods and Api interfaces
1. Use vuex technology, that is, use the store folder to put the public data of the whole program together. The summarized store is called index.js.
2. The set method of data in state is defined by mutations, and the get method in state is defined by getter.
3. Actions defines the functions to be used by the program, separates the request that needs to interact with the back end and puts it in a folder (request), and puts the real call in the actions of the store (Promise).
4, the parts that need to be called to this must be invoked in this module. The parts that need not use this can be placed in store. It is very troublesome, but it is very common.
1. Add store
-----------------------Add an interface in api/login.js
import axios from '@/main.js'

export function login(loginForm){
    return axios.request({
        url:`login`,
        method: 'post',
        data: loginForm
    })
}
-----------------------store/index.js
import Vue from 'vue'
import Vuex from 'vuex'
//***************1. Introduce required functions
import {login} from '@/api/login.js'

//***************2,use
Vue.use(Vuex)

//***********3,store is usually used, but in order to prevent confusion, I use AAA to distinguish */
const aaaaa= new Vuex.Store({
  state: {
  },
  mutations: {
  },
  actions: {
    //******************4. In the module, this function can be called directly through this.$store.dispatch('Login',loginForm) without import.
    //Where $store is the following export default store
    Login(loginForm) {
      return new Promise((resolve,reject)=>{
        login(loginForm).then(response =>{
        if (response.data.meta.status !== 200) return;
        window.sessionStorage.setItem("token", response.data.data.token)
      }).catch(error=>{
        console.log("Error ")
      });
      });
    }
  },
  modules: {
    // ********************5. Add your own store
  }
})
// ********************6. Export self defined AAA
export default aaaaa
-----------------------Reference store in main.js
import Vue from 'vue'
import App from './App.vue'
import router from './router'
//******************1. Import AAA from store/index.js and rename it to store*/
import store from './store'
import './plugins/element.js'//Import styles in element UI
import './assets/css/global.css'//Import global style sheet
import axios from 'axios' //Import axios


axios.defaults.baseURL='http://localhost:8888/api/private/v1/'

axios.interceptors.request.use(config => {
  // console.log(config);
  config.headers.Authorization = window.sessionStorage.getItem("token");
  return config;//Finally, you must return config
})

Vue.prototype.$http = axios;
Vue.config.productionTip = false;
//******************2. Add to vue
new Vue({
  router,
  store,
  render: h => h(App)
}).$mount('#app')

export default axios;
2. Refer to the function in the store in the module
    handleLogin(){
        this.$refs.loginFormRef.validate((valid) => {
        if (!valid) return;
        this.$aaaaa.dispatch('Login', this.loginForm);//This AAA is our own defined store.
        this.$router.push("/home");
      });
    }
[Q1] what is this in the project?
1. According to console.log(this), we can find that this in the project represents the direct component object calling this function, that is, this of this component can only call the content of this component.
2. The function in the store cannot recognize this, so only a few functions can be implemented in the store.
[Q2] Vue. Prototype. $HTTP = Axios?
We use Vue. Prototype. $HTTP = axios in main.js. Why can axios be called through this. $HTTP in each component?
This Vue program will include the components imported from router. Where $is just an identifier and has no effect. The global variable set through Vue.prototype... To be solved
[project tips] use Google's vue plug-in