Vue Learning Notes (2) Built-in Instructions and Forms
1. Built-in Instructions
1. Basic Instructions
- v-cloak: It does not require an expression; it is removed from the bound HTML element at the end of the Vue instance compilation and is often used in conjunction with display:none of CSS.
[v-cloak] {
            display: none;
        }


<div id="app" v-cloak>{{message}}</div>
    <script>
        var app = new Vue({
            el: '#app',
            data: {
                message: 'Hello World'
            }
        })
    </script>
Looking at the page, I found it didn't work.When the network speed is slow and the Vue.js file has not finished loading, the word {{message}} will be displayed on the page until Vue creates the instance and edits the template, the DOM will not be replaced, so the process screen will flash.Solve by setting a CSS style.
-
v-once: It is also a directive that does not require an expression, so that the element or component that defines it renders only once, including all the child nodes of the element or component.After the first rendering, it will no longer be re-rendered as the data changes and will be treated as static content.
2. Conditional Rendering Instructions
- v-if, v-else-if, v-else are similar to if, else, else if in JS.Conditional directives can render or destroy elements/components in the DOM based on the value of the expression.
V-else-if follows v-if, v-else follows v-else-if or v-if. When the value of the expression is true, the current element/component and all child nodes are rendered and removed as false.If you are judging more than one element at a time, you can use conditional instructions on the <template>element built into the Vue, and the final rendered result will not contain that element.
<div id="app">
        <input type="text" id="age" v-model="age">
        <h4 v-if="age>=65">I am an old man</h4>
        <h4 v-else-if="age>=40">I am middle-aged</h4>
        <h4 v-else-if="age>=20">I am a young person</h4>
        <h4 v-else>I'm a teenager</h4>
    </div>
    <script>
        var app = new Vue({
            el: '#app',
            data: {
                age: 0
            }
        })
    </script>
When rendering elements, Vue reuses its elements as much as possible rather than re-rendering them for efficiency reasons.
<div id="app2">
        <template v-if="type==='QQ'">
            <label>QQ Sign in</label>
            <input type="text" name="loginName" placeholder="Please enter QQ number">
        </template>
        <template v-else>
            <label>Mailbox login</label>
            <input type="text" name="loginName" placeholder="Please enter your mailbox">
        </template>
        <button @click="changeLogin">Switch sign-in mode</button>
    </div>
    <script>
        var app2 = new Vue({
            el: '#app2',
            data: {
                type: 'QQ'
            },
            methods: {
                changeLogin: function() {
                    this.type = this.type === 'QQ' ? 'email' : 'QQ';
                }
            }
        })
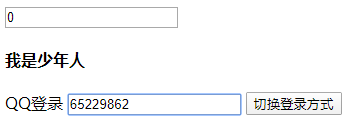
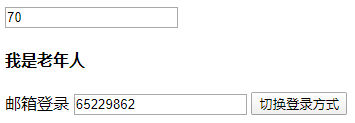
If you don't want to do this, you can use the key attribute provided by Vue, which lets you decide for yourself whether to reuse elements, and the value of the key must be unique.
- V-show: basically the same as v-if, except that v-show is the display of the CSS attribute that changes the element.When the value of the v-show expression is false, the element is hidden.
The difference from v-if is that v-if is a true conditional rendering that appropriately destroys or rebuilds elements and bound events or subcomponents based on the value of the expression.If the initial value of the expression is false, the element/component is not rendered at first, and compilation starts only when the condition first becomes true.
And v-show is just a simple CSS property switch that compiles whether the condition is true or not.
<div id="app3">
        <button @click="showContent">Comment</button>
        <div v-show="isShow">
            <h3>Comment</h3>
            <textarea class="" value="" placeholder="Please enter comments">
            </textarea>
        </div>
    </div>
    <script>
        var app3 = new Vue({
            el: '#app3',
            data: {
                isShow: false
            },
            methods: {
                showContent: function() {
                    this.isShow = true;
                }
            }
        })

3. List Rendering Instructions
v-for: to iterate through an array or enumerate an object, its expression needs to be combined with in, similar to item in items
<div id="app">
        <ul>
            <li v-for="(articleName,index) in articlesName">
                <a href="#">{{articleName}}</a>
            </li>
        </ul>
    </div>
    <script>
        var app = new Vue({
            el: '#app',
            data: {
                articlesName: ['The most beautiful thing in life, but that sunflower', 'When everything is lost, there are still memories in', 'Resume the old youth', 'Lotus pond nostalgia']
            }
        })
    </script>
Be careful:
- The v-for expression supports an optional parameter as the index of the current item, the statement before the separator in is enclosed in parentheses, and the second is the index of the current item.
- Like v-if, v-for can also be used to render multiple elements on the built-in tag <template>.
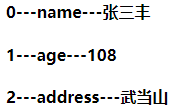
- In addition to arrays, attributes of objects can also be traversed. When traversing objects, there are two optional parameters, key name and index.
<div>
    <h4 v-for="(prop,key,index) in person">{{index}}---{{key}}---{{prop}}</h4>
</div>
person: {
    name: 'Zhang Sanfen',
    age: 108,
    address: 'Wudang Mountain'
}
- v-for can also iterate over integers
3.1 Array Update
At the heart of Vue is the bi-directional binding of data to views. When we modify the array, Vue detects changes in data, so views rendered with v-for are updated immediately.Vue contains a set of methods for observing array variations, and using them to change the array also triggers view updates.
push(),pop(),shift(),unshift(),splice(),sort(),reverse(),filter(),concat(),slice()
When Vue detects array changes, it does not directly re-render the entire list, but maximizes the reuse of DOM elements.Items with the same elements in the replaced array will not be re-rendered, so you can boldly replace the old array with the new one without worrying about performance.
<body>
    <div id="app">
        <ul>
            <li v-for="book in books">{{book}}</li>
        </ul>
        <input type="text" v-model="bookinfo">
        <button @click="addBook">Add Book Name</button>
        <button @click="deleteBook">Delete Book Name</button>
        <button @click="filterBook">Filter book names</button>
        <button @click="sortBooks">Sort Book Names</button>
    </div>
    <script>
        //Delete the specified element from the array
        Array.prototype.remove = function(val) {
            var index = this.indexOf(val);
            if (index > -1) {
                this.splice(index, 1);
            }
        }
        var app = new Vue({
            el: '#app',
            data: {
                bookinfo: '',
                books: ['Java Programming', 'C Language Programming', 'Photo image processing', 'JavaScript Programming']
            },
            methods: {
                addBook: function() {
                    console.log(this.bookinfo.length);
                    if (this.bookinfo.length > 0) {
                        this.books.push(this.bookinfo);
                    }
                },
                deleteBook: function() {
                    this.books.remove(this.bookinfo, 1);
                },
                filterBook: function() {
                    var bookname = this.bookinfo;
                    this.books = this.books.filter(function(item) {
                        return item.match(bookname);
                    })
                },
                sortBooks: function() {
                    return this.books.sort();
                }
            }
        })
    </script>
</body>
4. Methods and Events
Vue listens on HTML, similar to the native JavaScript onclick method on event binding.The @click main grammar sugar in the above example is equivalent to v-on:click.
The method defined in the methods is called by @click, and it is important to note that the method name of the @click call may not be followed by parentheses ().At this point, if the method has parameters, the native event object event will be passed in by default.
This design of listening for events on HTML elements seems to tightly couple DOM with JavaScript, contrary to the principle of separation, because HTML lets you know which method is called, decoupling logic from DOM for easy maintenance.Most importantly, when the ViewModel is destroyed, all event handlers are automatically deleted without having to clean up themselves.
Vue provides a special variable, $event, to access native DOM events.For example, the following example can prevent a link from opening;
<div id="app1">
        <a href="http://Www.baidu.com "@click=" handleClick ('No Opening', $event)">Open Link </a>
    </div>

var app1 = new Vue({
    el: '#app1',
     methods: {
        handleClick: function(message, event) {
             event.preventDefault();
              window.alert(message);
         }
     }
})
The event.preventDefault used in the above example can also be implemented using the Vue event modifier, with a small dot'. 'followed by a suffix modifier after the @bound event.
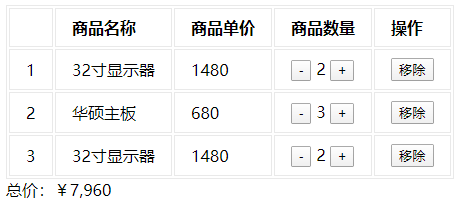
2. Simple Shopping Cart
<!DOCTYPE html>
<html lang="en">

<head>
    <meta charset="UTF-8">
    <meta name="viewport" content="width=device-width, initial-scale=1.0">
    <title>Simple Shopping Cart</title>
    <style>
        [v-cloak] {
            display: none;
        }

        table {
            border: 1px solid #e9e9e9;
        }

        th,
        td {
            padding: 8px 16px;
            border: 1px solid #e9e9e9;
            text-align: left;
        }
    </style>
</head>

<body>
    <div id="app" v-cloak>
        <template v-if="goodsList.length">
            <table>
                <thead>
                    <tr>
                        <th></th>
                        <th>Commodity Name</th>
                        <th>item pricing</th>
                        <th>Quantity of Goods</th>
                        <th>operation</th>
                    </tr>
                </thead>
                <tbody>
                    <tr v-for="(item,index) in goodsList">
                        <td>{{index+1}}</td>
                        <td>{{item.name}}</td>
                        <td>{{item.price}}</td>
                        <td>
                            <button @click="handleReduce(index)">-</button>
                            {{item.count}}
                            <button @click="handleAdd(index)">+</button>
                        </td>
                        <td>
                            <button @click="handleRemove(index)">remove</button>
                        </td>
                    </tr>
                </tbody>
            </table>
            <div>Total price:¥{{totalPrice}}</div>
        </template>
        <div v-else>Shopping cart empty</div>
    </div>

    <script src="../vue.js"></script>
    <script>
        var app = new Vue({
            el: '#app',
            data: {
                goodsList: [{
                    id: 1,
                    name: '32 Inch display',
                    price: 1480,
                    count: 2
                }, {
                    id: 1,
                    name: 'Asus motherboard',
                    price: 680,
                    count: 3
                }, {
                    id: 1,
                    name: '32 Inch display',
                    price: 1480,
                    count: 2
                }]
            },
            computed: {
                totalPrice: function() {
                    var total = 0;
                    for (var i = 0; i < this.goodsList.length; i++) {
                        var item = this.goodsList[i];
                        total += item.price * item.count;
                    }
                    return total.toString().replace(/\B(?=(\d{3})+$)/g, ',');
                }
            },
            methods: {
                handleReduce: function(index) {
                    if (this.goodsList[index].count === 1) return;
                    this.goodsList[index].count--;
                },
                handleAdd: function(index) {
                    this.goodsList[index].count++;
                },
                handleRemove: function(index) {
                    this.goodsList.splice(index, 1);
                }
            }
        })
    </script>
</body>

</html>
3. Forms and v-model s
Form control hosts data entry and interaction of a web page, such as radio, multiple selection, drop-down selection, which can be used to complete data entry, verification, submission, and so on.Vue provides a v-model directive for bidirectionally binding data on form class elements.
1.v-model
<body>
    <div id="app">
        <input type="text" placeholder="Please enter an account number" v-model="message">
        <h3>What you entered is:{{message}}</h3>
    </div>
    <script src="../vue.js"></script>
    <script>
        var app = new Vue({
            el: '#app',
            data: {
                message: ""
            }
        })
    </script>
</body>

After using v-model, the value displayed by the form control depends only on the bound data, does not care about the value attribute at initialization, and does not work for values inserted between <textarea></textarea>.
When using v-model, if you input Chinese using the Chinese input method, Vue will not update the data before there is no selected phrase, that is, during the phonetic phase, and will trigger the update when the Chinese characters are typed.If you want to always update in real time, you can replace the V-model with @input.In fact, the V-model is also a special grammatical sugar, but it will be handled intelligently on different forms.
2. Radio Buttons

<body>
    <div id="app">
        <input type="radio" name="man" id="man" value="male" v-model="picked">
        <label for="man">male</label>
        <input type="radio" name="woman" id="woman" value="female" v-model="picked">
        <label for="woman">female</label>
        <p>The gender you choose is:{{picked}}</p>
    </div>
    <script src="../vue.js"></script>
    <script>
        var app = new Vue({
            el: '#app',
            data: {
                picked: 'male'
            }
        })
    </script>
</body>
3. Checkboxes

<body>
    <div id="app">
        <input type="checkbox" name="Java" id="Java" value="Java language" v-model="checked">
        <label for="Java">Java</label>
        <input type="checkbox" name="C" id="C" value="C language" v-model="checked">
        <label for="C">C language</label>
        <input type="checkbox" name="C#" id="C#" value="C#" v-model="checked">
        <label for="C#">C#</label>
        <p>Your favorite language:{{checked}}</p>
    </div>
    <script src="../vue.js"></script>
    <script>
        var app = new Vue({
            el: '#app',
            data: {
                checked: []
            }
        })
    </script>
</body>
4. Selection List
A selection list is a drop-down selector, which is divided into radio and multiple selections.
Radio
<body>
    <div id="app">
        <select v-model="selected">
            <option value="Chinese">Chinese</option>
            <option value="English">English</option>
            <option value="French">French</option>
        </select>
        <p>Your choice is:{{selected}}</p>
    </div>
    <script src="../vue.js"></script>
    <script>
        var app = new Vue({
            el: '#app',
            data: {
                selected: 'Chinese'
            }
        })
    </script>
</body>
<option>is an alternative, and if the value attribute is included, the v-model will match the value of the value first; if not, it will match the text of <option>directly.
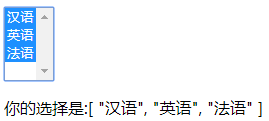
Multiple Selection: Add attribute multiple to selected to select multiple, and the v-model binds to an array.
<body>
    <div id="app">
        <select v-model="selected" multiple>
            <option value="Chinese">Chinese</option>
            <option value="English">English</option>
            <option value="French">French</option>
        </select>
        <p>Your choice is:{{selected}}</p>
    </div>
    <script src="../vue.js"></script>
    <script>
        var app = new Vue({
            el: '#app',
            data: {
                selected: ['Chinese']
            }
        })
    </script>
</body>
In business, option s are often output dynamically using v-for, and value s and text s are also output dynamically using v-bind.
<select v-model="selected">
   <option v-for="option in options" :value="option.value">{{option.text}}</option>
</select>
5. Modifiers
v-model modifier to control when data is synchronized.
.lazy:
In the input box, the default of v-model is to synchronize the input box's data in the input event (except for the case of the previous Chinese input method), using the modifier.lazy will change to synchronize in the change event.In this case, the v-model bound data is not changed in real time, but is updated when it loses focus or presses the Enter key.
.number:
Use the modifier.number to rotate the input to a Number type, otherwise, if you enter a number, it is actually a string type, which is useful in a number input box.
.trim:
This modifier automatically filters the first and last spaces of the input.

